
|
 11-12-2013, 12:55 PM
|
#151 |
|
Registered User
Join Date: Jan 2011
Location: Redmond, OR
Posts: 754
|
Re: Project: Over My Head
Sometimes it is best to just pay the $$ to have a pro do it so you can get to driving it.
__________________
68 Chev C20- son has it now 83 K20 - bought from son 70 C20 - in progress |

|

|
|
11-12-2013, 03:26 PM
|
#152 |
|
Registered User
Join Date: Feb 2013
Location: Grants Pass Oregon
Posts: 473
|
Re: Project: Over My Head
yossarian19. Here's my exhaust that cost less than 200.00. You have to fab it and so I know that means welding. I bought my gas mig welder awhile back that I paid close to 400.00. Its only 85 amp but welds everything I need to weld. The exhaust kit I ordered from Summit Racing. 67-81 Camaro for 189.00. There's enough tubing in the kit to take it all the way out the back. I did it with my truck on jack stands. If you like fabbing and crawling around your garage floor under your truck then maybe you can get your exhaust and a welder too. Just food for thought. Good luck on anyway you decide to go.
Earl aka Clarance J.
__________________
You have to have patiences or you'll be one. |
|
|
|
|
11-12-2013, 03:50 PM
|
#153 | |
|
Registered User
Join Date: Jan 2012
Location: Motown
Posts: 7,670
|
Re: Project: Over My Head
Quote:
an muffler shop will crush bend pipe, which IMO looks like dookie and drastically increases the resistance. for the price of the $600 install, you can buy the pipe, a grinder, a welder and a case of beer. when your done you still have an exhaust system, a grinder and a welder. no, you won't have the beer, but new tools are always a good thing....  no need to buy a kit, just a couple of flanges, mufflers, bends and tubing. our trucks are easy to run mostly straight pipe. dmack; if you go to a custom exhaust shop that installs mandrel bent tubing they would do the same thing. you can not re-install the tube into a mandrel bender to tweak a bend like you can a crush bender. we do a lot of one off custom exhaust systems from ss tube they are all done like this.  crush bent tube look like this 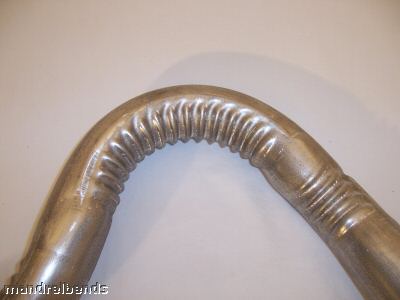 mandrel bent tube looks like this  headers i made for a 69 dynacorn body mustang w/ coyote motor  turbo header i made for 2011 ford fusion 
__________________
cool, an ogre smiley Ogre's 58 Truk buildhow to put your truck year and build thread into your signature shop air compressor timer |
|
|
|
|
|
11-12-2013, 11:50 PM
|
#154 |
|
Registered User
Join Date: Sep 2011
Location: Nevada City, CA
Posts: 908
|
Re: Project: Over My Head
...Rad. Ogre, do you run a rod shop? I always wonder, when I see some of these builds, what guys do for a living...
I've got holiday spending to do so I think the truck is going to have to go back on hold, unfortunately. Oh, well - marathon, not a sprint.
__________________
"Over my head" 1957 Chevy 3200, big rear window & 6 lug. Front disc, power steering, Vortec 4.8 / 4L60E swap, hydro boost brakes & patina. |
|
|
|
|
11-13-2013, 01:21 PM
|
#155 |
|
Registered User
Join Date: Jan 2012
Location: Motown
Posts: 7,670
|
Re: Project: Over My Head
i do volunteer work
i spent my life in construction; pipe fitter, electrician and then went to school for civil engineer. when people ask what kind of work i do i tell them i'm a retired civil engineer and now i do volunteer work. they get all foggy eyed when i say ''i do volunteer work'', sometimes i add ''at a hot rod shop'' 
__________________
cool, an ogre smiley Ogre's 58 Truk buildhow to put your truck year and build thread into your signature shop air compressor timer |
|
|
|
|
11-20-2013, 08:19 PM
|
#156 |
|
Registered User
Join Date: Sep 2011
Location: Nevada City, CA
Posts: 908
|
Re: Project: Over My Head
I had a couple good weeks working so I spent a few bucks on parts.
One thing I came up with was a fluid pressure type brake switch. I'd initially been scared off because I underestimated the pressure capacity of a 1/8" NPT fitting. They are suposedly good for 5,000 PSI - a lot more than my hydroboost can put out, so I think I'm good. The parts came off Amazon for under $20. It's a 3/16" inverted flare on two sides & a 1/8" NPT on the other with the brake switch screwed into it... 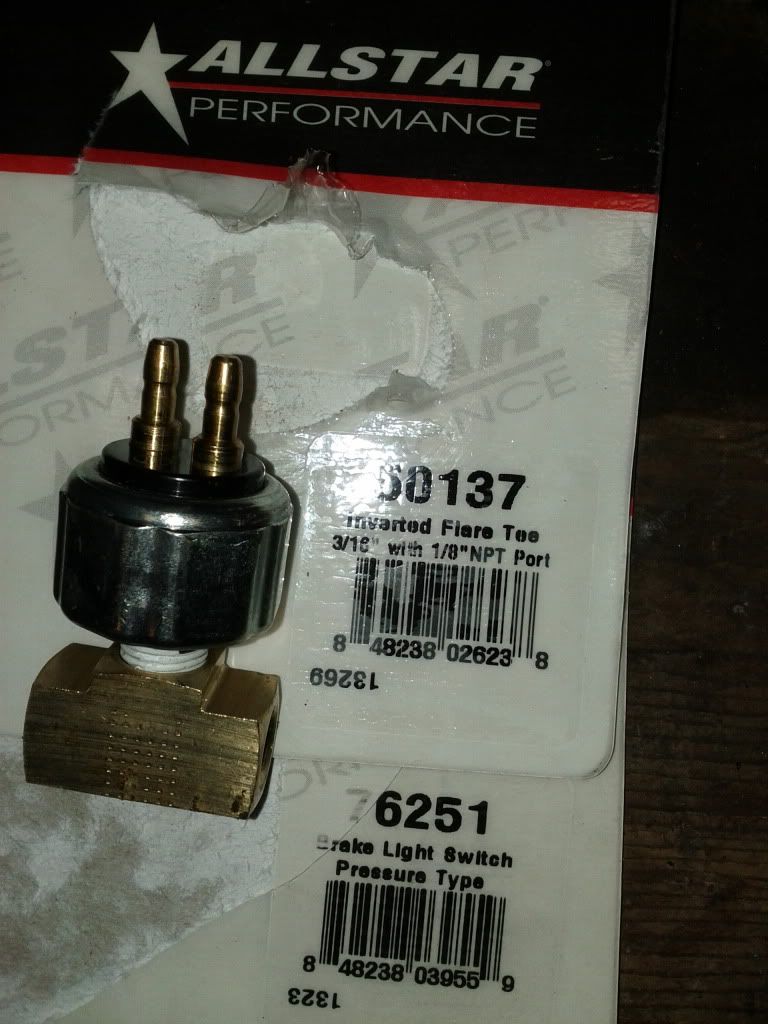 At some point soon I'll have to plumb then wire this into my brake circuit so the 4.8 knows when my foot is on the brake (TC unlocks) and everyone else knows what I'm doing. Totally unrelated to the brakes, I'm also working out how to rebuild my hood hinges. One side had skipped a tooth due to play in the rivets. While I'm figuring out what exactly to do about putting it back together, I'm soaking the disassembled parts in white vinnegar to ease the rust off them. 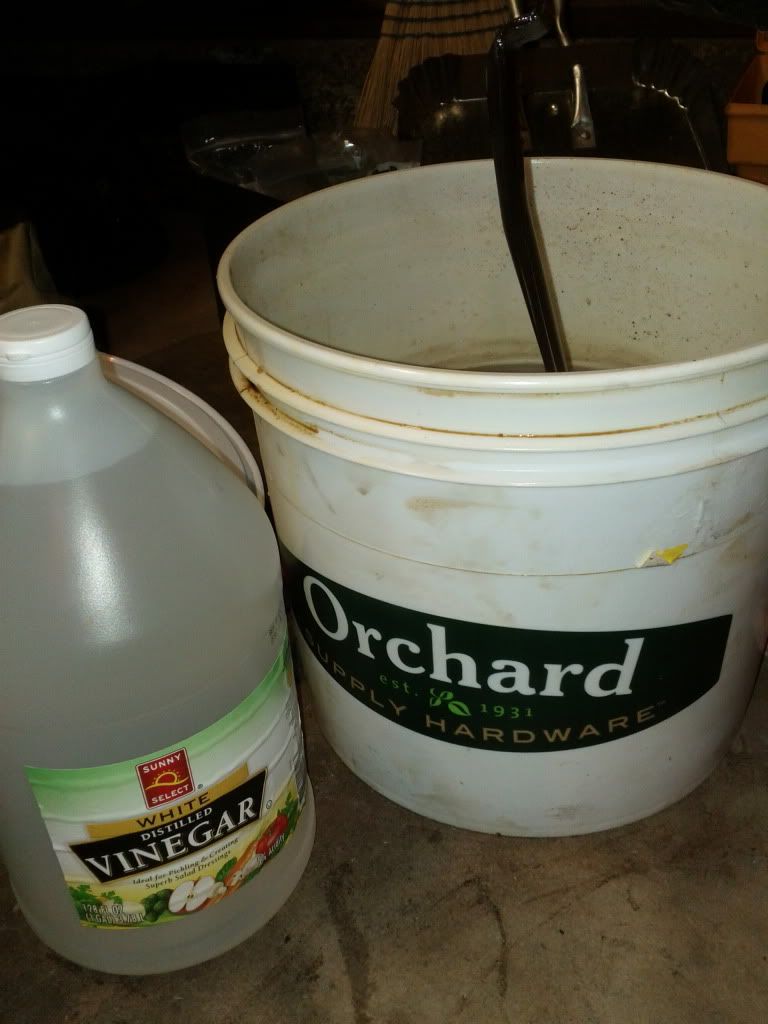 I think McMaster-Carr.com has the bushings I'll use to rebuild them. 7/16" bolts came close but ultimately didn't fit well enough. The shorter bolts don't have any unthreaded shank on them and the threaded portion fit sloppy. So, I'll drill out the pieces that need it to use the bushings I can get. By the time I'm done with the vinnegar bath, painting, installing bushings & putting bolts in it, this won't be a hell of a lot cheaper than buying reproduction units. On the other hand, it will be a little cheaper and a lot more instructive.
__________________
"Over my head" 1957 Chevy 3200, big rear window & 6 lug. Front disc, power steering, Vortec 4.8 / 4L60E swap, hydro boost brakes & patina. |
|
|
|
|
11-22-2013, 10:37 PM
|
#157 |
|
Registered User
Join Date: Sep 2011
Location: Nevada City, CA
Posts: 908
|
Re: Project: Over My Head
After a couple days soaking in vinnegar with the occasional scrubbing, I got the hood hinge parts back out. Also had my bushings from McMaster - they arrived quick!
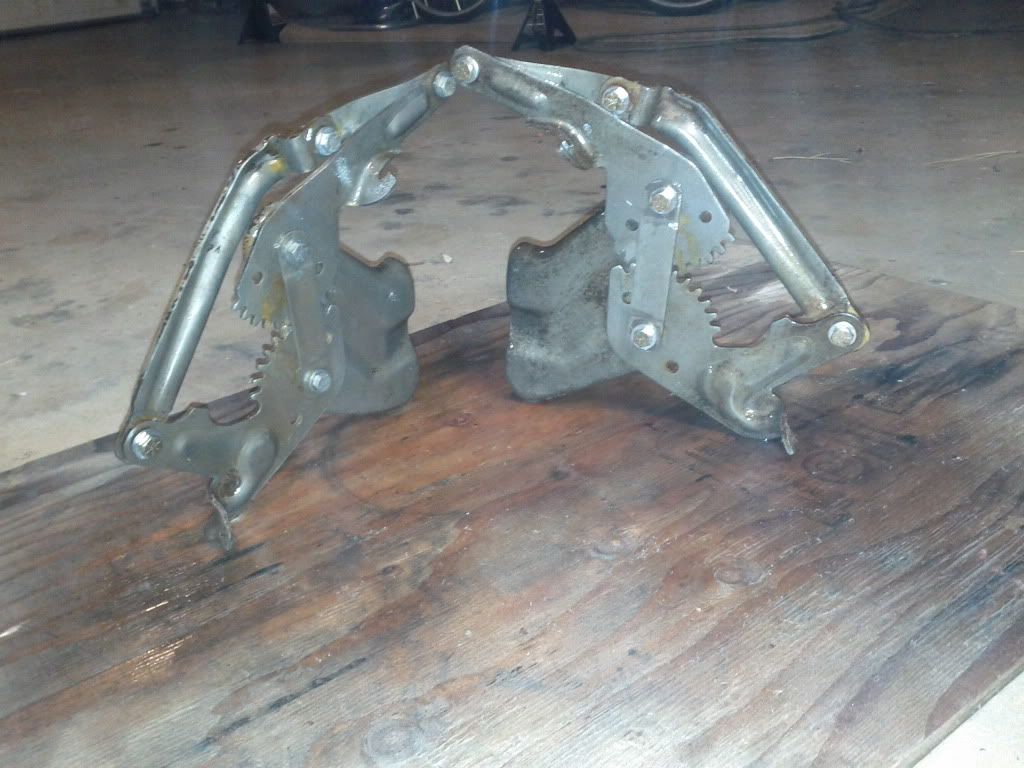
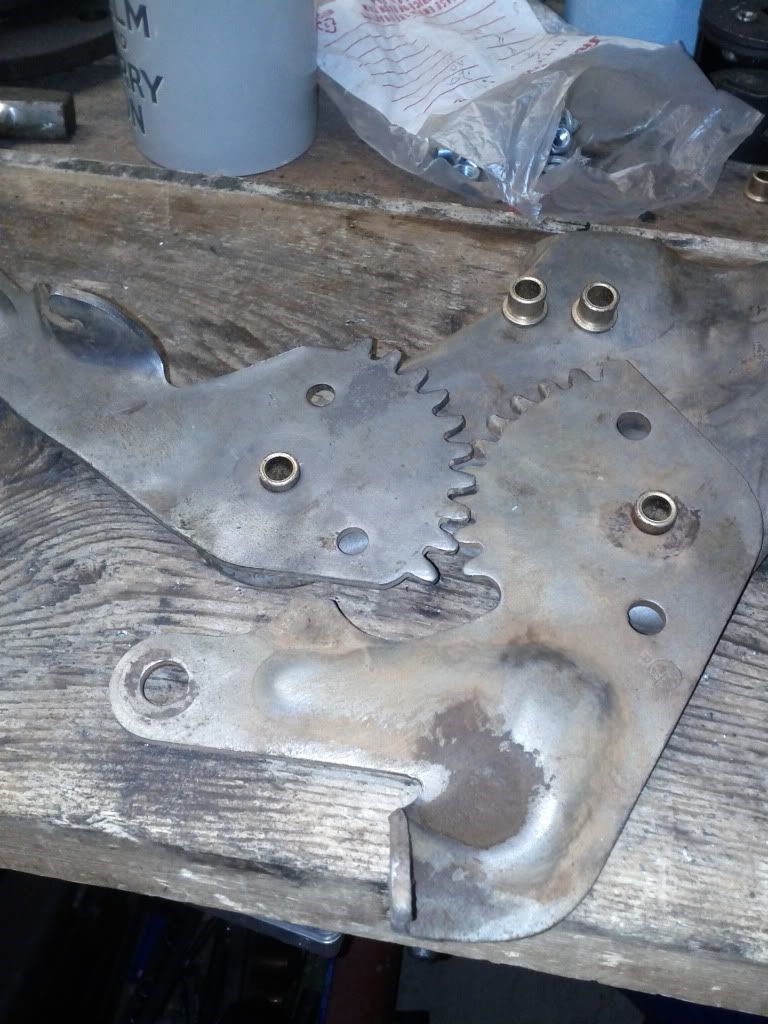 I pressed the bushings in place, when needed, with the bench vise. A small hammer and a socket works, too. From there, a couple holes in the hinges need to be drilled to 7/16". I think 3 holes per side. Here's one side roughly assembled 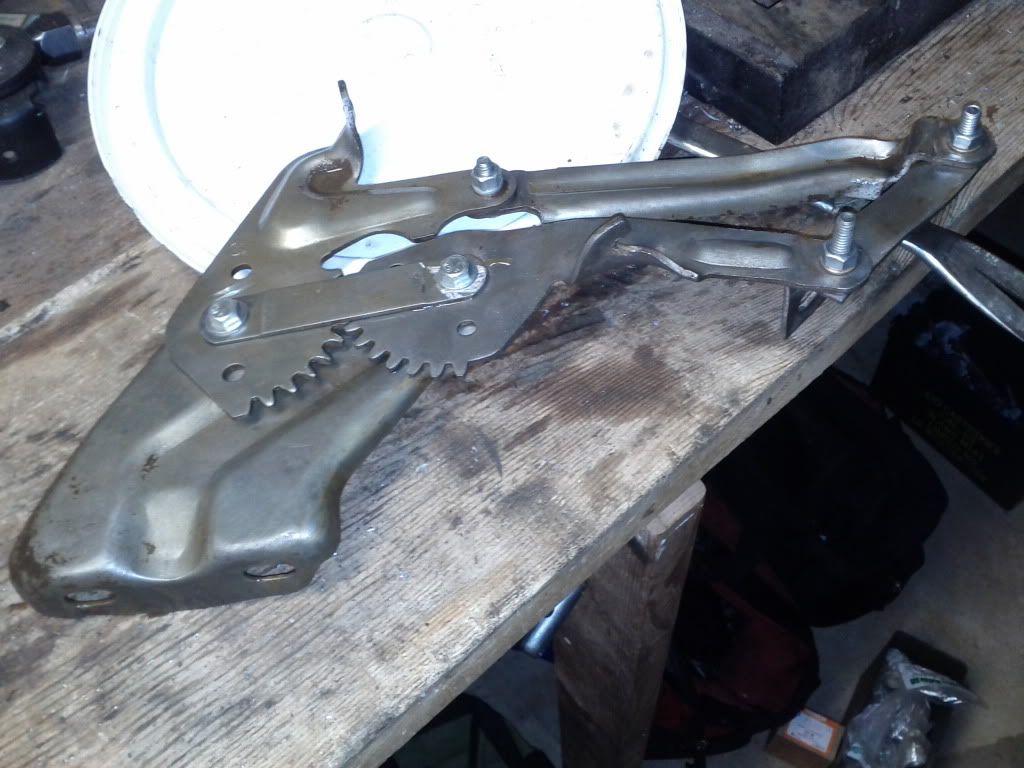 I'll need to get some different bolts and nylock nuts. With the nylocks I should be able to set the drag on the hinge pretty accurately and not worry about it loosening off. I also need to shoot some clear coat on all that shiny-again metal. This isn't truck related, but I thought I'd get (make) my sister & brother in law an "industrial" themed bar set. Here's the tumblers... 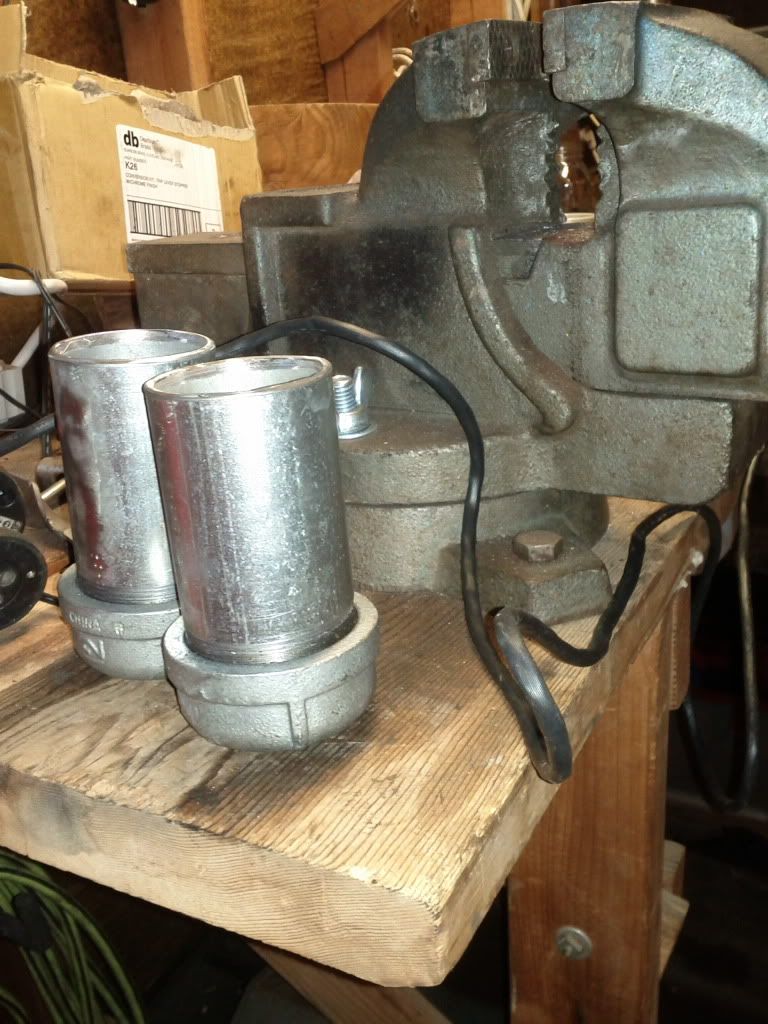 The corkscrew & bottle opener, not pictured, are made from 1/4" square steel.
__________________
"Over my head" 1957 Chevy 3200, big rear window & 6 lug. Front disc, power steering, Vortec 4.8 / 4L60E swap, hydro boost brakes & patina. |
|
|
|
|
11-23-2013, 12:26 PM
|
#158 |
|
Registered User
Join Date: Aug 2007
Location: Corona, California
Posts: 7,998
|
Re: Project: Over My Head
The hinge looks real nice.
Kim |
|
|
|
|
11-23-2013, 09:51 PM
|
#159 |
|
Registered User
Join Date: Sep 2011
Location: Nevada City, CA
Posts: 908
|
Re: Project: Over My Head
 Hood hinges : done and drying. The action on them is *so* much better. I'm probably $25 into the project, clear coat bushings and bolts included. As compared to, what, $65 for reproduction? More? Dunno. Family is coming in to town tomorrow, actually my mom & dad are coming for Thanksgiving. First time I've been in a position to host, which is pretty exciting.
__________________
"Over my head" 1957 Chevy 3200, big rear window & 6 lug. Front disc, power steering, Vortec 4.8 / 4L60E swap, hydro boost brakes & patina. |
|
|
|
|
11-24-2013, 08:07 PM
|
#160 |
|
Registered User
Join Date: Sep 2011
Location: Nevada City, CA
Posts: 908
|
Re: Project: Over My Head
Sharp observers will notice that I'd gotten the good side and the bad side switched, end result that I had the teeth meshed improperly and the hood didn't quite shut.
Spent an extra 20 minutes adjusting the mesh and now the hood shuts properly. I also figured out a better way to get the hood on and off, instead of He-Maning it. 4 cargo straps, one for each corner of the hood, slung over the rafters of the garage. Open the hood, pull each corner *just* tight. Hood stays just in place to be taken on / off with no real labor on my part.
__________________
"Over my head" 1957 Chevy 3200, big rear window & 6 lug. Front disc, power steering, Vortec 4.8 / 4L60E swap, hydro boost brakes & patina. |
|
|
|
|
12-05-2013, 11:04 PM
|
#161 |
|
Registered User
Join Date: Sep 2011
Location: Nevada City, CA
Posts: 908
|
Re: Project: Over My Head
Well, I had my folks in town for a week and ate a lot of turkey. In fact, we've got the last of the bird in the crock pot just now to make stock for soup.
The Taurus fan I've been trying to wedge into place has given me plenty to do. Really, the Taurus fan isn't a great choice for going between grill and radiator. Too thick. I'll eventually wind up cutting 1" of depth out of the grill to notch it around the fan. Also, the trans cooler I selected is a bit wide so the fan has to clear that, too. Anyway. I'm calling the fan "done for now". Tomorrow I'll run to the parts store for some 90 weight, then re seal the rear end. Saturday is supposed to be *real* cold, so that might be all I get done for the weekend.
__________________
"Over my head" 1957 Chevy 3200, big rear window & 6 lug. Front disc, power steering, Vortec 4.8 / 4L60E swap, hydro boost brakes & patina. |
|
|
|
|
12-08-2013, 04:27 AM
|
#162 |
|
Registered User
Join Date: Jan 2011
Location: Redmond, OR
Posts: 754
|
Re: Project: Over My Head
Define "real cold." I just got off of work and it was -25 at one point. Up to a balmy -14 right now. Keep it up and you will be driving it in no time.
__________________
68 Chev C20- son has it now 83 K20 - bought from son 70 C20 - in progress |
|
|
|
|
12-08-2013, 08:54 PM
|
#163 |
|
Registered User
Join Date: Sep 2011
Location: Nevada City, CA
Posts: 908
|
Re: Project: Over My Head
Hah! OK, got me. It isn't *real* cold out, it's just "cold enough". It got to -5 overnight on Saturday. In the garage, it hasn't broke freezing all day. I know because I hauled in a section of garden hose that had frost stuck on it - and it never melted.
No real tech here, but I stole away from house guests long enough to: Trim some plywood to fit in the bed properly & screw it to the old wood (I'll do the job properly some day. Really. I swear.) Plan out how to get a bumper, cross member and trailer hitch to play nice together (low priority, really) Re-seal the diff cover & pinion, clear the vent & give it a basic inspection No tech here, but I've always wanted to put a picture of my rear end on the internet, so... 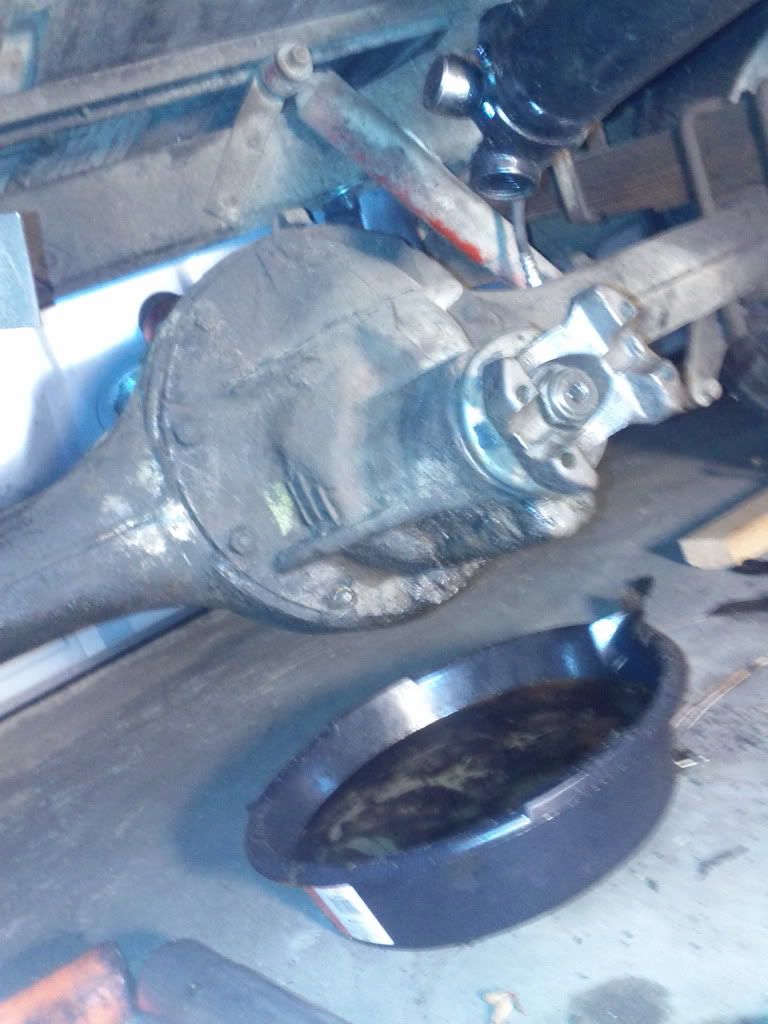 As an aside, I've got to say: this fossil of an axle is beefy as all getout. 9" and change ring gear? Threaded adjusters? Studs holding the 1/8" thick rear cover on? Drain plug as well as filler? Dropout 3rd member? I love this thing... I'm glad the gears are in good shape. Pinion only moves 1/4" total slack. If I get to the point where gearing and / or bearings need to be changed I'll look at a 12 bolt for economic reasons but really, I might just rebuild this "10 bolt"
__________________
"Over my head" 1957 Chevy 3200, big rear window & 6 lug. Front disc, power steering, Vortec 4.8 / 4L60E swap, hydro boost brakes & patina. |
|
|
|
|
12-09-2013, 07:02 AM
|
#164 |
|
Registered User
Join Date: Jan 2011
Location: Redmond, OR
Posts: 754
|
Re: Project: Over My Head
On the rear end, the "run what you have" works well for the economics. What gears are in it? How expensive is it to do a brake job on it (if necessary)?
__________________
68 Chev C20- son has it now 83 K20 - bought from son 70 C20 - in progress |
|
|
|
|
12-09-2013, 01:57 PM
|
#165 |
|
Registered User
Join Date: Sep 2011
Location: Nevada City, CA
Posts: 908
|
Re: Project: Over My Head
I don't actually know what gears are in it. I put the cover back on before counting teeth. At some point I'll raise the back end and check. It's either 3.90 or 4.10, though. With overdrive, it puts me around 2300 RPM at 70 mph. Not bad. In third gear, I'd be turning 3300 RPM. So a downshift, say while climbing a grade and loaded up, won't kill me.
Around town it should have plenty of power. I hope so, anyway. I'm starting to wonder if I chose the right engine. I'd really hate for it to be slow at this point. Full brake job from Rockauto is $120 on this axle. Not bad at all. The 55T is expensive to overhaul or re gear but just to keep.. it's fine.
__________________
"Over my head" 1957 Chevy 3200, big rear window & 6 lug. Front disc, power steering, Vortec 4.8 / 4L60E swap, hydro boost brakes & patina. |
|
|
|
|
12-09-2013, 03:25 PM
|
#166 |
|
Registered User
Join Date: Jan 2012
Location: Virginia Beach, VA
Posts: 282
|
Re: Project: Over My Head
I just read you entire thread, and I must say that you have done a good job at making do with what you have.
A couple of things I can add is to DEFINETLY do the exhaust yourself. $600 for a shop to do it is not a good deal. I scrapped together some pipe from 2 older projects and made true duals for my '69 Suburban in a day. Cost me under $100, including new mufflers. And that was over 30' of exhaust plumbing!! I did it with what I consider to be the worst welder on earth, the $100 Harbor Freight 90A flux core welder. It's not a bad welder, just not a good one. Make sure if you get it that it has all of the parts to attach the wire spool inside the top cover!! lol In the end, you will have a welder and an exhaust. I can suggest craigslist or a junkyard to get old exhaust systems from. Just cut and fit parts and pieces until it gets the smoke from the front o the back. Second, you need to re-evaluate your brake switch. What you have is good for turning on the brake lights, because it is a Normall Open (NO) switch that closes when pressure is applied. The ECM needs a Normally Closed (NC) circuit that opens when brakesa are applied to serve the TCC correctly. So you need BOTH a NO switch (for brake lights) and a NC switch (for TCC) These two sentences were shamelessly stolen from Brendan Patten's site lt1swap.com: "Blue Connector C1: Pin 33 - Purple - TCC Brake Switch - This wire tells the PCM when you hit the brakes. It needs 12v+ all the time, and the brake switch should "open" this circuit when you hit the brakes." "Stop Lamp Supply Voltage - This wire should be hooked to the same wire that feeds you're brake lights 12v+ when you press on the brake pedal. THIS IS NOT THE SAME WIRE AS TCC BRAKE SWITCH THAT THE PCM USES TO UNLOCK TORQUE CONVERTER. After those are wired, you also MUST have the TCC brake switch signal to the PCM. If this signal is not received by the PCM, cruise will not function. TCC Brake Switch Signal is 12v+ when brakes are NOT pressed, and the switch OPENS when you hit the brakes. This signal wire is at PCM connector C1-Blue: Pin #33; Purple wire." I just though that you should be aware of this.
__________________
1972 C10 "Shop Truck" Build - EFI, 5-speed, Posi, and Patina http://67-72chevytrucks.com/vboard/s...d.php?t=834292 1957 Chevy pickup - Twin Turbo 5.3/NV3500, Jag IFS & IRS, AirRide http://67-72chevytrucks.com/vboard/s...d.php?t=606987 Check me out on YouTube - "Tiny Garage Fabrication" http://www.youtube.com/oneoffstroker |
|
|
|
|
12-09-2013, 03:42 PM
|
#167 |
|
Registered User
Join Date: Sep 2011
Location: Nevada City, CA
Posts: 908
|
Re: Project: Over My Head
Thanks for the input.
My thinking for the brake switch is to use a dual-throw relay: B+ Power goes in on pin z (no, not "Z", but I don't remember the pinout off the top of my head, so bear with me) Contacts in the relay, not energized, default to connect pin Z to pin Y Pin Y goes to ECM brake switch signal When the brake switch closes, it passes current to pin X on the relay Pin X is the relay coil. When activated, it connects Z to W, W being the brake lights. So without the brake switch activating the relay, it sends power to the computer. "normally closed". When the switch activates the relay, the wire to the computer goes dead - so the torque converter unlocks. The relay is now sending power to my brake lights. Yeah, I'm doing what I'm able with what I've got. The inventory, honestly taken, includes a lot of myself. My metalworking skills, my experience, my impulsiveness, etc. Making a project like this go from A to B efficiently takes a lot more than a checking account and a set of wrenches. I think, all things considered, I've done OK - but I've learned a lot from the wide variety of mistakes I've made.
__________________
"Over my head" 1957 Chevy 3200, big rear window & 6 lug. Front disc, power steering, Vortec 4.8 / 4L60E swap, hydro boost brakes & patina. |
|
|
|
|
12-15-2013, 01:44 AM
|
#168 |
|
Registered User
Join Date: Sep 2011
Location: Nevada City, CA
Posts: 908
|
Re: Project: Over My Head
Sigh.
Got the brake switch plumbed in. Put some Speed Bleeders into the front calipers, too, and picked up a small pump that screws into a standard quart sized bottle so I could more easily refill the brake fluid reservoir. Bled brakes, all is well. Went to lift the hood and finish the day off with wiring the brake & ecm - no joy. Hood latch is stuck. Spent an hour or so today trying to open the hood, no joy yet. Soaked it in PB, got the grill mostly out so I can reach the latch better, try again tomorrow.
__________________
"Over my head" 1957 Chevy 3200, big rear window & 6 lug. Front disc, power steering, Vortec 4.8 / 4L60E swap, hydro boost brakes & patina. |
|
|
|
|
12-15-2013, 11:06 AM
|
#169 | |
|
Senior Member
 Join Date: May 2011
Location: Cypress, Tx.
Posts: 1,504
|
Re: Project: Over My Head
Oh my! I can relate to the hood latch being stuck! When I bought my truck, the hood was still "popped", so I pressed down on the hood and stayed down for a week! I pulled the grille, and forget what finally got it open. When I finally installed the new latch(a year or two later), I was so reluctant to shut the hood! But alas, it works just fine! You're doing fantastic~ keep up the great work!
 dne' Quote:
__________________
'72 Ford Bronco project(July 17 2021-?) https://67-72chevytrucks.com/vboard/...d.php?t=828015 59 Apache (sold 6-25-2021) 67 Ford Mustang (re-restored after Harvey) 1968 Jeep Cj5 (2-8-2020 to present) 1992 Jeep Yj (8-17-20 to present) (Jurassic build) www.Classiccarsandtools.com |
|
|
|
|
|
12-15-2013, 09:21 PM
|
#170 |
|
Registered User
Join Date: Sep 2011
Location: Nevada City, CA
Posts: 908
|
Re: Project: Over My Head
I forgot to take pictures as I worked, but...
 You can see in the above picture that there is a hooked "primary" catch on the right, which is if I recall correctly a single stamped piece with the hood release lever. Cut into this single release / primary catch is about a 3/8" relief that the secondary catch, which is the ramping (not hooked) section on the left of the center tower looking piece, keys into. The design works so that pulling the hood release will directly disengage the hook while allowing the ramping secondary catch to pivot, allowing the hood to be lifted. The problem on my truck was a combination of three things. First, the ramp on the secondary catch had a flat spot worn into it which formed a natural stop point. Second, everything had a little surface rust on it. Third, the grease on it had long since turned to grime. The three of these together meant that instead of smoothly disengaging as I lifted the hood, the secondary catch just jammed in place. I fixed it by soaking it in PB Blaster over night, lifting the hood release, and manually disengaging the secondary latch. I used my hands but it would have been easier with a pick or pliers. I don't think I could have done this, or done this so easily as I did anyway, with the grill in place. Fortunately, you can actually remove the grill with the hood stuck down. The bolts holding down the latch support panel (bridge from radiator support to grill) were *just* accessible with a 1/2" open wrench. Remove those, loosen / remove the bumper, undo the rest of the dozen or so bolts, remove grill... THEN it's pretty easy to work on the broken / stuck latch. In the following picture, the secondary latch was moved by the pivoting piece above the clock spring.  Wish I could describe all of this better but hopefully it helps somebody in the future... So, instead of finishing my wiring, I got the hood latch cleaned & greased. Got the hood opening & closing, and put the grill suround body work back in place. I'm skipping over some sheet metal massaging, some rust, and a few broken bolts. Grill itself is on hold for a while. Tomorrow when I'm done with customer's car, I'll get brake lights working. For real this time.
__________________
"Over my head" 1957 Chevy 3200, big rear window & 6 lug. Front disc, power steering, Vortec 4.8 / 4L60E swap, hydro boost brakes & patina. |
|
|
|
|
12-17-2013, 02:05 AM
|
#171 |
|
Registered User
Join Date: Sep 2011
Location: Nevada City, CA
Posts: 908
|
Re: Project: Over My Head
Well, I'd forgotten that I had a meeting at noon and a financial planning session at 2 pm.
Then, when I got home around 245 or 3, I decided to take apart the work bench and add another 2x12-8' board to the work surface. It is a *lot* more useful being 3' deep than 2'. So much so that I got the boxes of SAE tools out from under the bench, put them on top, moved the drill press and *still* have a lot of work surface. After all of that, some goofing around, and eating dinner, I got as far as wiring up the brake switch and relay, power and ground to the relay, and verifying that I have power to the correct ECM pin when the key is on. I still have to run power from the relay back to the lights, though. My fiance gets restless if I'm in the garage past 945 or so... Tomorrow...
__________________
"Over my head" 1957 Chevy 3200, big rear window & 6 lug. Front disc, power steering, Vortec 4.8 / 4L60E swap, hydro boost brakes & patina. |
|
|
|
|
12-17-2013, 09:55 AM
|
#172 |
|
Senior Member
Join Date: May 2011
Location: Cypress, Tx.
Posts: 1,504
|
Re: Project: Over My Head
Do you feel you don't get enough quality time to work on your truck or in your garage? For me, I'm kind of a later starter(10:30am), then Gary usually gets home around 3:00(just when I'm really getting into what I'm doing), then I know what I'll hear, "are you almost through in the garage?" meaning HE wants to go somewhere expecting me to drop what I'm doing!
 I'm ready for the holidays to end so I can get back to a normal routine. I'm ready for the holidays to end so I can get back to a normal routine.
__________________
'72 Ford Bronco project(July 17 2021-?) https://67-72chevytrucks.com/vboard/...d.php?t=828015 59 Apache (sold 6-25-2021) 67 Ford Mustang (re-restored after Harvey) 1968 Jeep Cj5 (2-8-2020 to present) 1992 Jeep Yj (8-17-20 to present) (Jurassic build) www.Classiccarsandtools.com |
|
|
|
|
12-17-2013, 12:21 PM
|
#173 |
|
Registered User
Join Date: Sep 2011
Location: Nevada City, CA
Posts: 908
|
Re: Project: Over My Head
I think, generally, I've got a remarkable amount of freedom to order my day as I like it. Especially for a guy under 30. That said - if I was single, I'd be in the garage till midnight most nights. Course I couldn't afford the rent on one, so it's all hypothetical
 Only a few weeks and we are all back to the regular swing of things. A few weeks after that, I start school (again...) and it remains to be seen how much time & money will be available for Truck. So. I'd really better actually get the brake lights working today and maybe some turn signals while I'm at it.
__________________
"Over my head" 1957 Chevy 3200, big rear window & 6 lug. Front disc, power steering, Vortec 4.8 / 4L60E swap, hydro boost brakes & patina. |
|
|
|
|
12-17-2013, 12:28 PM
|
#174 | |
|
Registered User
Join Date: Sep 2011
Location: Nevada City, CA
Posts: 908
|
Re: Project: Over My Head
Quote:
I'm just hoping I have a driver out of this project before school, the wedding & newborns take over. Be nice if I could drive it to our next house instead of towing it, too. In the mean time, I've got a Toyota Echo making what sounds like a lot of accessory belt noise. Ought to fix that, earn some money and *then* enjoy my leisure time.
__________________
"Over my head" 1957 Chevy 3200, big rear window & 6 lug. Front disc, power steering, Vortec 4.8 / 4L60E swap, hydro boost brakes & patina. |
|
|
|
|
|
12-17-2013, 10:15 PM
|
#175 |
|
Registered User
Join Date: Sep 2011
Location: Nevada City, CA
Posts: 908
|
Re: Project: Over My Head
I first thought the Echo's water pump was bad, based on the character of the noise, the location of the noise, the fact that when I took the belt off the noise stopped & the pump pulley had excessive end play.
Nope... Replaced it and noise was unchanged. Darn - hate to swing & miss. Bought a stethoscope & sure enough, the alternator sounds awful. But anyway... Got the brake lights finished & working. Had to add a ground strap to the bed since it apparently isn't grounded well enough just sitting there. Could be those mounting bolts I'd loosened a while back, come to think of it... Oh well, the extra ground wire won't hurt anything. Doing it again, I'd spend the extra $360 or so and buy a ready made Ebay wiring harness for the engine. It's kind of a rat's nest in there. I figure, an hour a month for the next several years and it will be cleaned up. Of course, if I were to do a 2nd LS swap I could make it much nicer from the get-go. Much better to do all this stuff while the motor is on the stand and spend an afternoon doing it with everything installed & accessible. Live and learn.
__________________
"Over my head" 1957 Chevy 3200, big rear window & 6 lug. Front disc, power steering, Vortec 4.8 / 4L60E swap, hydro boost brakes & patina. |
|
|
|
 |
| Bookmarks |
|
|


 Linear Mode

