
|
|
|
 05-28-2019, 02:33 PM
|
#1 |
|
Post Whore
  Join Date: May 2015
Location: Alabama
Posts: 14,592
|
Re: 55 Wagon Progress
Sweet work as usual...
question on the fusion weld..how do you fix the blowout?...will it heal itself with more torch work or do you have to add filler?
__________________
Mongo...aka Greg RIP Dad RIP Jesse 1981 C30 LQ9 NV4500..http://67-72chevytrucks.com/vboard/s...d.php?t=753598 Mongos AD- LS3 TR6060...http://67-72chevytrucks.com/vboard/s...34#post8522334 Columbus..the 1957 IH 4x4...http://67-72chevytrucks.com/vboard/s...63#post8082563 2023 Chevy Z71..daily driver |

|

|
|
05-28-2019, 02:38 PM
|
#2 |
|
Registered User
Join Date: Jan 2013
Location: Leonardtown, MD
Posts: 1,635
|
Re: 55 Wagon Progress
Some go back afterward and add filler, some keep a TIG rod handy to attack the issue as it happens..
__________________
Robert Last edited by MP&C; 05-28-2019 at 02:54 PM. |
|
|
|
|
06-13-2019, 12:45 PM
|
#3 |
|
Registered User
Join Date: Jan 2013
Location: Leonardtown, MD
Posts: 1,635
|
Re: 55 Wagon Progress
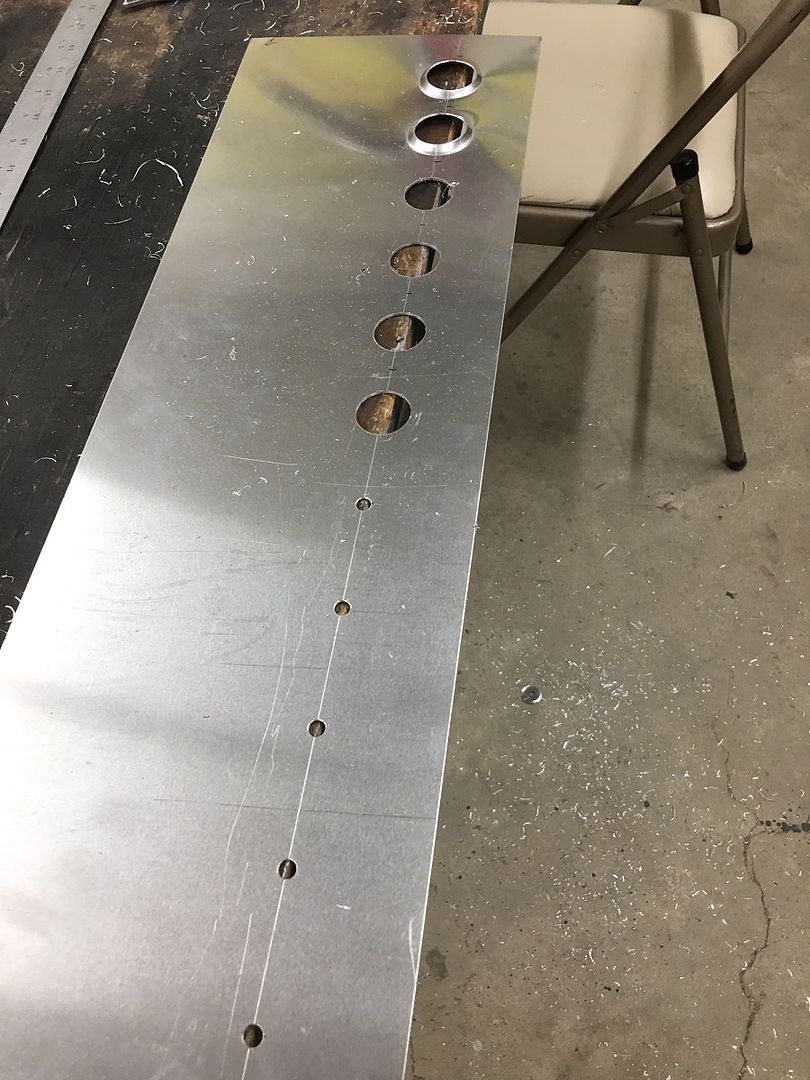
We're making some speaker "adapter" rings to be able to mount the speakers in the door. We used some 18 ga CRS to form rings, the seam was gas welded.
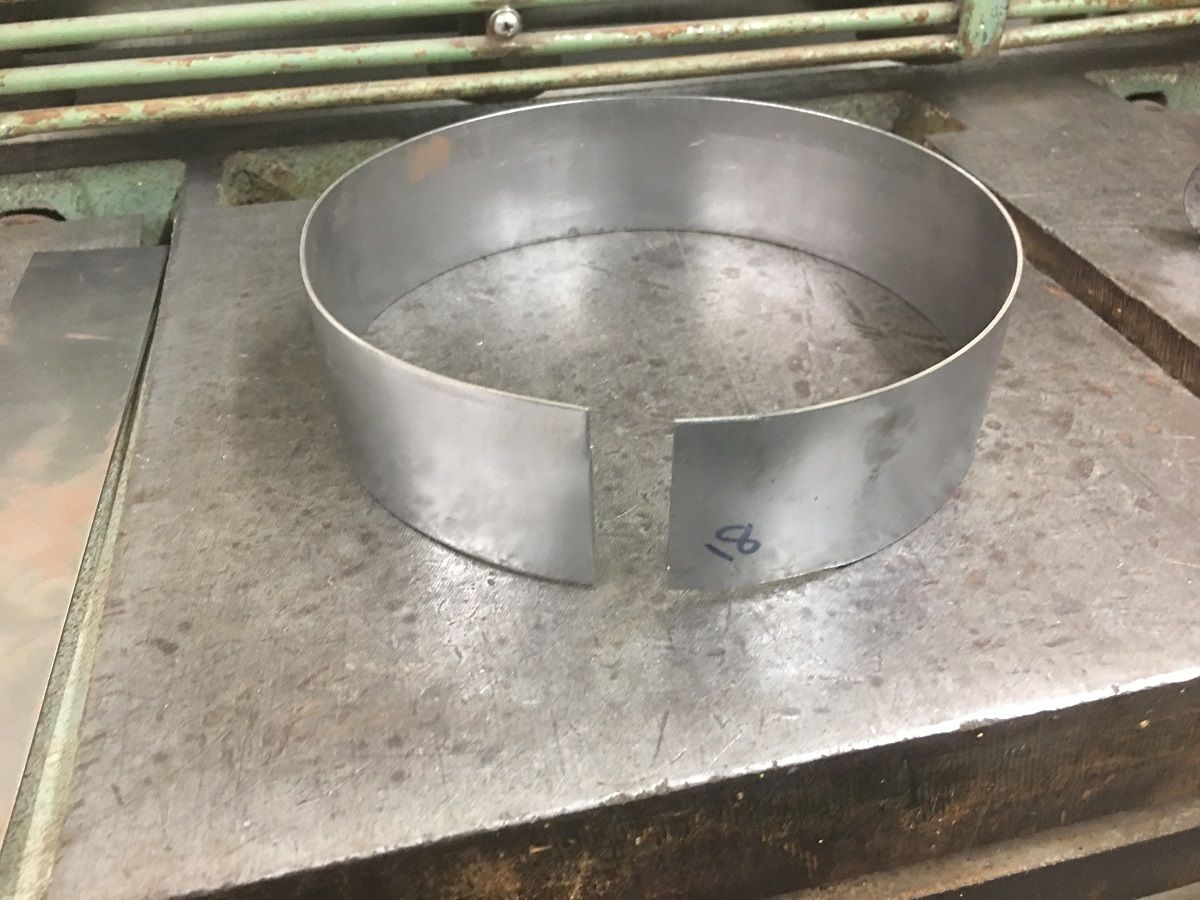 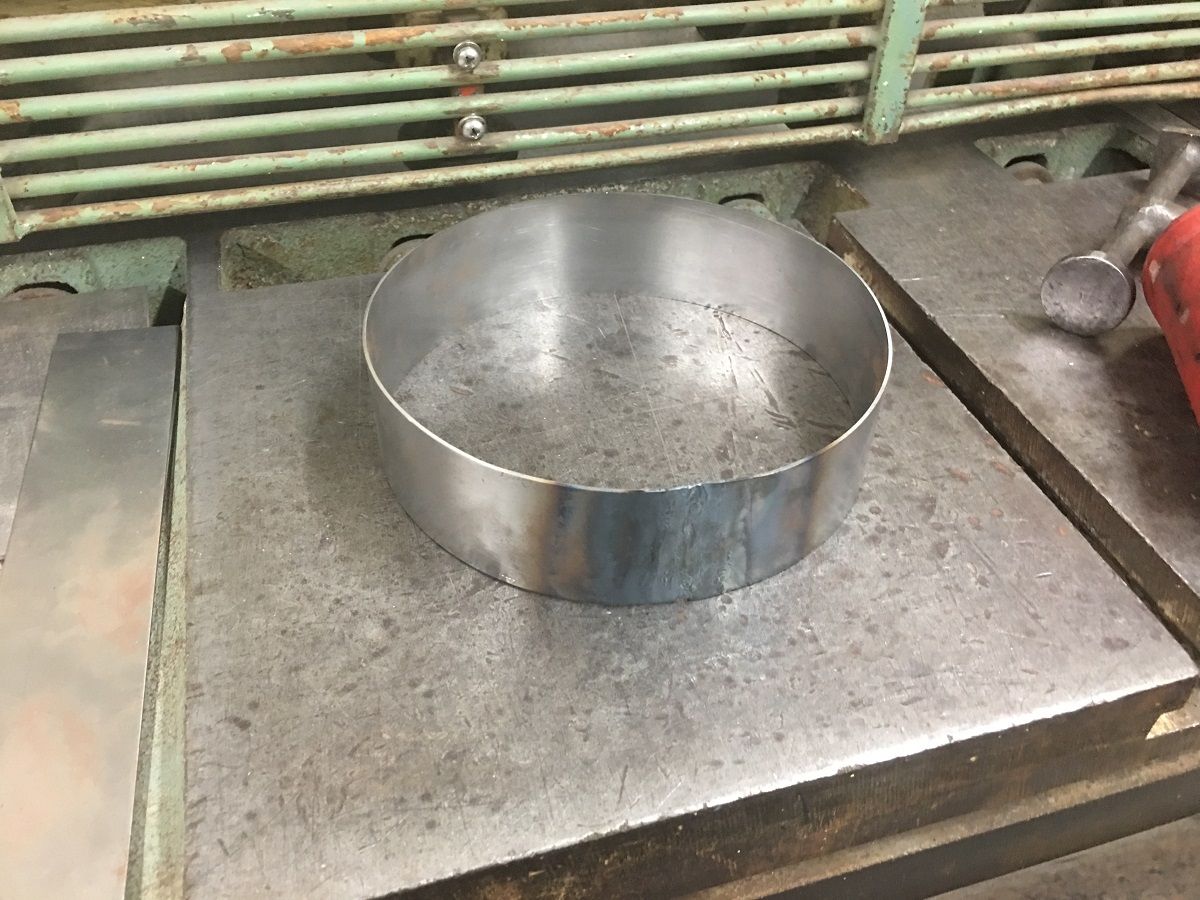 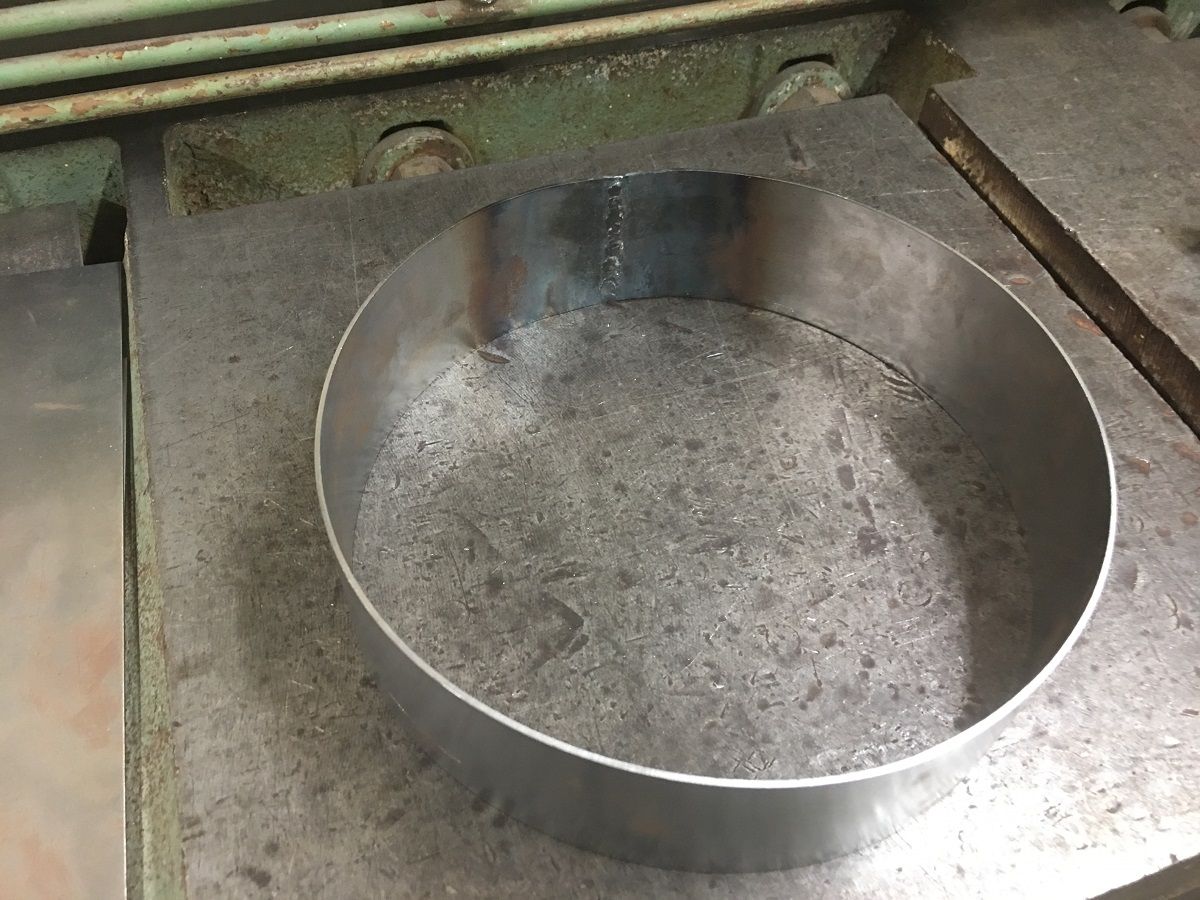 The outer flange is started on the Fasti-werks bead roller using the tipping die and the lower die we made last week. 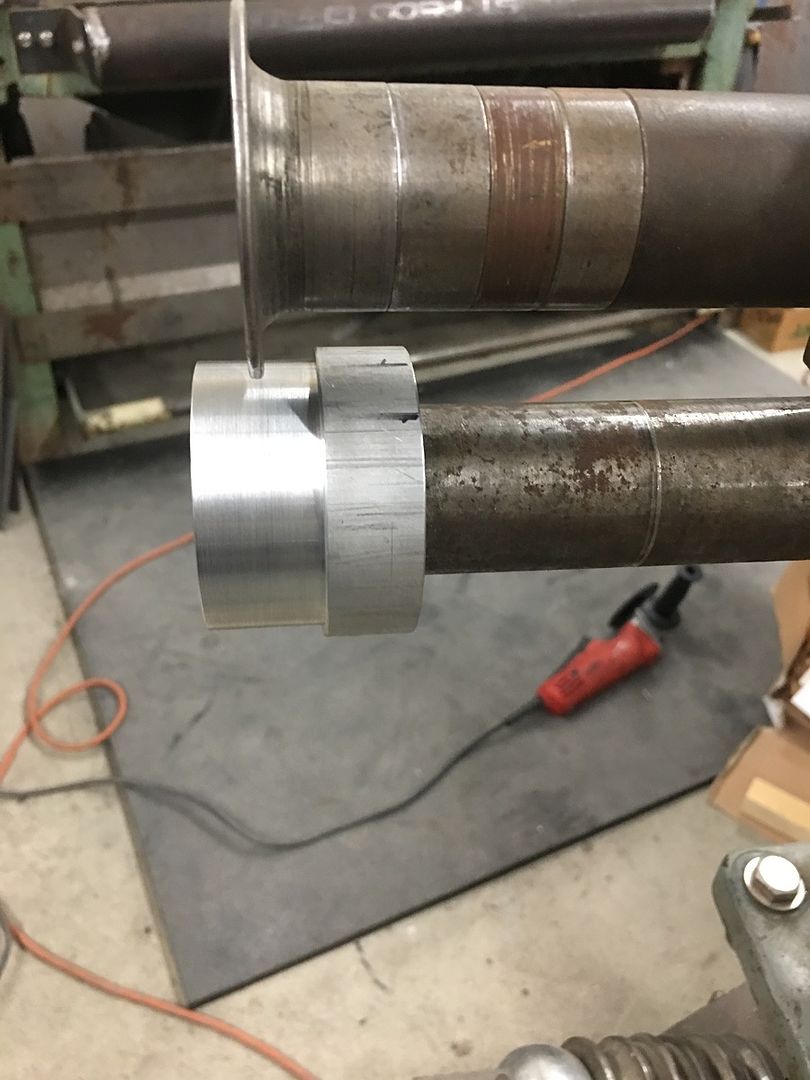 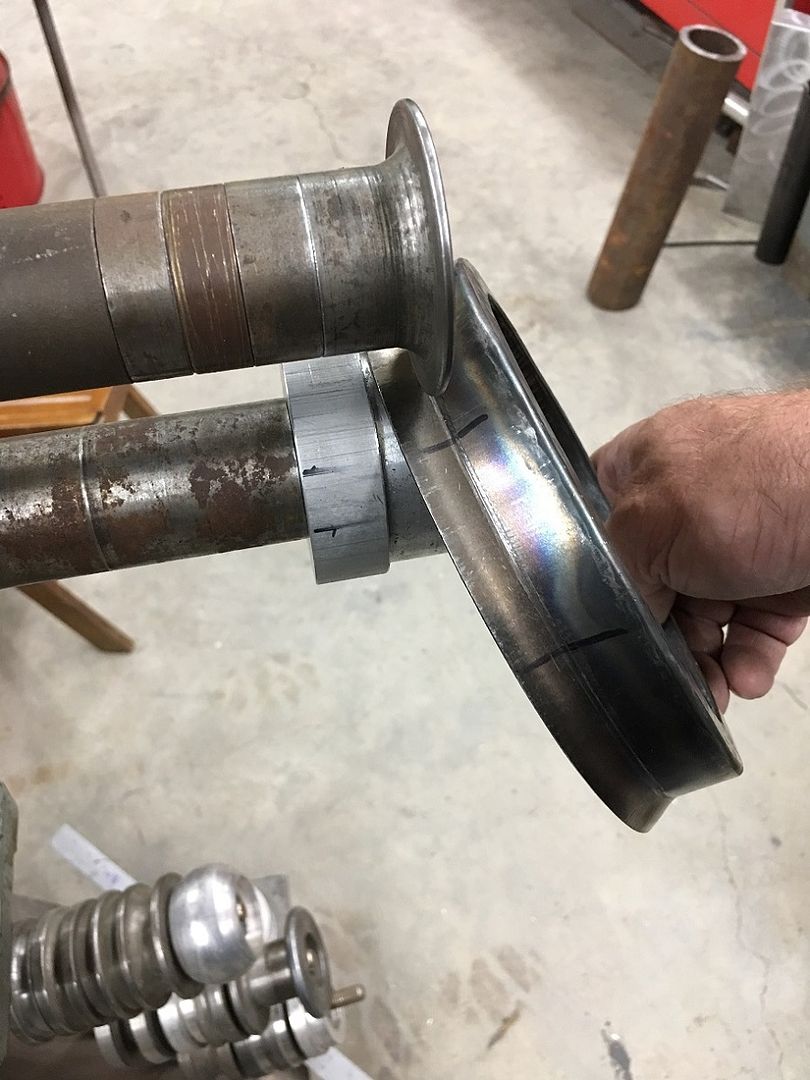 Once it started to resist the tipping (needs stretching of the flange) we changed to using the linear stretch dies in the Lennox TE250 https://www.youtube.com/watch?v=bX0gzPlqXEw https://www.youtube.com/watch?v=ATRYXZ-I3CU https://www.youtube.com/watch?v=9KRturFOdHA 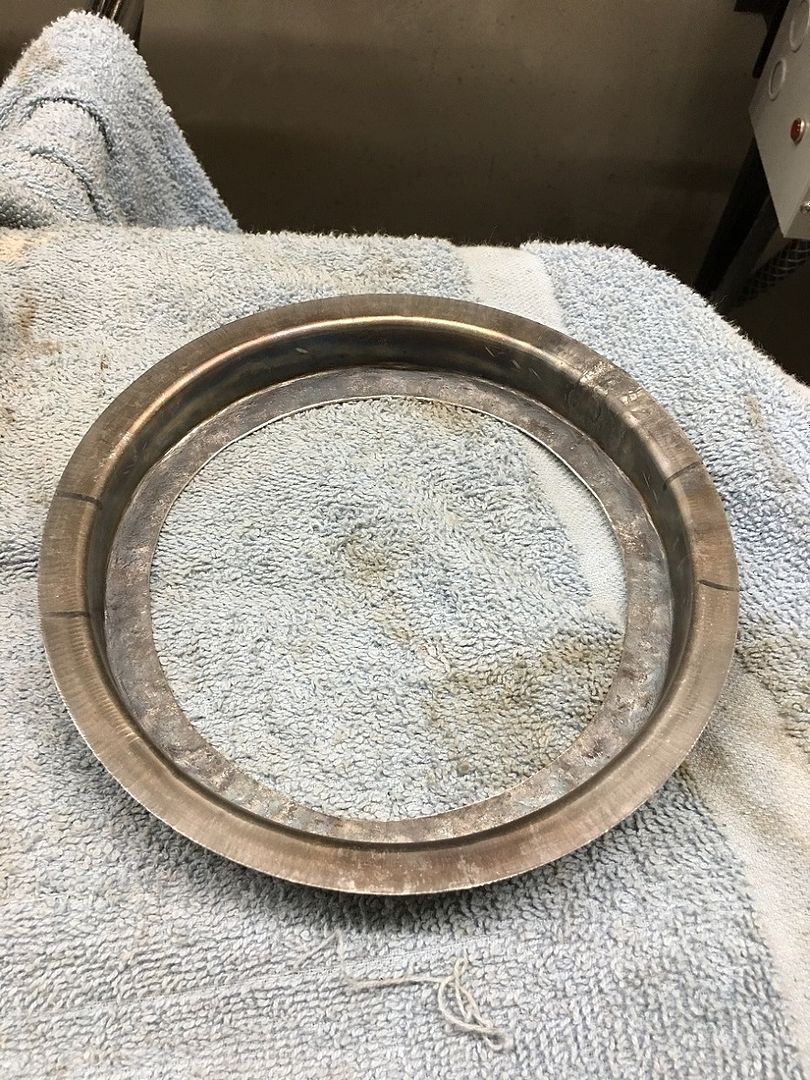 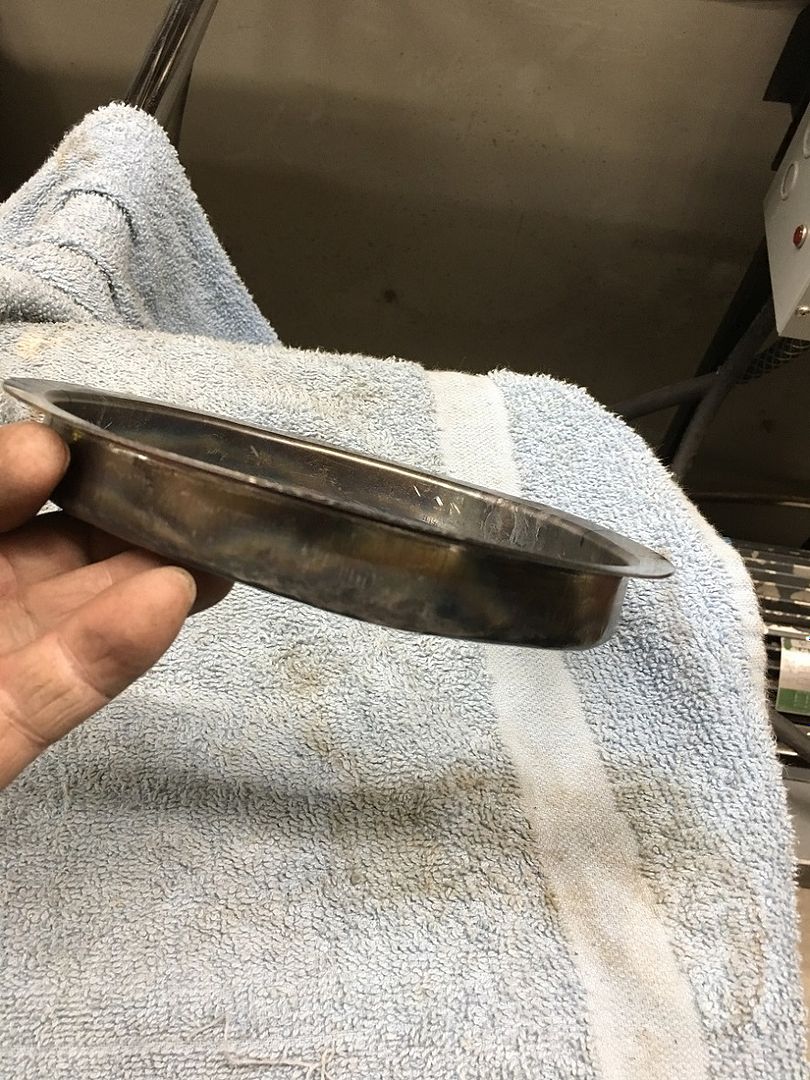 Originally we were looking at using the area below the power window motor, but in order to clear the power connector it would be too close to the bottom of the door... 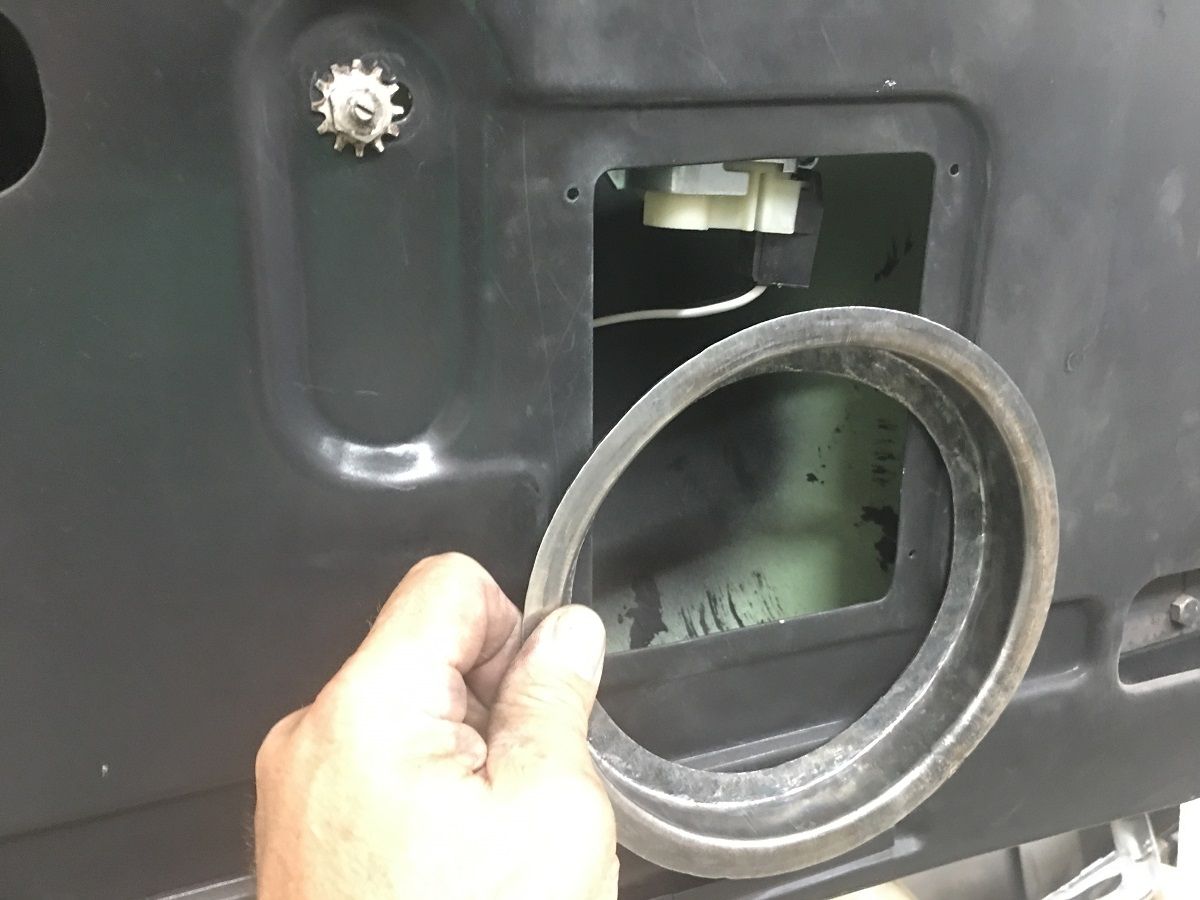 With not much else for room in the door, we opted to open a hole at the rear area of the inner hinge brace. 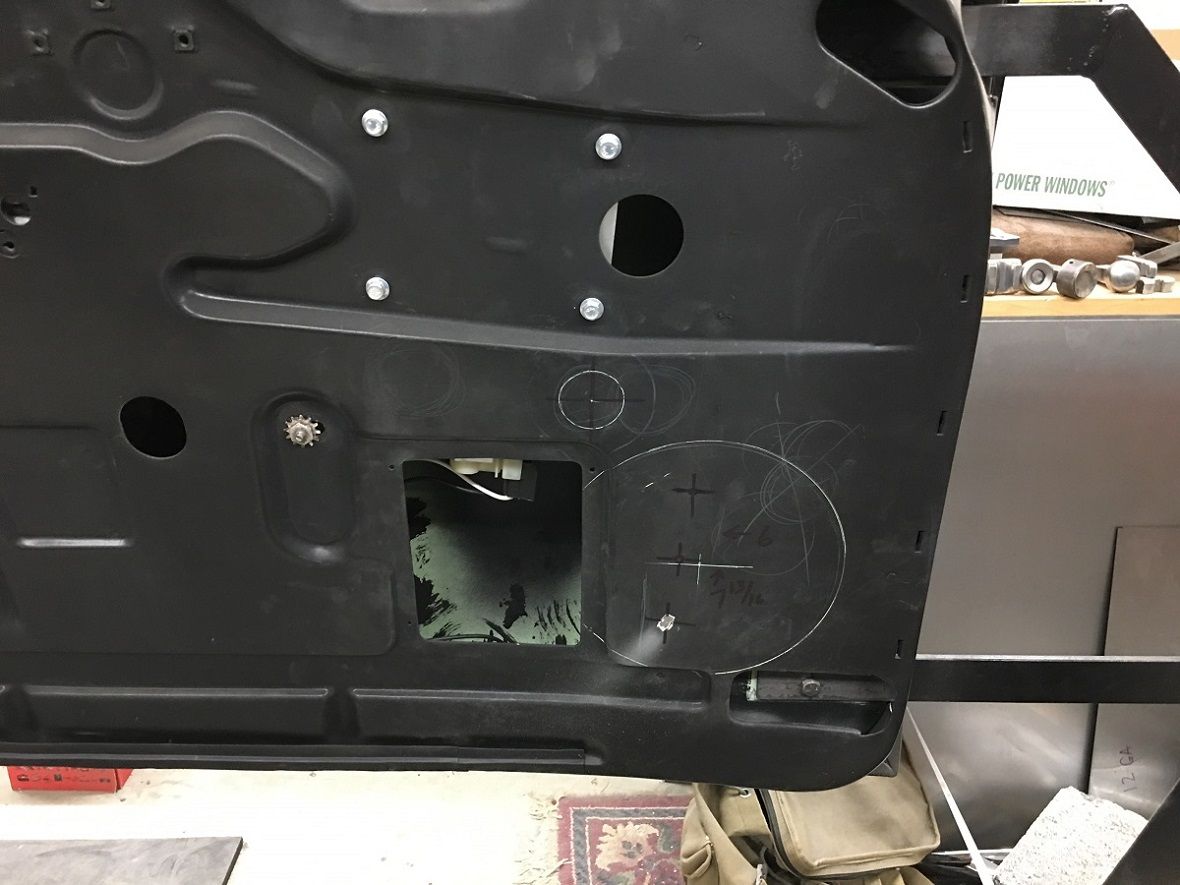 With space above for the tweeter, this will closely mimic what we have in the rear kick panels.. 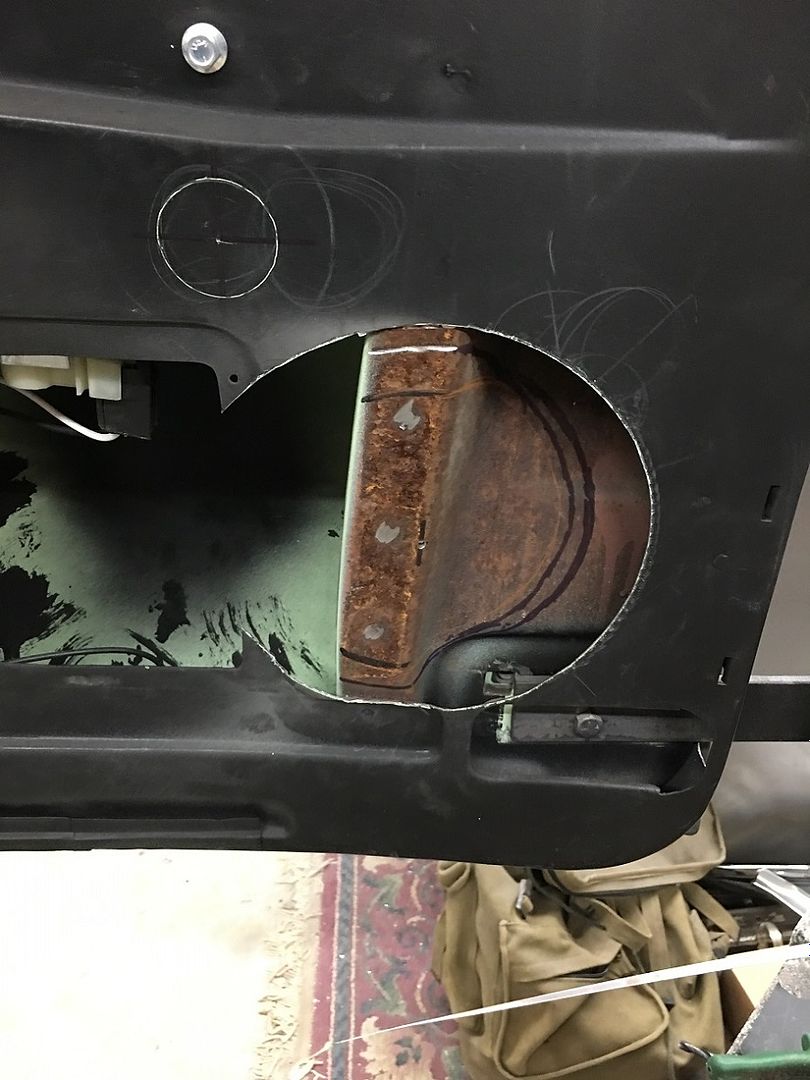 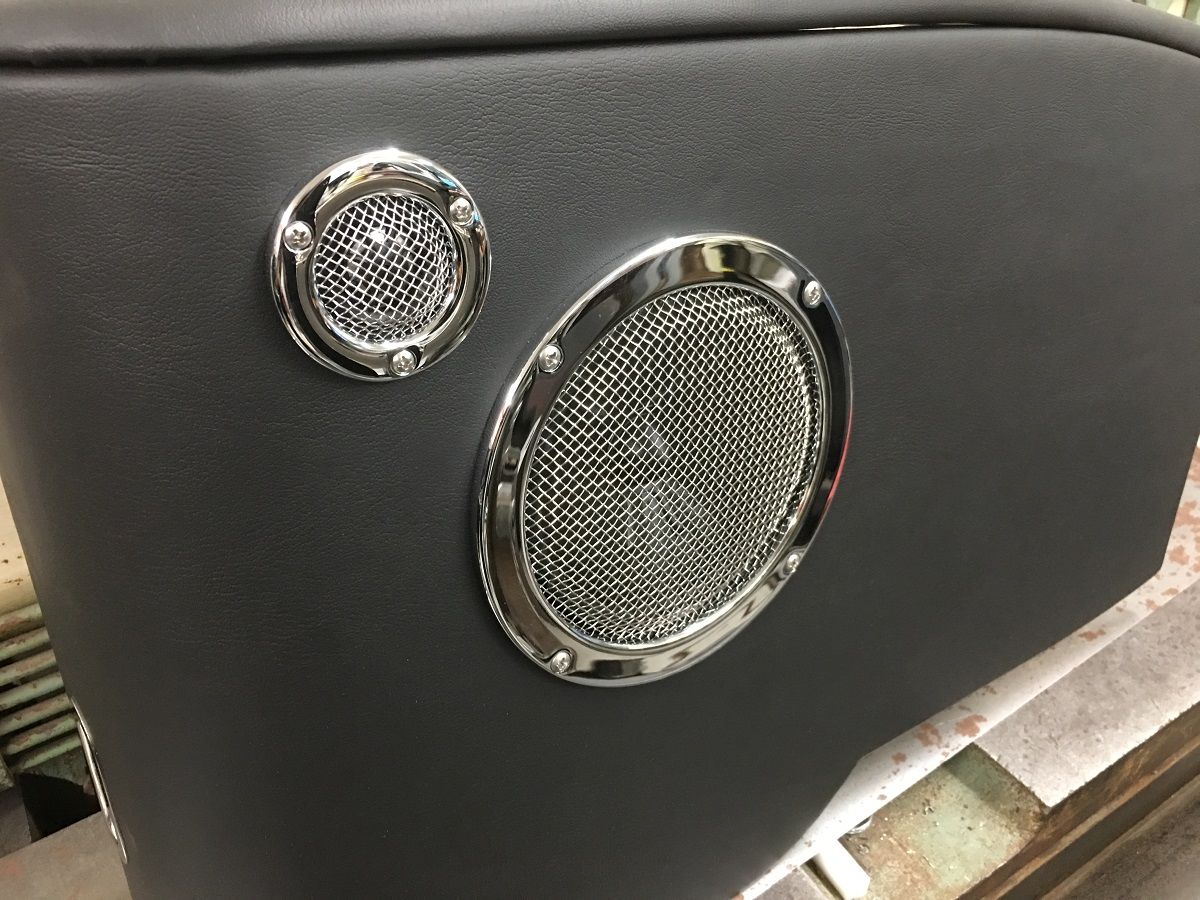 The rings will get TIG welded in place, but before that we'll add a bit of structure back in the hinge brace. 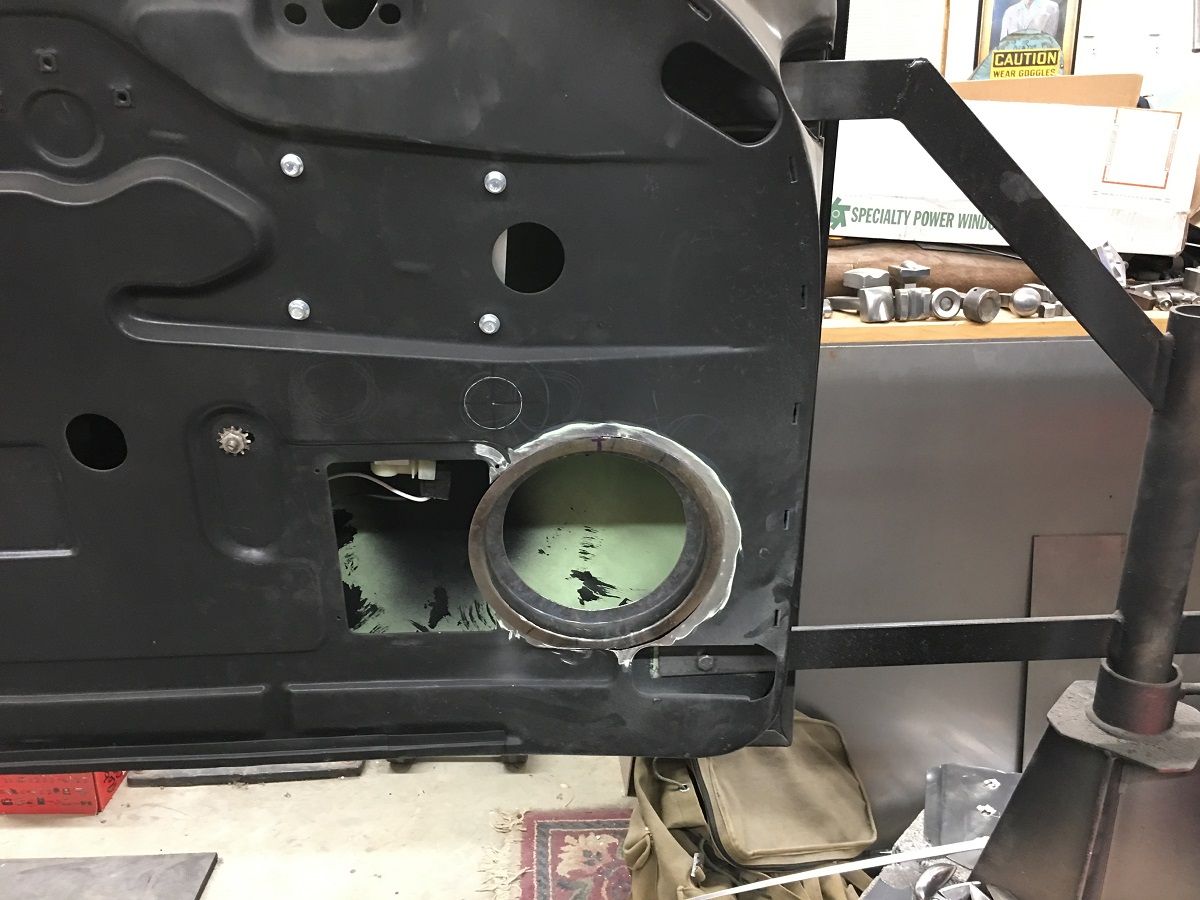
__________________
Robert |
|
|
|
|
06-17-2019, 09:50 AM
|
#4 |
|
Registered User
Join Date: Jan 2013
Location: Leonardtown, MD
Posts: 1,635
|
Re: 55 Wagon Progress
Mike is still plugging away on the Drummer's Lounge sign.
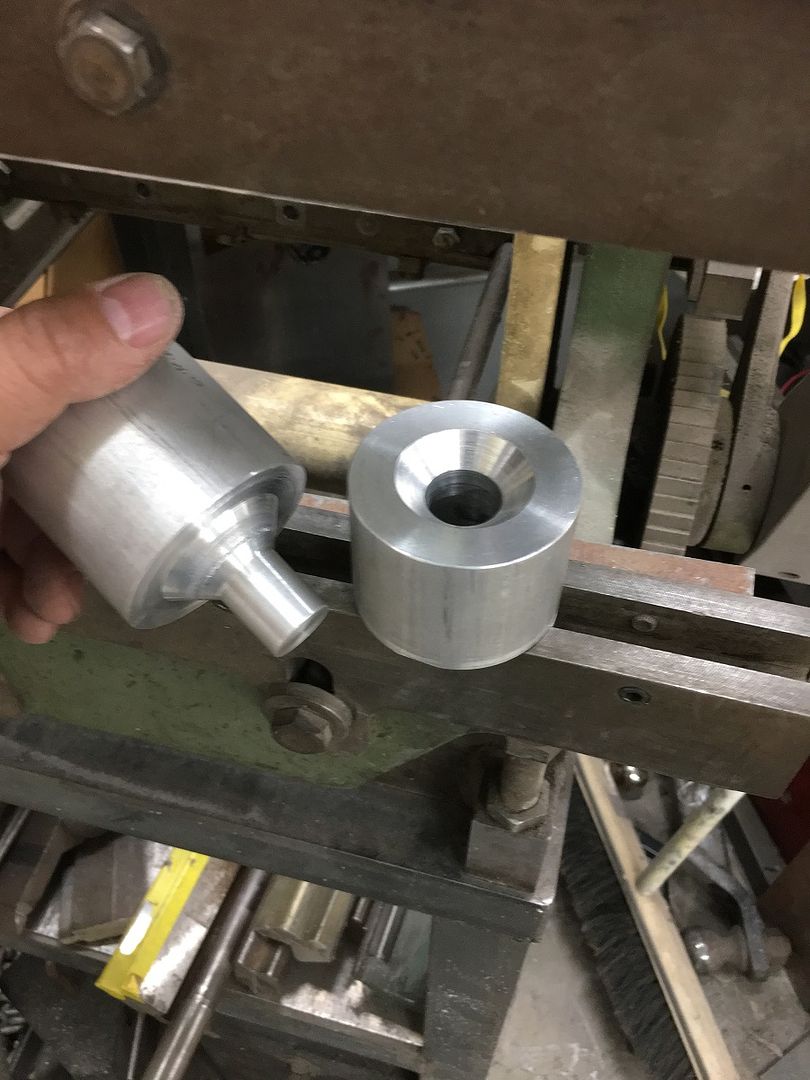
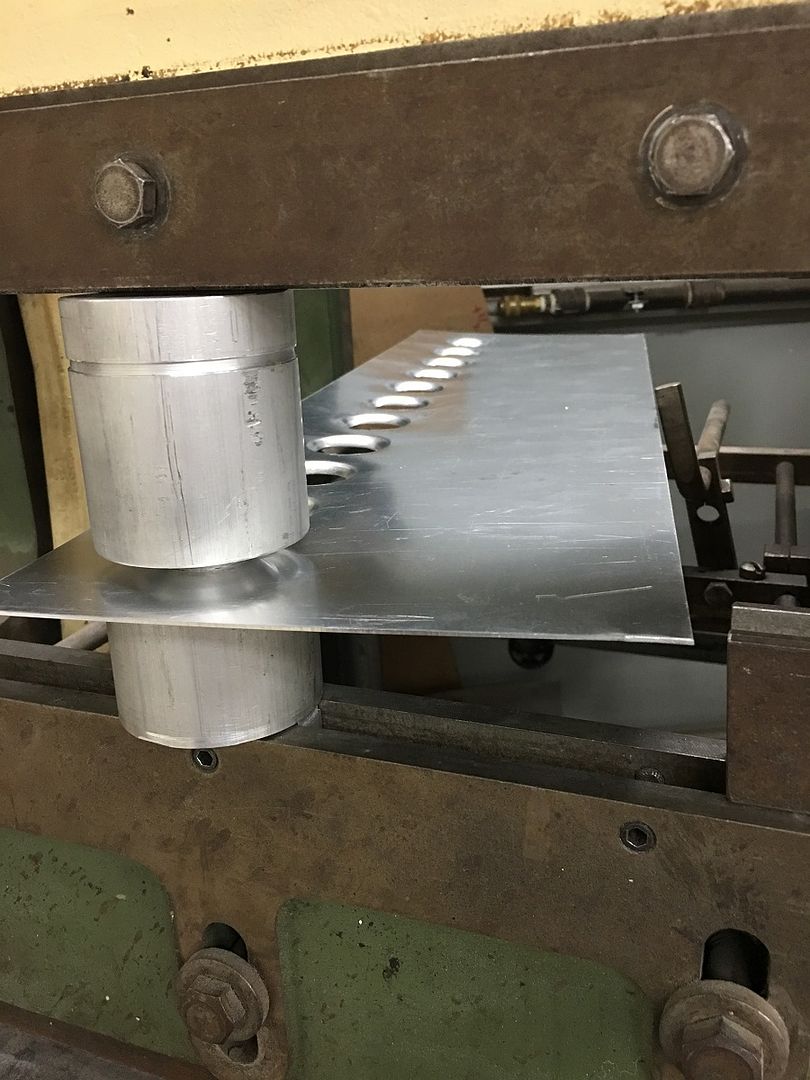
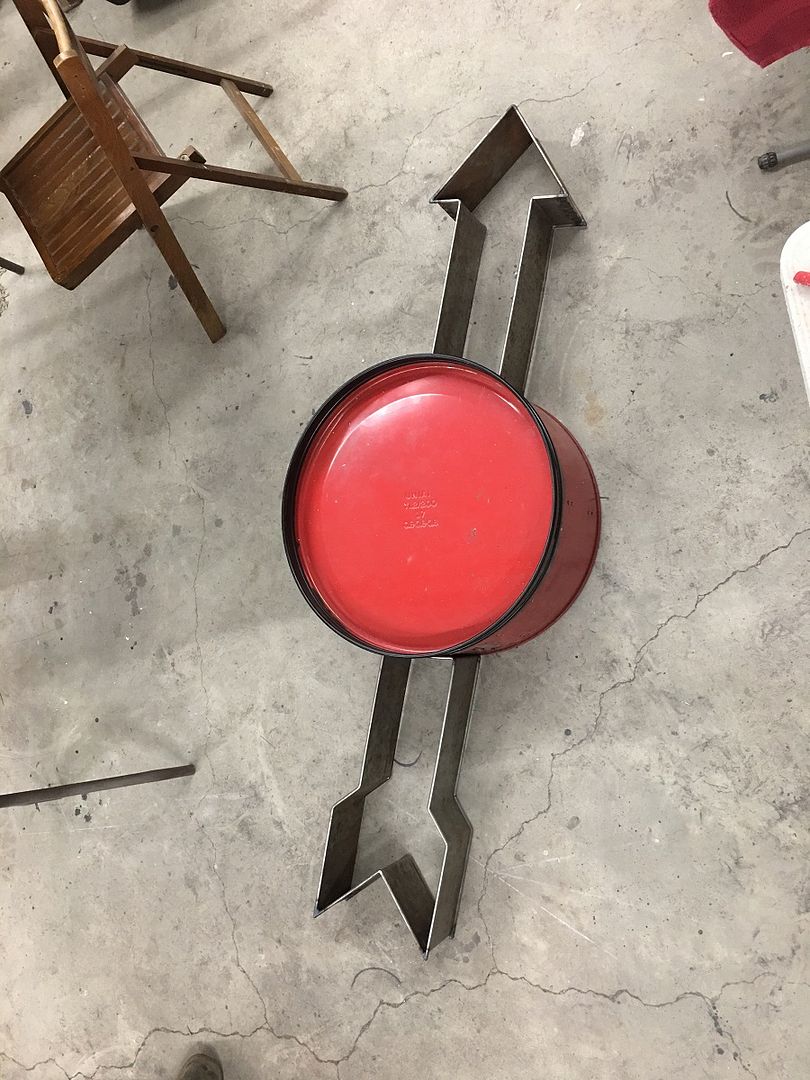 Saturday he started fabrication of the insert panels. One side will be plug welded in place, the other will be removeable to access the wiring for the flashing lights. Tracing the first pattern onto some 19 ga crs, and adding mounting flanges. 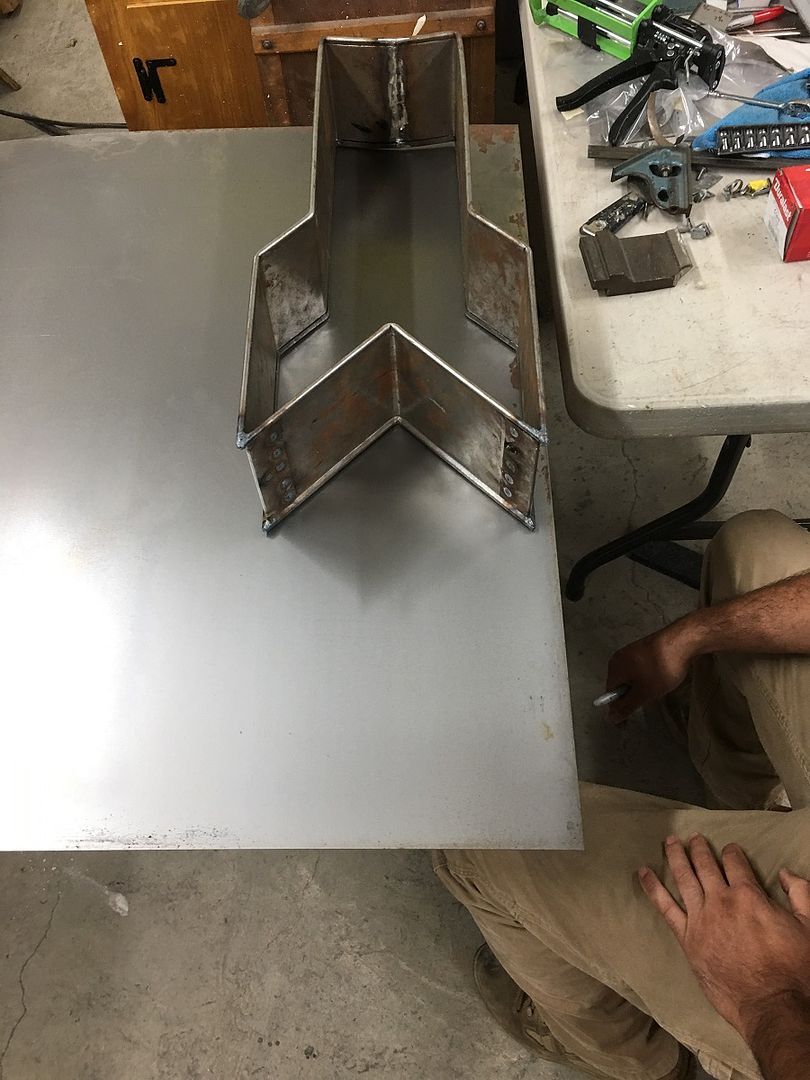 The bend lines are run through the bead roller with a tipping die into the skate board wheel to better mark the bend location. Makes it easier to locate the upper press brake die as it will fall into the indent. 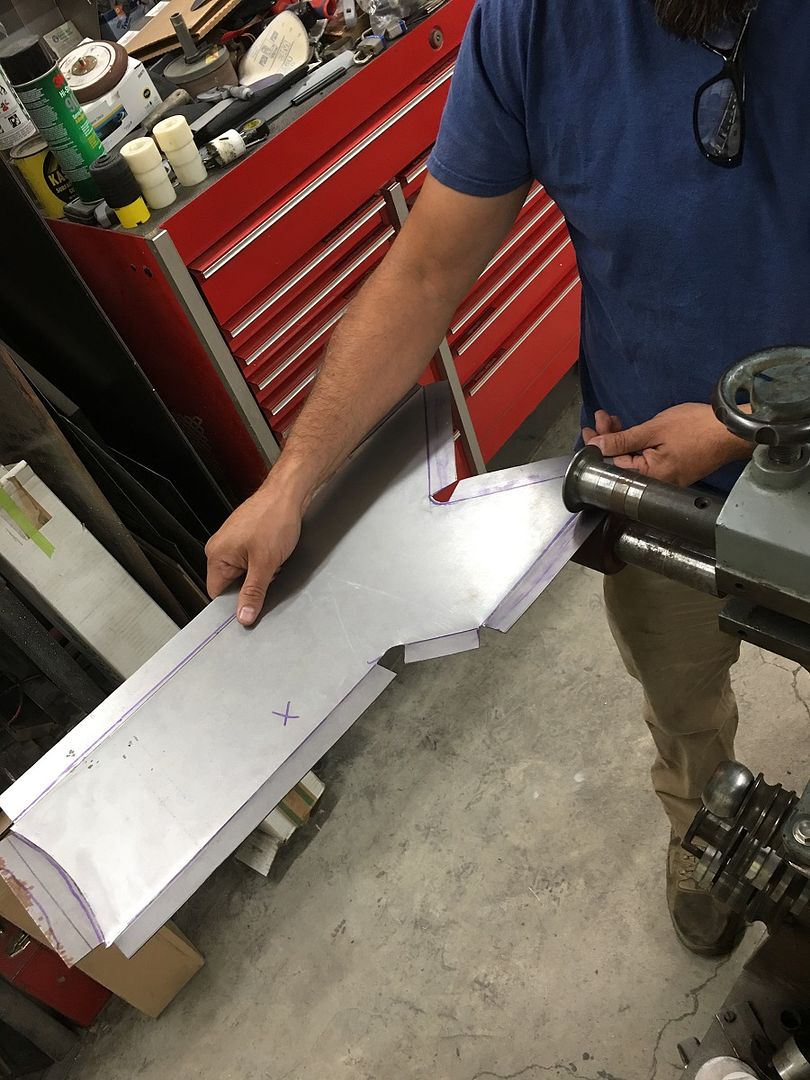 Since everything is a tool, and we needed to fold down a bit of metal in the inside corner, a piece of angle is chosen for it's inside radius match and a body hammer with a nice barrel roll on it does the trick...  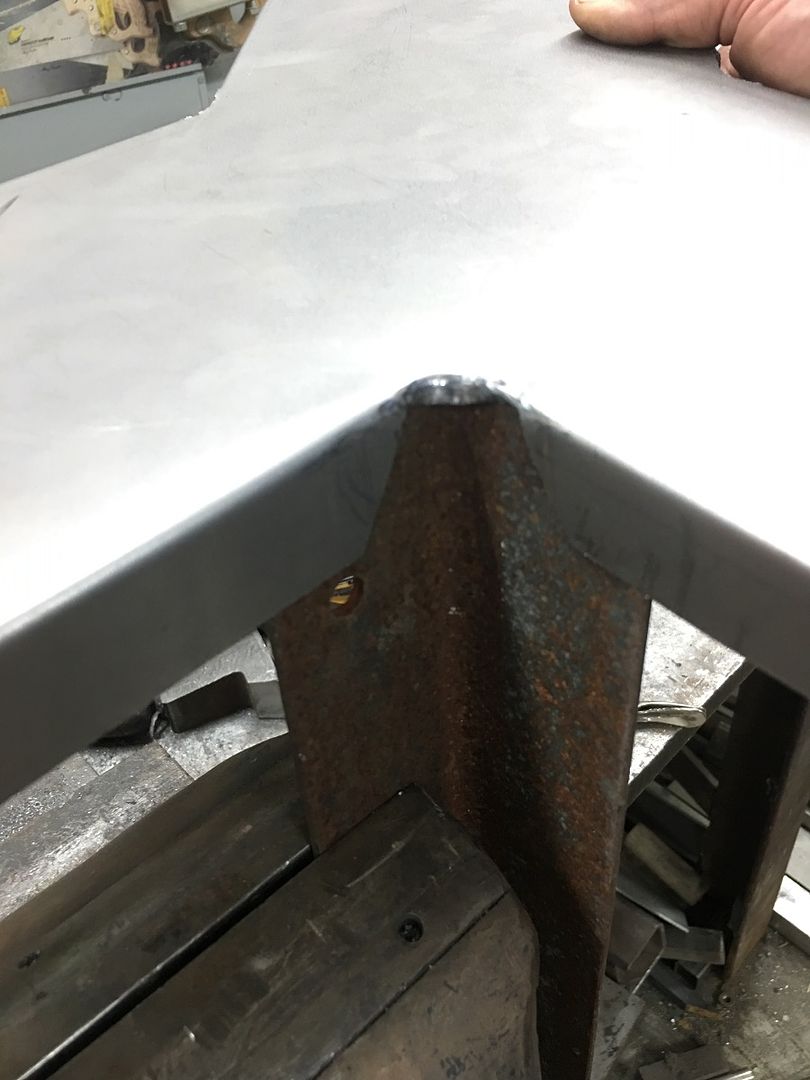 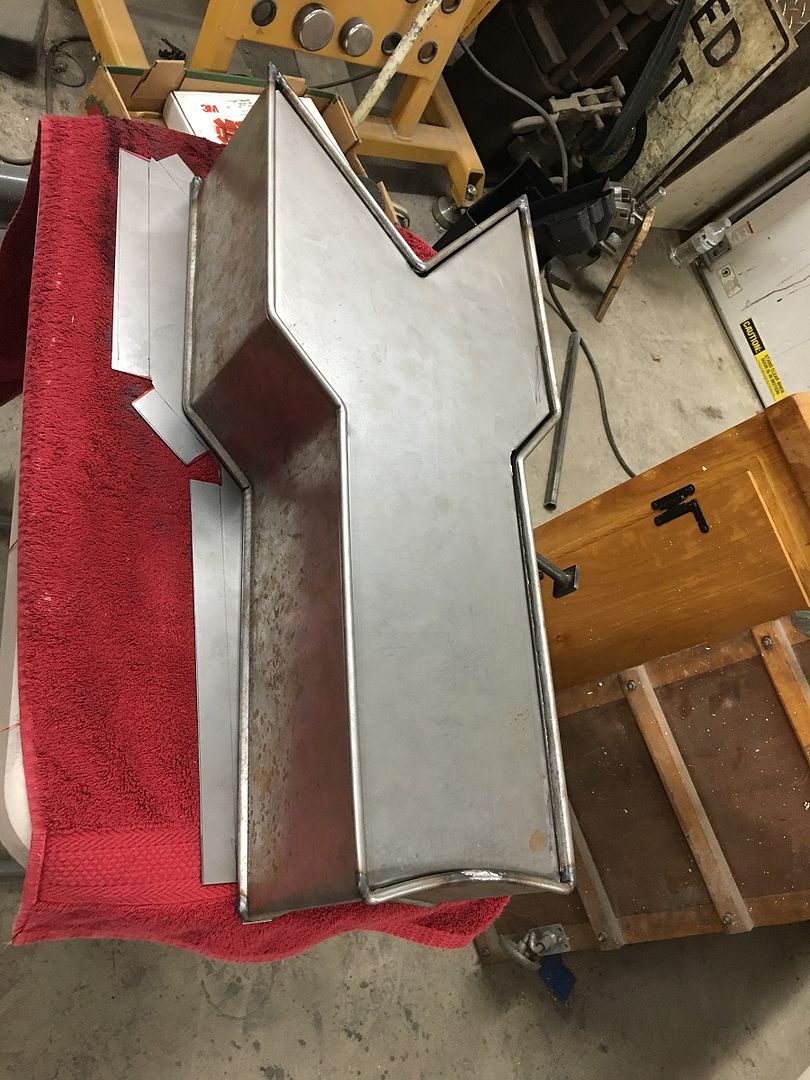 Side #2.... 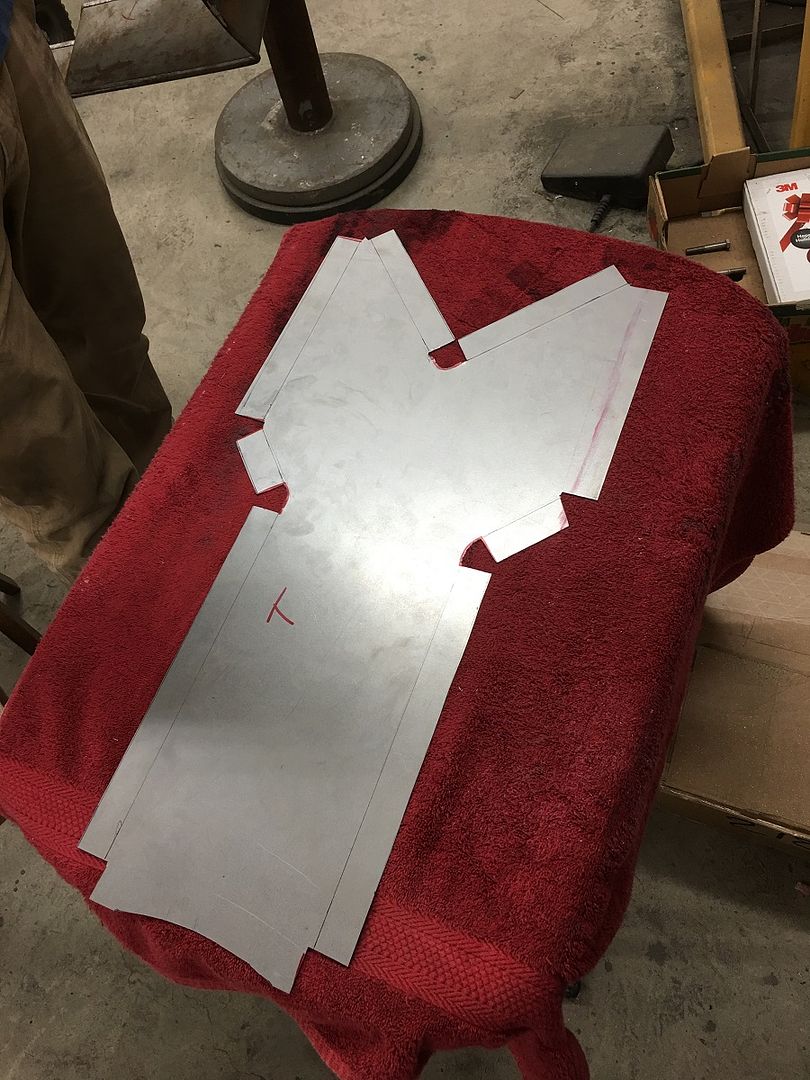 While he was busy with that, I continued on our speaker mount modification to the doors. Since we had cut away at the hinge mounting structure, we needed to add strength back in that surrounded the speaker. We chose a cone shape over cylindrical as we thought that would have less chance of collapse under stress. Our pattern is cut out and transferred to some 14 gauge cold rolled, the same thickness as the hinge structure.  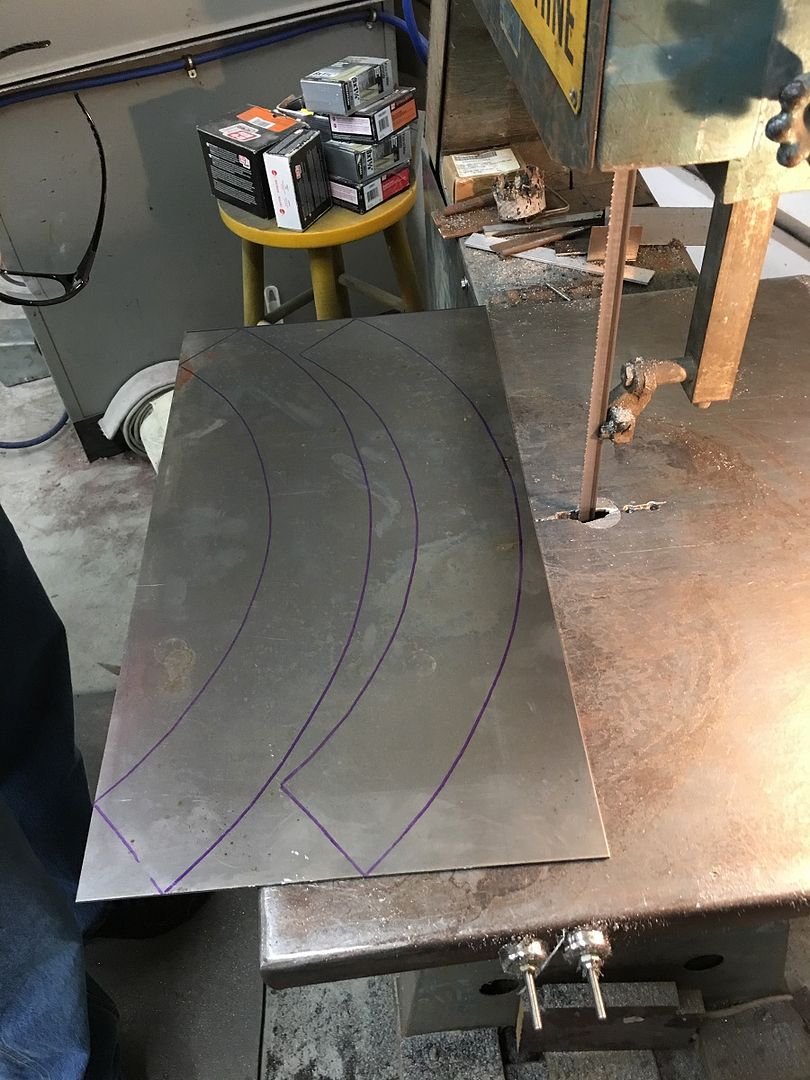 I forgot to get pictures of us rolling the cones, but basically as shown here with the pattern, the bend line was kept aligned with the vertex of the outer angle cuts, and slightly pressed, move and repeat, and continued until we have a good roll where the ends met up. 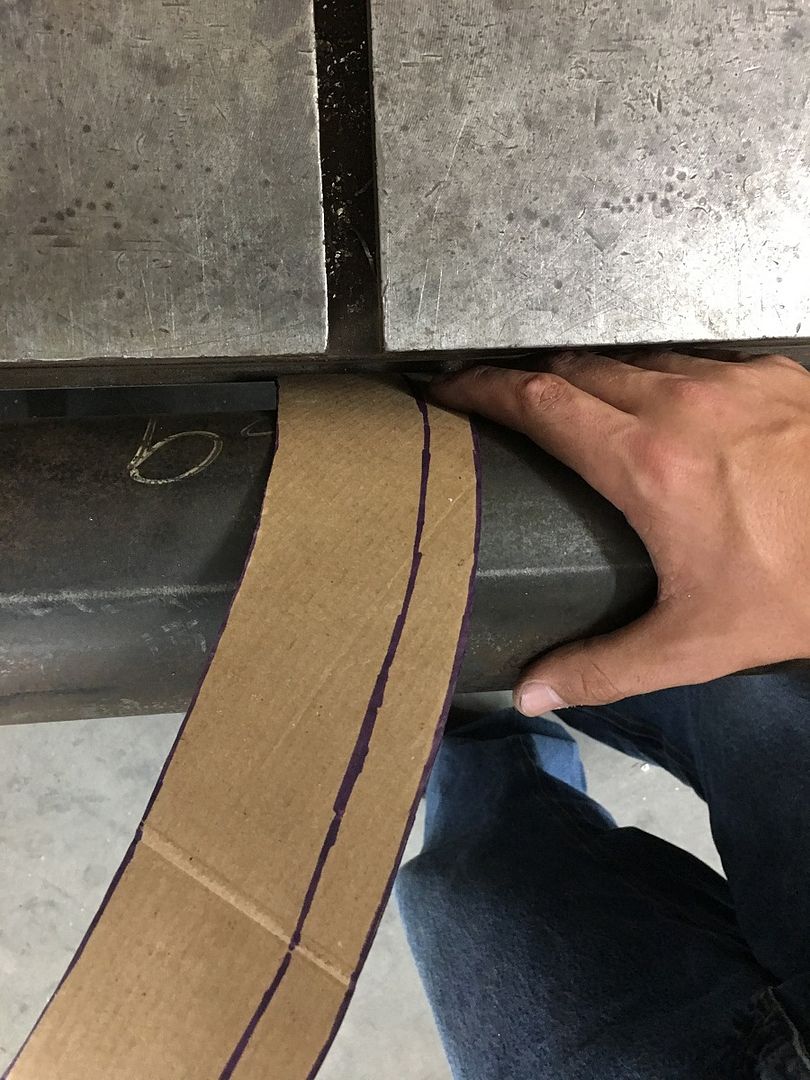 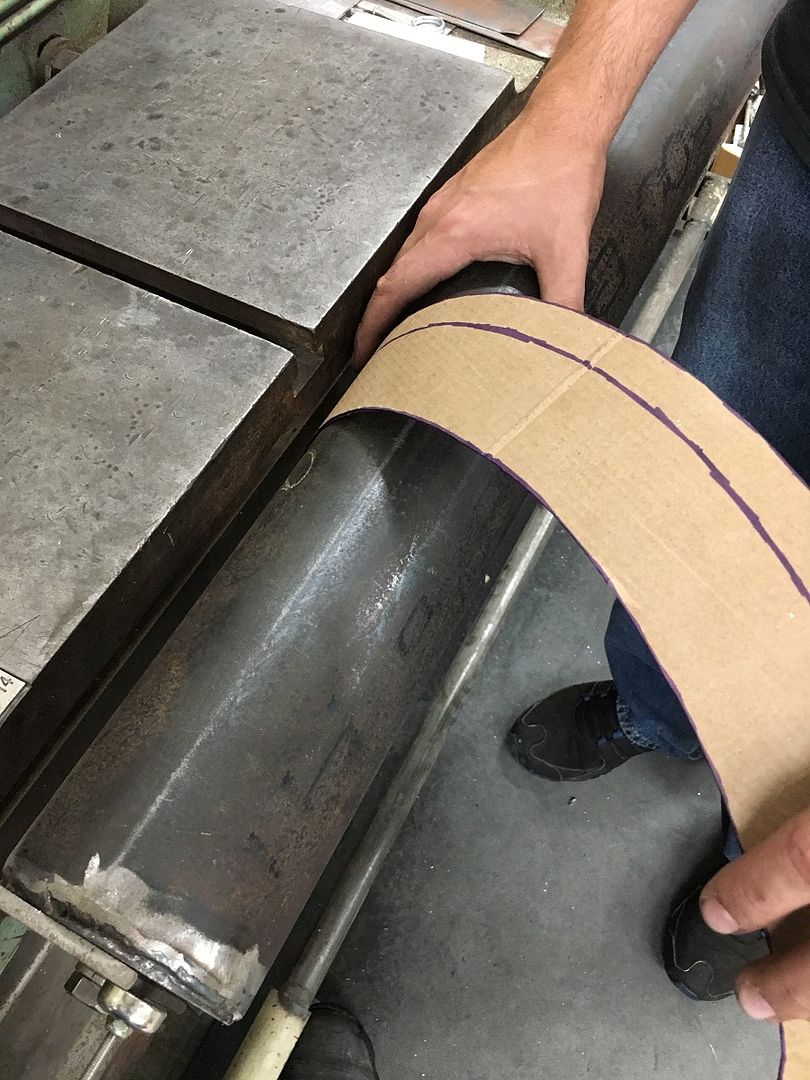 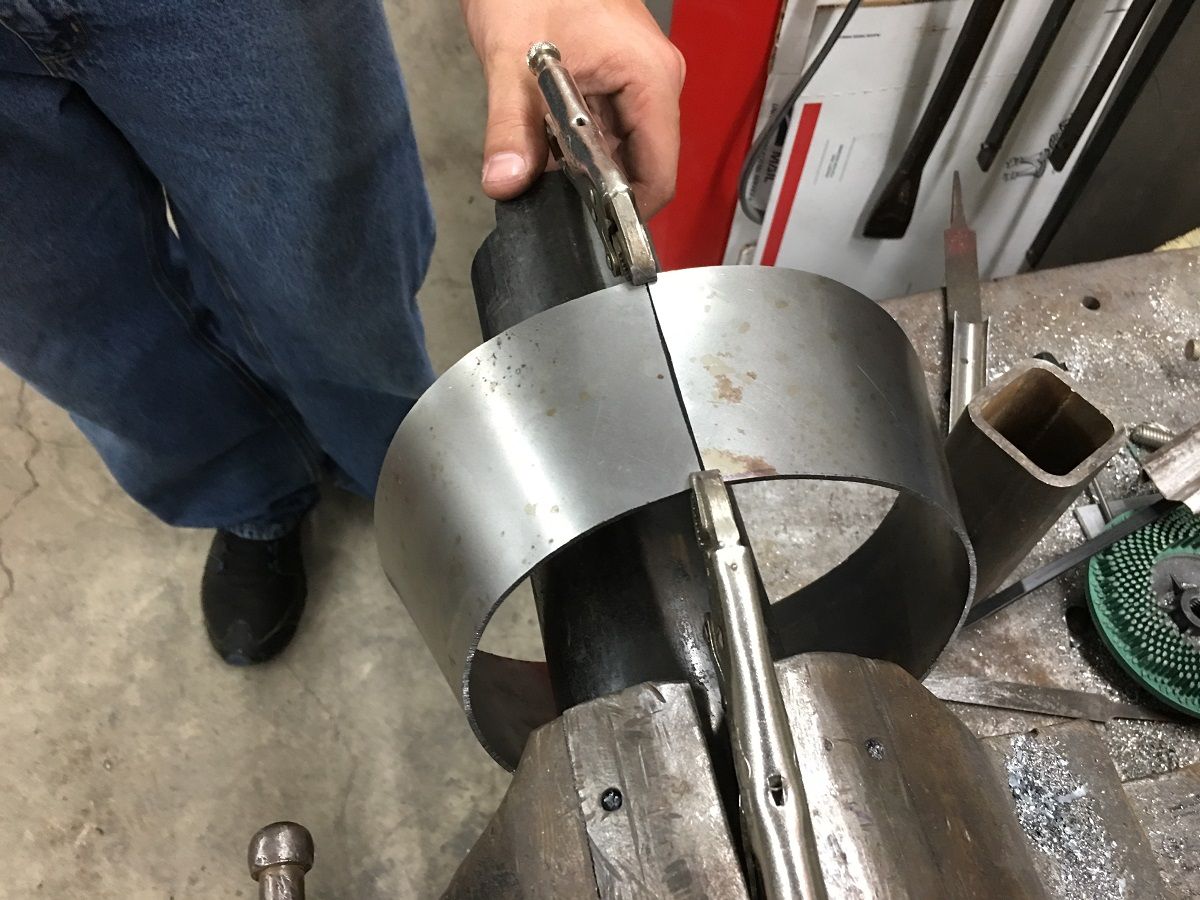 We plan on wire edge on the edge inside the square opening, so let's use gas welding for a more pliable weld area. 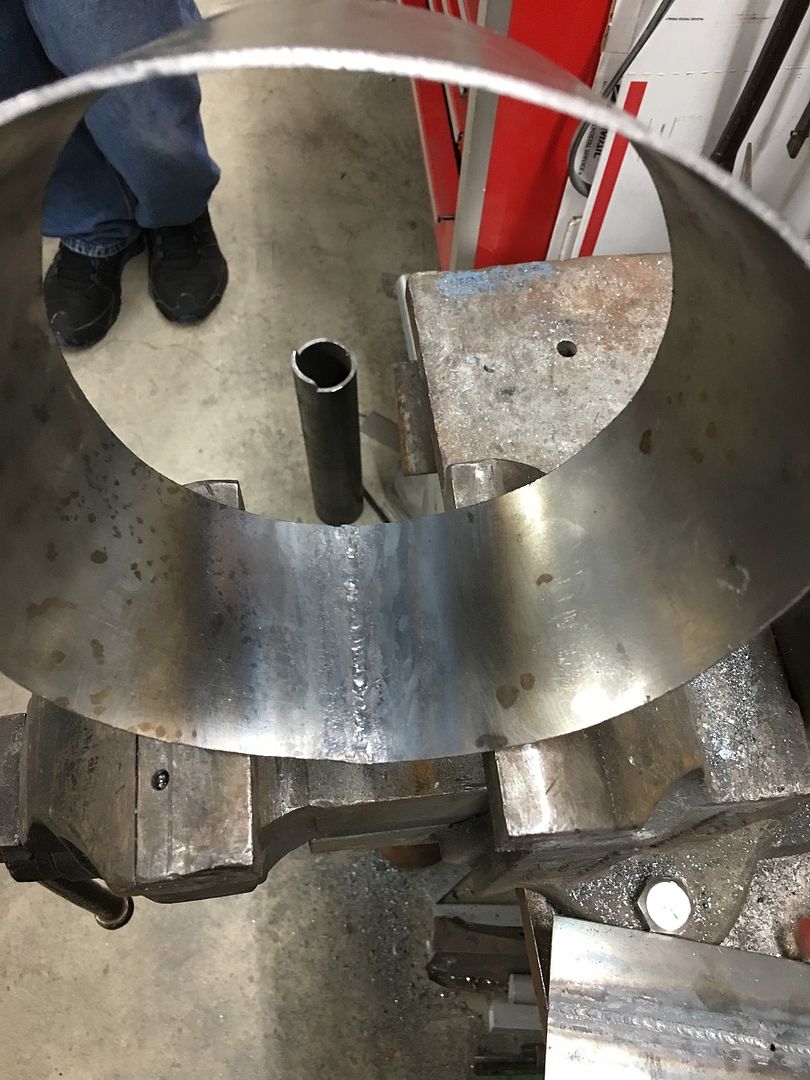 https://www.youtube.com/watch?v=hEWXNOFgSas The cone is then trimmed to fit the structure profile... 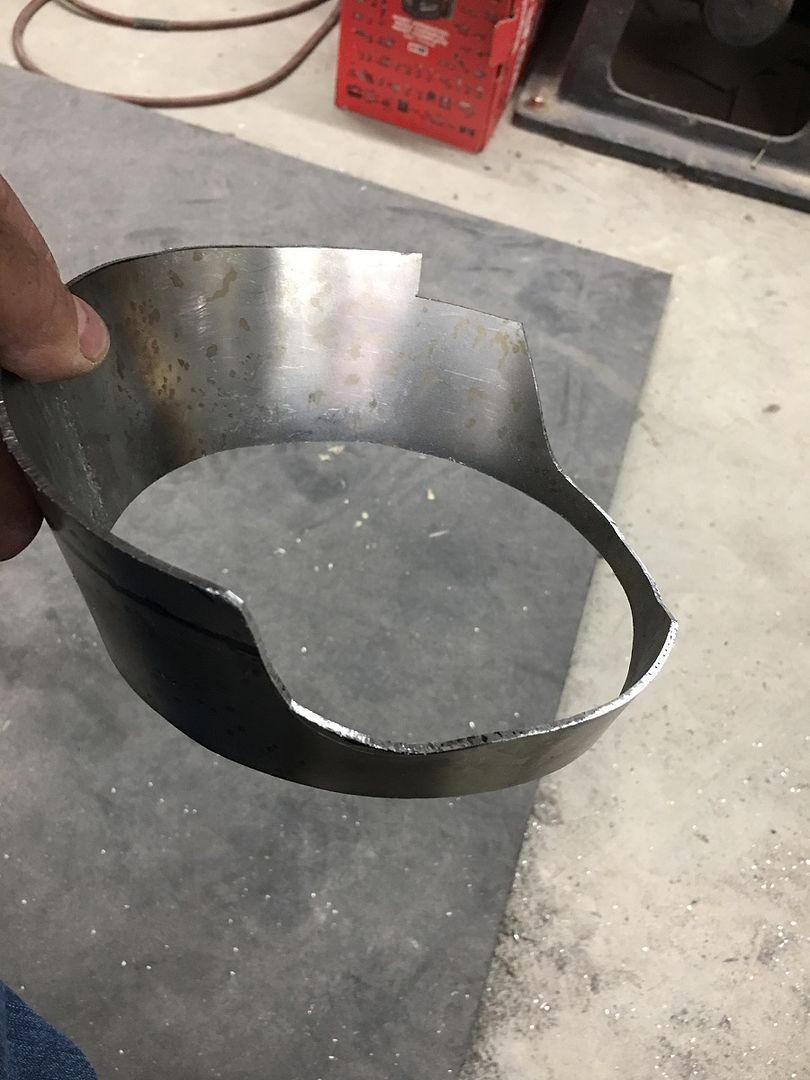 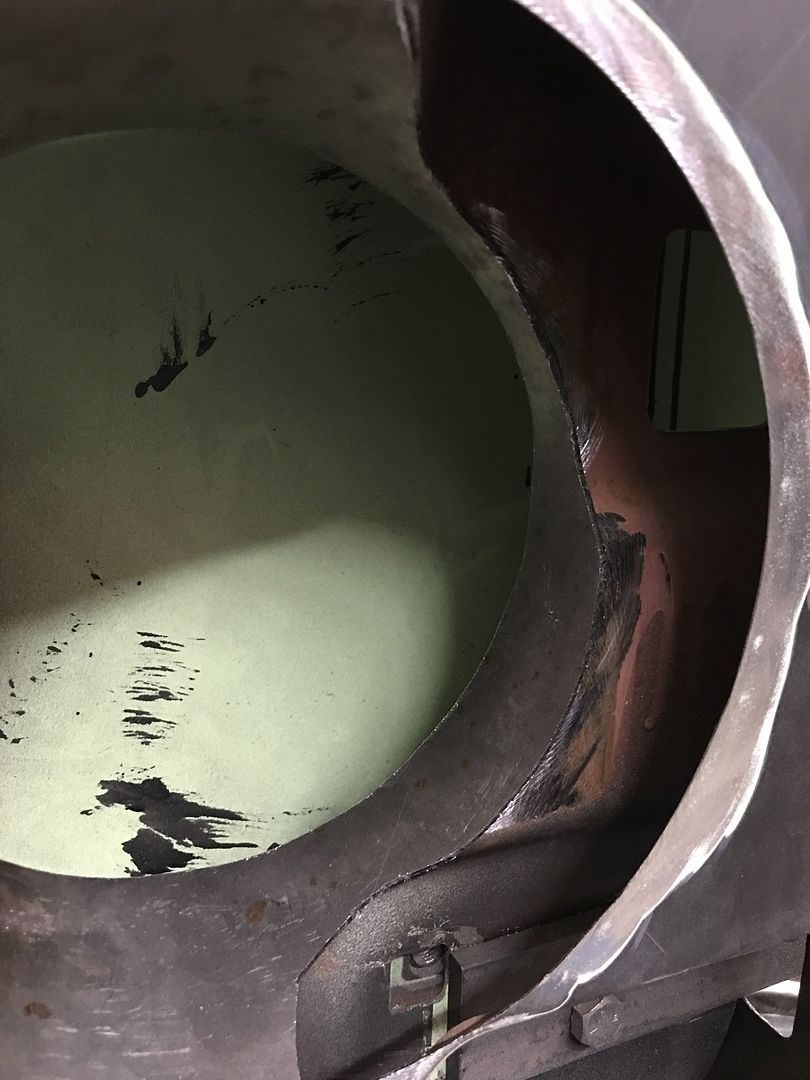 Flange is left for our wire edging of the open area...  The flange is tipped on the bead roller and then used the linear stretch dies in the Lennox to both stretch and tip the flange over to flat. 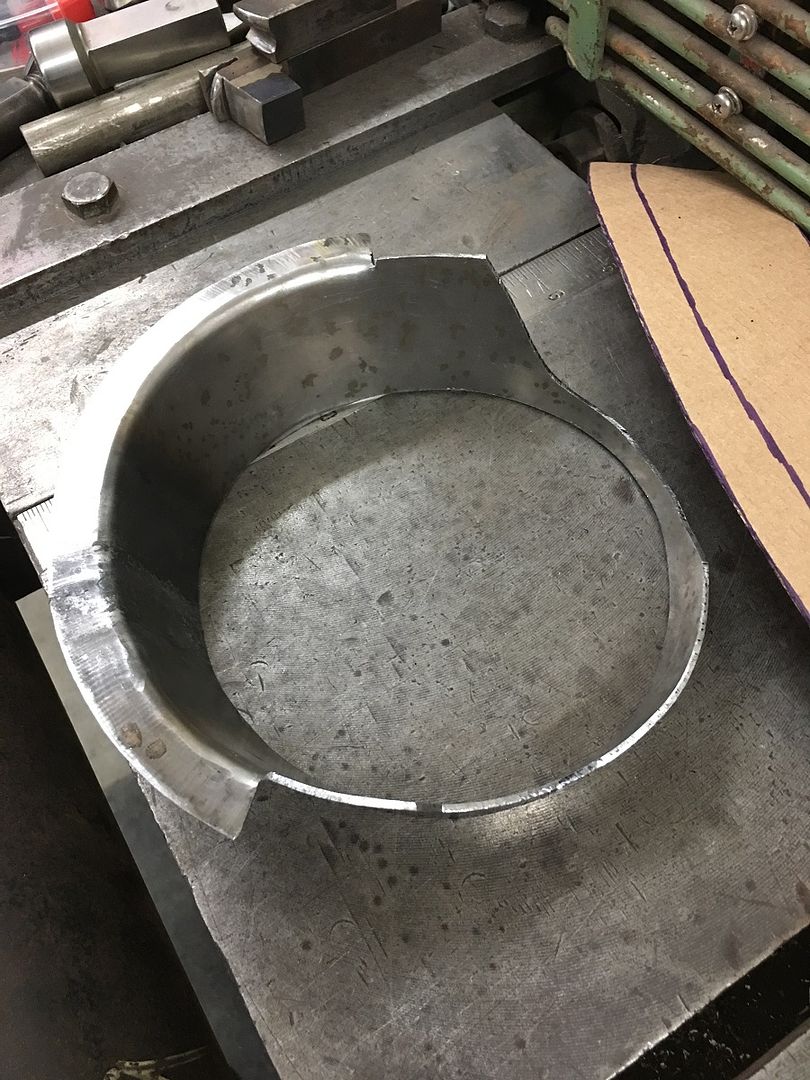 Then we use this modified Craftsman punch to hammer over a rounded void for the 3/16 wire to lay in.. 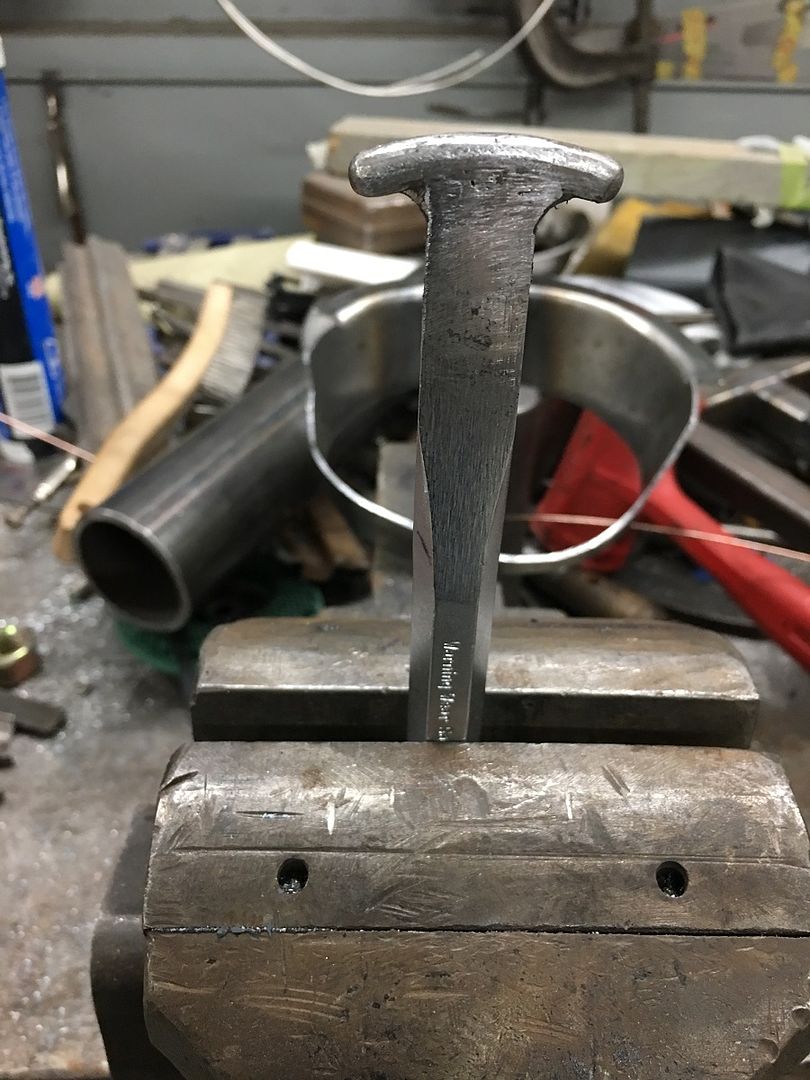 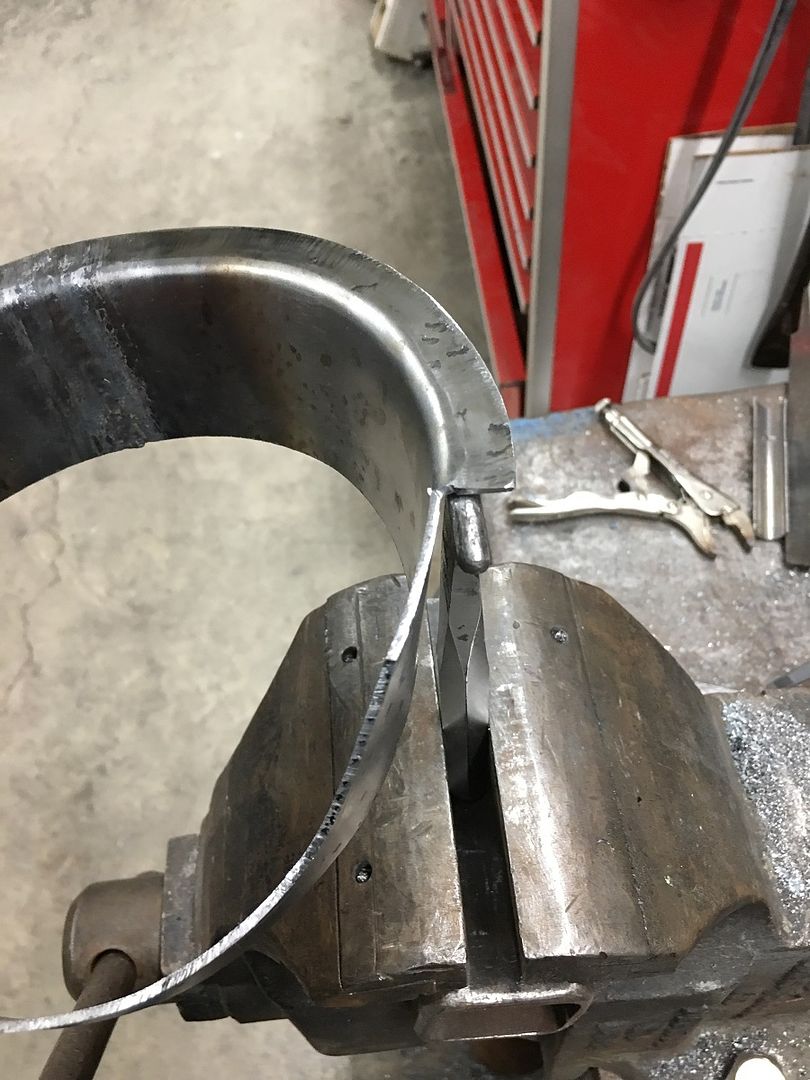 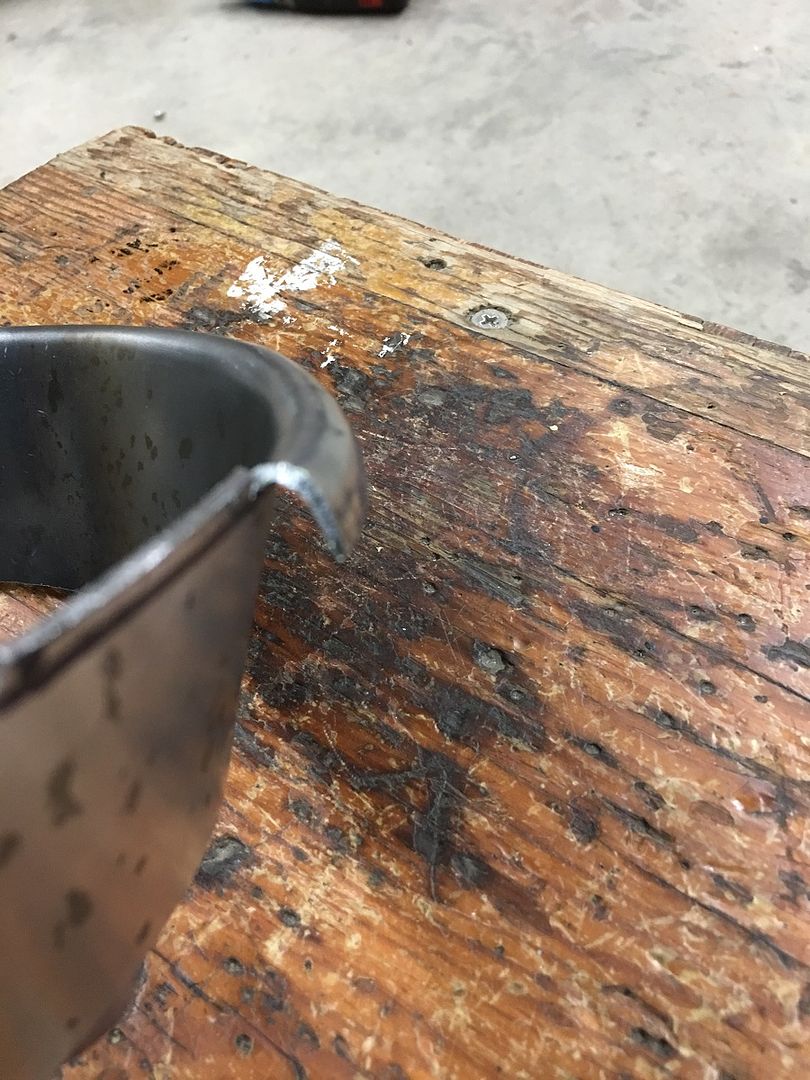 Then we have some modified vise grips that have a relief cut into the top so it won't slip off the wire when clamped. 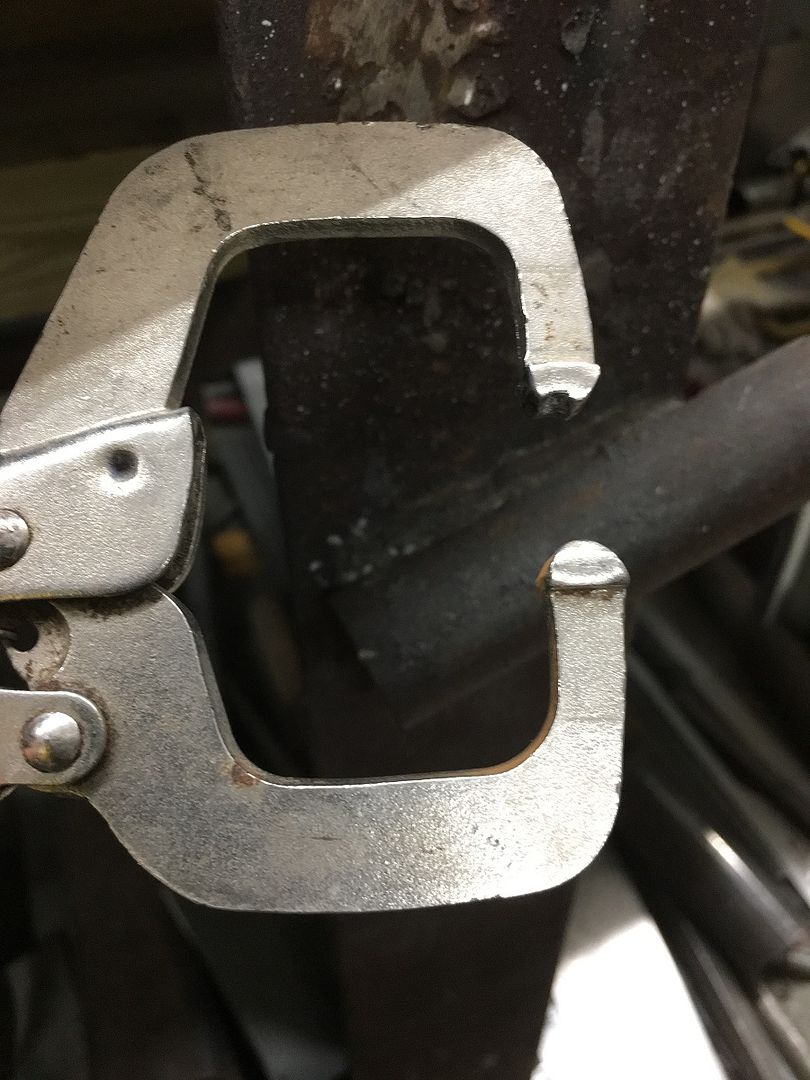 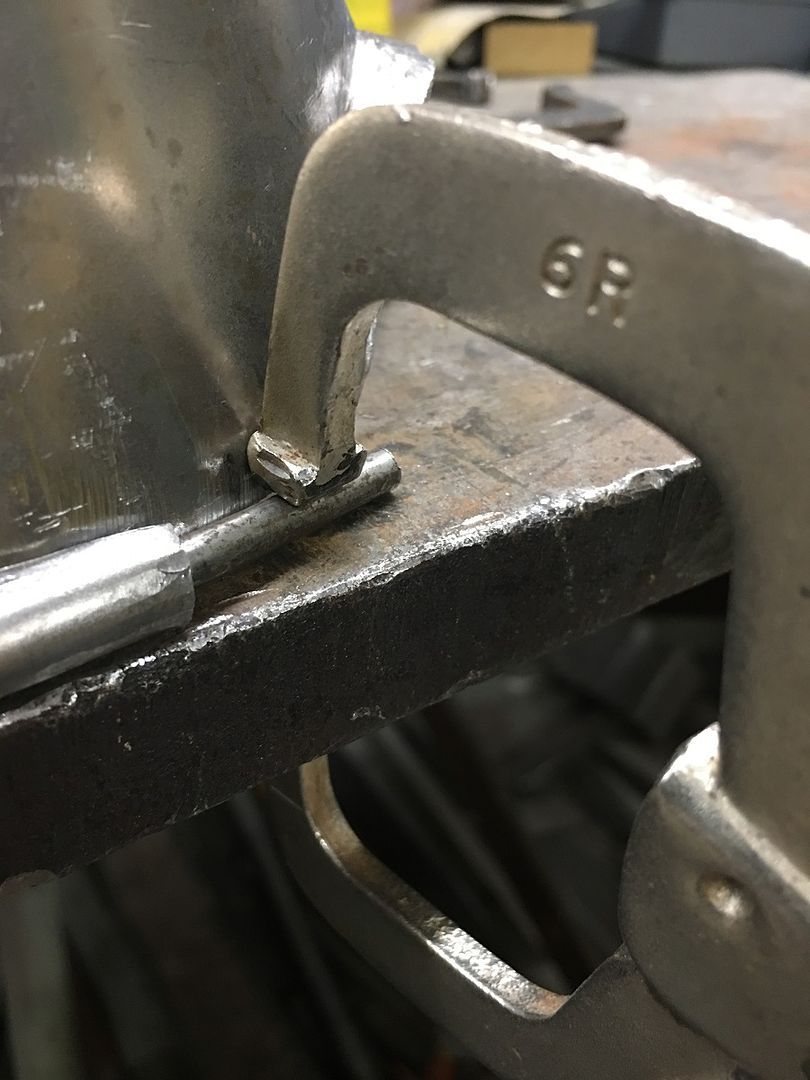 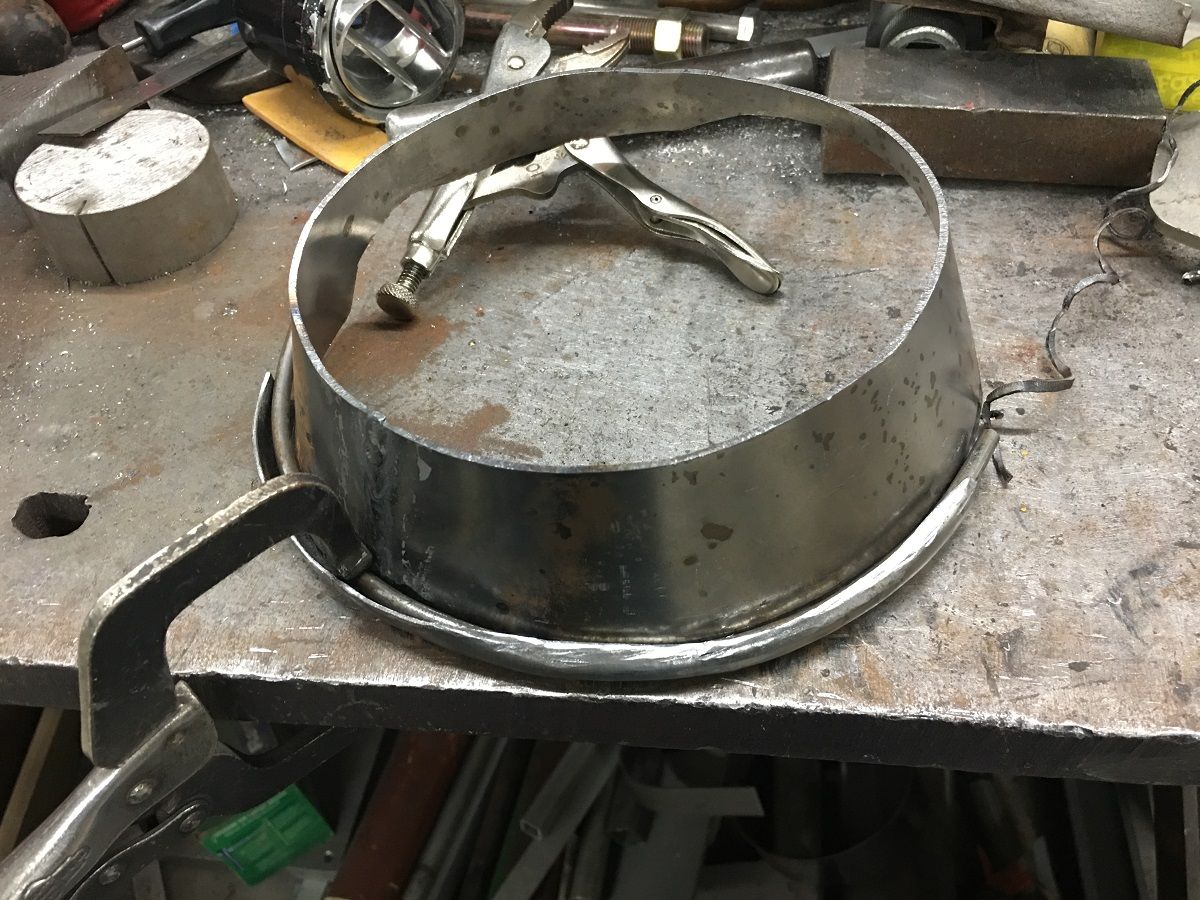 The wires were left long so they could better tie into the hinge structure, here the VEE relief is where the wire will weld to that structure. https://www.youtube.com/watch?v=mEVDpRCER54 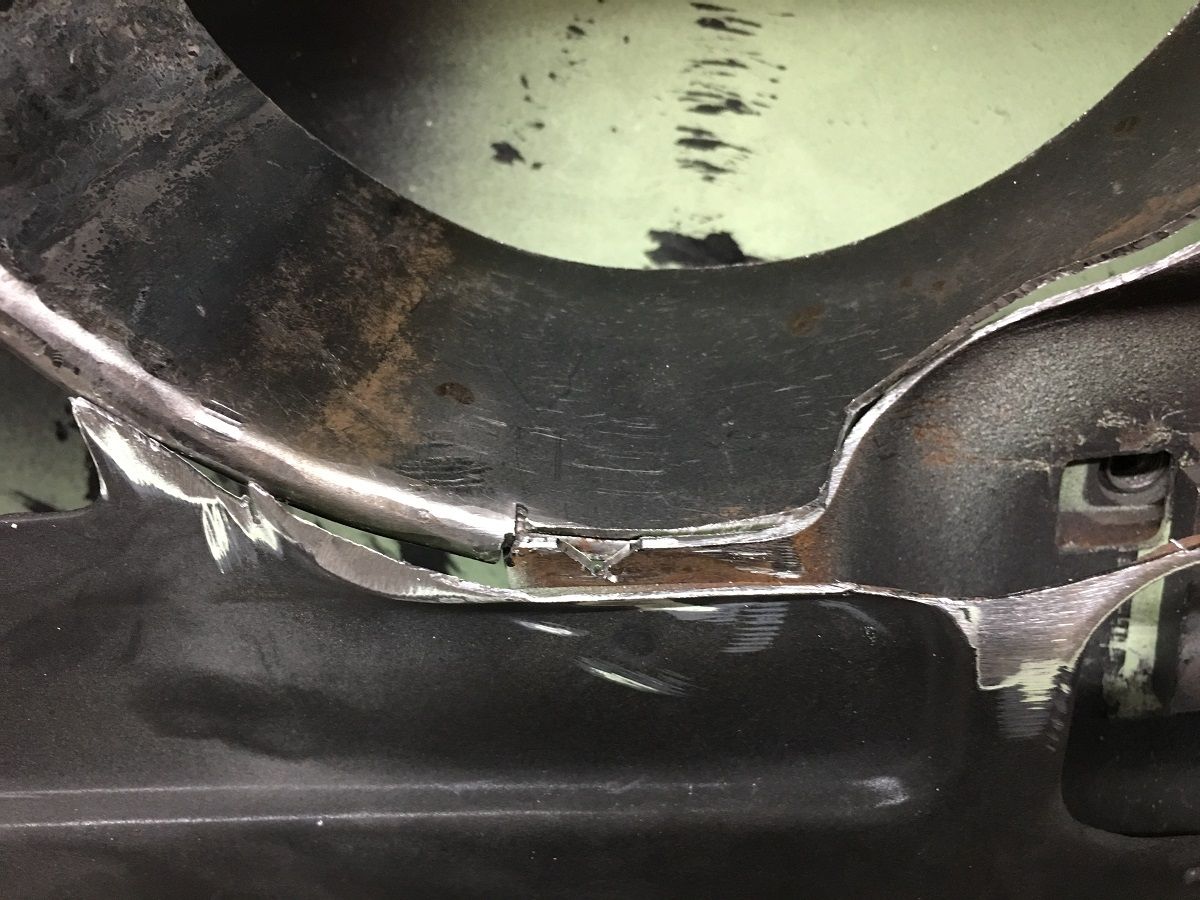 Tacked in place with the MIG, then TIG welded.... 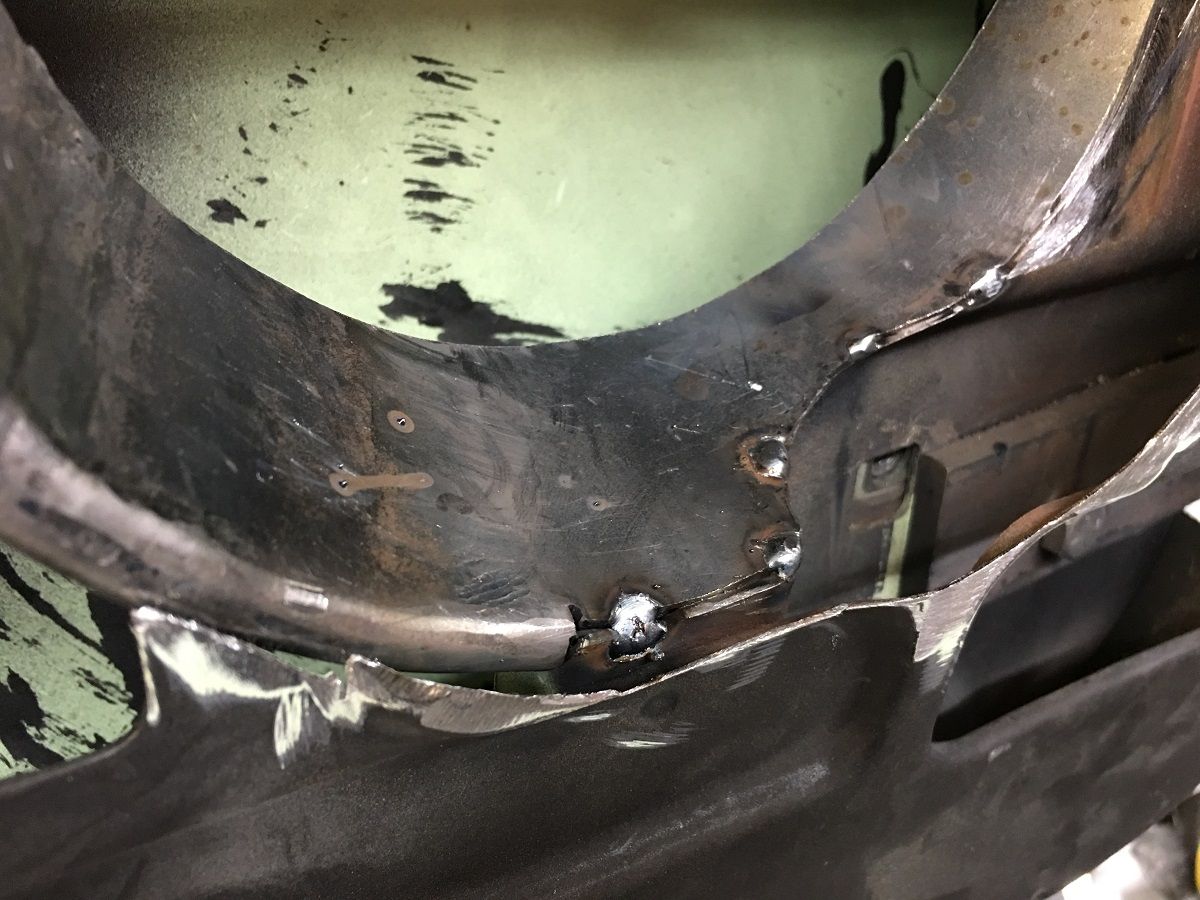 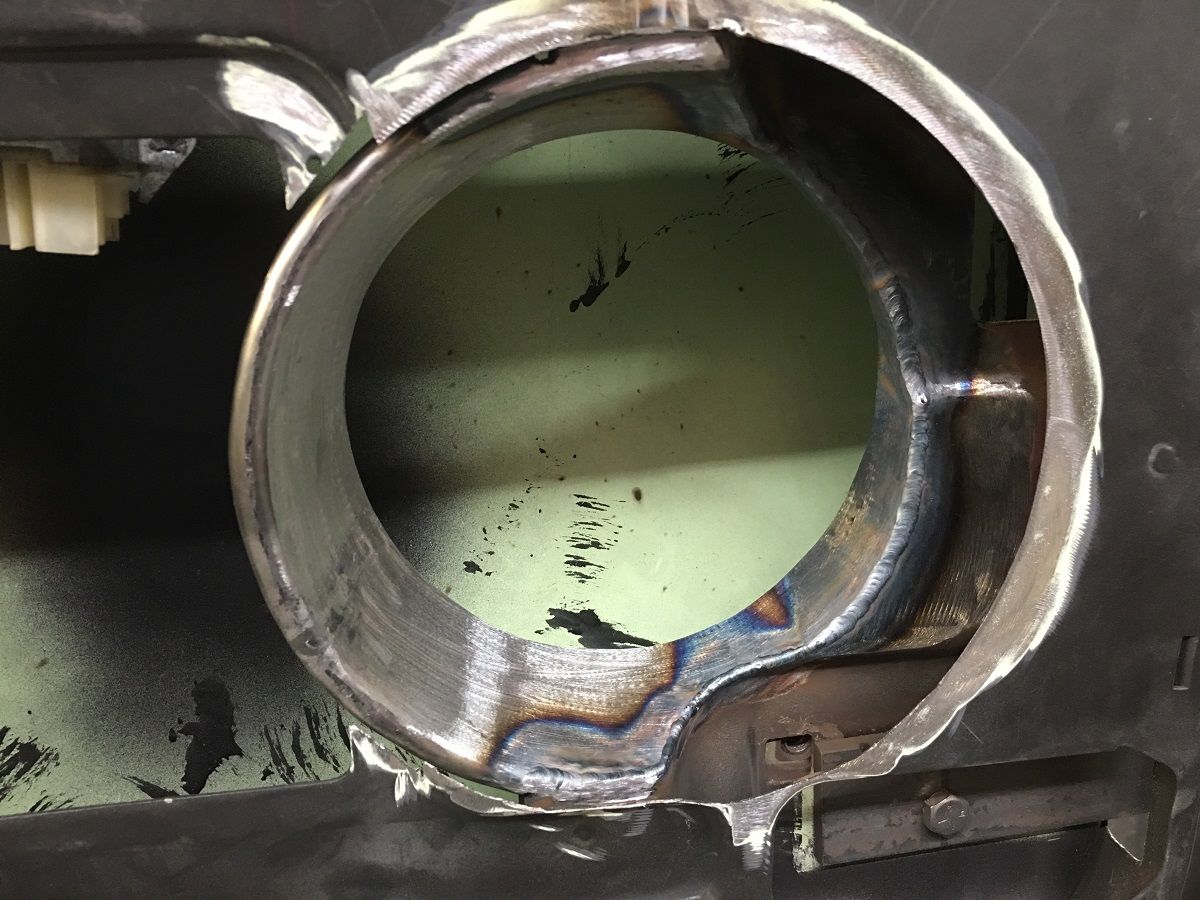 All cleaned up and then primed with some epoxy primer before we weld the speaker mounting ring in place. 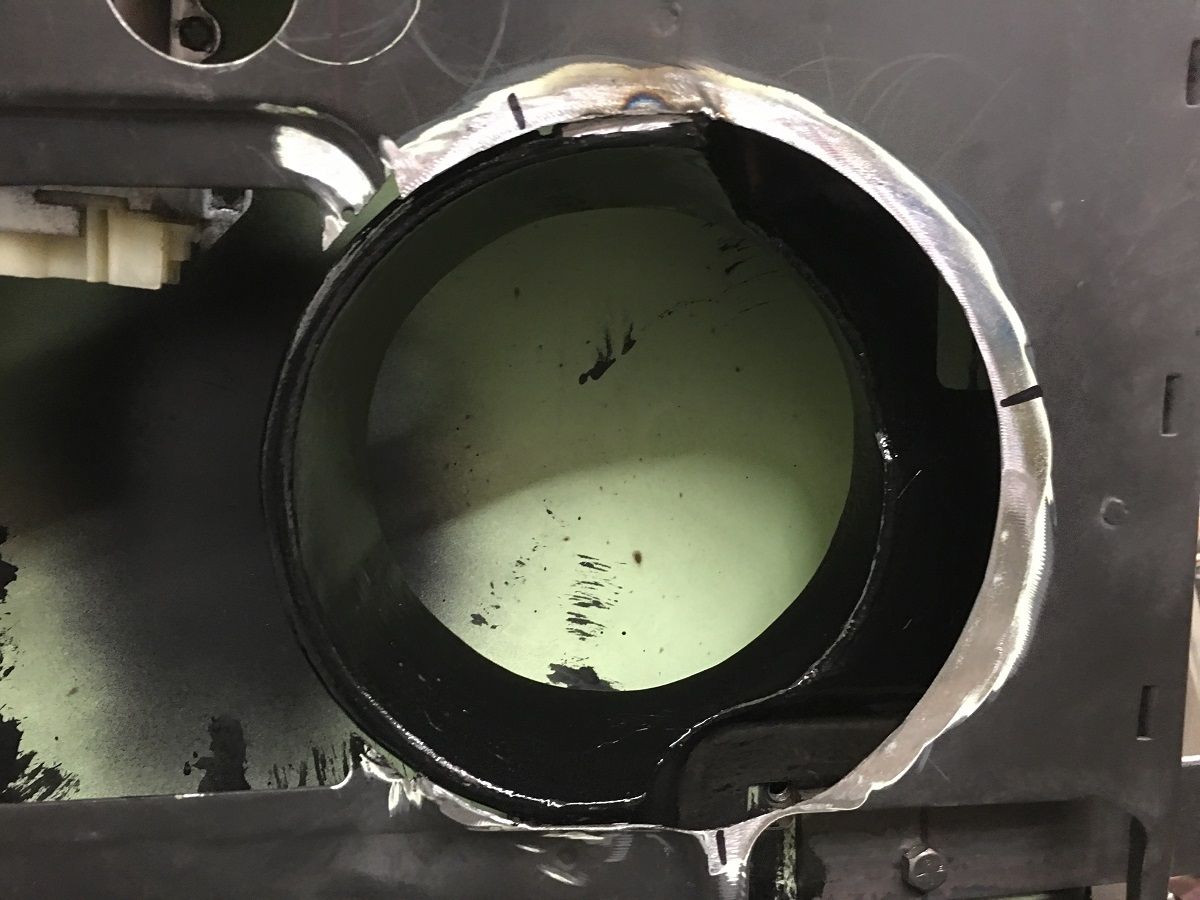
__________________
Robert |
|
|
|
|
06-18-2019, 10:47 PM
|
#5 |
|
Registered User
Join Date: Jan 2013
Location: Leonardtown, MD
Posts: 1,635
|
Re: 55 Wagon Progress
Back on our speaker mounting ring, we welded on some 8-32 hex nuts on the back side....
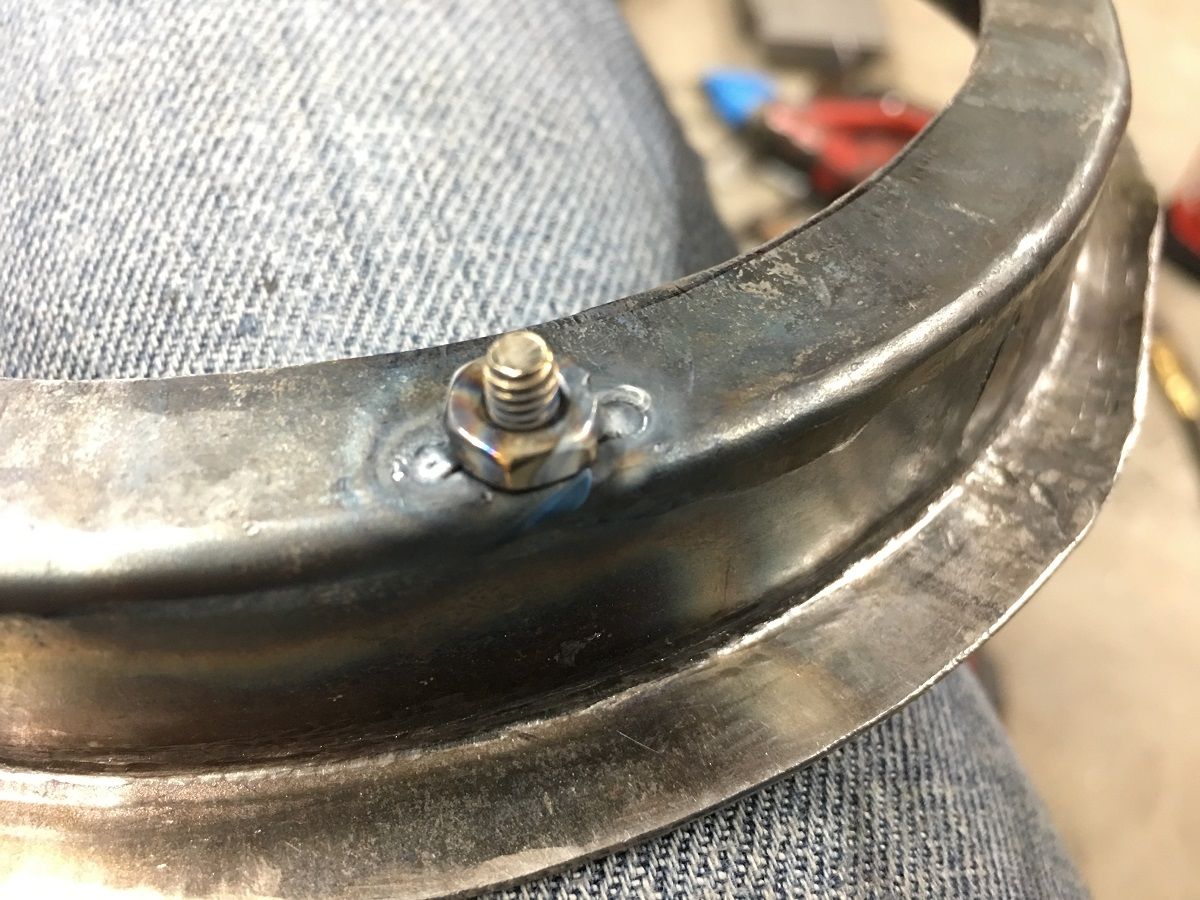 Then the ring is TIG welded in the door... 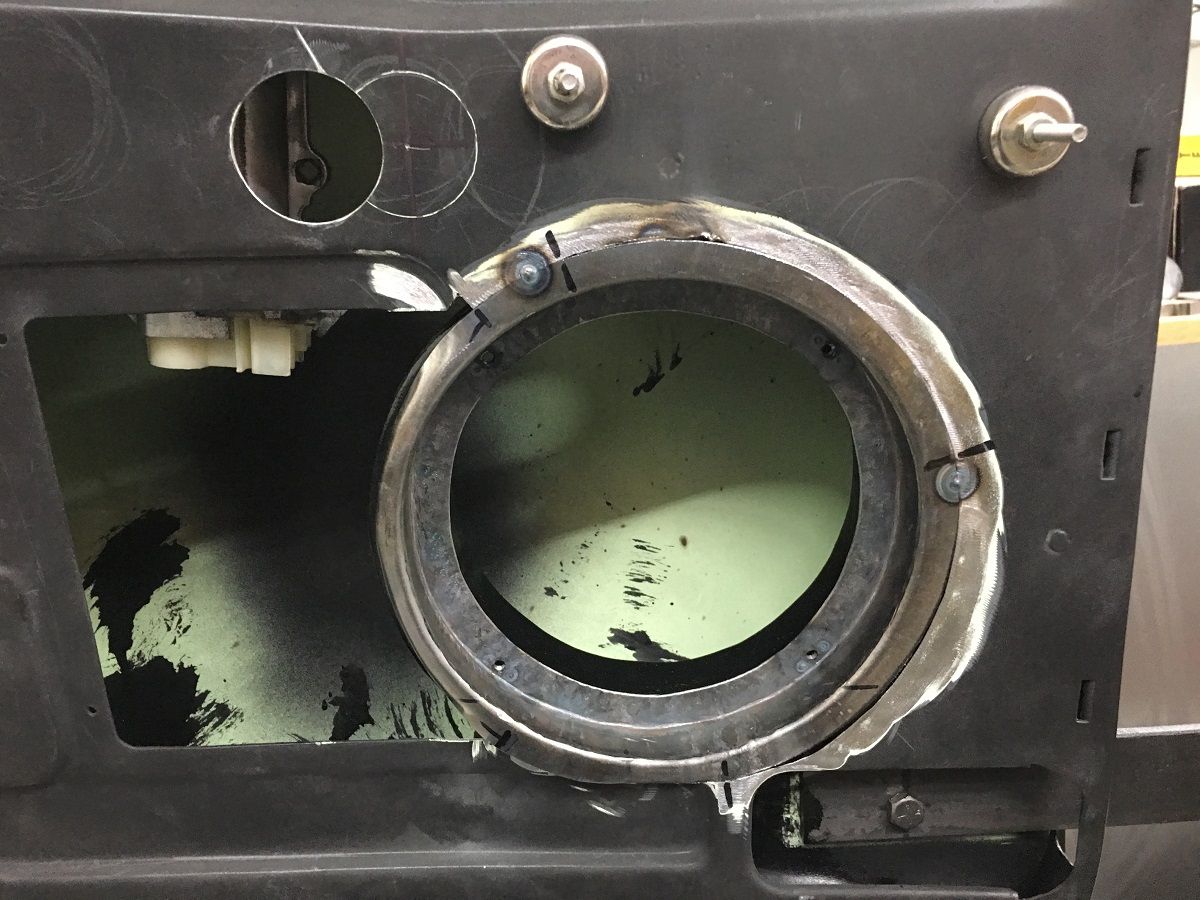 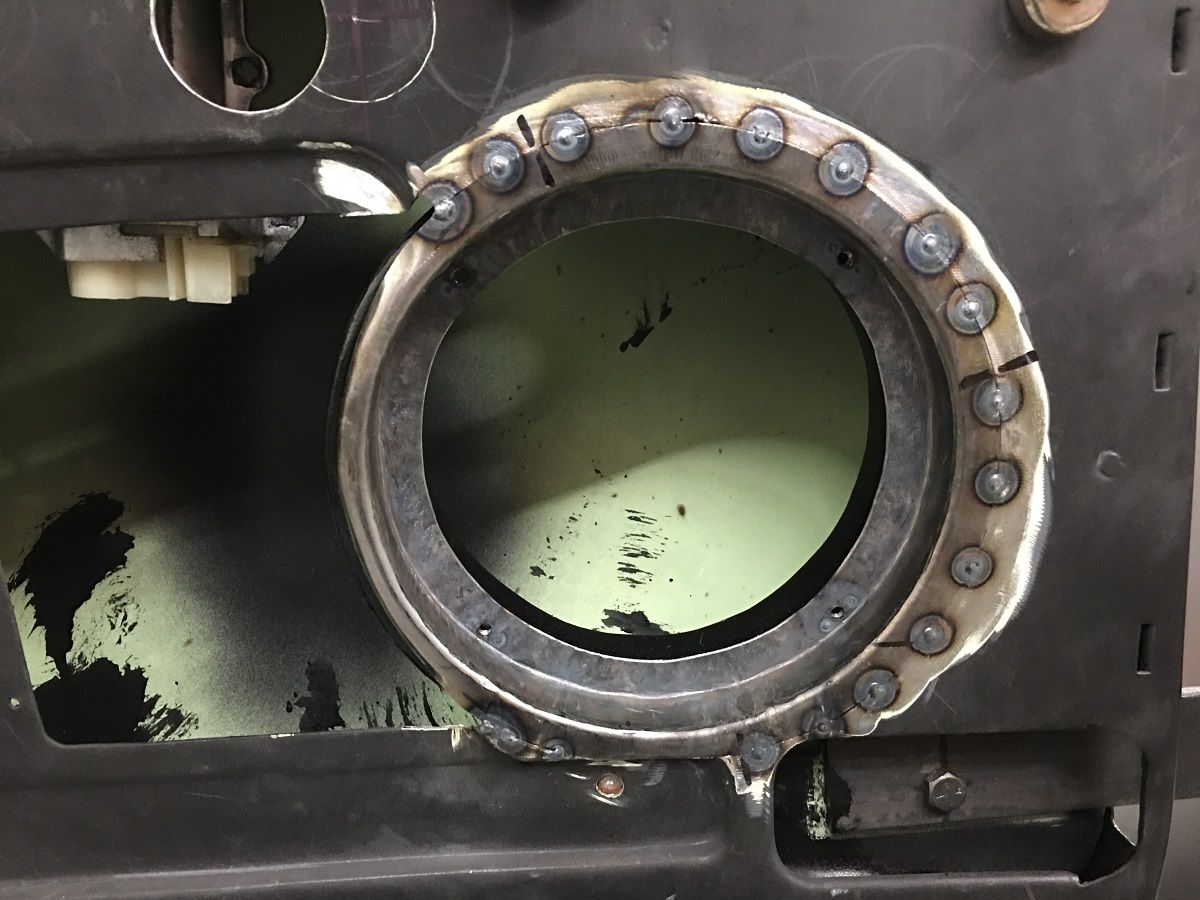 After welding, the area is scuffed and brush painted using SPI epoxy primer. 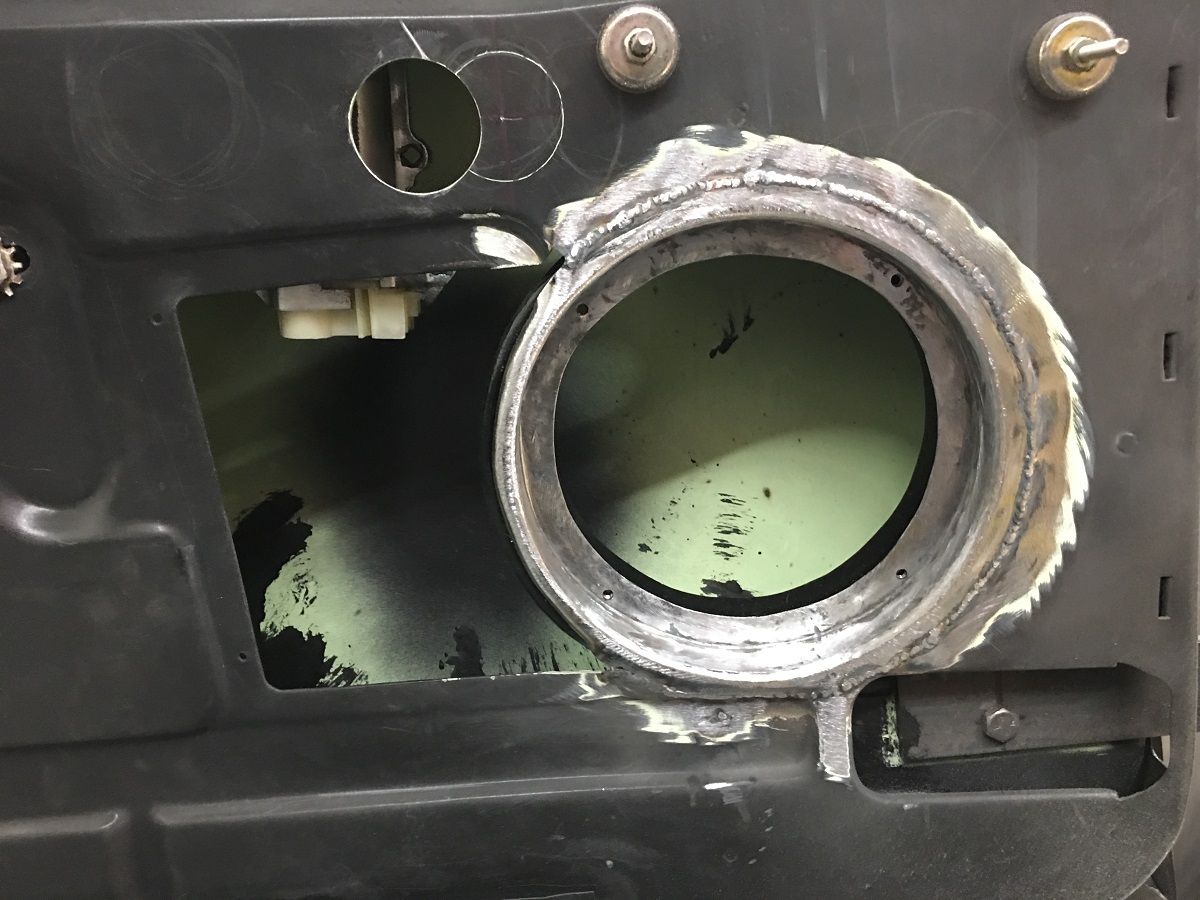 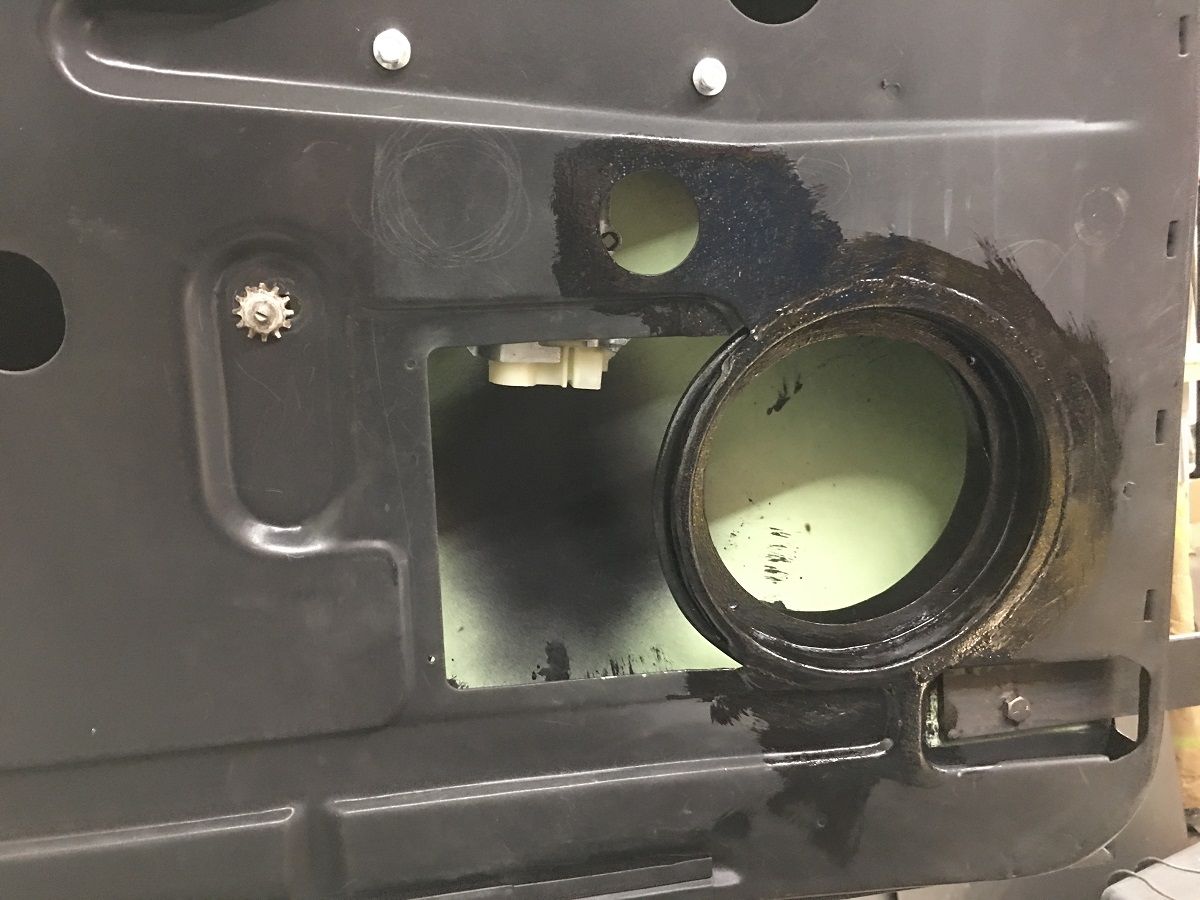 https://youtu.be/ywadRNLIywA 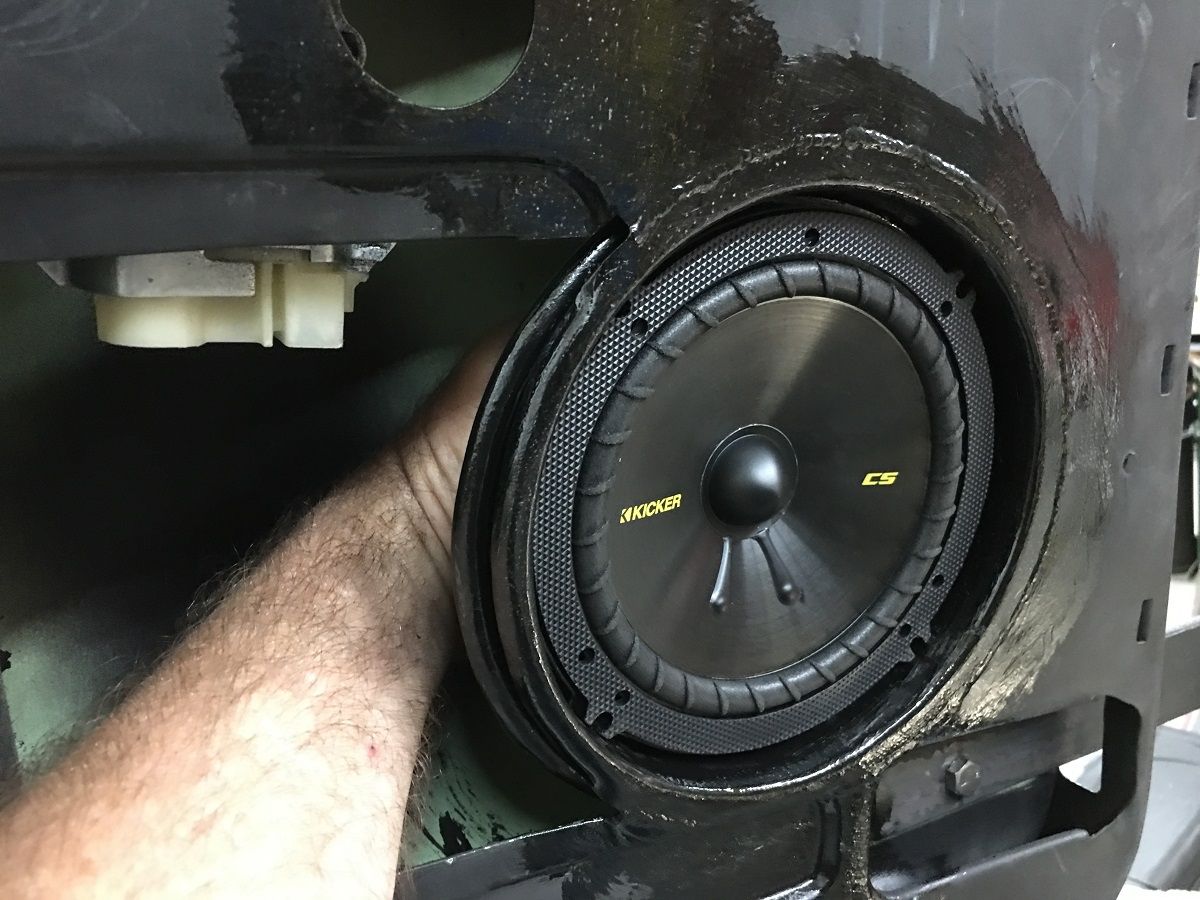 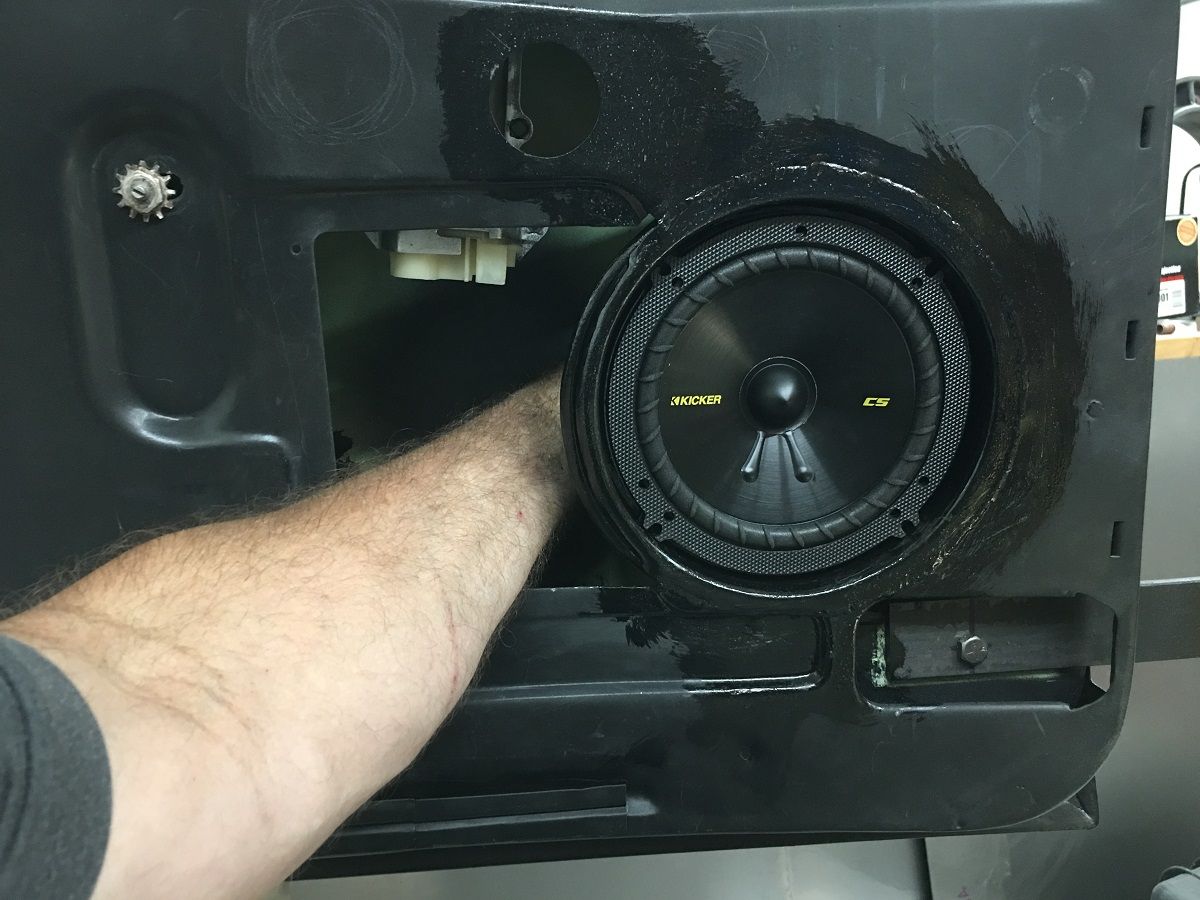
__________________
Robert |
|
|
|
|
07-01-2019, 10:32 PM
|
#6 |
|
Registered User
Join Date: Jan 2013
Location: Leonardtown, MD
Posts: 1,635
|
Re: 55 Wagon Progress
Passenger door modifications, inner structure added...
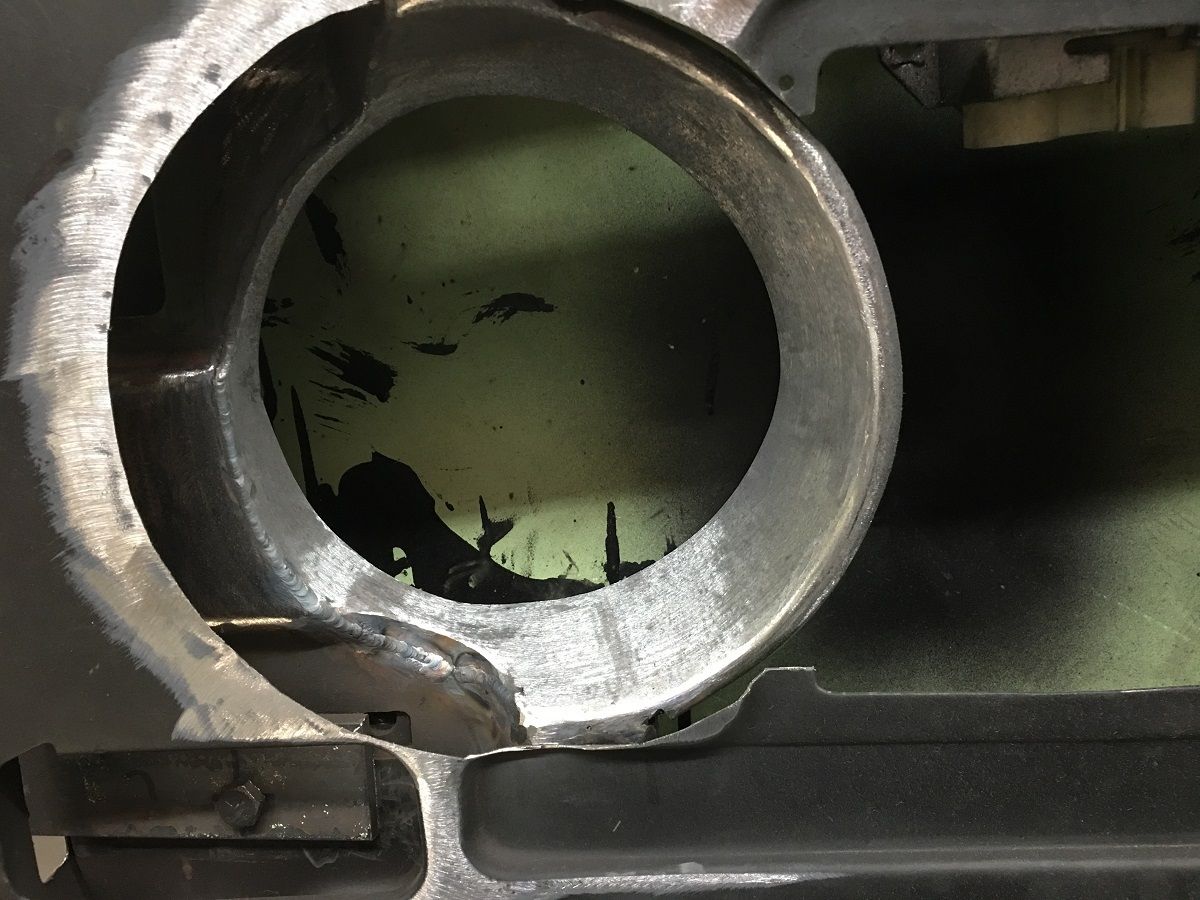 …..speaker mounting ring welded in place and brush painted using SPI epoxy primer.. 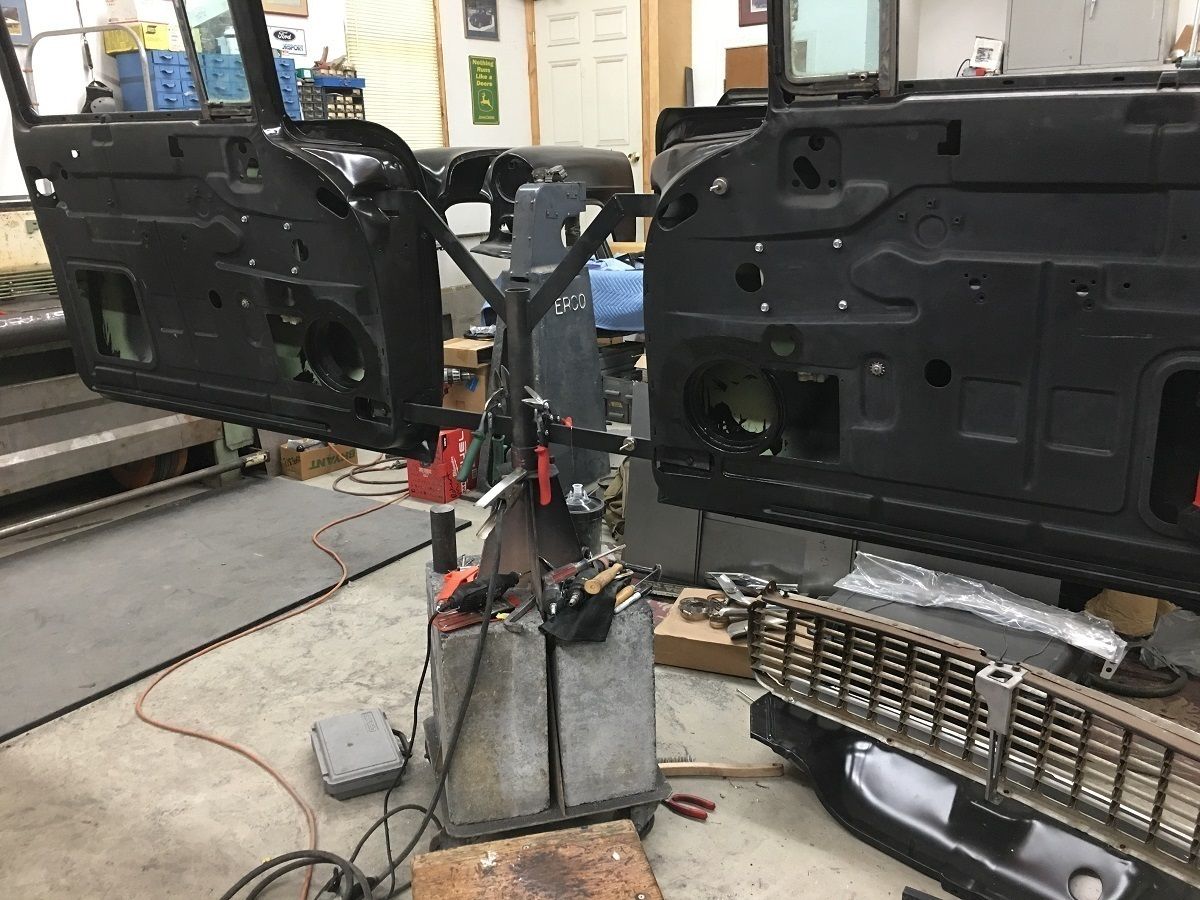 In our attempt to finalize all the needed fabrications before getting deep into paint mode, we had some clearance issues to deal with on the Vintage Air bracket for the AC compressor. The initial mockup showed that the upper mounting tab was too close to the tall valve covers we have on the 383 stroker. A half inch spacer under the intake mounting tab gives us about 1/4" clearance, and shows how much we need to modify the water pump mounting tab. 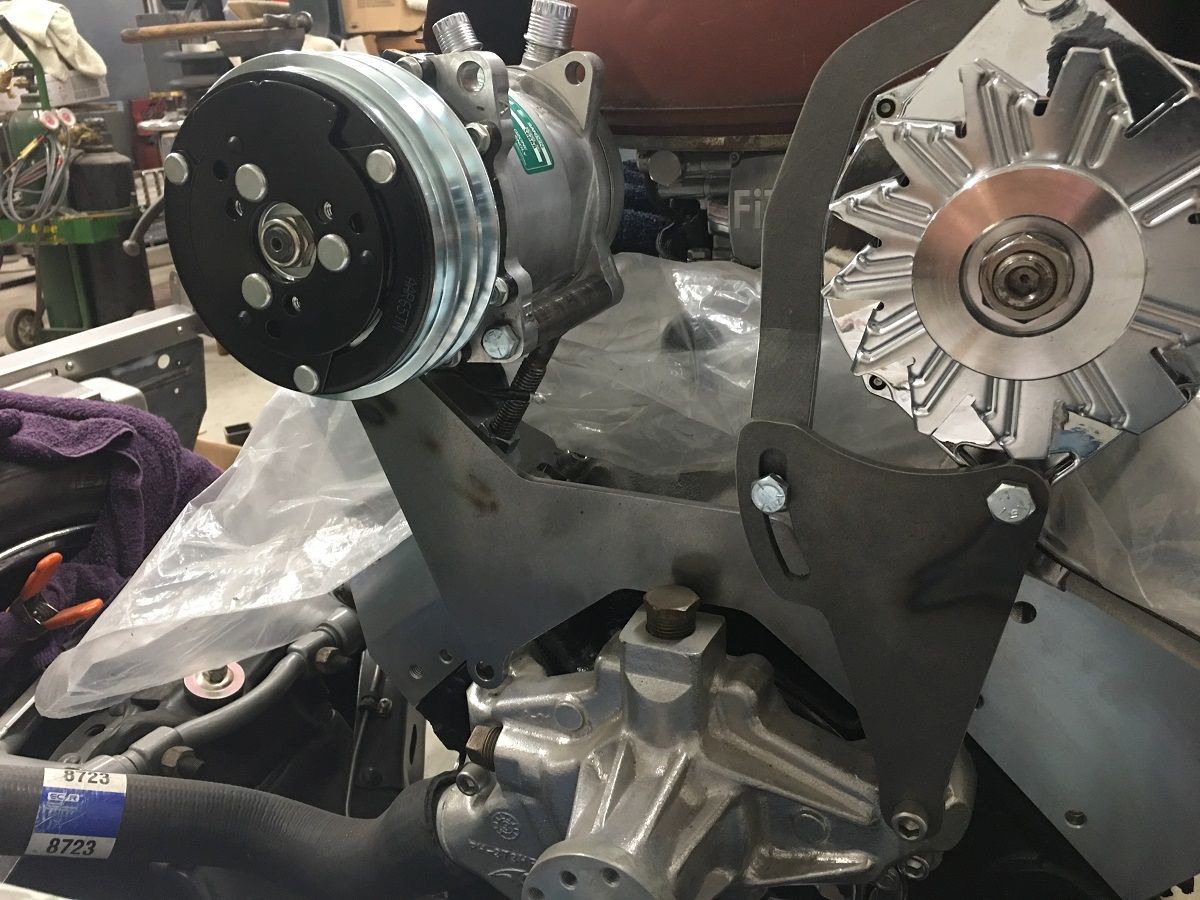 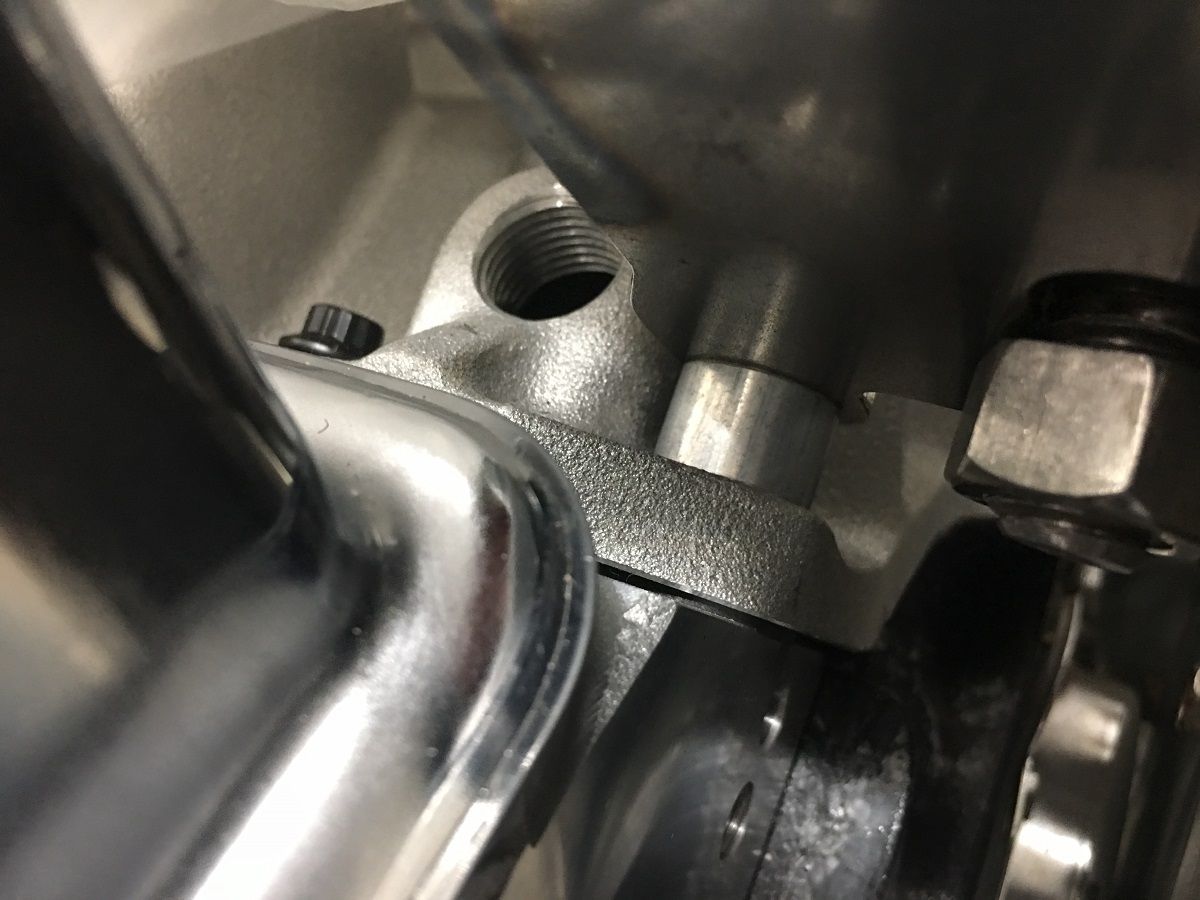 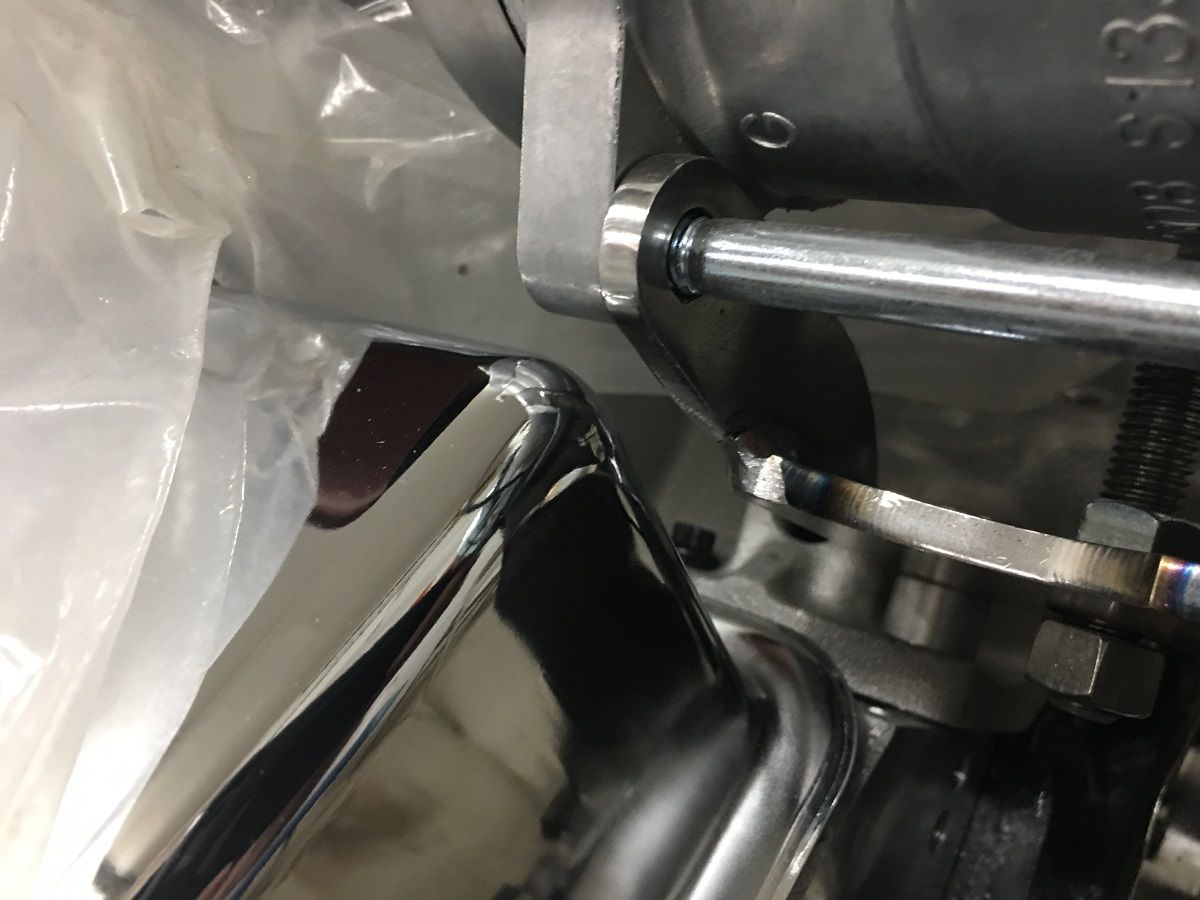 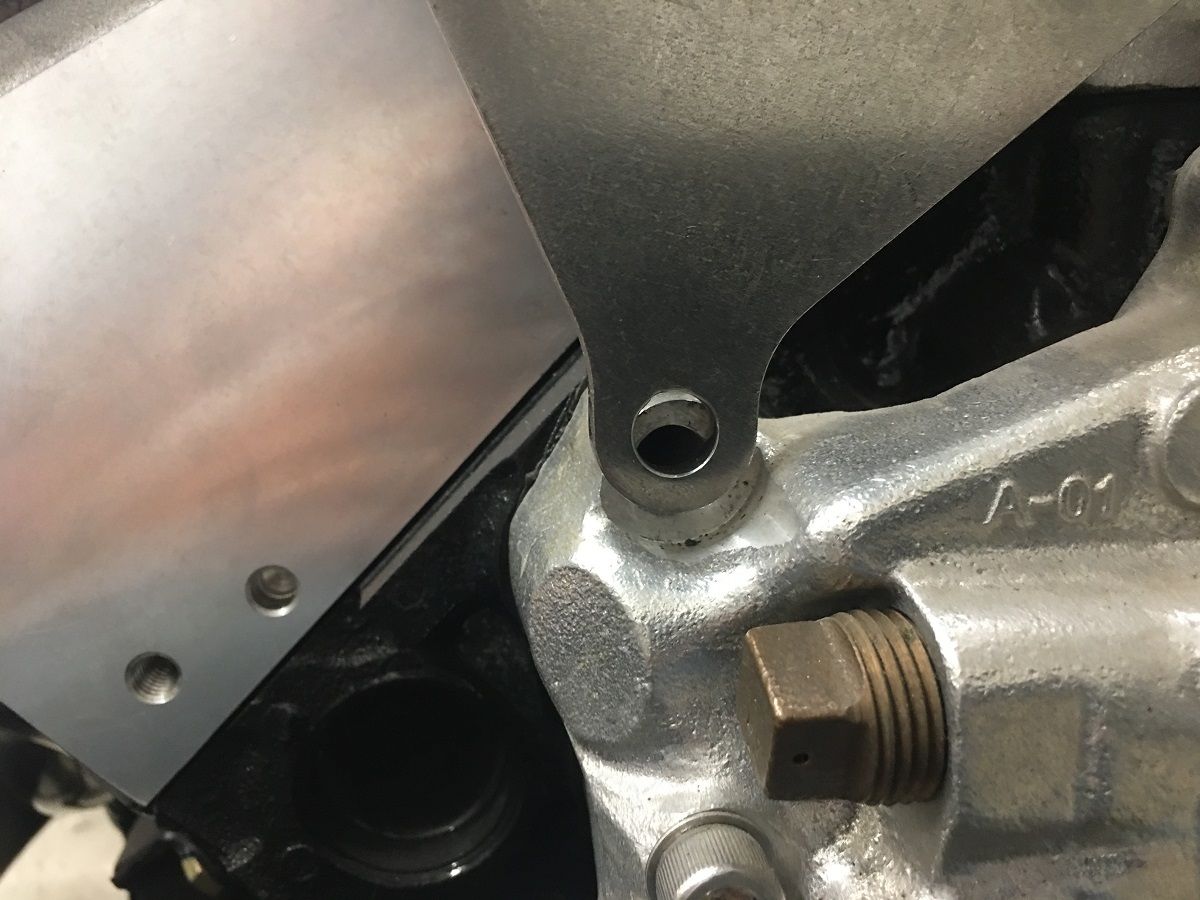 I didn't have much in the selection of 1/4" flat stock, so the shoulder of a 5/16 bolt was used, first the root pass and then a filler pass. 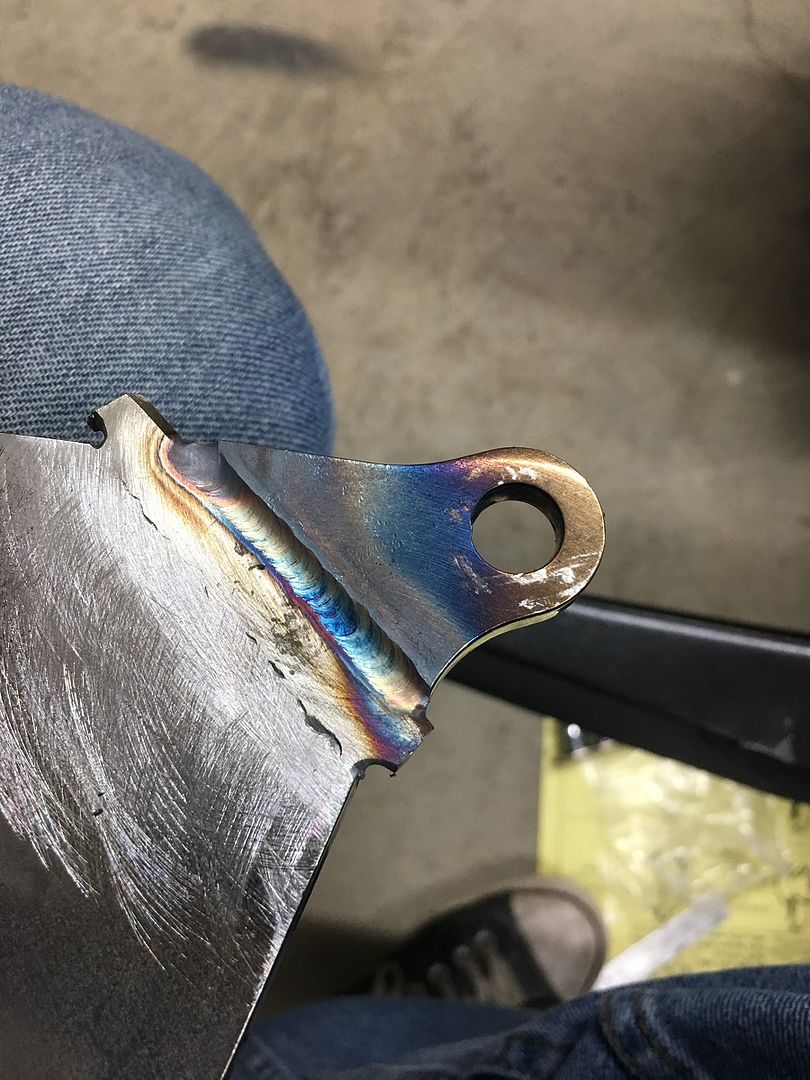 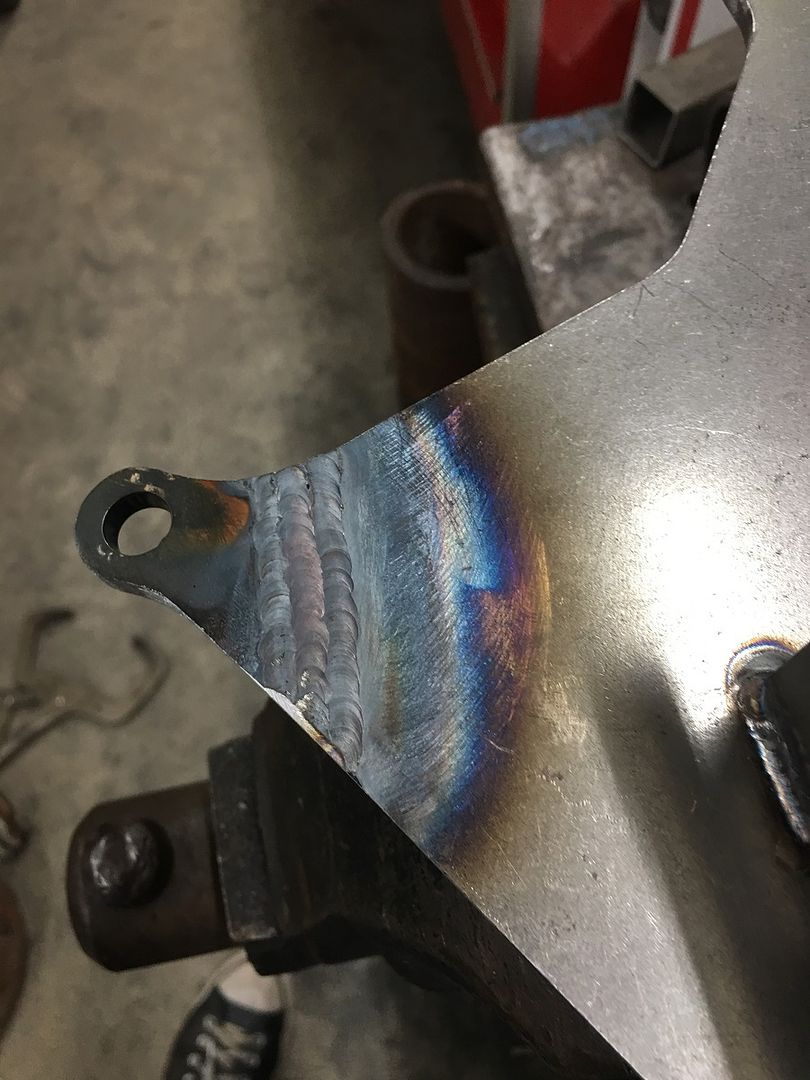 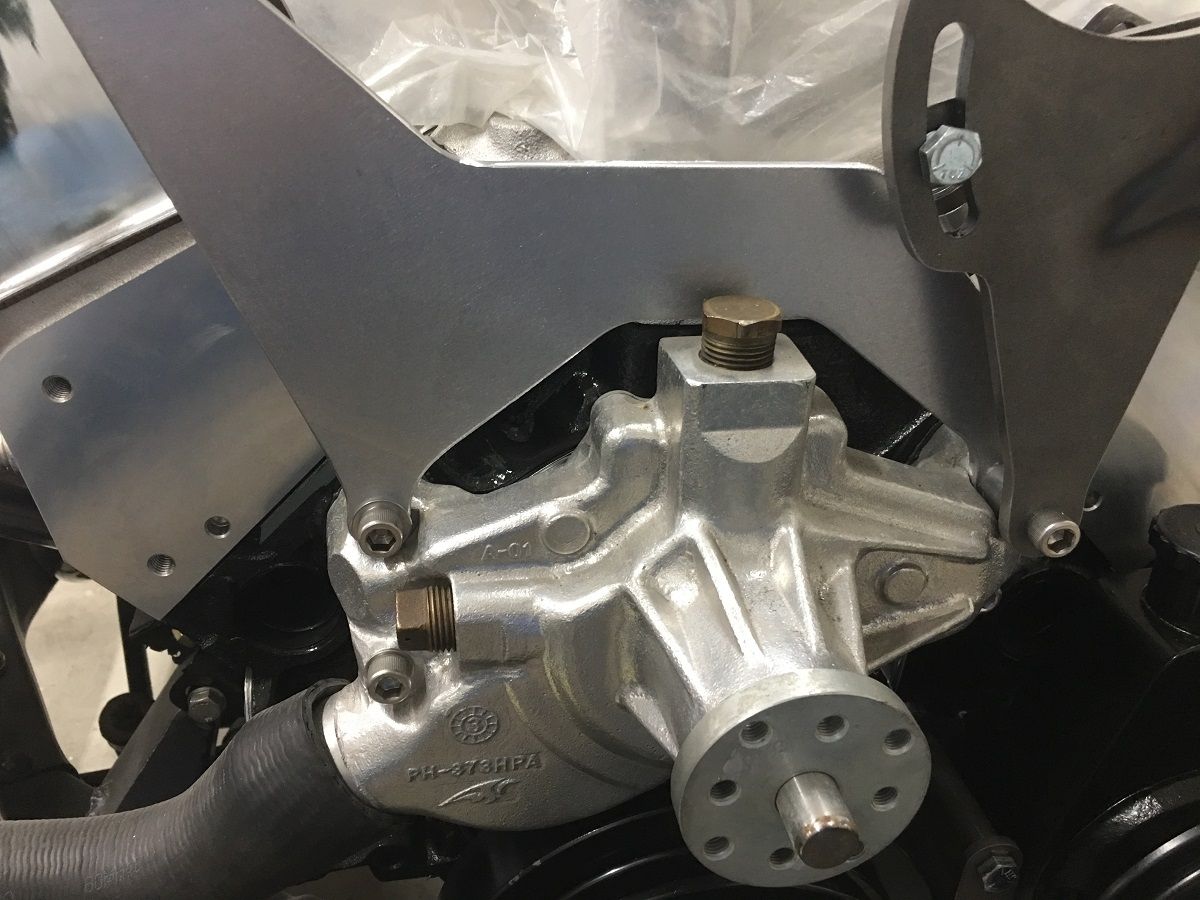 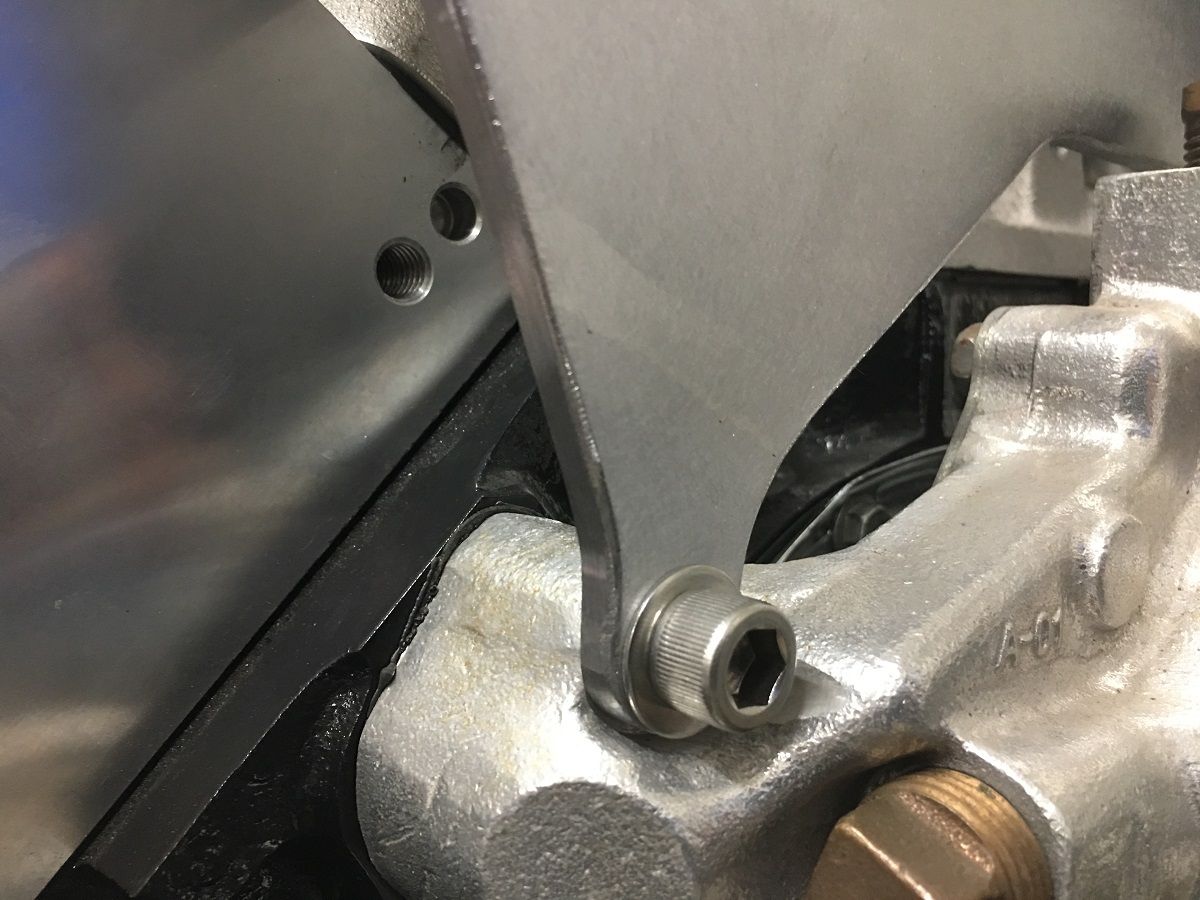  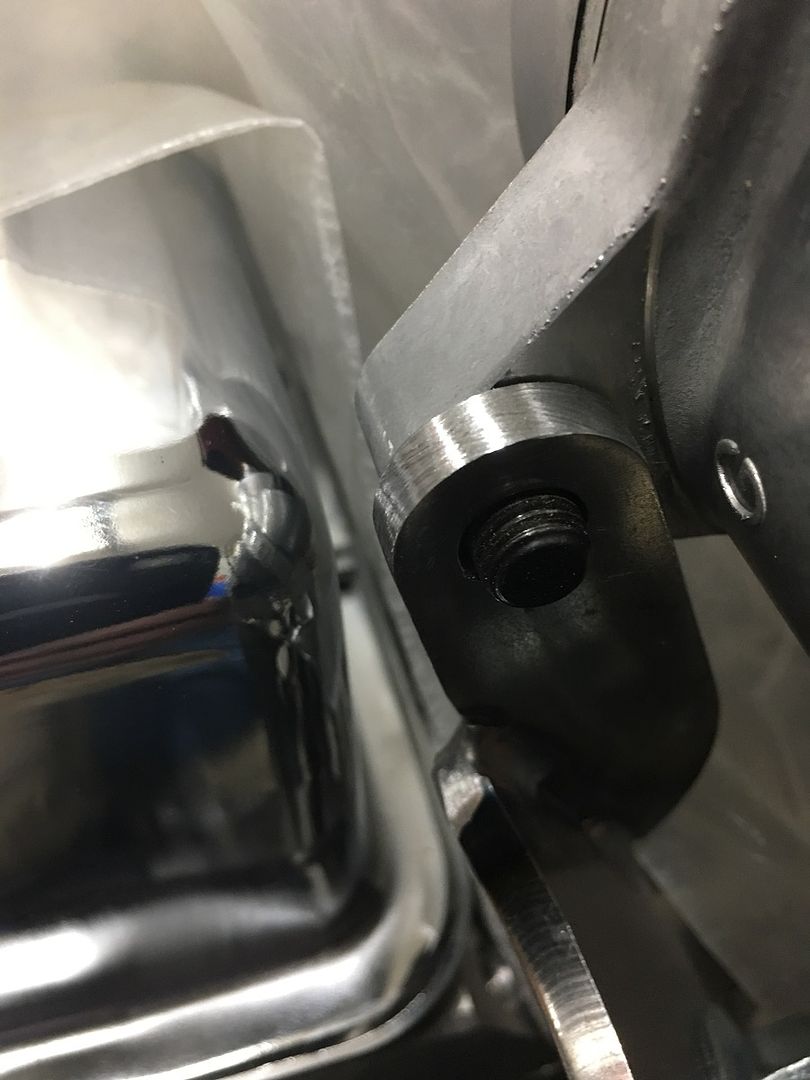  Another part checked off the list....
__________________
Robert |
|
|
|
|
07-01-2019, 11:17 PM
|
#7 |
|
Senior Member
Join Date: Mar 2011
Location: West Plains, Missouri
Posts: 7,553
|
Re: 55 Wagon Progress
Robert, nice work...Jim
__________________
my build thread: http://67-72chevytrucks.com/vboard/s...d.php?t=459839 Jimbo's long bed step build:http://67-72chevytrucks.com/vboard/s...t=464626<br /> |
|
|
|
|
07-01-2019, 11:53 PM
|
#8 |
|
Post Whore
Join Date: May 2015
Location: Alabama
Posts: 14,592
|
Re: 55 Wagon Progress
Great fix...!
__________________
Mongo...aka Greg RIP Dad RIP Jesse 1981 C30 LQ9 NV4500..http://67-72chevytrucks.com/vboard/s...d.php?t=753598 Mongos AD- LS3 TR6060...http://67-72chevytrucks.com/vboard/s...34#post8522334 Columbus..the 1957 IH 4x4...http://67-72chevytrucks.com/vboard/s...63#post8082563 2023 Chevy Z71..daily driver |
|
|
|
|
07-19-2019, 02:04 PM
|
#9 |
|
Registered User
Join Date: Jan 2013
Location: Leonardtown, MD
Posts: 1,635
|
Re: 55 Wagon Progress
Thanks!
Time to play catch-up, had a short hiatus in Upstate NY on the St Lawrence river. Daytime and sunset:  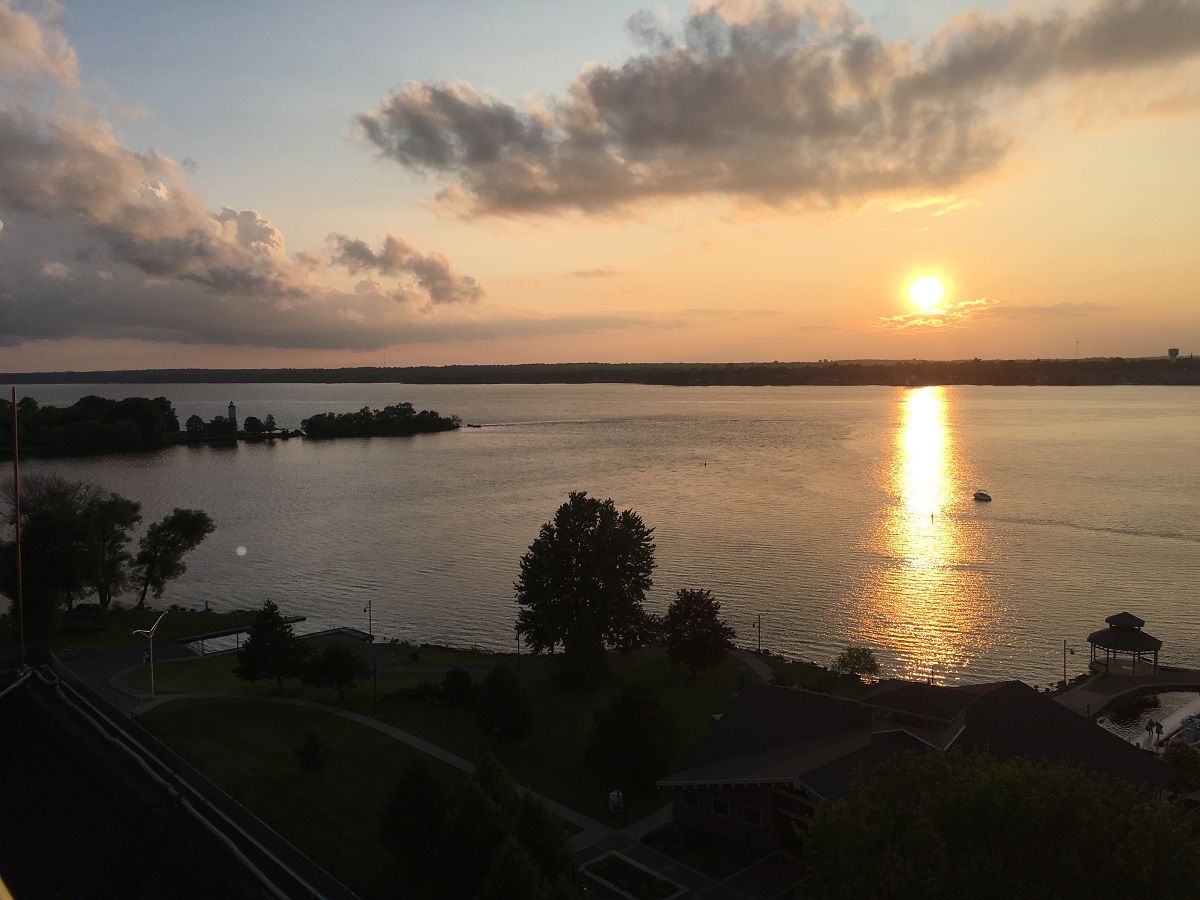 I picked up some louver dies that are set up for the press brake but should be the start of a louver press eventually... got both 2" and 3" dies. 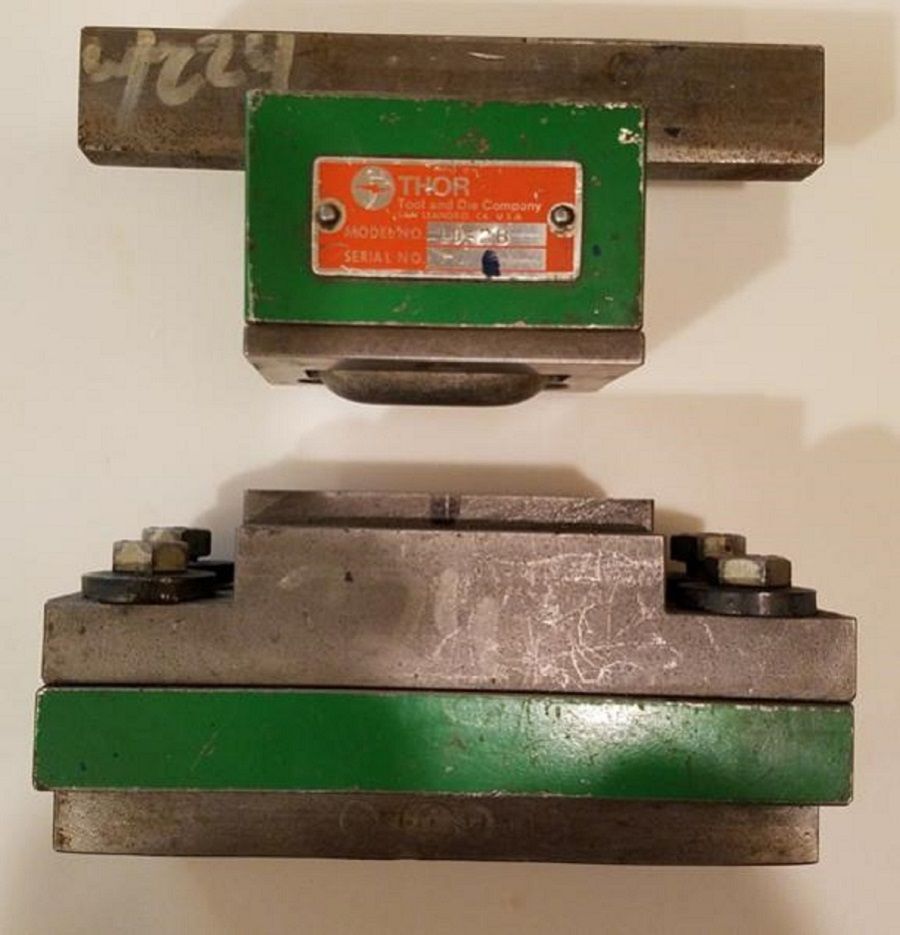 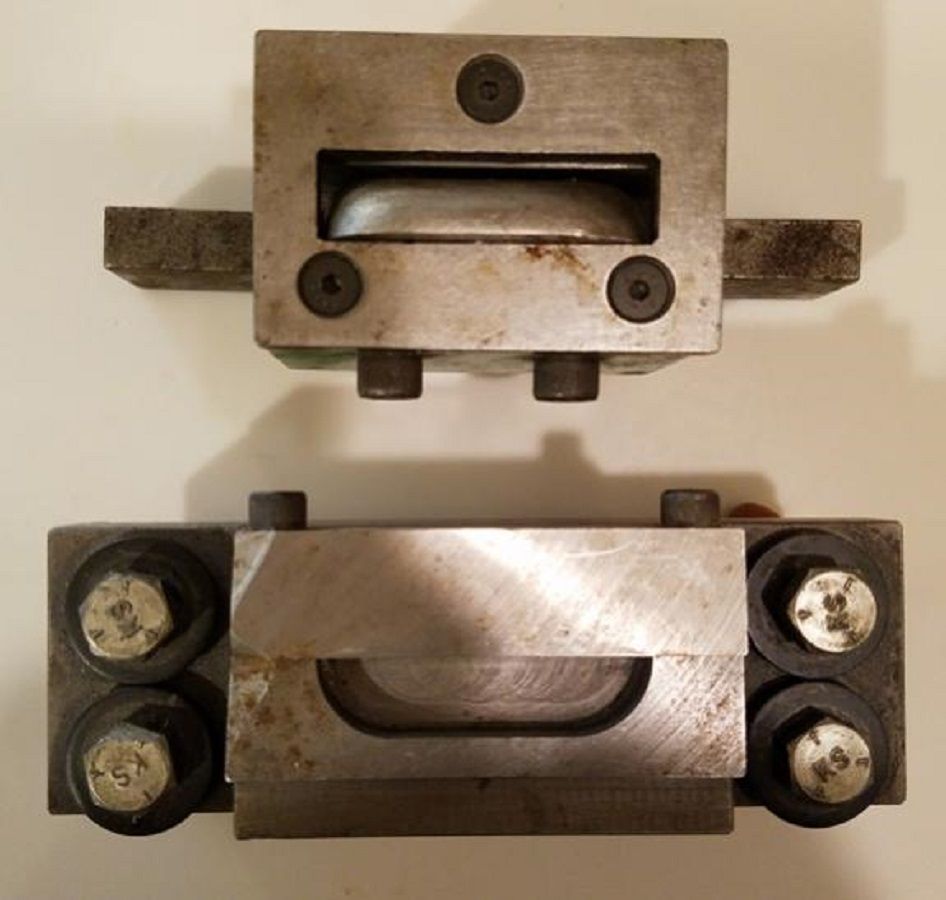 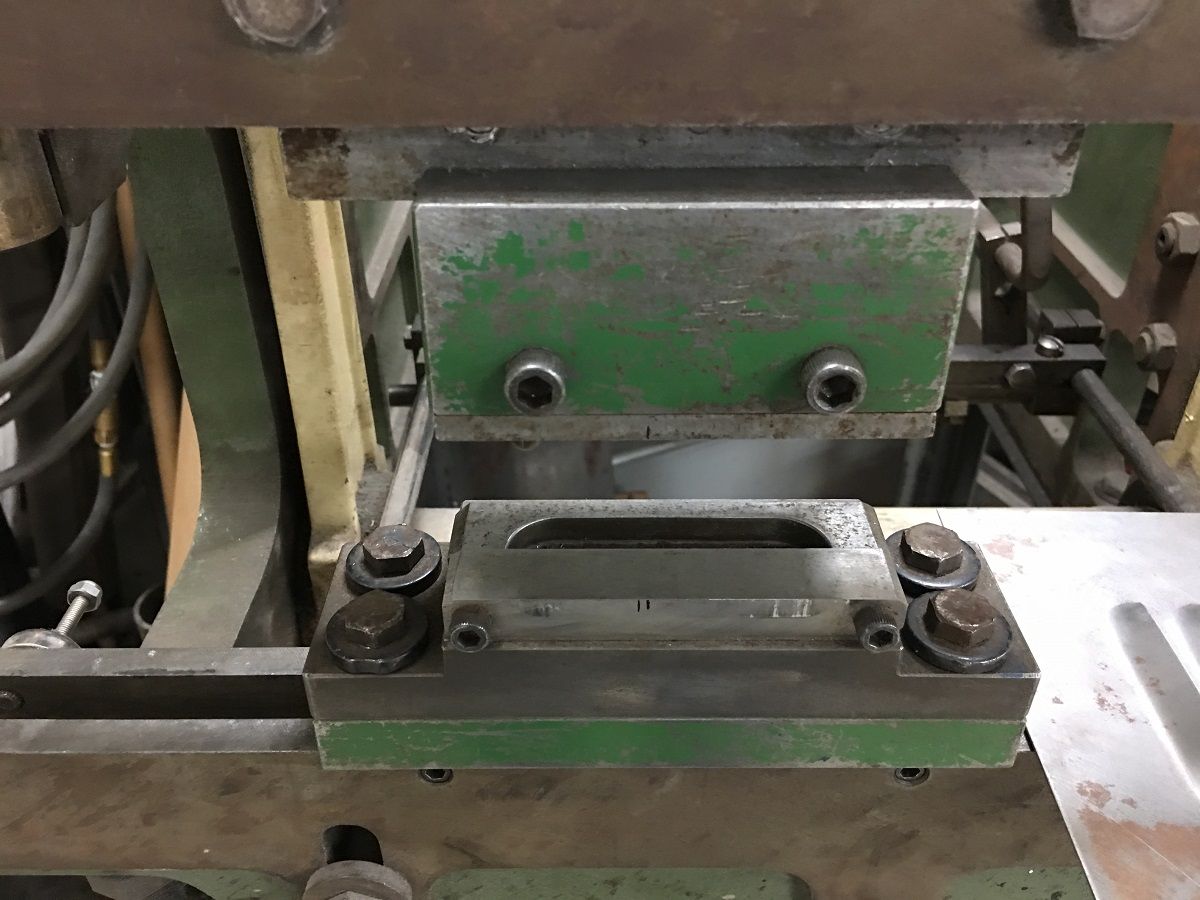 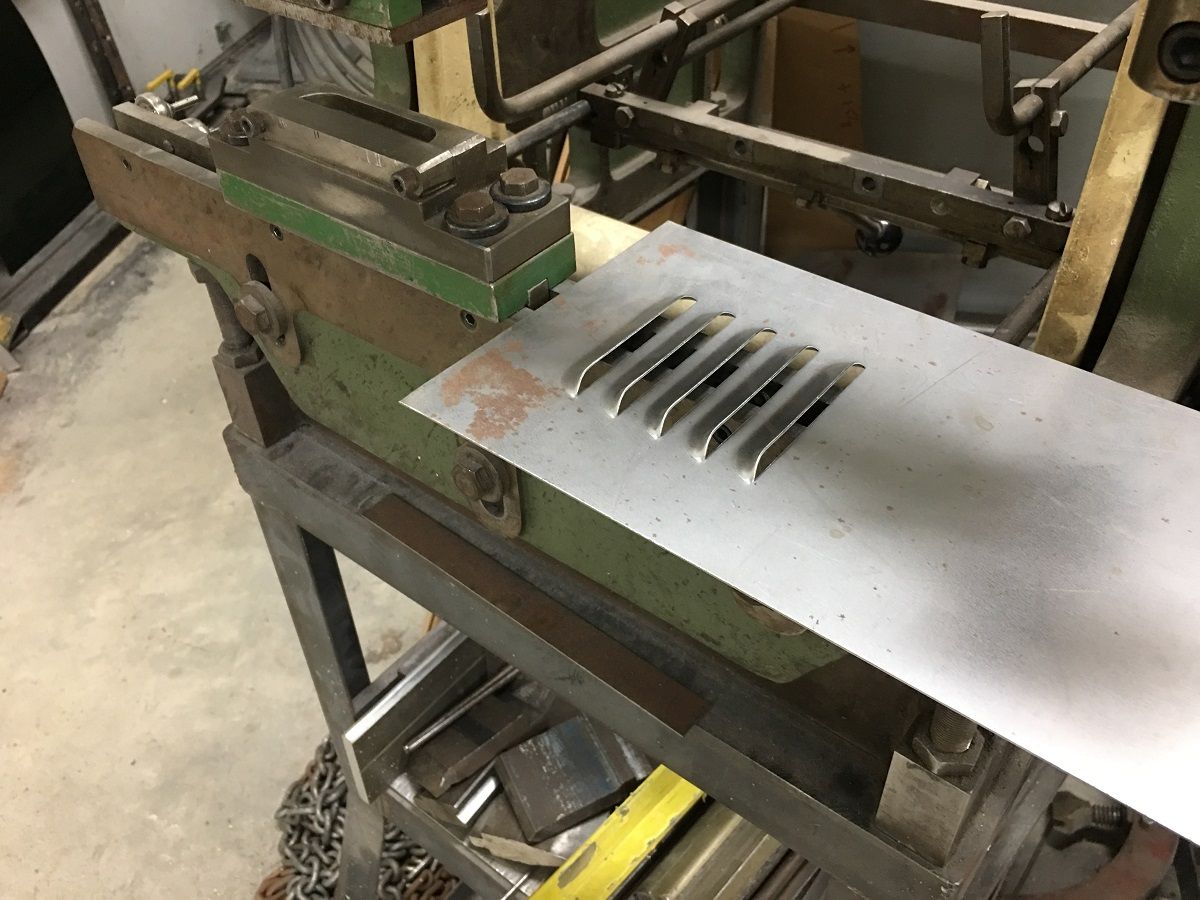 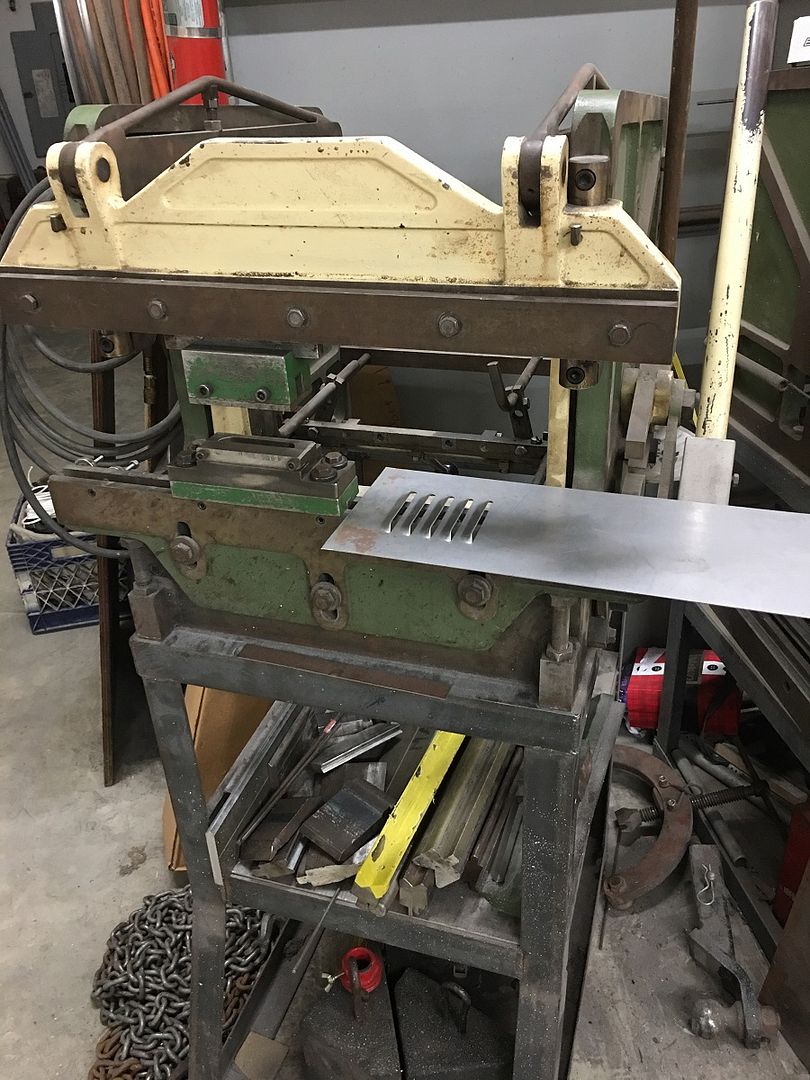 I also have a couple good friends that understand my tool addiction that both sent me a link to an ad for body tools, especially for the Vise Grips. Here's what I picked up from a retired bodyman, now to keep these quality tools going. VG collection is now over 130.. never enough. 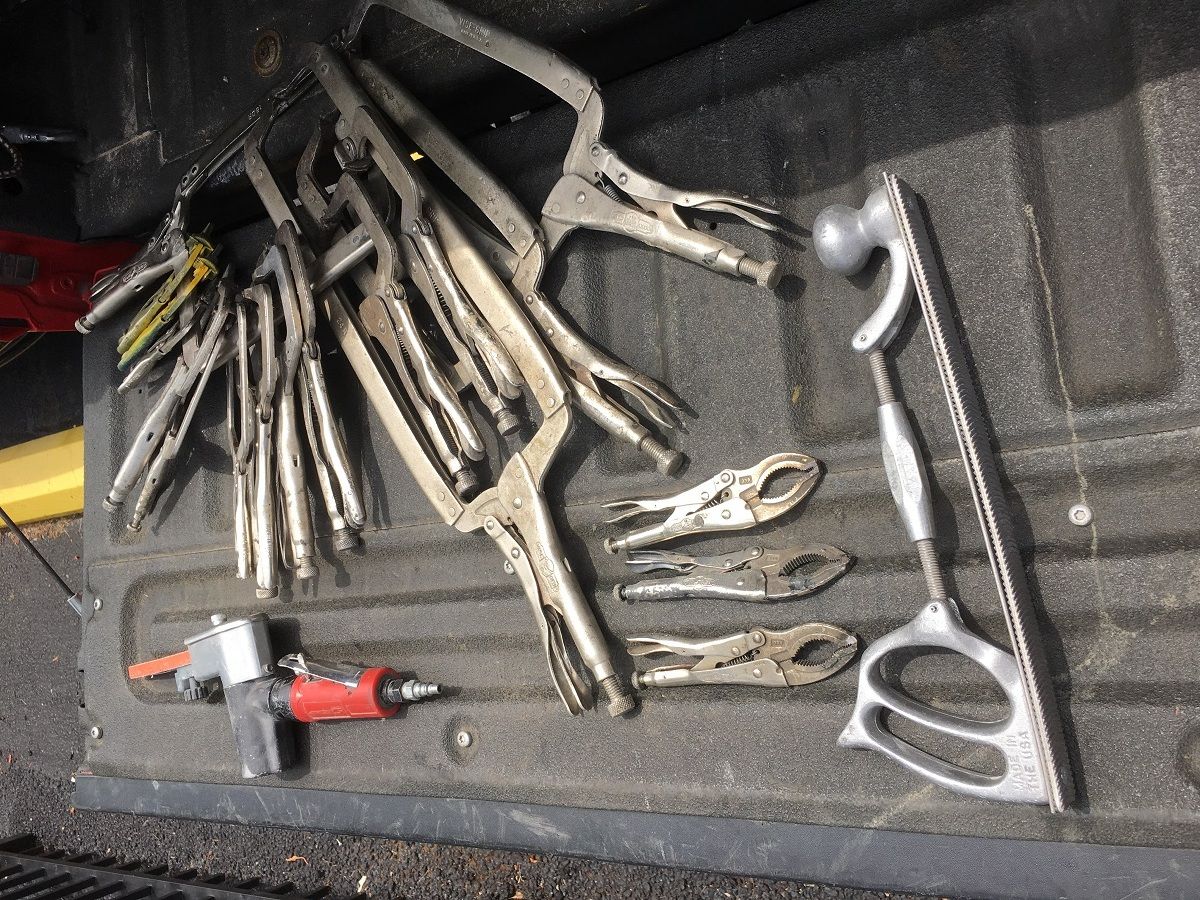 ...and with the engine brackets back from powder coating, and our new 45* water neck arrived, we were able to get the belts and upper hose all mocked up. The hose we used was a Dayco 72384, made as a lower hose for a V6 Ford Explorer, but it fits this application like a glove... 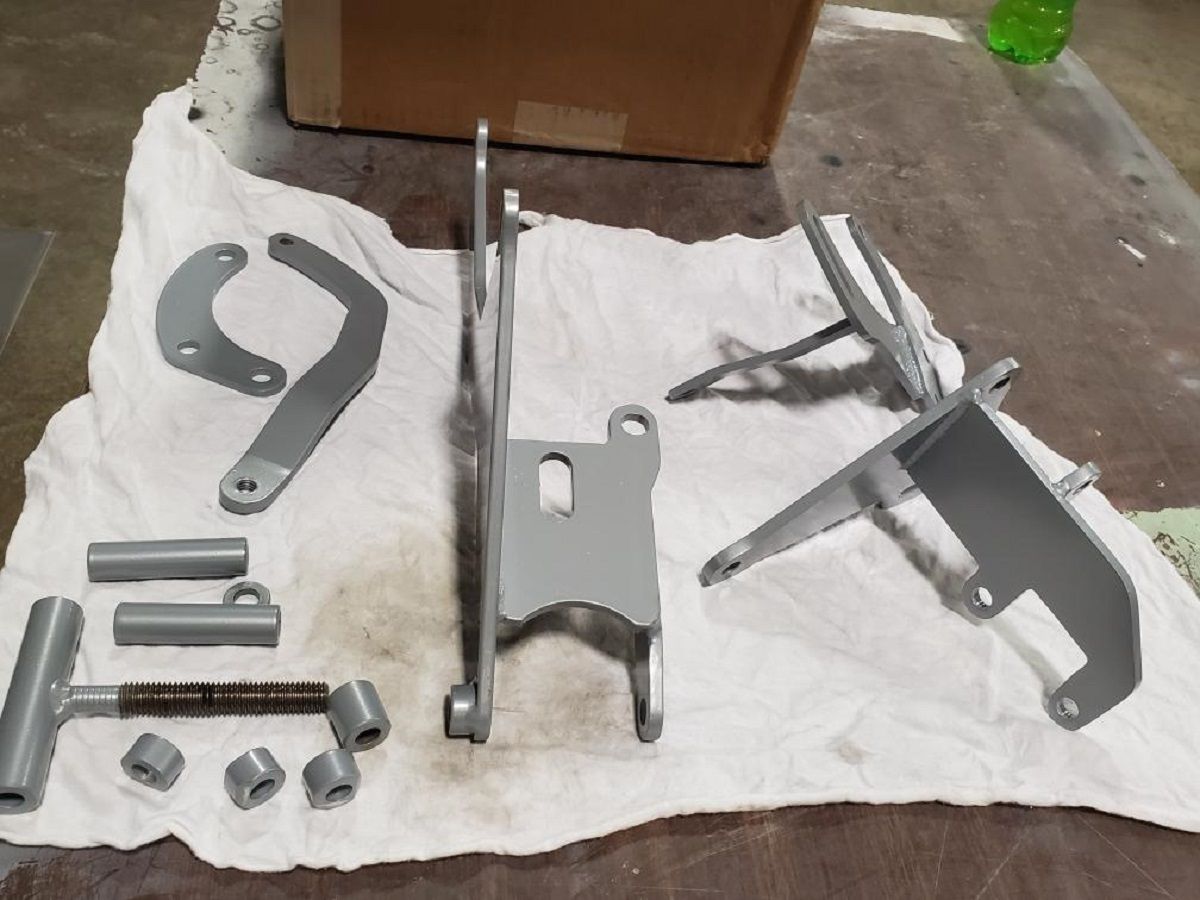 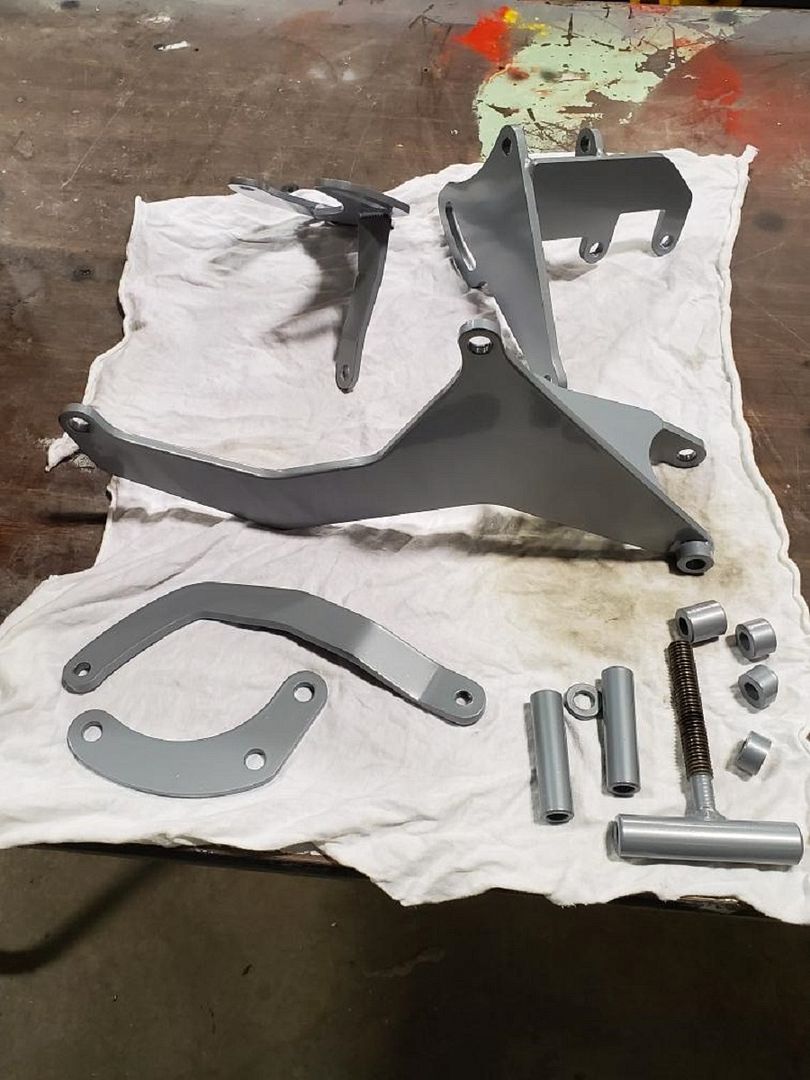 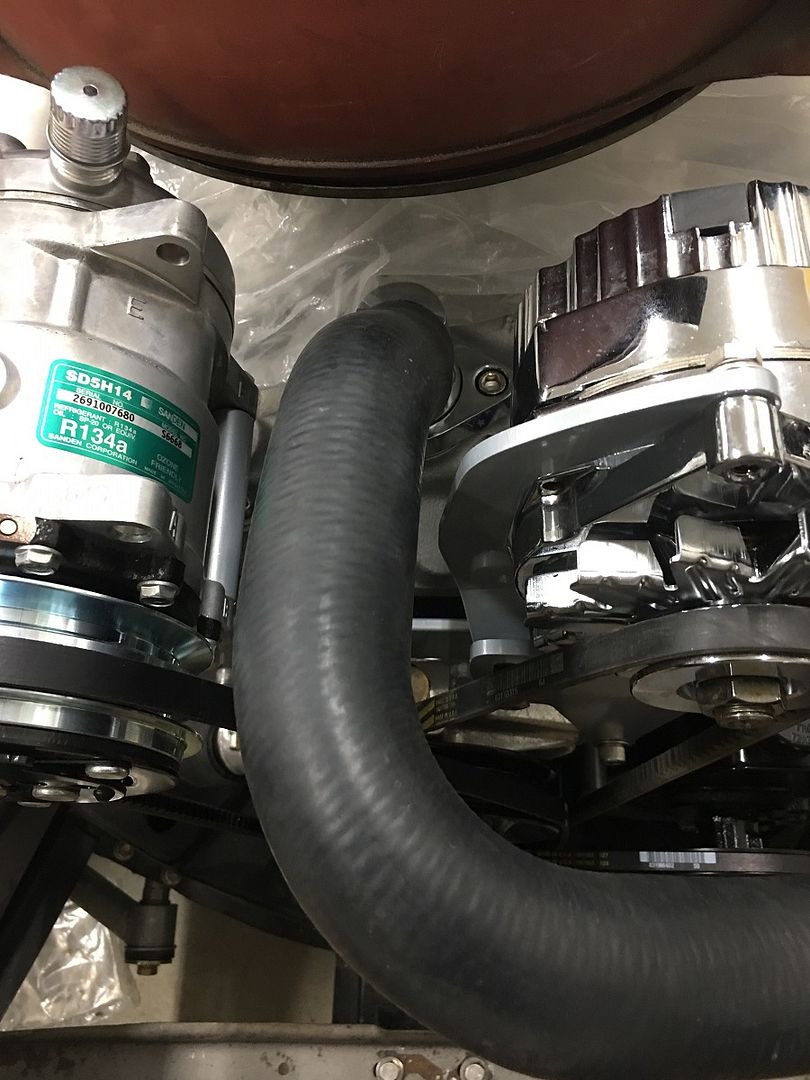 Video version: https://www.youtube.com/watch?v=5TvMKp_9VH4 .
__________________
Robert |
|
|
|
|
07-21-2019, 11:01 PM
|
#10 |
|
Registered User
Join Date: Jan 2013
Location: Leonardtown, MD
Posts: 1,635
|
Re: 55 Wagon Progress
Spent some time organizing, needed some racks for all the Lennox dies..
   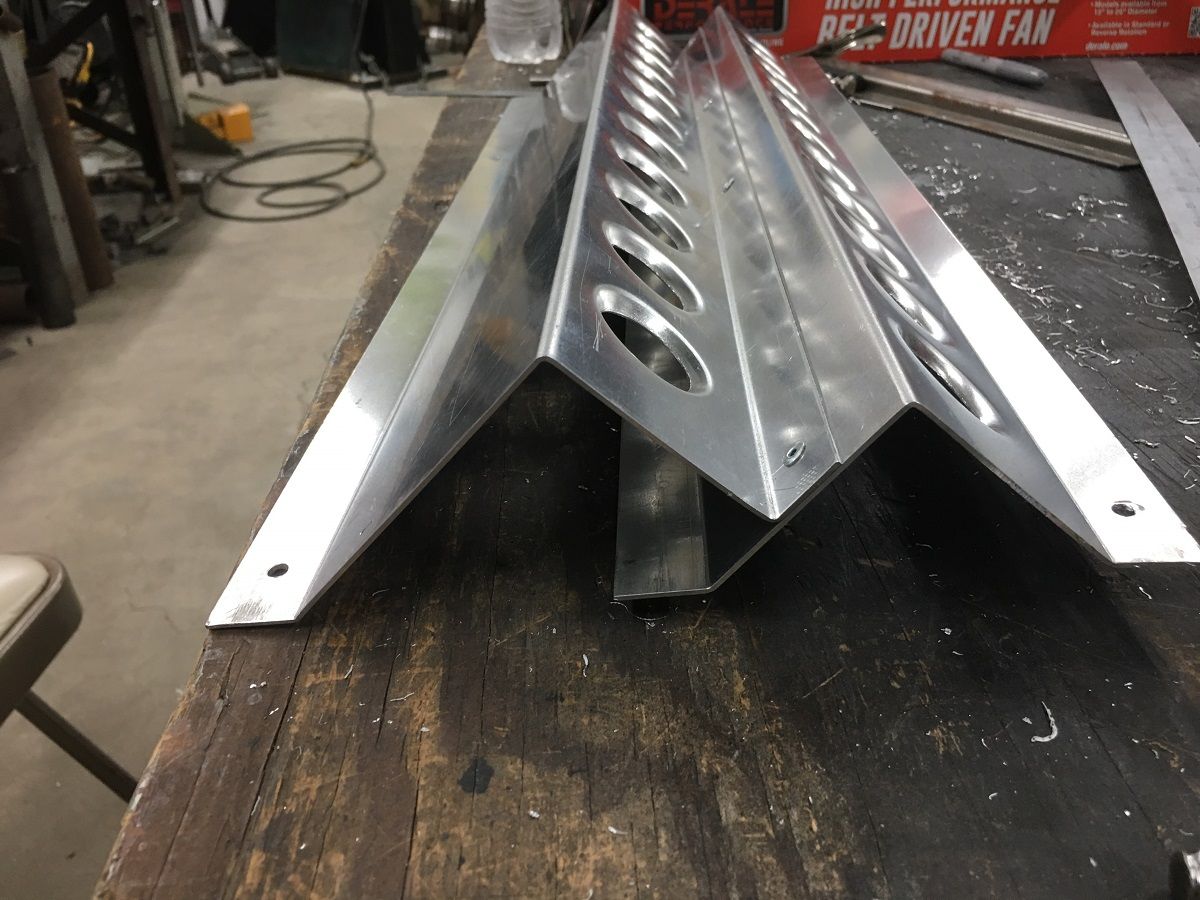 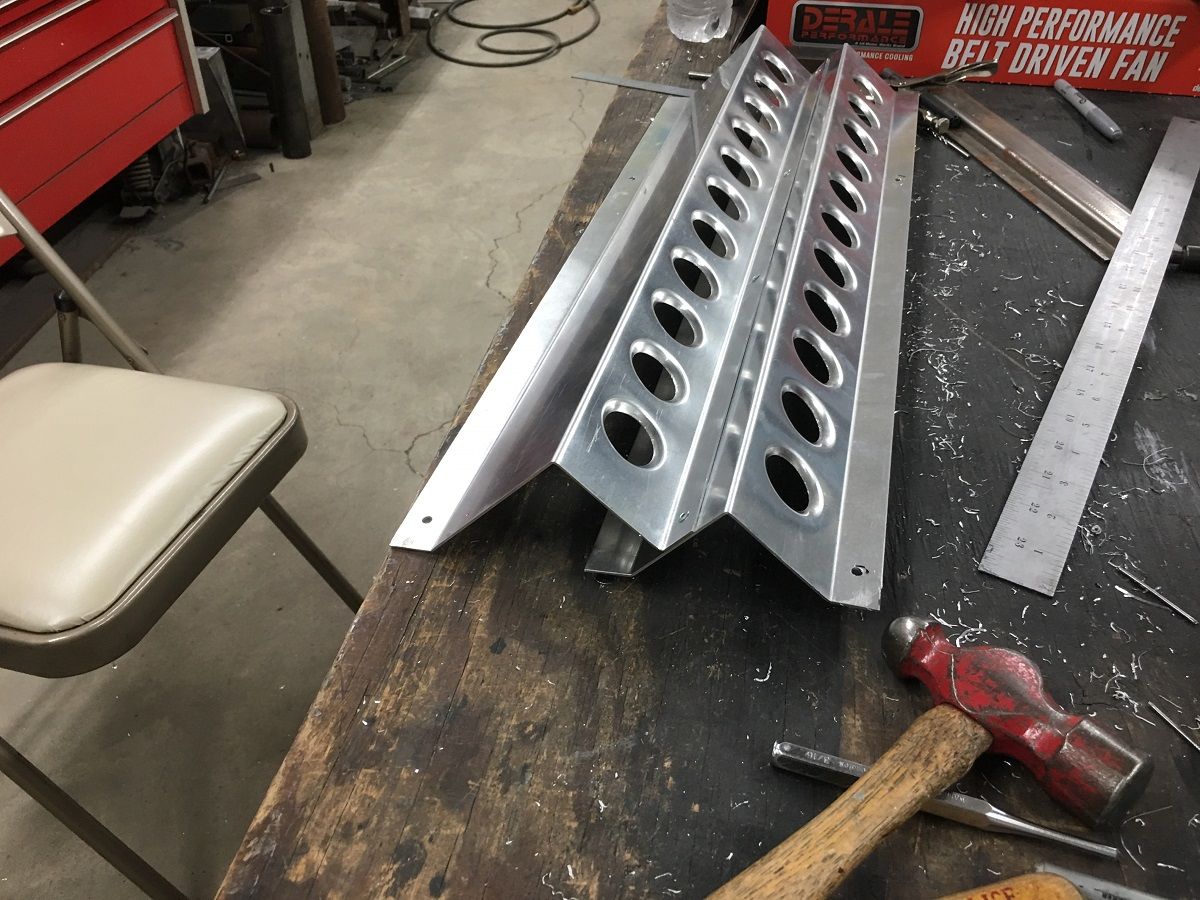 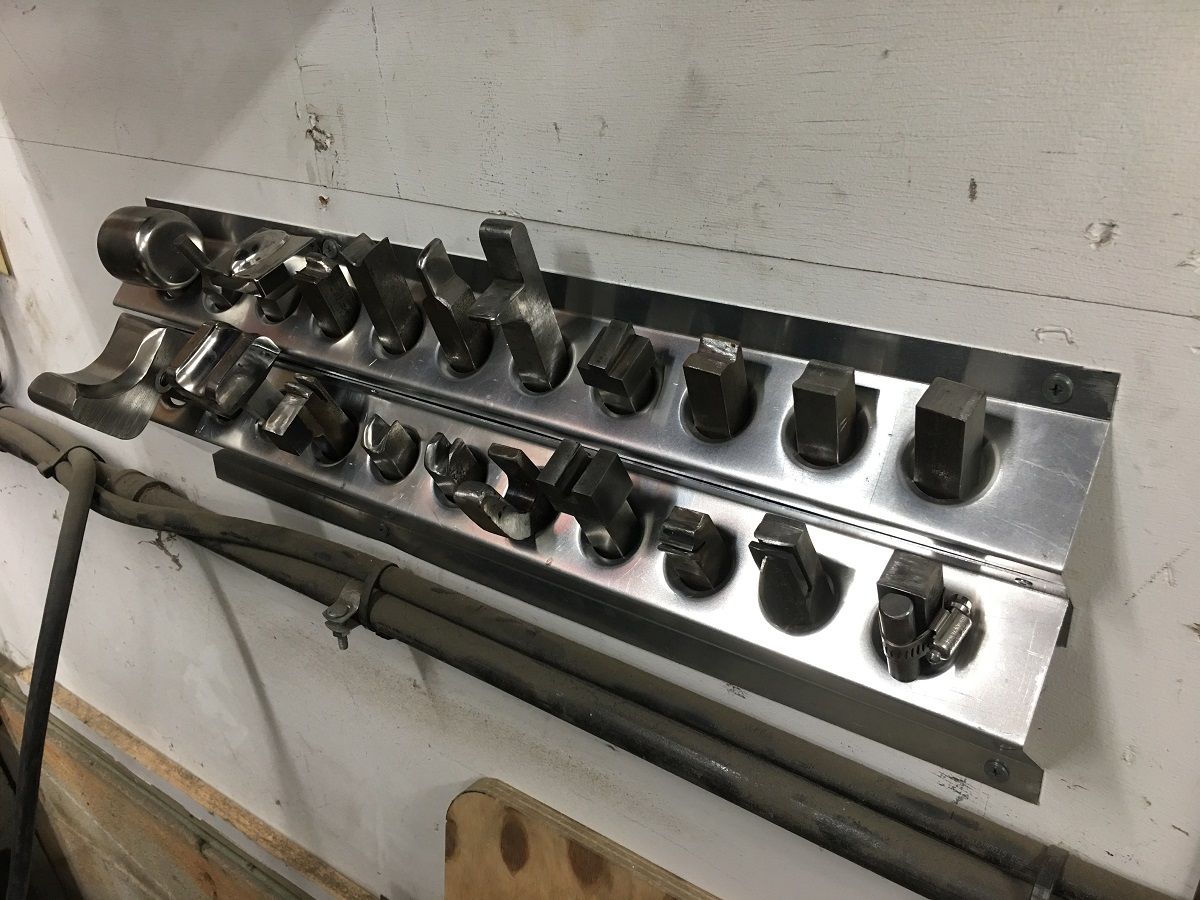 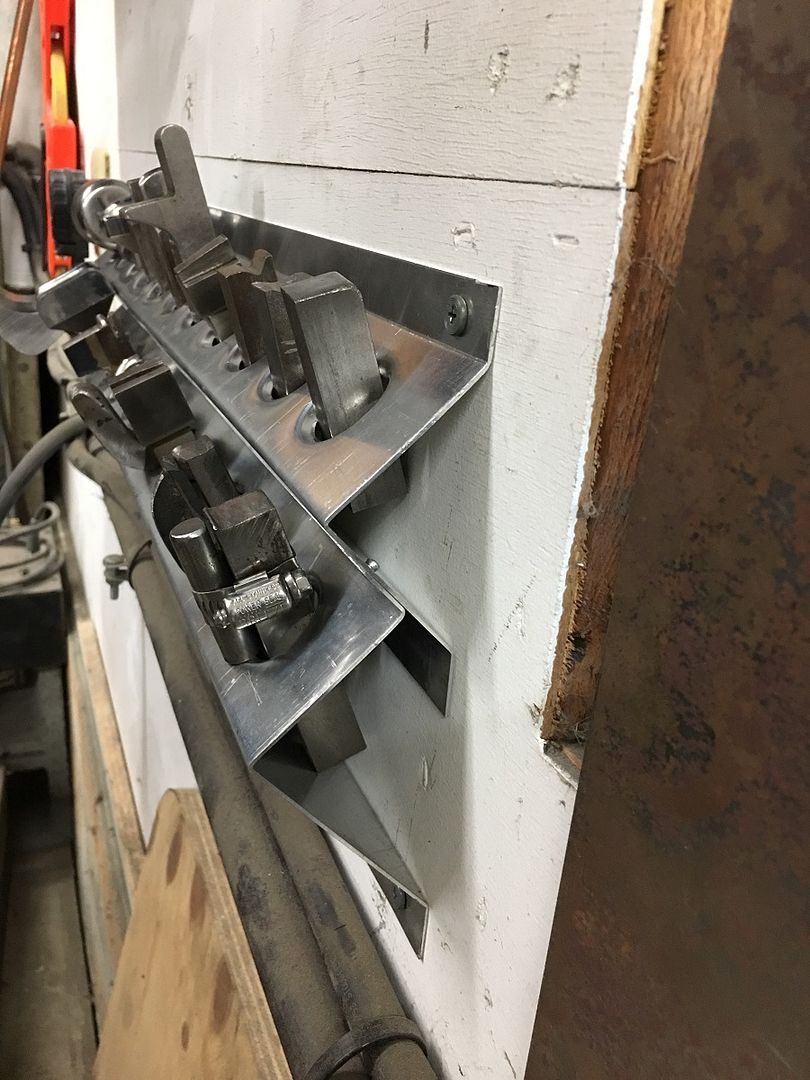 One set down, two more to go....
__________________
Robert |
|
|
|
|
07-22-2019, 12:12 AM
|
#11 |
|
Post Whore
Join Date: May 2015
Location: Alabama
Posts: 14,592
|
Re: 55 Wagon Progress
those look great Robert...now you need to dream up someway to store clamps...ive got a piece of angle iron that I clamp em to but its aggervating to get to em when theyre close together...and there's no good way to hang em either
__________________
Mongo...aka Greg RIP Dad RIP Jesse 1981 C30 LQ9 NV4500..http://67-72chevytrucks.com/vboard/s...d.php?t=753598 Mongos AD- LS3 TR6060...http://67-72chevytrucks.com/vboard/s...34#post8522334 Columbus..the 1957 IH 4x4...http://67-72chevytrucks.com/vboard/s...63#post8082563 2023 Chevy Z71..daily driver |
|
|
|
|
07-28-2019, 11:31 PM
|
#12 |
|
Registered User
Join Date: Jan 2013
Location: Leonardtown, MD
Posts: 1,635
|
Re: 55 Wagon Progress
Greg...I need to get pics of the vise grip racks for you... Maybe next weekend...
So while I'm blocking primer (think I shoulda swapped jobs with her) E worked on the next two tooling racks. Here using the Diacro press brake to add some dimples.... 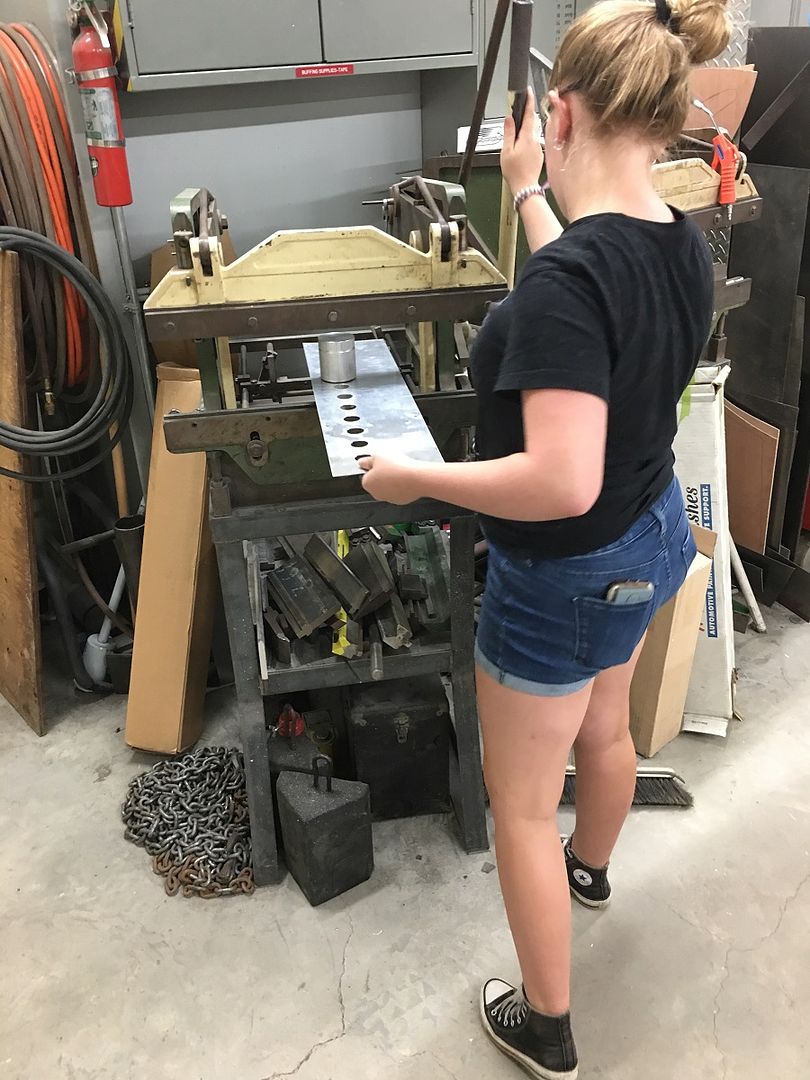  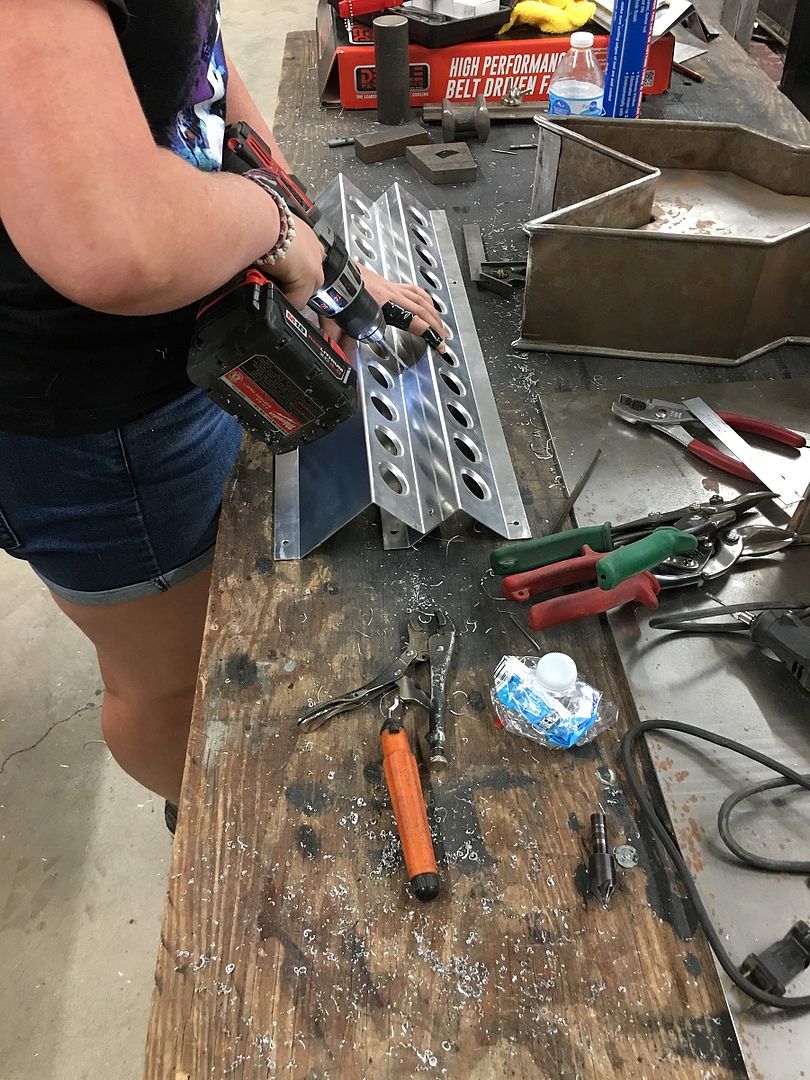 Note here she is also skilled in applying the electric tape bandage.... 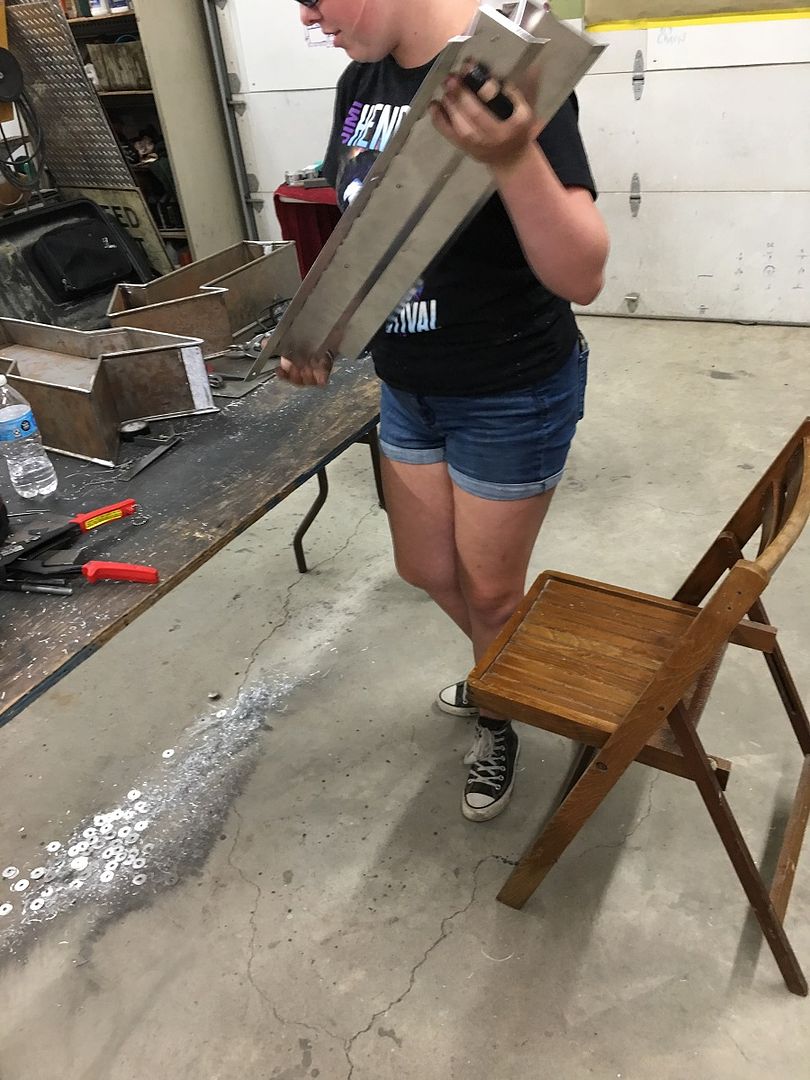 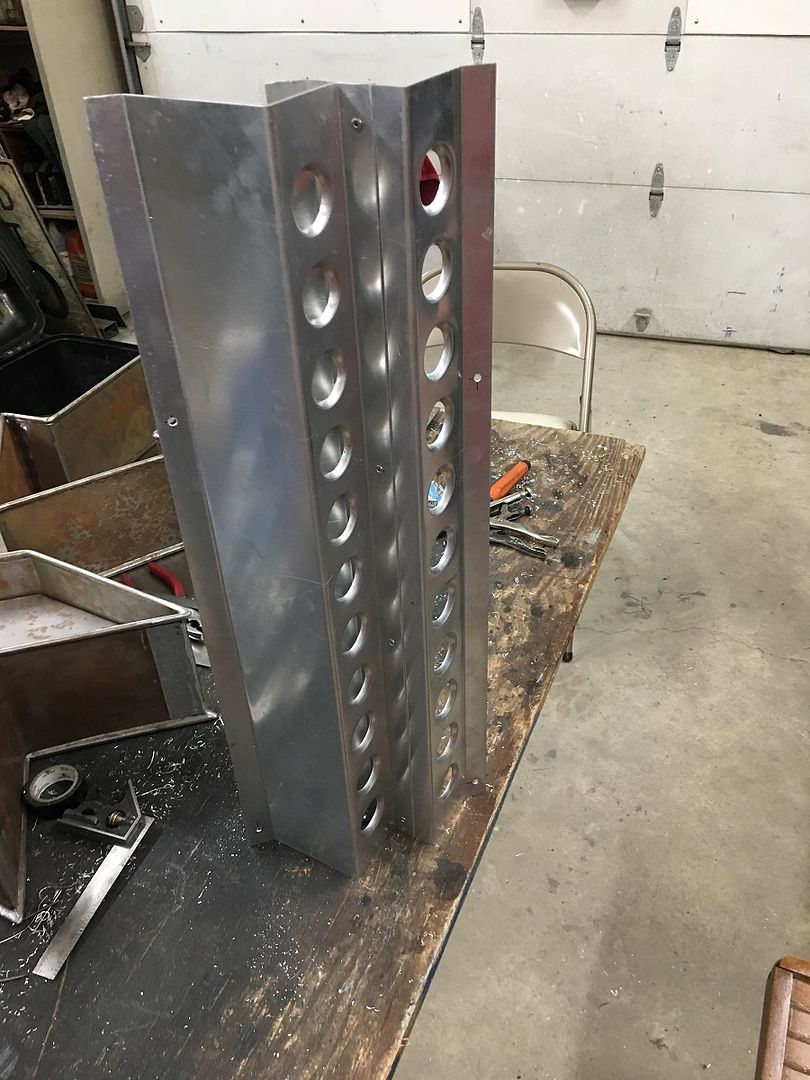 ….for some reason I don't think three sets is gonna be enough....  https://www.youtube.com/watch?v=u832gcW_lbM .
__________________
Robert |
|
|
|
|
07-30-2019, 11:20 PM
|
#13 |
|
Registered User
Join Date: Jan 2013
Location: Leonardtown, MD
Posts: 1,635
|
Re: 55 Wagon Progress
Next job for E was to add some sound deadening to the inside of the door skins...
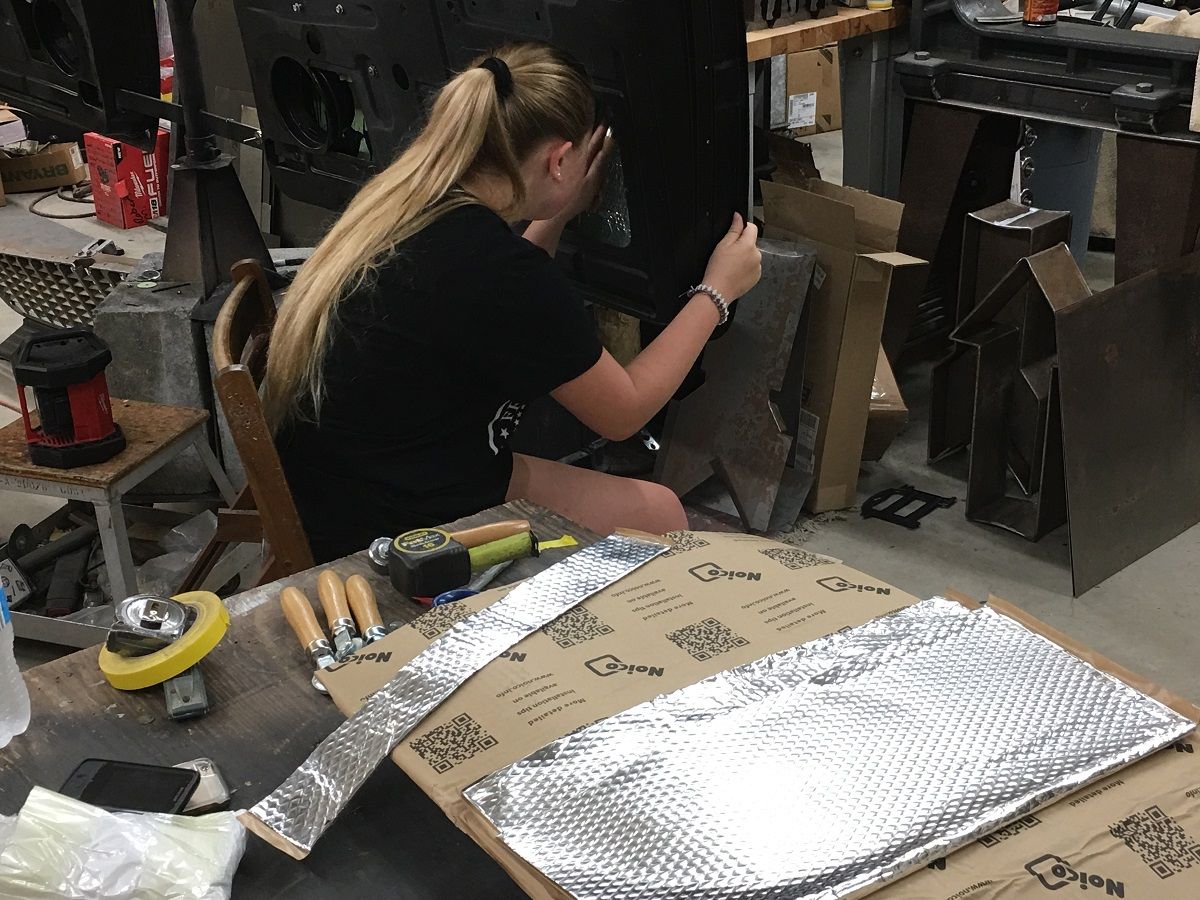 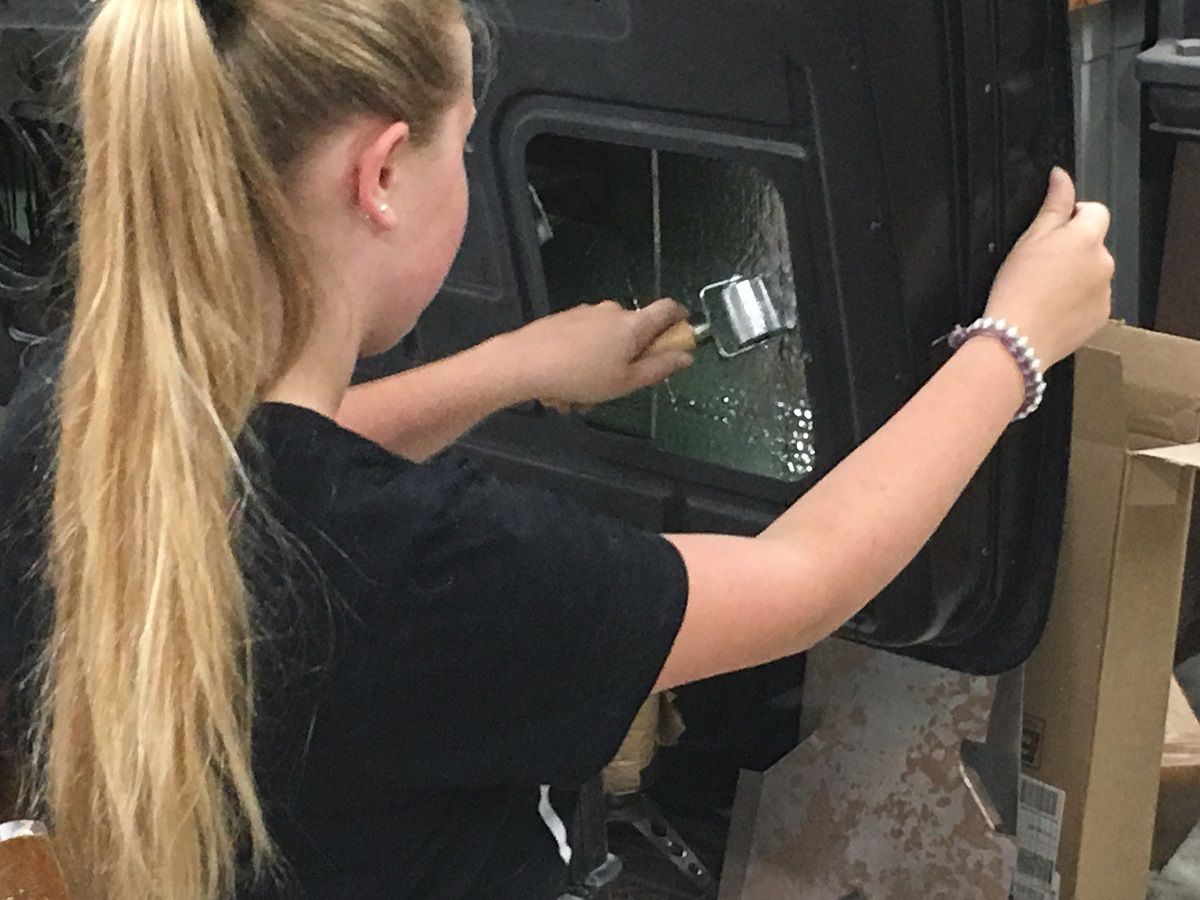 Behind each of the speaker mounts we added a section of Dynaliner… 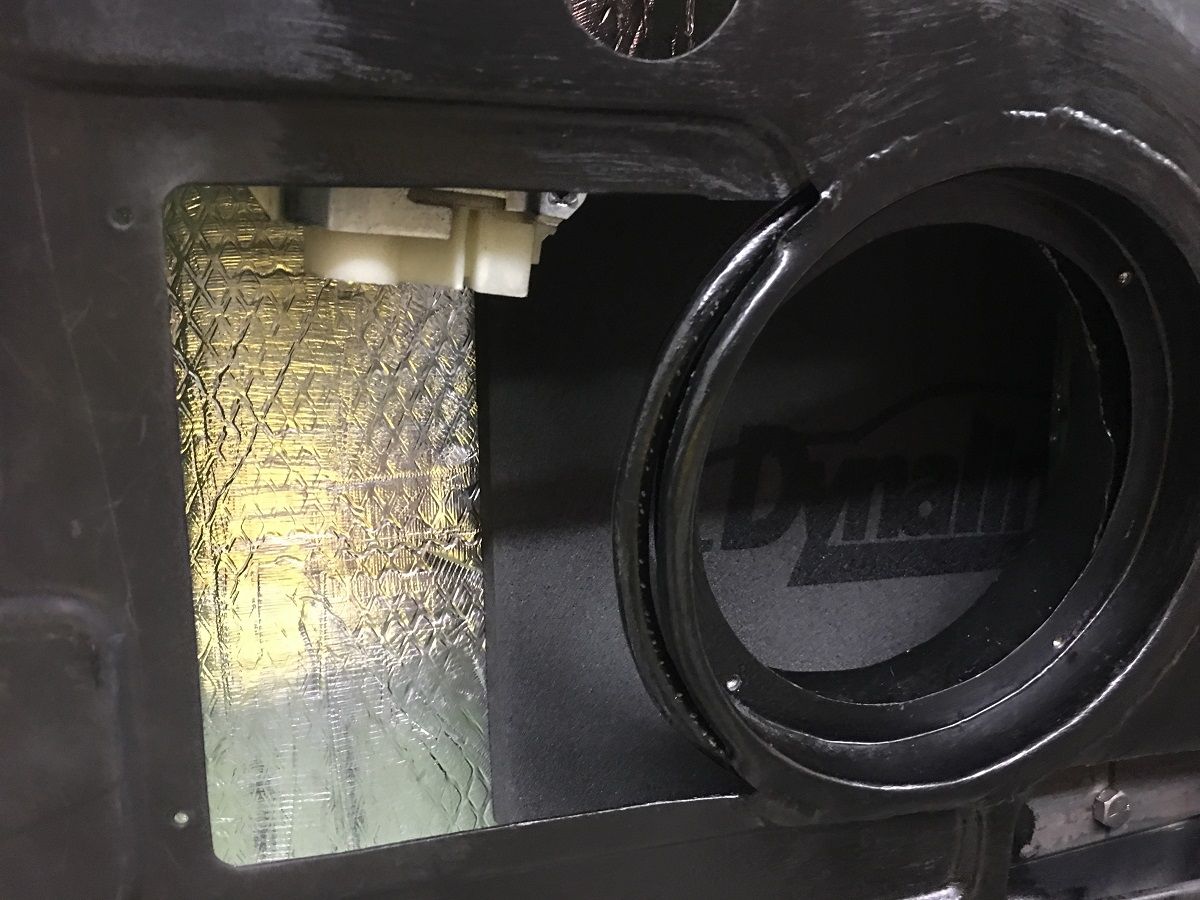 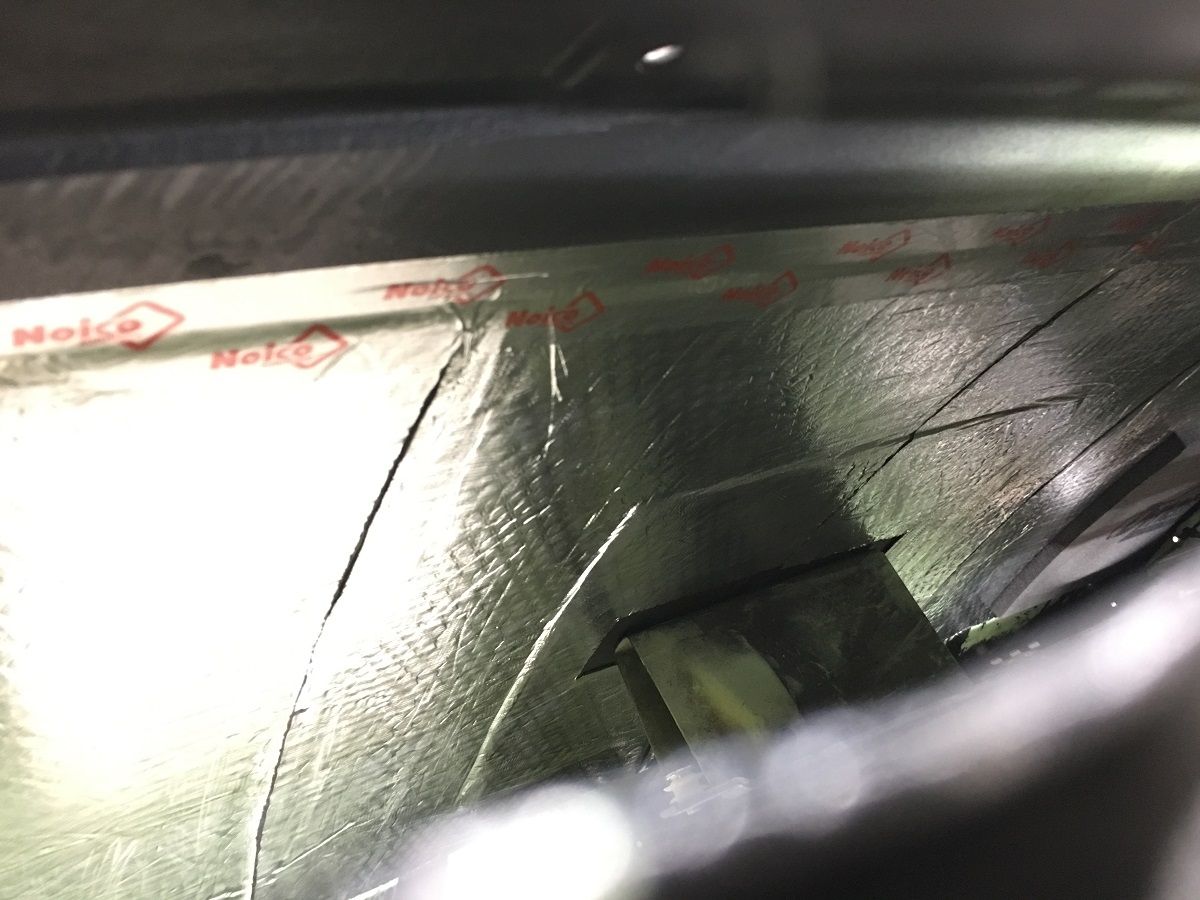 She did a good job of that, wait until she sees how much more we have to go!
__________________
Robert |
|
|
|
|
07-31-2019, 03:45 PM
|
#14 |
|
Senior Member
 Join Date: Feb 2014
Location: new smyrna beach fl / 29 palms cal
Posts: 1,727
|
Re: 55 Wagon Progress
Looks good she has your talent and attention to detail
__________________
Hand made A/C vent manifolds for 64-66 trucks adapts any aftermarket A/C to OEM vent |
|
|
|
|
09-04-2019, 12:49 PM
|
#15 |
|
Registered User
Join Date: Jan 2013
Location: Leonardtown, MD
Posts: 1,635
|
Re: 55 Wagon Progress
Thanks! She's actually more artsy than I am, does paintings in her free time.
Progress pics from last night... Yep, we've been block sanding.. 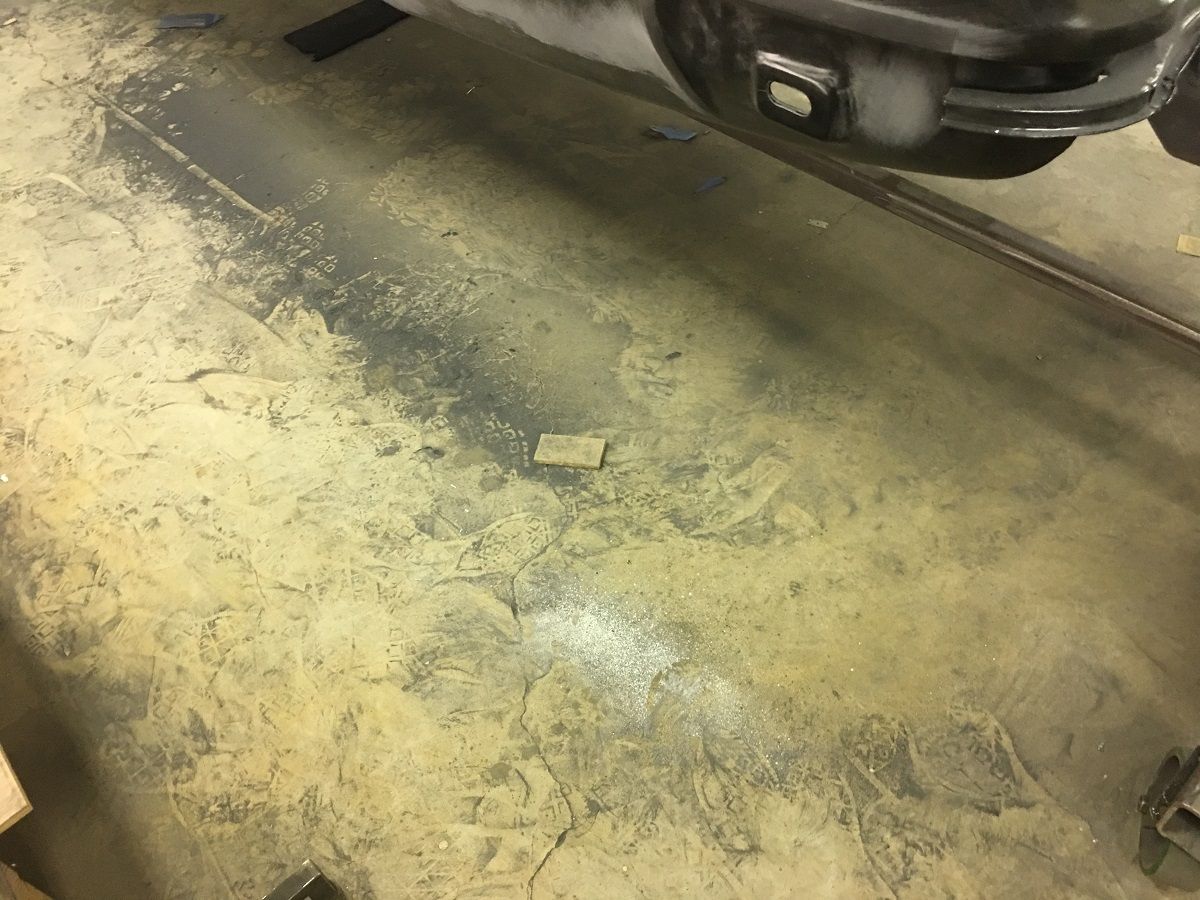 Using Evercoat 416 to address the few low spots.. 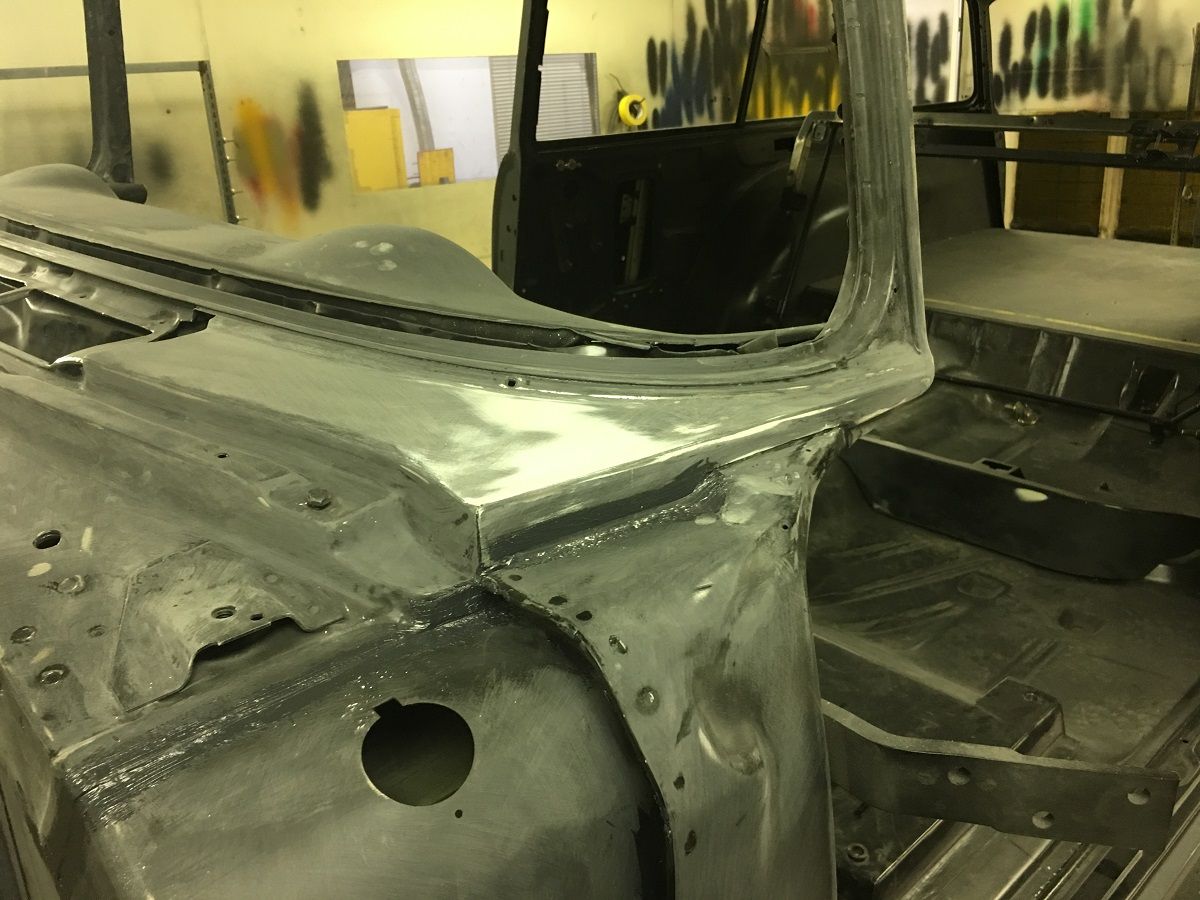 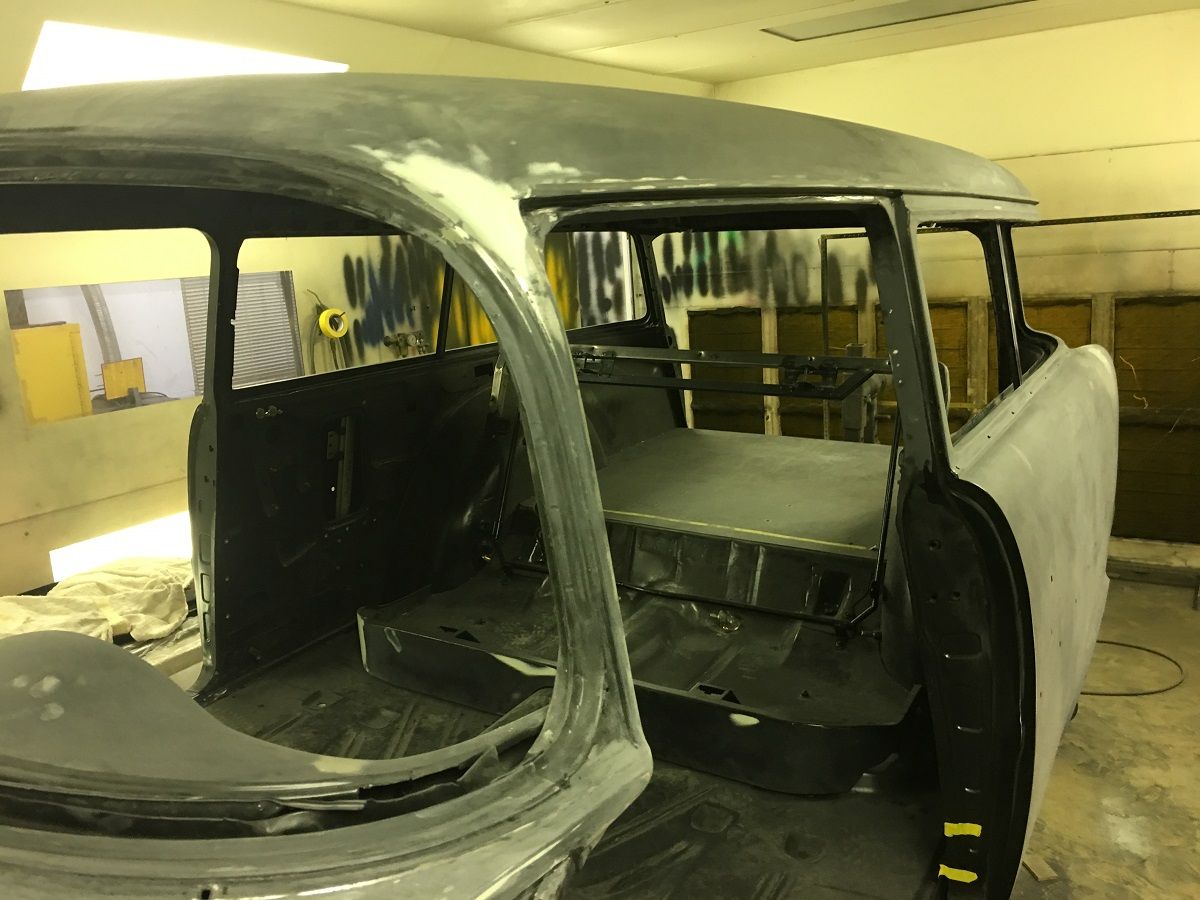 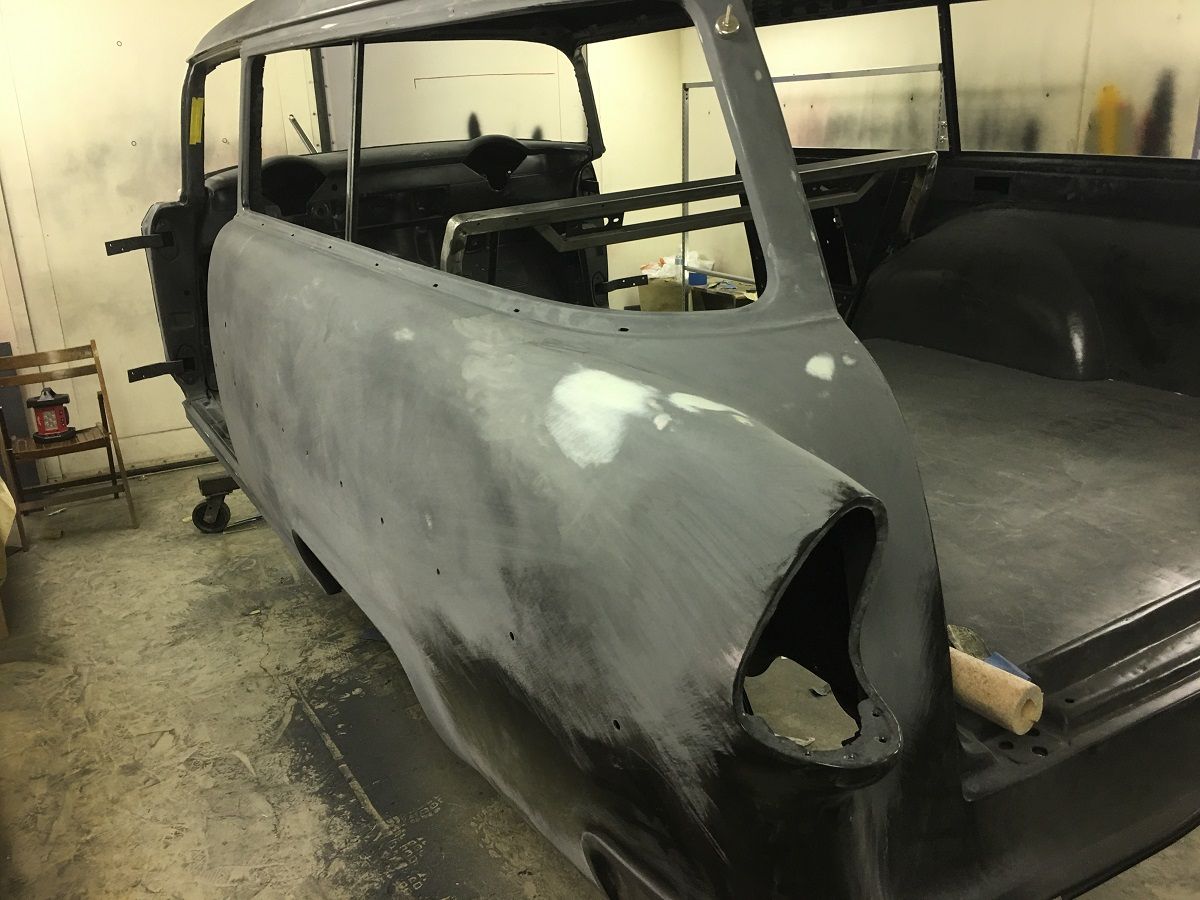 Honing up on my painting skills with brush on seam sealer 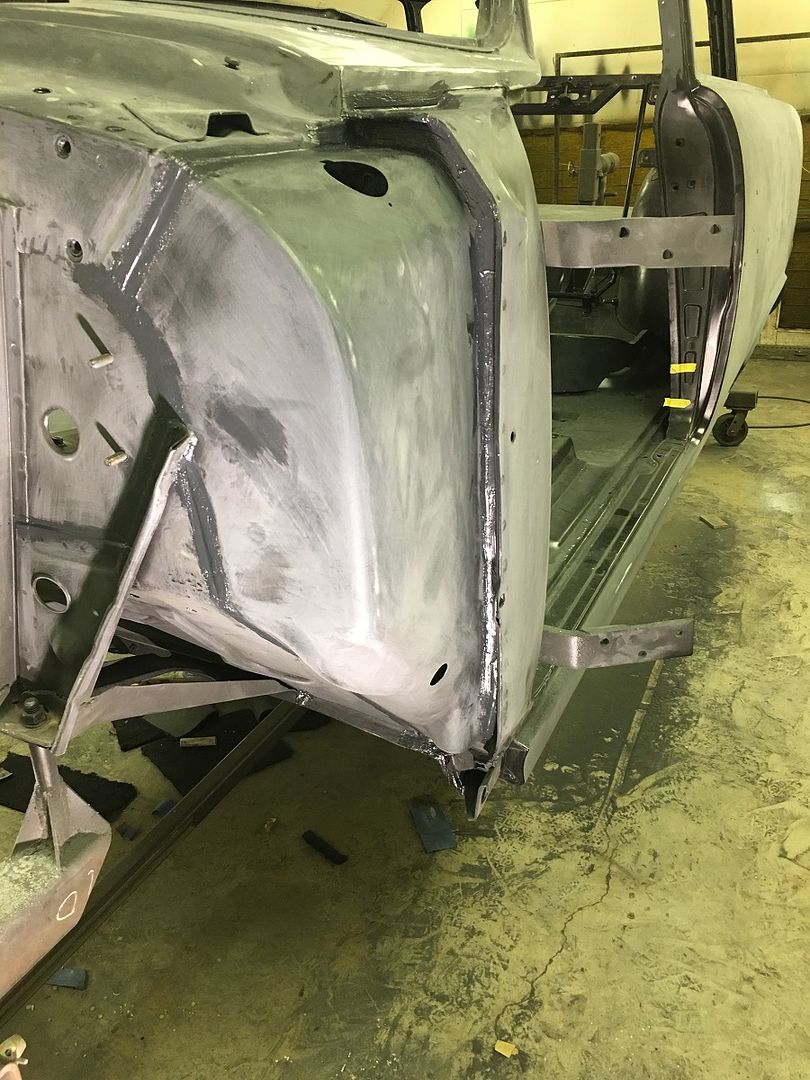 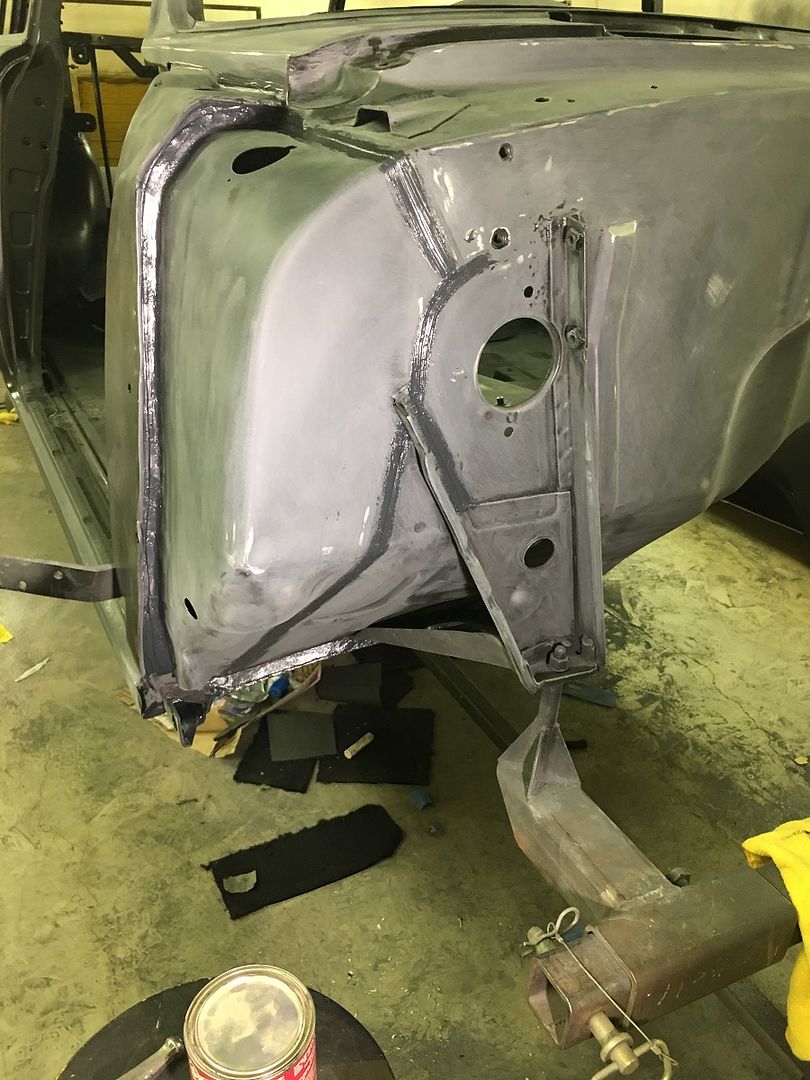 Today's lesson is on media blasting and stretch damage that occurs. Here’s what a sand blaster will do to a roof skin when blasting the braces underneath. 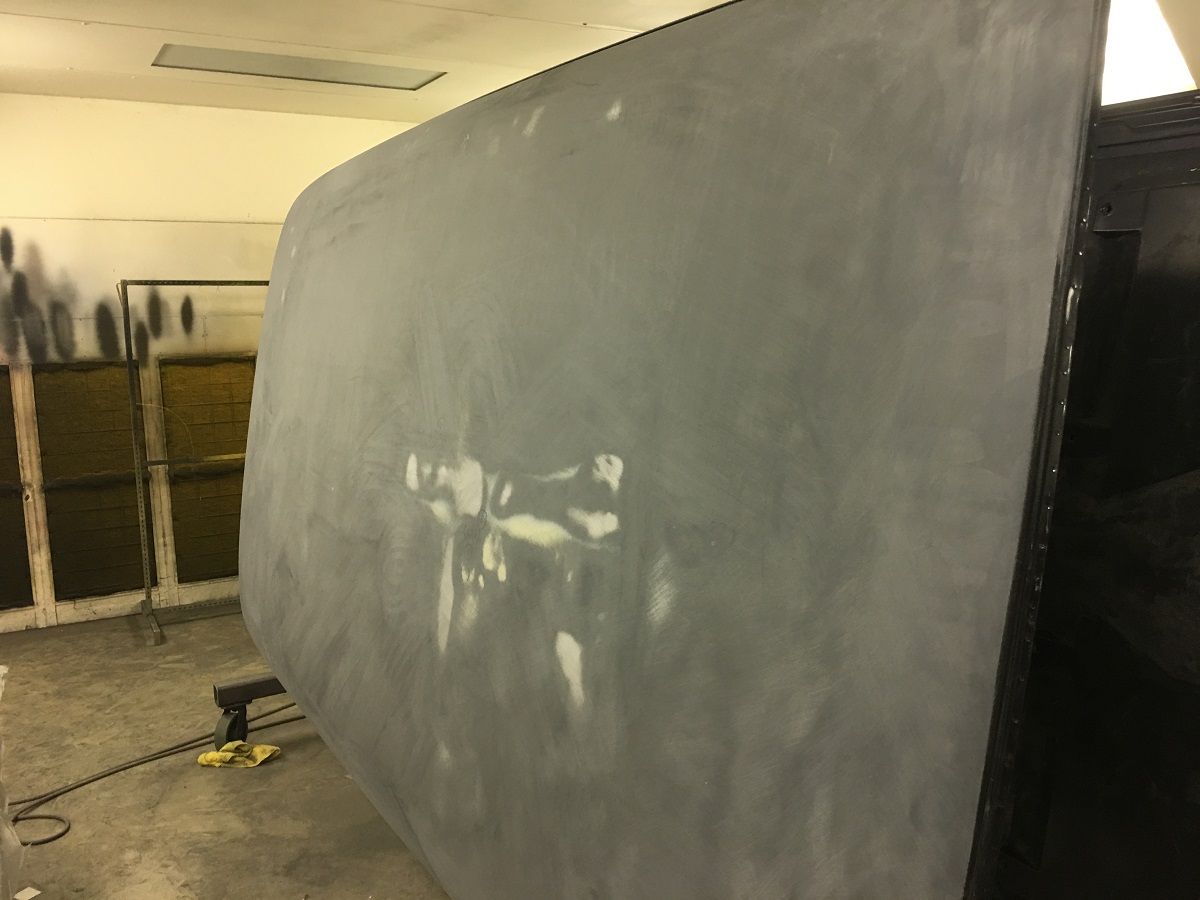 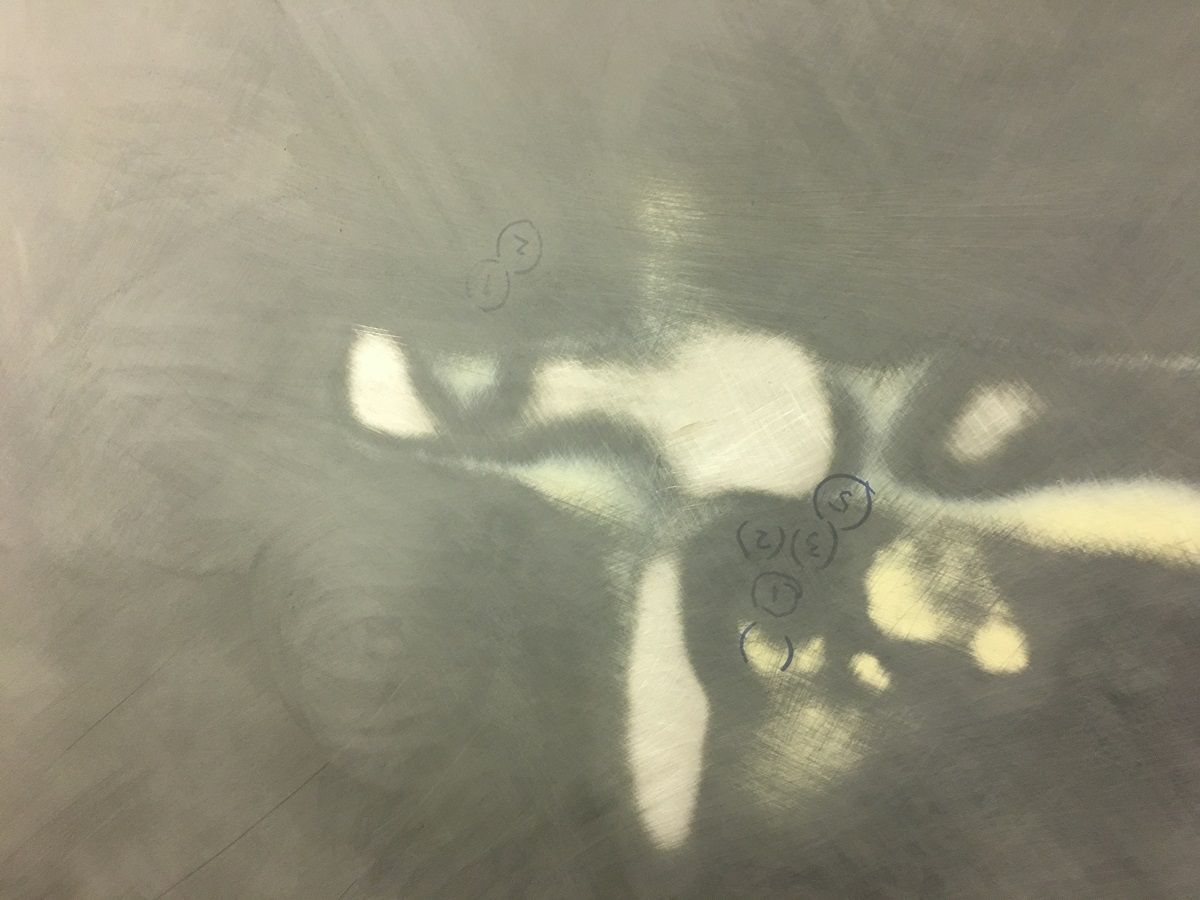 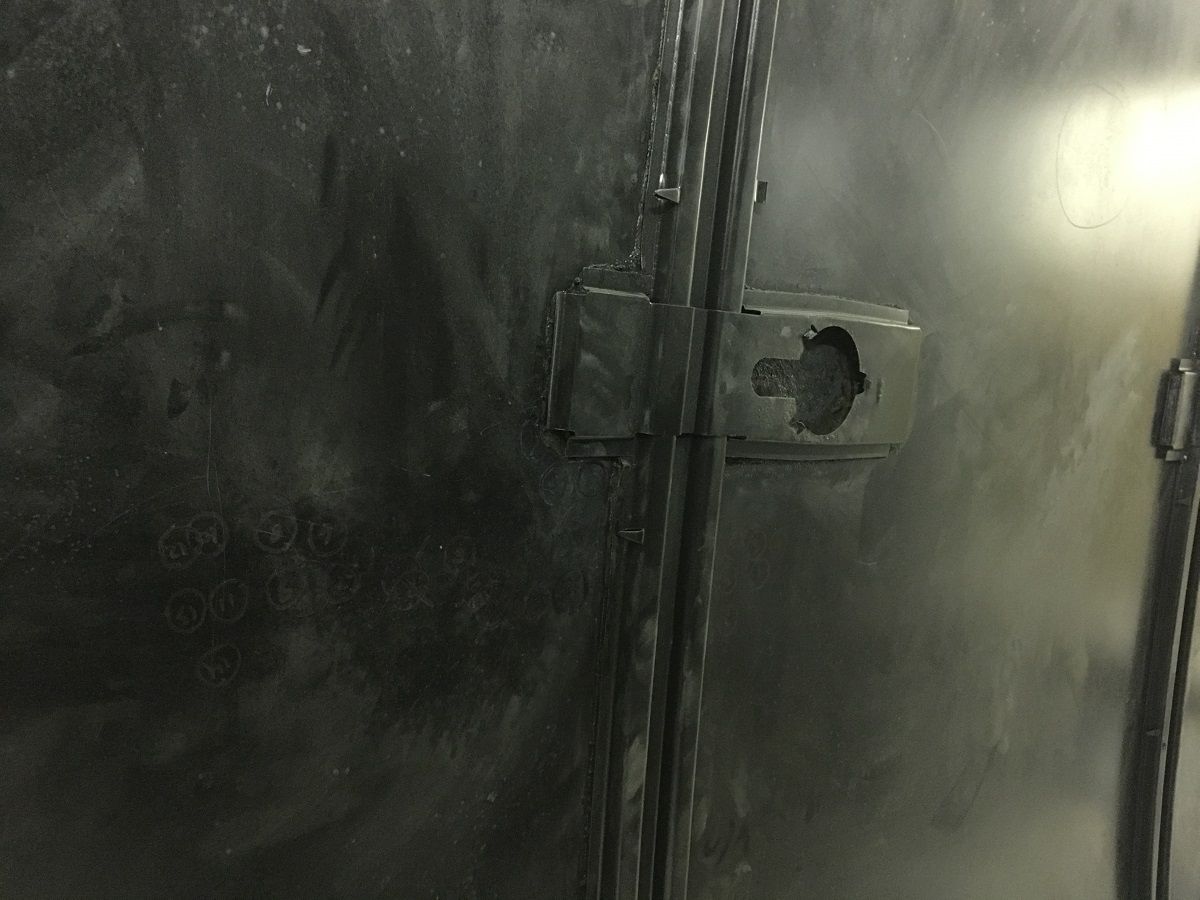 Our blaster was doing the brace from underneath/inside and the inadvertent stray media hitting the adjacent roof skin stretched it, pulling it inward toward the media stream . On the outside the “unstretched” area shows as a high spot, the stretched part that needs shrinking is seen as a low. So if you must media blast any braces or internal structure, block off the skin next to it so no media touches it. Save yourself the extra body work. We fixed the lows by locating the exact spots on the inside that needed shrinking and tapping outward into a small shot bag. To locate, a rare earth magnet is placed outside on the roof skin in each low spot, and some grinding dust finds the magnet on the inside where we can mark the perimeter both inside and out, and work with one person on either side to remove the lows. (See video, magnet marks highs or lows, it doesn’t care) For multiple lows, mark both sides of all spots and number them, so you can move from one spot to the next, calling out the number desired to your shrinking assistant. If your car is too clean to have grinding dust, look under your bench grinder. Magnet use video: https://www.youtube.com/watch?v=HHHTKiWZ2Xo Note on the inside roof skin picture the multiple numbered circles where we found low spots to address. .
__________________
Robert |
|
|
|
|
09-08-2019, 11:57 PM
|
#16 |
|
Registered User
Join Date: Jan 2013
Location: Leonardtown, MD
Posts: 1,635
|
Re: 55 Wagon Progress
So we've been blocking out epoxy primer, it sure is nice to be able to rotate the car where you need it instead of sanding upside down on the bottoms of drip rails.
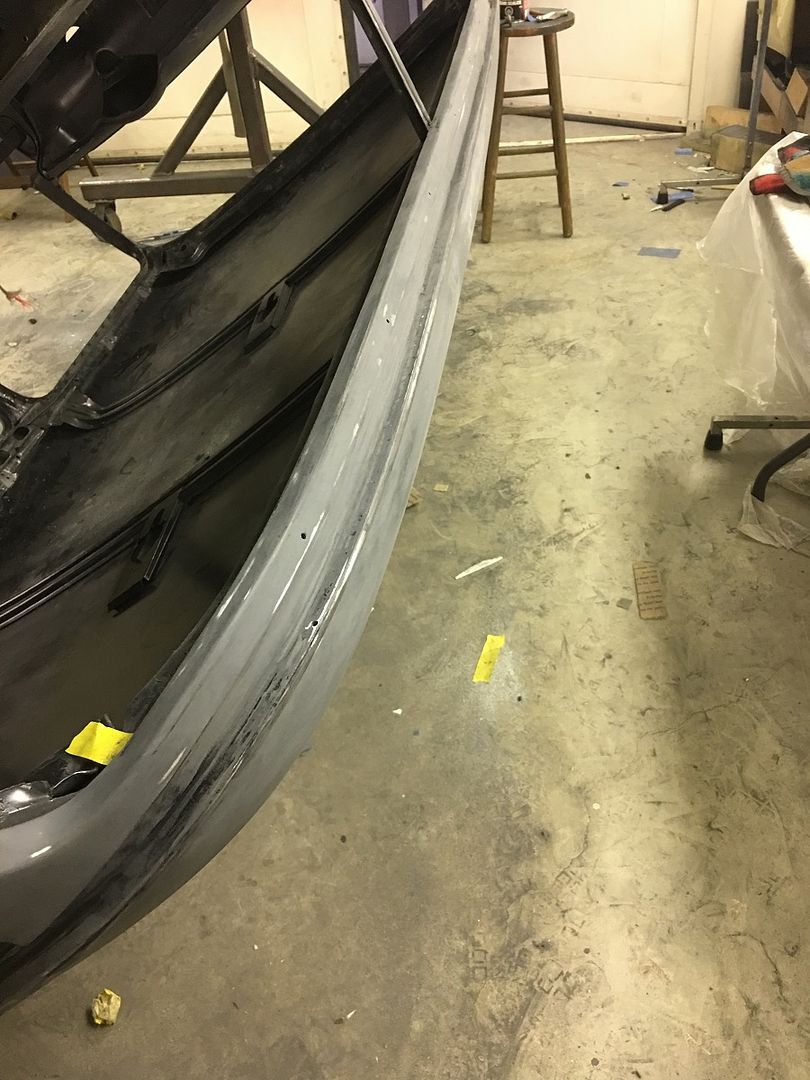 But then you walk past the Driver's A pillar and see holes that shouldn't be there. 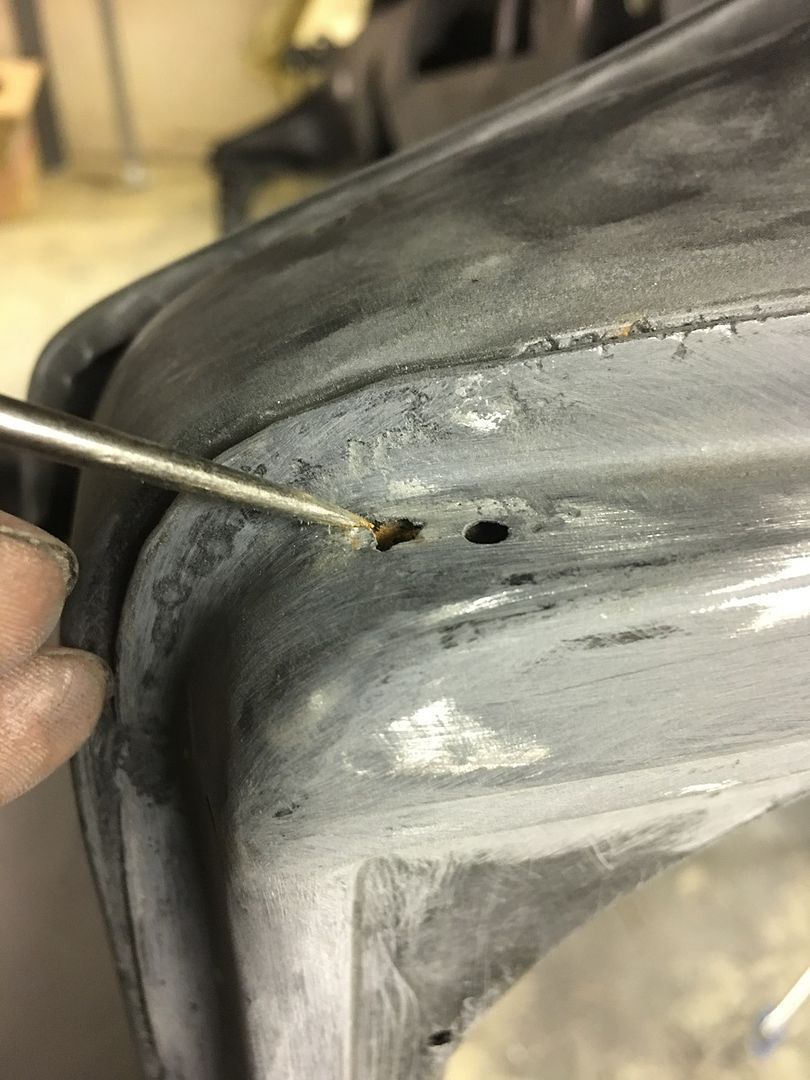 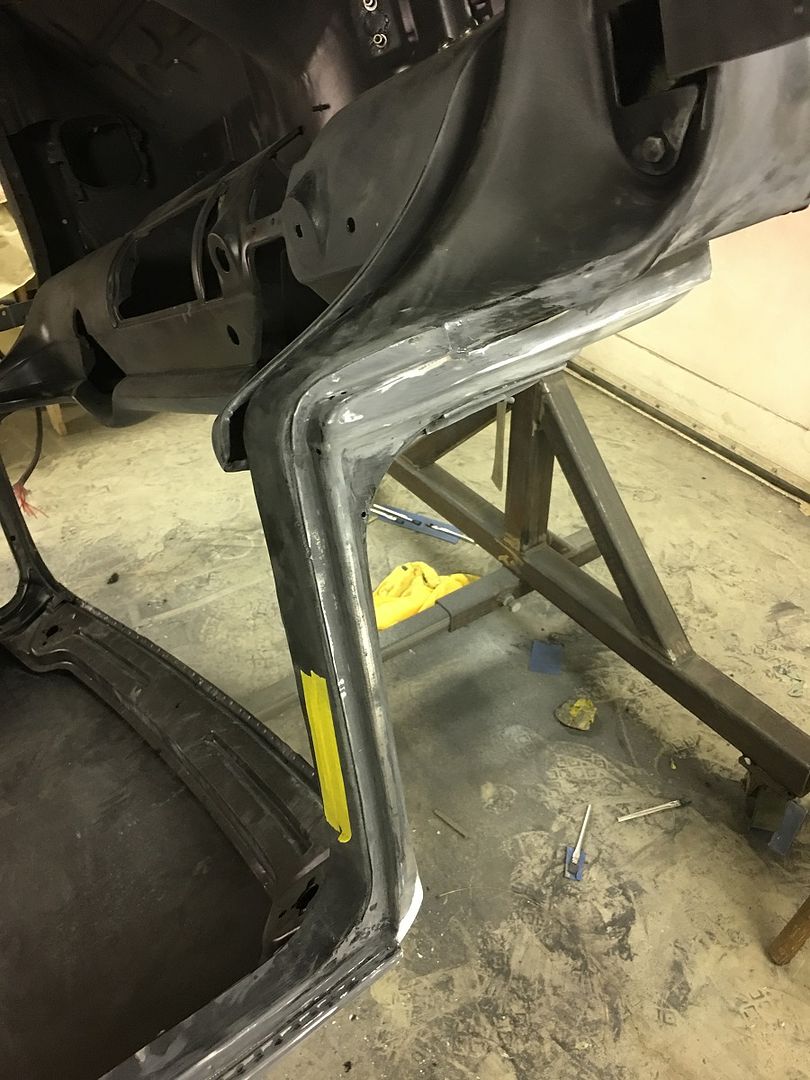 I don't know how I've missed this before. We did have this same repair done to the other side, I guess with the roof damage confined to that same side I must have not thought this side was suspect. Goes to show, check ALL problem areas, especially if issues show on one side.    Inside the hole has a minimal amount of surface rust, especially for 64 years old. Safe to say the damage was caused by water/dirt accumulation between the center structure (the one we're remaking) and the outer skin. Oh well, it's been a while since I've had a back up and punt moment. Glad this was found before the green kandy went on. Starting to make the new replacement for the inside, using 14 gauge cold rolled steel. https://www.youtube.com/watch?v=G7xV0t4WaVY https://www.youtube.com/watch?v=0gpH2WfqWVc Quite a bit if stretch added for the part to match the original..  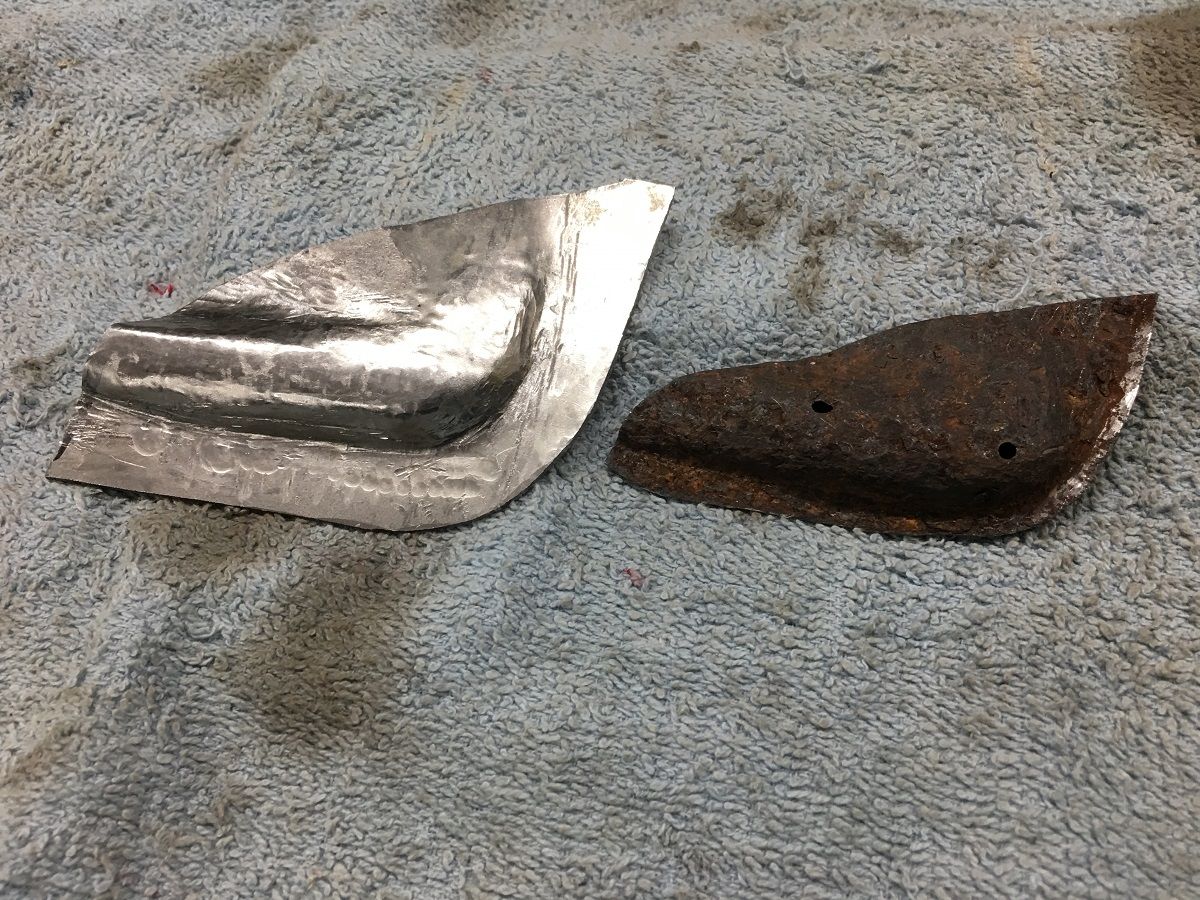 Rough shaped on the MH19, tuned up a bit with body hammers, punches used as anvils, and various other implements of destruction. Trimmed and fitted: 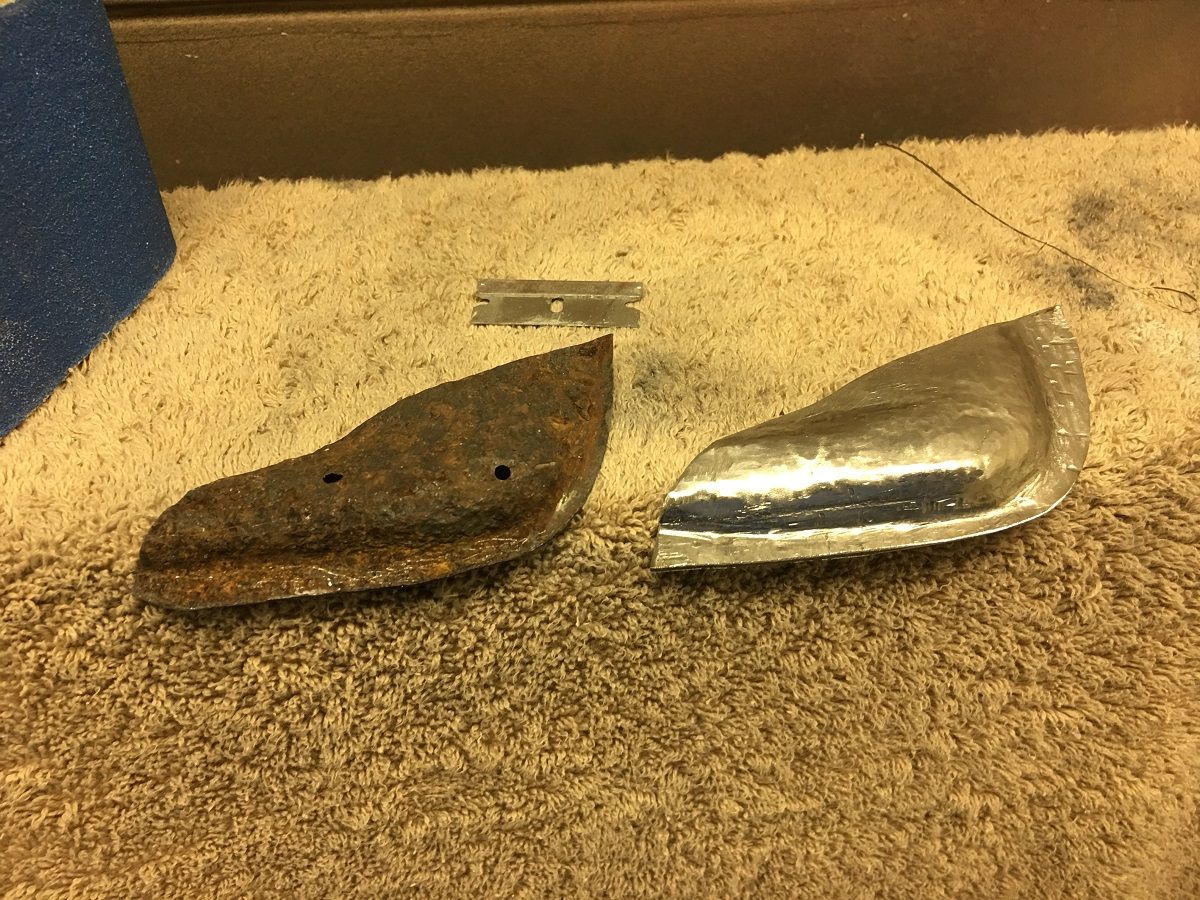 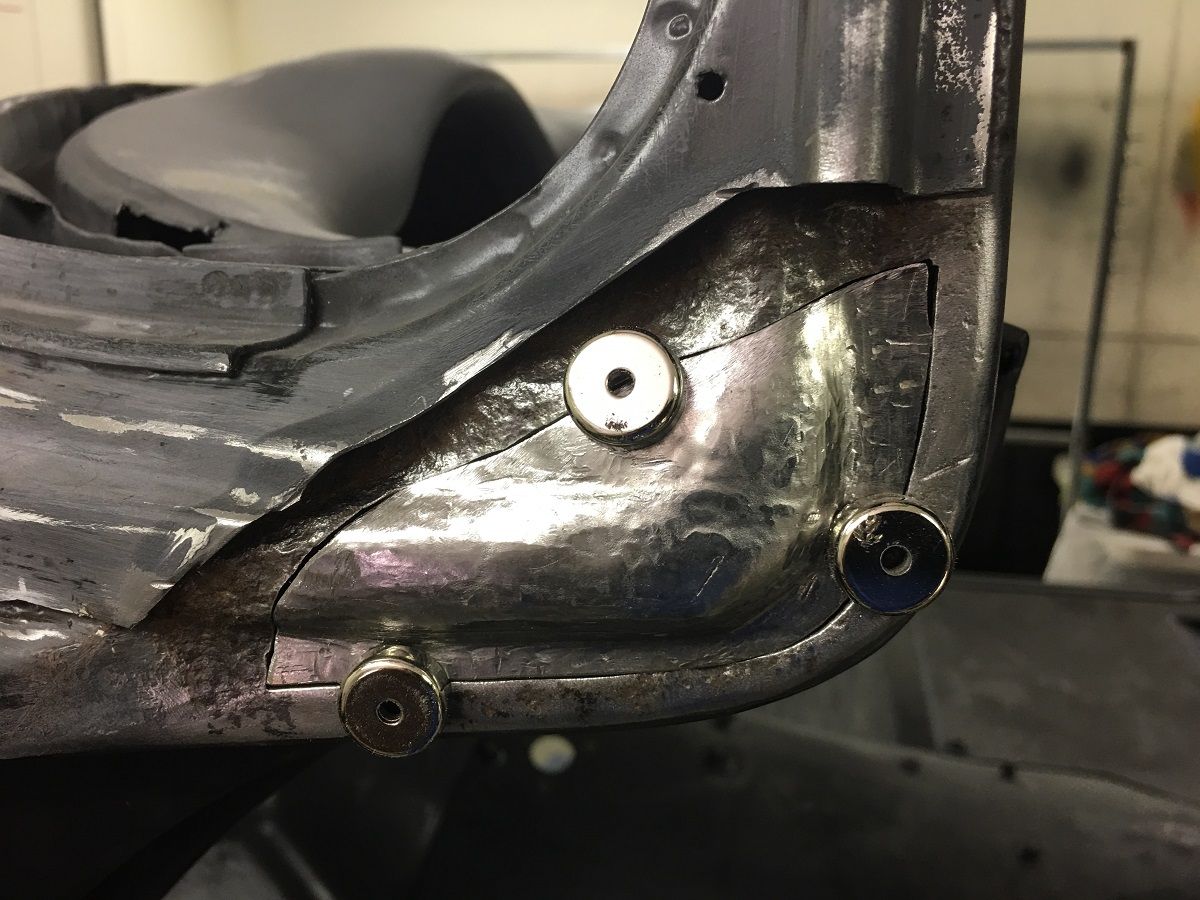 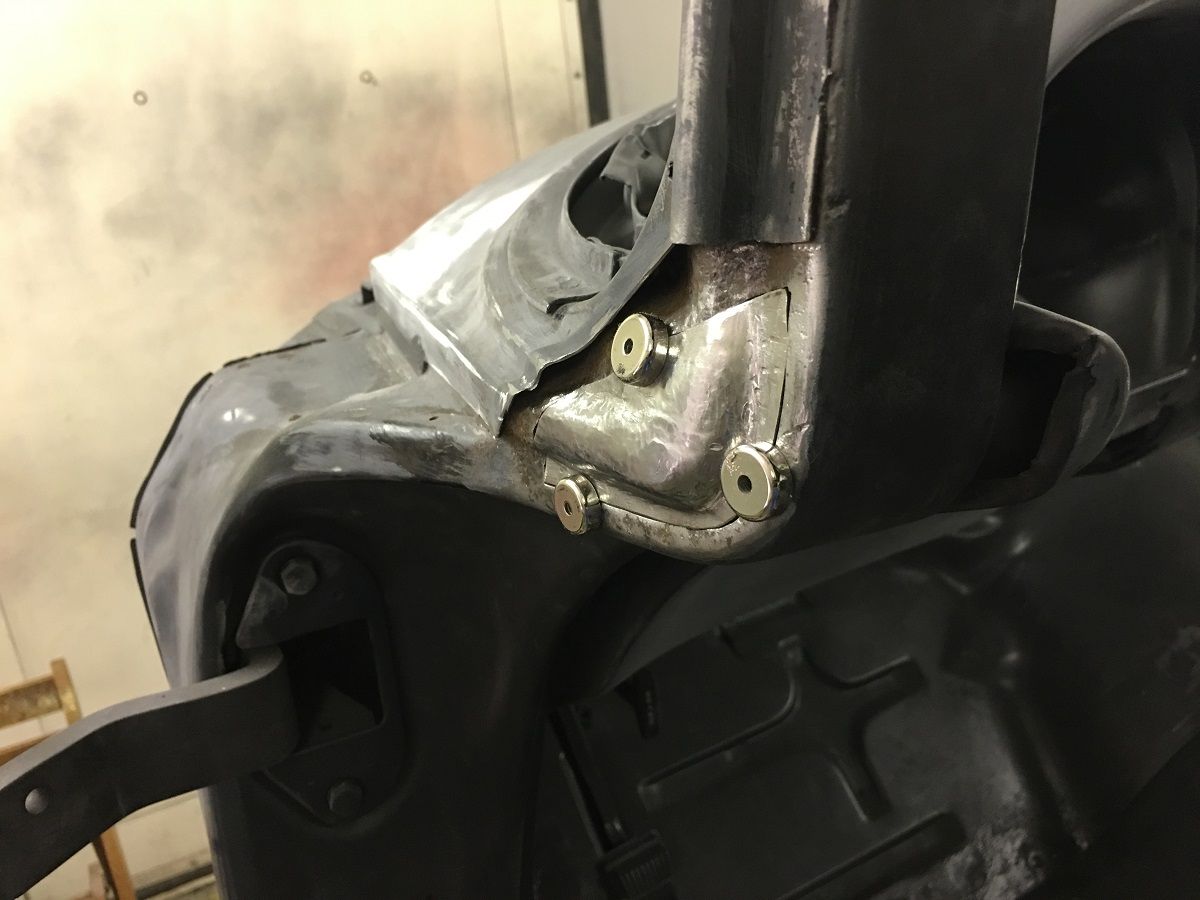 All ready for welding. Meanwhile, Mike has been working on the pointy end of the arrow, here stretching an inside corner to better fit the housing.... https://www.youtube.com/watch?v=ohC3TdJKy1o And adding holes for the plug welds.... 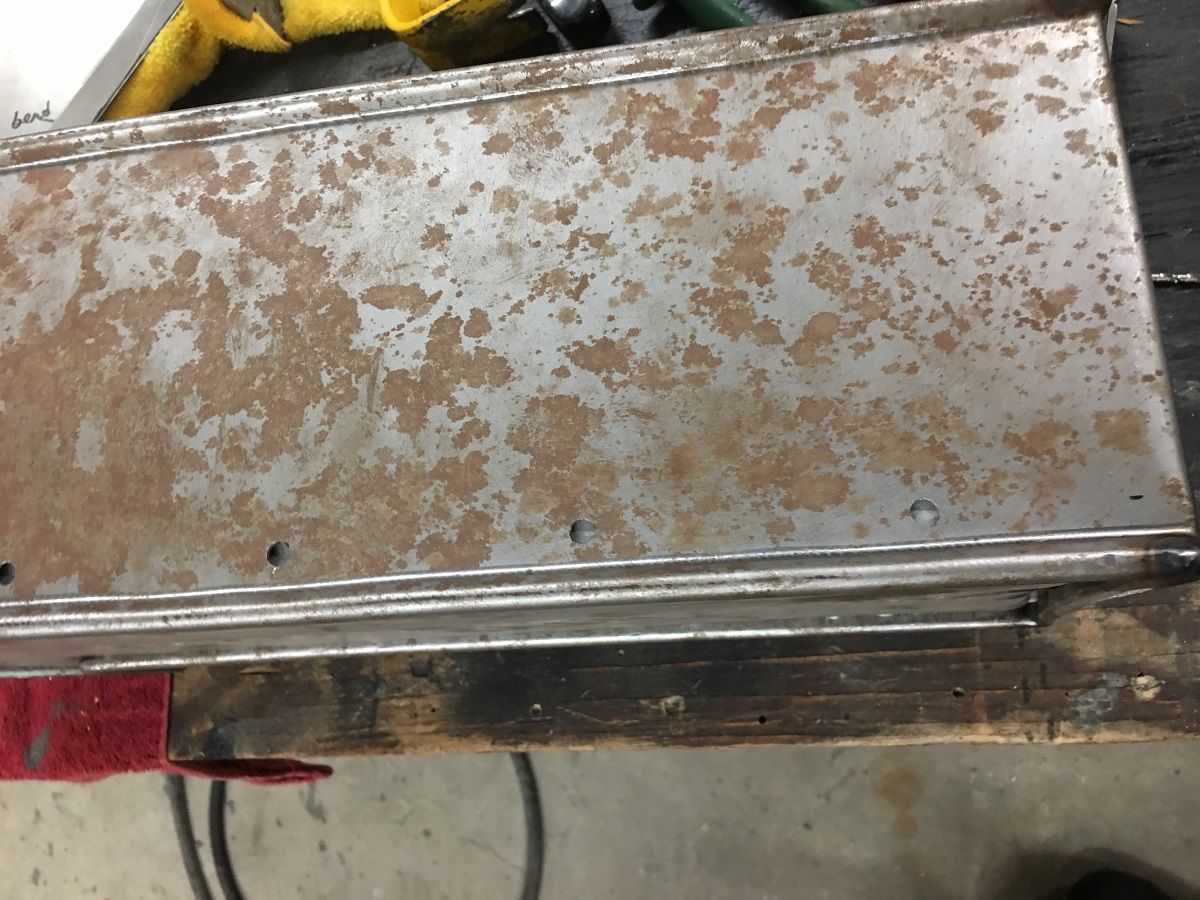 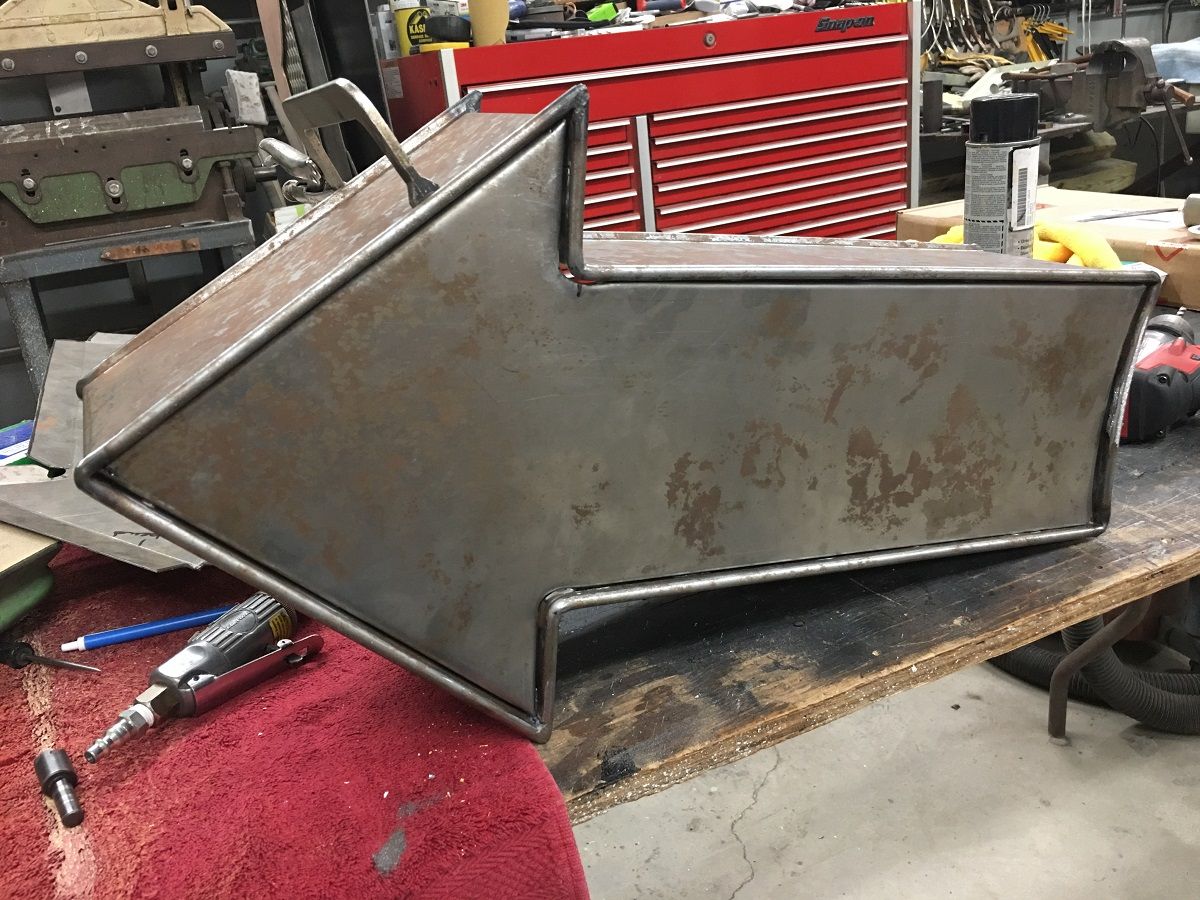 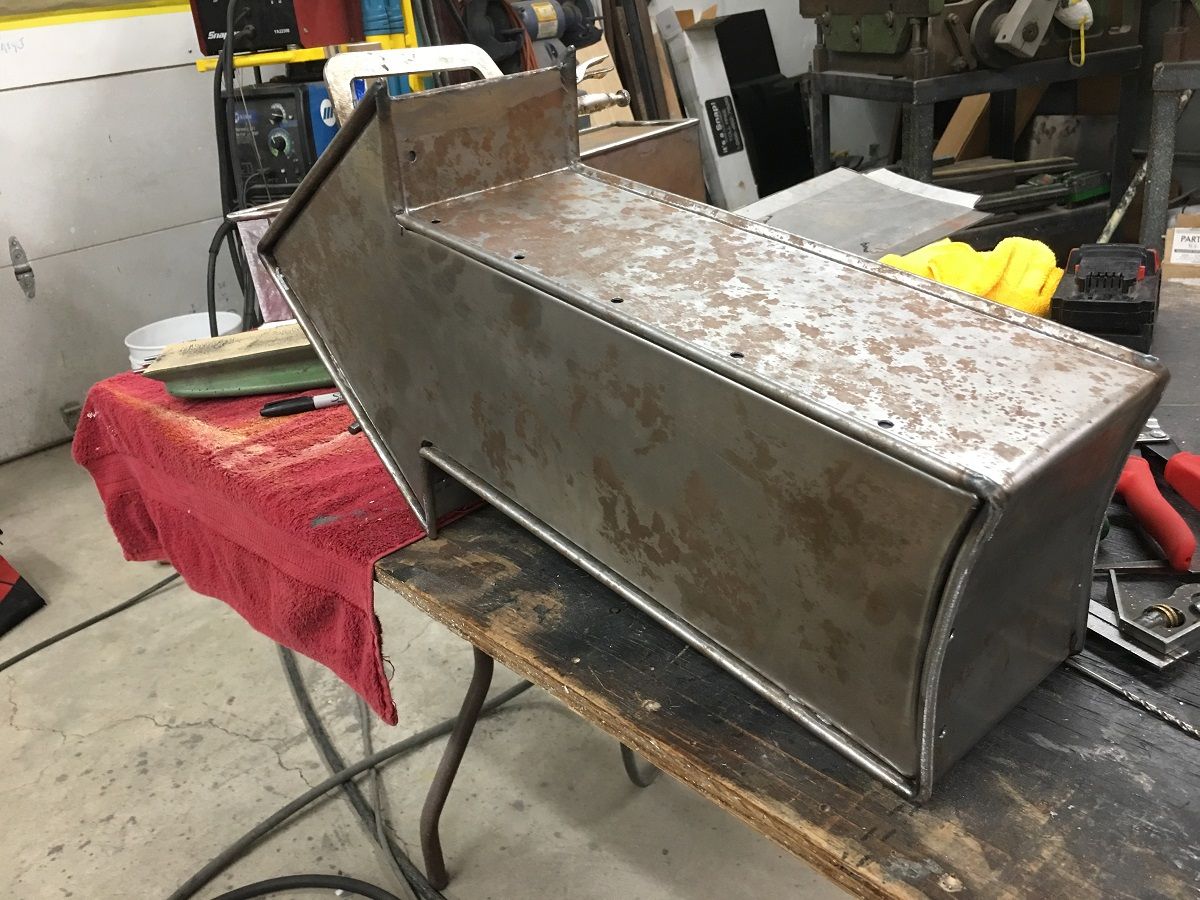
__________________
Robert |
|
|
|
|
09-09-2019, 12:33 AM
|
#17 |
|
Post Whore
Join Date: May 2015
Location: Alabama
Posts: 14,592
|
Re: 55 Wagon Progress
good catch Robert ....were those drain holes in those pieces?
__________________
Mongo...aka Greg RIP Dad RIP Jesse 1981 C30 LQ9 NV4500..http://67-72chevytrucks.com/vboard/s...d.php?t=753598 Mongos AD- LS3 TR6060...http://67-72chevytrucks.com/vboard/s...34#post8522334 Columbus..the 1957 IH 4x4...http://67-72chevytrucks.com/vboard/s...63#post8082563 2023 Chevy Z71..daily driver |
|
|
|
|
09-09-2019, 12:50 AM
|
#18 |
|
Registered User
Join Date: Jan 2013
Location: Leonardtown, MD
Posts: 1,635
|
Re: 55 Wagon Progress
I believe the one hole was factory and for drainage, it is too perfectly round. The other was not..... but it warranted investigation nonetheless.
__________________
Robert |
|
|
|
|
09-09-2019, 09:24 AM
|
#19 |
|
Senior Member
Join Date: Mar 2011
Location: West Plains, Missouri
Posts: 7,553
|
Re: 55 Wagon Progress
Nice repair piece...Jim
__________________
my build thread: http://67-72chevytrucks.com/vboard/s...d.php?t=459839 Jimbo's long bed step build:http://67-72chevytrucks.com/vboard/s...t=464626<br /> |
|
|
|
|
09-18-2019, 12:01 AM
|
#20 |
|
Registered User
Join Date: Jan 2013
Location: Leonardtown, MD
Posts: 1,635
|
Re: 55 Wagon Progress
Thanks Jim!
After a week in FL for the day job, time to get the inner patch welded in place. Tacked using the TIG: 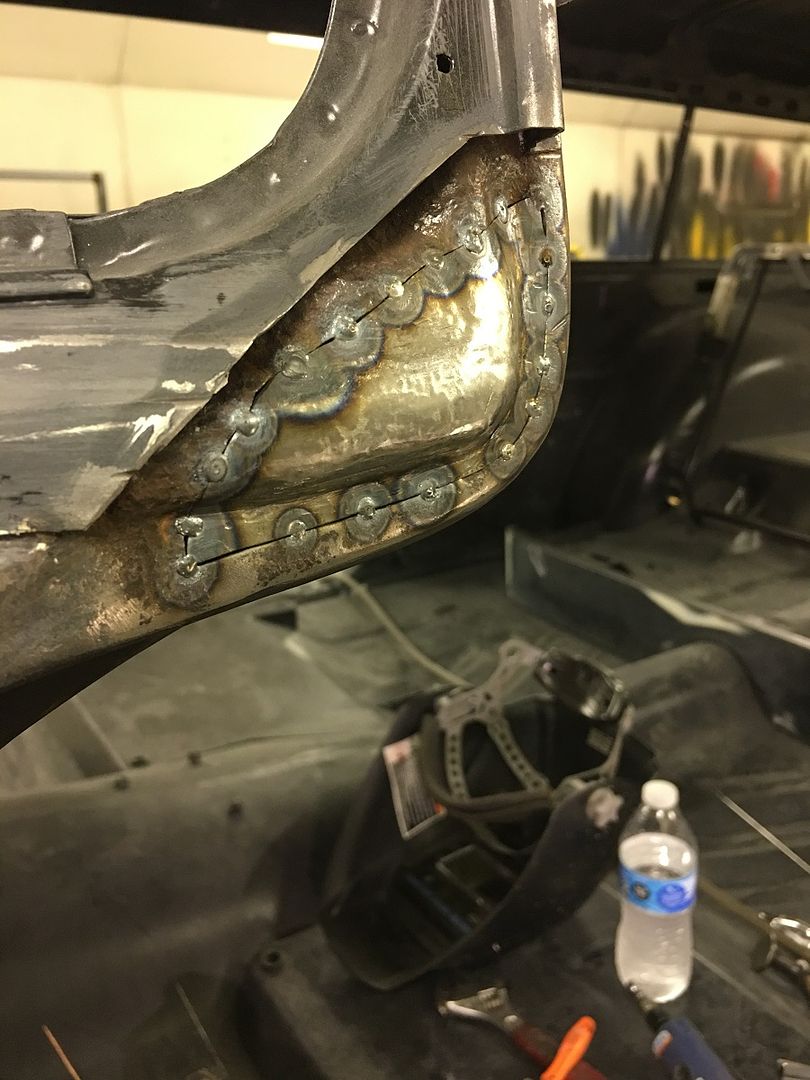 video: https://youtu.be/UixLOAZejMI 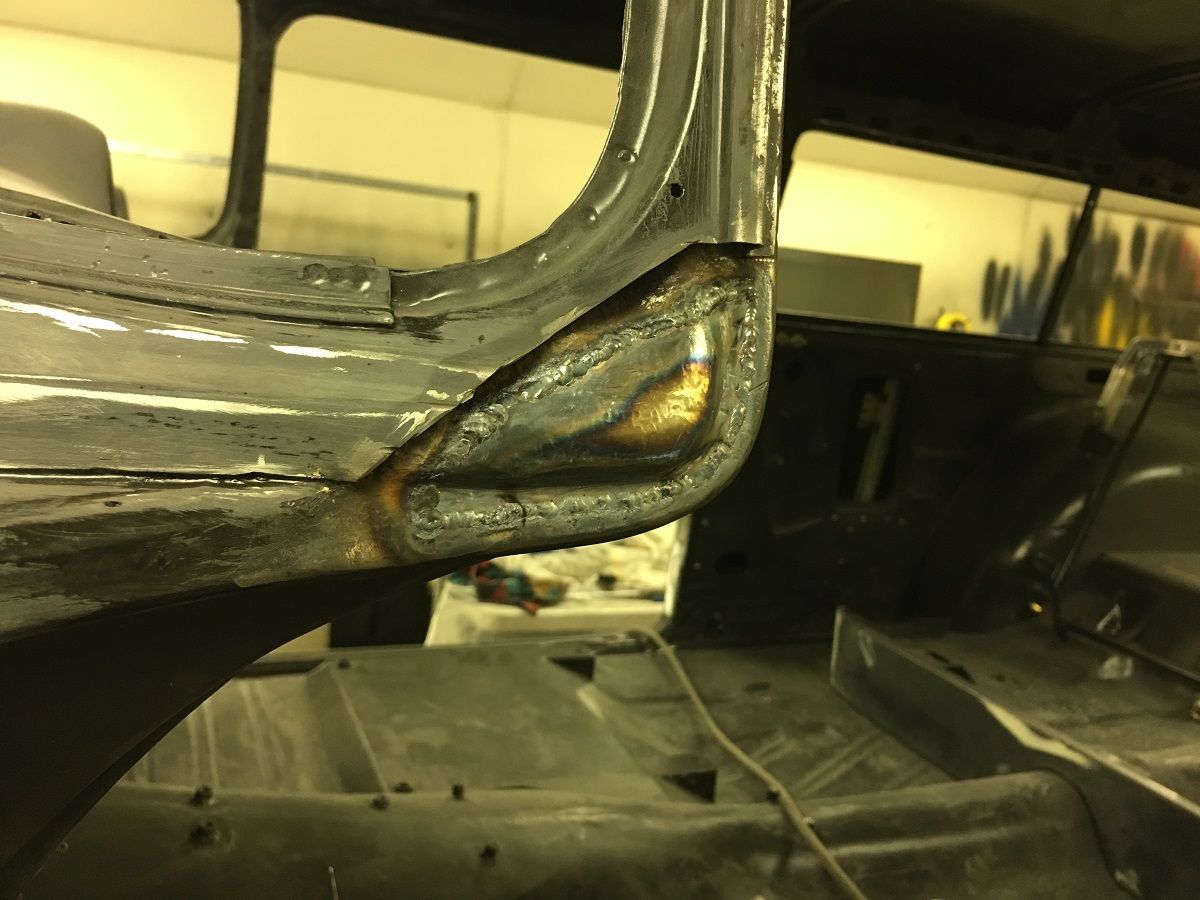 welds dressed: 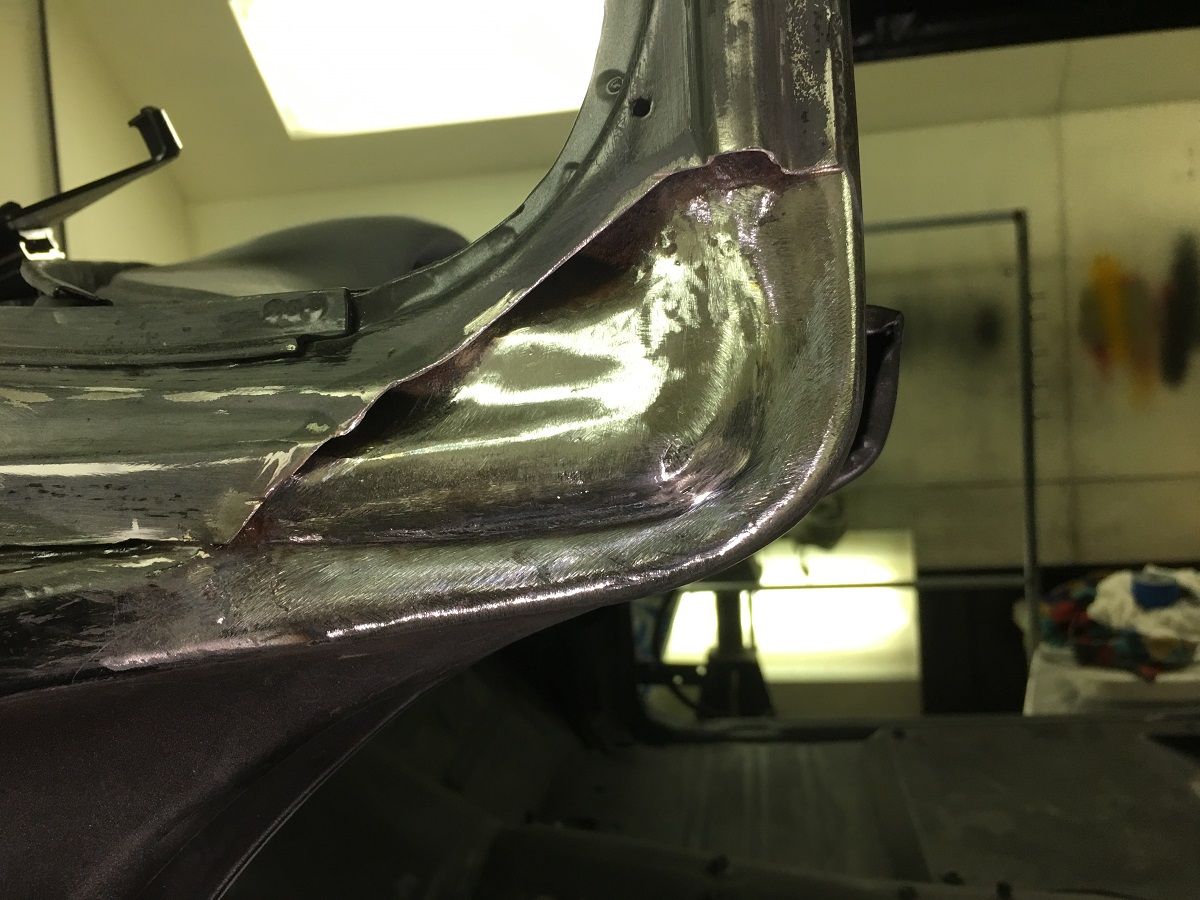 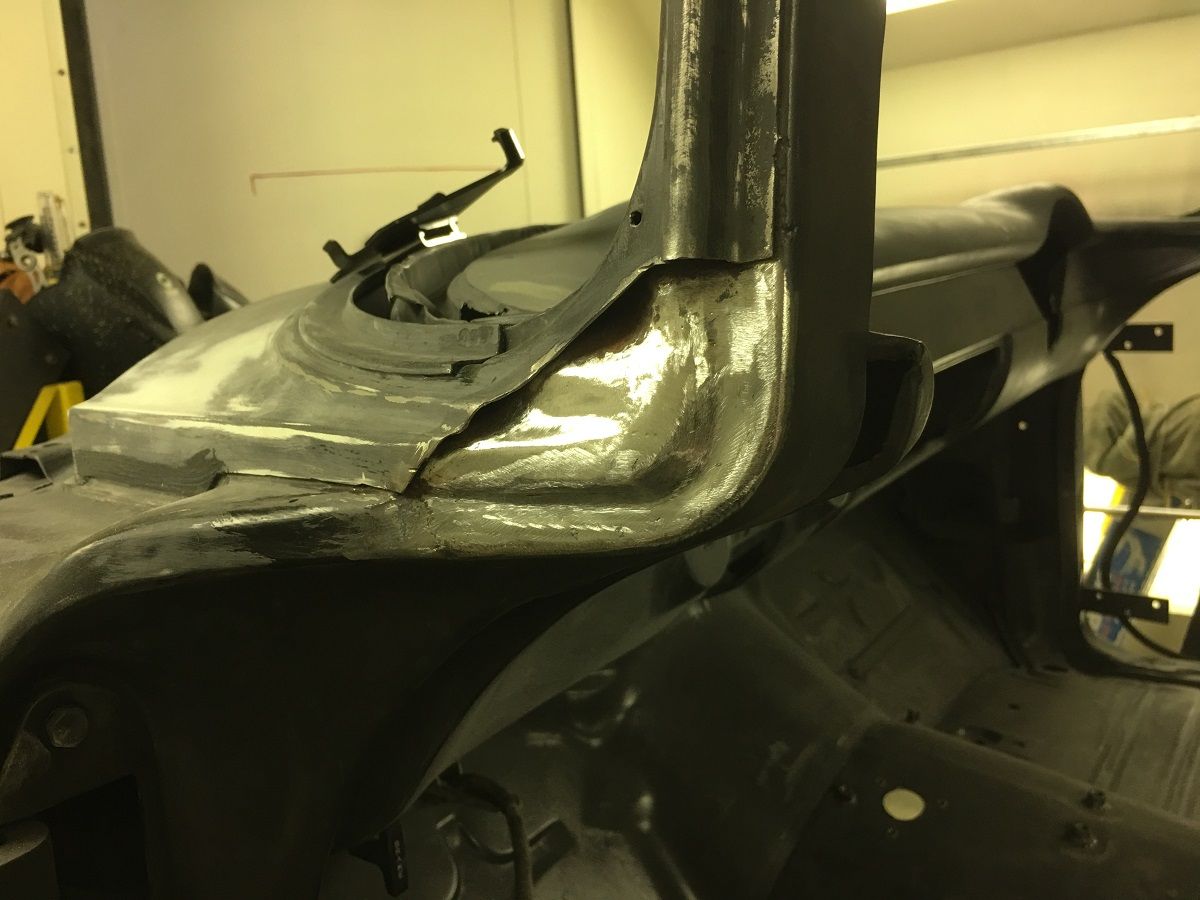 Epoxy primer added: 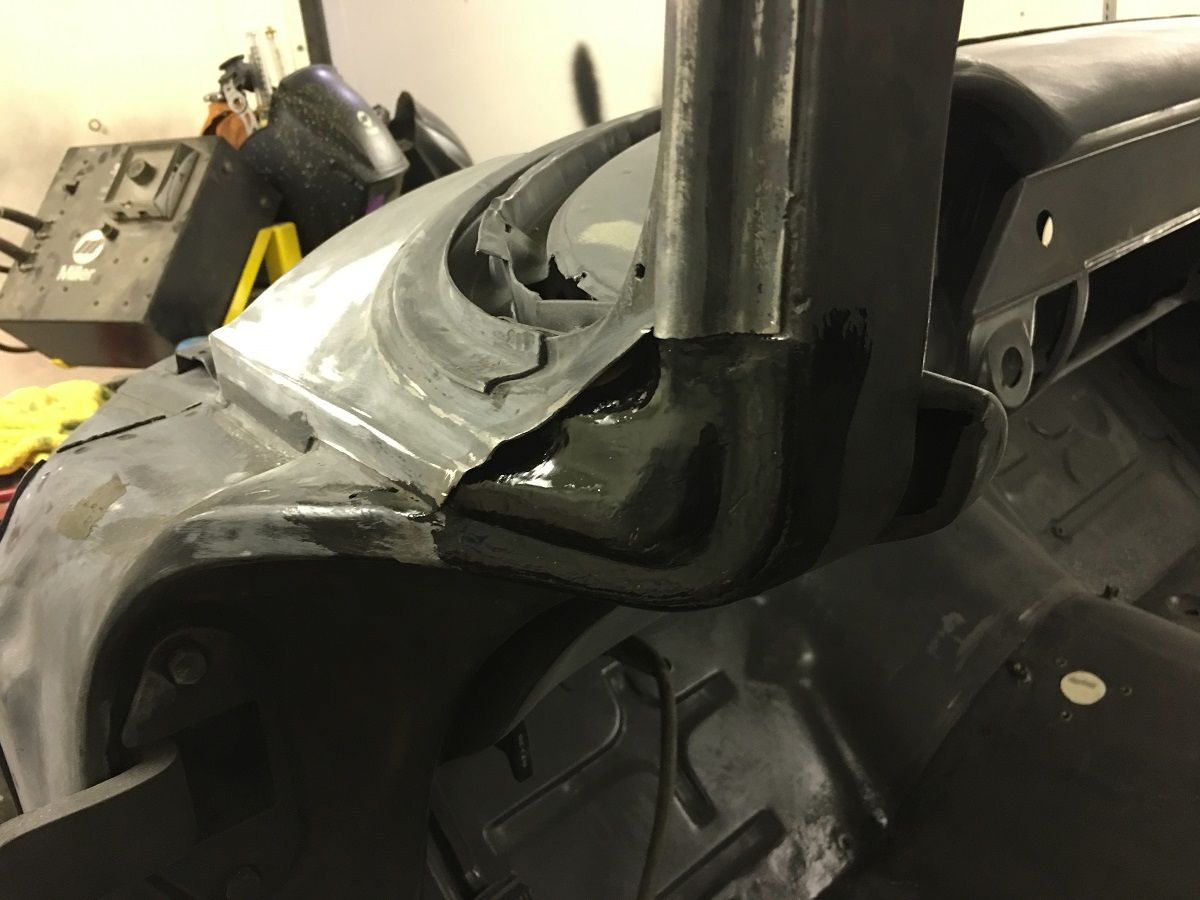
__________________
Robert |
|
|
|
|
09-18-2019, 12:27 AM
|
#21 |
|
Post Whore
Join Date: May 2015
Location: Alabama
Posts: 14,592
|
Re: 55 Wagon Progress
wow ..great work on something thatll never be seen..shows commitment...
__________________
Mongo...aka Greg RIP Dad RIP Jesse 1981 C30 LQ9 NV4500..http://67-72chevytrucks.com/vboard/s...d.php?t=753598 Mongos AD- LS3 TR6060...http://67-72chevytrucks.com/vboard/s...34#post8522334 Columbus..the 1957 IH 4x4...http://67-72chevytrucks.com/vboard/s...63#post8082563 2023 Chevy Z71..daily driver |
|
|
|
|
09-18-2019, 12:41 AM
|
#22 |
|
Registered User
Join Date: Jan 2003
Location: Safford,AZ
Posts: 3,613
|
Re: 55 Wagon Progress
nice!
|
|
|
|
|
09-20-2019, 11:16 PM
|
#23 |
|
Registered User
Join Date: Jan 2013
Location: Leonardtown, MD
Posts: 1,635
|
Re: 55 Wagon Progress
Thanks Guys!
Now to get our outer patch fabricated.. The corner is going to need a GRUNCH of shrinking.. We started on the Baileigh, but the dies are only going to get us so far. So some tuck shrinking with some heat for persuasion was used.. 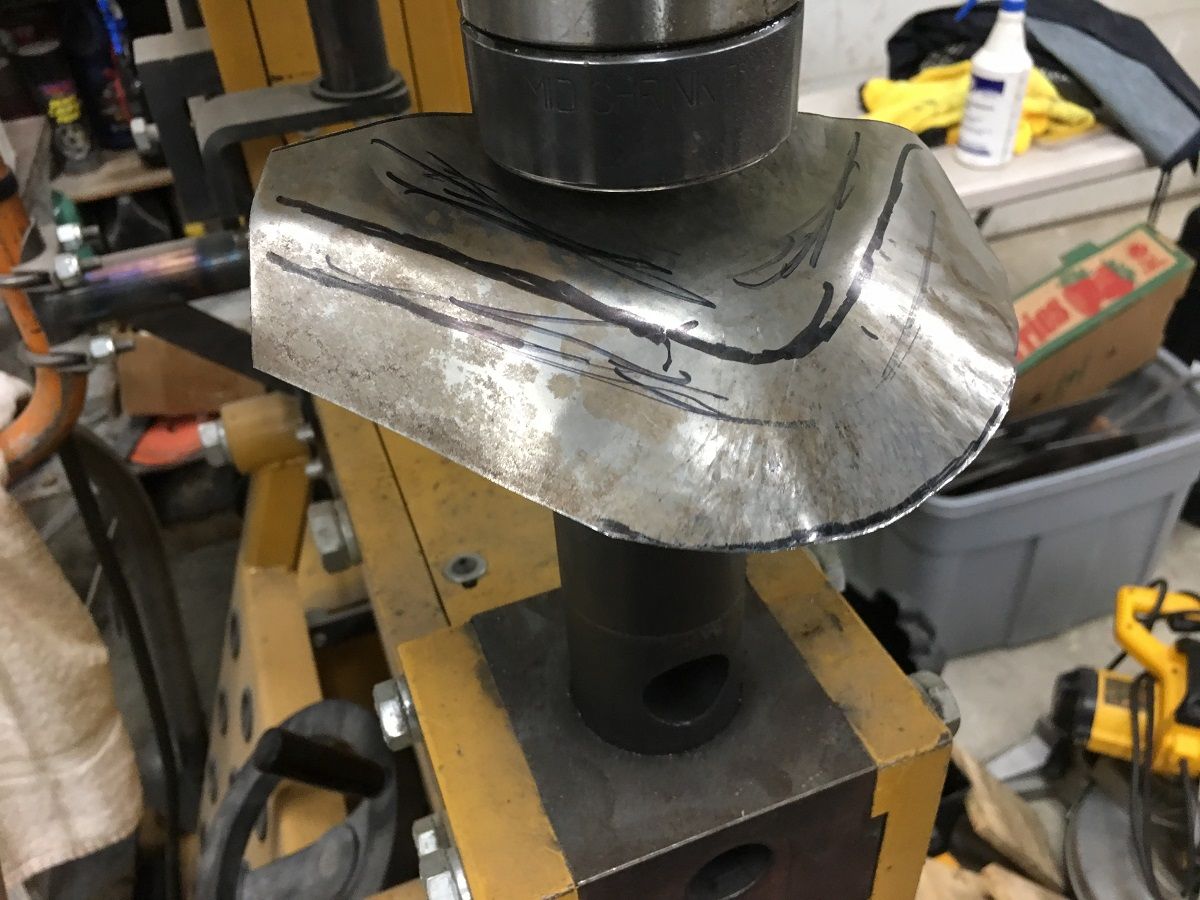 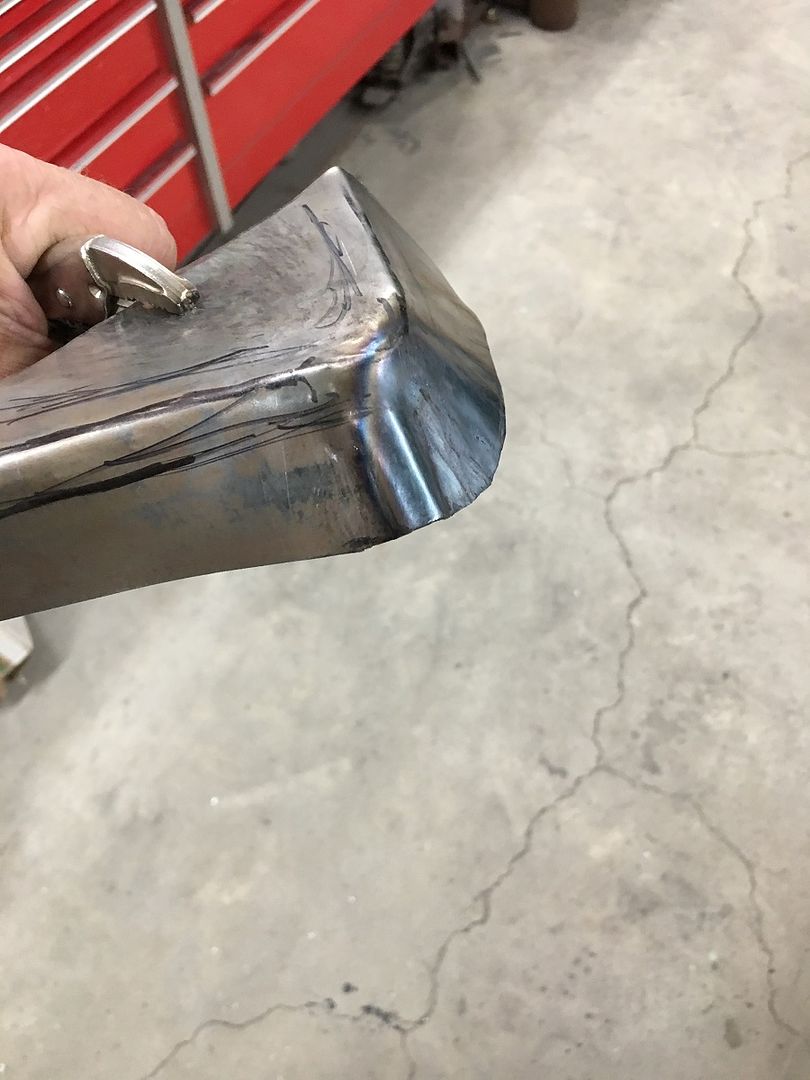 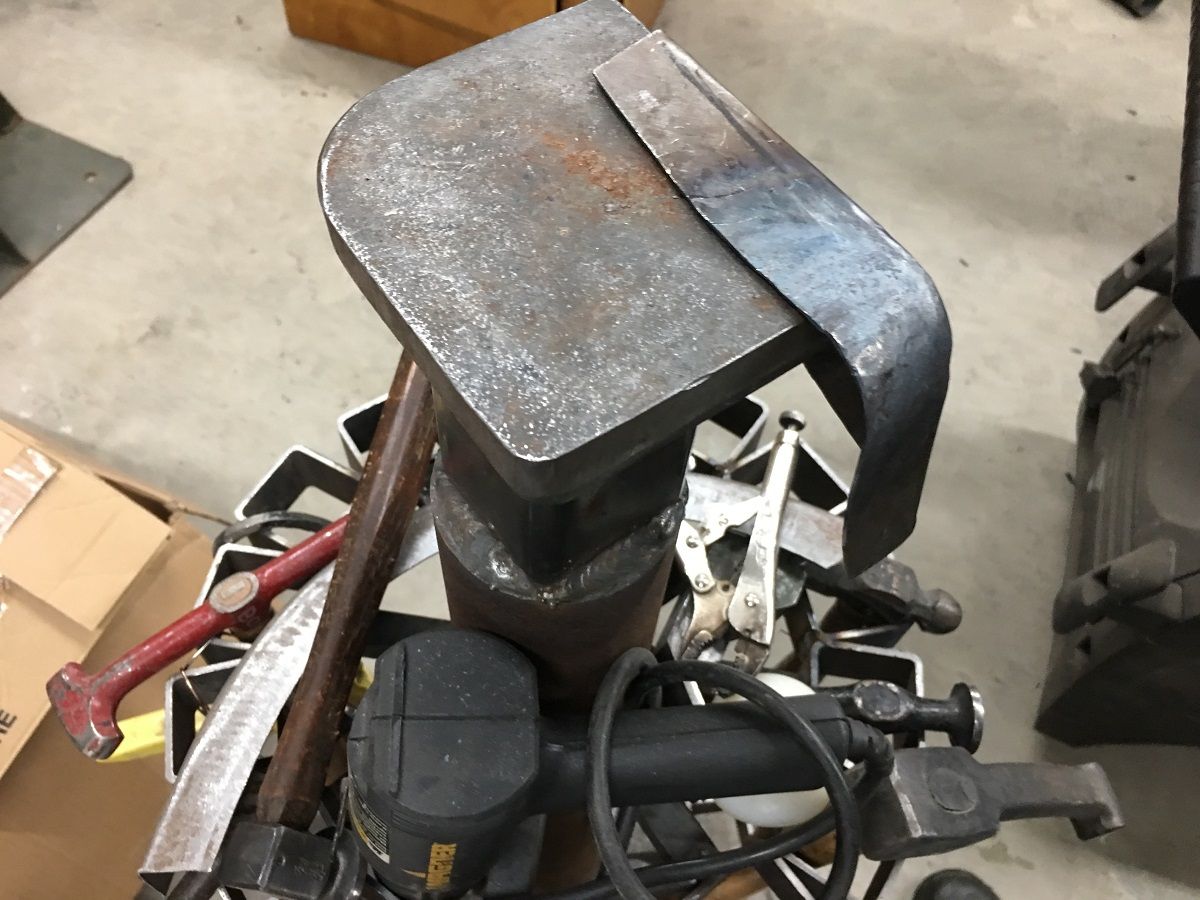 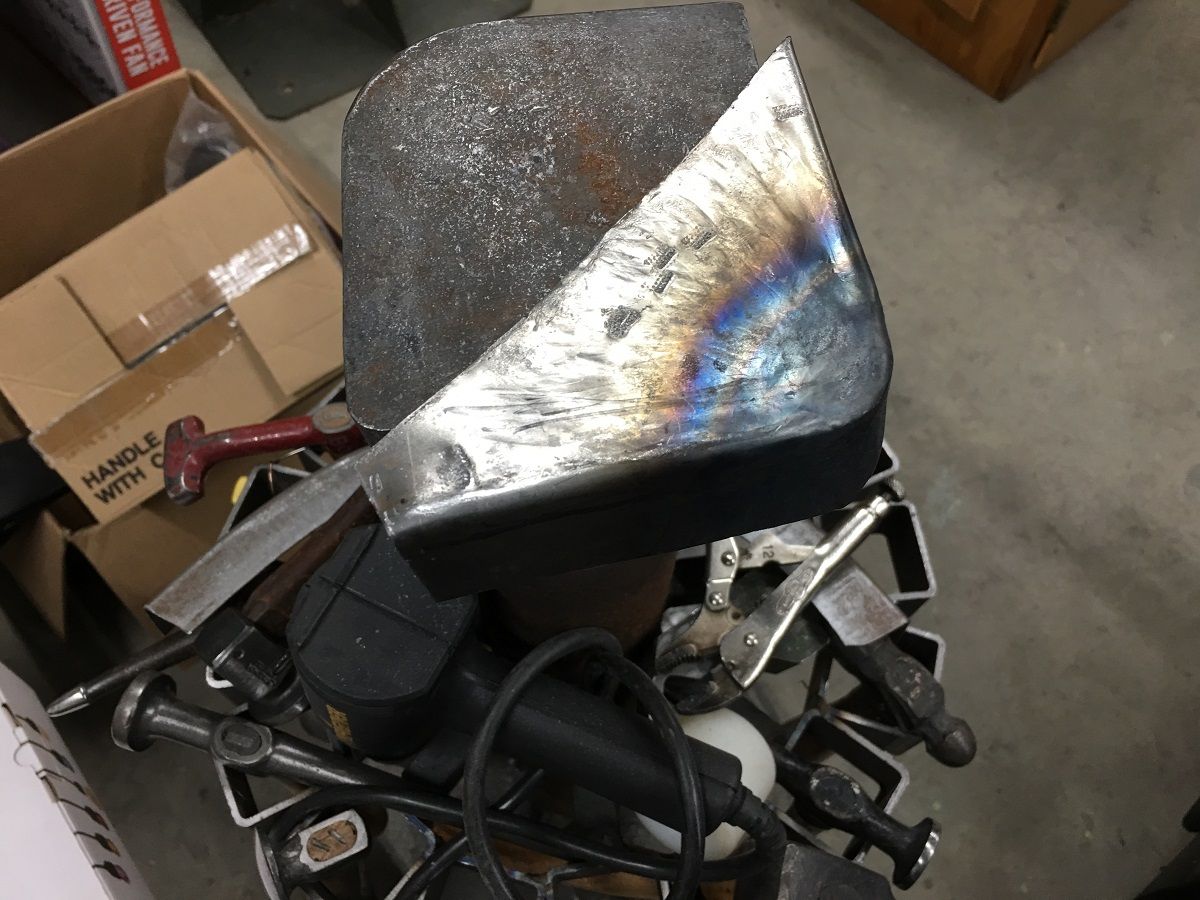 A tipping wheel in the bead roller was used to mark our bend line, and an upper press brake die used as an anvil to hammer the flanges over.. 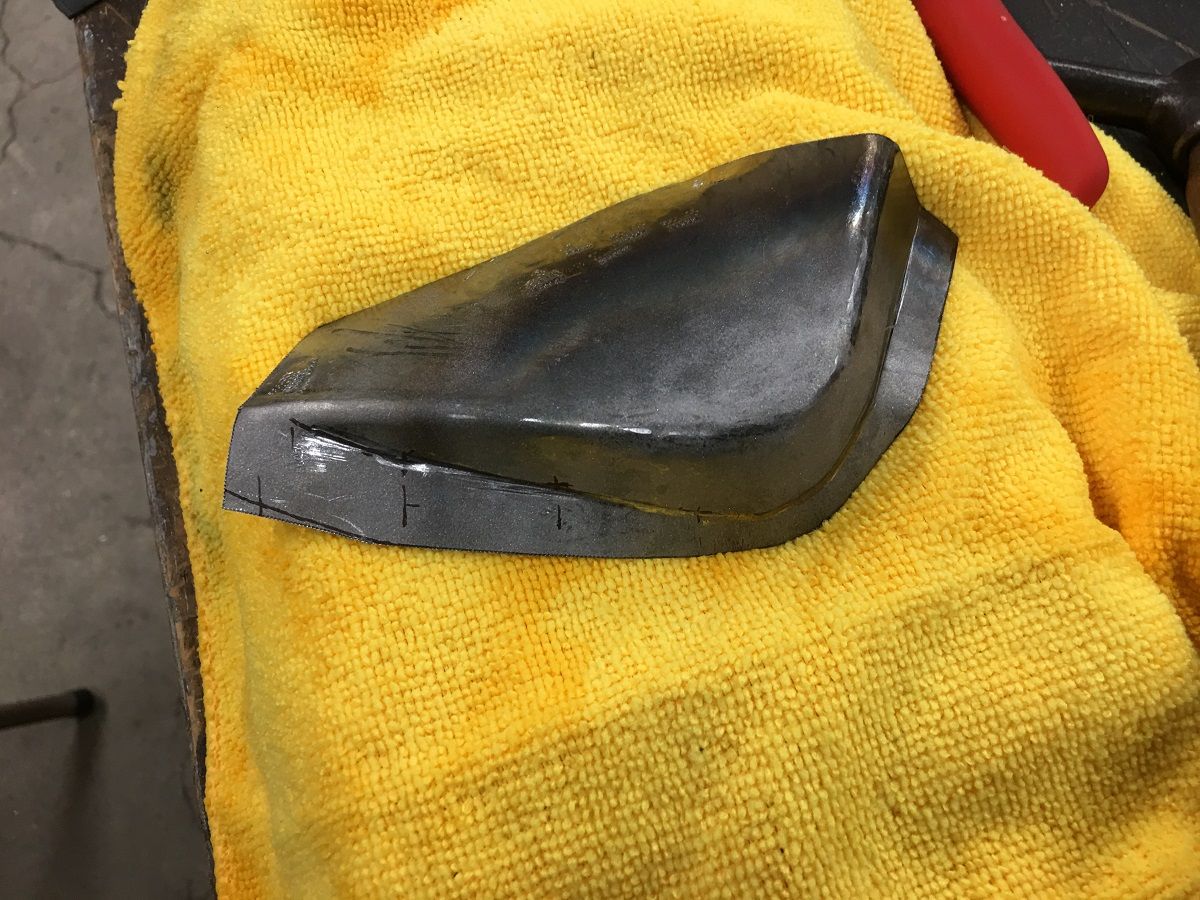 Some hammer action to stretch the corner flange so it will tip the full 90* https://www.youtube.com/watch?v=_FEIEQoGzdg 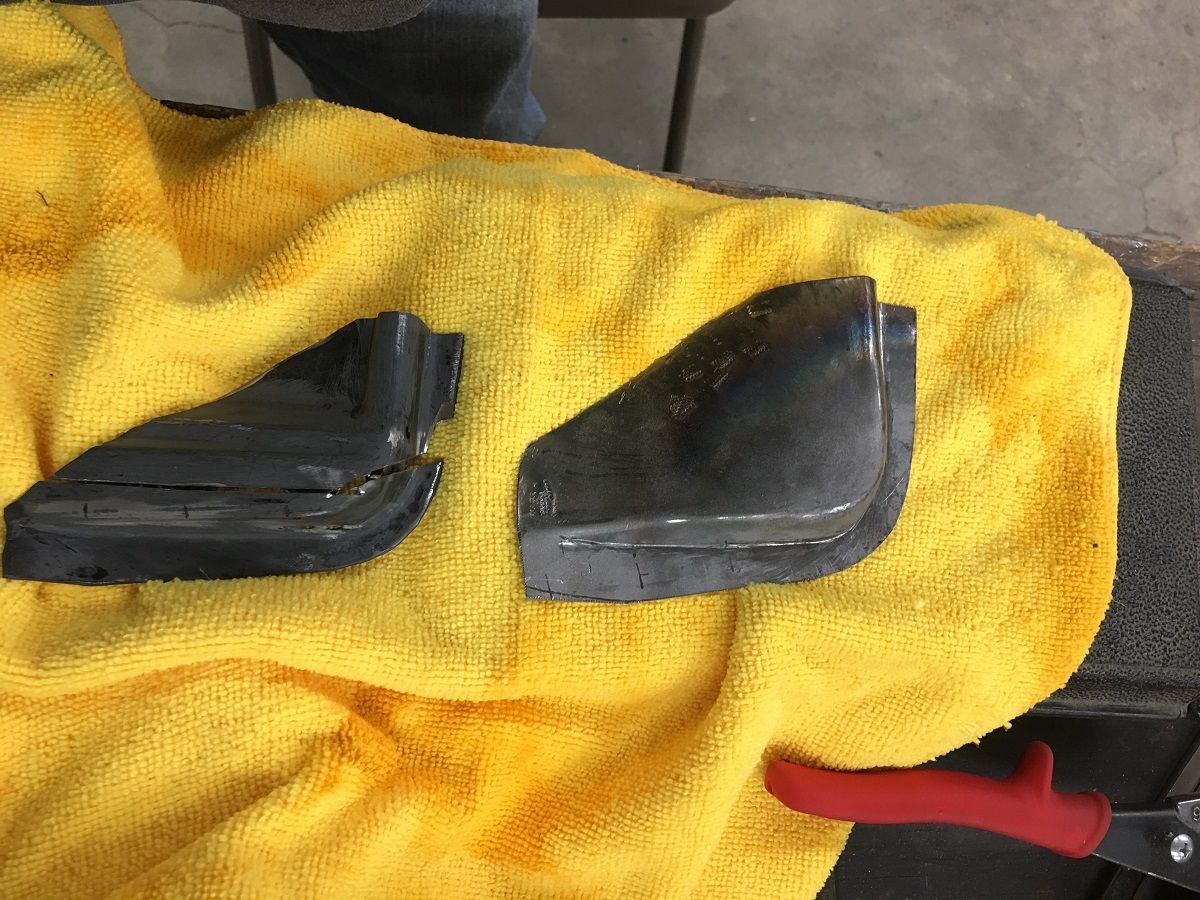 I missed some in process pictures here, but various hammers, anvils, punches, and other implements of destruction were employed to give us our basic shape... 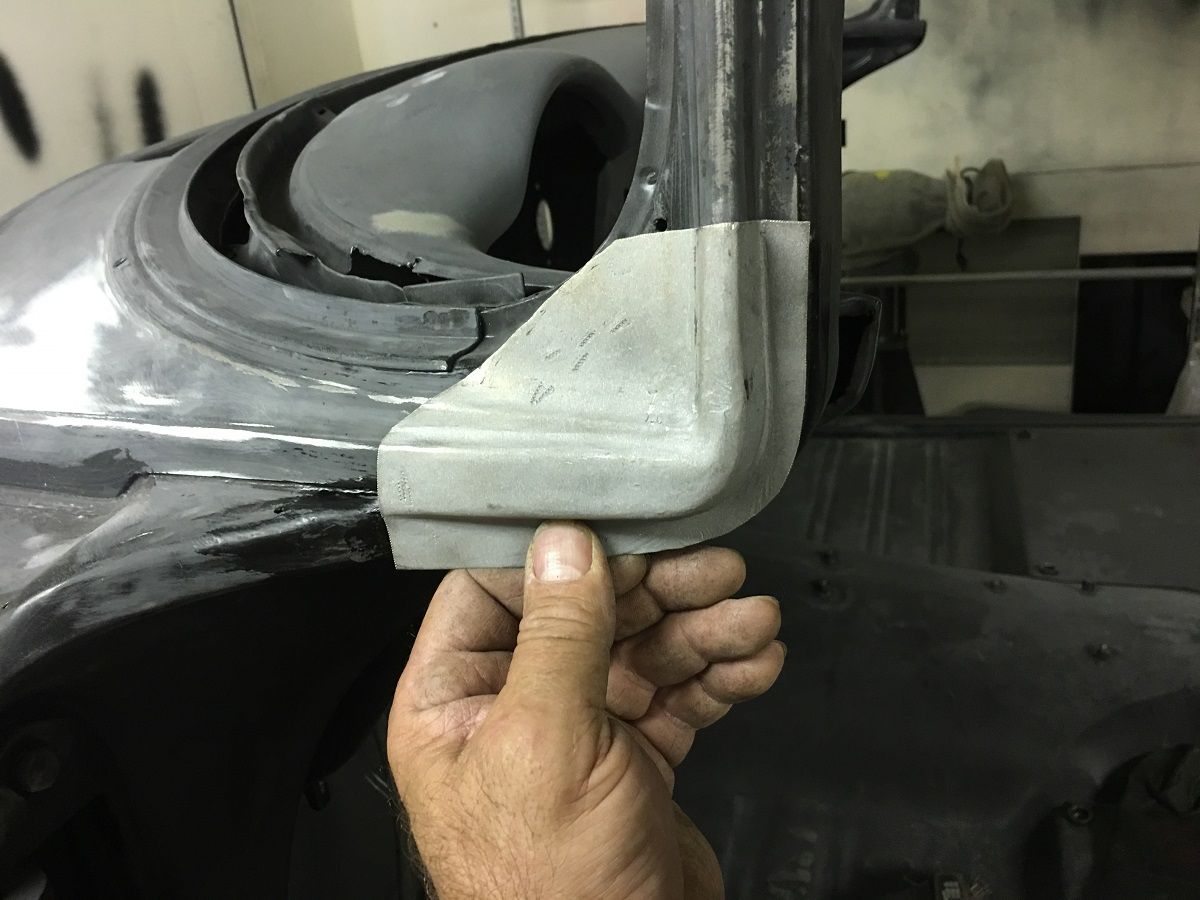 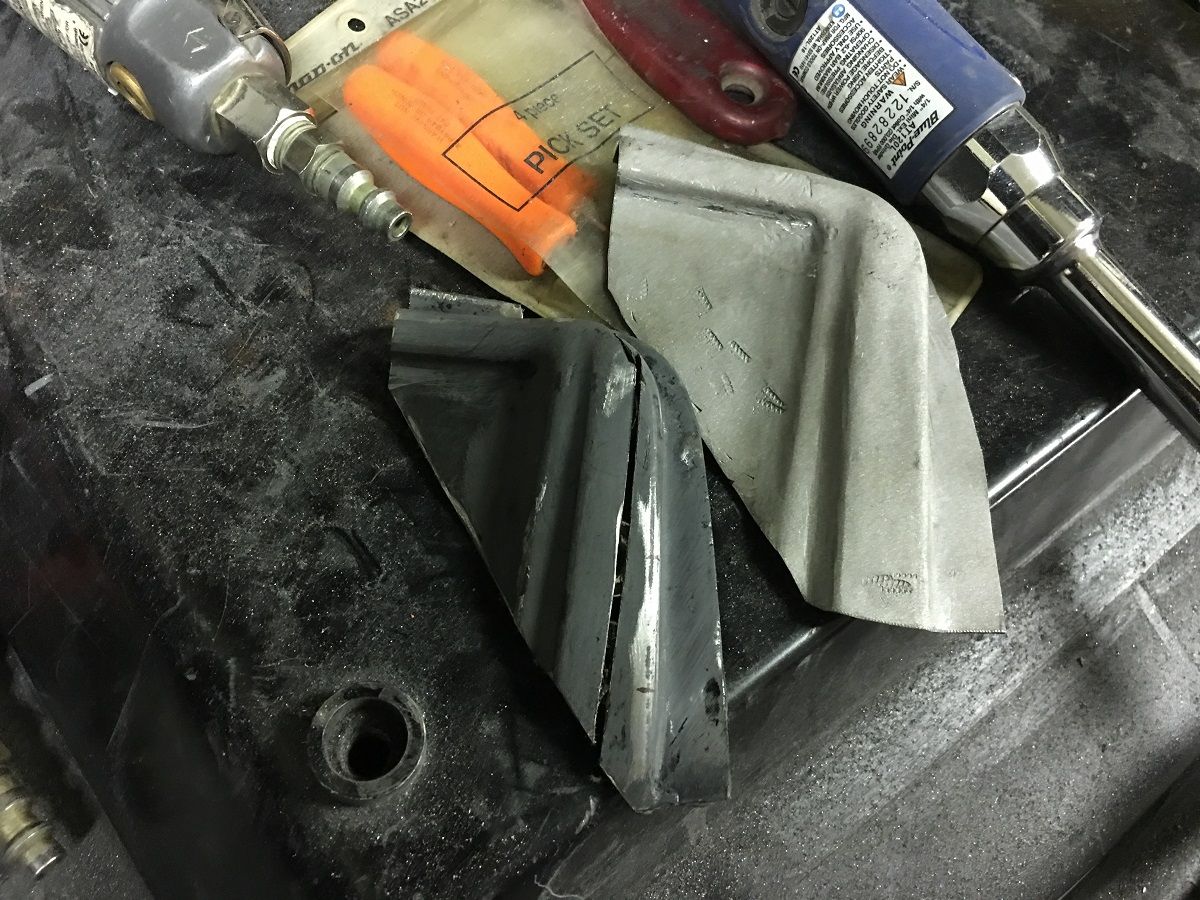 After a bit of fine tuning, it is trimmed and fitted into the A Pillar... https://www.youtube.com/watch?v=HCDRj5uOU3s and the windshield stainless is test fit for good measure.. 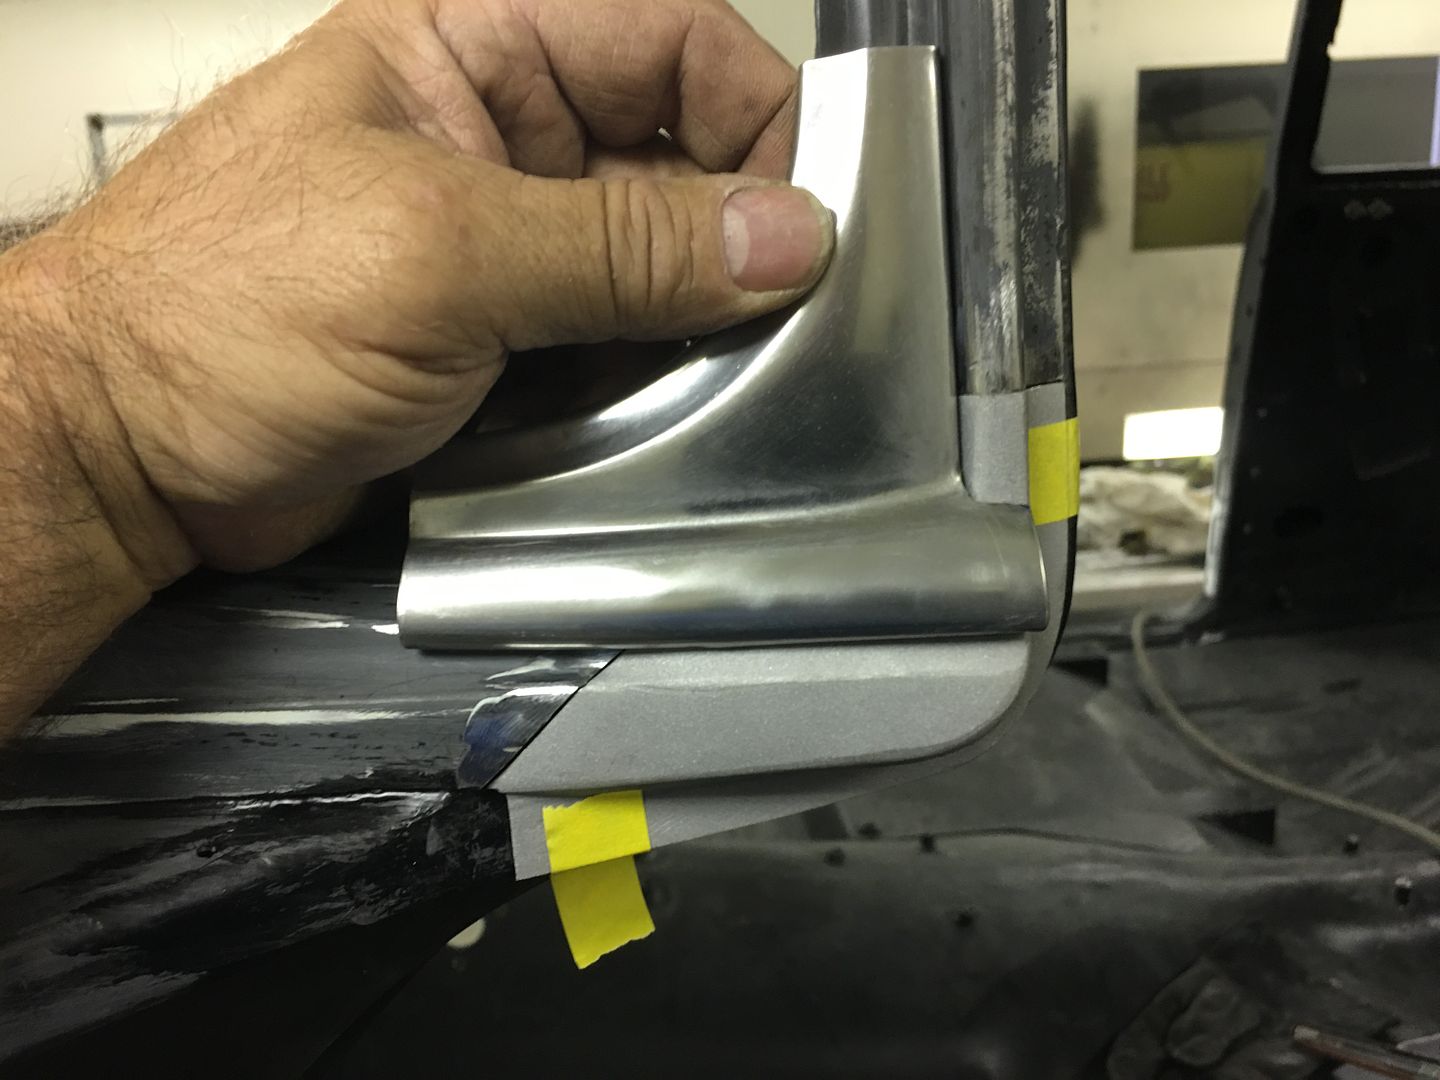 The finished piece is media blasted (Barton Garnet) so the SPI epoxy primer will have a good bite. The inside is primed as a bit more preventative measure over factory.... 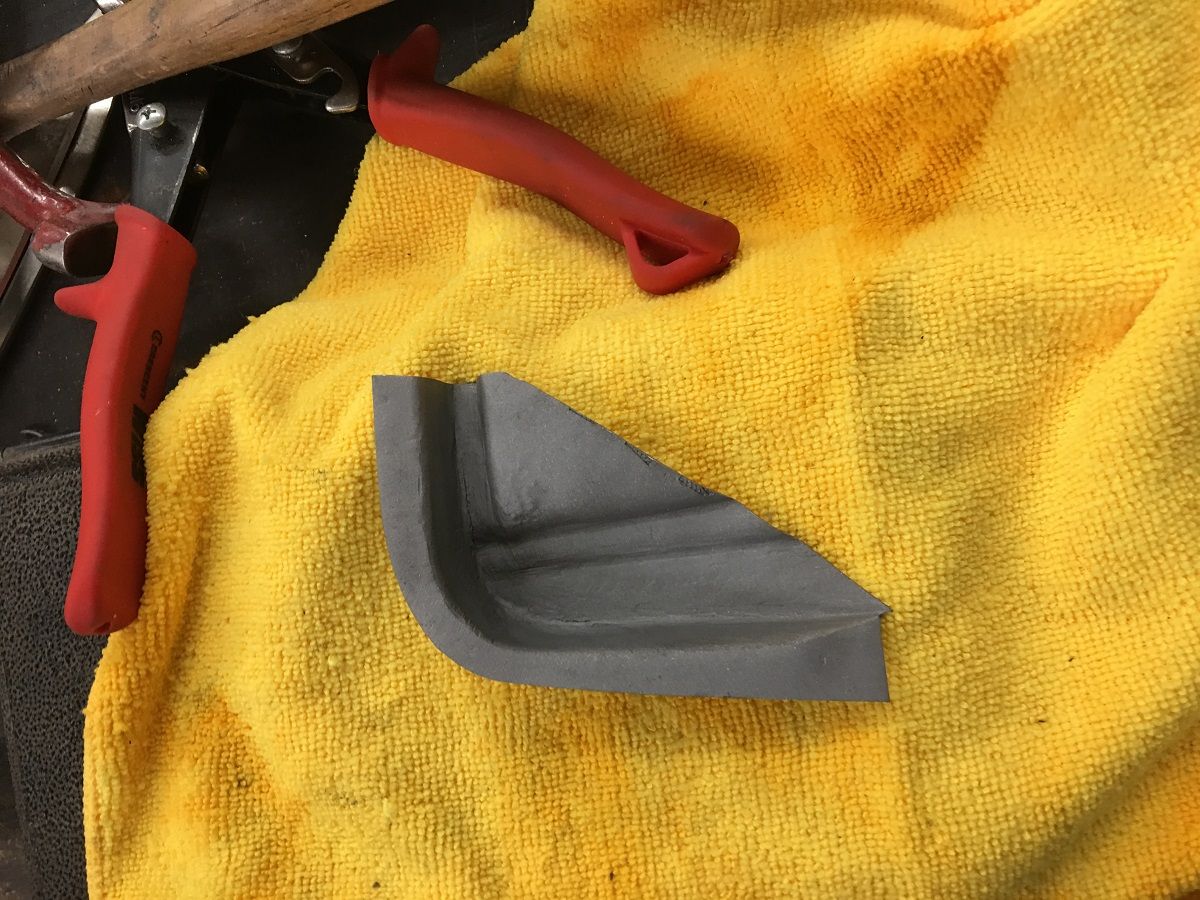 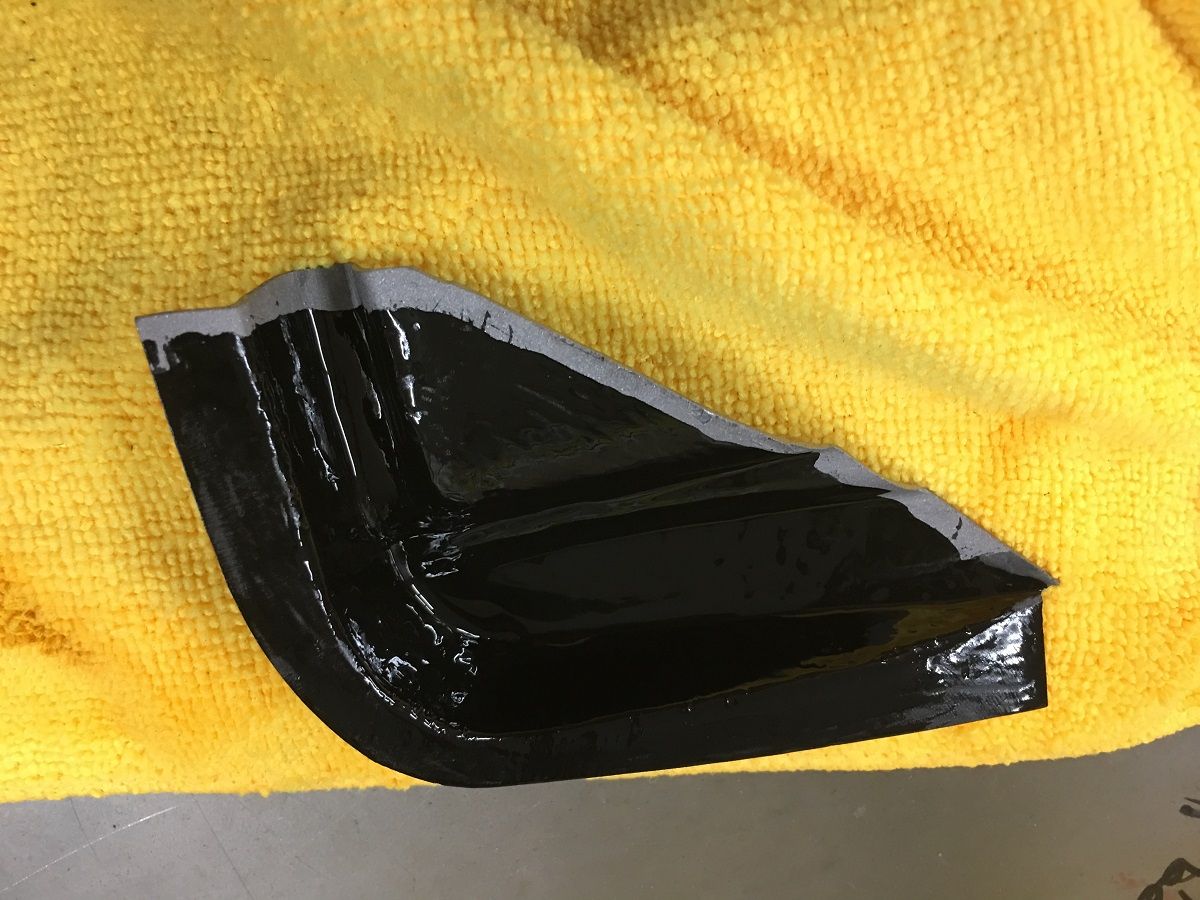 The flange is quite small compared to what we normally plug weld, so we opted for a .169 drill bit to keep the heat away from the edge... 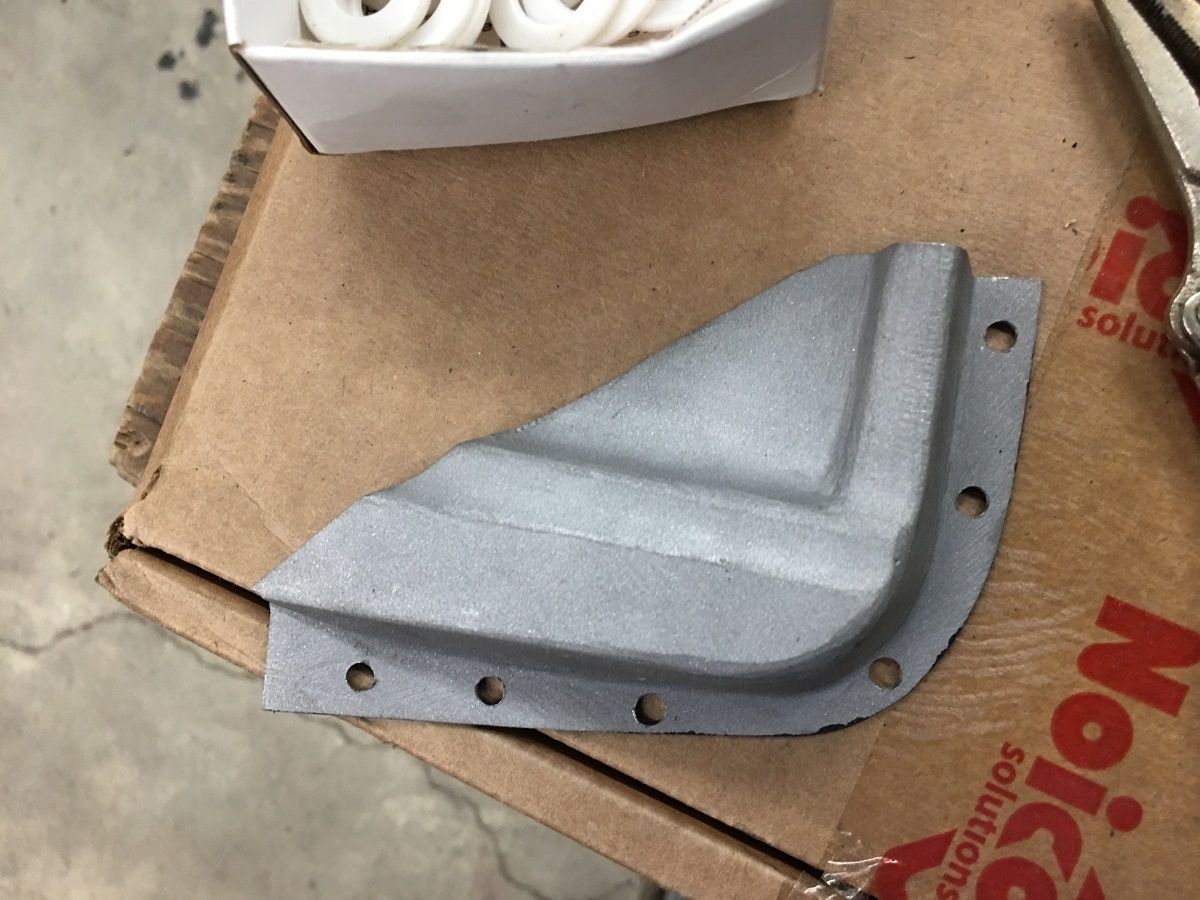 In order to clean he primer out the inside of our plug weld holes, we flattened and backfaced our drill bit to mimic an end mill.... 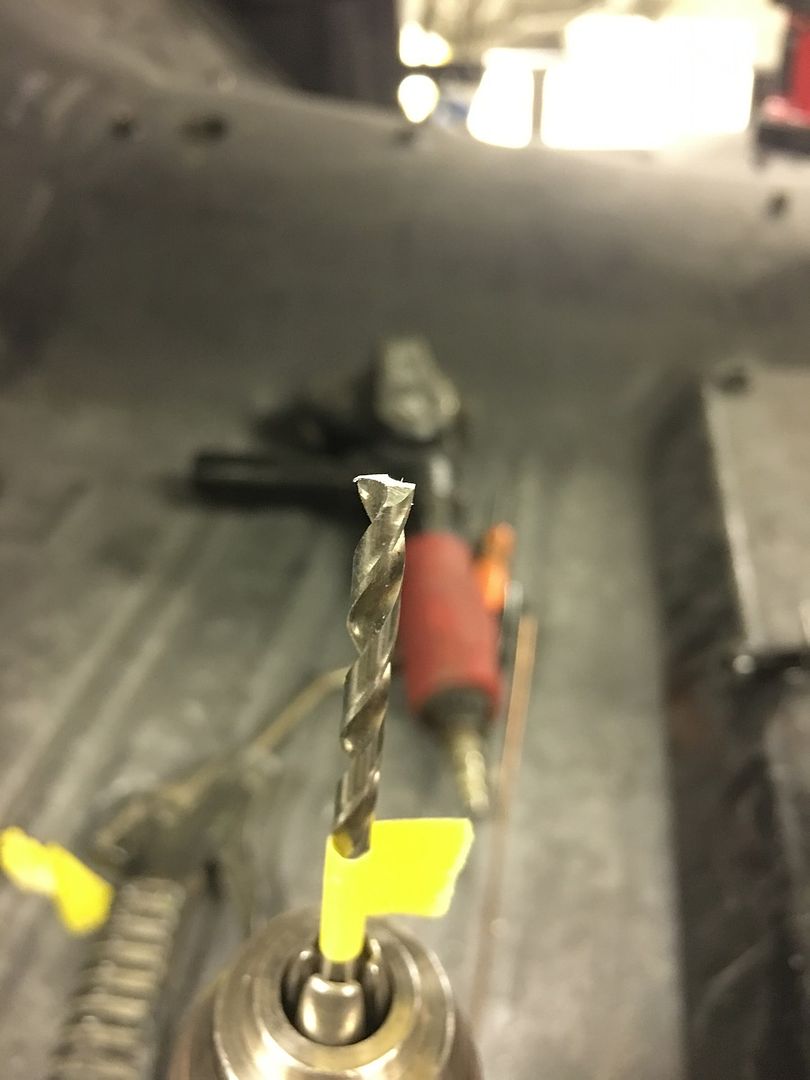 Does a good job of giving us nice clean metal for a good weld.. 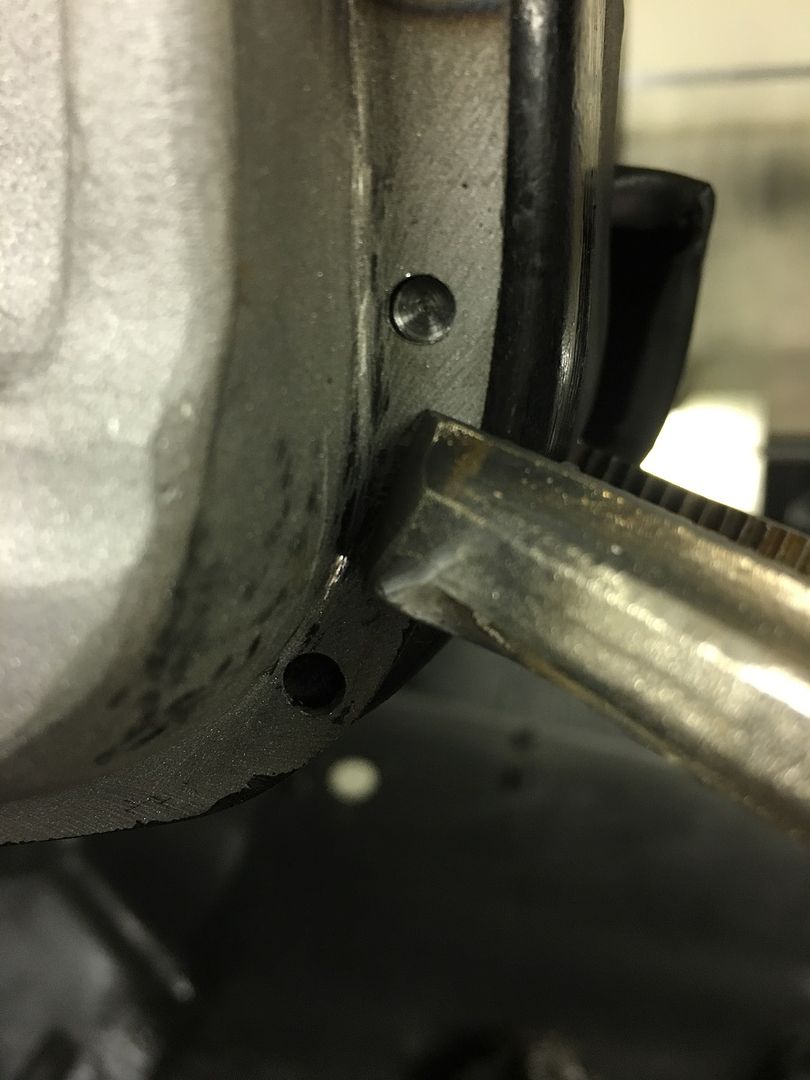  much better.... https://www.youtube.com/watch?v=T8ajeDMzOJ0 .
__________________
Robert |
|
|
|
|
09-20-2019, 11:30 PM
|
#24 |
|
Senior Member
Join Date: Mar 2011
Location: West Plains, Missouri
Posts: 7,553
|
Re: 55 Wagon Progress
Just great work...Jim
__________________
my build thread: http://67-72chevytrucks.com/vboard/s...d.php?t=459839 Jimbo's long bed step build:http://67-72chevytrucks.com/vboard/s...t=464626<br /> |
|
|
|
|
09-21-2019, 01:33 AM
|
#25 |
|
Post Whore
Join Date: May 2015
Location: Alabama
Posts: 14,592
|
Re: 55 Wagon Progress
Unreal.....
__________________
Mongo...aka Greg RIP Dad RIP Jesse 1981 C30 LQ9 NV4500..http://67-72chevytrucks.com/vboard/s...d.php?t=753598 Mongos AD- LS3 TR6060...http://67-72chevytrucks.com/vboard/s...34#post8522334 Columbus..the 1957 IH 4x4...http://67-72chevytrucks.com/vboard/s...63#post8082563 2023 Chevy Z71..daily driver |
|
|
|
 |
| Bookmarks |
|
|


 Hybrid Mode
