
|
Register or Log In To remove these advertisements. |
|
|
|
|||||||
 |
|
|
Thread Tools | Display Modes |
 10-30-2006, 09:29 PM
|
#1 |
|
Chris
Join Date: Nov 2004
Location: Monaville, WV
Posts: 3,737
|
Do-it-Yourself dash repair.
To read further discussion on this topic go here- LINK
I figured I'd make a post about my latest project in case somebody else would like to fix there dash. Tools and supplies needed: 1.Compressor to run die grinder 2.Die grinder, I used a right angle style one 3.Surface condition disc, or sanding disc, I used 36 grit, was old one half worn out. Plenty of others would work. Theese are to be used on the die grinder. 4.Sand paper, I used dry paper only, 36 grit and 220. 36 was old worn out junk just to cut it down fast. 5.Automix flexible repair compound, it's a 2 part system, designed for bumper cover repair. A little costly, like $35 for small pack(more then enough) or $55 for the large pack. I had half tube left of each to use on this dash. 6.Some scrap cardboard or mixing board. 7.Bondo spreader. 8.Sanding block, like 4-6" long. 9.Grease and wax remover, I had some R&M left over, fairly cheap stuff. 10.vinyl paint, I used some plastic kote stuff from wal-art for like $4 a can. 11.Maybe some cleaning/primer thinner for extra cleaning measure. or tack rags. Here's what I started with....  You can clearly see how it's cracked. The first thing I did was to knock down the cracks, since they were bulged upwards. I done this with a right angle die grinder and a grinding disc like 36 I think. I also broke loose the cracked or loose pieces, and used the grinder to smooth the edges. That step may or may not have been a great idea, doing so took out some of the foam underlay, which made me need to use more filler. it looked like this once done...  You can see I had like 4 big spots to deal with. 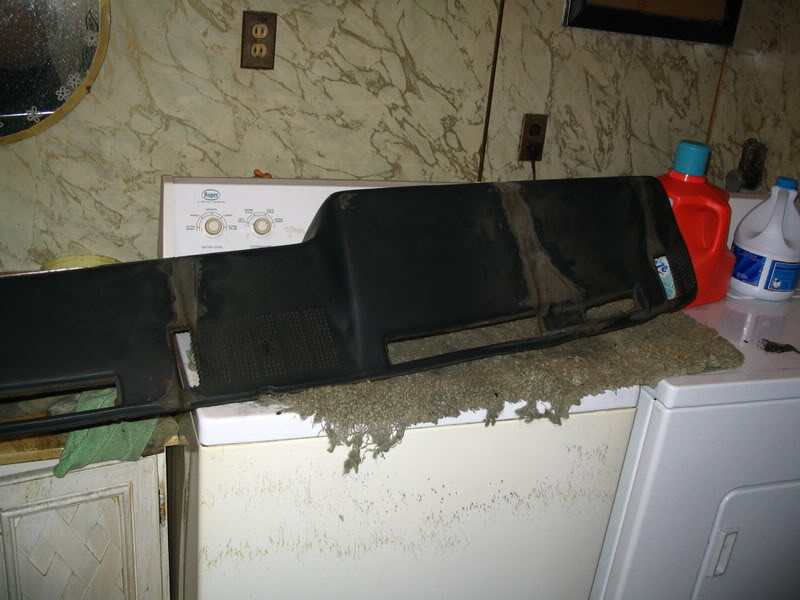 Next step was to mix and apply the automix compounds. it's easy, it mixes 50/50 squeeze out a line about 4-6 inches long of both tubes, then mix to even color. Apply just like bondo. it dires in about 30 minutes and can be sanded. once that was done I needed more because I had low spots. i sanded mine with a rubber sanding block and some 36 grit paper on it, using an X-pattern, like blocking a body down to keep it flat and level. After the 36 I went back over it with some 220.  Now since I had used half of the automix previouly I ran out, and mainly due to the fact that I cut into the foam too deep, left me short on the automix. I used some glazing putty to fill in some low spots, I wouldn't recomend it though, by all means if you can use the automix as the only filler. Once I had it all sanded and smooth I took it outside, wiped it down with the grease and wax remover, then followed that with some laquer thinner, just to be safe. I knew I had alot of armor all on the dash.   I laid it out in the sun to warm it up also, next I shook up the vinyl paint, and sprayed it using light coats, then allowed some dry time between coats, just a minute or two. it dried very quick. I put about 4-6 coats on it total, I noticed it you got it on too heavy it would fisheye/seperate, but would dry out smooth. So light coats is the key. once you get a few coats on, you can get a little heavier with the coats. Just watch yourself, don't get too carried away or it could run or seperate badly. Here's how it looks now....   It turned out really well, so well in fact I pulled the door panels, cleaned them in the same way as listed above and painted them with the same vinyl paint.   Also I'm sure most of you noticed the speaker opens are all broken out, I done this on purpose because they were all cracked, se 1st pic. I am going to make some custom ones out of wire mesh to put back in. I'll post some pics once I get this stuff put back in hopefully tomorrow. One final note I did not try to duplicate the grain pattern, I just left the repair spots the way they were after the 220 paper. I also went over the whole dash some with the 220. if you'd like texture consider using some textured paint(not trunk paint) or some vinyl top paint, or try to spray some paint on and dab it with a rag, that leaves some texture to it.
__________________
Chris GIT R DONE!!!!!! Check out all our rides, http://www.cardomain.com/id/benwa454 Last edited by augie; 05-10-2011 at 12:39 AM. |

|
|
10-30-2006, 10:48 PM
|
#2 |
|
Chris
Join Date: Nov 2004
Location: Monaville, WV
Posts: 3,737
|
Re: Do-it-Yourself dash repair.
Only spots that messed up were the passenger side where I had to use the spot putty to fill in low spots, on the front, the tops turned out good. The driver's side turned out better because it used only the automix no putty needed.
Here's the same spot shown in the 3rd. pic up top.  This is the top part of that same spot(sorry about the dust showing up and dog hair.)  Driver's side top...  
__________________
Chris GIT R DONE!!!!!! Check out all our rides, http://www.cardomain.com/id/benwa454 Last edited by augie; 05-10-2011 at 12:34 AM. |
|
|
|
11-03-2006, 04:19 PM
|
#3 |
|
Chris
Join Date: Nov 2004
Location: Monaville, WV
Posts: 3,737
|
Re: Do-it-Yourself dash repair.
Sorry for the delay guys here's some reinstalled pics.
    You can see the end 2 grilles aint that great but the middle turned out ok.
__________________
Chris GIT R DONE!!!!!! Check out all our rides, http://www.cardomain.com/id/benwa454 Last edited by augie; 05-10-2011 at 12:36 AM. |
|
|
|
| Bookmarks |
|
|


 Linear Mode

