
|
Register or Log In To remove these advertisements. |
|
|
|
|||||||
 |
|
|
Thread Tools | Display Modes |
 06-03-2013, 10:03 PM
|
#1 |
|
US Army Veteran
 Join Date: Nov 2008
Location: Central Texas
Posts: 1,049
|
AC Condensor fittings size
Sometimes, the simplest of things can consume enormous amounts of time! I've searched the site via google, searched for the actual hard lines, and no one seems to note the fittings size on the factory ac condenser.
I'm picking up a universal parallel flow ac condenser for my '72. The condenser has two outlet fittings, #6 and #8. What I'm trying to figure out, unsuccessfully, is what are the fitting sizes on the stock factory condenser? Need to know this, so I can determine the type of 90 degree adapters I need, so I can use the factory ac hard lines.
__________________
1972 C10 Highlander - The making of a daily driver |

|

|
|
07-10-2013, 06:53 PM
|
#2 |
|
Registered User
Join Date: Apr 2012
Location: Denver, CO
Posts: 232
|
Re: AC Condensor fittings size
Did you ever get an answer on this? I just hooked up my factory ac on an ls swap and it isn't useless, but definitely could be better. I'm thinking a different condenser could be the answer.
__________________
Another 71 My truck In tank fuel pump how to LS factory gauges wiring how to-post 18 |
|
|
|
|
07-10-2013, 07:03 PM
|
#3 |
|
US Army Veteran
Join Date: Nov 2008
Location: Central Texas
Posts: 1,049
|
Re: AC Condensor fittings size
I figured it out. looked at the condenser and the existing fittings.
The top of the condenser is a #8 fitting and the bottom is a #6 fitting. This is the same for the existing fittings that would go into the normal condenser for our trucks. My concern was, that after 40+ years, maybe the fittings were different, but they are not. From there, I spent some time on Ebay, looking for #6 and #8 fittings, male in (to the condensor) and female out, to the lines. Everything hooked up fine. Lowest temp at the evaporator (at 1500 rpm) was 20.8 degrees! It would jump back up to the 40s/50s at idle.
__________________
1972 C10 Highlander - The making of a daily driver Last edited by BruthaMan; 07-10-2013 at 11:22 PM. |
|
|
|
|
07-10-2013, 09:50 PM
|
#4 |
|
Registered User
Join Date: Apr 2011
Location: Klein Texas
Posts: 3,852
|
Re: AC Condensor fittings size
I hope you mean the "evaporator"
 That's a pretty good temp change between idle and cruise. I bet a little tuning could fix that. Are you using an X-valve or orifice? You're right, some condensers will have metric fittings and that requires more fabrication to fit. AcSource.com has good prices on condensers. I haven't used them but I'm thinking about buying some hose and fittings from them.
__________________
My Classics: '72 K20 Suburban + '65 Dodge Town Wagon '72 Corvette Roadster +'67 Corvette Roadster '73 Z-28 Camaro '63 Ford SWB Uni Pickup '50 Ford Coupe |
|
|
|
|
07-10-2013, 11:34 PM
|
#5 | |
|
US Army Veteran
Join Date: Nov 2008
Location: Central Texas
Posts: 1,049
|
Re: AC Condensor fittings size
Quote:
I have the diverter box out, inside the cab, so I can point the infrared thermometer directly at the evaporator. I'm using the stock setup, POA valve, expansion valve, with a pro6ten compressor. The "condenser" is a universal parallel flow. I'm also using ES-12 R134a Industrial replacement (hydrocarbon). POA valve is adjusted to 29 PSI (have a POA bench tester I put together from some instructions on the web). Given all those variables, if you have any suggestions for tweaking performance, I'm open to suggestions. I used the ES-12 because it's cheap and I went through quite a bit of R12 when getting the system up last summer. Turned out the condenser (different than I have now) had a kink in the top fitting, that was really bad and causing flow problems, which caused the low side pressure to soar. Now that I have it working good with ES-12a, may consider going back to R12, or flushing, resetting the POA valve down to 21, and trying out R134.
__________________
1972 C10 Highlander - The making of a daily driver |
|
|
|
|
|
07-11-2013, 09:56 PM
|
#6 |
|
Registered User
Join Date: Apr 2012
Location: Denver, CO
Posts: 232
|
Re: AC Condensor fittings size
Thanks for the quick answer BruthMan. I assumed that might be the case but it is nice to have real world feedback.
I read through your build thread today and see you've been through a lot with your ac so you might be able to answer my question. I charged my system up to 2.6 lbs of r134 (80% of the r12) and my vent temp is only about 55. My pressures seem to be ok and I also sprayed the condenser with water, which dropped the pressures instantly but only dropped the outlet temp about 5 degrees. This leads me to believe the condenser isn't my main problem. Should I add more r134? I read somewhere to keep adding till the temp starts to rise ( as long as pressures are ok) then you know you have the correct amount.
__________________
Another 71 My truck In tank fuel pump how to LS factory gauges wiring how to-post 18 |
|
|
|
|
07-11-2013, 11:34 PM
|
#7 |
|
US Army Veteran
Join Date: Nov 2008
Location: Central Texas
Posts: 1,049
|
Re: AC Condensor fittings size
Are you using the standard POA valve? If so, and the POA valve was not adjust to 26 PSI, it won't get nearly as cold as it can/should.
I can share with you some things I've learned over the past year, that my be of help. 1) The standard POA valve on our trucks needs to be adjusted for R134. On our trucks, the POA valve is set at 29.5 PSI from the factory. This can be adjusted via a very small set screw (nut) located inside the end of the POA valve. 2) From what I've read at auto ac forums (I've spent hours reading a wealth of information there), when using the POA valve with R134, it needs to be adjusted down to 26 PSI. This is done with a 7/32 socket (I believe is the size) and turning the set nut 1/4 turn counter-clockwise. The set screw (really, it's a nut) is located in the end of the POA valve that has the external threads. Here's a pic of what it looks like: 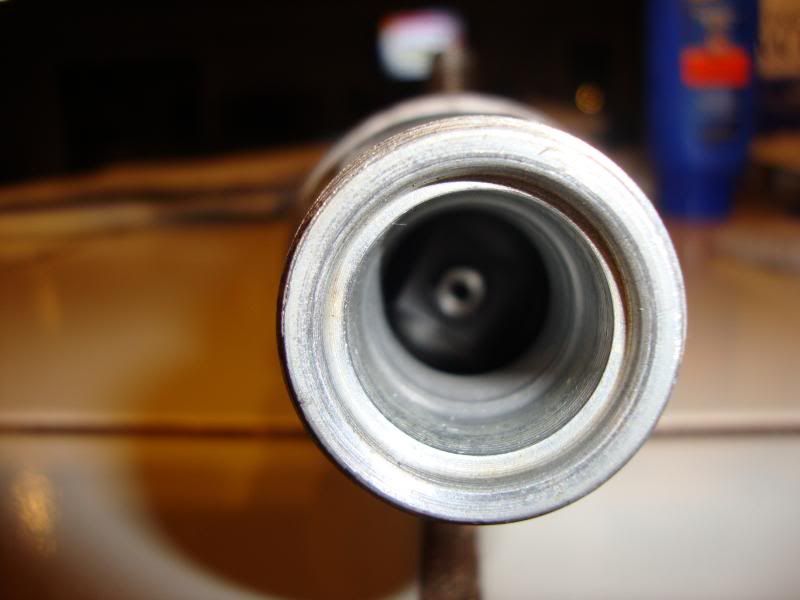 3) This temp pressure chart can be of help in determining the proper low/high side pressure, given an ambient temperature. If you have an air compressor, it's very simple to build a POA valve tester. I referenced a thread on autoacforum.com, but it appears that thread (with images) no longer exists. I've taken a few pics (below) and will try to outline the process. 1) The red line, I picked up at harbor freight. It's a standard air compressor extension line. Picked up the proper fitting for the end, so I can plug it into my compressor air hose. 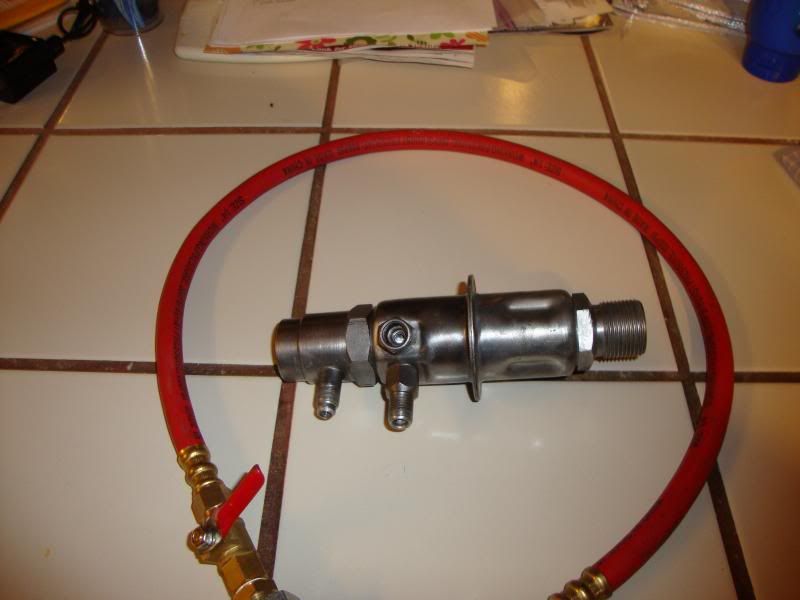 2) I added an on/off valve seen connected to the red hose, that I also picked up from harbor freight. The red line simply screws into the valve. When air pressure exists, you simply turn the valve lever to let air in, or close it off. 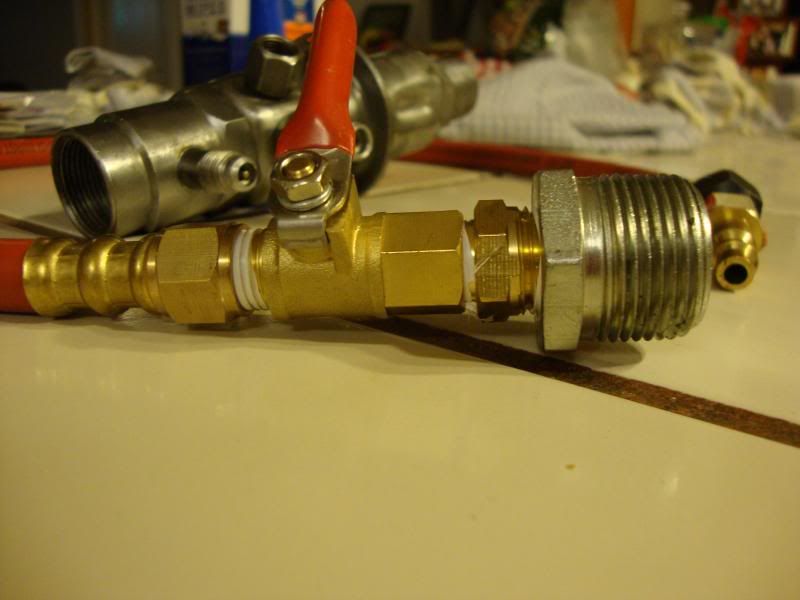 3) I'm not sure on the size, but I took that setup along with the POA valve to a local bolt shop here and said "I need to connect this line to this POA valve" and they found a fitting to go from the on/off valve (an intermediate fitting), that then connected to another fitting that would screw into the POA valve. In the pic, you can see that intermediate fitting going out from the on/off valve and then connects to the big fitting that will go into the poa valve. Probably have $15 in the tester, between harbor freight and the local nut/bolt shop for the fittings. From there, just plug the end into your compressor air line, then screw the other end into your POA valve. Be sure to keep the on/off valve closed, until ready to test. If air is passed to quickly into the POA valve, it will squawk/make noise similar to a moose call. Odd noise! Next, hook the blue line of your AC gauges up to the fitting on the POA valve that you add freon through. This will allow you to monitor the pressure, as air goes through the POA valve. Once it's all hooked up, open the valve on the red line to let air in. I let the air in slowly, by controlling the on/off valve lever, until completely open. You should see around 30 PSI on the blue side gauge. Take the socket and extension, put into the end of the POA valve, find the nut, and turn it counter-clockwise until the pressure drops down to 26 PSI. That's the setting for using R134. You can turn it back and forth and should see the pressure on the gauge go up/down. The key things are: 1) Make sure your POA valve is adjusted properly. 26 PSI for R134. 29.5 for R12. It does make a huge difference in evaporator temperature. 2) Add R134 using the pressure chart link I posted above, to make sure the pressures are in range with the ambient temperature. 3) Add R134 and check temps with the RPM around 1500. This the temp reading you will see when driving around. At idle, the temps are going to come up some. This is very noticeable when using the old style condenser. The newer parallel condensers are supposed to be more efficient at keeping cooler temps when idle. Hope that helps. I'm by far no expert. Just passing on what I've learned in the process.
__________________
1972 C10 Highlander - The making of a daily driver |
|
|
|
|
07-12-2013, 12:28 AM
|
#8 |
|
Registered User
Join Date: Apr 2012
Location: Denver, CO
Posts: 232
|
Re: AC Condensor fittings size
Wow, thanks for the great writeup! I adjusted my POA using the very unscientific method of turning the adjusting screw out 3/4 turn. If I end up evacuating again I will for sure use your method and get an exact reading. I've been using this other chart that uses psi, since that is what I am used to. It was above 90 today when I was playing with it and the low side was just barely over 40 and the high around 270, that's at idle with dual electric fans running. At that setting my outlet temp was 70, ouch. I know it drops if I'm moving as it did when I sprayed the condenser with water. I also know altitude plays into this (Denver) so it looks like I may have loosened the POA a little too much? I'll try one more can of 134a to see if I can get my pressures right. If not I'll start over and use your adjusting method and a parallel flow condenser.
Thanks again 
__________________
Another 71 My truck In tank fuel pump how to LS factory gauges wiring how to-post 18 |
|
|
|
|
07-12-2013, 06:05 AM
|
#9 |
|
Registered User
Join Date: Apr 2011
Location: Klein Texas
Posts: 3,852
|
Re: AC Condensor fittings size
Using that chart you're likely overcharged.
Low side pressure @ 50 psi is 55º refrigerant temp. That is no bueno
__________________
My Classics: '72 K20 Suburban + '65 Dodge Town Wagon '72 Corvette Roadster +'67 Corvette Roadster '73 Z-28 Camaro '63 Ford SWB Uni Pickup '50 Ford Coupe |
|
|
|
|
07-12-2013, 11:27 AM
|
#10 | |
|
Registered User
Join Date: Apr 2012
Location: Denver, CO
Posts: 232
|
Re: AC Condensor fittings size
Quote:
__________________
Another 71 My truck In tank fuel pump how to LS factory gauges wiring how to-post 18 |
|
|
|
|
|
07-12-2013, 12:53 PM
|
#11 |
|
Registered User
Join Date: Apr 2011
Location: Klein Texas
Posts: 3,852
|
Re: AC Condensor fittings size
Yes, it should also be on your gauge set.
The low pressure side needs to be closer to freezing. The expansion valve/POA should do this automatically if charged to the correct amount. 
__________________
My Classics: '72 K20 Suburban + '65 Dodge Town Wagon '72 Corvette Roadster +'67 Corvette Roadster '73 Z-28 Camaro '63 Ford SWB Uni Pickup '50 Ford Coupe |
|
|
|
|
07-12-2013, 11:51 PM
|
#12 |
|
Registered User
Join Date: Apr 2012
Location: Denver, CO
Posts: 232
|
Re: AC Condensor fittings size
OK, now I have more questions. On the charts referenced by BruthaMan and Bigdav they both show 104 inches of mercury (in hg) at 90 degrees. My chart shows 50 psi (45-55) at 90 degrees.
in hg x 0.49 = psi 104 in hg x 0.49 = 50.96psi That shows me that all three charts are in agreement. My question is, if you are saying that in a POA valve system the pressure should always equal the POA setting regardless of ambient temperature? That's what I'm gathering when you say the low pressure side should be closer to freezing.
__________________
Another 71 My truck In tank fuel pump how to LS factory gauges wiring how to-post 18 |
|
|
|
|
07-13-2013, 01:26 AM
|
#13 |
|
US Army Veteran
Join Date: Nov 2008
Location: Central Texas
Posts: 1,049
|
Re: AC Condensor fittings size
My understanding is, the pressures are to be checked at 1200-1500 rpm. I do mine at 1500 rpm. When I have my son or wife step in the truck and take it up to 1500 rpm, the pressures drop. At idle, I see 45-50 on the low side, at 750 rpm idle.
When it goes up to 1500, the low side pressure drops down to right at 30 PSI on the gauges, which is where it's supposed to be.
__________________
1972 C10 Highlander - The making of a daily driver |
|
|
|
|
07-13-2013, 02:24 PM
|
#14 |
|
Registered User
Join Date: Apr 2012
Location: Denver, CO
Posts: 232
|
Re: AC Condensor fittings size
Thanks again for the help guys. I did some more research and discovered a few things. To check the POA valve you disconnect the vent fan and watch the pressures. I could see my POA cycling at about 26 psi, so my 3/4 turn method worked pretty good. POA valve set for 134a. Then I checked my pressures again with the fan on. Low side was a little low, high side a little high. I added some more 134 and my low side went up slightly. I also raised the rpm's and my low pressure dropped and high pressure increased. From my research it looks as though I may have too much oil in the system. This is very possible since I'm not sure how much oil was in the compressor when I began, I added about 7 ounces. I also had a mishap in the middle of one of my Freon adds so I can't say for sure how much I have in, but most likely too much. Here are my pressures if anyone wants to confirm or deny my findings.
41 psi low - 255 psi high - 65 vent temp - med fan - 80 degree day 35 psi low - 275 psi high - @ 1500 rpm I'm a windows down guy anyway so this is no great loss to me, I just like things to work.
__________________
Another 71 My truck In tank fuel pump how to LS factory gauges wiring how to-post 18 |
|
|
|
|
07-13-2013, 02:55 PM
|
#15 |
|
US Army Veteran
Join Date: Nov 2008
Location: Central Texas
Posts: 1,049
|
Re: AC Condensor fittings size
Seems like it's really pushing it on the high side.
If you have access to an air compressor, you can evacuate (heh), disconnect the hardlines at the drier, then blow air through to get oil out. Thanks for posting progress in this thread. I'm very interested in how your results turn out, as I may switch over to r134. So far, I'm very impressed with the cooling of ES-12a Industrial. It's hard to read a post on the web without ten guys copying/pasting the evils of flammability, but I sit in front of my gas tank in my truck and run a carburetor. The least of my concerns in a wreck is a little over a lb of propane. I have some more pics to post, hopefully later this evening.
__________________
1972 C10 Highlander - The making of a daily driver |
|
|
|
|
| Bookmarks |
| Tags |
| condenser, hard lines |
|
|


 Linear Mode

