
|
Register or Log In To remove these advertisements. |
|
|
|
|||||||
 |
|
|
Thread Tools | Display Modes |
 11-07-2012, 02:36 AM
|
#26 |
|
Registered User
Join Date: Nov 2011
Location: Idaho
Posts: 857
|
Re: And so it begins......
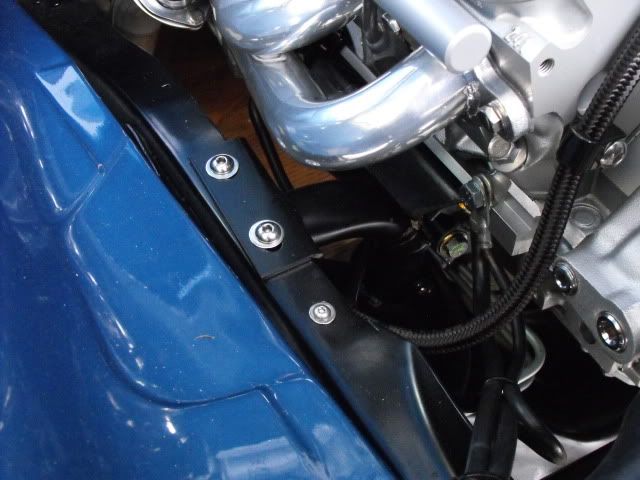
I wanted my exhaust to run above the trans x member that's why I went with aftermarket. I know I could have removed the piece that bolts to the upper frame rail but felt better using a trans x member that bolts the same as original. Much cleaner than oem. My exhaust. You can see how much higher than bottom framing rail.
  Posted via Mobile Device |

|

|
|
11-08-2012, 08:03 PM
|
#27 |
|
Registered User
Join Date: Dec 2010
Location: NC
Posts: 666
|
Re: And so it begins......
I bought a returnless fuel rail to replace the return style rail and when it showed up I noticed the end was kinda dented in. Do y'all think it'll be ok? Will it leak?
Posted via Mobile Device Posted via Mobile Device |
|
|
|
|
11-08-2012, 08:06 PM
|
#28 | |
|
Registered User
Join Date: Dec 2010
Location: NC
Posts: 666
|
Re: And so it begins......
Quote:
Posted via Mobile Device |
|
|
|
|
|
11-08-2012, 08:38 PM
|
#29 |
|
Registered User
Join Date: Nov 2011
Location: Idaho
Posts: 857
|
Re: And so it begins......
I think 3". Had to make 2 hole blanks out of 3/4 plywood then positioned them on the x member bolt the two pieces together to sandwich x member then remove center bit of hole saw now the blanks are your guide kind of have to do it this way because where you will be drilling there's no Metal for the drill to center itself. A plasma cutter would have been easier.
Posted via Mobile Device |
|
|
|
|
11-09-2012, 09:59 AM
|
#30 |
|
Registered User
Join Date: Mar 2005
Location: 10-Uh-See
Posts: 5,609
|
Re: And so it begins......
I used the POL towers and an ECE trans crossmember in my swap. The only issue I'm currently having is a wrong pinion angle. I plan to eventually get a Porterbuilt tailing arm crossmember and tubular trailing arms.
__________________
|
|
|
|
|
11-09-2012, 10:09 AM
|
#31 | |
|
Registered User
Join Date: Dec 2010
Location: NC
Posts: 666
|
Re: And so it begins......
Quote:
Posted via Mobile Device |
|
|
|
|
|
11-09-2012, 07:12 PM
|
#32 | |
|
Truck and auto performance nut
Join Date: Feb 2007
Location: McKinney,Texas
Posts: 3,848
|
Re: And so it begins......
Quote:
__________________
Kurt - '68 GMC short step - NIB '09 LY6 6.0L crate motor w/mods, NIB '12 crate 4L85e w/billet 3k stall Circle D, 3.73 posi 12 bolt, DynaTech f-swap headers, 3/4 drop, handling mods, etc. - my toy '72 Chevy LWB C-10 Highlander - 350/350 ps/pb/tilt/ac - not original but close '06 Chevy TrailBlazerSS - LS2/4L70e - little black hot rod SUV - my DD '18 Kia Sorento - wife's econo-driver '95 Chevy S10 - reg cab shortbed, LS, 4.3, auto... my '68's powertrain and chassis build -links broken A surprise phase - carb to efi -links broken |
|
|
|
|
|
11-10-2012, 11:25 PM
|
#33 | |
|
Registered User
Join Date: Dec 2010
Location: NC
Posts: 666
|
Re: And so it begins......
Quote:
Posted via Mobile Device |
|
|
|
|
|
11-11-2012, 02:13 PM
|
#34 |
|
Truck and auto performance nut
Join Date: Feb 2007
Location: McKinney,Texas
Posts: 3,848
|
Re: And so it begins......
I'm using SBC towers with TransDapt plates, mounted in the forward frame holes. Trans x-member is a CPP tubular with poly mount.
That said....I plan to switch to the POL towers some day as I like the setup better. I've had a bear or a time with vibration. Thinking maybe something got damaged when my rear ujoint broke. Shafts balanced...but something's causing it.
__________________
Kurt - '68 GMC short step - NIB '09 LY6 6.0L crate motor w/mods, NIB '12 crate 4L85e w/billet 3k stall Circle D, 3.73 posi 12 bolt, DynaTech f-swap headers, 3/4 drop, handling mods, etc. - my toy '72 Chevy LWB C-10 Highlander - 350/350 ps/pb/tilt/ac - not original but close '06 Chevy TrailBlazerSS - LS2/4L70e - little black hot rod SUV - my DD '18 Kia Sorento - wife's econo-driver '95 Chevy S10 - reg cab shortbed, LS, 4.3, auto... my '68's powertrain and chassis build -links broken A surprise phase - carb to efi -links broken |
|
|
|
|
11-14-2012, 11:19 PM
|
#35 |
|
Registered User
Join Date: Dec 2010
Location: NC
Posts: 666
|
Re: And so it begins......
I've been busy guys! I know you all love pictures, but unfortunately I don't have any pictures to show, but what I do have is 4 tracking numbers that I am checking obsessively and will hopefully have 5 by the weekend
 Didn't know it was possible, but I think this week I have (with the help of LS1tech) melted my debit card. Paypal is sending me self-help emails for crying out loud. Stay tuned for goodies 
|
|
|
|
|
11-15-2012, 10:43 PM
|
#36 | |
|
Registered User
Join Date: Mar 2005
Location: 10-Uh-See
Posts: 5,609
|
Re: And so it begins......
Quote:
__________________
|
|
|
|
|
|
11-16-2012, 12:50 PM
|
#37 |
|
Senior Member
 Join Date: Jul 2009
Location: Hayden, Al.
Posts: 4,147
|
Re: And so it begins......
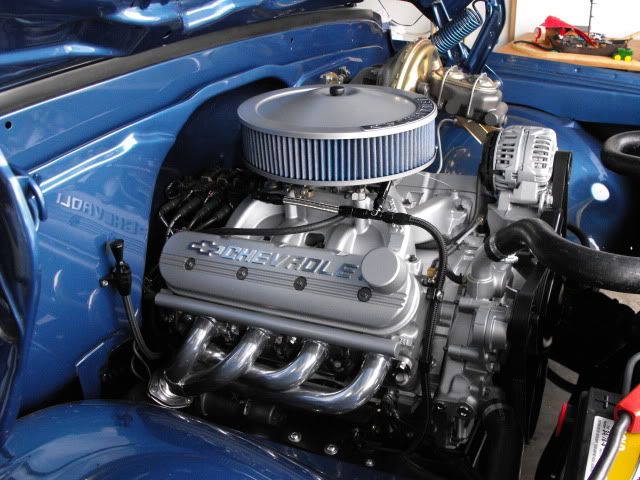
68StepBed...that is B-E-A-UTIFUL!!!! Love all the stainless bolts and such...nice touch!
|
|
|
|
|
11-16-2012, 02:16 PM
|
#38 | ||||
|
"I ain't nobody, dork."
Join Date: Sep 2007
Location: Whidbey Island, Washington
Posts: 8,921
|
Re: And so it begins......
Sorry for the derail... but... 68stepbed... how did you mount the coils? I like that clean valve cover look without the COP.
Gary
__________________
'cuz chicks dig scars... My 1972 GMC 1500 Super Custom (Creeping Death) "long term" build thread. The Rebuild of Creeping Death after the wreck Quote:
Quote:
Quote:
Quote:
|
||||
|
|
|
|
11-17-2012, 12:36 AM
|
#39 |
|
Registered User
Join Date: Dec 2010
Location: NC
Posts: 666
|
Re: And so it begins......
I've been out of town for work but when I got back tonight I had some parts waiting for me!
LS3 heads should be here Monday!!! Posted via Mobile Device Posted via Mobile Device |
|
|
|
|
11-22-2012, 01:18 PM
|
#40 |
|
Registered User
Join Date: Dec 2010
Location: NC
Posts: 666
|
Re: And so it begins......
Happy Thanksgiving y'all!
Posted via Mobile Device |
|
|
|
|
11-23-2012, 12:09 PM
|
#41 | |
|
*************
Join Date: Apr 2005
Location: Pensacola, FL
Posts: 17,831
|
Quote:
Posted via Mobile Device
__________________
Rob - https://www.instagram.com/hart_rod_c10 As Iron Sharpens Iron, So One Man Sharpens Another. Proverbs 27:17 FOR SALE: DBW pedal bracket - http://67-72chevytrucks.com/vboard/s...d.php?t=651123 FOR SALE: Hood Brackets http://67-72chevytrucks.com/vboard/s...d.php?t=679945 1987 Silverado SWB - 34.5K original miles http://67-72chevytrucks.com/vboard/s...d.php?t=801834 1969 SuperBurb - http://67-72chevytrucks.com/vboard/s...d.php?t=200387 1968 Farm truck - http://67-72chevytrucks.com/vboard/s...d.php?t=358692 1968 SWB - http://67-72chevytrucks.com/vboard/s...d.php?t=551258 1948 Chevy - http://67-72chevytrucks.com/vboard/s...=122164&page=3 |
|
|
|
|
|
11-23-2012, 12:33 PM
|
#42 | |
|
Registered User
Join Date: Dec 2010
Location: NC
Posts: 666
|
Re: And so it begins......
Quote:
 Actually that brings up a good question for you: seems like I remember you had done a side marker fill with a cabinet hinge. Are you still happy with it? Posted via Mobile Device |
|
|
|
|
|
11-28-2012, 09:36 PM
|
#43 |
|
Registered User
Join Date: Dec 2010
Location: NC
Posts: 666
|
Re: And so it begins......
Well a few new parts on the way. I went ahead a bought the Pacesetter 72C2276 TBSS long tube headers. I'll keep y'all updated on the fit. Fingers crossed. I'm used to 3 bolt flanges or v-band collector connections, but these have slip connections. Any idea how I'm supposed to hook the rest of the exhaust to the collectors? Just a simple swell on the end of the pipe? I know this question has to sound stupid, but I'm not familiar with these style headers.
Also, what do y'all think about running this aluminum line along the frame rail? http://www.ebay.com/itm/Pro-Series-3-8-Aluminum-Fuel-Line-Tubing-Hose-25Ft-/310514982206?pt=Motors_Car_Truck_Parts_Accessories&hash=item484c229d3e&vxp=mtr |
|
|
|
|
11-28-2012, 09:42 PM
|
#44 |
|
Senior Member
Join Date: Jul 2009
Location: Hayden, Al.
Posts: 4,147
|
Re: And so it begins......
I ran aluminum fuel line on a fuel injected CJ-5 I built many many moons ago and I abused that thing in the woods and rocks without ever having any worries.
Posted via Mobile Device |
|
|
|
|
12-02-2012, 12:59 AM
|
#45 |
|
Registered User
Join Date: Dec 2010
Location: NC
Posts: 666
|
Re: And so it begins......
So what do y'all think about running a frame mount trans cooler on the outside of the frame rail beside the trans vs running lines all the way up to the factory radiator? I am going to be running a 4L80e and factory A/C on the engine. I'm thinking about bending up aluminum line for the trans lines and using a trans cooler seems a lot simpler. And I over thinking this? Which way would be better for the trans?
|
|
|
|
|
01-21-2013, 11:17 PM
|
#46 |
|
Registered User
Join Date: Dec 2010
Location: NC
Posts: 666
|
Re: And so it begins......
So it's official: I've entered the doldrums with this swap. Got everything bought and cam FINALLY arrived tonight. Hoping to take the engine to the engine shop this week for the LS3 top end swap. I was getting some stuff together at the shop tonight and noticed that some of the paint from where I painted the engine orange had started flaking off already. I started looking and all the paint is crap. So now I need to strip the whole engine again and wipe down with lacquer thinner. With an unheated shop and 40 degree highs I can't get the paint to stick. Just delaying the engine and the whole swap even more. It sounds petty but just stupid set backs have been getting the best of me.
Quick: provide me some inspiration. Posted via Mobile Device |
|
|
|
|
02-05-2013, 01:47 PM
|
#47 |
|
Registered User
Join Date: Dec 2010
Location: NC
Posts: 666
|
Re: And so it begins......
Warning: the images contained below may cause sickness.
Posted via Mobile Device Posted via Mobile Device |
|
|
|
|
02-05-2013, 01:55 PM
|
#48 |
|
Registered User
Join Date: Nov 2009
Location: maine
Posts: 2,315
|
Re: And so it begins......
What the !!!!
Posted via Mobile Device
__________________
1972 C10 Deluxe.Shortbed. 402/400. A/C, white interior, needs complete restore. Project Red, white and blue. Used to be a Longbed apperently. http://67-72chevytrucks.com/vboard/s...d.php?t=451950 1971 c10 step 250 3 OTT 1969 c30 TOW-MATER. 307 4 speed, holmes 440 body. http://67-72chevytrucks.com/vboard/s...d.php?t=451082 2006 CTS-V LS2 6spd. |
|
|
|
|
02-05-2013, 01:59 PM
|
#49 |
|
Registered User
Join Date: Dec 2010
Location: NC
Posts: 666
|
Re: And so it begins......
Just received that from my engine builder. He was just supposed to be doing a head/cam swap. Now I'm sick and at a loss.
Posted via Mobile Device |
|
|
|
|
02-05-2013, 02:15 PM
|
#50 |
|
Registered User
Join Date: Nov 2012
Location: West Des Moines, Iowa
Posts: 450
|
Re: And so it begins......
Well, looks like you'll be getting some higher compression pistons out of the deal.
CL motor I assume? Edit - I'd be very suspect of the trans. That motor has had water in it. I bet it came out of a flood vehicle - do you have the VIN off of what it came out of? |
|
|
|
|
| Bookmarks |
|
|


 Linear Mode

