
|
 02-07-2019, 02:20 PM
|
#176 |
|
Senior Member
 Join Date: Sep 2017
Location: Bryan, Texas
Posts: 2,265
|
Re: Wife's 48
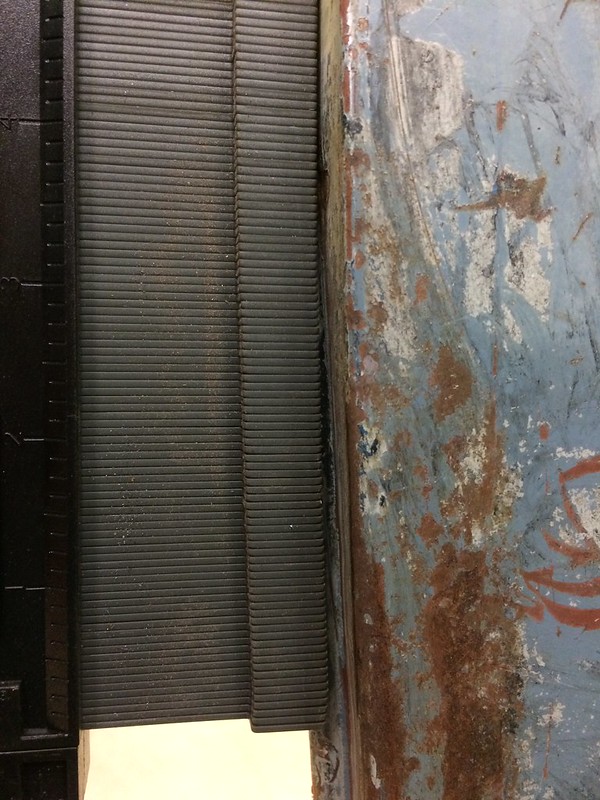
Ok, I went back to the riders door and checked it again. It opens and closes well, no rubbing. When closed and latched, the reveal around the door is pretty good. Because of the problem with the drivers door I checked the upper window frame.
 IMG_2191 by Robert Moorman, on Flickr IMG_2191 by Robert Moorman, on FlickrThe top back is 1/4" in at the curve. So I checked the front. 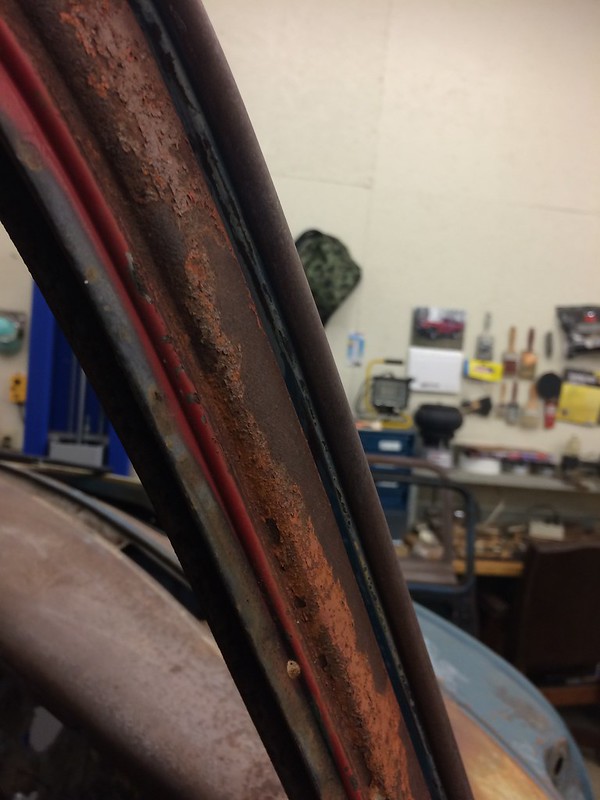 IMG_2192 by Robert Moorman, on Flickr IMG_2192 by Robert Moorman, on FlickrIt is almost dead on all the way. So I did as Joe suggested, used a block of wood and slowly moved the upper channel out so it doesn't rub. I put in the latch and latched it and this is what I have. 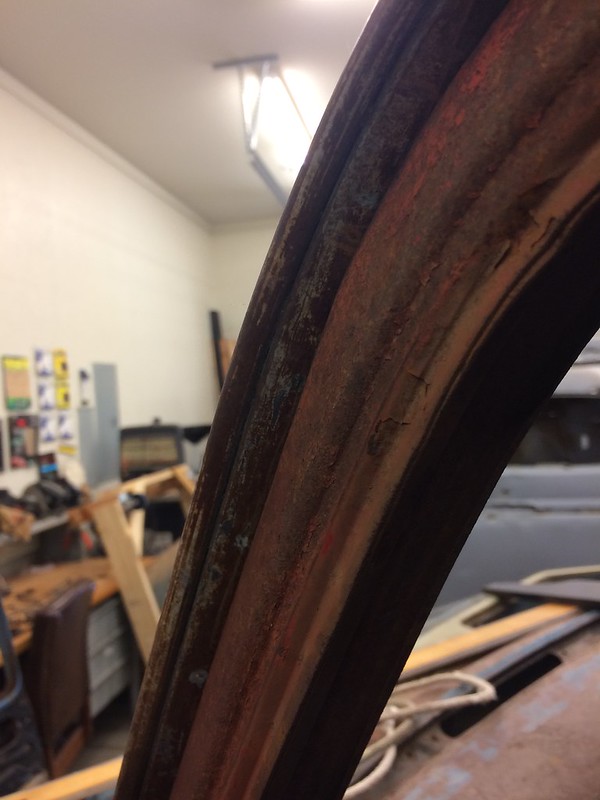 IMG_2193 by Robert Moorman, on Flickr IMG_2193 by Robert Moorman, on FlickrIt's 3/8" IN at the front upper curve. It is almost dead on at the rear upper curve. I'm worried that when I put the weather stripping in it will not close. Also, at the belt the door seems to be in about 3/8" as compared to the cab. I guess this could be a hinge thing, but I'm looking for some help here. Any ideas? So I started on the dash. I've shown the dash work before, and I showed how the cut it out, here it is again. 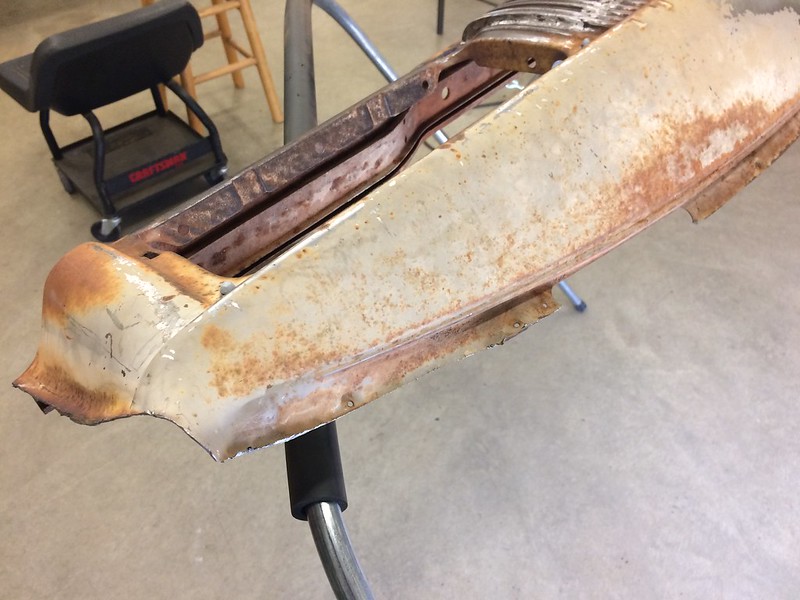 IMG_2194 by Robert Moorman, on Flickr IMG_2194 by Robert Moorman, on FlickrSo now I'm removing the last of the old dash from the bad cab to "build a new dash that can be spot welded into the cab. 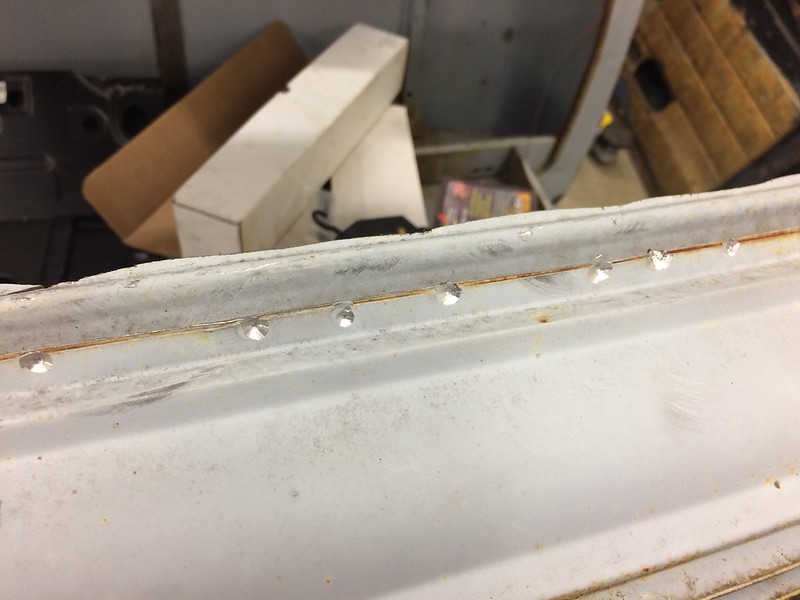 IMG_2195 by Robert Moorman, on Flickr IMG_2195 by Robert Moorman, on FlickrCutting spot welds out of the dash is a PITA! I am trying not to bend up the flange, but I can already tell I'm going to be working on the dash for a while.
__________________
8man-aka Robert 1948 on a S10 Frame, small block with a carb 1954 Cab, 53 Front and Bed, 50 Doors, S10 Frame, Power TBD Build thread: "]http://67-72chevytrucks.com/vboard/showthread.php?t=746899&highlight=wife%27s+48[/URL] [/URL]http://67-72chevytrucks.com/vboard/showthread.php?t=840204 |

|

|
|
02-07-2019, 03:29 PM
|
#177 |
|
Registered User
Join Date: Nov 2010
Location: calgary alberta
Posts: 7,823
|
Re: Wife's 48
get the bottom of the door where you need it by adjusting the hinges in or out on the pillar, may have to oblong some holes especially if you have done some work in the area. this will get the door in or out at the front edge compared to the body.the rear edge is done with the door latch. sliding the door forward or aft is done with the adjustments where the hinge bolts to the door. get it right for the lower section, where the big sheet metal is, then adjust the top by the wood method or the knee method if it has to come in some. adjusting the lower hinge further out and leaving the upper hinge will result in the top section of the door going in at the top. like a see saw effect. don't worry about weather stripping fitting, it will fit if the door is correct with the body. for weatherstrip use a good soft brand, like soffseal, the cheaper ones will not let the door close. trust me.
remember, these doors didn't fit great when new so if you don't have the original doors for the cab, from factory, they will be even worse maybe because they were fit to something else. some guys have added welding or ground down the edges of the doors then welded the crack back up, just to get the gaps proper. it's a whole thing on the build cycle of the truck if you want it to look awesome. some don't mind a little rubbing or wind noise. it depends on you and your tastes. https://www.soffseal.com/ |
|
|
|
|
02-07-2019, 07:37 PM
|
#178 |
|
Senior Member
Join Date: Sep 2017
Location: Bryan, Texas
Posts: 2,265
|
Re: Wife's 48
Thanks for the help guys. I'm still working on the doors and they are getting closer.
__________________
8man-aka Robert 1948 on a S10 Frame, small block with a carb 1954 Cab, 53 Front and Bed, 50 Doors, S10 Frame, Power TBD Build thread: "]http://67-72chevytrucks.com/vboard/showthread.php?t=746899&highlight=wife%27s+48[/URL] [/URL]http://67-72chevytrucks.com/vboard/showthread.php?t=840204 |
|
|
|
|
02-08-2019, 12:52 PM
|
#179 |
|
Registered User
Join Date: Jul 2017
Location: Joshua, Texas.
Posts: 1,303
|
Re: Wife's 48
Your build is a fun read. Nice shop too, how tall is the ceiling?
__________________
1950 Build |
|
|
|
|
02-08-2019, 04:23 PM
|
#180 |
|
Senior Member
Join Date: Sep 2017
Location: Bryan, Texas
Posts: 2,265
|
Re: Wife's 48
The shop has 12'+ ceilings. If you have any other questions shoot me a pm and we can go offline and discuss anything about it.
__________________
8man-aka Robert 1948 on a S10 Frame, small block with a carb 1954 Cab, 53 Front and Bed, 50 Doors, S10 Frame, Power TBD Build thread: "]http://67-72chevytrucks.com/vboard/showthread.php?t=746899&highlight=wife%27s+48[/URL] [/URL]http://67-72chevytrucks.com/vboard/showthread.php?t=840204 |
|
|
|
|
02-11-2019, 07:34 PM
|
#181 |
|
Senior Member
Join Date: Sep 2017
Location: Bryan, Texas
Posts: 2,265
|
Re: Wife's 48
Spent almost all day on the rider's door pillar. The rear corner has been crushed at some point. I knew the skin had bondo, but when I started looking at the pillar I found it had about 1/2" of bend in it. So I worked all day trying to get it out. I got it down to this.
 IMG_2210 by Robert Moorman, on Flickr IMG_2210 by Robert Moorman, on FlickrBest I can tell I've got about 1/8" to go. That curve is a bear! I tore the skin loose moving the post out.  IMG_2209 by Robert Moorman, on Flickr IMG_2209 by Robert Moorman, on FlickrHere is some of the bondo. I knew I wanted to replace it with good steel. Once the skin was loose I decided to cut some out so I could work on the jamb easier. The problem is that the bondo goes up higher than the patch corner I got. So back to the bad cab. 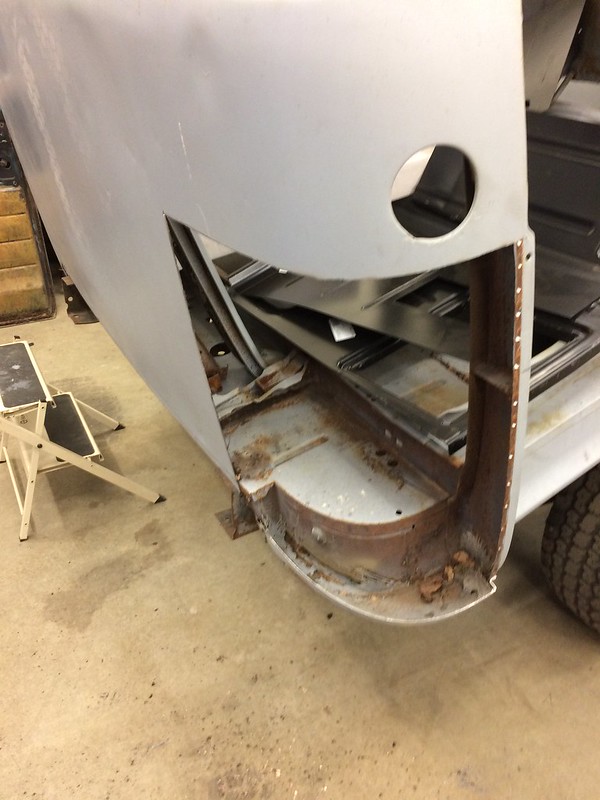 IMG_2207 by Robert Moorman, on Flickr IMG_2207 by Robert Moorman, on FlickrYes, a sacrificial panel. Now I think I should put this panel in and then do the corner. However, after I took the panel out of the bad cab, I got to looking at the door jamb. 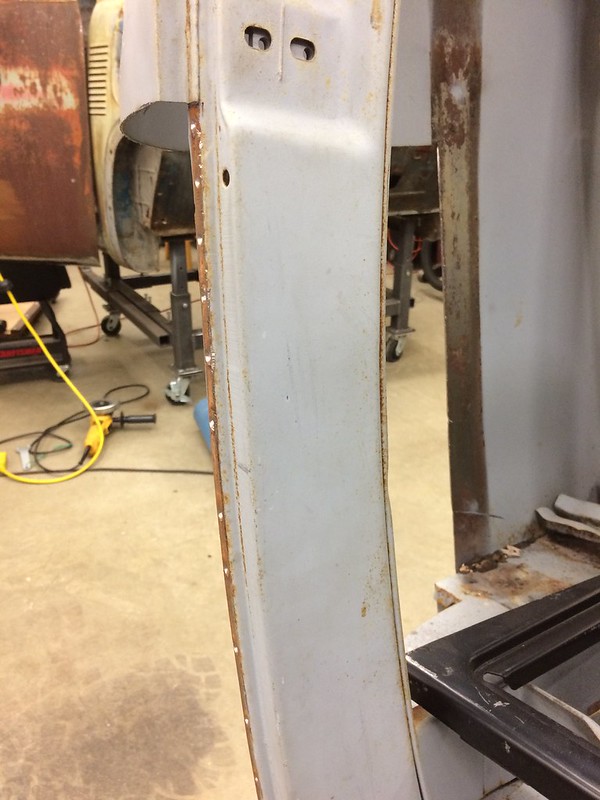 IMG_2211 by Robert Moorman, on Flickr IMG_2211 by Robert Moorman, on FlickrNow I'm thinking I should just cut out the bent door jamb section and splice a patch in from the bad cab. Seems like the prudent choice to get the curve right and a splice might be easier to finish than trying to work out that curve. Or is the jamb I worked on "close enough"?
__________________
8man-aka Robert 1948 on a S10 Frame, small block with a carb 1954 Cab, 53 Front and Bed, 50 Doors, S10 Frame, Power TBD Build thread: "]http://67-72chevytrucks.com/vboard/showthread.php?t=746899&highlight=wife%27s+48[/URL] [/URL]http://67-72chevytrucks.com/vboard/showthread.php?t=840204 |
|
|
|
|
02-13-2019, 07:41 PM
|
#182 |
|
Senior Member
Join Date: Sep 2017
Location: Bryan, Texas
Posts: 2,265
|
Re: Wife's 48
I didn't do the jamb transplant. I worked some more on the original and got it very close. I am happy with it. Then I started fitting the patch panel that is to go above the cab corner. I spent most of the day getting it from this
 IMG_2212 by Robert Moorman, on Flickr IMG_2212 by Robert Moorman, on Flickrto welded in and ready for the cab corner. I did learn somethings today. Panels really will warp if you go to fast. Yep, lesson learned. I was doing really well and I had a couple of runs that the gap was a little too wide, even after hours of fitting. So I decided "I can weld that". Well I can, but to do so put a lot of heat into the skin and it has a "woop de woop". I tried to bump it out and it seems a little better, but I broke some welds because I also learned that it doesn't take much to grind off too much metal. So I had to hunt down pinholes for a couple of hours. Weld and then grind. All day. I just put some weld through primer on it so I can sand it a little and see what it looks like when - you guessed it, I found 2 more pinholes. I shut everything off and came in. I'll do those two pinholes and some sanding next time I get some shop time.
__________________
8man-aka Robert 1948 on a S10 Frame, small block with a carb 1954 Cab, 53 Front and Bed, 50 Doors, S10 Frame, Power TBD Build thread: "]http://67-72chevytrucks.com/vboard/showthread.php?t=746899&highlight=wife%27s+48[/URL] [/URL]http://67-72chevytrucks.com/vboard/showthread.php?t=840204 Last edited by 8man; 03-01-2019 at 11:27 AM. Reason: picture deleted |
|
|
|
|
02-14-2019, 12:56 AM
|
#183 |
|
Senior Member
 Join Date: May 2007
Location: Doodah Kansas
Posts: 7,746
|
Re: Wife's 48
I dont have any advice except to keep at it man!
__________________
the mass of men live lives of quiet desperation if there is a problem, I can have it. new project WAYNE http://67-72chevytrucks.com/vboard/s...d.php?t=844393 |
|
|
|
|
02-14-2019, 09:54 AM
|
#184 |
|
Senior Member
Join Date: Sep 2017
Location: Bryan, Texas
Posts: 2,265
|
Re: Wife's 48
Thanks Joe. I was told by Martinsr and others to walk away and let it cool. Lucky the whoop de whoop will be covered by the bed. Doesn't make me happy, but covers up my mistake.
I was looking at the inside of the cab where I have been welding. I was also grinding that area. I guess I should just let that area be covered up by the interior instead of grinding it smooth. Oh well, we live and learn, and I know I'm really learning on these trucks!
__________________
8man-aka Robert 1948 on a S10 Frame, small block with a carb 1954 Cab, 53 Front and Bed, 50 Doors, S10 Frame, Power TBD Build thread: "]http://67-72chevytrucks.com/vboard/showthread.php?t=746899&highlight=wife%27s+48[/URL] [/URL]http://67-72chevytrucks.com/vboard/showthread.php?t=840204 |
|
|
|
|
02-14-2019, 12:48 PM
|
#185 |
|
Registered User
Join Date: Jul 2017
Location: Joshua, Texas.
Posts: 1,303
|
Re: Wife's 48
Looks good. Took me a year working on mine before I had the courage just to do my cab corners, not sure I'd do as big a repair as you yet. I cant get to back side real well with a grinder to clean up in there either but like you, its covered up and its way better than what we started with.
__________________
1950 Build |
|
|
|
|
02-15-2019, 10:46 AM
|
#186 |
|
Registered User
Join Date: Nov 2010
Location: calgary alberta
Posts: 7,823
|
Re: Wife's 48
how about on the whoop de whoop if you gat a hammer and dolly and hammer on dolly the weld area so it expands and takes the warp out. the warp is usually from too much heat in a concentrated area and then it cools down and shrinks that spot. if you can expand it back, by hammer on dolly, then it will be closer. when you weld also hammer on dolly when it is still red to expand the metal some so it cools and shrinks closer to what you want.
|
|
|
|
|
02-15-2019, 10:53 AM
|
#187 |
|
Senior Member
Join Date: Sep 2017
Location: Bryan, Texas
Posts: 2,265
|
Re: Wife's 48
Dsraven, The high is at the corner of the patch. Then as I go down the weld it goes low and high and low again. So the first question is hammer on dolly at the corner where it is high? Won't that stretch an area that is already high?
Again, I AM LEARNING, and I'm trying hard, but I thought hammer off dolly at that "high" corner and then see if I can get some more out. Is this correct? On the hammer on dolly when hot, I have been told that with MIG because of the way the weld sticks out that is not useful. Again, is this correct? Thanks for the help. I do want to get better at this before I ruin my truck.
__________________
8man-aka Robert 1948 on a S10 Frame, small block with a carb 1954 Cab, 53 Front and Bed, 50 Doors, S10 Frame, Power TBD Build thread: "]http://67-72chevytrucks.com/vboard/showthread.php?t=746899&highlight=wife%27s+48[/URL] [/URL]http://67-72chevytrucks.com/vboard/showthread.php?t=840204 |
|
|
|
|
02-15-2019, 10:54 AM
|
#188 |
|
Registered User
Join Date: Nov 2010
Location: calgary alberta
Posts: 7,823
|
Re: Wife's 48
also spot tack the panel all the way around before starting to weld,then just weld a short bead and walk away. when the welded area is the same temp as the surrounding metal do another stitch somehwere else, then walk away. its good to have another project on the go so you can get sidetracked and not get antsy about getting the welding done. if you get a seam that has too much gap you can use a copper or brass piece behind as a backer, the weld puddle won't fall through so easily. I have used a flattened piece of copper pipe in the past.
|
|
|
|
|
02-15-2019, 10:58 AM
|
#189 |
|
Senior Member
Join Date: Sep 2017
Location: Bryan, Texas
Posts: 2,265
|
Re: Wife's 48
I was using a piece of flattened copper pipe with a wooden handle as a backer for that reason. I'm just not good at it yet.
I got the panel tacked in and it was fitting great. I did as you thought and got going on some areas what with filling in the crack and that's what did it. They say we learn from our mistakes. I learned. I will not make that mistake again. As Martinsr said, if I can't put my tongue on it, I'll go do something else until I can. I don't want this problem again! Thanks for the help.
__________________
8man-aka Robert 1948 on a S10 Frame, small block with a carb 1954 Cab, 53 Front and Bed, 50 Doors, S10 Frame, Power TBD Build thread: "]http://67-72chevytrucks.com/vboard/showthread.php?t=746899&highlight=wife%27s+48[/URL] [/URL]http://67-72chevytrucks.com/vboard/showthread.php?t=840204 |
|
|
|
|
02-15-2019, 12:03 PM
|
#190 |
|
Registered User
Join Date: Nov 2010
Location: calgary alberta
Posts: 7,823
|
Re: Wife's 48
check out a google on shrinking discs, it will help you understand the theories behind shrinking a high spot.basically a shrinking disc is a flat surface that is spun on an angle grinder against the surface, it only hits the high spots and they get hot, then a wet rag is used to cool down that hot spot so it shrinks. some use an iron from the laundry room even.it only has to get hot enough to make some steam so you could try it if you can snag an iron without the boss seeing. then hammer the low spots out to be high spots and continue till you get it flat. hammer on dolly will expand, hammer off dolly will shrink. google a few methods or just try a few methods for some techniques.
|
|
|
|
|
02-15-2019, 12:07 PM
|
#191 |
|
Senior Member
Join Date: Sep 2017
Location: Bryan, Texas
Posts: 2,265
|
Re: Wife's 48
Great minds...I just got a 4" shrinking disc and watched videos on it yesterday. I have not tried it yet, but I am going to do that first. I think it may help me fix my mistake.
Thanks for the advice. It really helps when someone can confirm what I was thinking. Tomorrow I hope to have a report on the shrinking disc...
__________________
8man-aka Robert 1948 on a S10 Frame, small block with a carb 1954 Cab, 53 Front and Bed, 50 Doors, S10 Frame, Power TBD Build thread: "]http://67-72chevytrucks.com/vboard/showthread.php?t=746899&highlight=wife%27s+48[/URL] [/URL]http://67-72chevytrucks.com/vboard/showthread.php?t=840204 |
|
|
|
|
02-15-2019, 11:38 PM
|
#192 |
|
Registered User
Join Date: Nov 2010
Location: calgary alberta
Posts: 7,823
|
Re: Wife's 48
I have the 4" and 6" wray schellin discs, the larger one is better for normal sized areas but takes some power to run it, the smaller one fine works too. you get a feel for how much it takes to get the metal hot but not too hot.
|
|
|
|
|
02-15-2019, 11:43 PM
|
#193 |
|
Registered User
Join Date: Nov 2010
Location: calgary alberta
Posts: 7,823
|
Re: Wife's 48
do what you can with hammer/dolly and THEN use the disc on the high spots.
|
|
|
|
|
02-16-2019, 09:15 PM
|
#194 |
|
Senior Member
Join Date: Sep 2017
Location: Bryan, Texas
Posts: 2,265
|
Re: Wife's 48
First off, a BIG thank you to the members of this forum. I have had support and help with this as I am learning metal bumping, welding and finish.
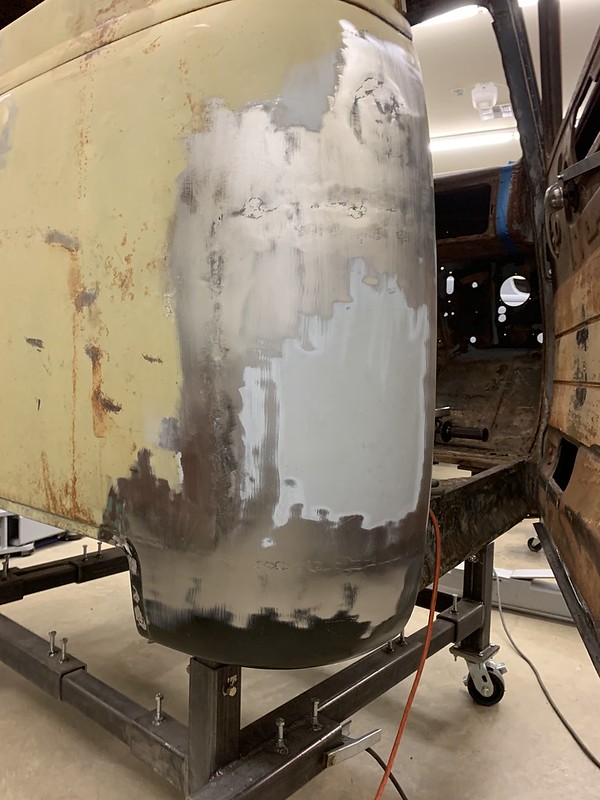
So after a few hours of hammer, spoon and dolly, the "whoop de whoop" was better, but not great. So I broke out the new shrinking disc and wouldn't you know it, the finish was better. I'll still have a skim coat, but if it's more than an 1/8th inch I'll be shocked. No, the shrinking disc is NOT a miracle worker, but it does help. 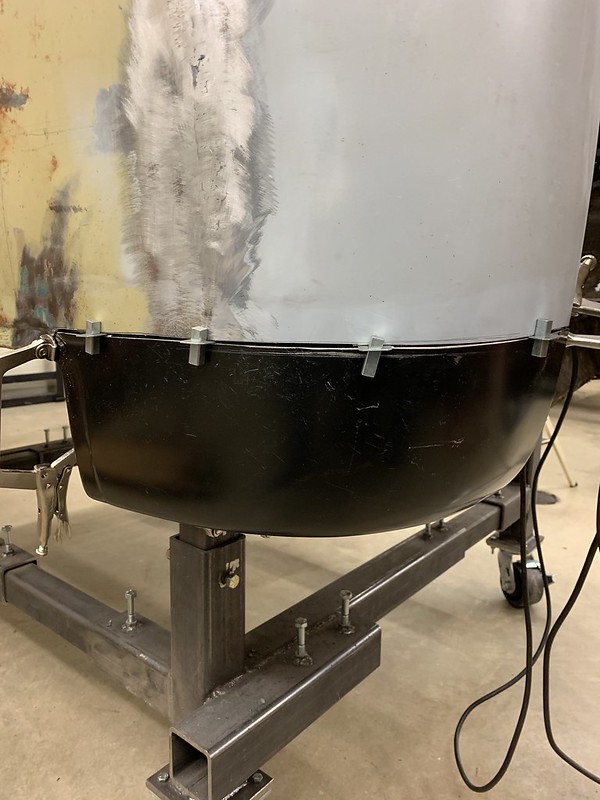 IMG_0007 by Robert Moorman, on Flickr IMG_0007 by Robert Moorman, on FlickrThe disc work shows above the black patch. So I started the cab corner, that's the black patch. The gap didn't suite me, based on what I learned with the panel above. So...  IMG_0008 by Robert Moorman, on Flickr IMG_0008 by Robert Moorman, on FlickrYes, that's a penny. I have been told that if the gap is no more than a penny in width, it's good to weld. So with another 30 minutes with a file, the whole gap is NO MORE than a penny in width. So it should be good to weld. I fitted it one more time, took everything off, sanded the old metal that will be covered, cleaned it and then put weld through primer on all of the covered areas. I started drilling the holes to plug weld when dinner called. Next time I'll see if I can weld this PATIENTLY and keep from putting too much heat in the metal. I know I said it, but thank you to all of you who have helped me. I am learning and I appreciate it!
__________________
8man-aka Robert 1948 on a S10 Frame, small block with a carb 1954 Cab, 53 Front and Bed, 50 Doors, S10 Frame, Power TBD Build thread: "]http://67-72chevytrucks.com/vboard/showthread.php?t=746899&highlight=wife%27s+48[/URL] [/URL]http://67-72chevytrucks.com/vboard/showthread.php?t=840204 |
|
|
|
|
02-26-2019, 07:21 PM
|
#195 |
|
Senior Member
Join Date: Sep 2017
Location: Bryan, Texas
Posts: 2,265
|
Re: Wife's 48
Well I think the welding and fitting are improving, they are just NOT where I want them. Man I wish there was someone who could teach me. It is really slow learning like this. Anyway, I got the cab corner done. I can't find any more pinholes, so I'm hopeful it is finished.
 IMG_0012 by Robert Moorman, on Flickr IMG_0012 by Robert Moorman, on FlickrYes the weld line is sunken in a little. I've been told that happens when you heat up the weld area. It appears most of it may finish out with a skim coat. Some of the other patches will need a little filler to smooth them out. I may try a shrinking disc to see what it does with those weld lines. My buddy was over and while I was busy elsewhere in the shop he decided that the rusty floor board needed to come out. When I got to him, between him and the rust so much of the drivers floor pan was gone I had to step in and help finish the job without doing any more damage. He's the proverbial "bull"! I have most of it out and will be fitting it back soon. I'll put up pictures then.
__________________
8man-aka Robert 1948 on a S10 Frame, small block with a carb 1954 Cab, 53 Front and Bed, 50 Doors, S10 Frame, Power TBD Build thread: "]http://67-72chevytrucks.com/vboard/showthread.php?t=746899&highlight=wife%27s+48[/URL] [/URL]http://67-72chevytrucks.com/vboard/showthread.php?t=840204 Last edited by 8man; 02-26-2019 at 07:27 PM. |
|
|
|
|
02-26-2019, 09:40 PM
|
#196 |
|
Registered User
Join Date: Jul 2017
Location: Joshua, Texas.
Posts: 1,303
|
Re: Wife's 48
Took me forever to do my cab corners and my weld line is a little sunken too.
__________________
1950 Build |
|
|
|
|
02-26-2019, 11:53 PM
|
#197 |
|
Registered User
Join Date: Nov 2010
Location: calgary alberta
Posts: 7,823
|
Re: Wife's 48
it sinks because it shrinks and distorts while still hot from weld,use hammer on dolly and see if that helps. it expands the metal so when it shrinks from cooling it isn't as sunken in.
|
|
|
|
|
02-27-2019, 09:56 AM
|
#198 |
|
Senior Member
Join Date: Sep 2017
Location: Bryan, Texas
Posts: 2,265
|
Re: Wife's 48
Thank you. I'll try that first.
__________________
8man-aka Robert 1948 on a S10 Frame, small block with a carb 1954 Cab, 53 Front and Bed, 50 Doors, S10 Frame, Power TBD Build thread: "]http://67-72chevytrucks.com/vboard/showthread.php?t=746899&highlight=wife%27s+48[/URL] [/URL]http://67-72chevytrucks.com/vboard/showthread.php?t=840204 |
|
|
|
|
03-14-2019, 09:00 AM
|
#199 |
|
Senior Member
Join Date: Sep 2017
Location: Bryan, Texas
Posts: 2,265
|
Re: Wife's 48
No progress to report, and there won't be any for another 5-7 weeks. Had surgery a week ago yesterday and can't put any weight on my foot until sometime in May.
So the rest of you need to get stuff done, post pictures, etc. because I'm going stir crazy already!!!
__________________
8man-aka Robert 1948 on a S10 Frame, small block with a carb 1954 Cab, 53 Front and Bed, 50 Doors, S10 Frame, Power TBD Build thread: "]http://67-72chevytrucks.com/vboard/showthread.php?t=746899&highlight=wife%27s+48[/URL] [/URL]http://67-72chevytrucks.com/vboard/showthread.php?t=840204 |
|
|
|
|
03-14-2019, 10:04 AM
|
#200 |
|
Registered User
Join Date: Jul 2017
Location: Joshua, Texas.
Posts: 1,303
|
Re: Wife's 48
Don't worry! Joedoh has a new build you can follow. Lol sorry to hear about your surgery, hope everything heals up good.
__________________
1950 Build |
|
|
|
 |
| Bookmarks |
|
|


 Linear Mode

