
|
 01-22-2021, 10:59 AM
|
#1 |
|
Registered User
Join Date: Feb 2019
Location: Carpentersville, Il
Posts: 41
|
Pop and Bang
Never could get engine to fire. It just pops and bangs out the carb.
- Rebuilt starter, carburetor, new coil, new electronic ignition. It cranks a bit slow but I get spark. I checked the spark plug wire configuration. It looks right. Rotor points to #1 plug. I'm not sure it could be 180 degrees off. That would go against the plug wire diagram.
__________________
54 Chevy 3100 Deluxe, IL6 235 12V conversion. Original as possible. |

|

|
|
01-22-2021, 11:19 AM
|
#2 |
|
Senior Member
  Join Date: Oct 2014
Location: Eagle, ID
Posts: 2,931
|
Re: Pop and Bang
Yep, sounds like a timing issue. Double check you distributor setting.
|
|
|
|
|
01-22-2021, 02:29 PM
|
#3 |
|
Senior Member
 Join Date: May 2007
Location: Doodah Kansas
Posts: 7,746
|
Re: Pop and Bang
pop and bang with slow crank sounds way advanced, turn the distributor clockwise a bit and see if that improves. (GM distributors turn clockwise, so turning the distributor clockwise will retard the timing)
if you have the firing order correct on an old points type distributor you can significantly advance or retard the timing, or even counteract 180 out, by just moving the plug wires IN ORDER around the cap.
__________________
the mass of men live lives of quiet desperation if there is a problem, I can have it. new project WAYNE http://67-72chevytrucks.com/vboard/s...d.php?t=844393 |
|
|
|
|
01-22-2021, 03:04 PM
|
#4 |
|
Registered User
Join Date: Jan 2012
Location: Motown
Posts: 7,662
|
Re: Pop and Bang
you wouldn't be the first guy to have the distributor out 180°

__________________
cool, an ogre smiley Ogre's 58 Truk buildhow to put your truck year and build thread into your signature shop air compressor timer |
|
|
|
|
01-22-2021, 05:48 PM
|
#5 | |
|
Registered User
Join Date: Sep 2014
Location: USA
Posts: 2,249
|
Re: Pop and Bang
Quote:
__________________
1951 Chevy Panel Truck |
|
|
|
|
|
01-22-2021, 07:23 PM
|
#6 |
|
Registered User
Join Date: Jul 2007
Location: Toppenish, WA
Posts: 15,265
|
Re: Pop and Bang
When I was teaching auto shop I would have my students play a game were we took a 289 Ford training aid engine that we had in a stand, pull the distributor out, put the points out of adjustment, pull all of the wires out of the cap and pairs of students had to put the engine in time, drop the distributor in in time, set the points, wire connect the wires and the coil wire from the distributor and fire the engine. Some got it down to about a minute and thirty seconds from start to run.
1. find the timing mark on the flywheel. clean up around it and mark it so you can see it. You may have to pull the cover off the bellhousing and do it under the truck but if you clean it up and do something to highlight it it will be a lot easier to see in the hole in the bellhousing. 2. pull number 1 plug and bump the engine over with the starter with your finger in the plug hole until you feel the compression against your finger. It may take several times before you or your helper bumps it just right to get the mark on the flywheel visible in the hole in the bellhousing. That is the big reason for highlighting the mark. #1 piston should be on Top dead center then. If you have the valve cover off you can crank it over by hand with number 1 plug out and watch the rocker arms. #1 intake valve should open and close and then the piston should come around to top dead center on the compression stroke. A long plastic straw out of a drink cup is pretty safe to use to stick in the plug hole of that engine to feel it come to tdc. Side note: I originally did that photo to show someone how to adjust the points. from the sound of it you are ok there but with the rubbing block on the tip of the cam the point gap should be .016 inch. Make sure that the rotor is pointing to the number 1 plug wire spot on the cap (not towards number 1 spark plug) You may want to mark the distrbutor body as to where number one wire goes. set your distributor so the points are open on number one. 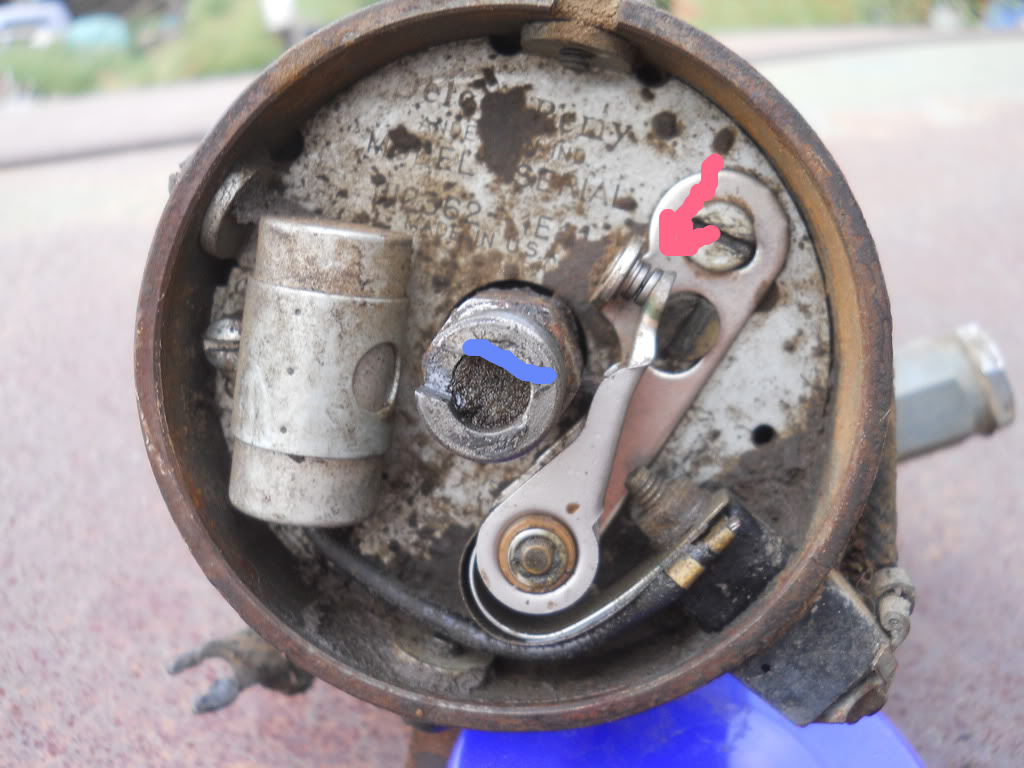 You want the rubbing block right on the tip of the cam lobe when you lock the distributor down. with that it should fire up and run and then after it warms up a bit you can fine tune it.
__________________
Founding member of the too many projects, too little time and money club. My ongoing truck projects: 48 Chev 3100 that will run a 292 Six. 71 GMC 2500 that is getting a Cad 500 transplant. 77 C 30 dualie, 454, 4 speed with a 10 foot flatbed and hoist. It does the heavy work and hauls the projects around. Last edited by mr48chev; 01-22-2021 at 07:31 PM. |
|
|
|
|
01-23-2021, 12:25 AM
|
#7 | |
|
Registered User
Join Date: Aug 2016
Location: Hunkered Down
Posts: 1,771
|
Re: Pop and Bang
Quote:
|
|
|
|
|
|
01-24-2021, 12:53 AM
|
#8 |
|
Registered User
Join Date: Nov 2010
Location: calgary alberta
Posts: 7,821
|
Re: Pop and Bang
start by doing a compression test. just to be sure.
check valve adjustments etc ensure you have fresh clean fuel pull the plugs and ensure they are all good, not cracked insulators etc and not wet or carboned up check the heat riser valve operation check the dizzy mechanical and vacuum advance to ensure it is working and not worn out check for possible vacuum leaks, float settings etc all the tune up stuff first you need to have the engine sitting so it is at tdc at the end of the compression stroke, not the exhaust stroke. to check for this take the plug out and air up the cylinder or take the valve cover off and check to see if the valves are closed. set the dizzy up so the rotor points to the number one spark plug wire tower. that should get you close enough to try it. have a buddy crank it over while you slowly turn the dizzy and see if it fires. fire it up and set the timing roughly. adjust the carb etc, use a vacuum gauge, reset the timing, recheck the vacuum gauge. google timing adjustment using a vacuum gauge. |
|
|
|
|
01-24-2021, 12:54 AM
|
#9 |
|
Registered User
Join Date: Nov 2010
Location: calgary alberta
Posts: 7,821
|
Re: Pop and Bang
do you have a nice blue spark
|
|
|
|
|
01-24-2021, 04:31 PM
|
#10 | ||
|
Registered User
Join Date: Feb 2019
Location: Carpentersville, Il
Posts: 41
|
Re: Pop and Bang
Quote:
Quote:
I tried the advise of moving distributor wires until it was 180 degrees. Never got a bang doing that. Here is the short story. Bought the engine from a shop/junk yard in Minnesota, in business 40+ years. They pull engines that customers want to replace. They had the one with correct casting #'s for my truck. They will test run them and then paint the color that the customer wants. They said the engine ran smooth. It came with 12v starter and generator. I swapped out with my rebuilt 6v starter and generator. It shipped well-braced on a skid. My goof was when I attempted pulling the engine off the truck using my come-along straps on the engine, it tipped on the carb side, hitting the ground and broke the carb base. I sent out for carb rebuild. I do not know if I damaged the engine or what, but I followed some of the great tips here, but it is same-'ol-same-'ol.
__________________
54 Chevy 3100 Deluxe, IL6 235 12V conversion. Original as possible. |
||
|
|
|
|
01-24-2021, 05:09 PM
|
#11 |
|
Senior Member
Join Date: May 2007
Location: Doodah Kansas
Posts: 7,746
|
Re: Pop and Bang
ahhhh your added info has me thinking either a big vacuum leak at the carb base or even at the manifold to head connection. if all that looks good you might crank the mixture screw out a full turn or start with it all the way in and turn back out 2.5 turns. most carb rebuilds do this, there is a chance its super lean right now
__________________
the mass of men live lives of quiet desperation if there is a problem, I can have it. new project WAYNE http://67-72chevytrucks.com/vboard/s...d.php?t=844393 |
|
|
|
|
01-25-2021, 03:55 AM
|
#12 |
|
Registered User
Join Date: Nov 2010
Location: calgary alberta
Posts: 7,821
|
Re: Pop and Bang
ah yes, more info is always good.
please explain also what type of popping are you getting? up through the intake and carb or out through the exhaust pipe? like said above, check for a vacuum leak. if it fell over hard enough to break stuff maybe the manifold is leaking vacuum or cracked. was it from the truck bed to the ground, like a few feet vertical? look at the obvious things first. since the wrecker says it was running you need to assume for a bit that it was, in good faith. since it fell you gotta think something related to that is the cause of the popping and no start situation. then, start with the basics. since you are taking their word for the engine condition and that it was a good runner, it doesn't hurt to trust that, but verify yourself just for peace of mind. I once bought a "good runner" from a wrecker and installed it without checking it. gotta be good right? and who has time to check. I was doing it as a job paid by the job and not by the hour. it was clean and seemed ready to go with fresh paint. after the install it didn't start either. that was because when they checked it they said it was good, had specs on the engine to go along with the price tag. they didn't tell me it sat on a shelf for a long time since that was done. there was actually a mouse condo inside one of the cylinders and the associated rusty cylinder that goes along with that extra moisture situation. not saying this is your situation, just saying trust but verify. -compression test. write down the results dry, then wet. compare the results. do a google search on how to do a compression test if unsure. you need to have the throttle plates wide open and have a full battery so the engine gets cranked at the same speed for all the cylinders. this can be the tell for a leaky valve which could cause a backfire or popping. a cylinder that is a bit lower than the rest and also doesn't rise in pressure with a wet test could indicate a leaky valve, which could account for the popping. https://www.hotrod.com/articles/engi...pression-test/ -since the plugs are out for a compression test check them to see if they are fouled or were possibly fouled with fuel previously. a fuel fouled plug should be replaced as they can be finicky and cause a misfire. a carbon fouled plug could indicate a rich mixture, a dry plug could indicate a lean mixture. have you tried the old tried and true method of spilling a bit of fuel down the carb, installing the air filter in case of a backfire, then try starting it? that could eliminate a few tests. if it starts then dies right away then it is a fuel issue most likely. especially if it does it again when the procedure is repeated. https://www.championautoparts.com/Pa...ark-plugs.html -distributor cap check. flip it over and look for any cracks or carbon tracing lines that could cause a misfire due to the spark redirecting itself inside the cap to ground or to another spark plug. also check the rubbing carbon electrode in the center to see if it is good. check the plug wire towers on the cap to ensure there is no cracks or carbon tracing that would also cause a misfire. check the rotor for a loose electrode and or a broken or damaged alignment area where the rotor indexes to the dizzy shaft. check all the contact areas to ensure a good contact is available. check the cap location detent to ensure it can't move around or be installed wrong -check the spark plug wires to ensure they good. look at each end and check for missing contact connections, poor crimps torn boots etc. if they are carbon core wires and not a metal wire inside check them for soft spots or extra flexible spots for their entire length which would indicate a break in the conductive core. you can also do a resistance test of each wire with an ohm meter. this includes the coil wire as well. -check the rest of the ignition system, including the wiring on ign switches and fuses etc, for loose or frayed wiring. check the ignition coil for proper connections and continuity, check the wiring inside the dizzy for a poor connection or a possible grounding issue of the wire connection at the points. check/replace the condenser if you want or it looks suspect. run a nice clean business card through the points to check for dirt or oil on the contacts. check the dizzy shaft for wear, check the dizzy mechanical advance for proper operation and full return to normal position after a manual turning of the mechanism. look for broken advance springs etc. check the vacuum advance mechanism to ensure it works properly and returns to the proper position. ensure the coil is connected with ignition source battery positive to the plus terminal and the negative terminal should go to the dizzy input https://www.yourmechanic.com/article...eduardo-ruelas -check the fuel pump pressure and output. it is fairly common for the fuel pump valves to stick on their seats and not operate properly after an engine has sat for awhile. sometimes some slight pressure applied from both directions through the pump is enough to unstick these valves and make the pump operate again. not that a new pump is not called for after that but sometimes this can get you out of a jam. -check the fuel lines and tank vent for kinks, integrity and operation. slight pressure applied to the fuel tank should result in no leaks and if a line is removed after the pump this pressure should also result in fuel flow. -check to ensure the accelerator pump is operational and the associated pressure jet is aimed at the leading edge of the throttle plate when the accelerator pump is operated. this ensures the jet stream is instantly useable as the throttle is cracked which can help eliminate a bog upon throttle bursts and will also show whether you have some fuel in the carb bowl -if you have access to a compressor you can air up the cylinders one at a time with a compression tester hose or you can make a fitting for the spark plug hole by breaking the porcelain from an old spark plug, cleaning the hole where the porcelain usually fits, then tap the hole to accept a short air hose or an airline fitting . set the engine so it is on the "ready to fire" position and add some air to the cylinder, if it wants to spin over-stop, reposition to get top dead center and then retry. once aired up check the exhaust pipe and intake manifold (at the carb air horn) to listen for leaks. this would indicate a leaky valve. compression ring wear would be noted if the breather is spewing lots of air. https://en.wikipedia.org/wiki/Leak-down_tester -check the valve adjustment and that all the valve springs are intact with no broken spring coils. a weak valve spring can cause a poor valve seal. if the engine had been siting awhile prior to you getting it, or the wrecker starting it, you could have a weak or broken spring due to the spring being held compressed for extended periods. also check that when you crank the engine over the valves actually all move about the same amount and that each one actually closes all the way. if you have a valve or 2 with a lot more lash that the rest possibly those valves are sticky and leaking. grab each valve (engine not running of course) by the spring and see if it will move a bunch from side to side. this checks for valve guide wear. check the rockers for excessive wear. if this all checks out good then adjust the valves. https://dannysengineportal.com/valve...ssible-damage/ https://www.stovebolt.com/techtips/valveadjustment.htm -check the heat riser operation. if it is stuck in the closed position you may not be getting rid of exhaust very well which leaves little room for a fresh charge of air/fuel to the cylinder so you basically have a lean condition which can cause a popping. a pic here http://67-72chevytrucks.com/vboard/s...d.php?t=551135 or here in post 8 https://talk.classicparts.com/thread...-raiser.21245/ -to check for initial timing to get it close enough to start you can make a quick tester to see when the spark should occur by using a regular test light connected to the dizzy connection and a 12v input connection, with the wire disconnected at the coil. -disconnect the wire that is on the neg terminal of the coil -remove the dizzy cap and rotate the engine in the normal rotation as it would be if it was running. watch the dizzy shaft to see which way it turns. clockwise or counterclockwise. make a note of this in memory or mark the side of the dizzy housing for reference. -connect a 12v test light, the old fashioned bulb style, to 12v. -connect the other end of the test light to that wire you just disconnected at the coil. the one that goes to the dizzy. this is simply making a switch out of the dizzy to turn your test light on or off. the points become your switch as they open or close when the engine is cranked over. -rotate the engine by hand and watch the test light. it should go on and off as the engine rotates because the points become the ground and the points are opening and closing, so making a ground and disconnecting a ground. -watch the process and keep an eye on the timing marks so you can stop rotating the engine when the light goes out and the timing mark is the closest to the pointer as possible but has not gone past the timing mark yet. -slowly rotate the engine until the marks line up to set the engine at the timing spec called for. this is likely to turn the light back on since you just rotated the engine a little. don't worry about that. -now with the engine set on the timing marks rotate the dizzy in the rotation that the dizzy shaft normally turns until the light just goes off, no further. this should be the spot you can go with to try to start the engine. tighten the dizzy clamp lightly to hold it there but so it can be turned with some pressure later. -now look at the location of the rotor and possibly mark it's position on the outside of the dizzy so you can place the dizzy cap back on and still know where the rotor pointing. -now install the cap and check the spark plug wire that is in line with the mark on the dizzy where the rotor is pointing. ensure you either have number one spark plug in that position on the cap or you have it's running mate spark plug wire in that position. the firing order should be 1-5-3-6-2-4, with number one being at the front. it's running mate will be number 6 which is at the rear of the engine. so either number 1 or number 6 should be in the dizzy tower that lines up with your mark. there is a possibility that the engine was not in the position for number 1 to be firing but instead it could be ready to fire number 6 so don't be alarmed if it is number 6 that lines up. -check the firing order as you go around the dizzy cap in the direction of rotation noted previously and ensure the rest of the spark plug wires are in order according to the firing order. if it was running before and you did not change any spark plug wires around in the cap, and you are confident that no-one else did either, then it should possibly already be correct and it should start now once everything is put back like it was. barring some problem in another system. -now put the wire back on at the coil and remove the test light so all is back to normal. ensure the dizzy cap is properly secured and try starting it. if it starts, awesome. if it backfires then try swapping the spark plug wires from number 1 to number 6 and vice versa. then go around the firing order again and ensure the rest of the wires are in position according to the firing order again. the coil is energized from the "key on" ignition switch. power goes through the coil and is grounded at the points when the points are closed. the points become the switch on the ground side of the coil circuit. when the coil is energized it induces a magnetic field around the 2 windings inside the coil. when the points open the circuit collapses and so does that magnetic field inside the coil. this collapse of the primary winding's magnetic field induces a current in the 2 coil windings.the purpose of the condenser is to absorb the "spark" of current induced in the primary winding when the magnetic field collapses otherwise the points will burn caused by the metal wanting to transfer between the contacts when the points open and arc from this induced current. also a much larger voltage is induced in the secondary winding of the coil. the secondary winding is connected to the high tension output on one end of the winding (so it is the center tower connection of the coil) and to ground on the other end. that is why a spark plug needs to be grounded to spark or a plug wire needs to be close to ground to for a spark to jump the gap. if your test light is lit when connected then the points are closed because it is connected to a positive feed and a ground when points are closed. as you rotate the engine slowly, by hand, sooner or later the light is going to go out because the points opened and the circuit to ground is lost. this is normally the instant that the magnetic field collapses and induces the high tension voltage that is sent to the dizzy. set the dizzy so that the engine, when turned by hand in the normal rotation like it would be when running, is sitting on the timing marks when the test light just goes out. that will be when the spark will occur when everything is connected again. hope that helps |
|
|
|
|
01-25-2021, 12:58 PM
|
#13 |
|
Registered User
Join Date: Feb 2019
Location: Carpentersville, Il
Posts: 41
|
Re: Pop and Bang
Thanks again to all for the suggestions/educational info. I'm not a mechanic....don't play one on TV.
Things to eliminate ASSuming new parts are perfect: Cap, rotor, plug wires, electronic ignition, battery, thick negative terminal wire. Rebuilt items ASSuming perfect: 6v starter, generator, and carb. I do not believe the engine sat with the "wrecker." I waited for a good while for them to notify me that a running truck came in and the customer wanted to swap the engine. Customer stated that the valves had been ground when it was owned by his father. When pulling off of the pickup, a corner of the skid hit the ground first, then the weight of the engine tipped with the carb and oil canister hitting the ground, spilling gas and oil on the driveway. I am actually more fearful (and sick) that I F'd up and damaged the engine. I did the simple 180 test rearranging the plug wires, but none of the other pertinent suggestions here yet. Maybe these engines can take abuse, but not the kind I gave. Stupid is what stupid does.
__________________
54 Chevy 3100 Deluxe, IL6 235 12V conversion. Original as possible. |
|
|
|
|
01-25-2021, 01:46 PM
|
#14 |
|
Registered User
Join Date: Nov 2010
Location: calgary alberta
Posts: 7,821
|
Re: Pop and Bang
I assume the engine hit on the intake side pretty hard if it crushed the oil filter which is usually bolted to the intake runner and also snapped the carb off at the base. really check the intake for cracks and or whether it moved on the gasket surface on the head flange. this could cause some serious vacuum leaks if thats the case.
got a pic or two? |
|
|
|
|
01-25-2021, 01:47 PM
|
#15 |
|
Registered User
Join Date: Nov 2010
Location: calgary alberta
Posts: 7,821
|
Re: Pop and Bang
|
|
|
|
 |
| Bookmarks |
| Thread Tools | |
| Display Modes | |
|
|


 Linear Mode

