
|
 05-22-2023, 11:53 AM
|
#126 |
|
Registered User
Join Date: Jun 2014
Location: Beaverton, Oregon
Posts: 196
|
Re: Sullii the 72 GMC 1500
I sectioned my crossmember 2" and raised all steering linkage up 2". Now I'm worried about the drag link hitting the bottom of my 350 SBC. Of course now I'm still waiting to get the engine back so I can't check. Did you raise your steering components up at all?
__________________
My 1970 C10 ChassisFab LWB to SWB Build Thread |

|

|
|
05-22-2023, 12:13 PM
|
#127 | |
|
Registered User
Join Date: Jun 2014
Location: Mocksville, NC
Posts: 1,726
|
Re: Sullii the 72 GMC 1500
Quote:
__________________
Builds: Green Gus the 68 C10 ; Sullii the 72 1500 - Instagram: @dr.hewitt - C10 Concept/Development Photos: Master Thread |
|
|
|
|
|
05-22-2023, 12:31 PM
|
#128 | |
|
Registered User
Join Date: Jun 2014
Location: Mocksville, NC
Posts: 1,726
|
Re: Sullii the 72 GMC 1500
Quote:
And just because I don't like new pages without a photo, here's a random one I never posted. This is from last year, before I moved the truck to my house. That mound of dirt beyond the fence is where my garage is now. 
__________________
Builds: Green Gus the 68 C10 ; Sullii the 72 1500 - Instagram: @dr.hewitt - C10 Concept/Development Photos: Master Thread |
|
|
|
|
|
05-22-2023, 07:32 PM
|
#129 | |
|
Registered User
Join Date: Jun 2014
Location: Beaverton, Oregon
Posts: 196
|
Re: Sullii the 72 GMC 1500
Quote:
I think the only option would be to use motor mount shims to go up or move it back like you said! What a cool build you've got going!
__________________
My 1970 C10 ChassisFab LWB to SWB Build Thread |
|
|
|
|
|
05-22-2023, 10:07 PM
|
#130 |
|
Senior Member
 Join Date: Jan 2007
Location: Turlock, CA
Posts: 8,413
|
Re: Sullii the 72 GMC 1500
Great pic
__________________
I live in California, but identify as a Texan  "If a job's worth doing, it's worth doing well" Project "Little Sister" (70 c10 blue original paint refresh) Project "C10 Fever" (68 factory black 396 swb) Project "Blue Bomb" (70 c30 blue original paint refresh) Project "Vitamin C" (71 c10 orange original paint refresh) |
|
|
|
|
05-25-2023, 11:51 AM
|
#131 |
|
Registered User
Join Date: Jun 2014
Location: Mocksville, NC
Posts: 1,726
|
Re: Sullii the 72 GMC 1500
Now that the core support is finally done, it has unlocked a few more items that I can work on. One thing I hadn't thought about up until recently was the air intake. To me, the air intake is the most out of place looking piece of a modern engine swap. Even so, I did not see a way around one without swapping out the whole intake setup on my engine. With this budget build, that was not happening. So, for now I am going to run a basic cold air intake. This is a universal swap kit from LS Swaps Performance Group made to work with a truck MAF sensor. This is just moc up. I will eventually paint the inlet pipe so it blends in better.
   I also had a chance to get the front end pieces reinstalled. First up was the bumper. If you recall, I did a 1" body drop which required dropping the frame horns down 1". This moved the bumper down with it to match with the dropped body. The bumper lines up nicely and all I have left is to mount the braces. Here's a visual reference for what will be very close to the final ride height. The bumper is the lowest part of the center line of the truck.  Before I completely reassemble the front end I wanted to determine if I should repaint the black on the grill. I keep going back and forth between leaving it, painting it back to original '72 style, or removing all the black. I think I've decided on touching up the black, but not repainting it completely. One thing I noticed is I kinda like the look of the black surrounding the headlights. I might have to paint my headlight surrounds even though GM never did this on the GMC.  
__________________
Builds: Green Gus the 68 C10 ; Sullii the 72 1500 - Instagram: @dr.hewitt - C10 Concept/Development Photos: Master Thread |
|
|
|
|
06-01-2023, 12:18 PM
|
#132 |
|
Registered User
Join Date: Jun 2014
Location: Mocksville, NC
Posts: 1,726
|
Re: Sullii the 72 GMC 1500
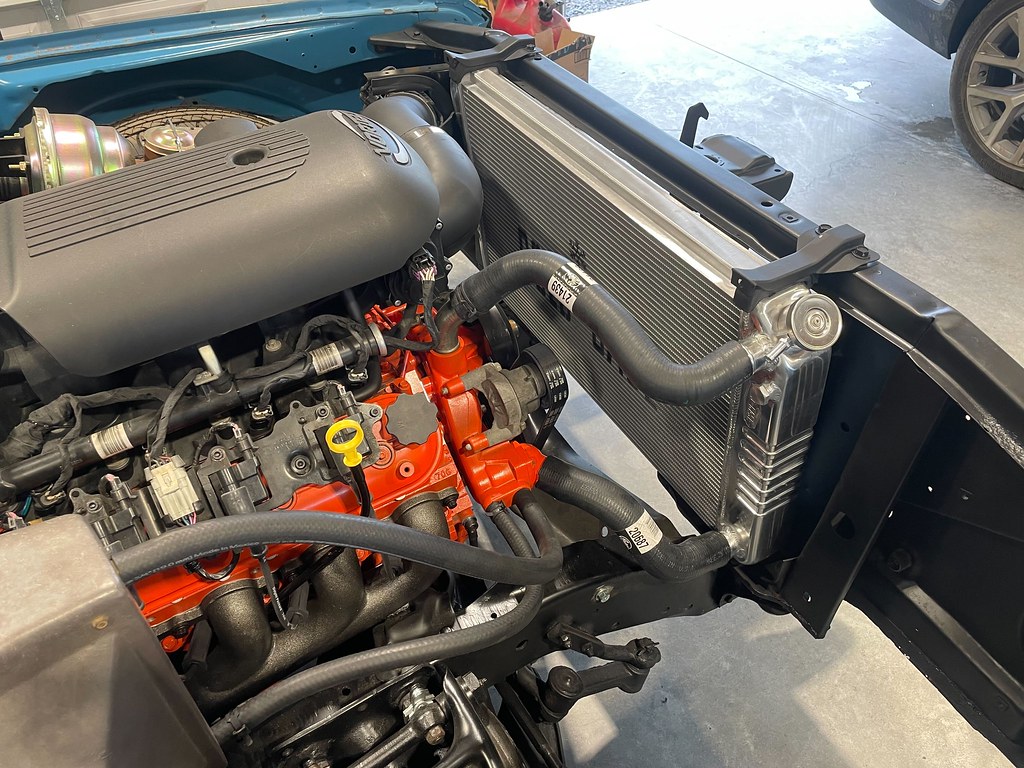
Pressing on with punch list items. It was time to figure out the cooling system. I had planned on using the original radiator but it was beyond dirty. I considered having it cleaned and tested, but at that point I'm half way to the cost of a new radiator. I decided to go with a Cold Case GMT558ALS LS swap radiator for C10s. This fits in the stock location but has both inlet and outlet on the passenger side, so it really cleans up the coolant line routing. The only thing to note with fitment is you need the 4-core radiator brackets. I didn't discover this until I tried to install the radiator and found out my original 3-core mounts were too short. For lines, I used a Gates 21439 top hose and 20687 bottom hose, both with a little trimming of the ends. The heater hoses are just Gates 5/8" and 3/4" lines sold by the foot. I wanted to use stock style constant tension clamps but didn't know what sizes to use. I errantly measured the outer hose diameter and ordered those sizes in mm. That did not give me enough expansion in the clamp to get over the flare on the ports! After installing the lines and measuring again across the flare, I ordered sizes to match these measurements and the clamps fit much better. These clamps are from Bell Metric and are very nice. The sizes I ended up with are as follows: 5/8 heater hose, 24mm. 3/4 heater hose, 27mm. Upper water pump line, 46mm. Lower water pump line and both radiator lines, 50mm. Remaining items for the cooling system are overflow tank and fans. I will update later on those items.
  I was also able to get the front lights installed and wired up. I've had the engine bay harness cleaned up and just sitting inside the cab since I stripped it down while doing the LS harness, so at this point it was just plug and play. I discovered that my front blinker bulbs were blown. I also had no marker lights but ultimately discovered that it was due to the blown blinker bulbs. The wiring diagrams I've seen have the markers wired as always on with the lights, but mine were wired to be on with the lights AND blink with the blinkers. Apparently GM wired these trucks up both ways. This also lead to the realization that the rear markers are always on and do NOT blink with the blinkers. This seems funny to me and I may have to make a modification to the wiring to remedy this. It's a small thing but it bothers me that it's different front to rear. Other than that, the lights work great!   Now that I am beginning to put body panels back on I am circling back to aesthetic updates to the truck. The front grill has always bothered me on this truck. I've always liked the C10 grills more, but for some reason my GMC grill just looked extra ugly. I decided to repaint all the black like factory and WOW did it revive the front end of this truck. I used Rustoleum flat black and it looks amazing in person. The original paint on the grill appeared to be brushed on, so I used a foam brush to paint everything by hand. It gave the paint just enough imperfections to blend right in with the rest of the truck without looking out of place. I also painted the headlight surrounds like I mentioned in the previous post and that also helped improve the overall appearance to me. I feel like this is how GM should have painted these originally, especially since they were painted on the C10s. At this point, I am completely satisfied with how the front end turned out and think I can kill any thoughts I had of converting it to a C10 front end.  
__________________
Builds: Green Gus the 68 C10 ; Sullii the 72 1500 - Instagram: @dr.hewitt - C10 Concept/Development Photos: Master Thread Last edited by hewittca; 06-02-2023 at 07:19 AM. |
|
|
|
|
06-01-2023, 07:20 PM
|
#133 | |
|
Senior Member
Join Date: Mar 2011
Location: Hanover NJ
Posts: 4,119
|
Re: Sullii the 72 GMC 1500
Quote:
__________________
Doc & Kim build http://67-72chevytrucks.com/vboard/s...d.php?t=722288 I am from the desert http://67-72chevytrucks.com/vboard/s...d.php?t=650332 basket case build SOLD http://67-72chevytrucks.com/vboard/s...d.php?t=648557 |
|
|
|
|
|
06-01-2023, 08:12 PM
|
#134 |
|
Registered User
Join Date: Apr 2014
Location: Azle,Texas
Posts: 2,248
|
Re: Sullii the 72 GMC 1500
The grille changes made a big difference. I've had the same feelings about the grilles on Chevy vs GMC, but I have to agree here as well. Leave it GMC!
 It's definitely more unique, I hardly ever see them around here... but Chevrolets all the time. It's definitely more unique, I hardly ever see them around here... but Chevrolets all the time. Have you given any more thought about your future wheel wells? I have been planning all along on leaving mine factory, but I know they're going to be the limiting factor on my ride height. I would love to go the whole 9 yards with Porterbuilt hood hinges and some sweet fiberglass wheel wells, but I don't want to drop that much cash as well. I think I could live with the less expensive styles that are sheet metal panels, like the ones Jason VaNatta makes. Whatever wheel wells you go with do you plan on painting them blue or black? I can't make up my mind on that either. Also, what are your hood hinge plans? sorry if I missed that...
__________________
Brian 1972 C10, "Loyd", LWB to SWB, 5.3, L83/6L80e, 4:11 Tru Trac, Air Ride, VA, DD, 20" Coys, 4 wheel disc, A quick LS swap turned into a 6 year frame off resto-mod. |
|
|
|
|
06-02-2023, 07:34 AM
|
#135 | |
|
Registered User
Join Date: Jun 2014
Location: Mocksville, NC
Posts: 1,726
|
Re: Sullii the 72 GMC 1500
Quote:
__________________
Builds: Green Gus the 68 C10 ; Sullii the 72 1500 - Instagram: @dr.hewitt - C10 Concept/Development Photos: Master Thread Last edited by hewittca; 06-02-2023 at 07:41 AM. |
|
|
|
|
|
06-13-2023, 03:43 PM
|
#136 |
|
Registered User
Join Date: Jun 2014
Location: Mocksville, NC
Posts: 1,726
|
Re: Sullii the 72 GMC 1500
I've had to circle back to my center crossmember several times over the course of this build, but I think I finally have it finished! The last step was to get it all final welded and painted and I was able to complete that with the help of my friend. With that done, I was also able to get the exhaust installed for good. No surprises this time around since I've already had it installed once before while building it. One thing I started to worry about prematurely was that these Venom 250 mufflers would be too loud. If that ends up being the case, I figure I have plenty of room just behind the manifold turn downs to add resonators to quiet it down. I've heard this done before and it really cuts down on the volume while retaining the tone of the muffler.
    At this point, I am pretty sure most of the heavy cutting/grinding/welding is complete on this truck (at least for now!). With that, it was time for a little motivation. I decided to throw the bed floor and a side on to get an idea of how everything will look and fit. There's not much to say in the way of progress for this step, other than the stance is going to end up exactly how I wanted it. It currently has a 1" rake front to rear which is what I was aiming for. I do believe I will leave the rear where it is and don't need to mill the blocks down at all.   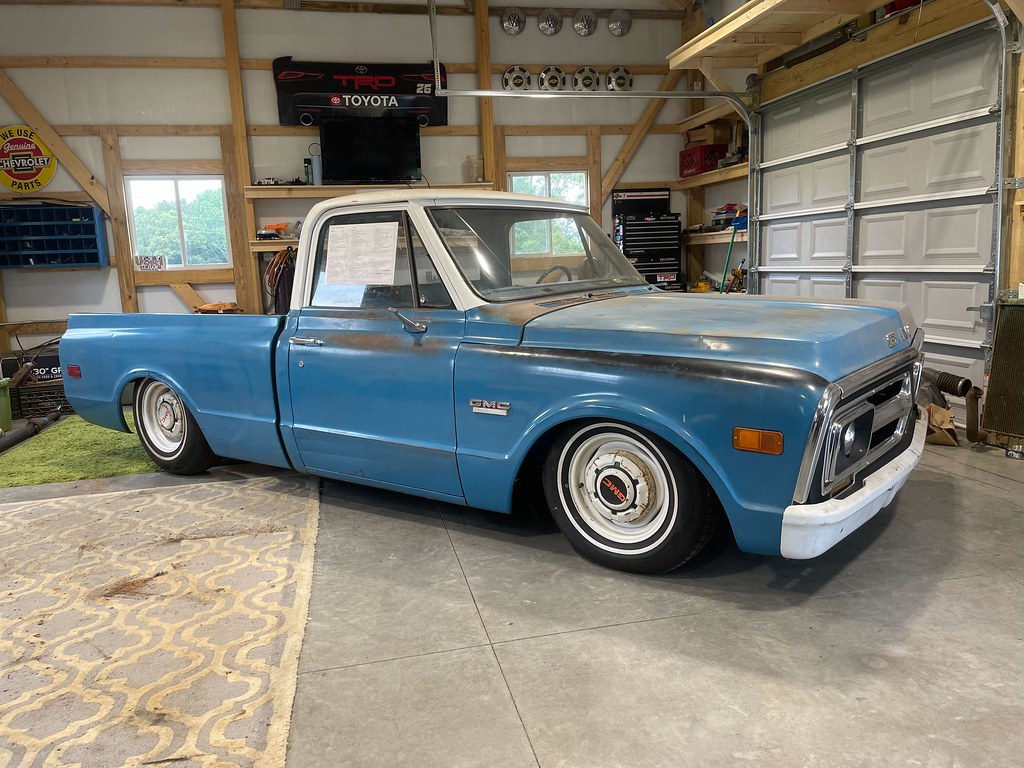  With the bedside on, I realized that I could finalize the tailpipe exit now that I had my reference point. I set it up so it gets the exhaust out from under the truck without blowing water all over the fender, but still tucked enough that at most angles you don't even see it. This was facilitated by the fact that the frame is 4" higher than it normally is compared to the fender, so I actually had to turn down the pipe to get it to exit below the fender.     Next step is to get the fuel system installed and finally fire this thing up. Here's one more pic for now. 
__________________
Builds: Green Gus the 68 C10 ; Sullii the 72 1500 - Instagram: @dr.hewitt - C10 Concept/Development Photos: Master Thread |
|
|
|
|
06-13-2023, 04:53 PM
|
#137 |
|
Senior Member
Join Date: Sep 2015
Location: Martensville, Saskatchewan
Posts: 954
|
Re: Sullii the 72 GMC 1500
It's looking great! Keep up the fantastic work
|
|
|
|
|
06-14-2023, 06:11 AM
|
#138 |
|
Senior Member
Join Date: Apr 2008
Location: Berne IN
Posts: 3,211
|
Re: Sullii the 72 GMC 1500
Great craftsmanship as usual
__________________
71 C10 72 K20 72 K10 Super Kirk |
|
|
|
|
06-14-2023, 11:05 AM
|
#139 |
|
Registered User
Join Date: Apr 2014
Location: Azle,Texas
Posts: 2,248
|
Re: Sullii the 72 GMC 1500
This is the result of a well managed and thoroughly thought out plan. As wise men say... proper planning prevents pi$$ poor performance.

__________________
Brian 1972 C10, "Loyd", LWB to SWB, 5.3, L83/6L80e, 4:11 Tru Trac, Air Ride, VA, DD, 20" Coys, 4 wheel disc, A quick LS swap turned into a 6 year frame off resto-mod. |
|
|
|
|
06-14-2023, 02:21 PM
|
#140 |
|
Registered User
Join Date: Mar 2015
Location: washington
Posts: 2,169
|
Re: Sullii the 72 GMC 1500
I used the Black Widow-Venom 250 mufflers also. They are loud but not too bad till you step on it. Then they are loud! Everyone within a couple blocks will know you! BG
Guess it depends on how and where you drive. I also reversed the trailing arm attachment points. Just don't add the type of sway bar that attaches to the arms. It's just dangerous. Let us know how you like the sound. Cheers. |
|
|
|
|
06-14-2023, 03:54 PM
|
#141 |
|
Senior Member
Join Date: Aug 2004
Location: Centennial, CO
Posts: 2,899
|
Re: Sullii the 72 GMC 1500
Sweet! It's looking good. I really like the exhaust exit location.
__________________
ClusterTruck: 68 C10 Bought in 89, wrecked in 03. Slow low $ rebuild started '17. 6.0 & TKO http://67-72chevytrucks.com/vboard/s...d.php?t=788602 93 K1500 Short Step, 350, NV4500, EBL flash ECU. Vortec heads & roller cam someday... 05 Jeep Wrangler Unlimited. 3 lift & 6-speed 02 E320 the insurance total free car 13 Tahoe LTZ |
|
|
|
|
06-14-2023, 10:11 PM
|
#142 | ||
|
Registered User
Join Date: Jun 2014
Location: Mocksville, NC
Posts: 1,726
|
Re: Sullii the 72 GMC 1500
thanks everyone!
Quote:
Quote:
__________________
Builds: Green Gus the 68 C10 ; Sullii the 72 1500 - Instagram: @dr.hewitt - C10 Concept/Development Photos: Master Thread |
||
|
|
|
|
06-25-2023, 09:54 AM
|
#143 |
|
Registered User
Join Date: Jun 2014
Location: Mocksville, NC
Posts: 1,726
|
Re: Sullii the 72 GMC 1500
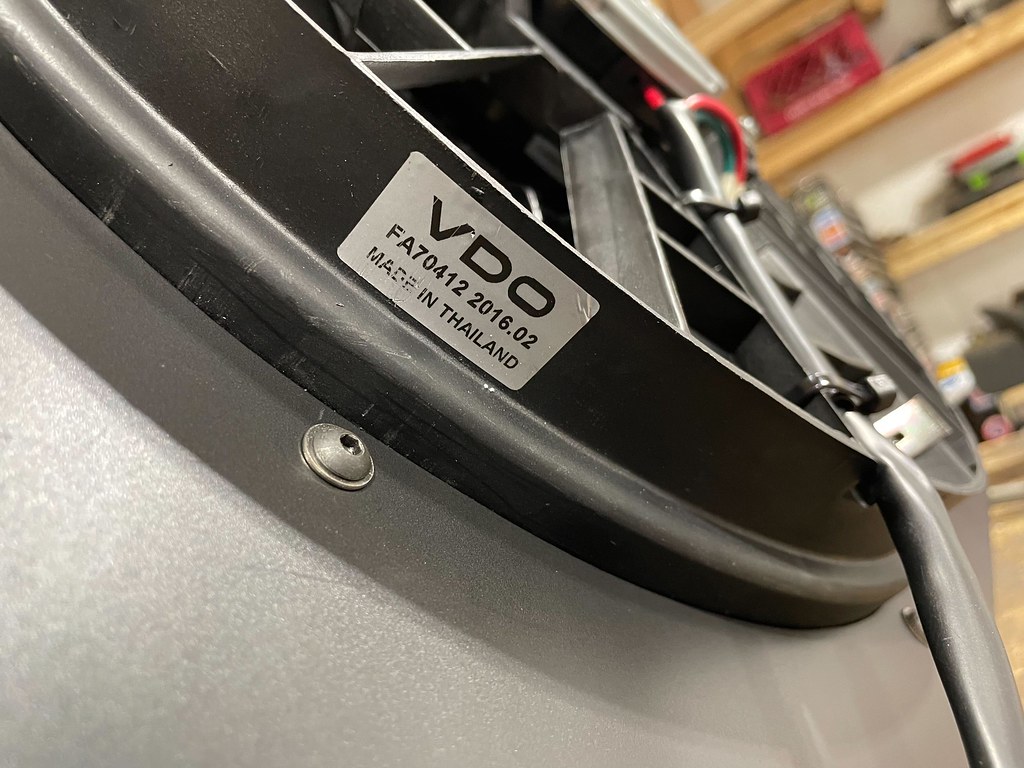
The last part of my cooling system that needed to be completed was the fan. I decided early on that I didn't want to keep the mechanical fan that came on my donor motor. At one point, a friend of mine donated a Ford Taurus fan to fill the void left by the mechanical fan. I learned from him that this fan was a popular option because its one of the best OEM two speed electric fans. Apparently Ford used it after they were experiencing overheating issues with the Taurus. Anyway, this fan has a build in shroud that made it quite tricky to integrate into a unit that I could bolt in the C10. After additional research, I found that the Volvo 850 from the 90's had the same fan but in a bolt on housing. I decided to get one of these instead and build my own shroud. I ordered PN FA70412 from Rock Auto and was surprised to see it was a VDO fan. This should do quite nicely. The one thing to note with this fan is the two speed power works differently than it would work with a typical GM fan 1 and fan 2 output control. This VDO fan is 12V to the green wire for low speed or 12V to the red wire for hi speed. The GM outputs are 12V to green for low and 12V to green AND blue for hi. I've read that this fan is sufficient enough just on low speed to cool an LS, so for now I have just hooked up the low speed side to the fan 1 output from the PCM. If that proves insufficient, I will have to add a few relays to trick the outputs into working like the Volvo fan controller.
 I ended up using a scrap piece of 14 gauge aluminum I had to build my shroud. Thicker than I think it needed to be, but definitely made a stout shroud. The angle in the shroud is to accommodate the angle of the radiator. Notice the notched corner on the side pieces... this was because I had to cut those out to fit the piece in the metal break. I should have bent the bottom two bends first. Lessons learned.  I mounted the shroud with a few bolts across the top and two on the bottom. For the bottom two, I facilitated assembly by welding some threaded inserts onto the core support.  After a quick coat of flat black paint, its ready for final install. With the radiator installed for the final time, I also filled the system with coolant. I decided to go with an open system so I could use standard green coolant. I made sure to fill the engine from the return port on the water pump before connecting the top hose. This greatly reduces the possibility of trapping air in the system, and also gives you coolant in the block for the first start. Otherwise, you won't get coolant flowing through the block until the thermostat opens for the first time. My overflow tank is a Doorman 603-001 and mounts to the core support with a few bolts.   With the shroud installed, this pretty much finalizes how my engine bay will look for now. I have nothing else to add under the hood and do not have any further plans until after I make sure this truck is a reliable driver. At that point, I will start to look into cleaning up the engine bay a bit more with things like fender wells and maybe a nicer engine cover and relocating the coils. 
__________________
Builds: Green Gus the 68 C10 ; Sullii the 72 1500 - Instagram: @dr.hewitt - C10 Concept/Development Photos: Master Thread Last edited by hewittca; 06-25-2023 at 04:09 PM. |
|
|
|
|
06-25-2023, 10:23 AM
|
#144 |
|
Registered User
Join Date: Jun 2014
Location: Mocksville, NC
Posts: 1,726
|
Re: Sullii the 72 GMC 1500
Another little side project I started a while ago and was able to finish up was modifying the brake and clutch pedal shafts. I always thought it was awkward how high these pedals were. I thought it would be nice to change these, and decided to go ahead with that thought once I saw how clay68c10 did his here. Basically, the pedal faces are moved forward so the pedals shafts come straight down instead of down and towards you. This makes the transition from throttle to brake much more natural and modern.
  These pedals were welded up by my friend at work where we have a welding table. We both learned that the brake spring makes a nice heater coil while welding! After only a few tacs it was cherry red. After that, we connected the ground clamp directly to the pedal shaft... another lesson learned.  With the LS swap, you need a dual function switch on the brake pedal. One normally open circuit for the brake lights, and one normally closed circuit for the PCM which needs to see 12V on the TCC brake switch when you are not on the brakes. I used ACDelco PN D850A which was a direct fit to the pedal bracket. I also had to add a clutch switch for the CPP input to the PCM which, like the brakes, needs to see 12V when you are off the clutch. I had a Essen MTCRS-26DH rocker switch lying around, so I used that. I had to weld a tab to the clutch to activate the switch. I added a pink wire in parallel between the brake and clutch switch that will go to a keyed power on terminal in my fuse panel. This will provide the 12V needed when the key is on. 
__________________
Builds: Green Gus the 68 C10 ; Sullii the 72 1500 - Instagram: @dr.hewitt - C10 Concept/Development Photos: Master Thread |
|
|
|
|
06-26-2023, 08:09 AM
|
#145 |
|
Senior Member
Join Date: Aug 2004
Location: Centennial, CO
Posts: 2,899
|
Re: Sullii the 72 GMC 1500
Nice work on the pedals.
I like how you did your clutch switch. I may be copying that.
__________________
ClusterTruck: 68 C10 Bought in 89, wrecked in 03. Slow low $ rebuild started '17. 6.0 & TKO http://67-72chevytrucks.com/vboard/s...d.php?t=788602 93 K1500 Short Step, 350, NV4500, EBL flash ECU. Vortec heads & roller cam someday... 05 Jeep Wrangler Unlimited. 3 lift & 6-speed 02 E320 the insurance total free car 13 Tahoe LTZ |
|
|
|
|
06-26-2023, 10:53 AM
|
#146 | |
|
Junior Member
Join Date: Apr 2023
Location: Anchorage, Alaska
Posts: 97
|
Re: Sullii the 72 GMC 1500
Quote:
Beautiful truck btw, love what you've done with it |
|
|
|
|
|
06-27-2023, 06:36 AM
|
#147 | |
|
Registered User
Join Date: Jun 2014
Location: Mocksville, NC
Posts: 1,726
|
Re: Sullii the 72 GMC 1500
Quote:
__________________
Builds: Green Gus the 68 C10 ; Sullii the 72 1500 - Instagram: @dr.hewitt - C10 Concept/Development Photos: Master Thread |
|
|
|
|
|
07-01-2023, 07:31 PM
|
#148 |
|
Registered User
Join Date: Jun 2014
Location: Mocksville, NC
Posts: 1,726
|
Re: Sullii the 72 GMC 1500
I'm making the last big push to get this engine swap fired up now that I have all the fuel system components. I debated for months what I wanted to do here. Early on, I was going to just keep the stock tank and make it EFI compatible like a few others have done on the forum. Then my friend convinced me to move the tank to the rear, so I was looking into the Blazer tank swap. That seemed like a reasonably priced option, however, I did not like how absolutely massive that tank is. Having 32 gallons of fuel sloshing around back there sounded absurd, so I started looking into aftermarket tanks. I ultimately settled on a universal EFI tank from Tanks Inc., PN UT-N-2-T. This tank is 16 gallons and fits almost perfectly behind the rear end. I just had to trim about 1/8" off each side of the lower part of the "C" of the frame rails. The tank itself is very nice and comes powdercoated already. The dent was my mistake trying to wrestle it between the rails before I realized I needed to trim them.
 Mounting the tank was fairly simple using the supplied straps. The existing crossmembers in the frame served as the perfect mounting points for these. I also had to add braces for the top of the tank so the straps had something to tighten the tank up to. The straps only come with one end formed, so you do have to cut these to fit. One mistake I made was to fit them without the rubber pad that goes between the straps and tank. They are thin so I thought they wouldn't make much difference. Wrong. I could barely get the nuts started once I added them to the straps. More lessons learned.  Tanks Inc. also has all the components necessary to complete the fuel system so I made things simple on myself and got everything I needed from them. The fuel level sender is a 1-TAN-GML that is compatible with 90 ohm GM fuel gauges. All I have to do here is reroute my sender wire from in the cab to this sender and the fuel gauge should work. The setup instructions for setting the float were very clear and easy to follow.  Next up, the fuel pump which is PN 1- GPA-4. Again, the setup instructions were very good and I had the pump assembled in about 15 minutes. The GPA-4 is a 255 liters per hour pump which is suitable for up to 630 hp (not that I'll be anywhere near that!).  I had one oversight in setting up this tank, but I ended up getting lucky. One of the cross supports for the bed runs directly over top of the sender and pump, but with the bed adjustment spacers I need to add I have just enough room to clear. These spacers are there because I incorporated an extra 1/2" when raising my bed floor so I could dial in the bed alignment perfectly. On my last truck, I could not get the bed low enough to align the body line properly and it always annoyed me. If you are installing this tank on a truck with a stock bed, however, you will run into clearance issues. The easiest solution I can see is to drop the tank by an inch.  The tank is now fully mounted and installed. With the addition of a 90 degree filler neck I am ready to wire this tank up and start connecting fuel lines. I will update later with line installation and hopefully first startup! 
__________________
Builds: Green Gus the 68 C10 ; Sullii the 72 1500 - Instagram: @dr.hewitt - C10 Concept/Development Photos: Master Thread |
|
|
|
|
07-03-2023, 11:46 PM
|
#149 |
|
Junior Member
Join Date: Apr 2023
Location: Anchorage, Alaska
Posts: 97
|
Re: Sullii the 72 GMC 1500
Looking good! +1 for the Tanks Inc stuff. I retrofitted using their pa5 kit.
And great tip on double checking spacing for the bed supports. I added my FI pump as a retrofit to an LMC tank and ended up having to notch the bed support, not because of the tank itself, but because of the pump fittings / hose connections. Good luck with the first start! |
|
|
|
|
07-18-2023, 02:53 PM
|
#150 |
|
Registered User
Join Date: Jun 2014
Location: Mocksville, NC
Posts: 1,726
|
Re: Sullii the 72 GMC 1500
I had a chance to connect all the fuel lines and wiring on the tank. Nothing really special or custom here. The Corvette style filter/regulator is mounted inside the left framerail and I ran the fuel lines that came with the Tanks Inc. kit. These utilize the -6 AN push on fittings. They go on quite easily so my instincts say not to trust them, but they seem well made and I'm sure they wouldn't sell these fittings if they didn't work, right...? My wiring is basically just extensions on the fuel sender and fuel pump wires so they reach to the rear. Then I tied the two grounds together and bolted it onto the crossmember and made sure I had a solid ground connection to the negative battery cable. I added a plug on the fuel pump wires just in case I ever need to pull the pump out. Overall, I would say my installation is based mainly on function and not form. It doesn't look super clean like some builds with all the custom stainless lines, but nothing on this truck is really to that level. I'm trying to keep it similar to a factory style install. You may also notice the charcoal canister on the left. The tank vent will eventually be routed through this after it loops up above the filler neck that will be mounted behind the marker light. This is in an attempt to keep gas fumes down while the truck is parked in the garage.
  On the other end of the truck, I have the gas line run and ready to connect. It uses a -6 AN to push on adapter to connect directly to the stock fuel rail.  At this point in the build, my garage has become quite the mess. I thought this would be a good time to roll the truck outside and clean up. The only remaining item to complete before I can start the truck is to make all my under dash wire connections. I could theoretically start the truck now, but all my wires are just temporarily connected from when I cranked the engine a few months ago. I'd rather have all the wiring in its final form before I try to start the truck. If things go according to plan, I should be able to start it this weekend. The results of that test will determine where my focus goes from there!   
__________________
Builds: Green Gus the 68 C10 ; Sullii the 72 1500 - Instagram: @dr.hewitt - C10 Concept/Development Photos: Master Thread |
|
|
|
 |
| Bookmarks |
|
|


 Silverado LTZ (Daily Driver)


 Linear Mode

