
|
 02-13-2019, 11:40 PM
|
#76 |
|
Registered User
Join Date: Feb 2010
Location: Dayton, OH
Posts: 255
|
Re: Berthas Build
Clutch push rod at rest
 Clutch push rod at full engagement. Im dont care for the angle of the rod fully pressed but it works fine for now and Im not sure how I would modify it at the moment. 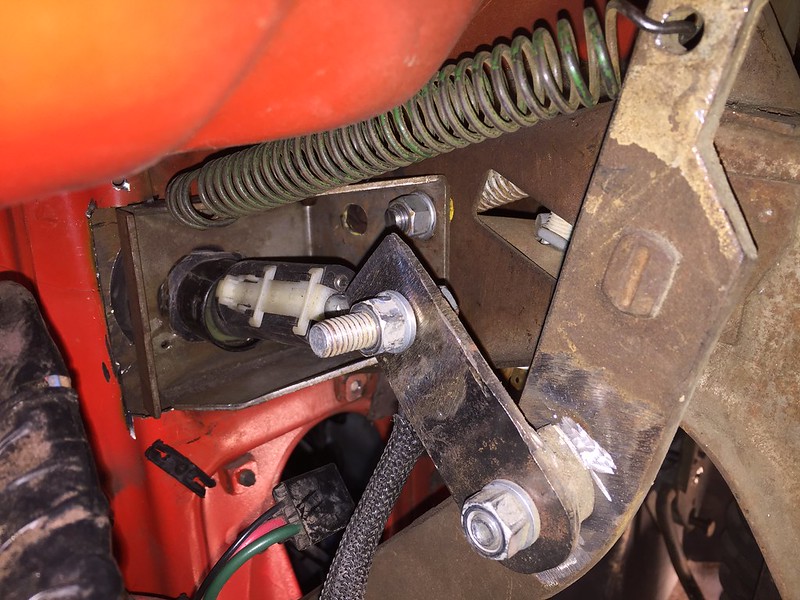 I could not for the life of me find a steel driven gear for my 29 spline Dodge output shaft/housing so I ended up swapping the housing and plastic drive gear with parts from a Chevy housing which parts were much easier to find for. 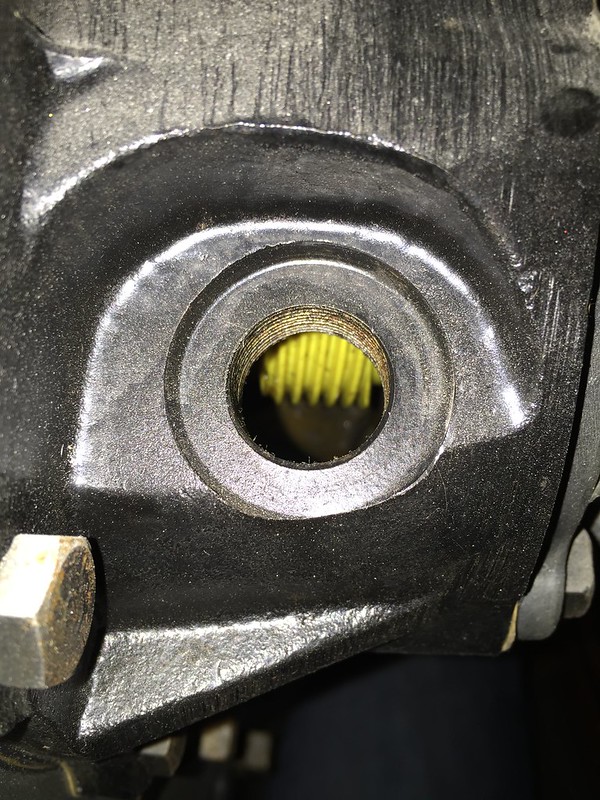 This is the driven gear that I could not locate 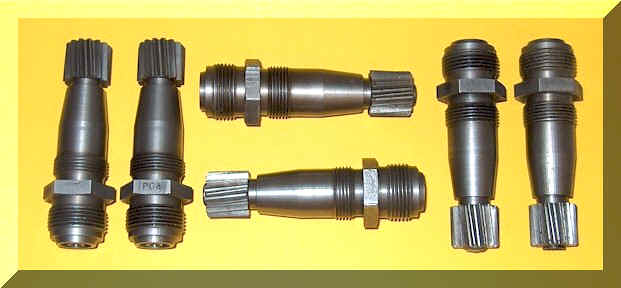 I made a set of traction bars from some solid aluminum and some heims from Ballistic Fab and cut some brackets out on the waterjet for them. I thought these turned out pretty damn cool. 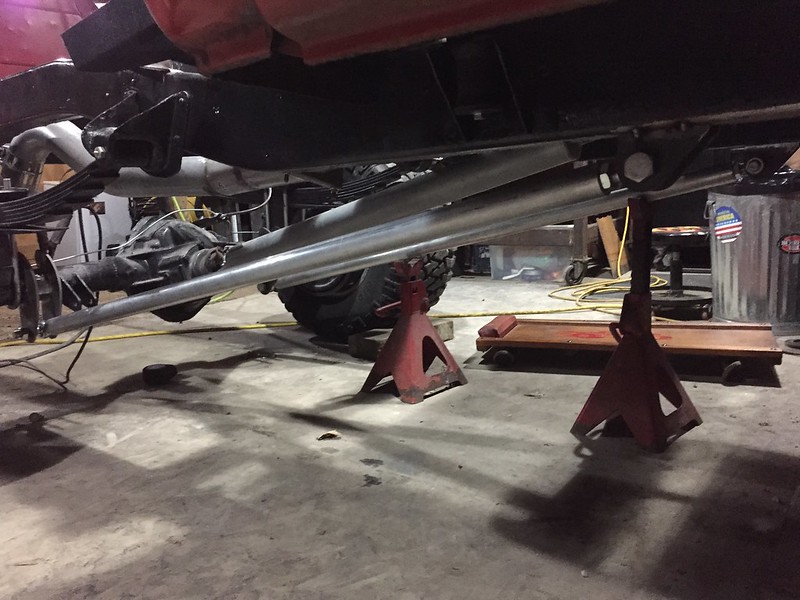 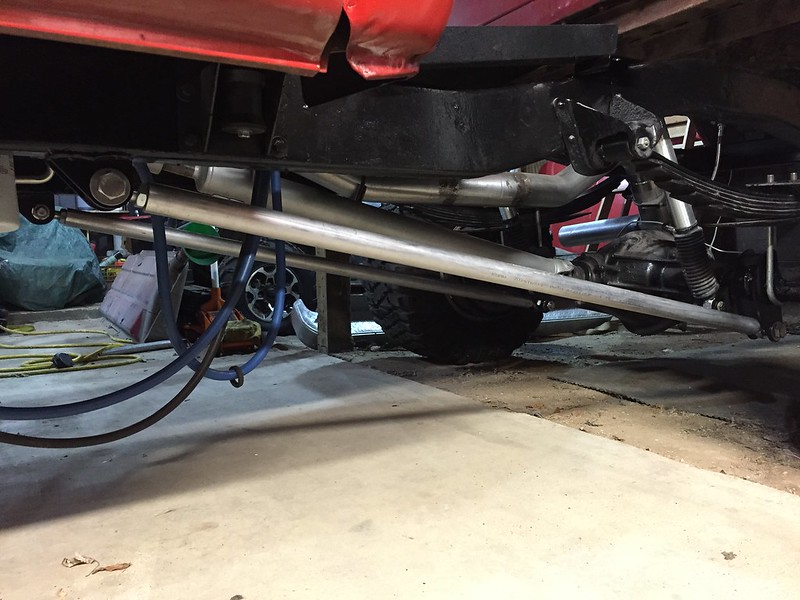 Once I had most everything hooked up to the cab and it semi-bolted to the frame, I threw a block of wood on the floor and drove(putted) it around the property. At this point it was bare bones obviously. No seats, still starting with a jump wire key across the ignition switch plug, a piece of pallet wood propping the radiator away from the fan, no bolts in the bed, the fuel tank propped up on a block of wood to get the little bit of fuel to the draw tube, the fuel pump hooked up to the battery manually, etc. It still felt good at this point to get her out and at least stretch her legs a little bit. There is ton of work yet left to do at this point. 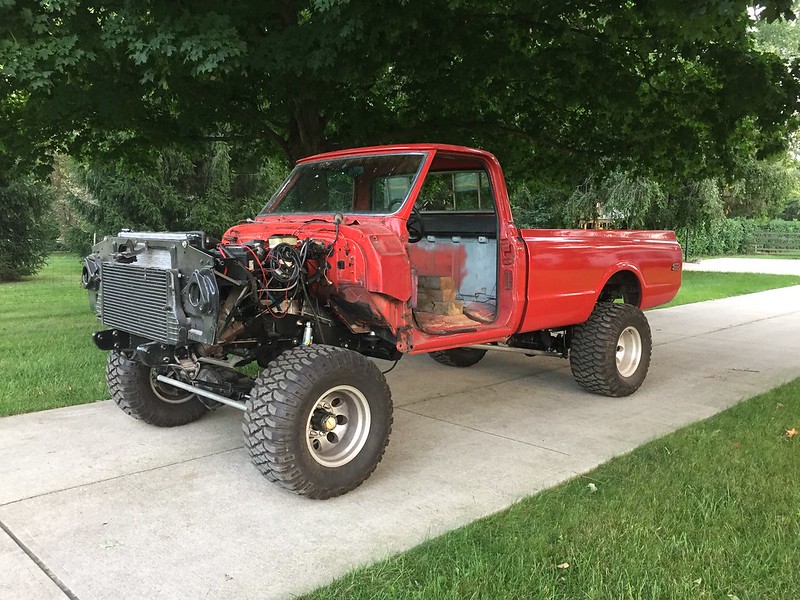 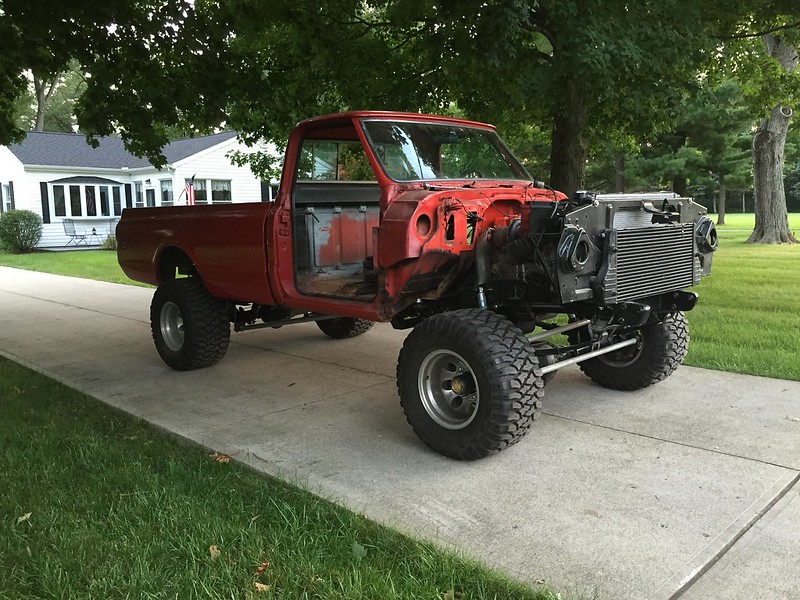 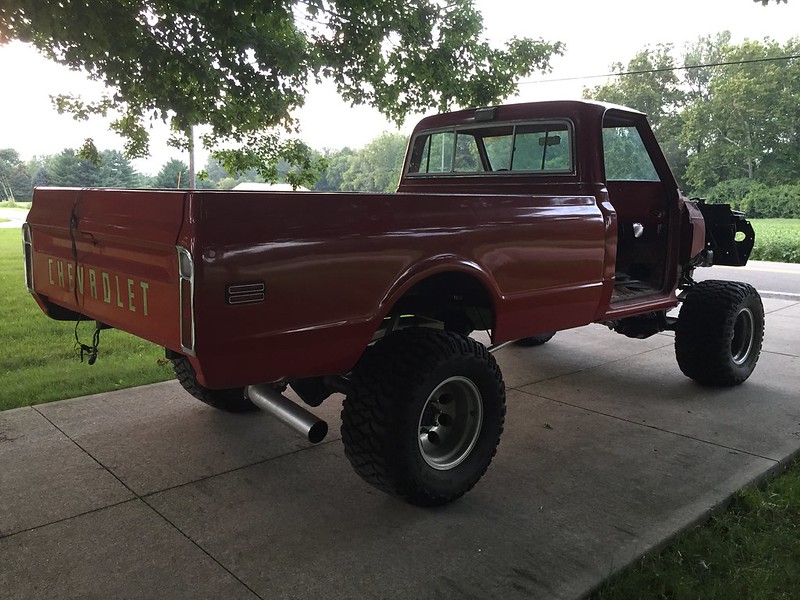 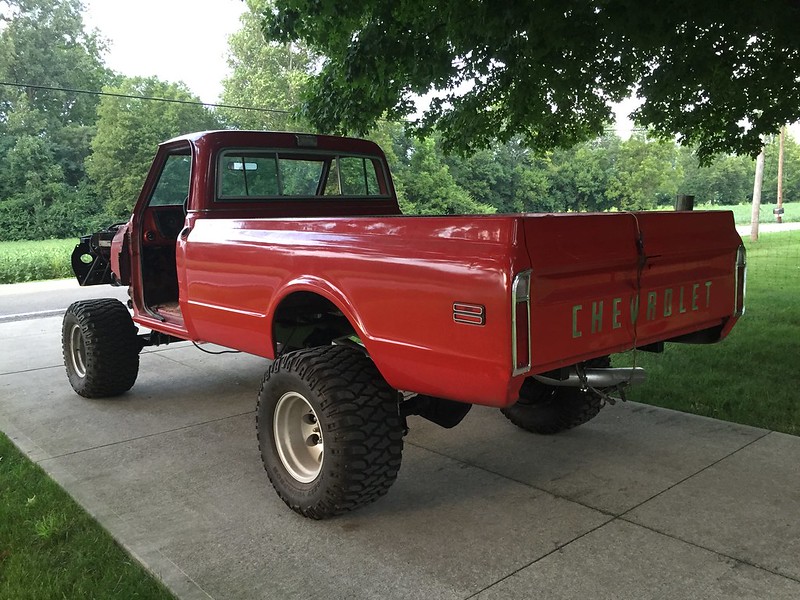 I think that is enough of a dump for tonight. Ill try to do another one soon. Last edited by dfairchild19; 02-15-2019 at 10:05 PM. |

|

|
|
02-14-2019, 01:38 AM
|
#77 |
|
Registered User
Join Date: Sep 2013
Location: Fairbanks, Alaska
Posts: 24
|
Re: Berthas Build
Great looking project! Looking forward to seeing more of your progress!
__________________
Grumpa's 72 GMC K2500 Denali |
|
|
|
|
02-14-2019, 09:32 AM
|
#78 |
|
Registered User
Join Date: Oct 2013
Location: Montrose, CO
Posts: 328
|
Re: Berthas Build
That new cab and bed looks great on the chassis. You have done a tremendous amount of work but damn does it look good!
__________________
Jim 1972 K20 Cheyenne- 350/350/205 1972 K20 Cheyenne - 350/SM465/205 |
|
|
|
|
02-14-2019, 05:24 PM
|
#79 |
|
6>8 Plugless........
 Join Date: Sep 2007
Location: Prairie City, Ia
Posts: 17,133
|
Re: Berthas Build
Oh heck yes, that new to you body is pretty sweet! Congrats on the acreage too. I'm on the hunt for one but they are out of sight price wise around here. Your truck is coming together nicely. What size wheels and tries are those? I love how it looks!
__________________
Ryan 1972 Chevy Longhorn K30 Cheyenne Super, 359 Inline 6 cylinder, Auto Trans, Tilt, Diesel Tach/Vach, Buckets, Rare Rear 4-link and air ride option Build Thread 1972 GMC Sierra Grande Longhorn 4x4 1972 Chevy Cheyenne Super K20 Long Step side tilt, tach, tow hooks, AC, 350 4 speed 1972 C10 Suburban Custom Deluxe 1969 Chevy milk truck 1971 Camaro RS 5.3 BTR STG3 Cam Super T10 1940 Ford 354 Hemi 46RH Ford 9" on air ride huge project Tired of spark plugs? Check this out. |
|
|
|
|
02-15-2019, 12:33 AM
|
#80 | |
|
Registered User
Join Date: Feb 2010
Location: Dayton, OH
Posts: 255
|
Re: Berthas Build
Thanks guys. The body is definitely a 10-20 footer unfortunately but it looks pretty good for what it is and a lot better than the primered sheet metal that was on it originally.
Quote:
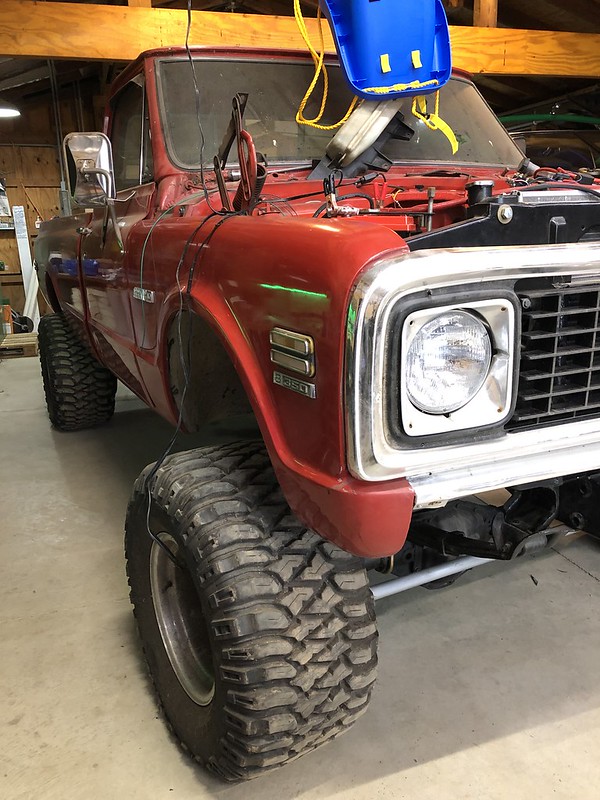
The tires are 33x15.0R16 on I believe a 16x12 wheel IIRC. Theres a ton more progress to post. Ill jist have to try to pick away at it when I can. I look forward to getting it all wrote out. Its pretty cool looking back on everything and having a story to read. Hell half of this stuff in the build thread Ive forgotten about and thats not to mention everything else that I havent documented which as you know on a build like this is impossible to count. |
|
|
|
|
|
02-15-2019, 01:52 AM
|
#81 |
|
6>8 Plugless........
Join Date: Sep 2007
Location: Prairie City, Ia
Posts: 17,133
|
Re: Berthas Build
Yes sir, I totally understand. I also like those traction bars. I forgot to mention that. Where did you source the aluminum for them? Those tires look so wicked on there.

__________________
Ryan 1972 Chevy Longhorn K30 Cheyenne Super, 359 Inline 6 cylinder, Auto Trans, Tilt, Diesel Tach/Vach, Buckets, Rare Rear 4-link and air ride option Build Thread 1972 GMC Sierra Grande Longhorn 4x4 1972 Chevy Cheyenne Super K20 Long Step side tilt, tach, tow hooks, AC, 350 4 speed 1972 C10 Suburban Custom Deluxe 1969 Chevy milk truck 1971 Camaro RS 5.3 BTR STG3 Cam Super T10 1940 Ford 354 Hemi 46RH Ford 9" on air ride huge project Tired of spark plugs? Check this out. |
|
|
|
|
02-15-2019, 10:28 PM
|
#82 | |
|
Registered User
Join Date: Feb 2010
Location: Dayton, OH
Posts: 255
|
Re: Berthas Build
Quote:
|
|
|
|
|
|
02-15-2019, 11:42 PM
|
#83 |
|
Registered User
Join Date: Feb 2010
Location: Dayton, OH
Posts: 255
|
Re: Berthas Build
More updates: This one will be more shop related than truck related.......
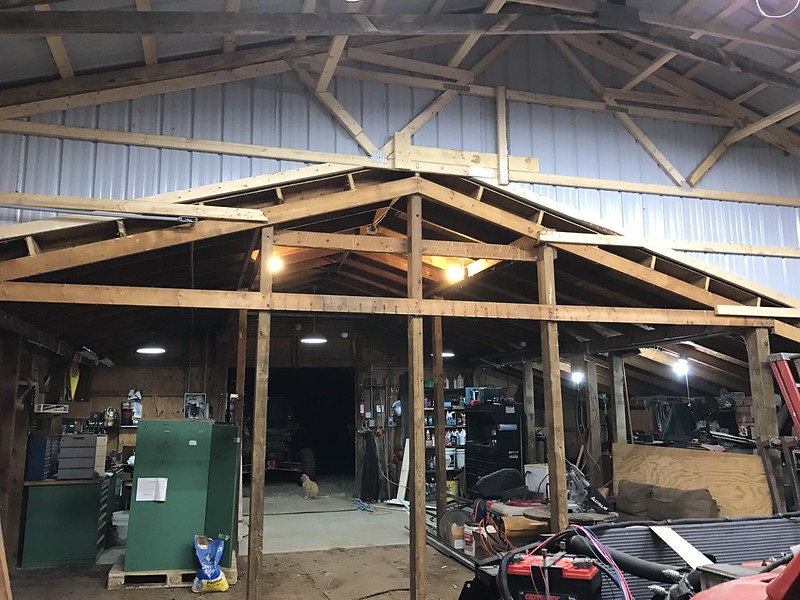
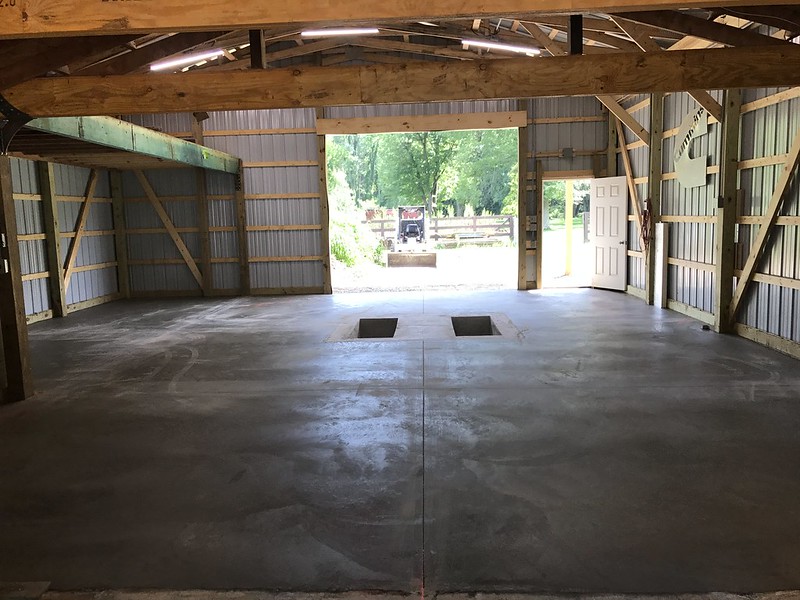
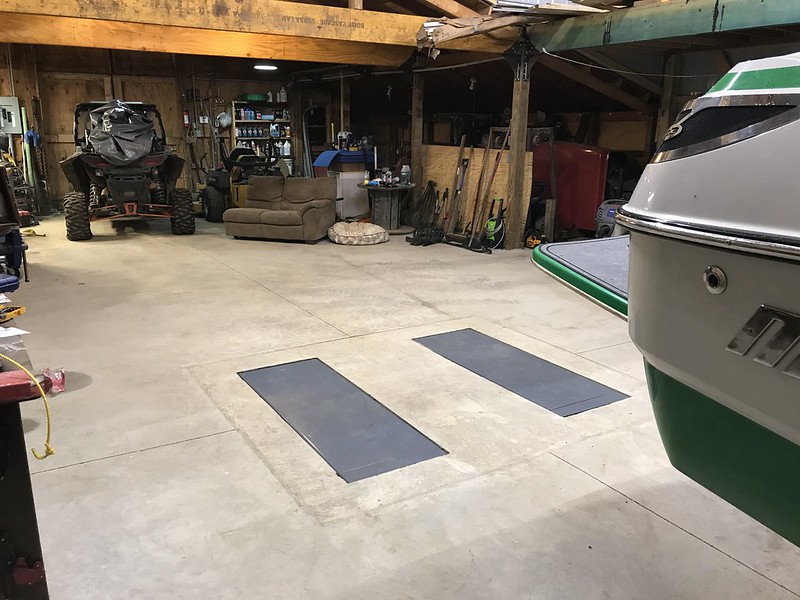
So switching gears a bit just as I did with life, I knew I wanted/needed more room for my outdoor hobbies. The idea was to convert the barn into a workshop somehow. With an 8'x8' sliding barn door as the only access door and the 24x32 size, I knew I had to either build new or try to add on. There were a lot of posts in the middle of the barn floor as-is and if the back wall of the barn was removed, it would leave even more posts. I figured if the space could be opened up and doubled with maybe some outdoor cover, that would serve me for a good bit. This is an overhead view of the "floorplan" with the lower half of the picture being the original part of the barn. This seemed like a ton of space on paper...... 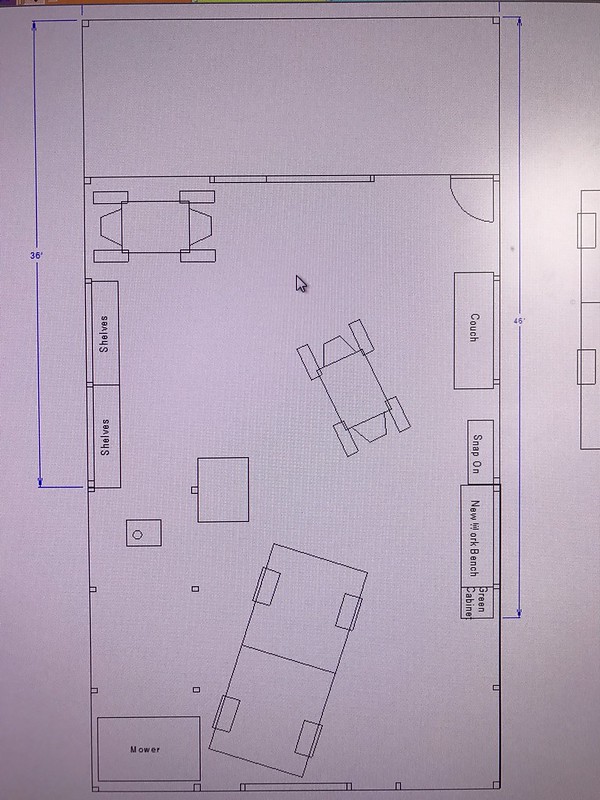 Here is a rendering of the vision. With the barn facing the back of the long and narrow property, I thought it would be super cool to have a door that allowed a view of out back.... 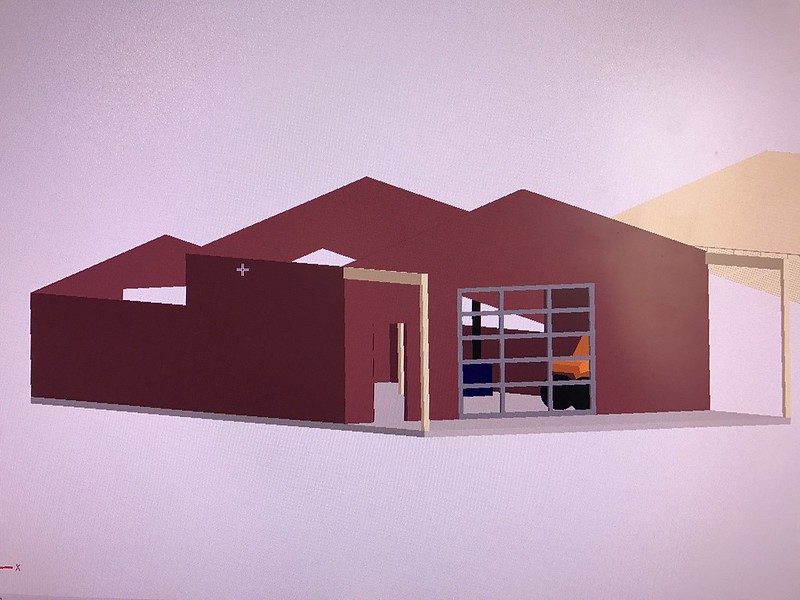 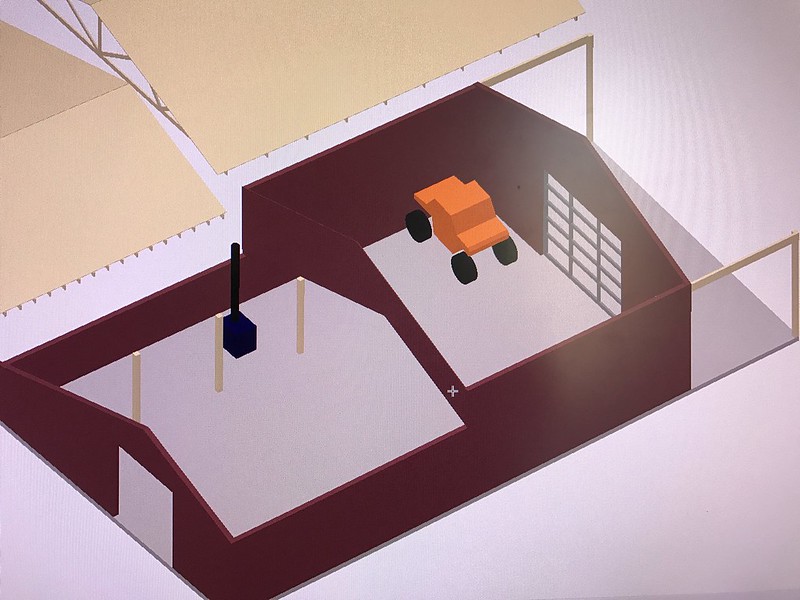 I played with the layout and even messed with the possibility of a two post lift...... more on that later..... 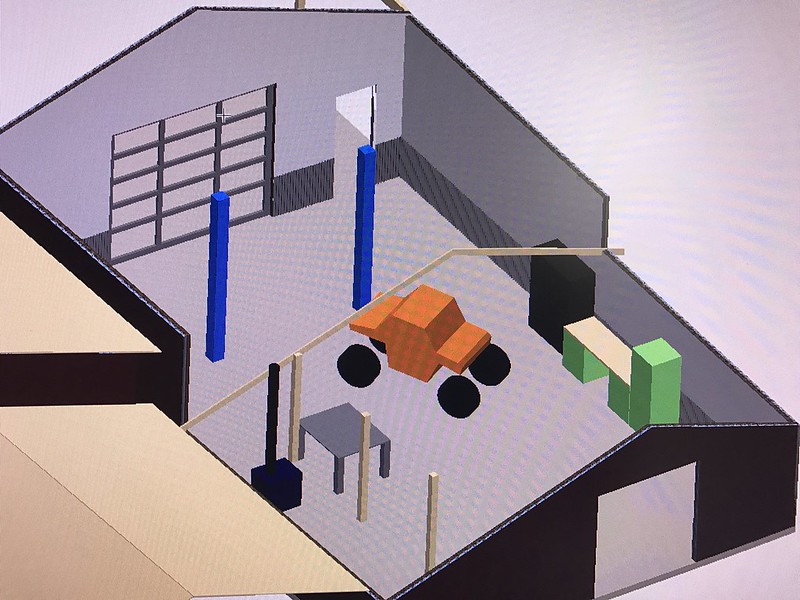 February 2017 - Apparently I had started the wiring process somewhere in there. I was not ready for that undertaking. It went on pause for a good while....more on this later as well.... 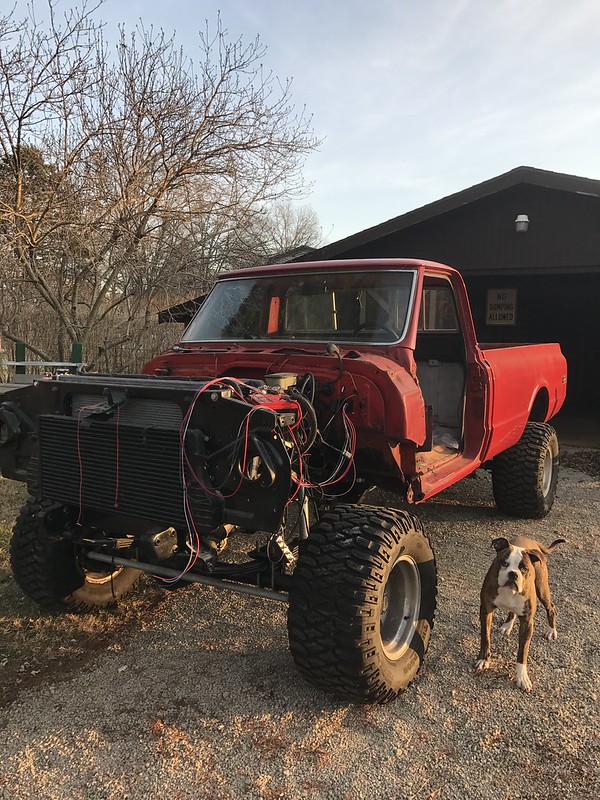 February 2017 - Time to pull the trigger on the addition by removing the siding and back doors from the existing barn. Check out all of those posts in my floor..... 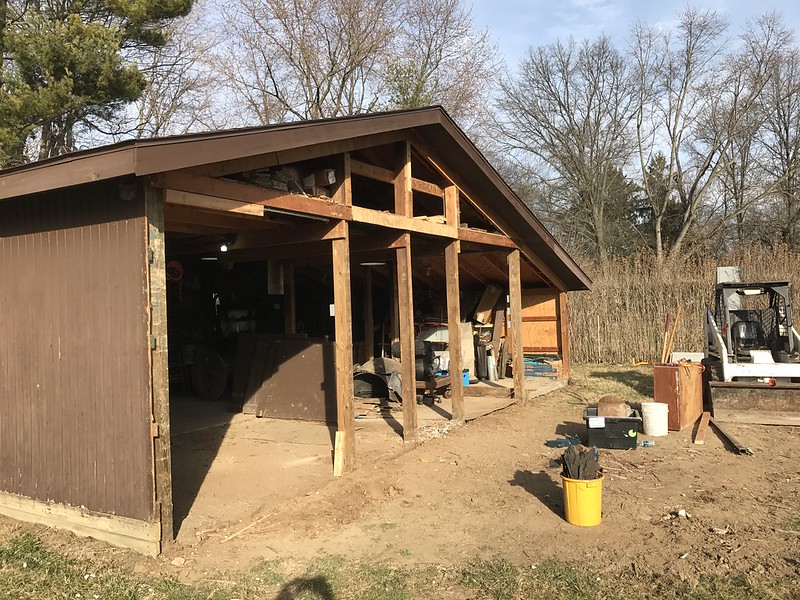 Another view. Also laid out the corner locations. 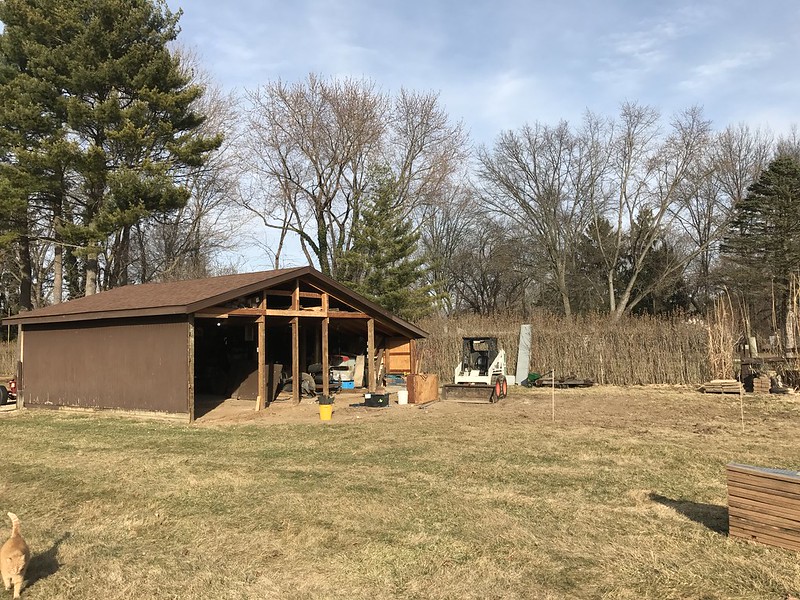 View from the inside. Again with the posts...... 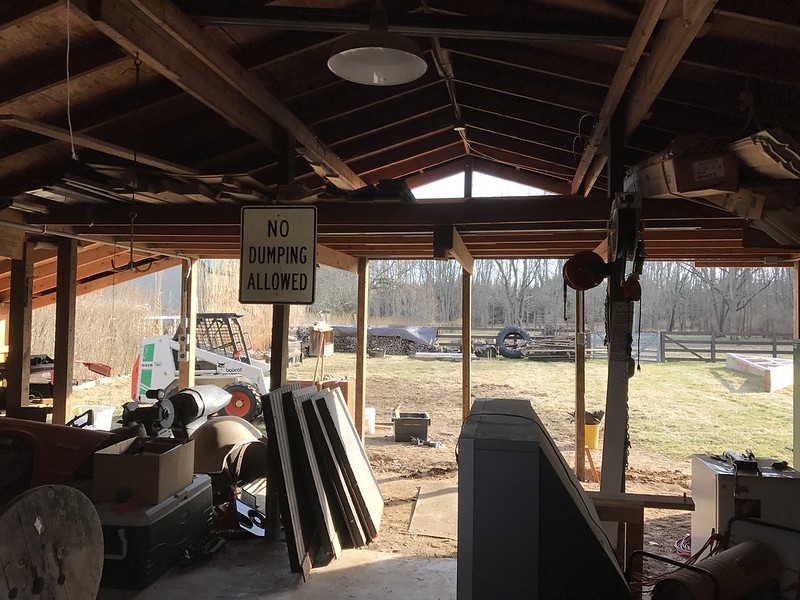 Night shot 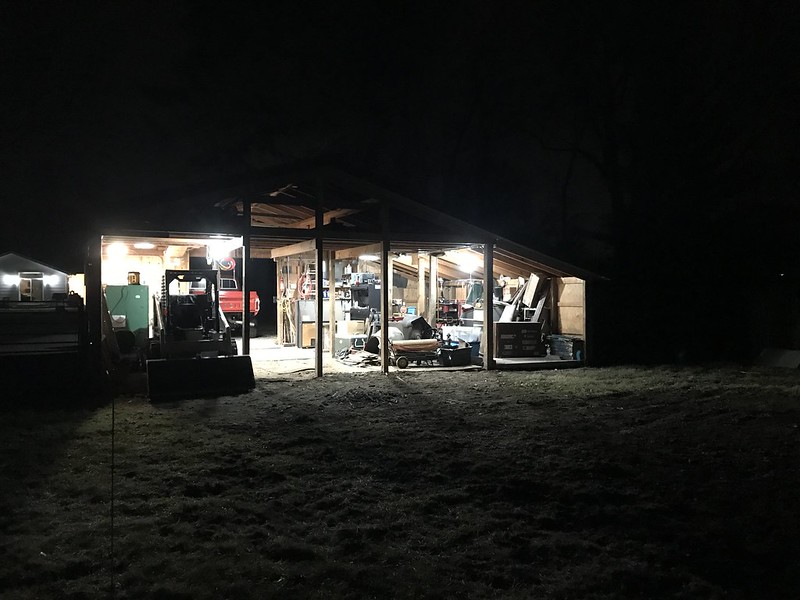 More playing with lift locations..... 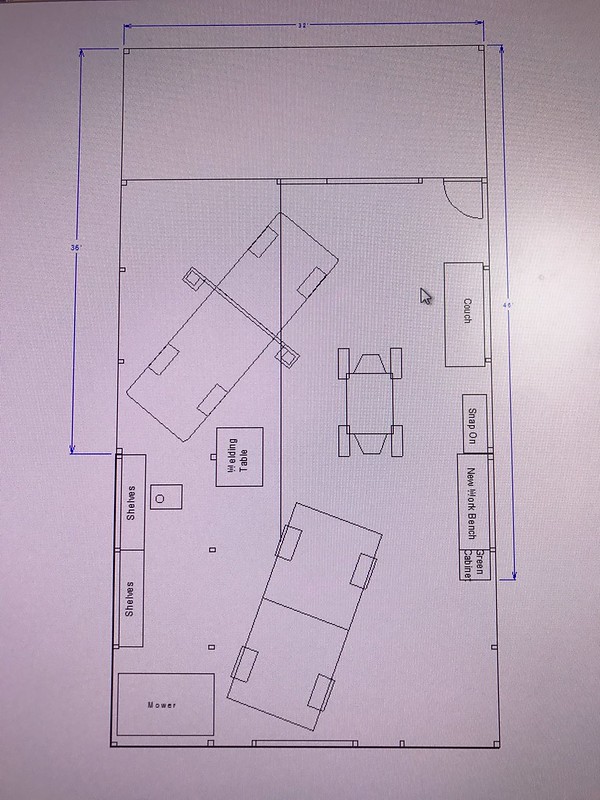 And all of a sudden the construction begins..... 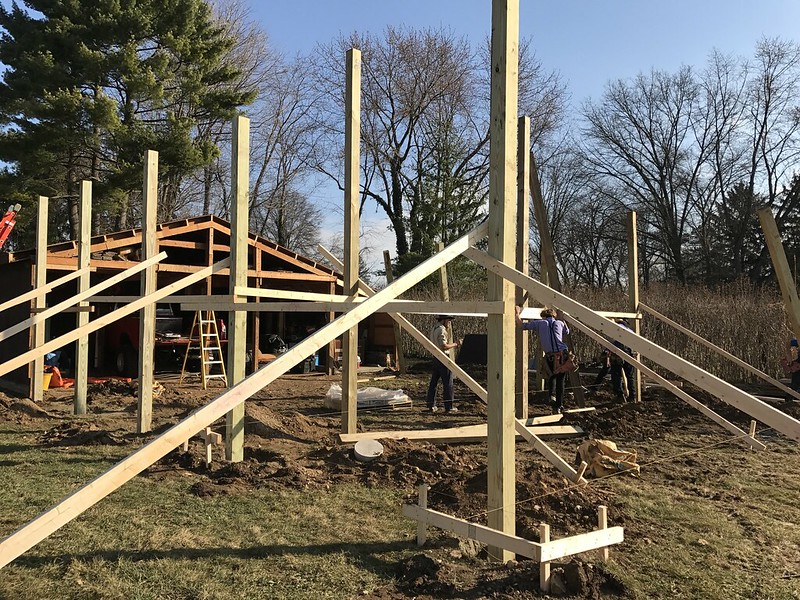 These Amish guys can really go to town on this stuff. Ive heard it before, but its hard to believe it until you actually see them in action. 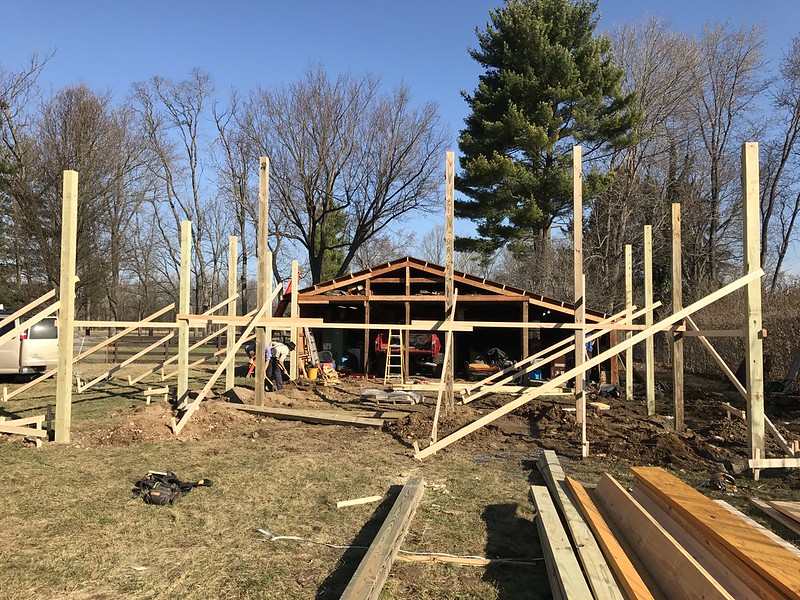
|
|
|
|
|
02-15-2019, 11:43 PM
|
#84 |
|
Registered User
Join Date: Feb 2010
Location: Dayton, OH
Posts: 255
|
Re: Berthas Build
February 2017 - 12' walls going up!
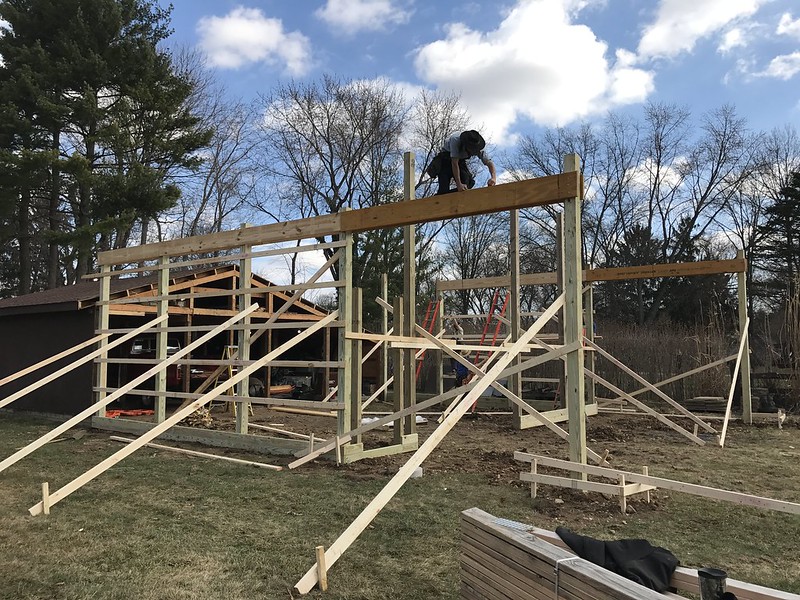 You can start to see the patio portion of the barn start to take shape here. 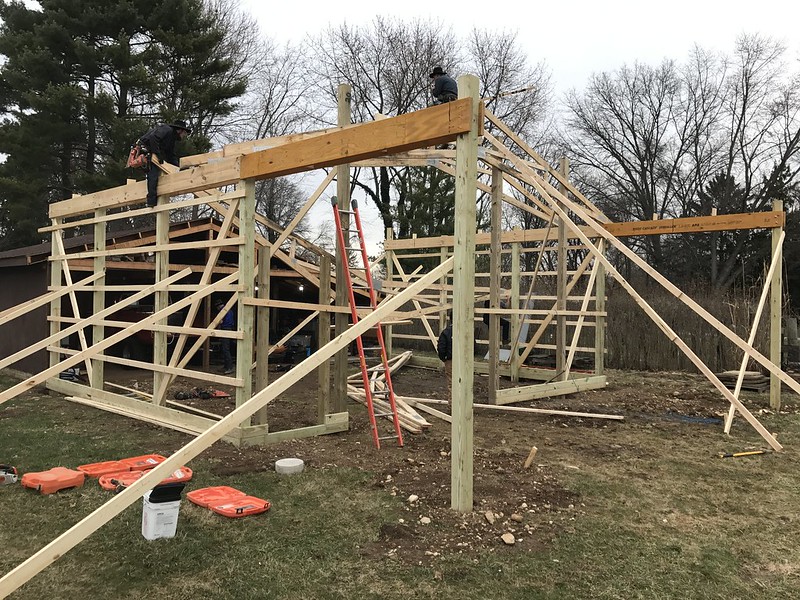 So the contracting house that I used for the construction happened to have these scissor trusses left over from a canceled job that just so happened to fit my exact width and they offered them at no extra cost. I was hesitant at first to let them use them but I think that the made a huge difference in the feel of the new space. I am very happy with them. 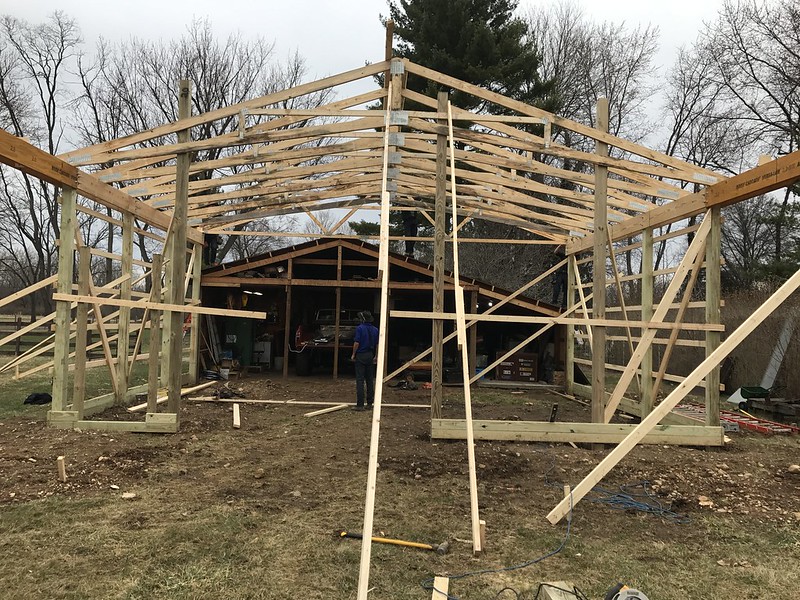 Framing complete and in the dry. 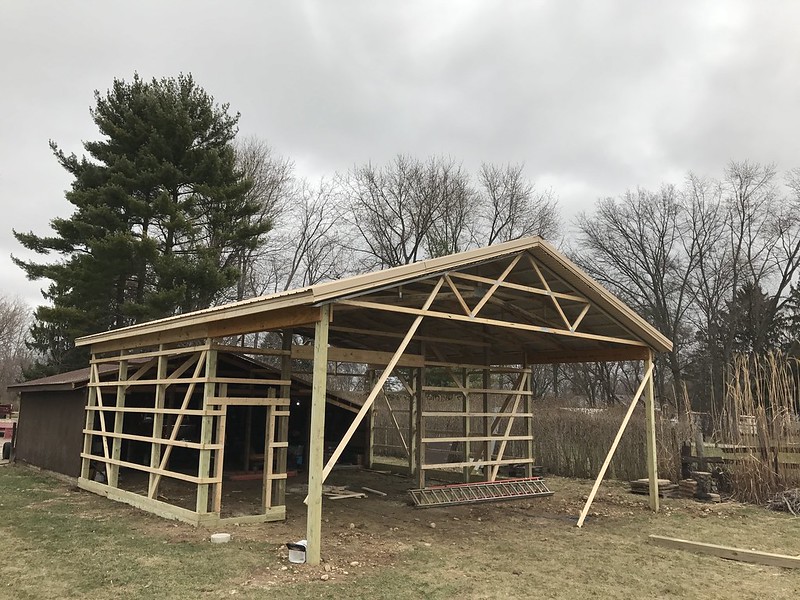 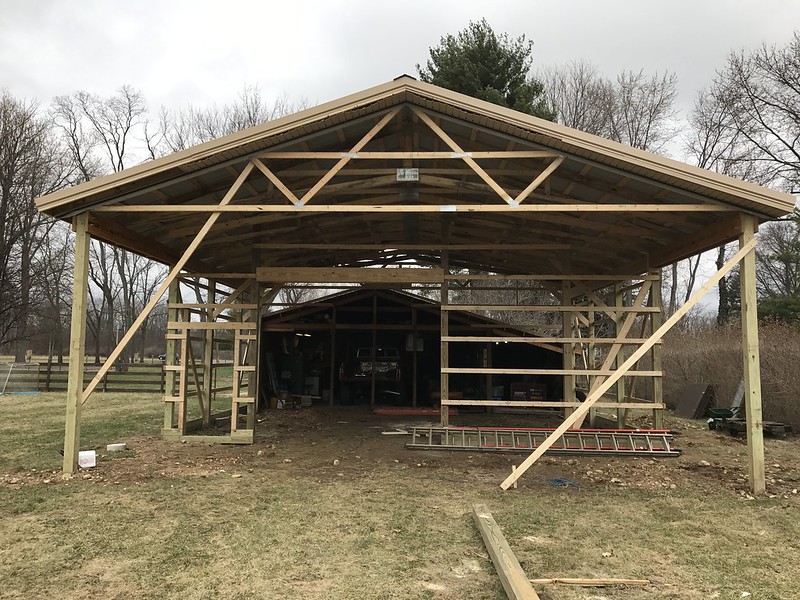 And skinned..... 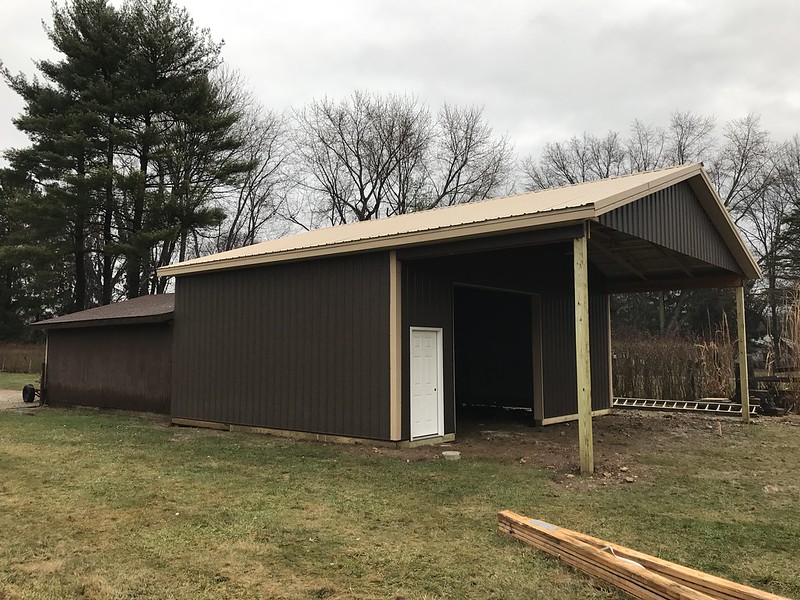 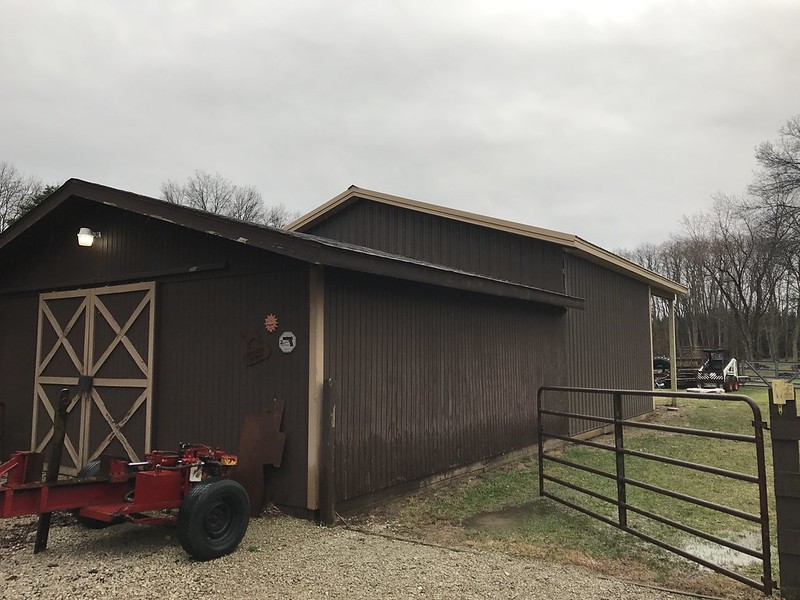 Inside. Again with the posts..... 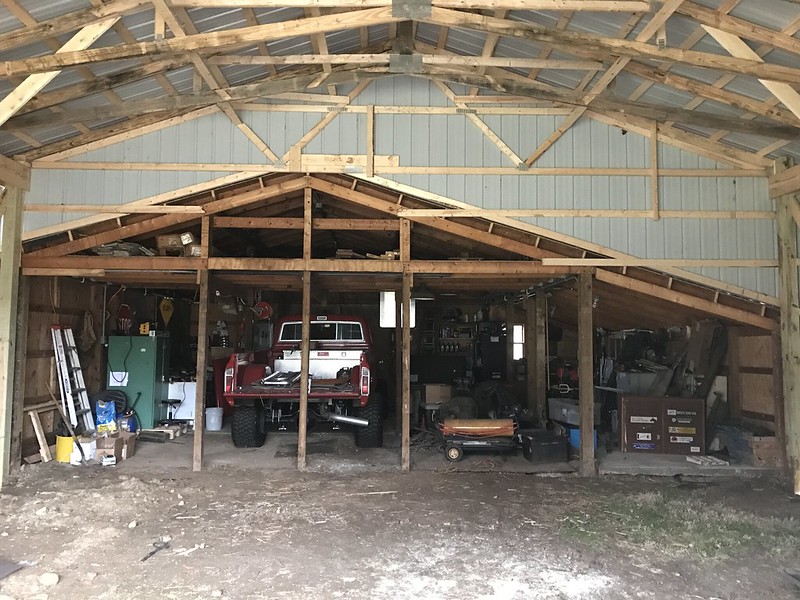 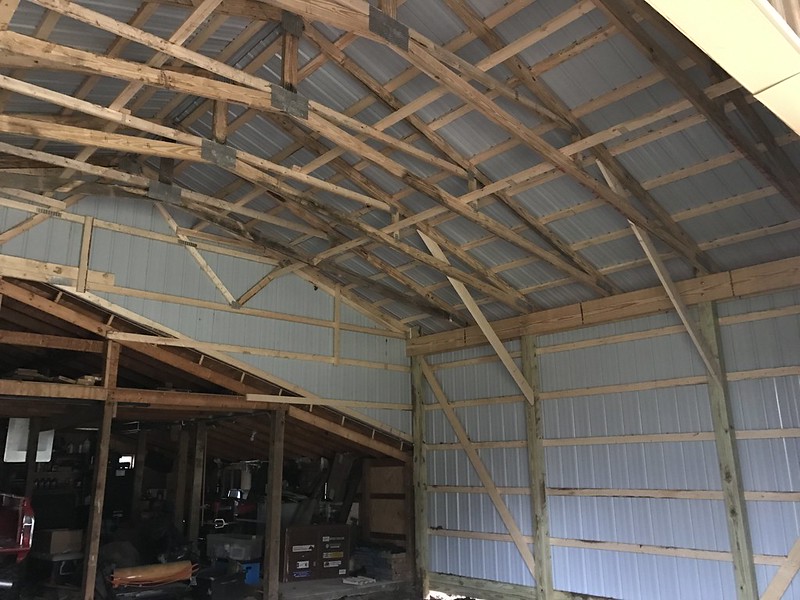 Berthas awaiting her new home 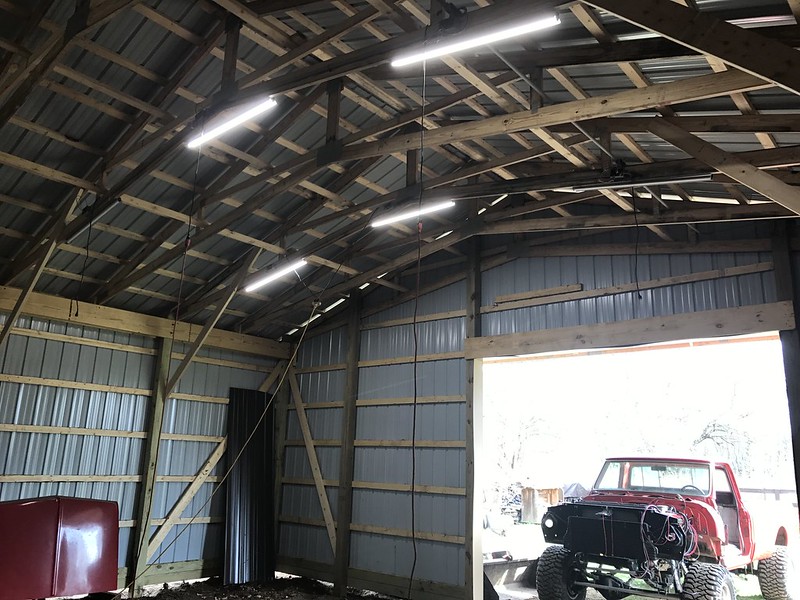 Night, Night. 
|
|
|
|
|
02-15-2019, 11:44 PM
|
#85 |
|
Registered User
Join Date: Feb 2010
Location: Dayton, OH
Posts: 255
|
Re: Berthas Build
April 2017 - Last look at the posts....
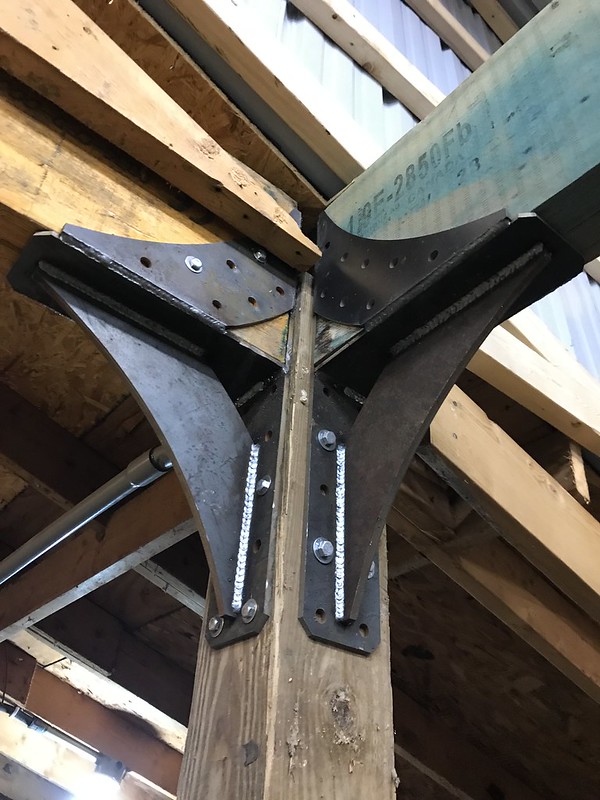
 First row of posts gone!!! Three down, two to go. 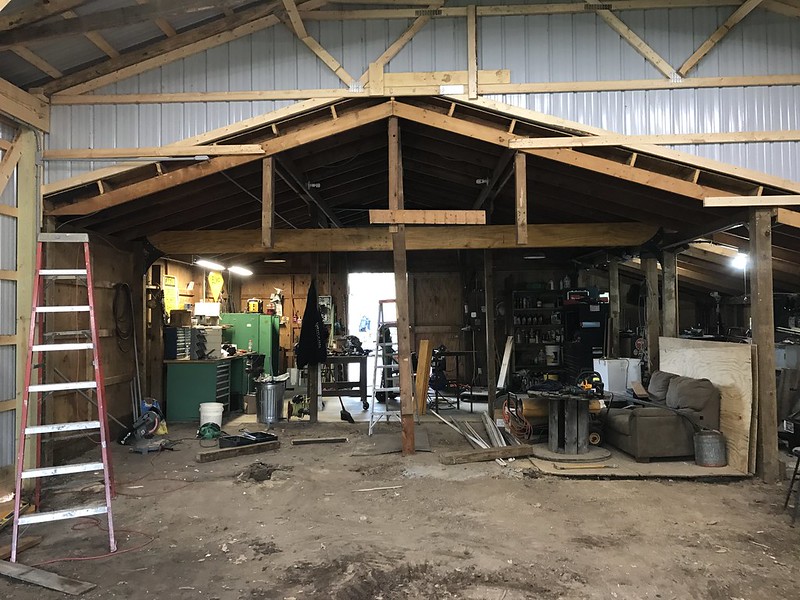 You can see the 24' LVLs that were used to support the first row of posts instead of them taking up all of my floor space! 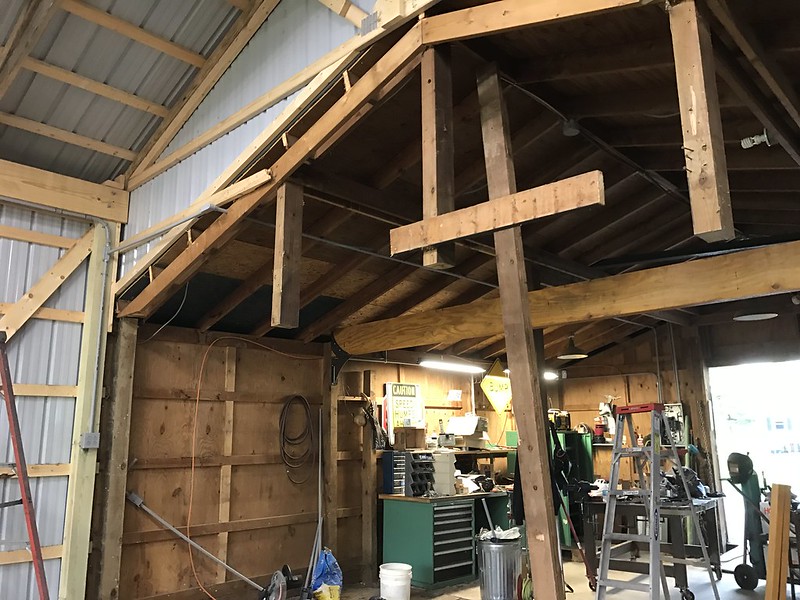 And both pairs of sandwiched 24' LVLs installed. It definitely changes the feel of the barn. She has come a long way to this point. 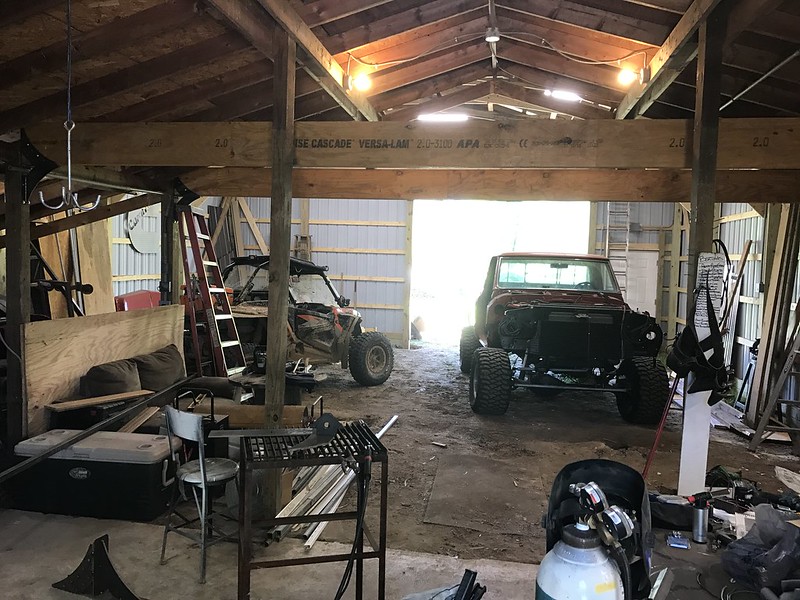 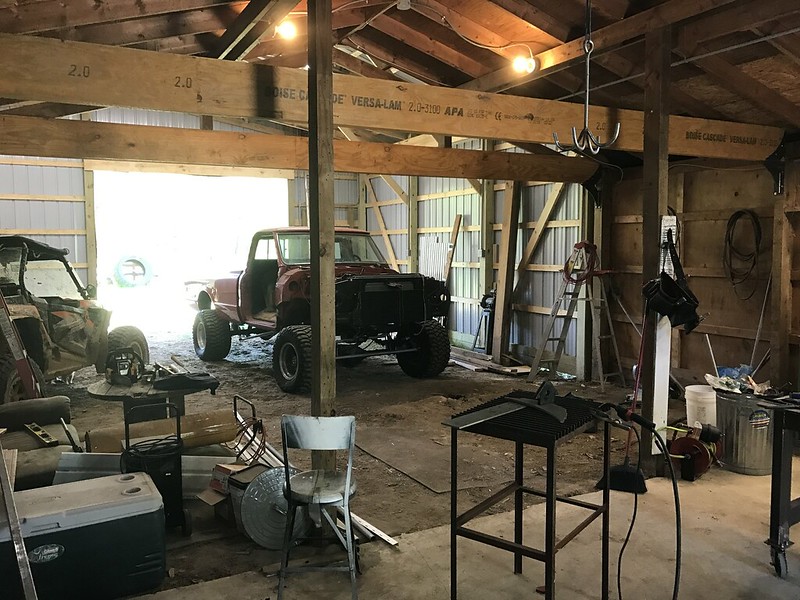 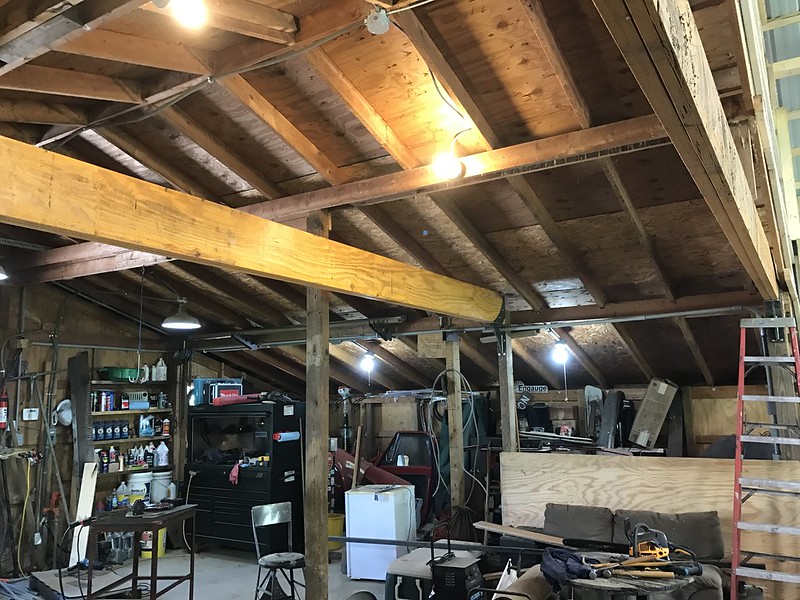 And the final posts removed. This felt great and was a major milestone of the construction. 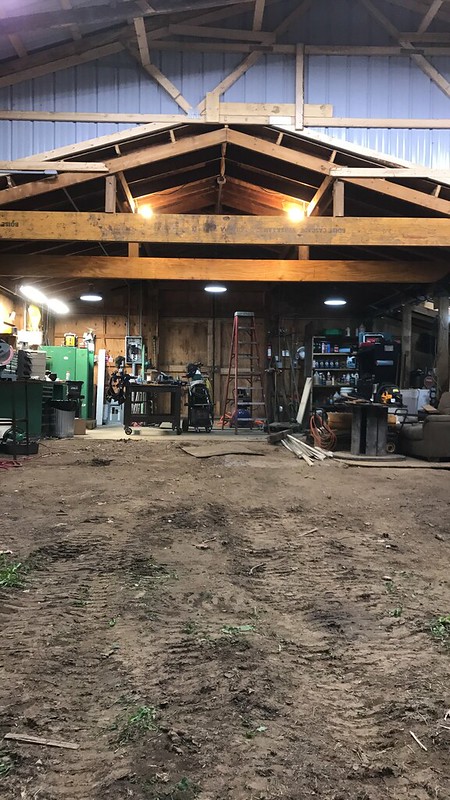 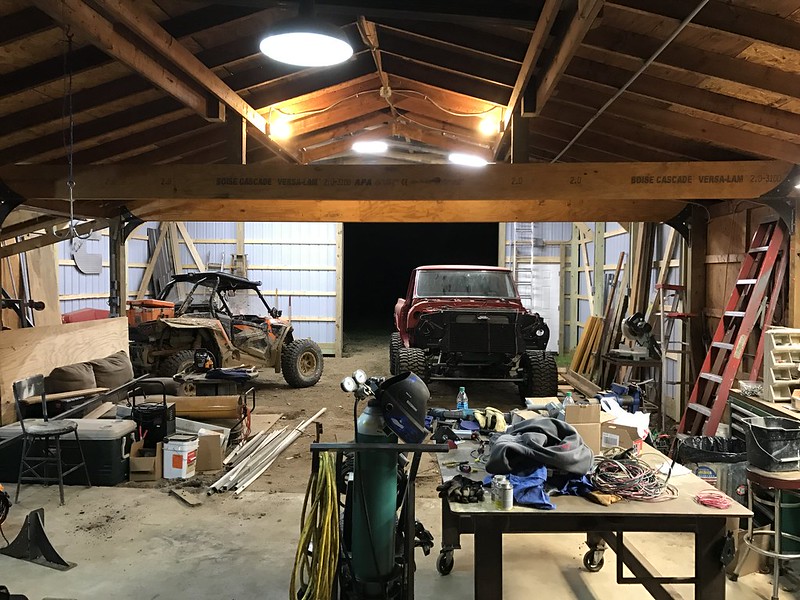 Heres a look at the support brackets that were cut on the waterjet and welded up. 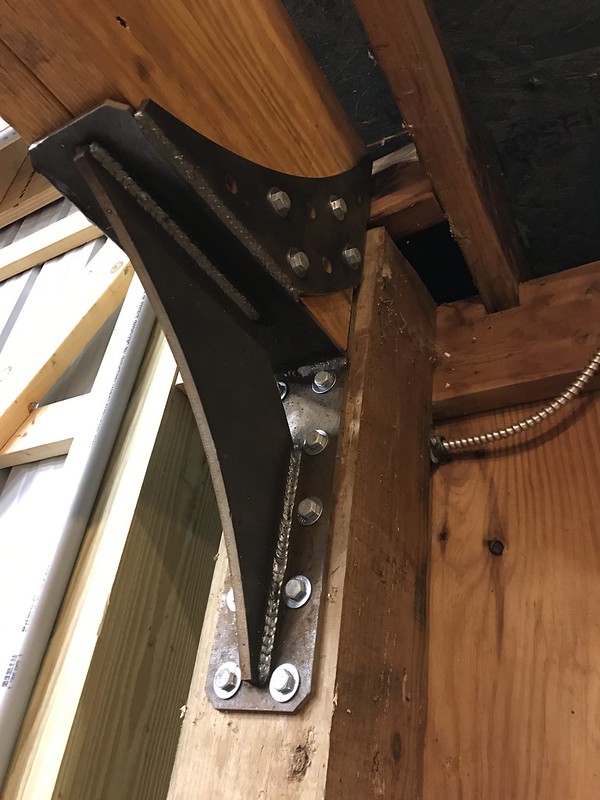 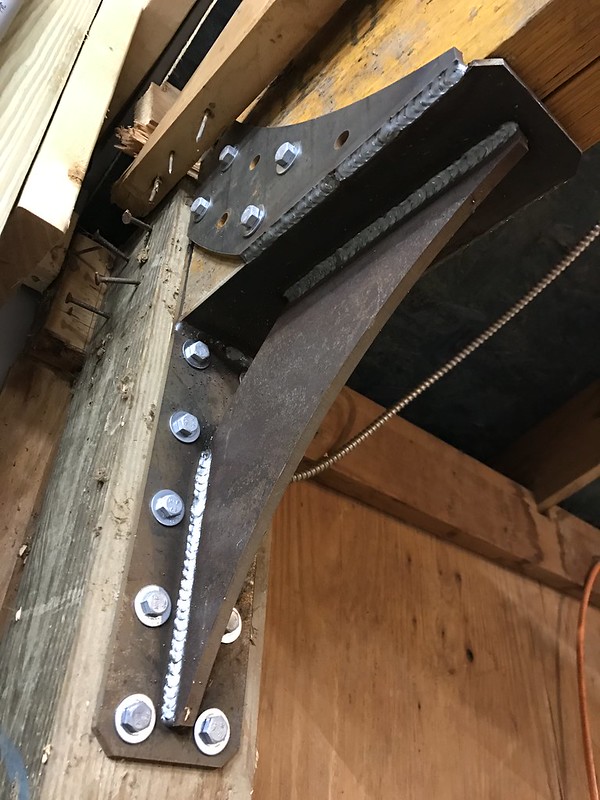 I decided to add these LVLs in last minute. There was a lot of space up there and I didnt think that it would end up being used for anything so I came up with the idea to throw a loft in. This would give me storage to get a lot of unused stuff up off of the precious floor space. 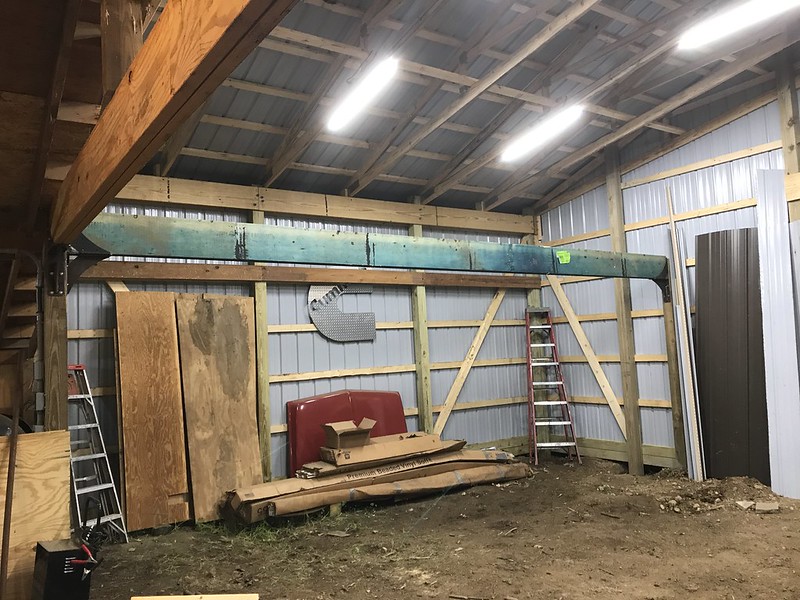
|
|
|
|
|
02-15-2019, 11:46 PM
|
#86 |
|
Registered User
Join Date: Feb 2010
Location: Dayton, OH
Posts: 255
|
Re: Berthas Build
May 2017 - This ended up being kind of a cool intersection with the LVLs and their brackets.
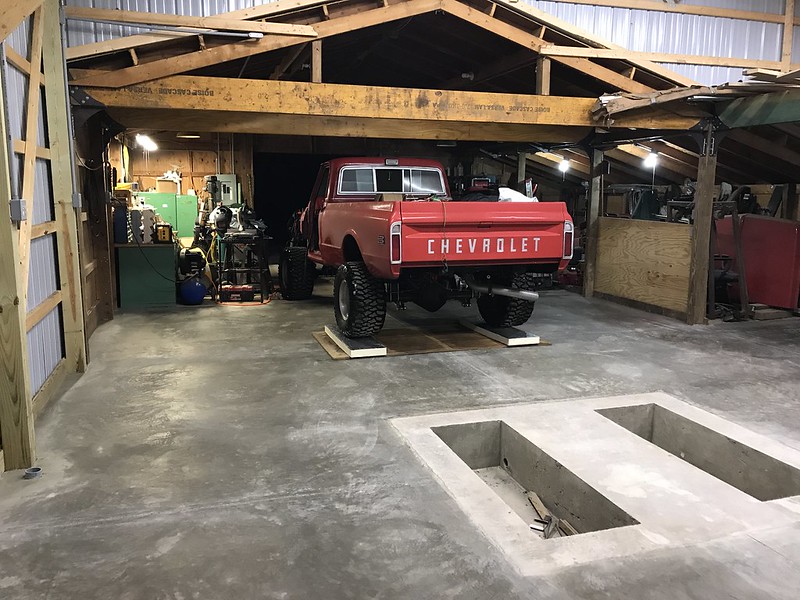
 Loft floor joists framed in. 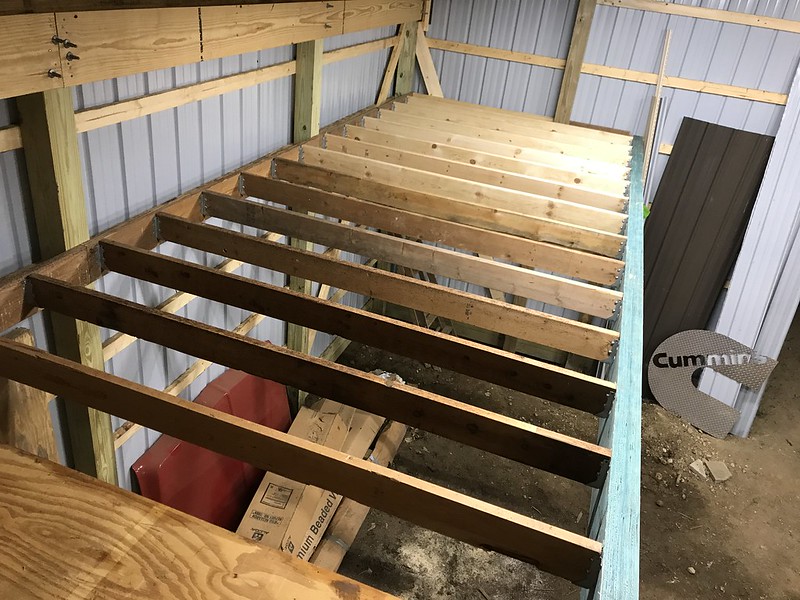 An overall look from the new doorway. 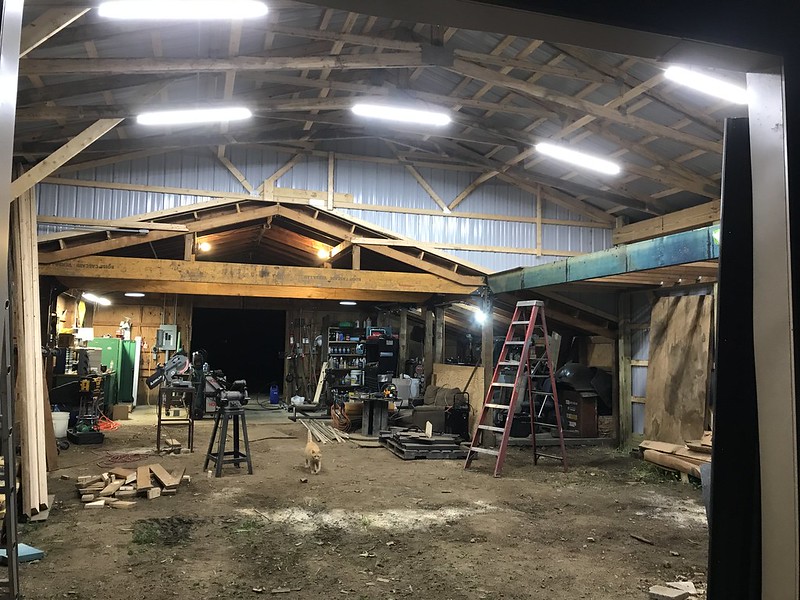 The ground was graded and prepped for the base gravel for the concrete. 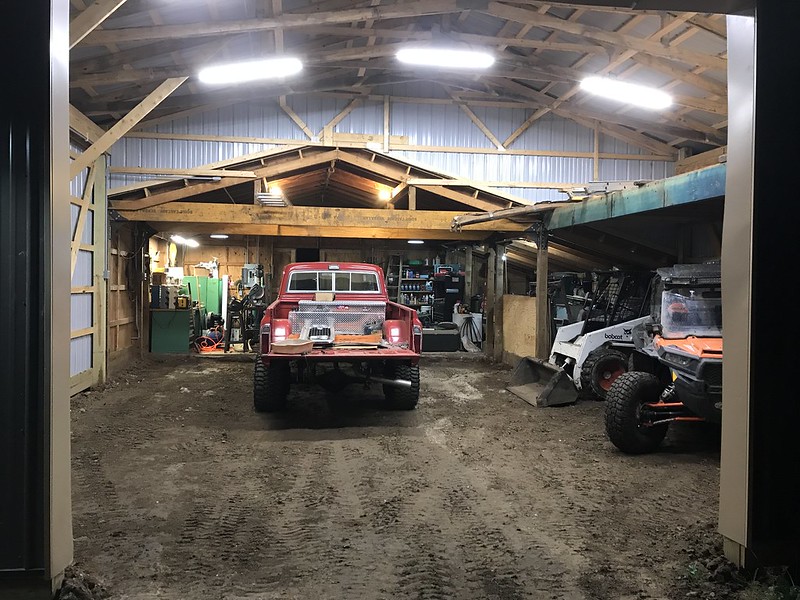 Base gravel was spread and then these were dug..... 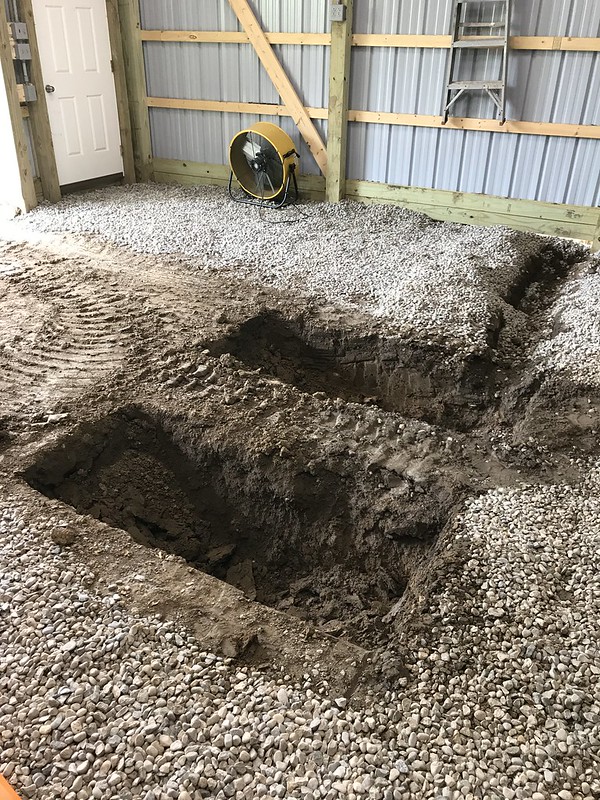 For these in ground scissor lifts  Holes dug a little deeper and cleaner 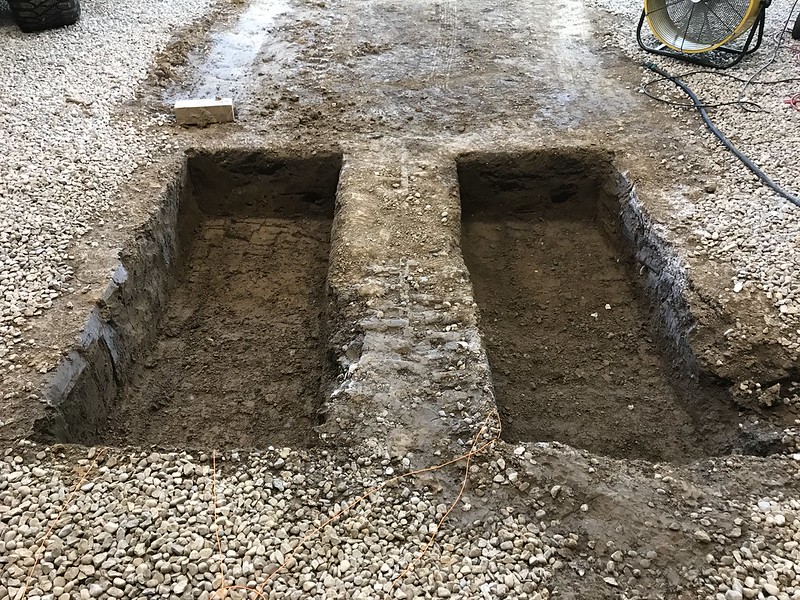 July 2017 - All formed up and ready for the first load of concrete. The concrete was done in three different stages. The pits will be poured separately from the rest of the floor and the patio will be poured last. 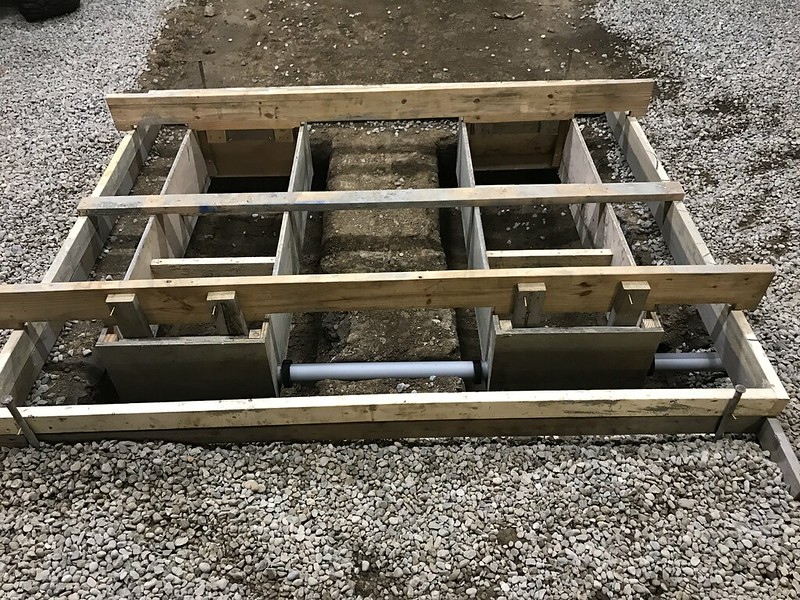 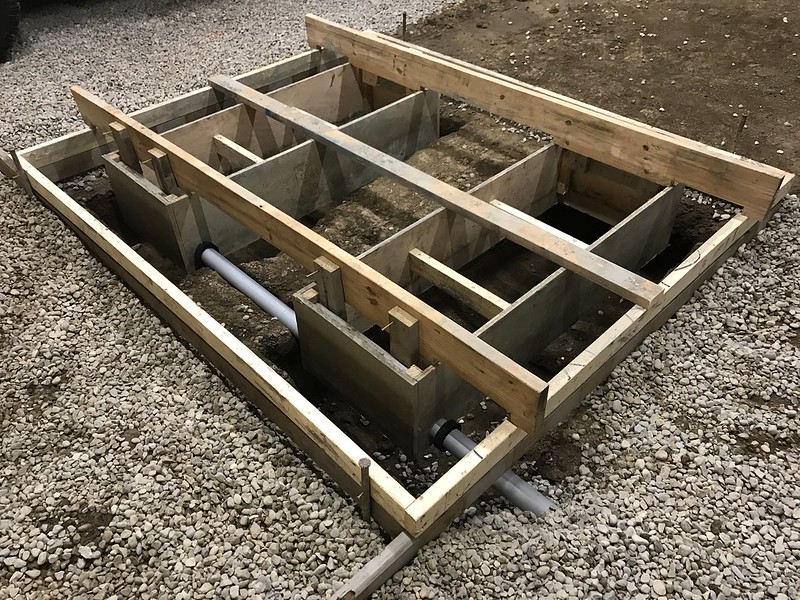 Another milestone complete! 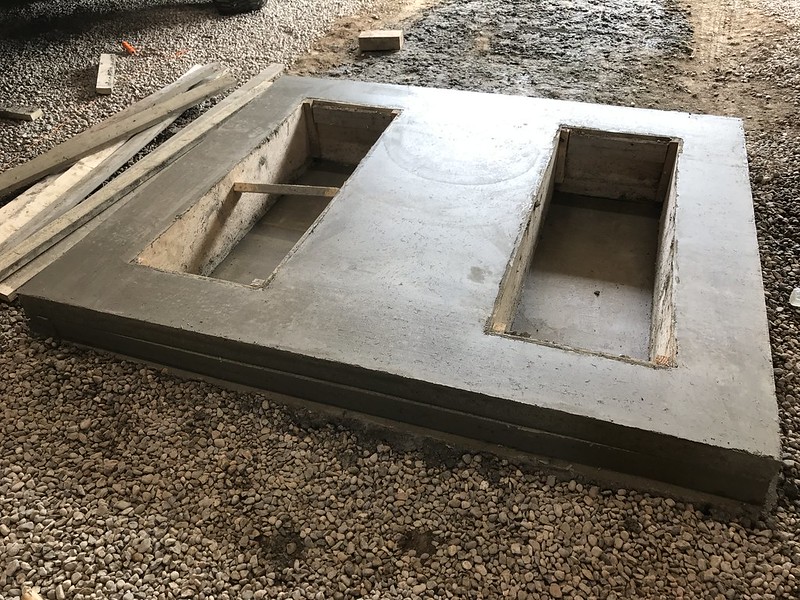 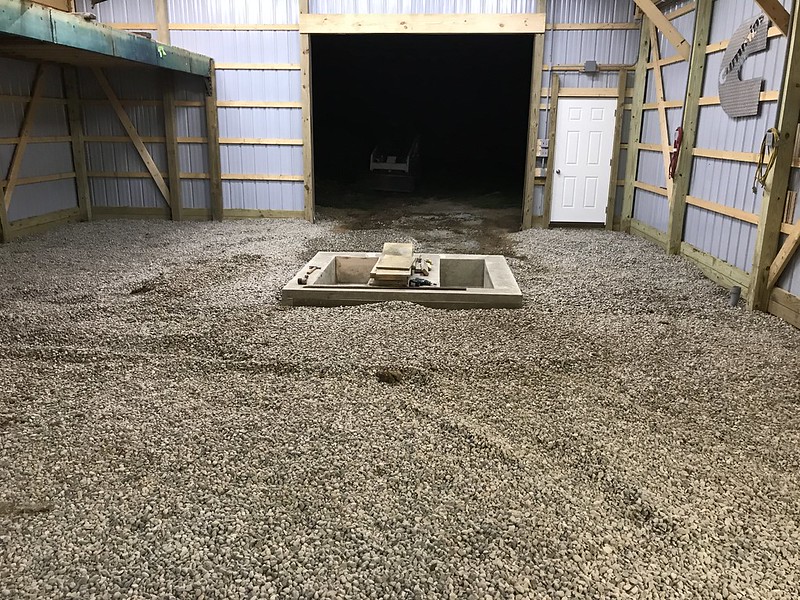 Day of the main floor pour! 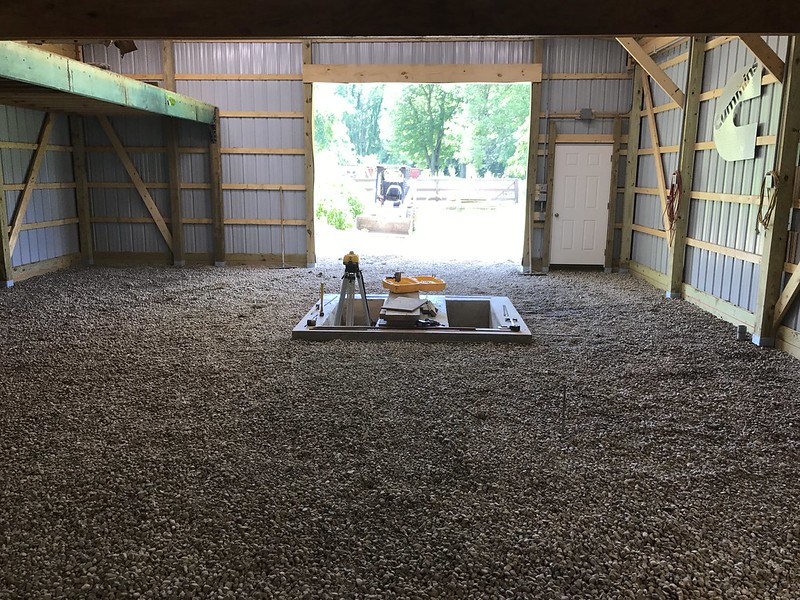
|
|
|
|
|
02-16-2019, 09:33 AM
|
#87 |
|
Registered User
Join Date: Oct 2013
Location: Montrose, CO
Posts: 328
|
Re: Berthas Build
Excellent barn transformation. Now you have some real space to work!
What part of Dayton are you in? I was born in Kettering and grew up in Waynesville.
__________________
Jim 1972 K20 Cheyenne- 350/350/205 1972 K20 Cheyenne - 350/SM465/205 |
|
|
|
|
02-16-2019, 12:29 PM
|
#88 | |
|
Registered User
Join Date: Feb 2010
Location: Dayton, OH
Posts: 255
|
Re: Berthas Build
Quote:
I was actually born in Kettering as well. I grew up just north of Dayton and still live around the area. |
|
|
|
|
|
02-16-2019, 02:42 PM
|
#89 |
|
Registered User
Join Date: Feb 2010
Location: Dayton, OH
Posts: 255
|
Re: Berthas Build
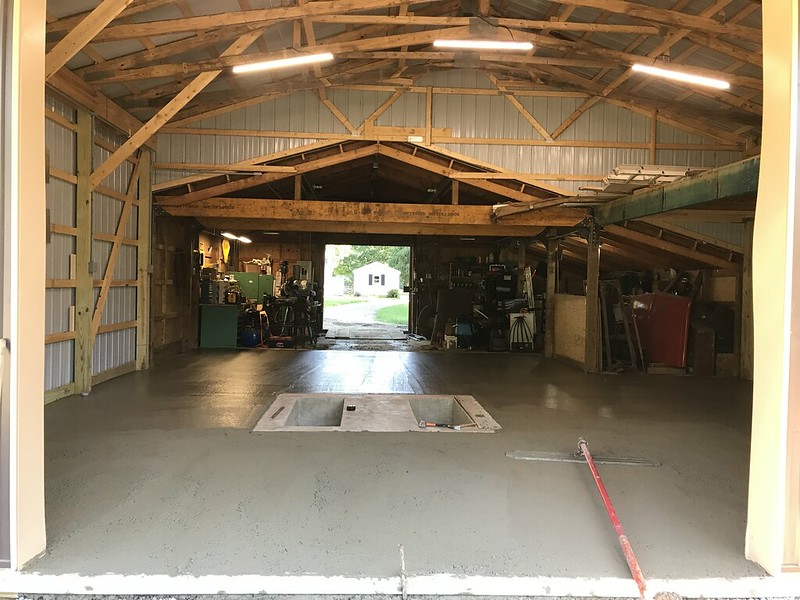
July 2017 - Main pour complete and being finished!
   I started on some insulation using some 3" rigid material that we had left over from a project that we run frequently. I wasnt able to finish it before winter last year or this year, but I was able to get the addition's roof insulated between the trusses which help hold the heat from all just escaping where most of it goes. Ill finish the rest once the truck is finished. 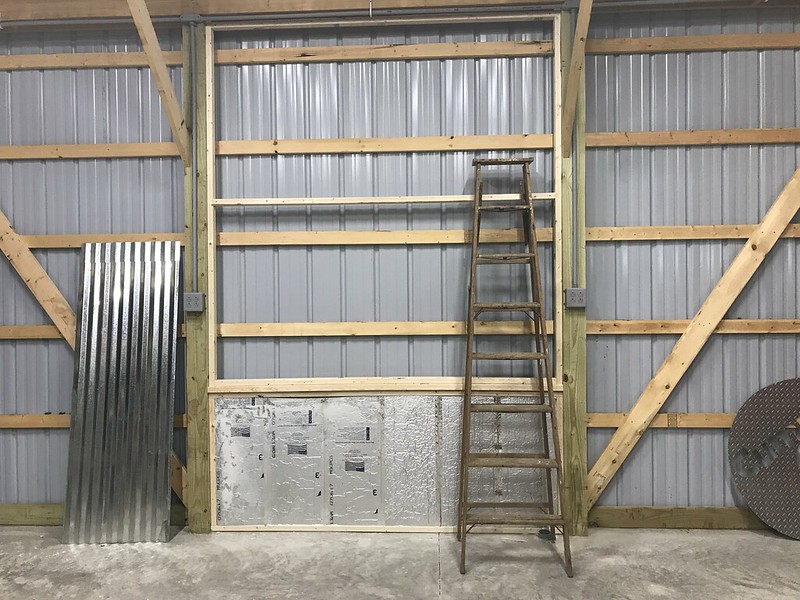 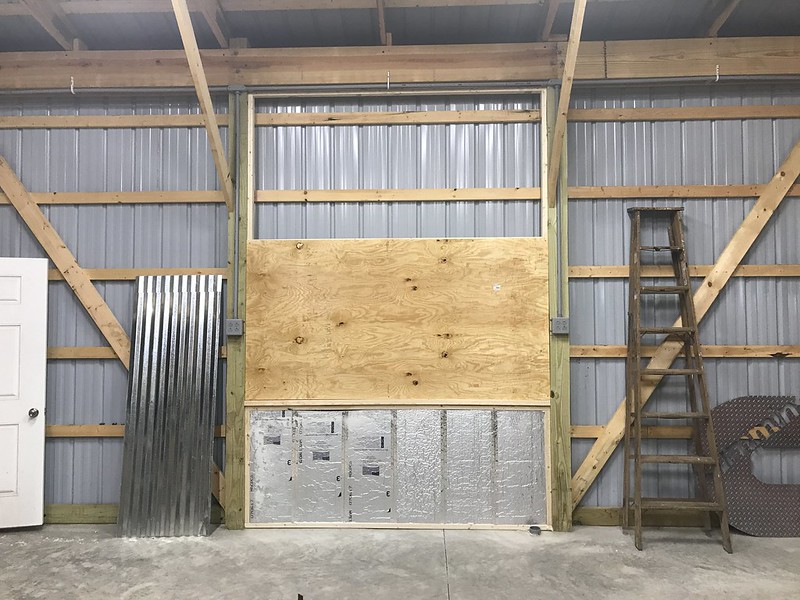 Bad picture but the final pour is complete and finished! The outside patio slab is one of my favorite parts of the barn. Lots of usable and covered space.  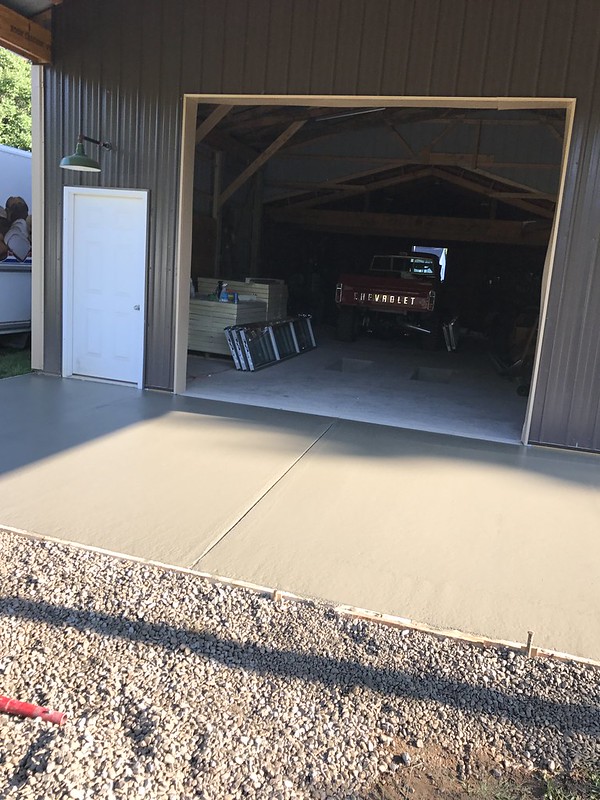 The lifts in the barn and ready to be installed. 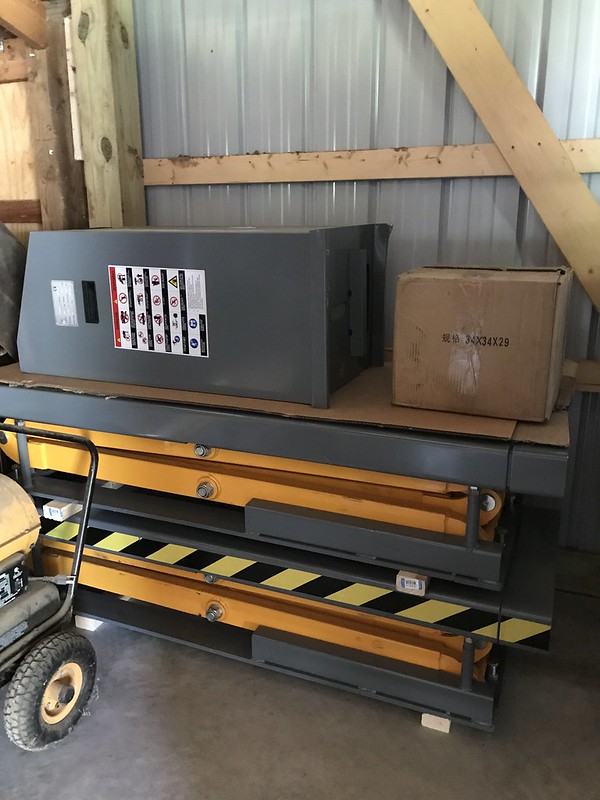 And yet another pretty major milestone for me was the door install. This is exactly the view I had envisioned when I came up with the idea of a full view door, if not, better. 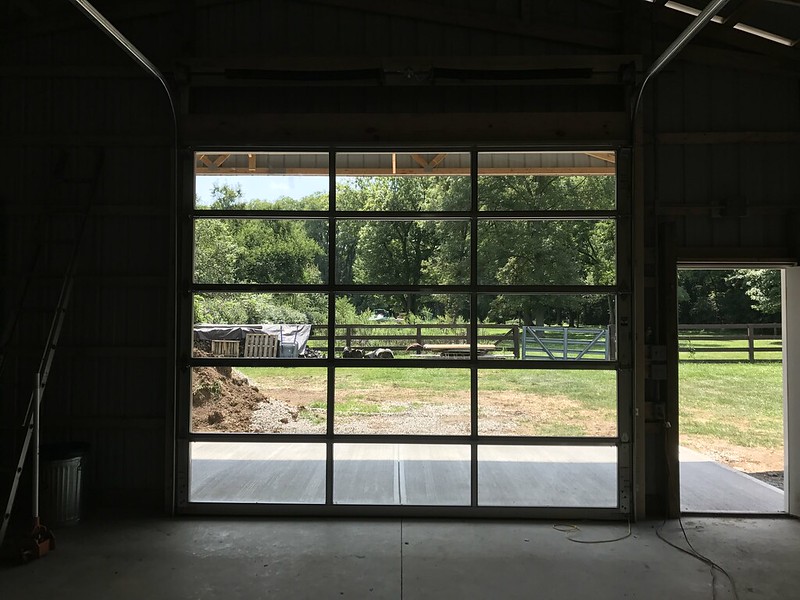  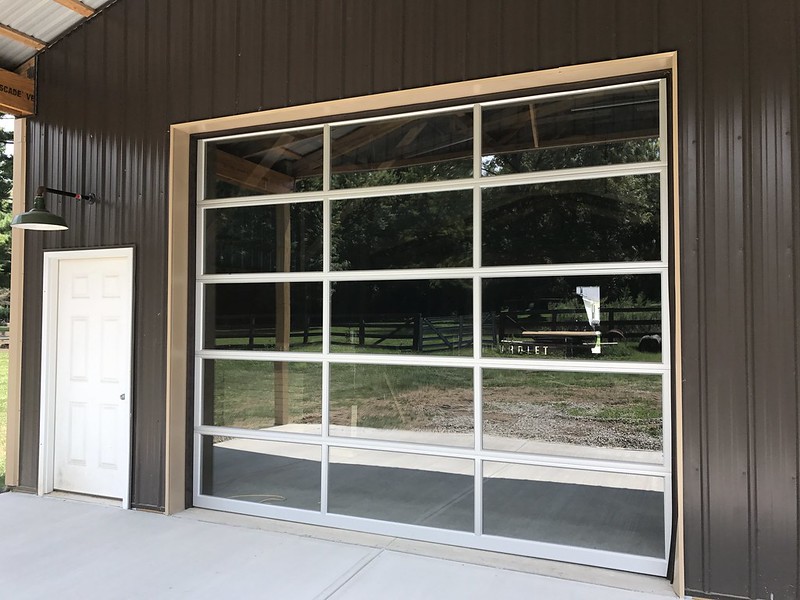 I recycled this barn light shade from over one of the horse stalls. I threw some iron pipe together and got it wired up as part of the minimum code requirement from the inspector. 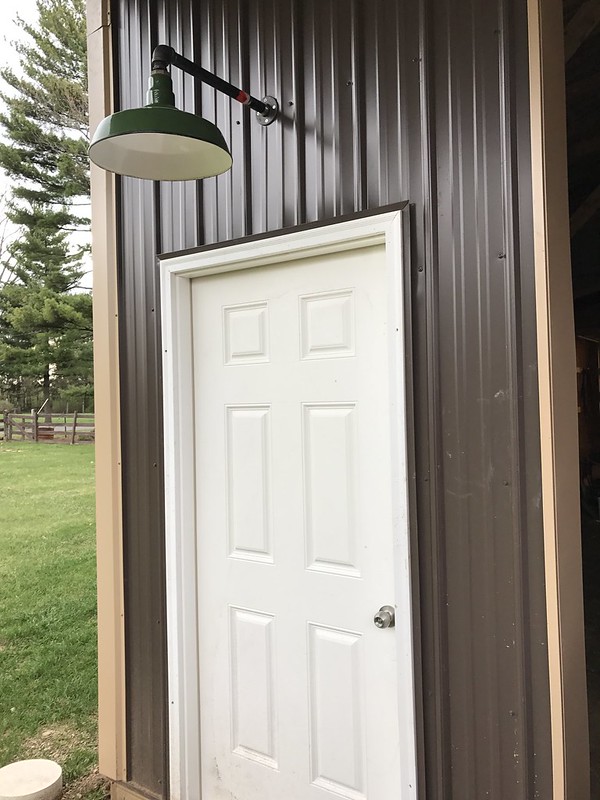
|
|
|
|
|
02-16-2019, 02:43 PM
|
#90 |
|
Registered User
Join Date: Feb 2010
Location: Dayton, OH
Posts: 255
|
Re: Berthas Build
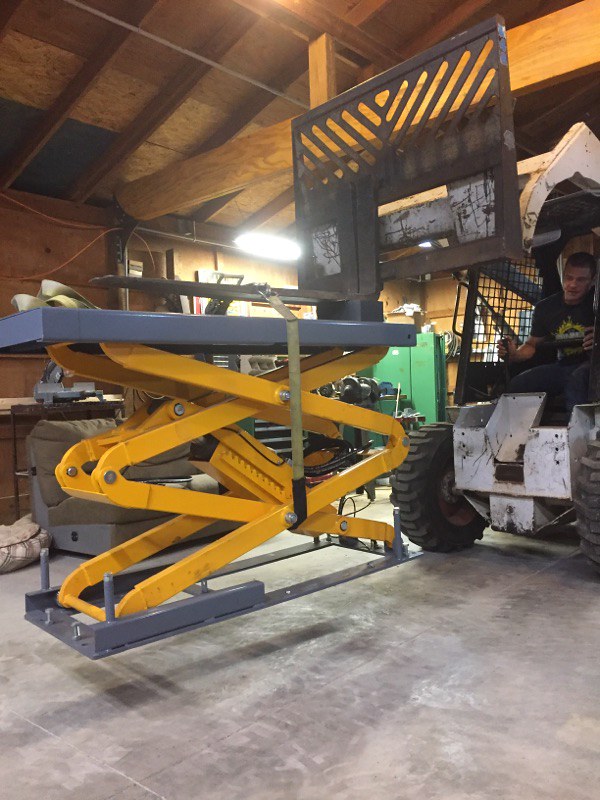
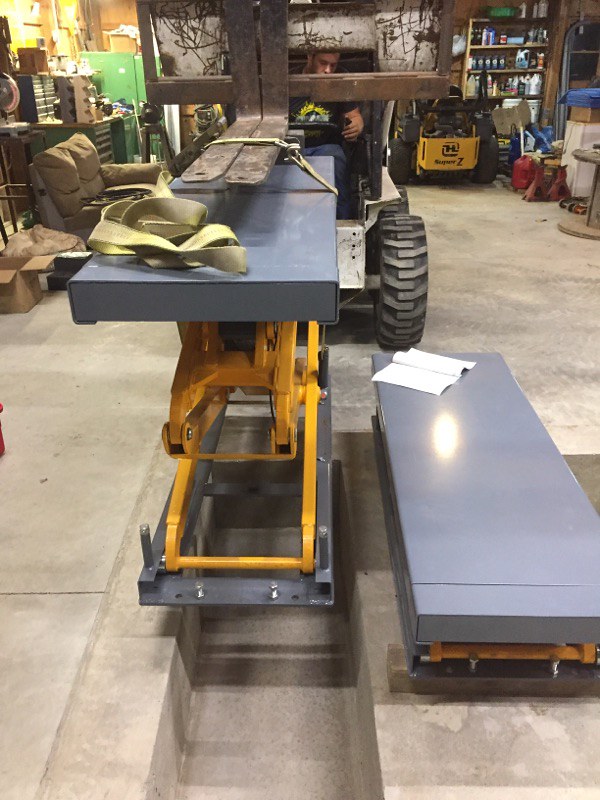
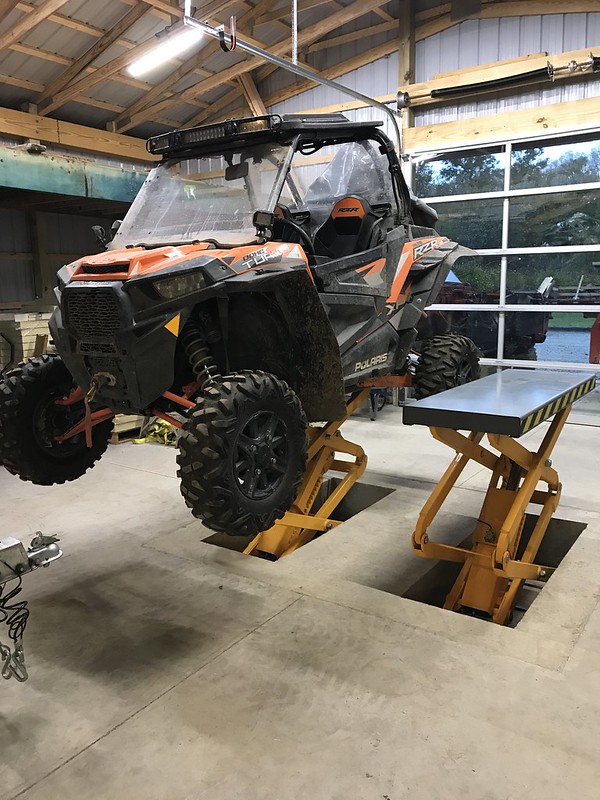
August 2017 - We dropped the lifts into the pits. Everything fit perfectly and the hydraulic and air lines just needed hooked up at this point.
   In place an lowered 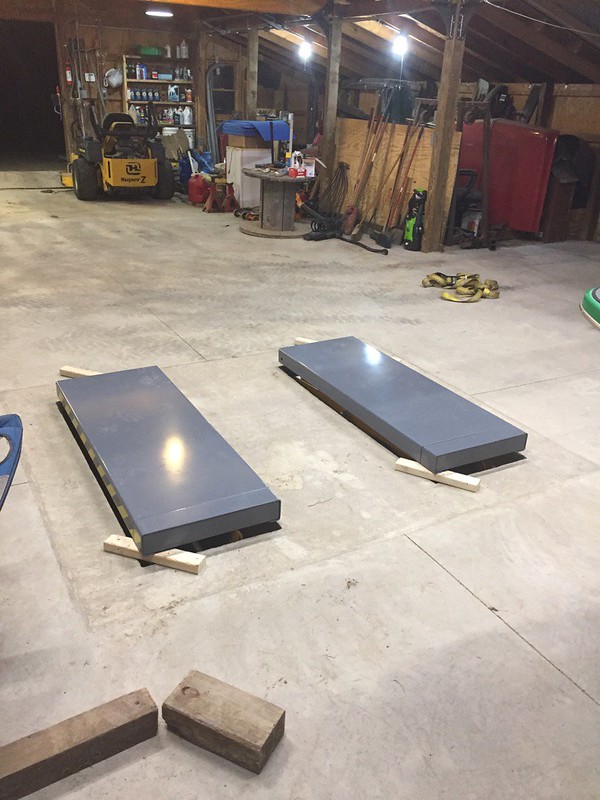 So this shelter was originally a lean-to off the back of the original barn. I didnt want to just demo and trash it. I needed a place for firewood for our wood burner in the house and potentially in the barn as well so I figured this would be a perfect use for it. It actually ended up being a perfect size for this use. 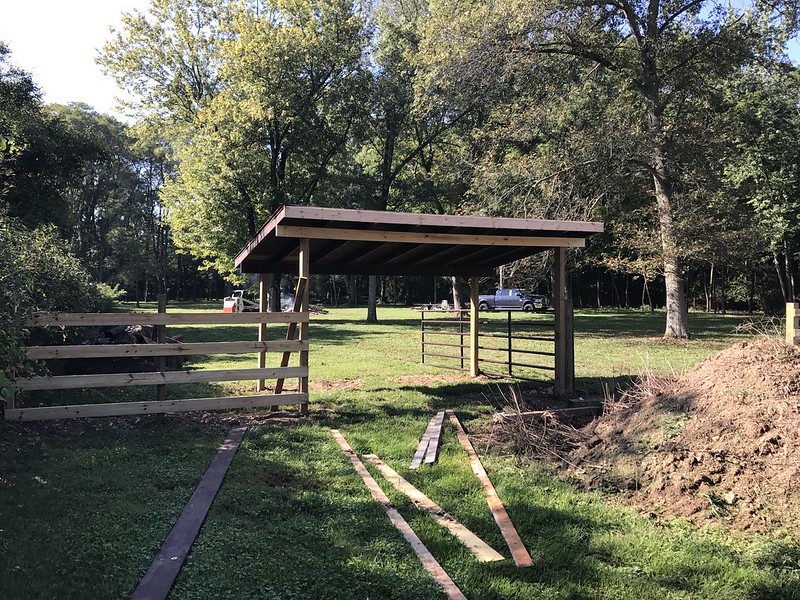 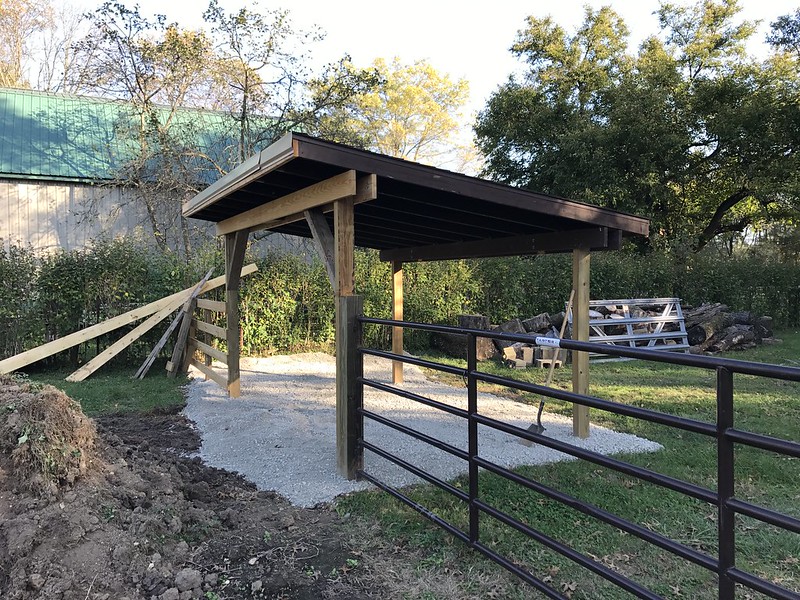 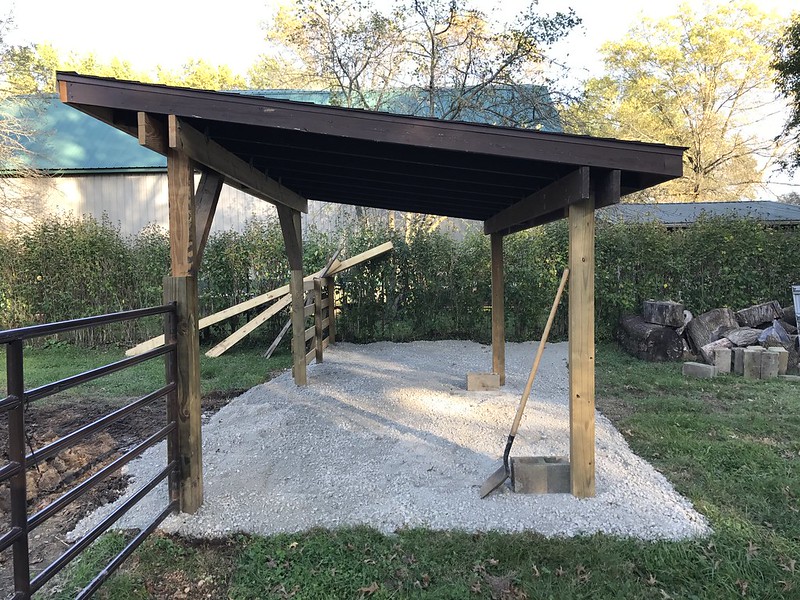 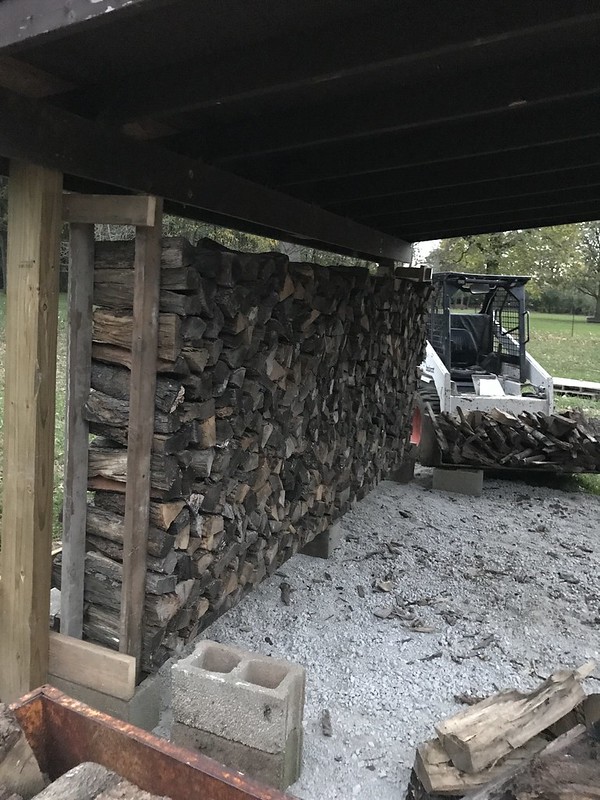 October 2017 - It was a mudpit getting anything to the rear of the barn and everything would just track mud into the barn if I didnt do something about it. This was quite a bit of work but well worth the results. 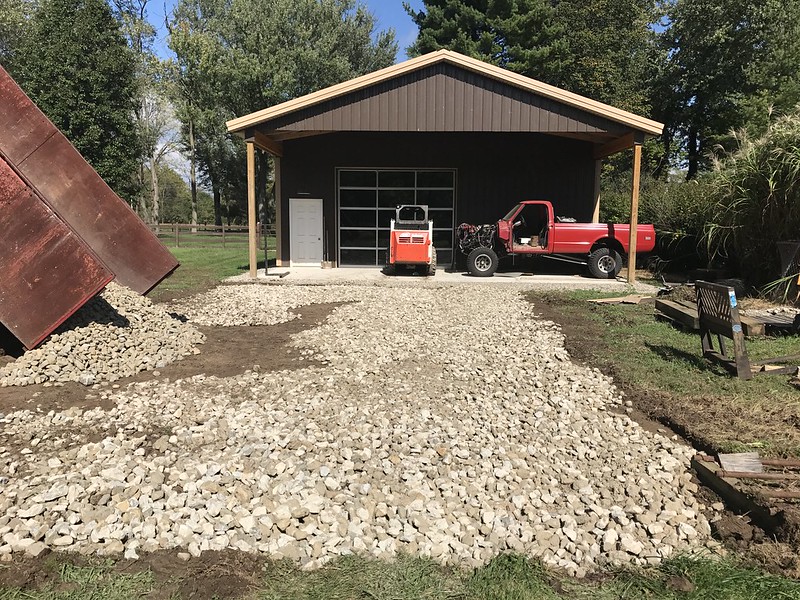 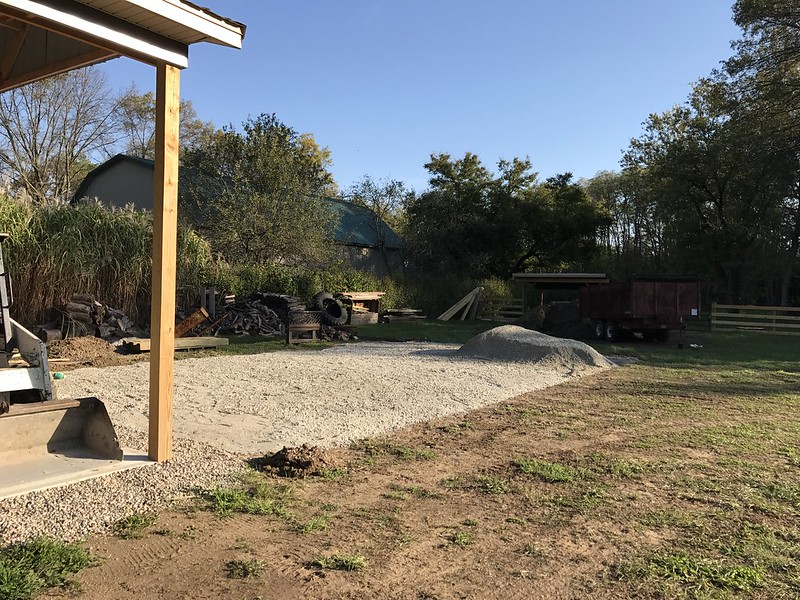 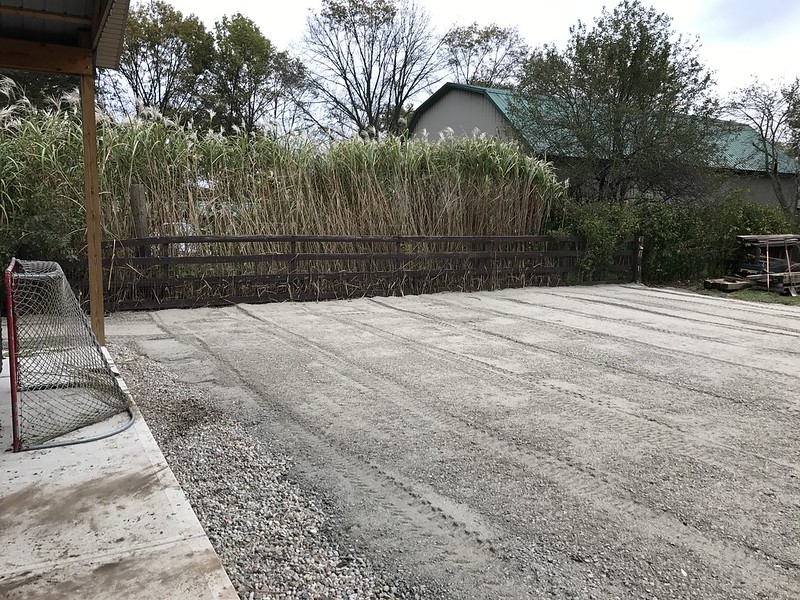 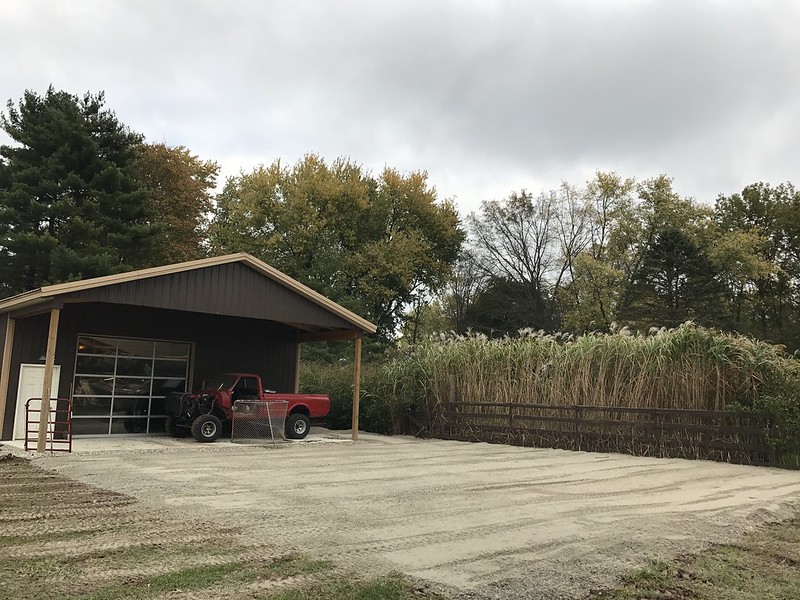
|
|
|
|
|
02-16-2019, 02:48 PM
|
#91 |
|
Registered User
Join Date: Feb 2010
Location: Dayton, OH
Posts: 255
|
Re: Berthas Build
November 2017 - Lifts are now hooked up and operational. They have yet to be bolted down but they are very stable as-is.
  I also finished to gravel along the side of the barn. I can now get to the rear of the barn without having to drive in the grass/mud. 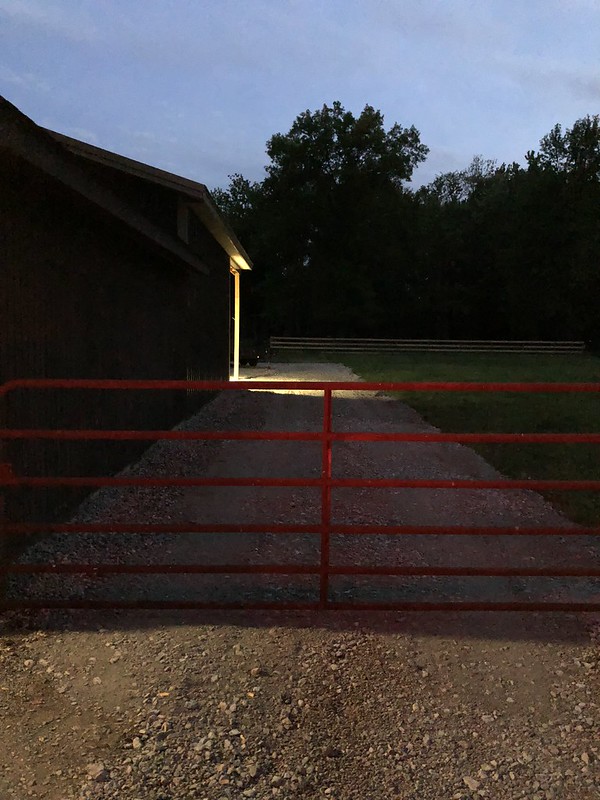 Worked a little more on the insulation and finishing the walls. I wanted to get these sections up before I put anything on this wall. 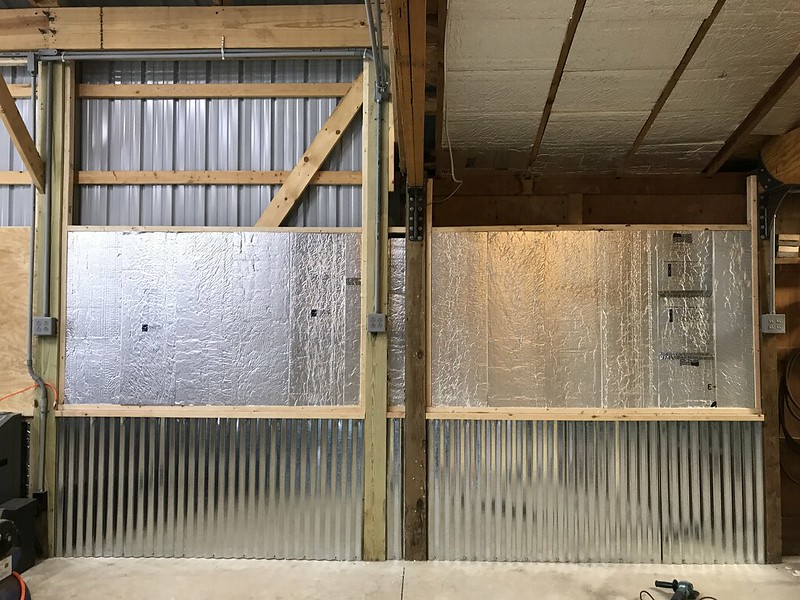 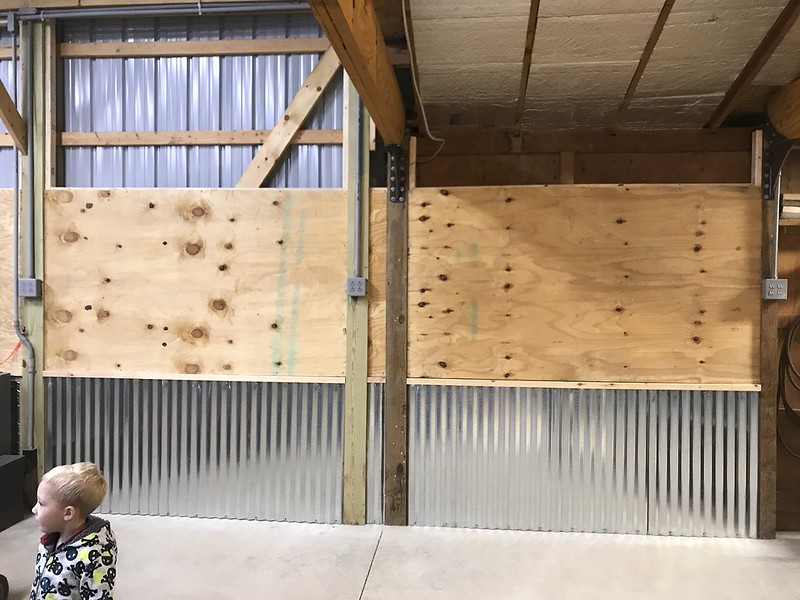 New to me work bench top on the Lista cabinets 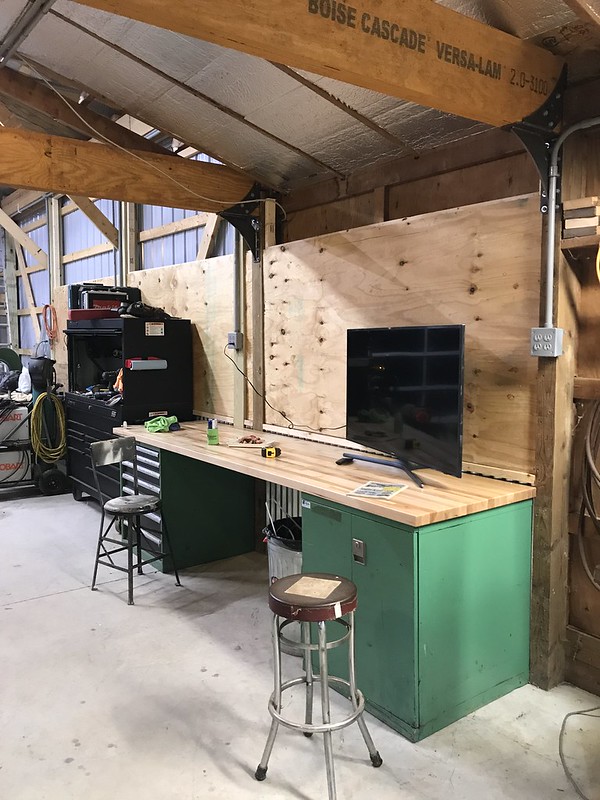  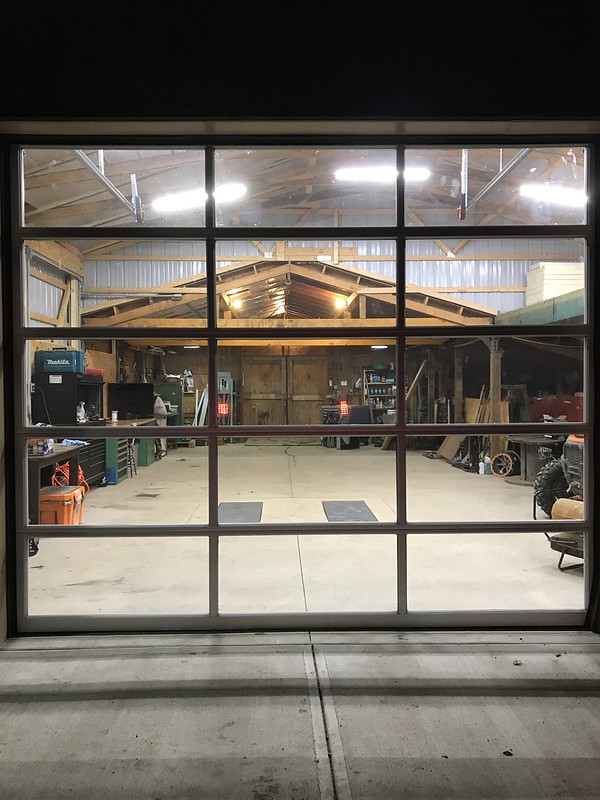 Now that most of my tools were halfway accessible, I could get things to a point that were workable in the new space and I could get back to work on Berthas...... eventually. 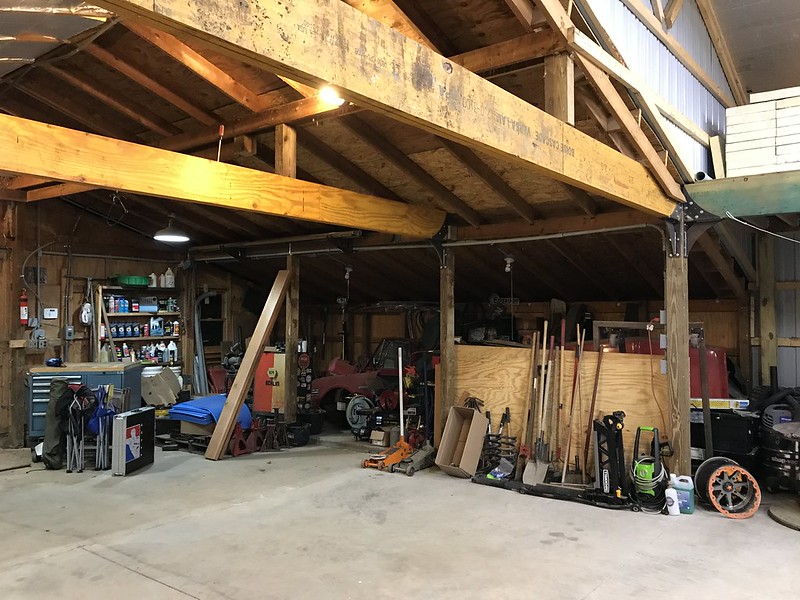 One last project for the barn. Storage shelves which are also steps to access the loft without a ladder. These are pretty handy except they only fit about half of the bottles that I planned to store on them. SMH  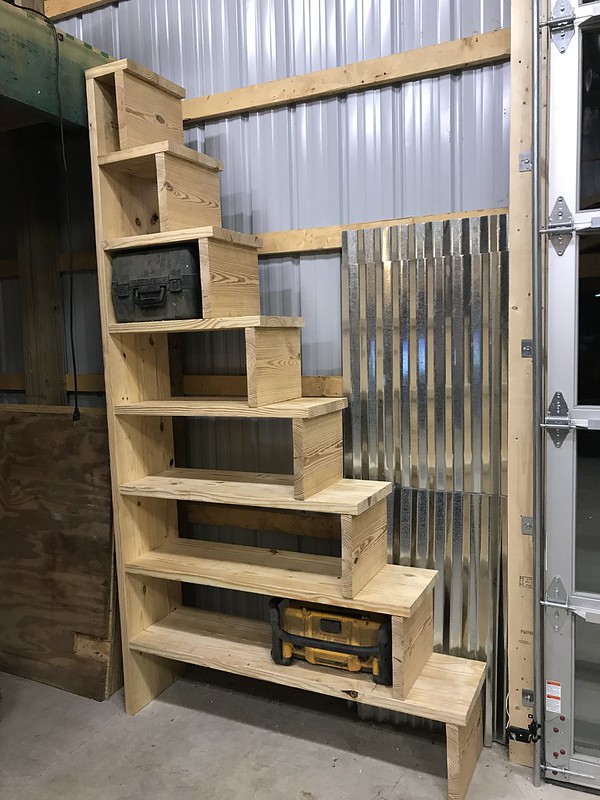
|
|
|
|
|
02-16-2019, 02:49 PM
|
#92 |
|
Registered User
Join Date: Feb 2010
Location: Dayton, OH
Posts: 255
|
Re: Berthas Build
February 2018 - Alright, back on Berthas.
I had been intimidated by the wiring and always said that it was the main thing holding me back on this project since the drivetrain was completed. Once it was all laid out and I knew what I needed out of the wiring, it became a bit easier and less intimidating. I installed parts of an American Auto Wire wiring harness maybe in earlier 2017? I kind of had a feeling that it wasnt going to do everything that I needed it to do. I needed to add some circuits and wanted/needed to run several different relays. I wanted everything in one place on one panel if it could work. I figured up everything that was needed in addition to the main AAW harness and started laying it out. Some of it works with the AAW harness or uses it as a source to trigger relays. This was the first sketch of the layout I came up with and actually ended up pretty close to this with the addition of a tach module and the main power distribution block. The main components were: - Main Circuit breaker - Main 120A relay - Fuel Shutoff Solenoid relay - Lift Pump relay - Low Headlight relay - High Headlight relay - Dakota Digital DSL-1 Tach Module - Grid Heater relays - 8 Fuse Panel - 12 Terminal block - Ground block This panel will be fed from a main power distribution block that will also feed the AAW Main fuse block, the grid heater relays, and it will be where the alternator will sense the voltage drop. The power distribution block will be fed by a 2/0 cable from the battery. The alternator charge cable will be 2 gauge and run from the alternator directly to the battery. 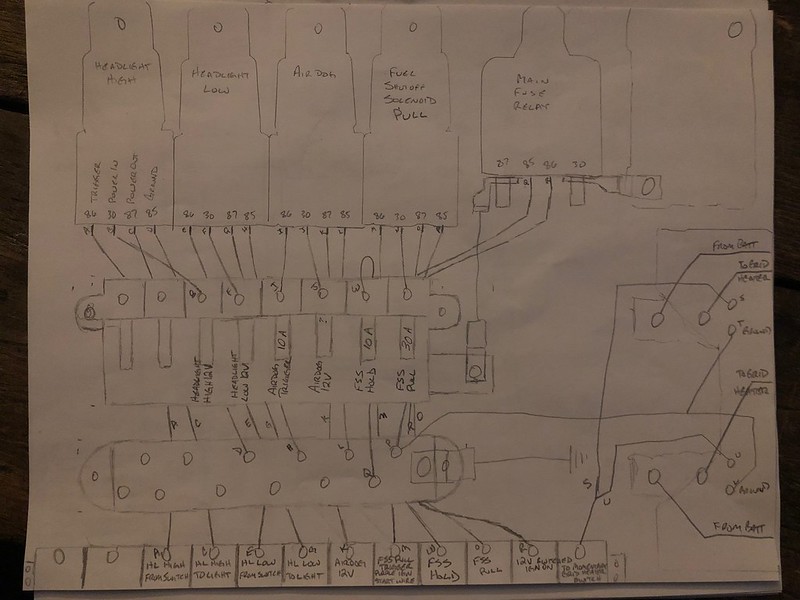 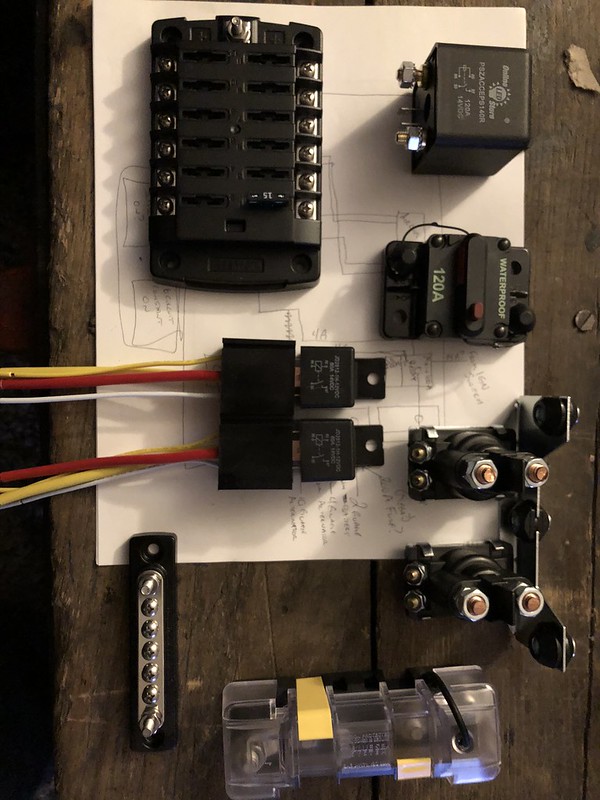 Playing with layouts of the panel 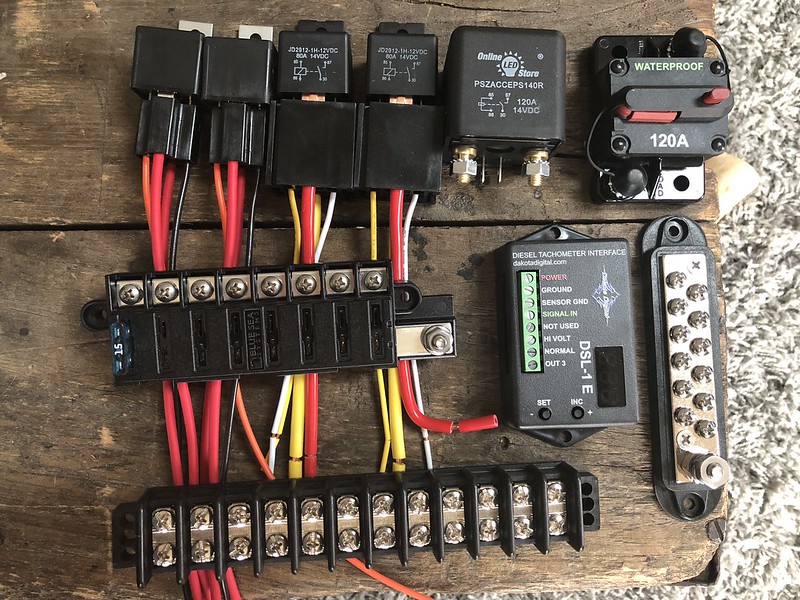 Most of the components needed for the power transfer and panel needs.  This a piece of 1/8" HDPE that was cut on the waterjet, heated and bent, and the beginnings of the final assembly and wiring of the panel. 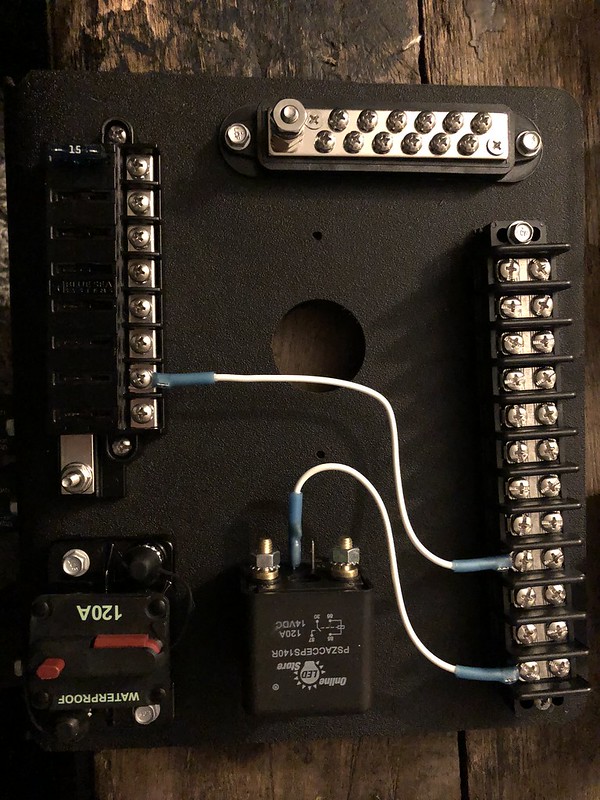 All of the wires to and from the panel will be routed through the large hole in the center of the panel. 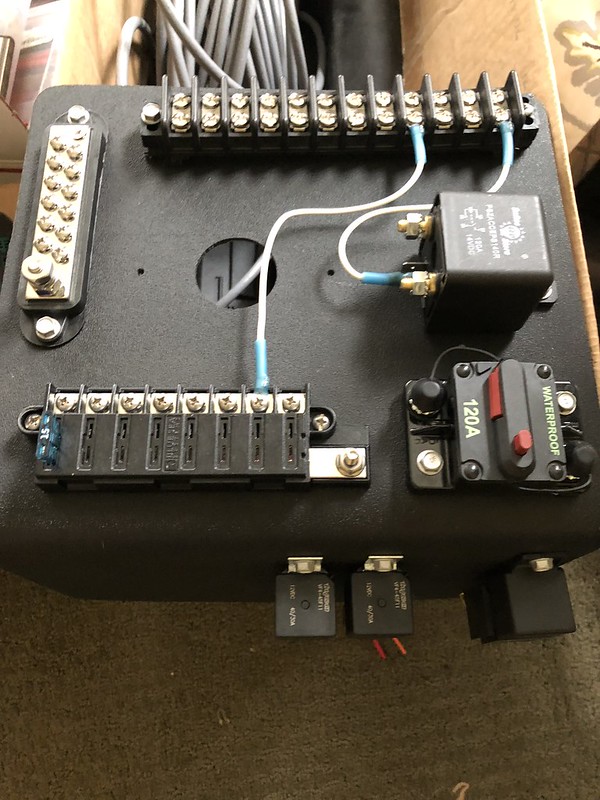 Then came up with the idea to cover the mess of wires running through the hole with the tach module but it would have to be blocked up to allow the wires to pass under it and through the hole. 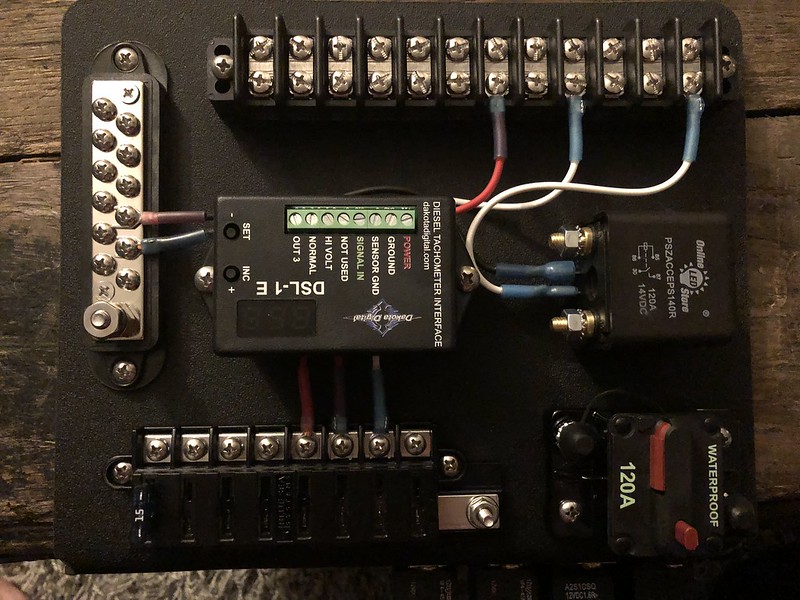 Most of the small gauge wires are ran with the exception of the wires from the AAW harness to trigger the circuits. They will come up through the same hole under the tach module as well and routed under the terminal block, which was also blocked up, and then ultimately connected to the terminal block. 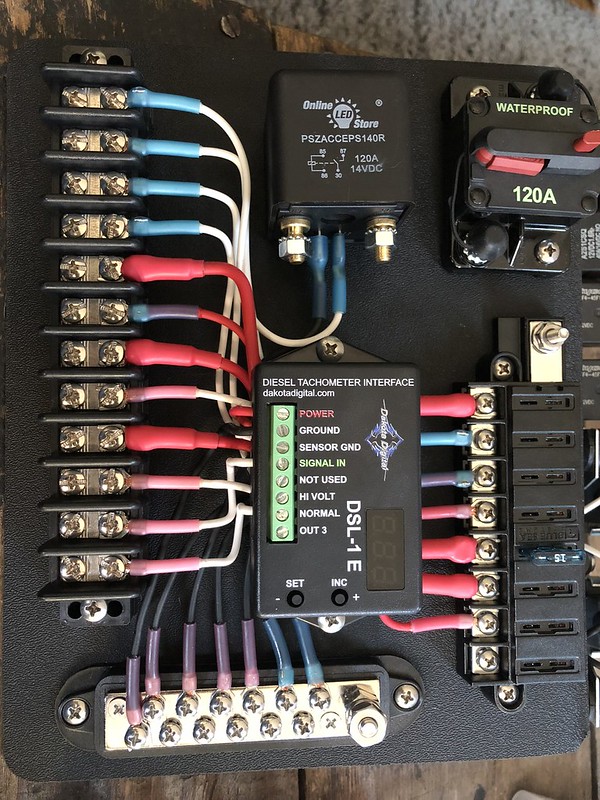 Power supply cables added 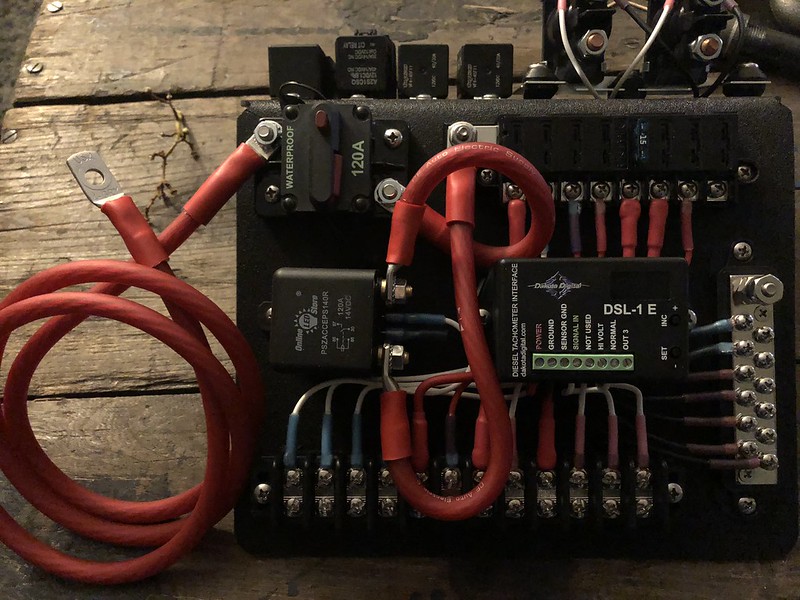 Relays mounted and routed. You can also see the 1" aluminum blocks that were cut on the waterjet to elevate the tach module for clearance for the wires to run through the hole underneath it. Ill post more on the installation of the panel and cables in a later update. 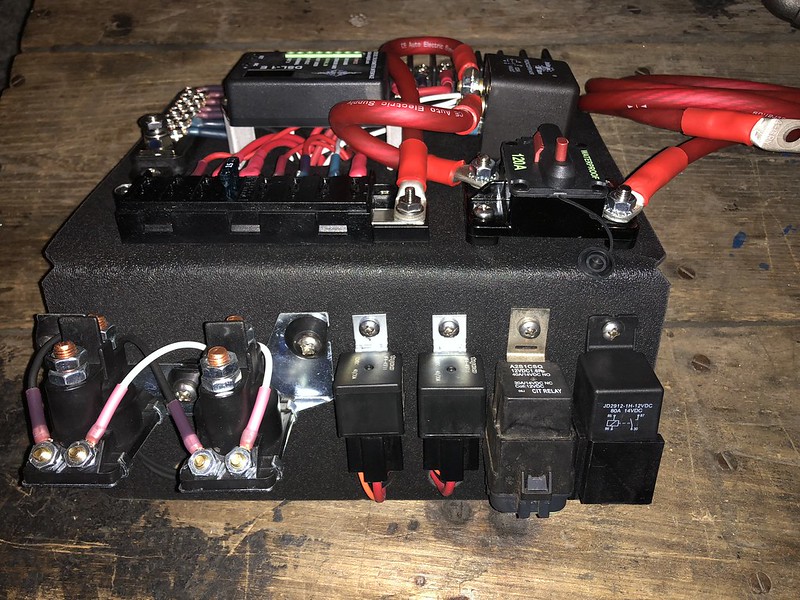
|
|
|
|
|
02-17-2019, 01:42 PM
|
#93 |
|
Registered User
Join Date: Feb 2010
Location: Dayton, OH
Posts: 255
|
Re: Berthas Build
July 2018 - I went on a delay from February through July while we did some renovations on the house in preparation for a new addition to our family who joined us on July 6th, 2018. She has been an incredible blessing and I took some time off of everything for a bit. I did find a little time here and there to work on her a bolt or two at a time.....
I knew that the head gasket needed replaced since I pulled the motor from the donor truck years ago. My original plan was to leave it be until the truck was drivable. I was driving it as is in the donor truck for a bit after all so why not?.... I dont know why I wouldnt have just replaced it while the engine was on the ground and fully accessible.. Ive done one before and there isnt much that can go wrong or be difficult to diagnose if something did go wrong. I guess I just wanted to have a completely blank slate to begin with so I didnt stack the deck against myself. With as long as this project has taken, I am pretty glad I decided not to mess with it much because I would have never remembered what all I did to it along the way.There were a few issues/symptoms that I want to fix before I start messing with any performance mods: 1.) Blown head gasket 2.) I started seeing oil leaking from the exhaust ports at both the turbo and at the head of the exhaust manifold. I figured that this was caused by a blown head gasket. I also thought it could be valve seals. As far as I can tell, the only other possibility causing oil in the exhaust is blow-by? 3.) I also noticed a bit of white smoke and a HEAVY eye-watering exhaust smell while it was running. Also thought the blown gasket might be part of the cause of this as it seemed to worsen some over the years, but Im going to say that this one is related to the impulsive tweaking we did to the injection pump when it was in the donor truck years ago.  4.)There is some hesitation and stuttering/missing as the engine is revved with no load. I am hoping that this is also a side effect of messing with the injection pump. My plan was to tackle the biggest item that I knew of on the list which was the headgasket. Here are the items I replaced while doing the head gasket repair: - Headgasket - Thermostat & Gaskets - Valve springs upgraded to heavy springs - O-ringed the head - ARP Head Studs - Pop Tested Injectors - Exhaust Manifold Gaskets Picture for reference before I started disassembly: 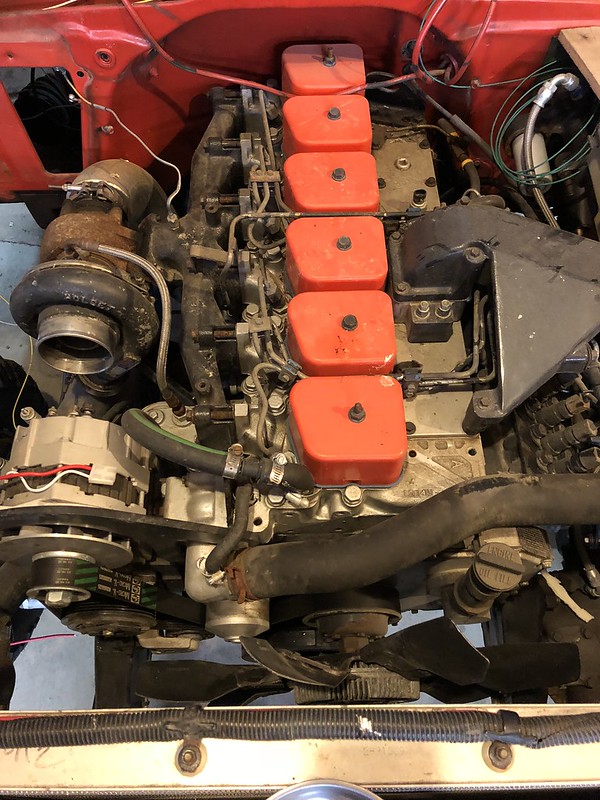 The oil wasnt present in all of the cylinders. It was worse in the rear two I believe. 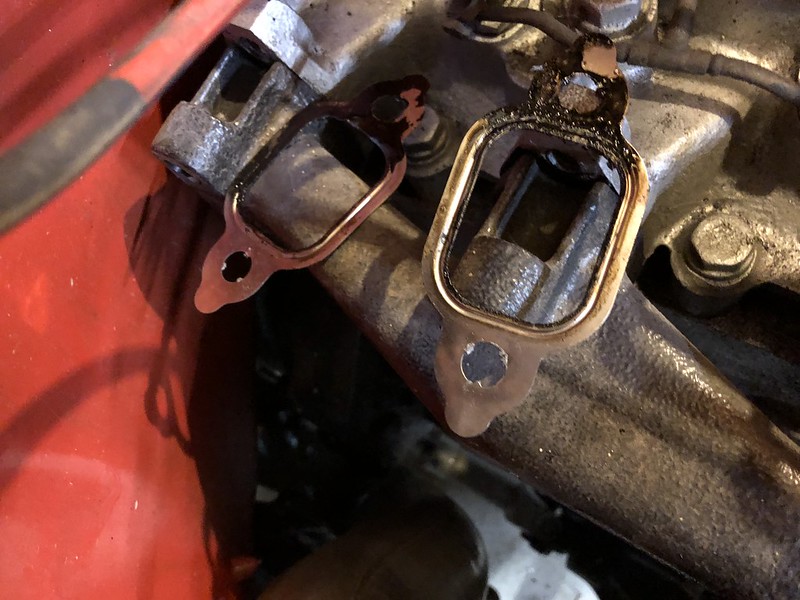 These are the front two cylinders. For some reason I didnt get a pic of the middle two cylinders. 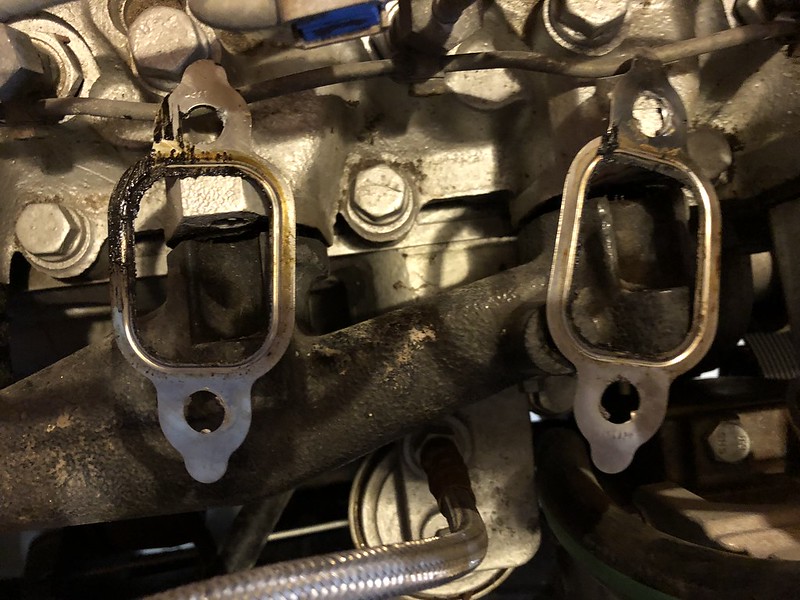 You can see the oil at the bottoms of the exhaust ports along with the oil at the bottom of the downpipe flange. 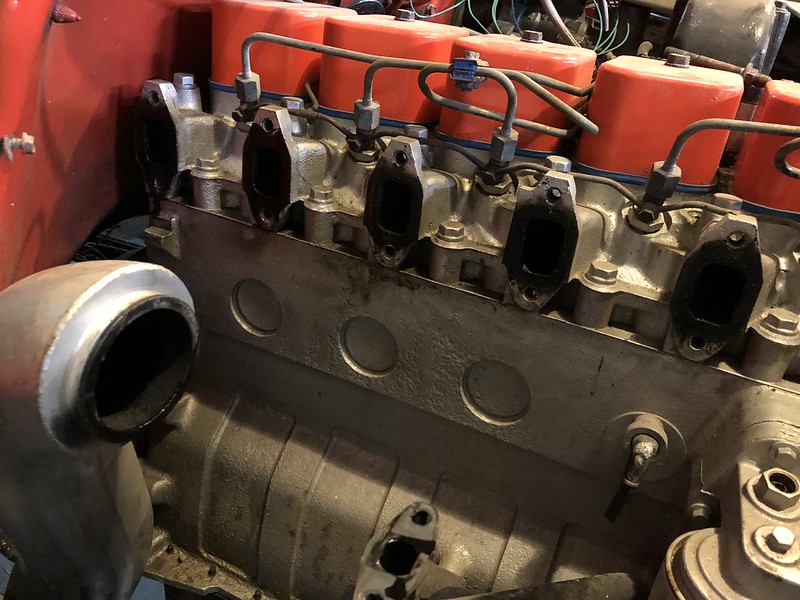 I got the head removed and took it to our local diesel performance shop. I had them O-ring the head and add heavy valve springs as well. They said that the head was in good shape and that the valve seals were good as well. I also had them pop test the injectors and they said that they were in good shape too. 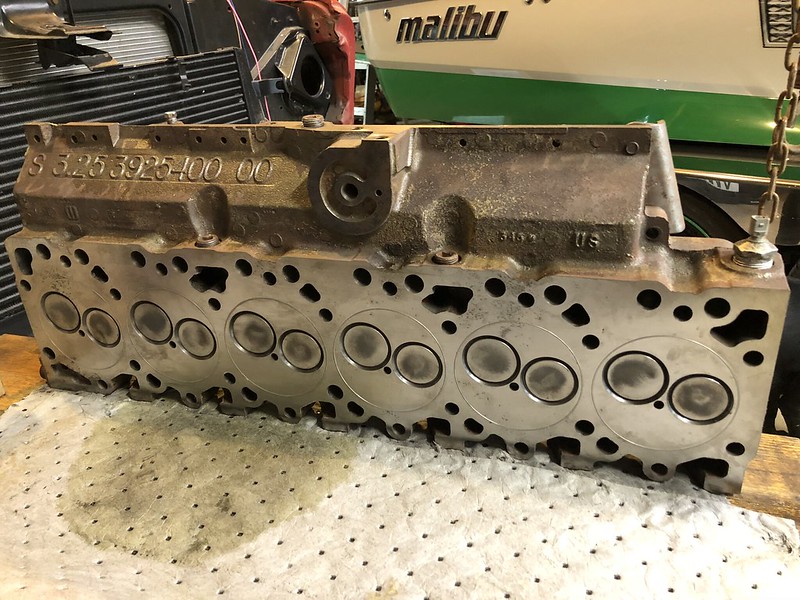 They cylinder walls didnt look too great as it looks like they all had some surface flash rust on them from the amount of sitting that this thing did. I am really not positive what the proper procedure is for this or how it will affect performance and efficiency down the road, but my hope is that it will be ok for a while. #1 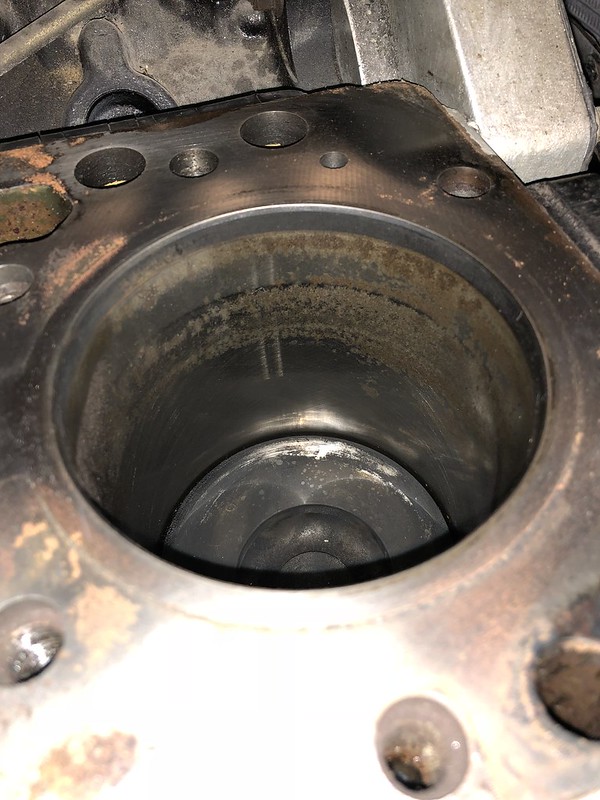 #2 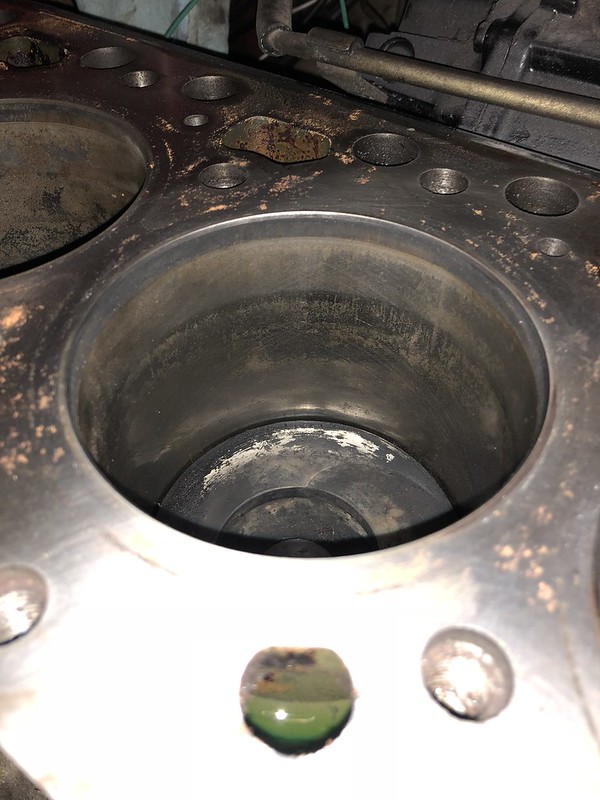 #6 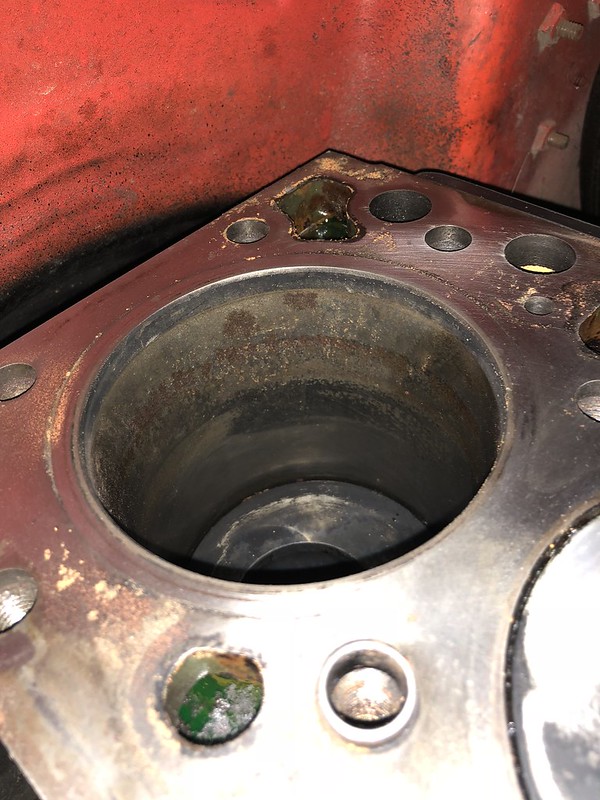
|
|
|
|
|
02-17-2019, 04:08 PM
|
#94 |
|
Registered User
Join Date: Feb 2010
Location: Dayton, OH
Posts: 255
|
Re: Berthas Build
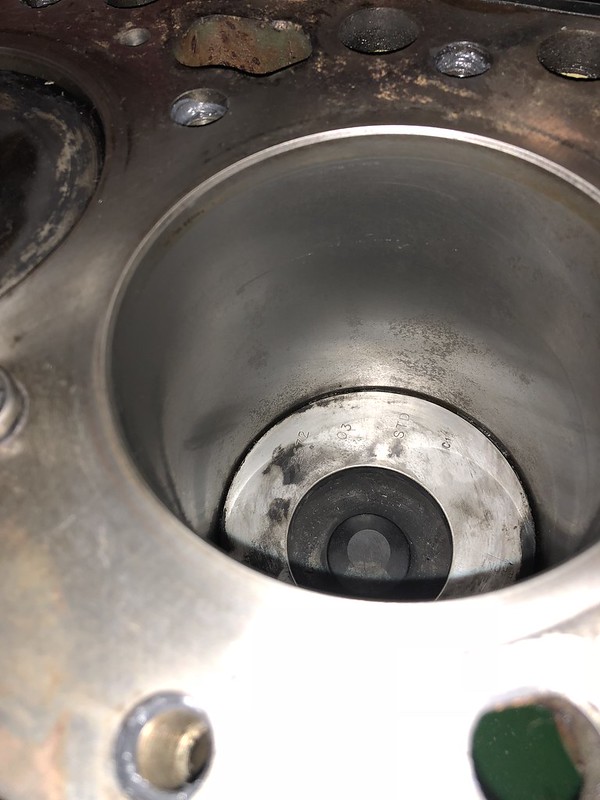
A little effort with some WD-40 and a red scotchbrite pad and it had them looking pretty decent. There were still some marks left when I finished cleaning them, but I could not feel them. Again, Im not sure how this will affect how it runs, blow-by, or anything else related to efficiency or longevity, but I am hoping for the best at this point. I would be curious to hear if anyone has any experience with running one of these with cylinders that look like this.
 One of the better ones 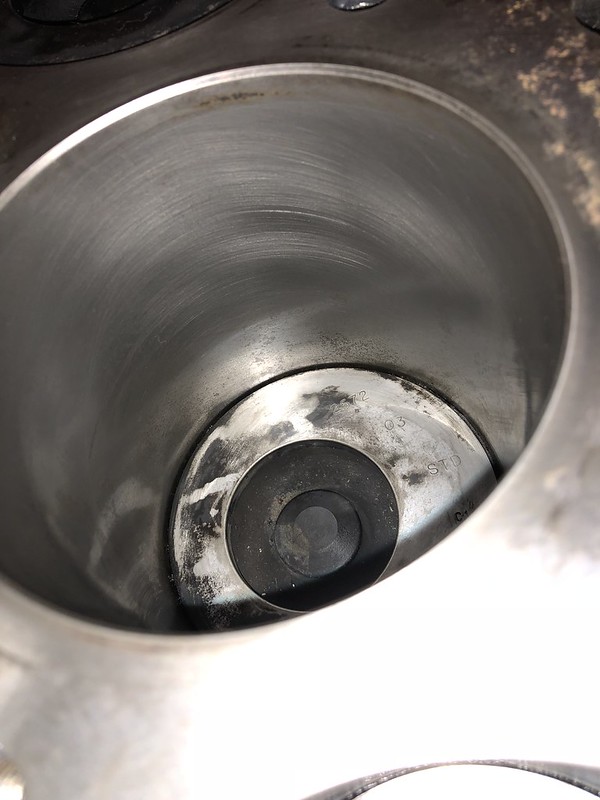 One of the worse ones  The head hanging and ready to be dropped back onto the block. 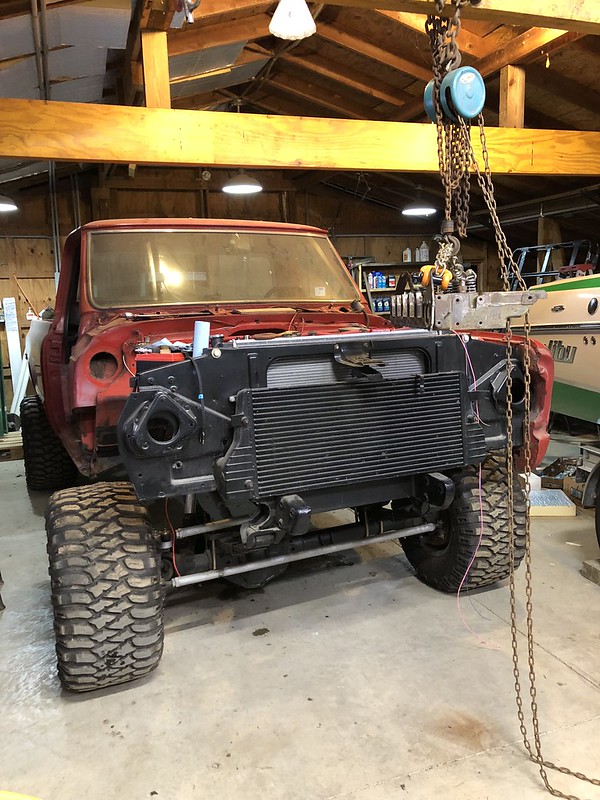
|
|
|
|
|
02-18-2019, 11:13 PM
|
#95 |
|
Registered User
Join Date: Feb 2010
Location: Dayton, OH
Posts: 255
|
Re: Berthas Build
I showed the head ready to go back on the block but I did have some hesitation and ended up putting the head on, hand threading the studs in, and then removing the studs and the head again. My hesitation was the cylinder walls. I had meant to clean them up but I forgot to do so before I put the head back on when I got it back as it had been a couple of weeks between the head removal and getting it back and ready to install. Once I got the cylinders cleaned up and revealed the cross hatching, it made me feel a bit better about it but I know that the engine will need to come out for a freshening up. Ill get a feel for how soon once it is driving for a bit.
I had another scare once I did finally get the head on and buttoned down. I installed a new Cummins thermostat but it came with a different style O-ring and only one at that. There is both an inner and outer O-ring and it only came with the inner and it didnt fit the ID of the hole in the head like the original one did. I figured maybe they changed the style and used this style on some of the years and that it would still work. Wrong. I filled the cooling system with antifreeze and sure enough, I had a slight leak. Cue gut wrench feeling. At this point, I just installed the thermostat and O-ring thinking it would be just fine and that although it looked completely wrong and as if it wasnt going to come close to sealing, someone designed it that probably knew better than I did? Wrong again. That is either the wrong part number(I want to say it even came in the Cummins Head Gasket Kit) or something isnt right there. I actually ended up looking up pictures at my local Oreillys to match the original O-rings. Those bolts on the thermostat housing a a ***** too! Id rather do that 10 times than have to remove the head again for a head gasket that I thought I somehow messed up. September 2017 - Speaking of water, I also sourced a new water temp sensor. I got tied up in using the stock Dodge wire connector so I went on a goose chase trying to find one that would fit. I relocated the sensor location to the next NPT port forward of the most rearward port of the head because my clearance at the rear wasnt enough to get the plug on the end of the sensor. I would have just relocated the original sensor but it was not the same size as the next forward port. You can see the sensor at the far right of the head and then the next forward port is where I relocated the new sensor to. Ive got two concerns with the new temp sensor at this point: 1.) Will the reading be similar to the original temp sensor port? 2.) Will this sensor read accurately and send the correct signal to my temp gauge? 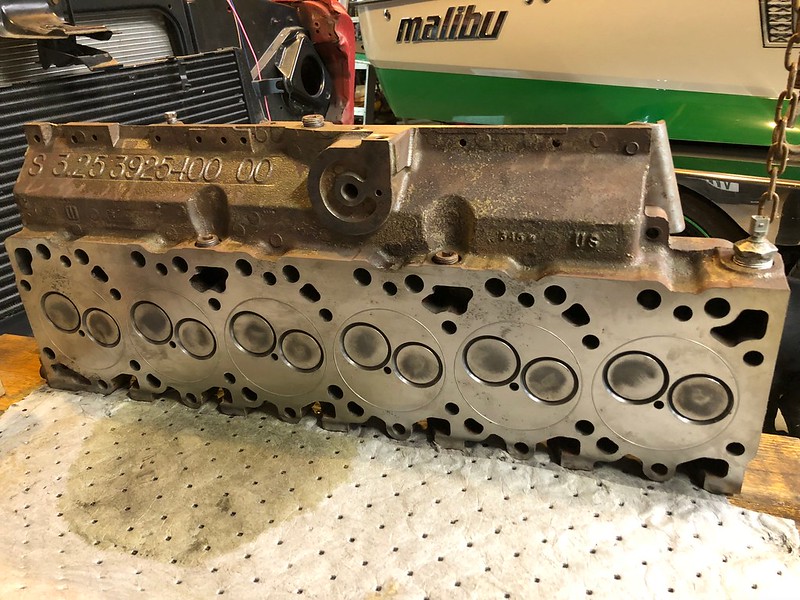 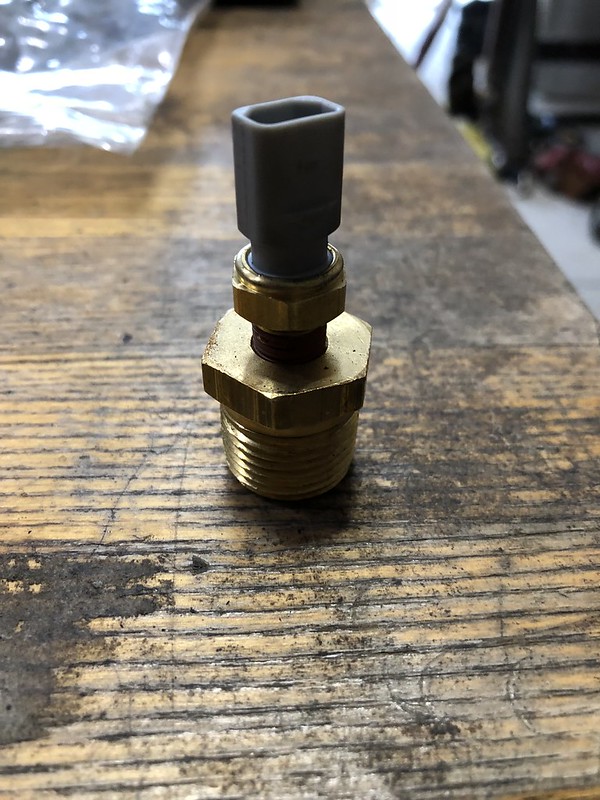
|
|
|
|
|
02-19-2019, 04:45 PM
|
#96 | |
|
Registered User
 Join Date: Nov 2008
Location: Texarkana, TX
Posts: 443
|
Re: Berthas Build
🤤
Beautiful wiring! Quote:
__________________
Brandon 63 Biscayne https://www.pro-touring.com/threads/90718-63-Biscayne 57 Chevy Truck (sold)http://67-72chevytrucks.com/vboard/s...d.php?t=321380 72 K20 Long bed stepside (wife's) 72 K20 Long bed 396 (flip or keep...?) The latest build: http://67-72chevytrucks.com/vboard/s...76#post8438476 |
|
|
|
|
|
02-20-2019, 03:22 PM
|
#97 |
|
Registered User
Join Date: Feb 2010
Location: Dayton, OH
Posts: 255
|
Re: Berthas Build
There were quite a few loose ends to tie up with both the drivetrain swap along with the overall truck itself. Ill cover the tip of the iceberg on them in these last few catch up posts.
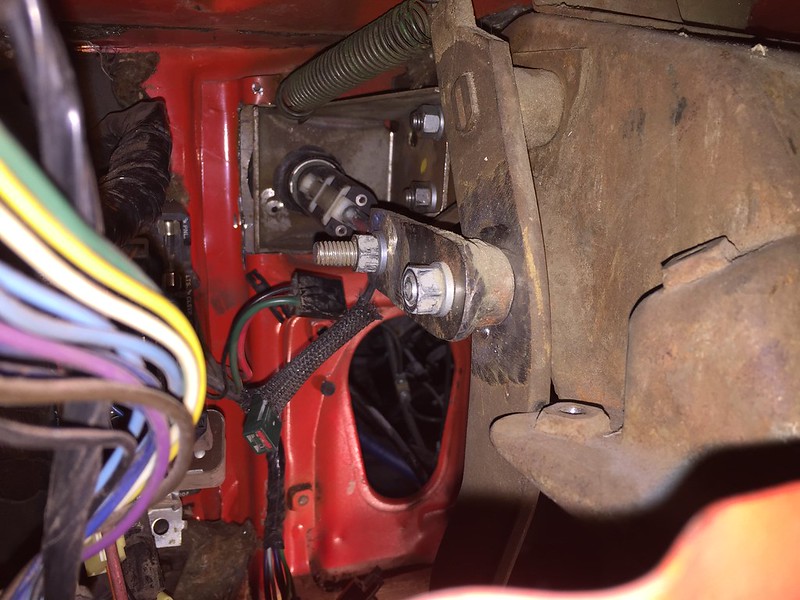
October 2018 - Since changing out the transfer case output housing from the Dodge unit to the Chevy unit, I was able to hook up my speedo cable. I have no idea where I will be with speedometer accuracy, but I figured I would find a speedo reading, an RPM reading, and a GPS speed and find the correct ratio box once she is driving. I was also going to change out my speedometer cable because it was just barely too short until, after doing some research on speedo ratio boxes and adapters, that I remembered that my dad had 90 degree box for his 69 Vette that he hadnt gotten around to installing and it just so happened that it was exactly what I needed. 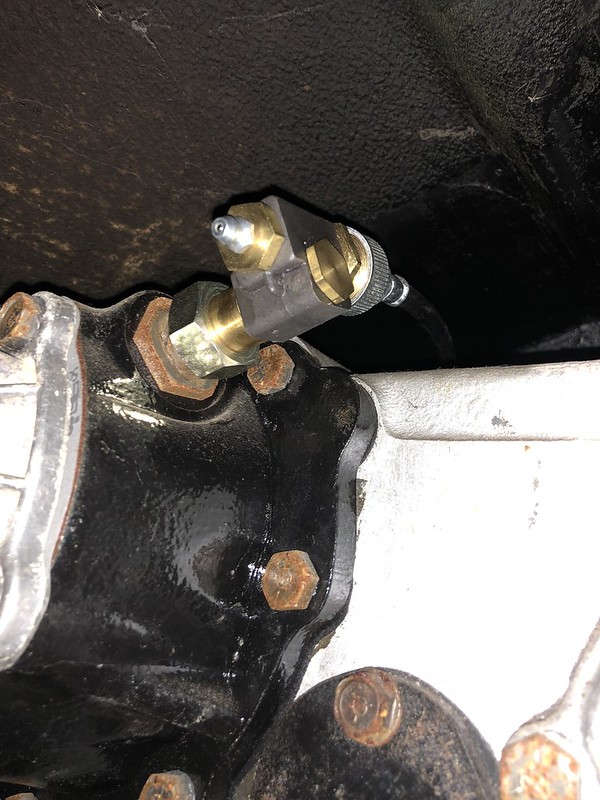  October 2018 - As I mentioned in an earlier post, I had been dreading the wiring for quite a while. It was the biggest obstacle that was preventing me from making some ground on this build for the longest time. I installed the AAW fuse panel and the under dash kit for it back in 2016 or 17 and hadnt touched it since. I think that getting the custom fuse panel to tie the basic truck wiring to the engine and drivetrain wiring was a huge help to this though as it gave me some clarity on what needed to be completed, where wires needed to be routed, and what their function was. The only wiring left to do is the rear light harness and it should take about as long as the front light harness which wasnt but a couple of hours. I do also have the grid heaters to wire up. I have everything for them, but at this point, they are not crucial to driving the truck so they arent the highest on the list at the moment. The first time these headlights have been lit up on her..... 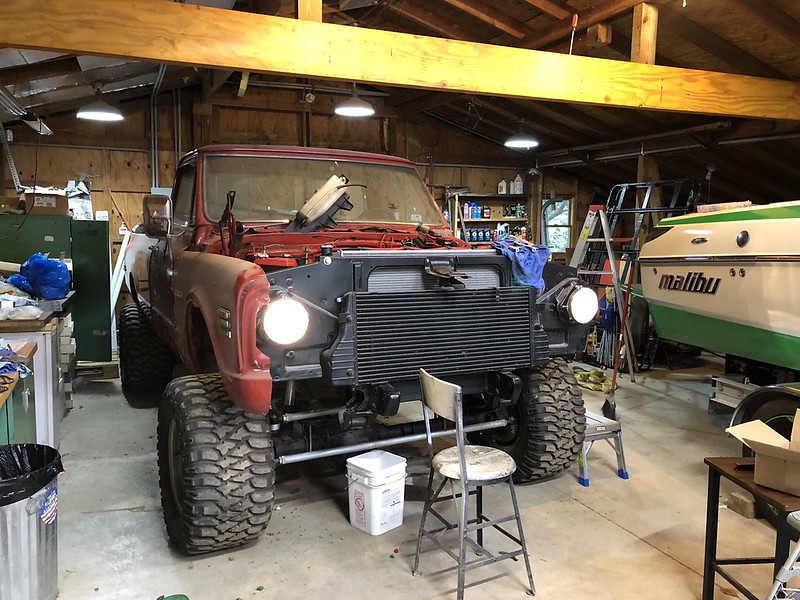 I knew the time would come to have to try to get the body aligned on this frame that this body was not originally on. In preparation for that, rebuilt the door hinges so I wouldnt have to do it once the fenders were mounted.  Thats about enough of those! Once I got the doors back on, I test fit the fenders and noticed I had quite a bit of a tapered gap between the door and the fender. After some asking around, I guess it is standard to shim the body mounts to get the gaps to work out right. Not being a body guy and never gapping body lines before, I think that these turned out acceptable to me. I ended up shimming the front cab mount up about 1/4"-3/8" to get the gap uniform. 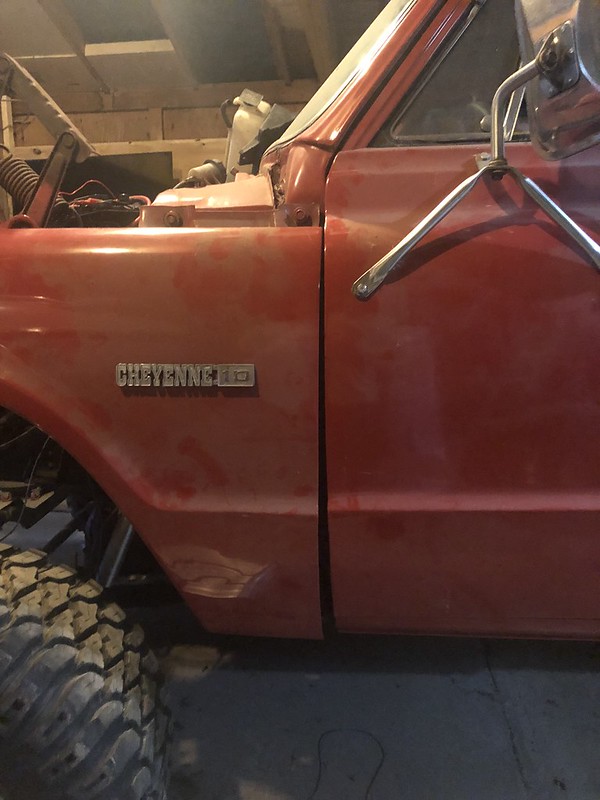 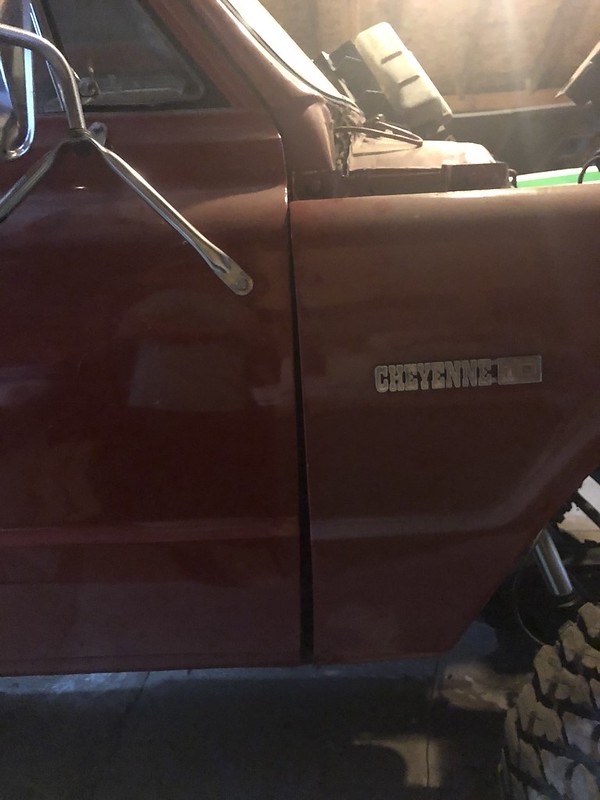  Anther item that was lingering for far too long was the clutch hydraulic reservoir mounting. I was just going to try to fab something simple in the barn to mount it but ended up throwing something together on the waterjet. Still simple, but much cleaner than I would have been able to fab up. 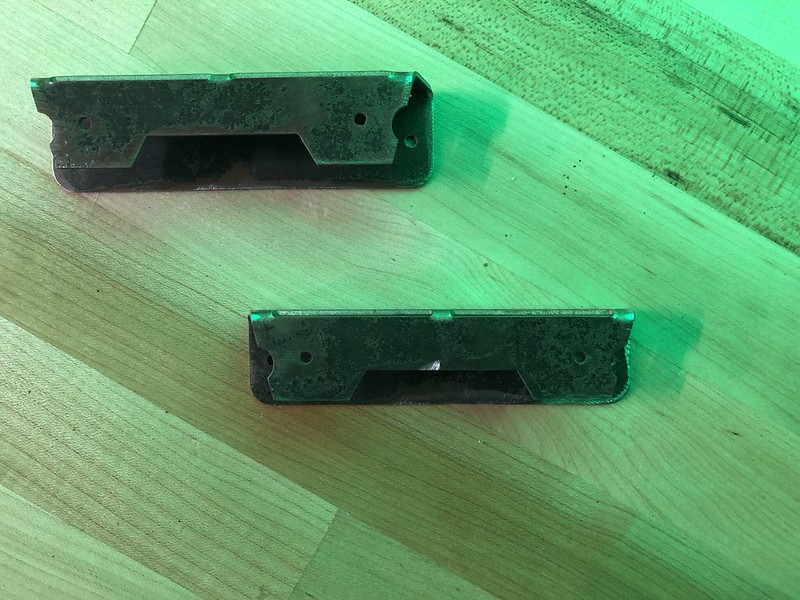 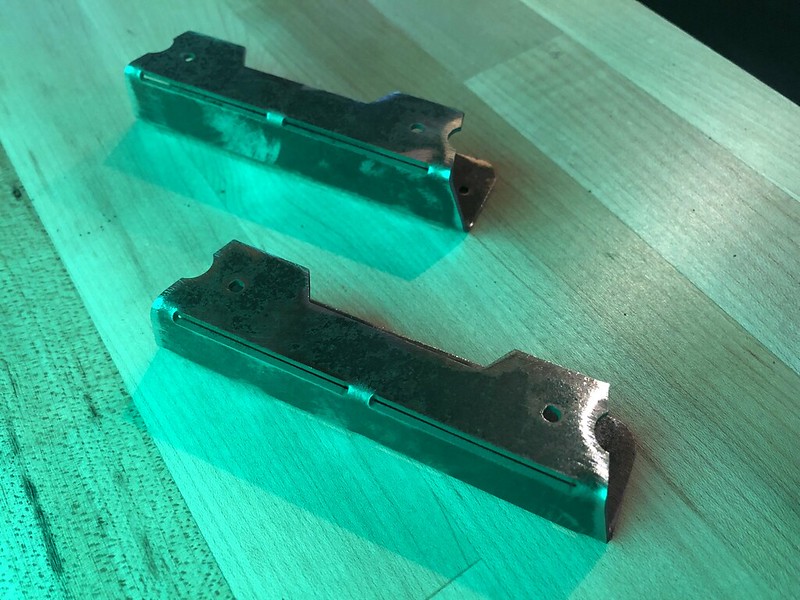 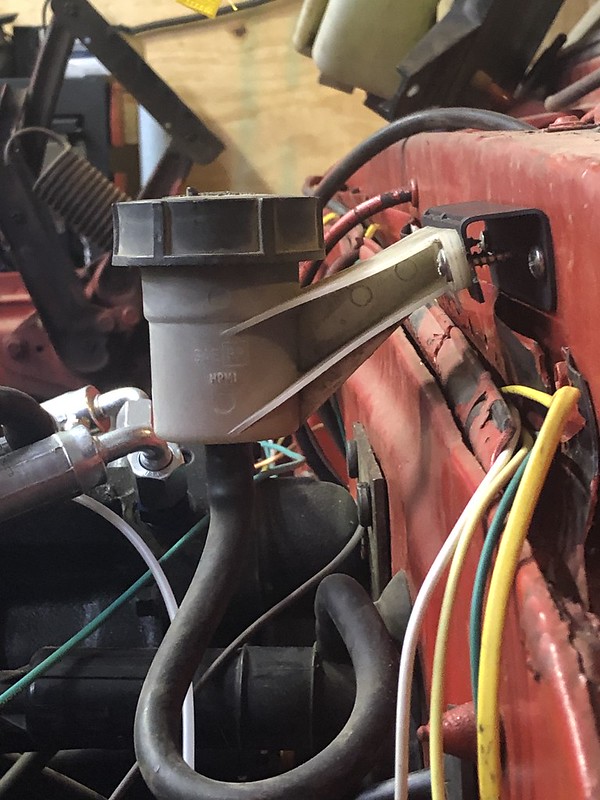 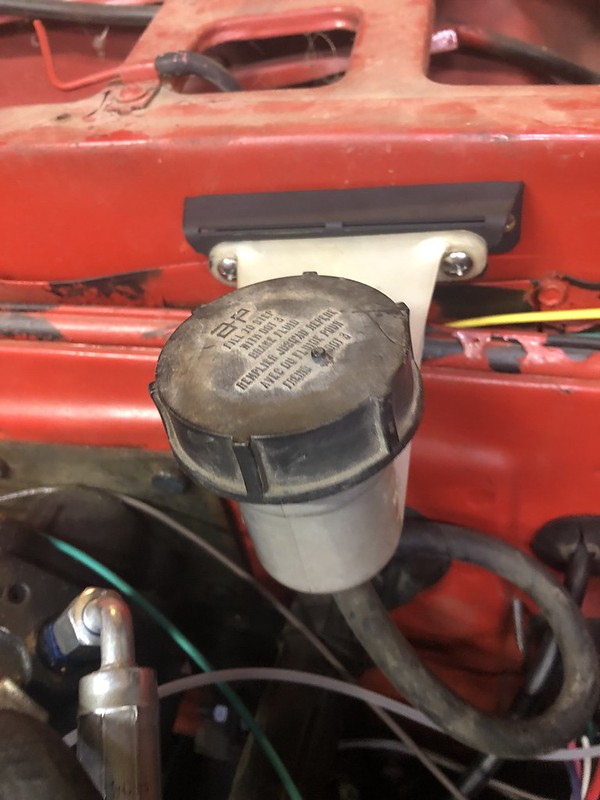
|
|
|
|
|
02-20-2019, 10:48 PM
|
#98 |
|
Registered User
Join Date: Feb 2010
Location: Dayton, OH
Posts: 255
|
Re: Berthas Build
December 2018 - Front sheetmetal is installed for good! And actually, I tightened down all of the body mounts while I was at it. Fenders, inner fenders, cowl, and the grille are all bolted up, aligned as best I could get them and mounted for good. I guess I will just have to get lucky that the hood aligns well with everything mounted. It feels good that most everything is mounted and bolted down. For the longest time, I would putt around the property afraid parts would just be falling off and scattered throughout the property. :dustin:
  I couldnt use the original hood latch support because its real estate is now occupied by the intercooler and I didnt want the grille to be the only support for the hood latch so I made a bracket to run under the intercooler and bolt to the bottom of the core support. I cut the original bracket to follow along side of the intercooler. The new support bracket has threaded holes in it to bolt throught the original bracket and into the new support bracket. The hood latch and the inner grille can now still bolt up just like factory and will have more than enough support. New 1/4" bracket in place 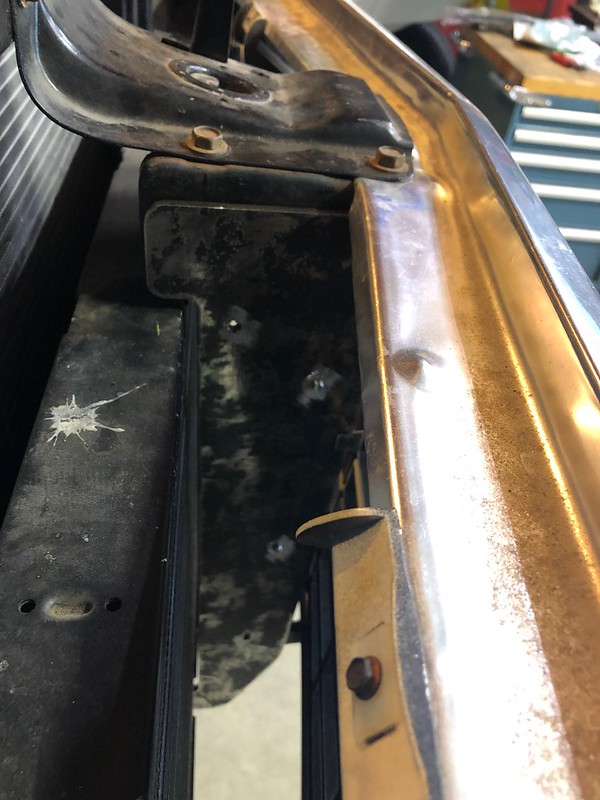 Bolts through the original bracket and into the threaded holes of the new bracket 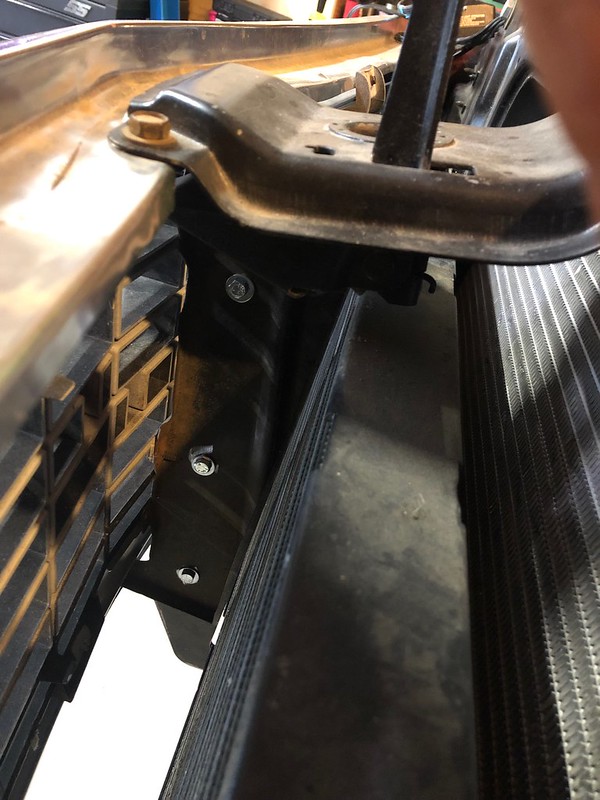 Bottom view where it bolts to the bottom of the core support 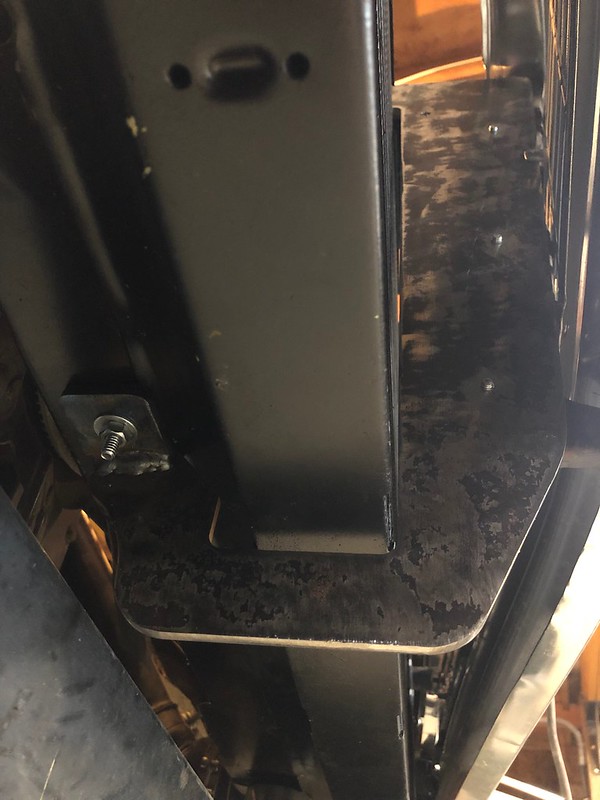 So after starting and running the engine a few times lately, I noticed something that I dont remember noticing before. The throttle linkage/pedal was sticking just slightly. Ive read that some have had some "bucking" issues with the throttle linkage when missing the bottom return spring. There was a clear mounting location on the linkage for the lower return spring but I couldnt hardly even make up at spot to hook the other end of the spring on towards the front of the injection pump just to get by. This was probably good because it forced me to come up with a much more permanent solution to the issue. The only place I could come up with to test it was to hook it onto one of the bolt heads of the pump. This gave me a proximity of where to put the new mounting hole for the other end of the spring. 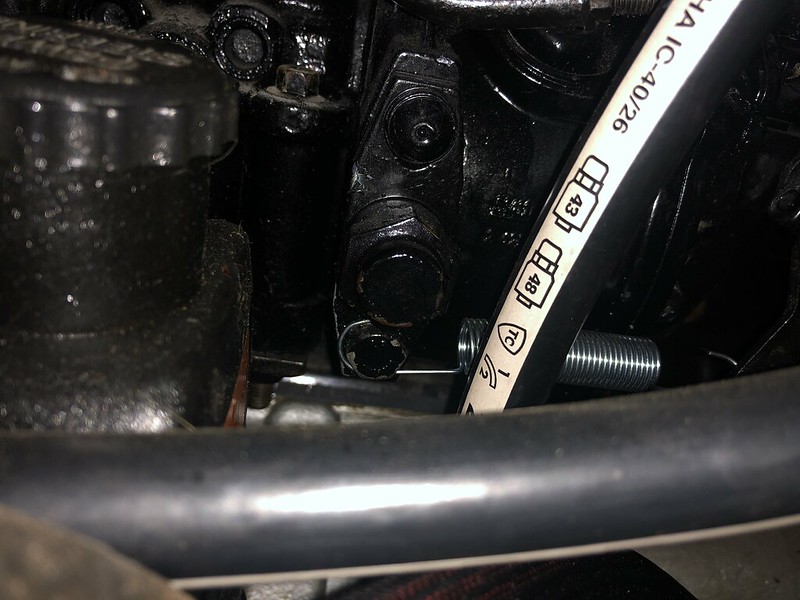 Based on some searches, this is the lower spring mount from 94-96 pumps. It attaches to a stud/pin on the linkage(which mine is missing) and then to a bracket with a similar stud/pin that bolts to I would assume either a pump mounting bolt or another point on the bottom/front of the injection pump. 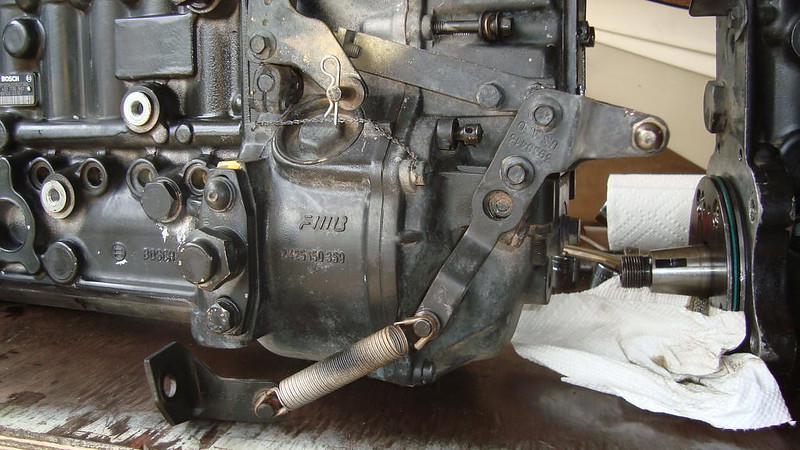 This is the lower throttle linkage return spring style that the 97 & 98 pumps used. Apparently this style is hard to find and very expensive. Although I havent looked too hard, I have found both styles to be pretty hard to find.  This is the solution that I came up with. I really just needed a small hole somewhere around where that bolt head was that I test mounted the spring to. I cut a simple bracket on the waterjet and problem solved. My spring isnt quite as heavy looking as the factory springs, but if it becomes an issue or seems to still stick, Ill replace it with a heavier one. I cut several different variations of it in case the original design didnt quite work but it turned out just fine on the first one.  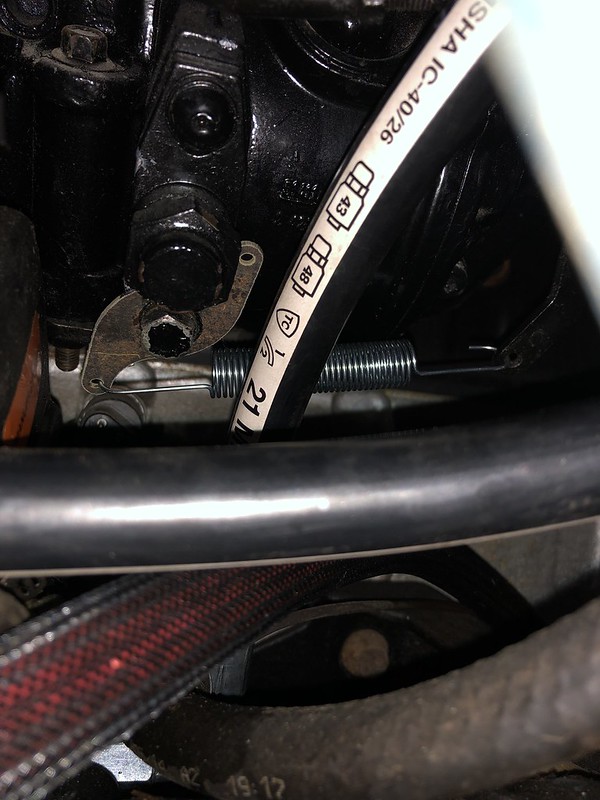 The distance is just enough to keep tension on the spring for a consistent pedal feel hopefully.... 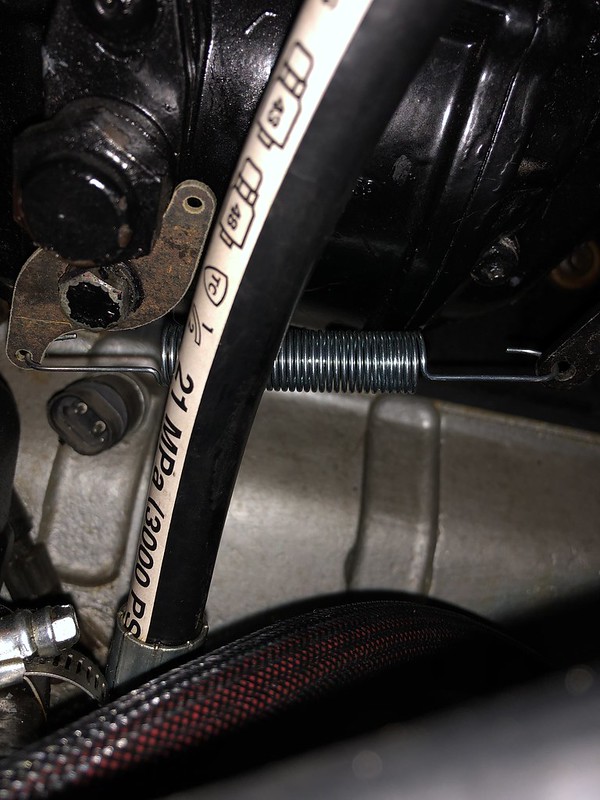
|
|
|
|
|
02-20-2019, 11:21 PM
|
#99 |
|
Registered User
Join Date: Feb 2010
Location: Dayton, OH
Posts: 255
|
Re: Berthas Build
December 2018 - With the headlight wiring update and them running through the relays in my custom electrical panel, it was definitely installed and in the truck for a bit(since about Semptember apparently), but I couldnt nail down a good way to mount it because of the contour of the inner fender until I finally bit the bullet and just threw some wild dimensions and guesses into CAD, cut the bracket, bent up the tabs, tapped the holes in the those tabs, and threw it in. I pretty much nailed it on the first try as well. I threw some paint on it and got it installed.
Ive learned that sometimes it just takes the activity of actually jumping in and doing something without knowing how or what youre doing to get it done and more often than not, it will turn out just fine. Ive gotten myself caught up in overthinking too many parts of the build when all it would take is jumping in head first and going after it to come up with a solution that works just as well, if not better, than if I had over analyzed the situation. Over thinking really is a sickness Im convinced...... 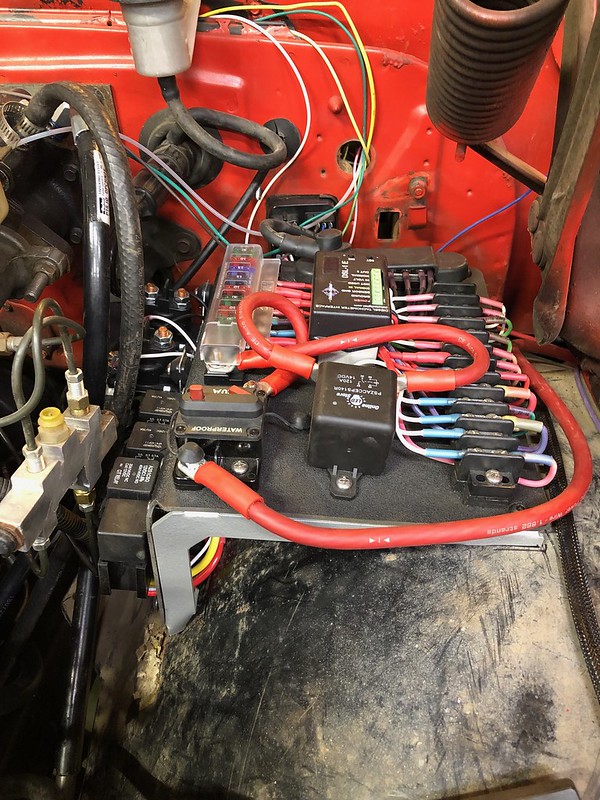 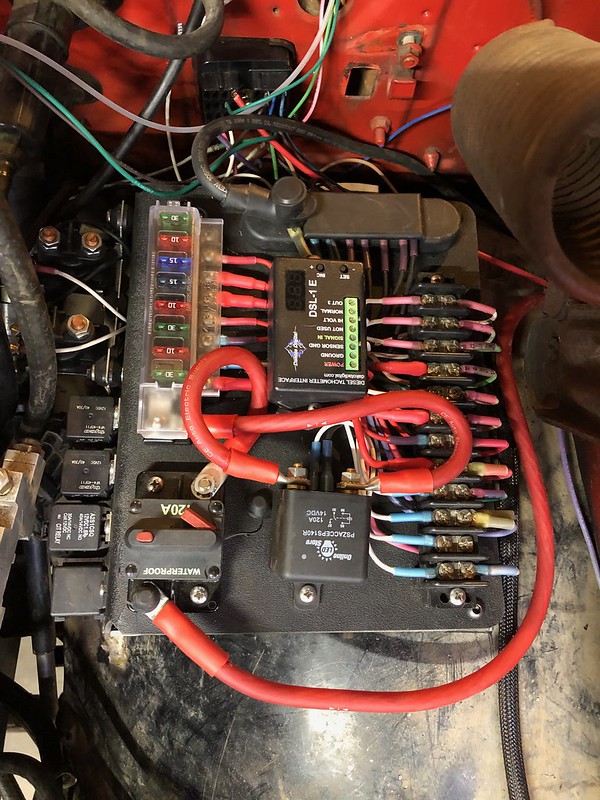 While Im on the topic of mounting the wiring panel, Ill throw in the power distribution block........ 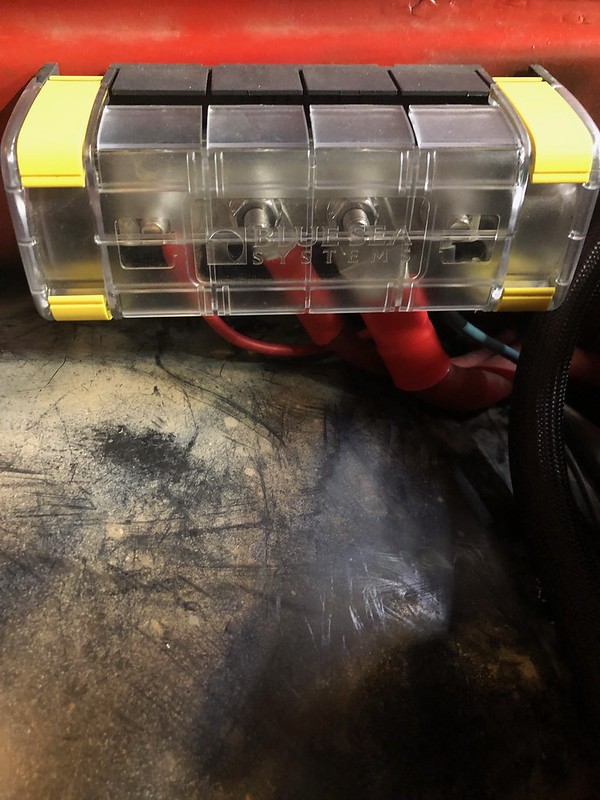 And the battery connections all wrapped up. 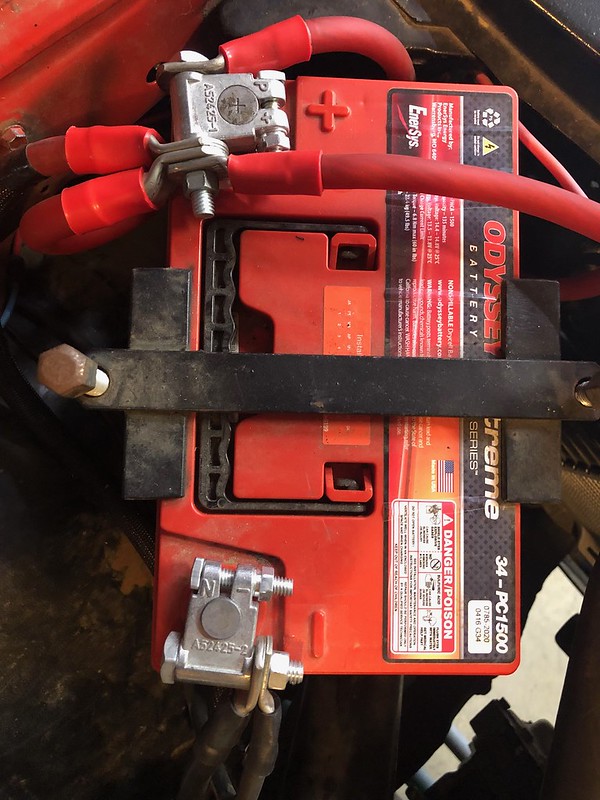 I do still need to figure out what in the system needs protection. My custom panel has a 120A circuit breaker at the main power for the panel. I dont have anything on the charge cable for the alternator to the battery(which I would imagine would be the most important source to protect) or any other cables feeding power to anything else. Ill do some research and try to figure out what power sources Ill need to protect from overloading. Most of the cables are 2 gauge or heavier and Im not sure they even make fusible links big enough for them. I really dont completely understand what to match them to to begin with though. Ive ready a rule of thumb to use is to go two sizes smaller for the fusible link than the cable you are wanting to protect but as I mentioned, Im pretty sure that Ive read that no one makes them bigger than 8 gauge and even they are fairly uncommon? Are Maxi fuses ok to use in place of fusible links? Do I have any other options? |
|
|
|
 |
| Bookmarks |
| Thread Tools | |
| Display Modes | |
|
|


 Linear Mode

