
 |
|
|
#876 |
|
Registered User
Join Date: Jul 2013
Location: albemarle, nc
Posts: 42
|
Re: Markeb01 Build Thread
so i was refered to your thread when looking for info on blitz black. ive gotta say, very good read. all 35 pages.
thank you, and others, for your service. I greatly appreciate the jobs you chose to do. on the blitz black, how has it held up over time? im looking at using it on a daily driven truck. sun, snow, hot, cold, salt, rain. never gets parked inside, to be honest. im wondering how its held up over the long run, if theres been any chalking, flaking, wearing through, etc. how does it hold up to gravel, scratches, etc? what have you done to maintain it? im looking for a long term, honest review of the stuff. most guys that ive found just talk about how cool it looks and how cheap it is. thanks again for the informative, quality read. Michael |
|
|

|
|
|
#877 |
|
Senior Enthusiast
Join Date: Feb 2007
Location: Spokane Valley, WA
Posts: 8,356
|
Re: Markeb01 Build Thread
Hi Michael, thanks for the compliments and for joining the forum. I am also a member of the Hotrodders forum and was notified of your question by Lakeroadster, so I will duplicate my answer there for other members that donít visit this site. Let me try to directly answer your questions up front so the information youíre looking for doesnít get lost in the text.
Apologies for the length of this reply, but I donít have a quicker way to fully answer your questions. My truck continues to look almost exactly as it did the day it was painted. I am unaware of any fading, and there is no chalking. Iím retired now so I donít drive as much, but the truck gets driven all year. It has suffered bird poop in 100+ degree temperatures, and been driven in the snow at temps well below freezing on roads that are covered in mag chloride. It is exposed to gravel roads on a daily basis, and is rarely washed except in preparation for a car show. The Blitz Black has never shown a rock chip, which amazes me compared to the gloss black lacquer that previously covered the truck. By the time I was ready to paint the truck with Blitz Black, the leading edge of both front fenders had lost about 70% of the paint (gloss black lacquer) due to rock chips. We have a partial gravel driveway, and up until a year or so ago the road in front of our house was gravel. Rather than paint chips the front of the truck is covered in bug guts because I havenít washed it since before our last car show several weeks ago. Compared to your environment however, my truck is garage kept. I truthfully donít know how this paint would hold up to extreme elements. Compared to other vehicles Iíve seen painted in Blitz Black, I believe mine might look nicer and hold up better because I apply the paint the same as a quality paint job. Prep is the same as for any other top notch paint job, and I always use the correct temp Acrylic Enamel Reducer for the time Iím painting. I never use mineral spirits or acetone as recommended by most enamel paint producers. They both dry too fast and make it very difficult to produce the desired sheen on the first pass. On the day of the shoot I mixed 7 different test blends of paint and reducers until I finally shot the one I was after. Then I mixed enough paint to do the whole job from the one batch so everything would match. Blitz Black is impervious to just about anything. Almost nothing sticks to it. It can be scratched, but not easily compared to other paints. I recently created a scratch on the left front fender with a wrench. Amazingly though, Iíve rubbed jeans, buckles, and jacket zippers against it which have never left a mark. For paint maintenance I have done absolutely nothing. It has never been waxed or preserved in any way, and rarely gets washed except when weíre participating in a car show. Most of the time itís dirty as we have a big field in front of our house and have old garage doors that donít keep the dirt out very well. When it does get washed I use Meguiars car soap, and for bird droppings I use Windex. Just a quick spray and a wipe with a wet rag removes all traces of the insult. Bird crap on the lacquer always etched the paint, no matter how fast it was cleaned off. Iíve heard of other guys using nothing but Windex to wash the whole paint job. Seems a bit tedious to me, but Iíve washed an entire door or fender with Windex leaving no marks or streaks of any kind. I donít want to give the impression Iím a fanatic about this miracle paint. It is what it is, a cheap synthetic enamel that offers great coverage, cheap cost, durability and excellent rust prevention. It can also provide an incredibly appealing cosmetic finish if applied correctly. The downside being mistakes or injuries canít be rubbed out, and spot repairs are not easy unless you want a splotchy looking finish. Iíve read dozens of paint forum threads indicating inexpensive paints are a horrible waste of labor and they wonít last like urethanes. My cheap paint job still looks like new after 4 years, and Iíve seen very expensive paint jobs that looked lousy after a few years, so itís a balance between how much is the vehicle worth, how long are you going to own it, and what are your priorities between a $200 paint job and one that might cost $5,000. My favorite car color is high gloss black. Regardless, I was just commenting to my wife this morning I would never go back, even if I could afford it. I have no interest in going back to waxing, polishing, washing, and detailing. I enjoy the freedom of rarely having to attend to the cosmetics of my truck. Itís very liberating. If you are seeking a satin flat finish, I believe Blitz Black is the way to go. If you want an expensive hardened urethane paint job, go with a gloss finish. It will be more attractive and probably last longer. Iíve spoken with many owners that had their cars or trucks painted with expensive flattened paint, and they almost always come out with dry spots, shiny spots, or varying sheen levels. Many did theirs over several times until it came out the way they wanted it (at great expense). For a before and current comparison, this photo was taken within a week or so of painting the truck back in 2009: 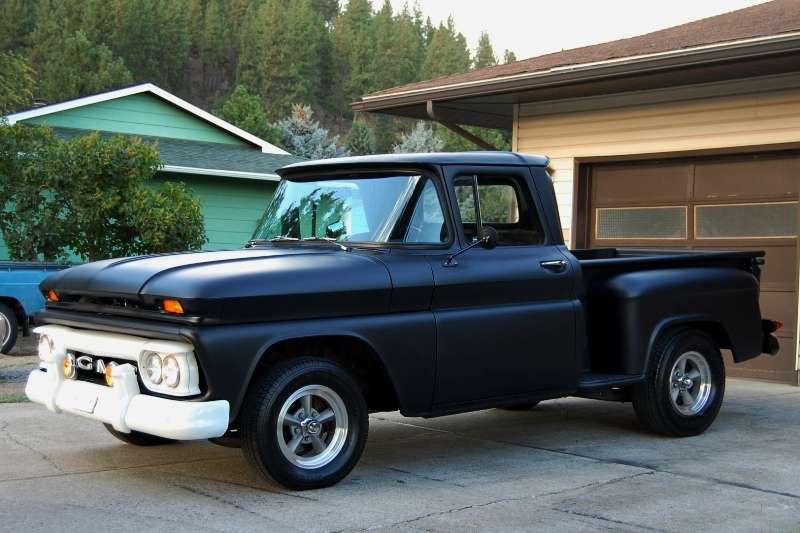 And this is what it looks like today: 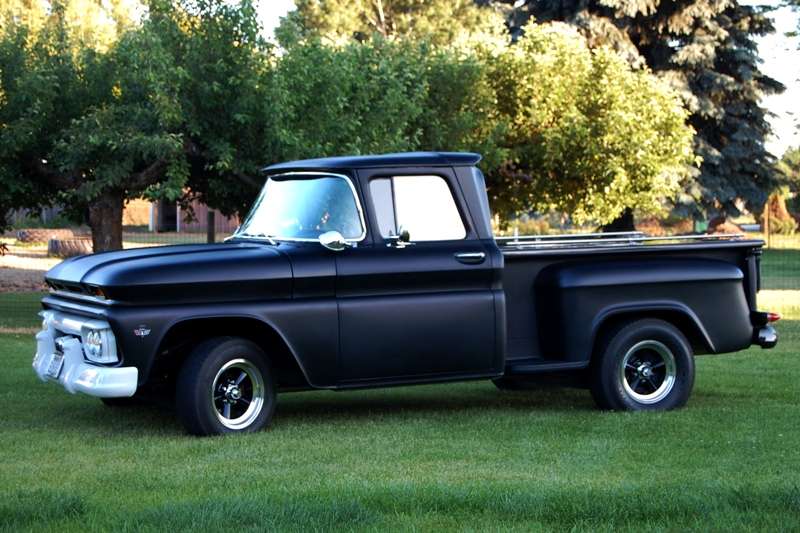 Only two things have been done to the paint since it was first applied. I removed the factory door mirrors and added 1958 Impala mirrors. I reshot the section of the door from the body break below the door handle to just below the window, and from the fender extension to the rear of the door. If you look closely at the second photo you can see the sheen is off by a tad. I should have thinned the paint a bit more and applied thicker coverage to make it match perfectly, but it was close enough to make me happy at the time. I also repainted the tailgate after some rust repairs. Other than that, nothing has been done to the rest of the paint. From an appearance standpoint Iíve had hundreds more compliments on the Blitz Black paint than I ever received when it was gloss black lacquer. I chose this paint for the most common reasons. I had recently lost my job and the paint was dirt cheap (around $200) for the entire paint job. It is also easy to apply, and I didnít have to disassemble the truck to remove all the lacquer. In addition I didnít use hardener so there were no isocyanates to worry about. Thatís about all I can think of at the moment. If I missed something let me know. Good luck on whatever you decide.
__________________
My Build Thread: http://67-72chevytrucks.com/vboard/s...d.php?t=444502 |
|
|

|
|
|
#878 |
|
Senior Enthusiast
Join Date: Feb 2007
Location: Spokane Valley, WA
Posts: 8,356
|
Re: Markeb01 Build Thread
Yesterday my son whipped up a pair of cutout block off plates for me out of 3/16Ē steel. These will stay in the glove box in case the cutouts ever get stuck open away from home:
 Iím going to paint the outside faces with the same POR-15 exhaust manifold paint I used on the manifolds and coat the inside with WD-40 and carry them in a plastic bag. I donít really want paint on the inner surfaces as it may gunk up my copper gaskets if the caps are ever pressed into service.
__________________
My Build Thread: http://67-72chevytrucks.com/vboard/s...d.php?t=444502 |
|
|

|
|
|
#879 |
|
Registered User
Join Date: Apr 2012
Location: Searcy, AR
Posts: 4,203
|
Re: Markeb01 Build Thread
Awesome info and write-up on the Paint, and the cutout plates! As always, I really enjoy seeing updates on your build!
__________________
DON Proverbs 27:17  US Air Force Retarded errr Retired My '65 Stepper Build:http://67-72chevytrucks.com/vboard/s...d.php?t=533920 My '60 Rusty Patina Build:http://67-72chevytrucks.com/vboard/s...66#post7402266 My '72 http://67-72chevytrucks.com/vboard/s...59#post7204359 SOLD |
|
|

|
|
|
#880 |
|
Registered User
Join Date: Jul 2013
Location: albemarle, nc
Posts: 42
|
Re: Markeb01 Build Thread
thank you so much. I really appreciate it. blitz black is one of the frontronners in my head for final paint on my ol truck.
thanks soooo much. Michael |
|
|

|
|
|
#881 |
|
Old and crusty
 Join Date: Jan 2009
Location: Surprise, AZ
Posts: 462
|
Re: Markeb01 Build Thread
Mark,
Great write up as usual and the truck is looking fine. Dumb question: Is this Blitz paint only available in black?
__________________
65 Chevy long wide daily driver - SOLD! 64 Chevy Short Step LS |
|
|

|
|
|
#882 |
|
Senior Enthusiast
Join Date: Feb 2007
Location: Spokane Valley, WA
Posts: 8,356
|
Re: Markeb01 Build Thread
As far as I know the John Deere line offers a wide range of colors. Let's see there's gloss yellow, green, black, and Blitz Black!
 I think black is the only color in they're lineup with the name Blitz in it, and the only flat/satin colored paint they offer. I think black is the only color in they're lineup with the name Blitz in it, and the only flat/satin colored paint they offer.Their paint is produced by Valspar, and I would imagine Valspar offers a lot more colors in their product line. From my experience however the JD Blitz Black must be a unique formulation as it doesn't seem to be identical to anything in the Valspar line.
__________________
My Build Thread: http://67-72chevytrucks.com/vboard/s...d.php?t=444502 |
|
|

|
|
|
#883 |
|
Old and crusty
 Join Date: Jan 2009
Location: Surprise, AZ
Posts: 462
|
Re: Markeb01 Build Thread
That's too bad. That would really be a nice product line in automotive colors.
How is the Raptor (I think that's what you used) holding inside your inner fenders?
__________________
65 Chevy long wide daily driver - SOLD! 64 Chevy Short Step LS |
|
|

|
|
|
#884 |
|
Senior Enthusiast
Join Date: Feb 2007
Location: Spokane Valley, WA
Posts: 8,356
|
Re: Markeb01 Build Thread
It looks just like it did when I sprayed it on. The stuff is really durable. I use what's left of the inner fenders for holding wrenches when I'm working on the engine, and there isn't a mark on it. For cleaning, once a season I go to the coin operated car wash and hose off the lower part of the firewall behind the tires, and it returns to like new appearance.
I wish it was around when I put my truck together. I would have coated inside the cab and inside the doors with it. Maybe I shouldn't have used up my last bottle, but I recently built a ramp for my wife's garden shed and sprayed the ramp face with it. Water just beads up and runs off, and it's never slipperly whether wet or dry. I'll probably buy another kit just to have around once I come up with a need for it.
__________________
My Build Thread: http://67-72chevytrucks.com/vboard/s...d.php?t=444502 |
|
|

|
|
|
#885 |
|
Senior Enthusiast
Join Date: Feb 2007
Location: Spokane Valley, WA
Posts: 8,356
|
Re: Markeb01 Build Thread
Painted the cutout covers this morning:
 Good thing I read the instructions. I was going to cook them under the heat lamps, when I read to leave them alone for 24 hours before exposing to high heat cycle. So theyíll be sitting on the bench until tomorrow, when theyíll be brought up to full operating temp by the lamps. According to instructions that removes any brush strokes. Cosmetically, Iíd love to pull the electric cutouts and replace them with these caps. The sneaker plugs look classically cool with just the covers, while the electric cutouts do not. Itís not going to happen however, since the electric cutouts are just too much fun. And opposed to California where itís illegal to even have cutouts on your car or truck, in Washington State itís legal to have them installed. Itís only illegal to use them on a highway. ďno person shall use a muffler cut-out, bypass, or similar device upon a motor vehicle on a highwayĒ. (RCW 46.67.390).
__________________
My Build Thread: http://67-72chevytrucks.com/vboard/s...d.php?t=444502 |
|
|

|
|
|
#886 |
|
Senior Member
 Join Date: Mar 2011
Location: Tucson, Arizona
Posts: 2,063
|
Re: Markeb01 Build Thread
I have planned on using the Raptor since I first heard all your great comments about the stuff and since you just mentioned it again I thought I'd chime in and say that I've got a kit ordered right now to do the bottom of my cab and I think I've made the right choice. Thanks again for all the great info you provide to everyone on here.

__________________
Sanity'66 http://67-72chevytrucks.com/vboard/s...d.php?t=515110 Long bed, Fleetside, Small back window I've Done So Much, With So Little, For So Long, That Now I Can Do Anything With Nothing. 
|
|
|

|
|
|
#887 |
|
Registered User
Join Date: Sep 2012
Location: Leander, TX
Posts: 969
|
Re: Markeb01 Build Thread
Great writeup on your paint. I hope my paint turns out half as good as yours. I bought it from TCP Global the Hot Rodz Flatz Black, White and California Suede for the interior. I seen the paint in person on another members truck and really liked it. I don't think it has as much sheen as yours does. More of an eggshell finish.
Bret
__________________
64' Build Thread http://67-72chevytrucks.com/vboard/s...d.php?t=586955 |
|
|

|
|
|
#888 | |
|
Old and crusty
 Join Date: Jan 2009
Location: Surprise, AZ
Posts: 462
|
Re: Markeb01 Build Thread
Quote:
__________________
65 Chevy long wide daily driver - SOLD! 64 Chevy Short Step LS |
|
|
|

|
|
|
#889 |
|
Senior Member
 Join Date: Aug 2012
Location: Somewhere In So. IL.
Posts: 398
|
Re: Markeb01 Build Thread
Mark, I recently attended a car show and there was a truck there ironically very similar to yours. Being in Illinois, I know it wasn't you. He stated his was painted in the JD Blitz Black also but his was a flatter, duller, almost chalky looking black. I'd call it closer to flat black rather than your satin sheen. Any ideas on what the difference is as I'd also like to paint mine this same color and I want it more satin like yours. Enlighten me on what he did differently so I don't make the same mistake as he did.
Doug |
|
|

|
|
|
#890 | |
|
Senior Enthusiast
Join Date: Feb 2007
Location: Spokane Valley, WA
Posts: 8,356
|
Re: Markeb01 Build Thread
Thanks guys for all the responses.
Quote:
Back when all my paint jobs were high gloss, one of my tricks was to use the slowest thinner I could get away with, without causing runs. I discovered giving the paint a chance to flow out made a world of difference in how glossy it turned out. The same rules apply with flat/semi-gloss paints. Several of my test batches/shots were so slow the paint came out nearly a full gloss finish. And not the attractive kind, more like a really terrible paint job done by someone that has no idea what they're doing.
__________________
My Build Thread: http://67-72chevytrucks.com/vboard/s...d.php?t=444502 |
|
|
|

|
|
|
#891 |
|
Senior Member
 Join Date: Aug 2012
Location: Somewhere In So. IL.
Posts: 398
|
Re: Markeb01 Build Thread
Thanks for the info Mark! I'm wondering, did you use the hardener in yours? I think you said somewhere that the hardener might react to laquer and your truck had laquer beforehand so I'm thinking you didn't.
Did you just scuff your old paint and go directly to the Blitz Black? As far as I'm concerned, your truck sets the standard for the satin black ... 
|
|
|

|
|
|
#892 |
|
Senior Enthusiast
Join Date: Feb 2007
Location: Spokane Valley, WA
Posts: 8,356
|
Re: Markeb01 Build Thread
No I didnít use hardener with the Blitz Black. The same as with automotive quality acrylic enamel, the catalyst causes the paint to cure by chemical reaction. This causes heat which can liquefy the lacquer. Iíve read on the painting forums that in severe cases the new paint can end up on the floor because the lacquer underneath just slid off the metal.
Regular enamel is an air dry product which is why it can be applied over just about anything Ė no chemical reaction. The other reason I donít use catalyst is because at this point in my life I donít want to invest in a full breathing system like Hobbyair, and I no longer spray anything with isocyanates in it. All of the urethanes and all of the hardeners have isocyanates. Even POR-15 has isoís, but as long as it is brushed on a respirator is safe enough. 25 years ago I sprayed catalyzed acrylic enamel wearing a respirator and bunny suit. At the time I didnít have any facial hair and felt this was sufficient. Since then Iíve learned that beyond the danger of ingesting isocyanate fumes, it is also absorbed through the skin and even the eyes. Iíve had a full beard for 20 years, so without full breathing gear including a full face mask Iíll never spray it again. If need be Iíd prefer to outlast my paint job rather than the other way around! And yes I sprayed directly over the sanded lacquer since it was old and completely cured. The only places that received primer were the areas with extensive rock chips (lacquer chips easily). Blitz Black is a nice heavy paint that covers completely. I had no issues with bleed through, even over that ugly yellow primer color. And thanks for the compliment. Considering it is just a cheap home garage paint job Iím very pleased with it. For a year or more before I decided to paint it, I spoke with every person I encountered with a flat/satin black car or truck. As best I remember I only met one guy with a Willys race truck that I thought looked better than mine turned out, and it required 6 or 7 complete repaints to get the sheen to match overall. His was flattened urethane and very striking. What I liked most was his turned out much blacker than mine. Every other one I saw had rough patches, shiny spots, a faded gray color and other problems. One had an unusual finish that literally looked like a very gritty eggshell. It looked decent from a distance, because it was at least the same color and finish overall. The main thing for me was to prep the truck and apply the paint as if it was the best paint job I had ever done, using the most expensive materials. It seems many that do paint jobs with cheap paint, expect it to come out looking that way so they donít put in the necessary effort to have it come out nice.
__________________
My Build Thread: http://67-72chevytrucks.com/vboard/s...d.php?t=444502 |
|
|

|
|
|
#893 | |
|
Senior Member
 Join Date: Aug 2012
Location: Somewhere In So. IL.
Posts: 398
|
Re: Markeb01 Build Thread
Quote:
Thanks for the guidance, Mark. I have a friend who does paint jobs for another friend (restoring older John Deere tractors ... LoL) so I've got that covered ... and an expensive (costing) paint job is out of my budget. That doesn't mean it has to look cheap ... |
|
|
|

|
|
|
#894 |
|
Senior Enthusiast
Join Date: Feb 2007
Location: Spokane Valley, WA
Posts: 8,356
|
Re: Markeb01 Build Thread
Yesterday I installed the replacement pulse generator for the cruise control. A 20 mile trip confirmed it again works just fine. Since the truck was already up in the air I gave the chrome rear end cover (Dana 44) a wash job and polished it up. Unfortunately I put the car back on the ground before I thought about taking pictures of how much neater the cruise drive mechanism looks, so no update photos until the next time I have a need to jack it up.
Back in 2011 I tired of the Hurst shifter handles as mine were either too long, too short, or ended up in the wrong place. I went with the short handle for a while, but it was uncomfortable (too short) and always put the boot in a bind: 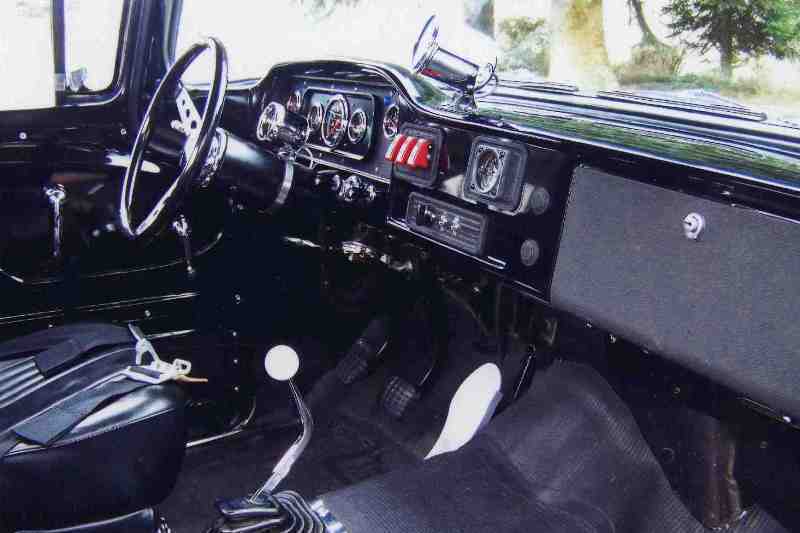 So I had my son whip up a couple of straight sticks out aluminum (different lengths) while I fabricated an adapter plate that positioned the knob exactly where I wanted it. Hereís the adapter in place: 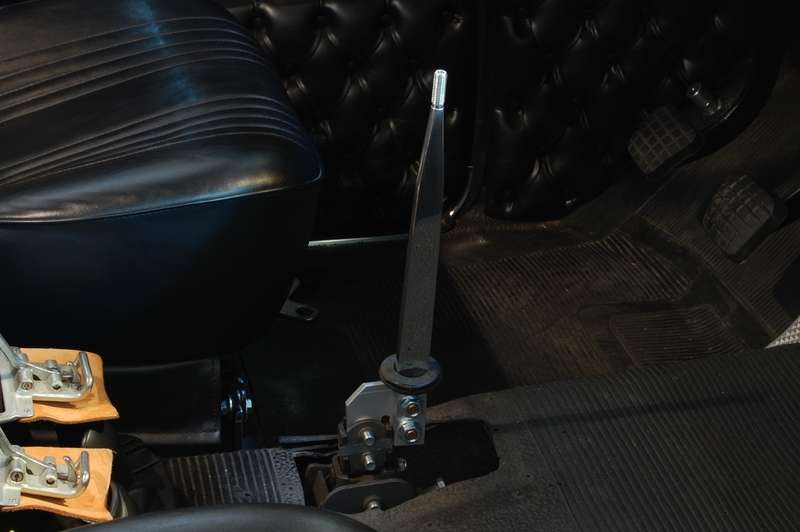 And here it is buttoned up under the boot (with the chrome top plate missing): 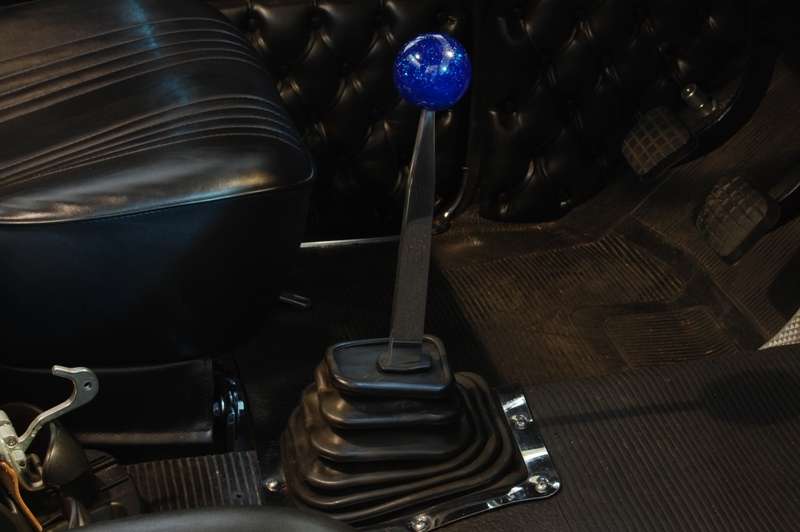 This arrangement has worked flawlessly, but cosmetically Iíve always preferred the Hurst handle. So Iíve switched back to the Hurst handle several times:  And each time I get tired of the position of the knob very quickly: Iíve reinstalled the chrome plate several times, and always end up pulling it off as it constantly pops loose in one spot or another and soon half the plate is sitting on top of the boot looking stupid. Regardless, Iíve never given up on having the chrome plate and a Hurst handle. In trying to find a solution and in having had good luck with several ďSpectreĒ products, about a year ago I ordered one of their large shift boots as it looked exactly like a Hurst Super Boot. It was a major disappointment, sharing none of the dimensions of the Hurst boot. It was also so stiff I wouldnít have been able to shift the transmission. Never giving up, more recently I bought an NOS Mr. Gasket super boot off Ebay for $8.00 including shipping. Dimensionally it is identical to the version with the Hurst logo. I found two details particularly interesting. Itís 100% more flexible than a brand new Hurst boot. The blank chrome plate that goes on top is one quarter inch smaller in both directions (1/8Ē all around the perimeter) than the plate that goes in the Hurst boot. Seeing this, I quickly installed the Hurst plate in the Mr. Gasket boot and found it a perfect snug fit. This should eliminate the popping out problem. And the rubber is so much more flexible it should eliminate the tearing common to Hurst boots. So I fixed the boot problem, but I still wanted the Hurst handle. So I went back to studying my adapter plate and realized I could simply make a taller version: The new adapter is on the left, the original is on the right. Neither one is pretty, but they work perfectly: 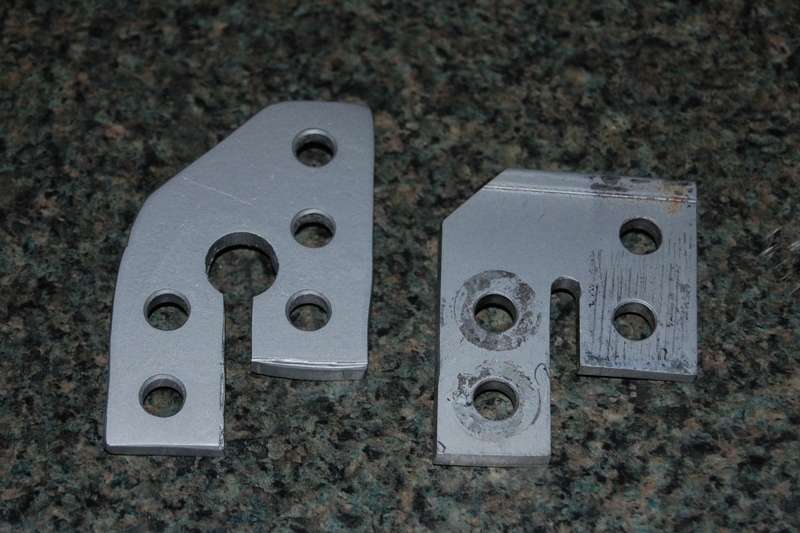 I also built some angle into the 3 mounting holes on the right side of the plate (only two of which are used). The lower two holes lean the stick forward, the upper two holes mount the stick straight up. This provides a variety of future mounting options if I get bored again! Hereís the new adapter mounting the Hurst handle. This only raises the stick/knob 7/8Ē, but it makes a big difference in comfort: 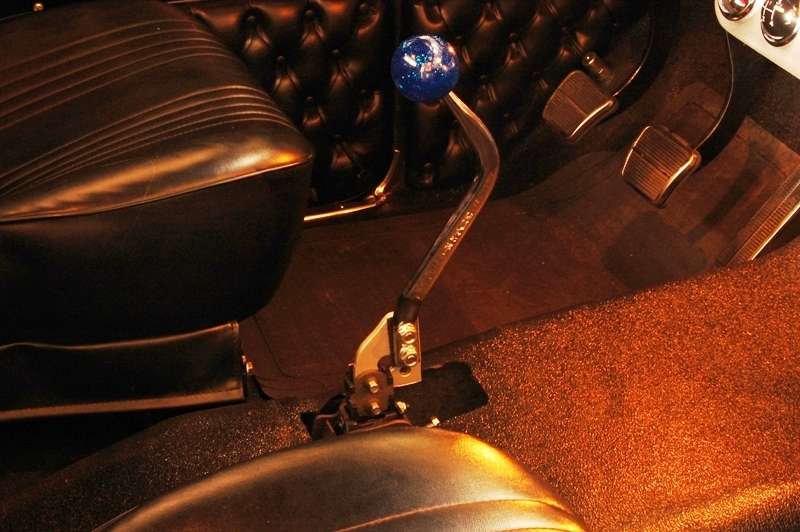 And hereís the whole thing completely assembled with the Hurst handle, Hurst plate, and Mr. Gasket boot. With the new adapter, the shift knob is in same place as it was with the straight aluminum stick:  I failed to overlay the two plates and take a photo. The best I could do was show the blank plate on top of the boot. Itís too small even for the Mr. Gasket boot and would be popping out immediately: 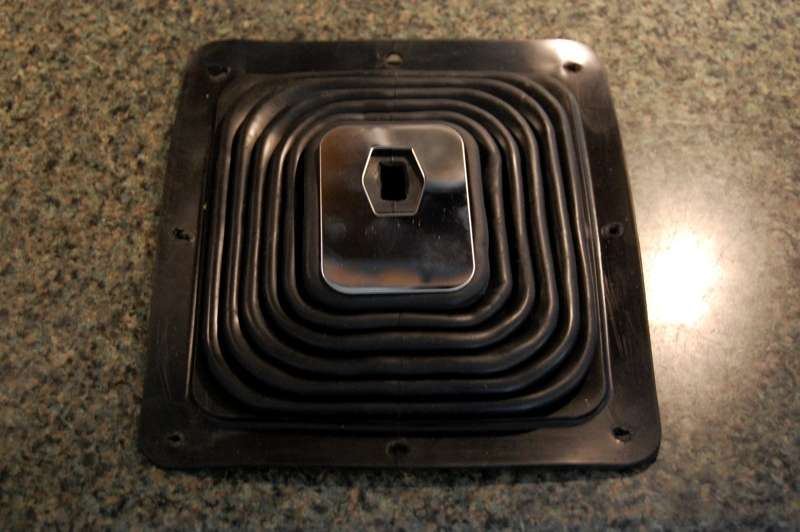 And the Mr. Gasket boot with Hurst plate installed. The plate is much tighter in this boot than it ever was in the Hurst boot: 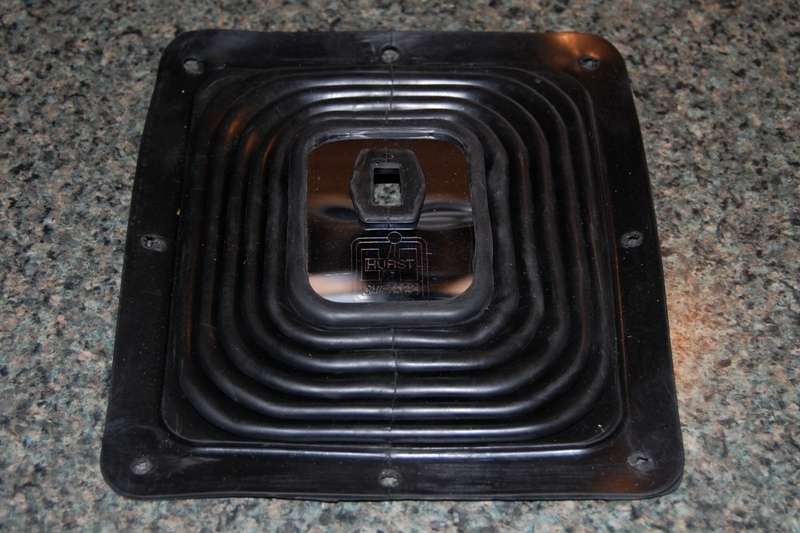 Not sure what Iíll be on to next, but with too much time on my hands Iím sure Iíll think of something! 
__________________
My Build Thread: http://67-72chevytrucks.com/vboard/s...d.php?t=444502 |
|
|

|
|
|
#895 |
|
Registered User
Join Date: Apr 2012
Location: Searcy, AR
Posts: 4,203
|
Re: Markeb01 Build Thread
Great information on the shifters and adapters! Looking forward to a video of you enjoying the cut outs... Love how clean your interior is... Function and form come to mind!
Posted via Mobile Device
__________________
DON Proverbs 27:17  US Air Force Retarded errr Retired My '65 Stepper Build:http://67-72chevytrucks.com/vboard/s...d.php?t=533920 My '60 Rusty Patina Build:http://67-72chevytrucks.com/vboard/s...66#post7402266 My '72 http://67-72chevytrucks.com/vboard/s...59#post7204359 SOLD |
|
|

|
|
|
#896 | |
|
Senior Enthusiast
Join Date: Feb 2007
Location: Spokane Valley, WA
Posts: 8,356
|
Re: Markeb01 Build Thread
Quote:
Today I took a step backward, and returned the gauge layout to the previous rev. A while back I installed an electric fuel pump to assist in engine starting when the truck had sat idle for long enough periods to evaporate all the fuel in the carburetor. As part of that project I thought it would be cool to have a fuel pressure gauge in the cab. Unfortunately Autometer doesnít make an electric version in the style of gauges I use, so I had to settle for a mechanical gauge with an isolator. Long story short it never worked out as hoped. Readings were all over the map and never matched the mechanical gauge on the fuel pressure regulator so the fuel pressure gauge was abandoned. Today I pulled the gauge and the shift knob I installed to assist my wife in finding reverse (she doesnít drive the truck very often) from the under dash gauge panel. In their place I relocated the fuel level and brake booster vacuum gauge. Itís now back to looking like this again, and Iím reasonably certain at this point Iím not making any more gauge changes in the future. Itís too hard on my back!  I also discovered that EPCO is the manufacturer of my blue metalflake shift ball, so Iíve ordered a new one engraved with the 4 speed pattern. That will be going on as soon as it arrives. Iím trying to get everything corrected to the most attractive level I can achieve, so all I have to do to attend an event from now on is just wash it up.
__________________
My Build Thread: http://67-72chevytrucks.com/vboard/s...d.php?t=444502 |
|
|
|

|
|
|
#897 |
|
Old and crusty
 Join Date: Jan 2009
Location: Surprise, AZ
Posts: 462
|
Re: Markeb01 Build Thread
Very nice, Mark. Which shows are you attending in August?
__________________
65 Chevy long wide daily driver - SOLD! 64 Chevy Short Step LS |
|
|

|
|
|
#898 |
|
Registered User
Join Date: Apr 2012
Location: Searcy, AR
Posts: 4,203
|
Re: Markeb01 Build Thread
Thanks for the heads up on EPCO... Now I have their site bookmarked, now it's decisions, decisions...
__________________
DON Proverbs 27:17  US Air Force Retarded errr Retired My '65 Stepper Build:http://67-72chevytrucks.com/vboard/s...d.php?t=533920 My '60 Rusty Patina Build:http://67-72chevytrucks.com/vboard/s...66#post7402266 My '72 http://67-72chevytrucks.com/vboard/s...59#post7204359 SOLD |
|
|

|
|
|
#899 |
|
Senior Enthusiast
Join Date: Feb 2007
Location: Spokane Valley, WA
Posts: 8,356
|
Re: Markeb01 Build Thread
There's a Camaro sponsored open show on the 10th at Mirabeau Park here in the Valley, and the next weekend is Goodguys at the fairgrounds in Spokane. If everything works out we're also planning on attending Bob's car show in Newport on Monday, September 2nd (Labor Day).
__________________
My Build Thread: http://67-72chevytrucks.com/vboard/s...d.php?t=444502 |
|
|

|
|
|
#900 | |
|
Senior Enthusiast
Join Date: Feb 2007
Location: Spokane Valley, WA
Posts: 8,356
|
Re: Markeb01 Build Thread
Quote:
Epco also makes billiard balls and bowling balls, so they are experienced with size, roundness, weight, and balance.
__________________
My Build Thread: http://67-72chevytrucks.com/vboard/s...d.php?t=444502 |
|
|
|

|
 |
| Bookmarks |
|
|