
|
 04-05-2014, 10:13 AM
|
#1376 |
|
Registered User
Join Date: Apr 2011
Location: .
Posts: 3,104
|
Re: Markeb01 Build Thread
That new column will definitely be a cleaner look. Probably feel smoother while cruizin' too.
|

|

|
|
04-06-2014, 01:37 AM
|
#1377 |
|
Senior Enthusiast
Join Date: Feb 2007
Location: Spokane Valley, WA
Posts: 8,356
|
Re: Markeb01 Build Thread
Ive disliked the old column for many years. Once I finally set a theme for the truck it looked big and clunky and I almost never used the tilt except when I was working under the dash. With a three bolt wheel, its so easy to remove I started doing that instead of tilting the column!
The other thing that has bothered me is that factory U-joint/coupler. With the column in its original location, that coupler always had the infamous GM clunk in it. When I trimmed the top of the lower column housing and moved the column closer to the dash, the clunk went away because the joint was riding higher in the housing. I have worried about how safe this is ever since I built the truck, but obviously not enough to replace the joint with a real one from Borgeson. Now everything will be new so Im assuming it really will be smoother steering. And of course the chrome housing helps with that too!  Today was marginally productive. I masked off the column with blue tape and test fit it in the truck (sorry forgot to take pictures). With the intermediate shaft 7/16 too long, and the U-joint resting on top of the tip, the top of the column jacket is exactly 1 closer to the dash than the old column. With the steering wheel adapter being ¼ taller, and the dish of the new wheel being ¾ deeper than the Covico wheel, the rim of the steering wheel will end up in exactly the same location it was before. So I pulled the column, trimmed 7/16 off the shaft, slid it into the U-joint and marked the set screw centers per instructions. These were then given a shallow 1/8 pilot hole followed up with a ¼ dimple. The end of the shaft was touched up with paint and cooked under the lamps to cure. Once the paint was dry it was bolted up to the flex coupler on the steering box:   In this last picture the shaft is resting on a shop magnet to hold it in alignment with the column position. While the column was in place I also checked the routing of the wiring harness, and discovered it will be easiest to snap the model P connector together before the column is bolted in place. Ill route the rest of the harness and hook it up to the main wiring connector behind the speedo before reinstalling the cluster panel. Should I ever need to pull the column in the future, I will no longer need to remove the instrument cluster, Ill just disconnect the wiring from the column at the lower P connector. Once I had no more physical items to work on I called Mooneyes to determine when my new steering wheel is due to arrive, which turned out to be a good thing. They show the wheel shipped Thursday, but have no idea where it was sent. So they processed a new shipment which left today (Saturday) and is due to arrive Monday. I certainly cant complain about their customer service! Now its a waiting game for when the firewall seal will show up. Ive received two order confirmations, but no shipping info yet. I dont imagine Ill see any updates until Monday, which explains how I found the time to hang all the stuff on the new pegboard in my wifes sewing room! Im tempted to take tomorrow off, but Im sure I can find something to tinker with!
__________________
My Build Thread: http://67-72chevytrucks.com/vboard/s...d.php?t=444502 |
|
|
|
|
04-06-2014, 04:01 PM
|
#1378 |
|
Post Whore
 Join Date: Mar 2013
Location: Southern Oregon
Posts: 10,384
|
Re: Markeb01 Build Thread
The new column looks killer!

__________________
1966 Chevy C10 "Project Two Tone" http://67-72chevytrucks.com/vboard/s...d.php?t=596643 1964 GMC "Crustine" semi-build:http://67-72chevytrucks.com/vboard/s...d.php?t=665056 My youtube channel. Username "Military Chevy": https://www.youtube.com/channel/UC_h...fzpcUXyK_5-uiw |
|
|
|
|
04-06-2014, 08:34 PM
|
#1379 |
|
Senior Enthusiast
Join Date: Feb 2007
Location: Spokane Valley, WA
Posts: 8,356
|
Re: Markeb01 Build Thread
Since Im taking a forced break from the truck waiting for parts, I thought Id share some of the stuff I do that keeps my wife happy with all my truck projects. As of this morning we had the ugly old fan shown in this first photo hanging in our living room. I use the lights, but have only run the fan maybe 3-4 times in 10 years:
 Last night my wife was once again lamenting the corner is so dark nobody can really enjoy the detail in the stagecoach robbery painting. And since we relocated the Franklin Mint Stagecoach to the top of the clock, it doesnt show up well either. Long story short as of this morning, the fan is gone and replaced with flexible track lighting from Home Depot:  And a couple of nights ago I installed two more plastic pegboard panels (the darker two on the left) in her sewing room. Yesterday afternoon I got the bug and started organizing and hanging her stuff with measuring tools on the left, tape items in the middle, and tools on the right. She changed it around about 10% to suit her tastes and that project was done.  Since the sewing room is in the basement Ive previously installed tons of lighting and clear totes on storage racks so she can easily find anything she wants:  And heres the aluminum windmill we put up the other day. It works really nice and since we live in a windy area, we refer to it numerous times a day to see what the conditions are like:  This close up shows the little red barn bird feeder she picked up the other day. It was all red with a black roof, so I painted the white details on the ends so it would more closely look like the barn/shed I had built for her last year.  Nothing truck related today, but well see what tomorrow brings.
__________________
My Build Thread: http://67-72chevytrucks.com/vboard/s...d.php?t=444502 |
|
|
|
|
04-06-2014, 09:03 PM
|
#1380 |
|
Rollin' Old Skool
Join Date: Jun 2007
Location: Hattiesburg, MS
Posts: 5,371
|
Re: Markeb01 Build Thread
Looks like a great place to call home. Love seeing your organizational skills. Your under-dash components cleaned up nicely & are much more attractive now. I look forward to seeing that shiny new column bolted in place. I apologize, but I couldn't help but laugh when I saw the pic of your steering shaft in the engine compartment. I said to myself, the next project will be cleaning/painting the front frame rails.
__________________
_____________________________________________ Phillip My Build threads: 1966 Chevy C-10 "Black Betty" shortbed, fleetside, BBW, 327 V8/ Powerglide (under construction) http://67-72chevytrucks.com/vboard/s...ighlight=betty 1997 Chevy Tahoe, 2dr/2wd, mild custom (Daily driver) http://67-72chevytrucks.com/vboard/s...d.php?t=601142 Pics: '66 C-10 https://flic.kr/s/aHsjHWD4h9 '97 Tahoe https://flic.kr/s/aHsjGZ7wKP '93 C-1500 https://flic.kr/s/aHskxdpdnQ '88 S-10 Blazer https://flic.kr/s/aHsjYGx4Md Previous Rides: 1993 Chevy S-10 ext. cab, 4.3L, 4/5 drop (Sold) 1993 Chevy C-1500 short/step Retro-Rod (Sold) 1988 S-10 Blazer 2dr/2wd mild custom (Sold) |
|
|
|
|
04-06-2014, 10:39 PM
|
#1381 |
|
Senior Enthusiast
Join Date: Feb 2007
Location: Spokane Valley, WA
Posts: 8,356
|
Re: Markeb01 Build Thread
No offense taken. Now you know why I hardly ever publish flash photos under the hood. The front of my frame/suspension looks terrible, and really deserves some attention. For that matter the whole chassis does. Unfortunately I have this defect in my brain that allows me to squander tons of money and time on something Im enthusiastic about, while at the same time completely ignoring something else Ive already taken care of and am no longer interested in. The chassis falls into that category.
Im more likely to invest in chrome side glass frames and chrome vent windows than refurbishing the chassis again. Years ago I stripped everything forward of the firewall and painted it all gloss black. Same thing with the front suspension when it was swapped. Later I stripped the frame as best I could and my wife painted it all with POR-15. But 9 winters living in North Idaho and 20+ years on the road really took a toll and now the whole thing looks like crap and needs to be done over. The easy feature is if I just leave the hood down, I dont have to look at it! Disappointingly, much of the front end shows beyond the front tires so I may someday do a pressure wash and spray can upgrade, but Im just getting too old to tear it all apart again to do it right. So the truck will most likely become a closed hood hot rod in the future, and Ill continue to concentrate on the stuff I look at every time I drive it!
__________________
My Build Thread: http://67-72chevytrucks.com/vboard/s...d.php?t=444502 |
|
|
|
|
04-07-2014, 01:15 AM
|
#1382 |
|
Rollin' Old Skool
Join Date: Jun 2007
Location: Hattiesburg, MS
Posts: 5,371
|
Re: Markeb01 Build Thread
Yeah, a simple pressure wash & spray can would do the trick. No need to blow it all apart. It's hard to keep a driver looking good, especially underneath. It's funny how you never really notice those minor imperfections until snapping a close-up photo. Just keep upgrading those things you're enthusiastic about, because they're much more eye-appealing. Some folks keep modifying until it begins to take away from the automobile, but I've yet to see anything you've done that doesn't work. Your truck just keeps getting more unique, & better!
__________________
_____________________________________________ Phillip My Build threads: 1966 Chevy C-10 "Black Betty" shortbed, fleetside, BBW, 327 V8/ Powerglide (under construction) http://67-72chevytrucks.com/vboard/s...ighlight=betty 1997 Chevy Tahoe, 2dr/2wd, mild custom (Daily driver) http://67-72chevytrucks.com/vboard/s...d.php?t=601142 Pics: '66 C-10 https://flic.kr/s/aHsjHWD4h9 '97 Tahoe https://flic.kr/s/aHsjGZ7wKP '93 C-1500 https://flic.kr/s/aHskxdpdnQ '88 S-10 Blazer https://flic.kr/s/aHsjYGx4Md Previous Rides: 1993 Chevy S-10 ext. cab, 4.3L, 4/5 drop (Sold) 1993 Chevy C-1500 short/step Retro-Rod (Sold) 1988 S-10 Blazer 2dr/2wd mild custom (Sold) |
|
|
|
|
04-07-2014, 09:41 PM
|
#1383 |
|
Senior Enthusiast
Join Date: Feb 2007
Location: Spokane Valley, WA
Posts: 8,356
|
Re: Markeb01 Build Thread
I woke up this morning, checked my email and received notification my 2nd order from Chevy Duty was shipped. Having received no notification about the previous order for the firewall to column seal, I assumed it was on back order and decided to make my own.
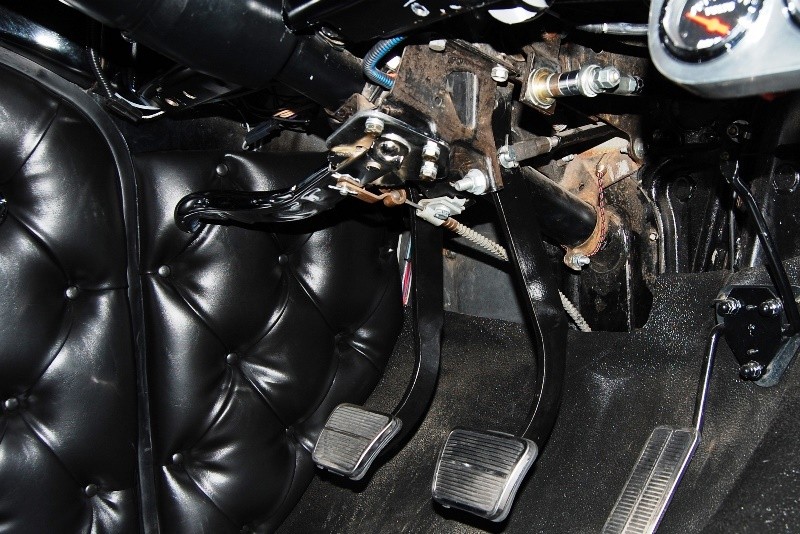
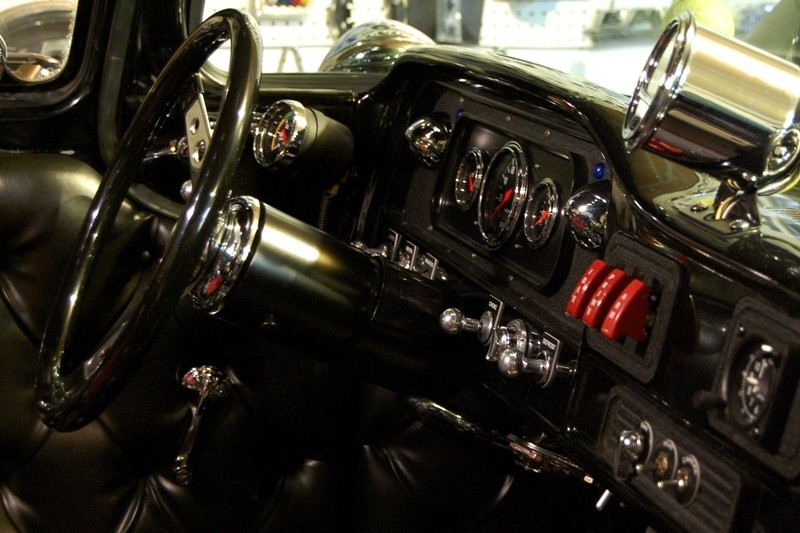
I went through my stash and found some closed cell foam the same thickness, along with some rubberized sheet material which was glued to both sides with 3M spray adhesive. It ended up looking like a brand new version of the original:  Ironically, right after I completed fastening all the attachments for the column, the newly ordered seal unexpectedly arrived in the mail! It worked out well that I made my own. The Chevy Duty piece is missing the lower portion of the seal which wraps under the floor and surrounds the parking brake cable & grommet:  The imprint of the bead surrounding the full seal can be seen in the original above. Im not sure what a person is supposed to use to fill in the missing section. I saw the catalog picture before placing the order, but never having removed the original seal, I had no idea what it supposed to look like. The column installation was uneventful with a few minor exceptions. I needed to remove the U-joint from the column as the set screws stuck out too far out and ran into the column seal. Last night I removed all the blue tape from the chrome as it was beginning to stick, making removal difficult. This morning I retaped it is 6 pieces on the bottom of the column only. This made the tape easier to remove once the column was in the truck. And since the column rested in the lower column support, with a little extra care I didnt really need any protective tape on the top or sides. Heres an under dash shot showing how much cleaner it looks now: 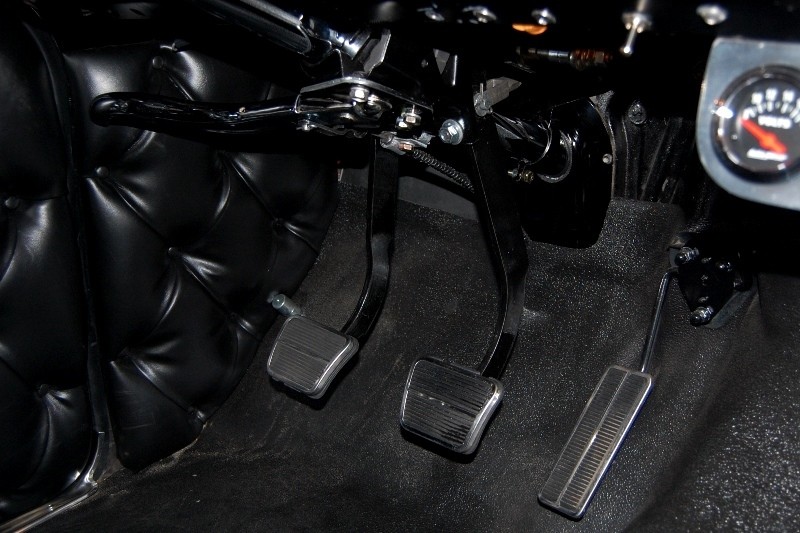 Heres a shot with and without flash attempting to show some of the detail:   And finally here are a couple of shots from the drivers side:   This was shot through the side of the windshield. In spite of the glare, the new column shape shows up pretty well:  There are a few little details to finish up. A tie wrap is needed to the left of the column, a replacement for the missing clutch bumper needs to be inserted, along with a new grommet for the parking brake cable (due to arrive tomorrow along with the new Moon steering wheel). And of course something always needs to be repaired. While checking all the electrical systems I discovered the blinker led stopped working in the 4th porthole on the drivers side. Its a minor fix no matter what the problem. At least the new steering column is in. It works perfectly and Im thrilled with the appearance!
__________________
My Build Thread: http://67-72chevytrucks.com/vboard/s...d.php?t=444502 |
|
|
|
|
04-07-2014, 09:53 PM
|
#1384 |
|
Senior Enthusiast
Join Date: Feb 2007
Location: Spokane Valley, WA
Posts: 8,356
|
Re: Markeb01 Build Thread
One last thought, here are a couple of before and after comparison photos:
__________________
My Build Thread: http://67-72chevytrucks.com/vboard/s...d.php?t=444502 |
|
|
|
|
04-07-2014, 10:55 PM
|
#1385 |
|
Registered User
Join Date: Apr 2011
Location: .
Posts: 3,104
|
Re: Markeb01 Build Thread
That new column is way nicer.
|
|
|
|
|
04-08-2014, 05:23 AM
|
#1386 |
|
Senior Member
Join Date: Mar 2011
Location: Tucson, Arizona
Posts: 2,062
|
Re: Markeb01 Build Thread
Very nice work as usual, Mark. The new column looks much better.
__________________
Sanity'66 http://67-72chevytrucks.com/vboard/s...d.php?t=515110 Long bed, Fleetside, Small back window I've Done So Much, With So Little, For So Long, That Now I Can Do Anything With Nothing.
|
|
|
|
|
04-08-2014, 09:00 AM
|
#1387 |
|
Registered User
Join Date: Jun 2012
Location: Selkirk Ontario Canada
Posts: 1,141
|
Re: Markeb01 Build Thread
that turn out great mark
__________________
My 63 GMC Panel Slow Build http://67-72chevytrucks.com/vboard/s...=1#post5457281 63 
|
|
|
|
|
04-08-2014, 12:12 PM
|
#1388 |
|
Rollin' Old Skool
Join Date: Jun 2007
Location: Hattiesburg, MS
Posts: 5,371
|
Re: Markeb01 Build Thread
Much prettier & cleaner now!

__________________
_____________________________________________ Phillip My Build threads: 1966 Chevy C-10 "Black Betty" shortbed, fleetside, BBW, 327 V8/ Powerglide (under construction) http://67-72chevytrucks.com/vboard/s...ighlight=betty 1997 Chevy Tahoe, 2dr/2wd, mild custom (Daily driver) http://67-72chevytrucks.com/vboard/s...d.php?t=601142 Pics: '66 C-10 https://flic.kr/s/aHsjHWD4h9 '97 Tahoe https://flic.kr/s/aHsjGZ7wKP '93 C-1500 https://flic.kr/s/aHskxdpdnQ '88 S-10 Blazer https://flic.kr/s/aHsjYGx4Md Previous Rides: 1993 Chevy S-10 ext. cab, 4.3L, 4/5 drop (Sold) 1993 Chevy C-1500 short/step Retro-Rod (Sold) 1988 S-10 Blazer 2dr/2wd mild custom (Sold) |
|
|
|
|
04-08-2014, 12:17 PM
|
#1389 |
|
Registered User
Join Date: Apr 2012
Location: Cambridge, Ontario, Canada
Posts: 1,771
|
Re: Markeb01 Build Thread
Looks great Mark, nice work!
__________________
Craigerrr My build thread, CRGRS 66 Winter Build: http://67-72chevytrucks.com/vboard/s...09#post5638709 |
|
|
|
|
04-08-2014, 12:27 PM
|
#1390 |
|
Registered User
Join Date: Apr 2012
Location: Searcy, AR
Posts: 4,203
|
Re: Markeb01 Build Thread
SO CLEAN!!!
Attention to Detail... 
__________________
DON Proverbs 27:17  US Air Force Retarded errr Retired My '65 Stepper Build:http://67-72chevytrucks.com/vboard/s...d.php?t=533920 My '60 Rusty Patina Build:http://67-72chevytrucks.com/vboard/s...66#post7402266 My '72 http://67-72chevytrucks.com/vboard/s...59#post7204359 SOLD |
|
|
|
|
04-08-2014, 05:28 PM
|
#1391 |
|
Senior Enthusiast
Join Date: Feb 2007
Location: Spokane Valley, WA
Posts: 8,356
|
Re: Markeb01 Build Thread
Thanks for the comments guys. In addition to better looks, the steering also feels tighter with the loss of the tilt mechanism and the factory U-joint/coupler hooking up to the intermediate shaft.
Back out in the garage today investigating why the 4th porthole blinker light wasnt working, I discovered the LED in the porthole worked fine. I tracked the problem back to the electronic sequencer. The yellow wire feeding the 4th light was no longer sending a signal. So I pulled it out for return to the manufacturer:  For the time being I hooked all the lights into a single circuit so all 4 blink at once, while the passenger side still sequences. If Im provided with a warranty replacement Ill simply reinstall it. If that doesnt go well Ill pull the other one as well and abandon the sequencers. They were/are fun, but it also looks cool with all four blinking at once.
__________________
My Build Thread: http://67-72chevytrucks.com/vboard/s...d.php?t=444502 |
|
|
|
|
04-08-2014, 07:44 PM
|
#1392 |
|
Senior Enthusiast
Join Date: Feb 2007
Location: Spokane Valley, WA
Posts: 8,356
|
Re: Markeb01 Build Thread
The new Moon steering wheel showed up around 3:00, and I got to work on it right away. This first shot is the new wheel photographed without flash:
 And heres the vintage Covico wheel without flash:  Sadly this is what the Covico wheel looks like when taken with flash photography. Here is just looks dull. In other photos it looks rusty red:  And heres the new Moon wheel installed. Both the chrome and the plastic and immaculate: 
__________________
My Build Thread: http://67-72chevytrucks.com/vboard/s...d.php?t=444502 |
|
|
|
|
04-08-2014, 08:30 PM
|
#1393 |
|
Senior Member
Join Date: Mar 2011
Location: Tucson, Arizona
Posts: 2,062
|
Re: Markeb01 Build Thread
Nice! I like the 4 hole spokes in the new wheel.
__________________
Sanity'66 http://67-72chevytrucks.com/vboard/s...d.php?t=515110 Long bed, Fleetside, Small back window I've Done So Much, With So Little, For So Long, That Now I Can Do Anything With Nothing.
|
|
|
|
|
04-09-2014, 07:47 PM
|
#1394 |
|
Senior Enthusiast
Join Date: Feb 2007
Location: Spokane Valley, WA
Posts: 8,356
|
Re: Markeb01 Build Thread
Earlier today I responded to a question in the What did you do to your truck today thread. It filled in several gaps so I thought I should also post the information in my build thread.
I have a floor shifted 4 speed manual transmission, and the key remains on the dash in the original location. I purchased the 32 chrome straight steel version, part number 101320020. It was very easy to install. I used the factory floor clamp, and years ago I added a muffler clamp at the dash to secure the column to the lower pedal support housing. Heres what that looks like. I simply drilled two holes in the column support and bolted it in place with the clamp saddle on top. It is clamped down gently, as the column has little reason to move around on its own:   In the engine compartment I retained my 2nd generation Monte Carlo intermediate shaft. I simply knocked the cross pin out, ground the round portion into the DD shape, cut off the piece with the hole for the cross pin, and later trimmed another 7/16 off the end and joined the column to the intermediate shaft with a polished SS Borgeson joint. The lower shaft is ¾ DD and the bottom of the column is 1 DD. Heres what the finished connection looks like:  Someday I may replace with old intermediate shaft with a polished stainless item in an attempt to further divert visual attention away from how crappy the rest of the chassis looks! The Ididit part number for the polished stainless Borgeson joint is 3000124952. The most difficult issue was sorting out which wire would work on the Ididit adapter for the horn. I ended up using the straight wire that came with the column. It looked just like this one from a different adapter kit. Notice the length of the plastic locking connector:  With the steering wheel adapter on the column, this connector reached all the way into the nylon horn tube and ended flush with the top of the adapter when locked in place. This is the actual wire and adapter that came with the adapter kit after being desoldered from the horn contact plate:  The wire is too short, and being soldered to the horn plate prevents removing it for ease of installation. Also the locking collar is so short its nearly impossible to latch in place even with tweezers. This shows the major components of the adapter/horn kit. It shows the soldered wire, but the locking connector is much longer than the one I received (shown above):  The kit shown above must be an earlier version, as the adapter I received had an extra hole present at 10:30 for alignment with the horn tower, and a channel on the face of the adapter to run the wire up into the horn cap area. Heres the type I received:  Since I didnt have any of the tiny female speaker terminals needed to hook the horn wire to the horn contact plate, I simply spliced on my old wire/terminal with a waterproof boat connector. Another interesting note every Covico, Grant, and Superior wheel of this type Ive seen has the top two mounting holes level across the top like these:  The Mooneyes wheel apparently was designed with the Ididit column in mind, as they rotated the mounting holes clockwise:  This was to accommodate the nylon tower on the horn plate being set at 10:30 on the top of the column. This allows identical left-right travel on the cancelling cam. With the Covico wheel, I had to position the horn plate at 9:00 as the upper left mounting hole is located at 10:30, making it impossible to align the horn plate at that clock position. With new Mooneyes wheel, I simply pulled the adapter back off and rotated it to match the newly corrected wheel position. I did have to drill a new hole at the location shown in the blue circle so I had room for the horn wire to make the turn into the cavity under the steering wheel. It sounds more complicated that it was. The entire modification/adjustment took about 10 minutes. Also, the Ididit instructions state snap the cap in place. This is incorrect information and a sure method for eventual failure. Here is a photo on the side of a typical modern horn cap (anything made in the last 30+ years). Note the dash stamped into the cap, with a dot underneath right at the edge:  The correct method for cap installation is to align the 3 dots on the sides of the cap with the 3 notches in the horn plate. Lower the dots over the notches, and rotate the cap left or right trapping the plate between the dots and the dashes imprinted on the sides of the horn cap. This will keep the horn cap in place without damaging the edges of the horn plate. To remove, simply turn the cap to align with the notches, and it will pop right off. Its also interesting to note the Ididit cap is more pointed in the center than generic horn caps, and it is also slightly larger across. It must be used with the horn plate that comes with it. Generic horn plates are slightly smaller. When attempting to install an Ididit cap on a generic plate, the cap simply falls off and wont latch. The caps arent much different, but I prefer the more pointed look of the Ididit cap, and the upper surface also extends further over to the edges making the cap look bigger than other brand caps. Also, here are a couple more shots with the Mooneyes wheel installed: 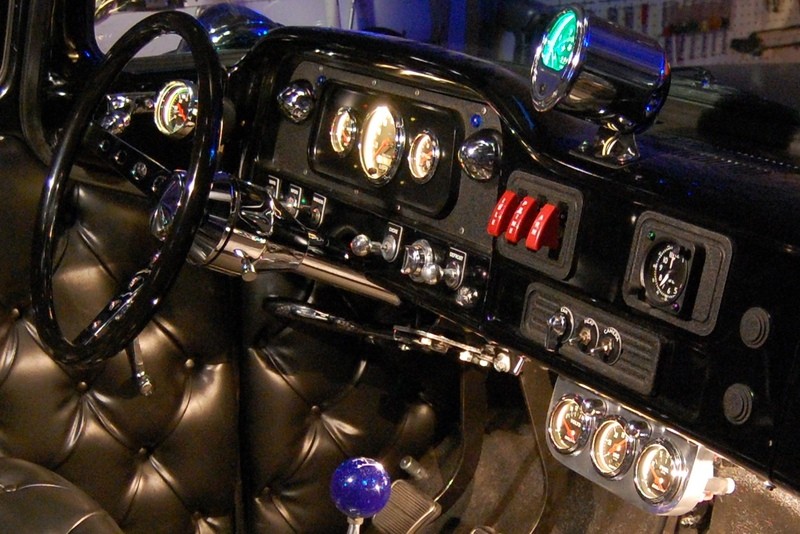 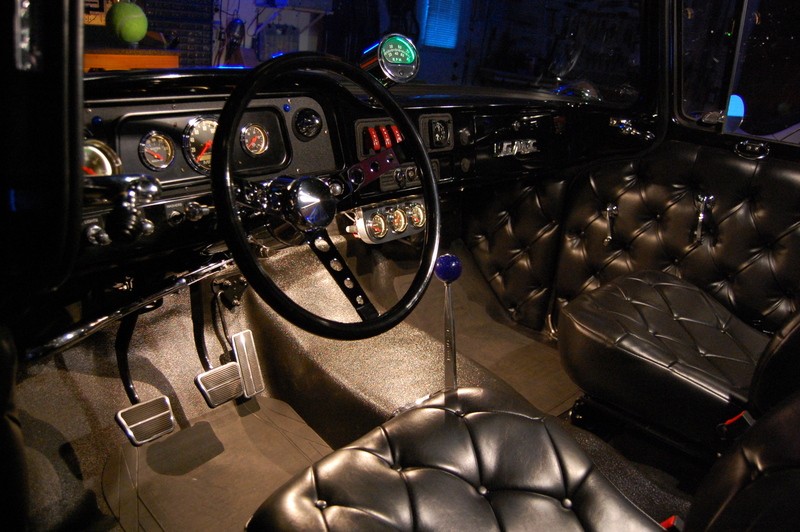 It is exquisitely finished and is truly beautiful compared to my classic Covico version. It also has the bead on top of the rim like the early Covico wheels had. This is an entertaining feature during casual driving.
__________________
My Build Thread: http://67-72chevytrucks.com/vboard/s...d.php?t=444502 |
|
|
|
|
04-09-2014, 10:52 PM
|
#1395 |
|
Registered User
Join Date: Sep 2011
Location: Tacoma, WA
Posts: 2,425
|
Re: Markeb01 Build Thread
Man that bottom photo of your interior is just beautiful.... everything came together in that pic, the textures, lighting... the whole shebang
__________________
Michael McMurphy My 66 Stepside My 64 Tow Truck My 66 Tempest Table Of Contents Added to Page1 |
|
|
|
|
04-10-2014, 12:14 AM
|
#1396 |
|
Senior Enthusiast
Join Date: Feb 2007
Location: Spokane Valley, WA
Posts: 8,356
|
Re: Markeb01 Build Thread
Thanks Mike. Fyi you guys have another care package on the way. It left this morning via 3 day mail, but I'm not sure what that means in North Pole time!
__________________
My Build Thread: http://67-72chevytrucks.com/vboard/s...d.php?t=444502 |
|
|
|
|
04-10-2014, 09:29 AM
|
#1397 |
|
Registered User
Join Date: Apr 2012
Location: Searcy, AR
Posts: 4,203
|
Re: Markeb01 Build Thread
Care Package from North Pole??? SWEET!!!
__________________
DON Proverbs 27:17 US Air Force Retarded errr Retired My '65 Stepper Build:http://67-72chevytrucks.com/vboard/s...d.php?t=533920 My '60 Rusty Patina Build:http://67-72chevytrucks.com/vboard/s...66#post7402266 My '72 http://67-72chevytrucks.com/vboard/s...59#post7204359 SOLD |
|
|
|
|
04-13-2014, 05:48 PM
|
#1398 |
|
Senior Enthusiast
Join Date: Feb 2007
Location: Spokane Valley, WA
Posts: 8,356
|
Re: Markeb01 Build Thread
Although I’ve been very pleased with the cosmetic appearance of the 58 Impala door mirrors, they just haven’t worked very well so Friday night they came off and the holes were filled using my standard JB weld method. Since my son currently has all my body working and paint stuff I’m just going to leave it as is for a while. The defects are only noticeable within 10 feet so I figure it’s good enough for now.
  Saturday the new Bob Drake peep mirrors arrived and were given a good polish and then installed. I think these may be the first outdoor photos since the portholes and mirrors were installed:   I preferred the styling symmetry of the Impala mirror location better than the peeps, but I’ve driven behind a peep mirror from 1970 until the early 90’s, so I’m very familiar with the sight picture and limitations. The Bob Drake peep mirrors are the highest quality I have seen in the aftermarket, and the closest I’ve seen to an original Yankee peep mirror:  IMHO those are the gold standard by which all others are measured. Here are the “good” features that compare to Yankee’s: The mirror is made of black glass for night time glare reduction. Many cheaper versions use clear glass. The edge of the glass is beveled allowing the rim to crimp to the glass below the level of the mirror face. I’ve seen cheap aftermarket mirrors that don’t bevel the glass, causing the rim to extend beyond the face of the glass. The rim can snag on wash mitts and fingers, and because this makes a poorly fitting crimp the glass frequently rattles. They have the “Yankee style indentation” around the perimeter on the back if the mirror head. Most aftermarket peep mirrors have no detail on the head. The edge is only slight thicker than a real Yankee mirror (1/4”) compared to some cheap copies where the head is almost 3/8” thick at the edge and look stupid in my opinion. They use a custom screw which covers the entire surface of the mounting ring, adding a look of class to the mirrors. The only downside of the Bob Drake mirrors is the stainless finish on the back of the head. They appear to have been formed out of industrial polished stainless, and show visible polishing striations in the finish. I’ve seen cheaper versions with mirror polishing on the back of the heads. Repeated polishing in the future may improve this feature, but it is disappointing they weren’t delivered with a mirror finish to begin with. This is one area where almost all aftermarket stainless steel mirrors have it over original Yankee versions. I believe the back of the head was chrome plated on original Yankee mirrors, which is not good for collectors as most are rusty and pitted when old. Regardless of the polish which could have been better, I’m very pleased with the overall quality and looking forward to not changing door mirrors again!
__________________
My Build Thread: http://67-72chevytrucks.com/vboard/s...d.php?t=444502 Last edited by markeb01; 04-13-2014 at 05:55 PM. |
|
|
|
|
04-13-2014, 09:34 PM
|
#1399 |
|
Registered User
Join Date: Apr 2012
Location: Searcy, AR
Posts: 4,203
|
Re: Markeb01 Build Thread
Outside Pics, and Peep Mirrors
Thanks for the comparison between the Bob Drake Mirros vs other aftermarket ones...
__________________
DON Proverbs 27:17 US Air Force Retarded errr Retired My '65 Stepper Build:http://67-72chevytrucks.com/vboard/s...d.php?t=533920 My '60 Rusty Patina Build:http://67-72chevytrucks.com/vboard/s...66#post7402266 My '72 http://67-72chevytrucks.com/vboard/s...59#post7204359 SOLD |
|
|
|
|
04-14-2014, 10:32 AM
|
#1400 |
|
Registered User
Join Date: Jun 2012
Location: Selkirk Ontario Canada
Posts: 1,141
|
Re: Markeb01 Build Thread
those are cool
__________________
My 63 GMC Panel Slow Build http://67-72chevytrucks.com/vboard/s...=1#post5457281 63
|
|
|
|
 |
| Bookmarks |
|
|


 Linear Mode

