
|
Register or Log In To remove these advertisements. |
|
|
|
|||||||
 |
|
|
Thread Tools | Display Modes |
 03-10-2007, 06:14 PM
|
#1 |
|
Used Register
Join Date: May 2005
Location: Live Oak, TX
Posts: 379
|
How To: Bestop TigerTop
Ok - I bit the bullet and spent alot of money on something that I would prefer not to use most of the time....A soft top
I picked up the Bestop TigerTop for 69-72 Blazer & Jimmy models, part number BES-51315 - only available in snap design and black vinyl. I have not seen a write-up for the install of this top, so I figured I would document my installation. For starters, the provided instructions are fairly good, so this won't be a step-by-step, but a photo diary and a highlight of the issues that come up and the items not well defined in the instructions. A pdf of the instruction set can be found at http://www.bestop.com/installation_guides/51315.pdf which, oddly enough, is not the same version as what came with my top, but it has the same details. I had no top at all, so I picked up a dozen SS 5/16"-18 bolts, washers and nylon locknuts, as the soft top reuses the hardtop hardware. The first few steps involve bolting in the rails and bow brackets, as shown in the first two photos.   The third shows the parts that form the new window surrounds and the fourth shows the template in place for the windshield snaps.   Photo 5 is the first not enough detail item. The front brackets are L-shaped, with a large hole on one side for the rod and 2 smaller holes on the opposite side. The directions for this step (Horizontal Bracket & Figure 5, if your reading along on the pdf) was pretty vague, so what I did was use the lower small hole and sandwiched the bracket between the windshield steel and the weatherstripping, because I could not get it to work any other way. I also tried the top hole, but this angled the front of the window surround too low. I am still not 100% sure this is correct.  Photo 6 shows the windshield snaps in place ignore the old snaps from some top concoction of the PO.  Photos 7, 8 and 9 show the completed install from various angles.    continued below (too many photos)..... Last edited by augie; 04-07-2011 at 10:06 PM. |

|
|
03-10-2007, 06:14 PM
|
#2 |
|
Used Register
Join Date: May 2005
Location: Live Oak, TX
Posts: 379
|
Re: How To: Bestop TigerTop
Photos 10 and 11 show some interior details for the bows, straps and door surrounds.
  Shots 12 and 13 show some of the details at the top to door and window interface.   Shots 14 & 15 are some more of the areas that could use better explanation. Again, these install details are my best guess or the best that the top would allow me to do. I would like to have seen the rear flaps be less to the sides of the truck, but it seems that the top was about an inch too short to get them where I wanted them. The way there are installed leaves an opening at the bottom corners and does not cover the zippers like it should. The front snap flaps .I have no clue. This was the only way I could secure them that would not present a sharp edge that would damage the strap. Is it right? Who knows, but thats how I did it.   Shot 16 is an area of concern for me. I think this is going to be a bad wear spot in pretty short order. I still need to see if I can tweak, man-handle, or otherwise convince this area to behave better. 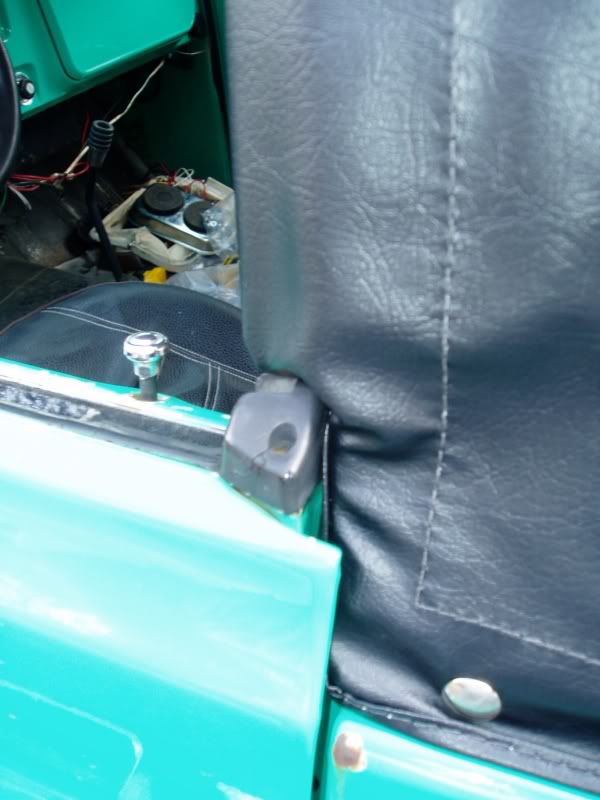 Overall, I like to look of the top, but Im not completely satisfied with the fit. I dont know how it compares to others though. I tend to be a rather anal person, so maybe my expectations are too high. This top does seem to serve the purpose I have a lid over my head now. I dont expect it to be water-tight by any means I see daylight at the front top window corners and at the lower corners of the rear hatch, so I would expect some leaks there as well. I just tried it on a 20 minutes highway run and its still attached. Its louder than I would have expected no flap or typical soft top noise, but it seems to have somehow amplified my tire whine. That concludes my wall O text. Fire away if you have any questions or would like to see a specific shot I did not include. Herb Last edited by augie; 04-07-2011 at 10:07 PM. Reason: fixed photo links |
|
|
|
03-12-2007, 01:09 PM
|
#3 | |
|
Used Register
Join Date: May 2005
Location: Live Oak, TX
Posts: 379
|
Re: How To: Bestop TigerTop
Quote:
I was able to get a little better fit around the bottom rear of the door windows by bending the vertical supports a bit. I bent it where the round stock welds to the angle iron and that releave some of the pressure on the fabric at that lower back corner at the door area. This was done off the truck, in a vice. On a side note - one thing I forgot to mention is that these window surrond parts are thickly powder coated, which is great,but...You have to chase the threads before the wingnut can be installed and the coating is easily cracked off when you bend the rod for adjustment. I touched up the newly bare metal areas with a black paint pen from a hobby store. Also got to try it out last night and this morning - torential downpours!  What timing! Interior stayed mostly dry, but having a vent window would help a bit more... Absolutely no puddling over the front cabin, but the area between the rear bows does collect water. Plan for a wet knee too - the run-off from the tops seems to easily find the gap at the front top of the window. Again, maybe a vent window would assist. What timing! Interior stayed mostly dry, but having a vent window would help a bit more... Absolutely no puddling over the front cabin, but the area between the rear bows does collect water. Plan for a wet knee too - the run-off from the tops seems to easily find the gap at the front top of the window. Again, maybe a vent window would assist.Herb |
|
|
|
|
| Bookmarks |
|
|


 Linear Mode

