
|
Register or Log In To remove these advertisements. |
|
|
|
|||||||
 |
|
|
Thread Tools | Display Modes |
 03-28-2020, 02:12 PM
|
#76 |
|
Registered User
Join Date: Jan 2019
Location: Mantua Ohio
Posts: 189
|
Re: Budget Shortbed: welding, grinding, rust oh my
The OE windshield went in very nicely with the precision gasket. I will never go with anything else now after my first experience with my 69cst with the trim grove.
I also disassembled and cleaned the inner heaterbox and controls. It took two sets of everything to make one good one. All the controls move with ease now. The 4 position blower switch didn't work when I continuity tested it. I disassembled the switch and found it was corroded inside. It still didnt work completely so i levelled all of the contacts with a fine sandpaper over a file, and now they all make good connection. Under dash wiring was went through, fuse box inspected, cleaned and connections checked. |

|

|
|
03-28-2020, 11:24 PM
|
#77 |
|
Registered User
Join Date: Jan 2019
Location: Mantua Ohio
Posts: 189
|
Re: Budget Shortbed: welding, grinding, rust oh my
I'm debating whether I want to pull the wiper motor and test it. The wiring looks good, and the motor isnt locked up. I'm not going to be running the washer fluid through it so as long as it rotates I'm happy. It's just a pain to get up in there, what do you guys think?
|
|
|
|
|
03-28-2020, 11:34 PM
|
#78 | |
|
Registered User
Join Date: Oct 2017
Location: Hudson Valley, New York
Posts: 609
|
Re: Budget Shortbed: welding, grinding, rust oh my
Quote:
 . I would say at the least, if they wipe I'd leave them alone, and not worry about washer fluid. . I would say at the least, if they wipe I'd leave them alone, and not worry about washer fluid.The truck is looking great by the way 
__________________
'68 C20 Utility 396 4sp (BuildThread: http://67-72chevytrucks.com/vboard/s...d.php?t=806904 ) '68 C10 50th |
|
|
|
|
|
03-30-2020, 02:17 PM
|
#79 |
|
Registered User
Join Date: Jan 2019
Location: Mantua Ohio
Posts: 189
|
Re: Budget Shortbed: welding, grinding, rust oh my
Thanks for the encouragement, I checked the motor and all three high/low/park work after adding a grounding strap to the motor case.
I ordered a radio and speaker and will try to wait to reinstall the dash until they arrive. Until then I'll rebuild the door components and install them. Then rebuild the TH350 that may be fine but I don't want to take a chance. Also I need to switch my cluster to a tach, and whatever goes with that. |
|
|
|
|
03-30-2020, 03:42 PM
|
#80 | |
|
Registered User
Join Date: Oct 2017
Location: Hudson Valley, New York
Posts: 609
|
Re: Budget Shortbed: welding, grinding, rust oh my
Quote:
I finally started tearing into my 68 utility, I have the dash all pulled apart and was/am on the fence about radio and speaker. As well was looking at the Brother's tach conversion kit lol Not sure I'm going to go for that just yet as I want to get the truck back together and not get too carried away...
__________________
'68 C20 Utility 396 4sp (BuildThread: http://67-72chevytrucks.com/vboard/s...d.php?t=806904 ) '68 C10 50th |
|
|
|
|
|
03-31-2020, 01:53 PM
|
#81 |
|
Registered User
Join Date: Jan 2019
Location: Mantua Ohio
Posts: 189
|
Re: Budget Shortbed: welding, grinding, rust oh my
That is funny! I figure I might as well get it all done now, or as much as I can before I lose too much steam. I have a bunch of house projects coming up that are waiting for me when this hits the road too, the wife is sitting patiently...
|
|
|
|
|
03-31-2020, 02:13 PM
|
#82 |
|
Registered User
Join Date: Jan 2019
Location: Mantua Ohio
Posts: 189
|
Re: Budget Shortbed: welding, grinding, rust oh my
I've had to fix every door component on the drivers side, talk about time consuming.
Here is how I am fixing the stuck rollers on the window tracks. I figure its worth posting to help others. Chisel up the back of the rivet head, but do not cut it off! Working around the rivet slowly raise the head up, until you can get a 90 degree chisel to finish raising it. The 90 degree chisel is crucial so that you aren't cutting the rivet head off. Once its raised enough, take a very small punch, I used thick TIG rod and held it with pliers, and punch out the roller. Brace each side of the arm good, and hit it pretty hard. Once that pops out and flies across the shop, punch the metal body out of the plastic roller. Clean the rust off of the roller and regulator arm, and I greased mine just a bit. To reinstall I hammered it back in to seat it, then expanded the rivet with a combination of center punches, and tapered punches that I ground out of bolts. Don't put in the wrong side! The rivet will probably crack some when setting. If the rivet just blows out, I still set it in, then ground a nail with a blunt tip just larger than the rivet hole. I pound the nail into the back of the rivet, forcing the sides out as much as possible, and it seems to be a good connection. Not ideal though. Setting the rivet required a setup with two vices, one to hold the regulator arm, and one to hold a small carriage bolt. I place the head of the roller stud directly atop the carriage bolt. This way you can properly set the rivet while not damaging the roller. Pics to follow |
|
|
|
|
03-31-2020, 02:17 PM
|
#83 |
|
Registered User
Join Date: Jan 2019
Location: Mantua Ohio
Posts: 189
|
Re: Budget Shortbed: welding, grinding, rust oh my
Raising and removing rivet
|
|
|
|
|
03-31-2020, 02:20 PM
|
#84 |
|
Registered User
Join Date: Jan 2019
Location: Mantua Ohio
Posts: 189
|
Re: Budget Shortbed: welding, grinding, rust oh my
Cleaning and installing
|
|
|
|
|
03-31-2020, 02:24 PM
|
#85 |
|
Registered User
Join Date: Jan 2019
Location: Mantua Ohio
Posts: 189
|
Re: Budget Shortbed: welding, grinding, rust oh my
Setting rivet.. shop needs cleaned bad.
|
|
|
|
|
04-01-2020, 12:10 PM
|
#86 |
|
Registered User
Join Date: Jan 2019
Location: Mantua Ohio
Posts: 189
|
Re: Budget Shortbed: welding, grinding, rust oh my
After thinking about setting the tubular rivets, I should have tried the rivet setting punch provided with the wing window rebuild kit.
|
|
|
|
|
04-01-2020, 12:56 PM
|
#87 | |
|
Registered User
Join Date: Oct 2017
Location: Hudson Valley, New York
Posts: 609
|
Re: Budget Shortbed: welding, grinding, rust oh my
Quote:
(and pretty good at that
__________________
'68 C20 Utility 396 4sp (BuildThread: http://67-72chevytrucks.com/vboard/s...d.php?t=806904 ) '68 C10 50th |
|
|
|
|
|
04-01-2020, 10:23 PM
|
#88 |
|
Post Whore
 Join Date: Feb 2016
Location: Portland Oregon
Posts: 10,783
|
Re: Budget Shortbed: welding, grinding, rust oh my
Great work again.
I had broken rollers on my Burbans rear window regulators and I was able to find new rollers with new rivets . It was a 2 man job to install . One guy holding the regulator and one punching the rivits. But it worked slick and saved me from having to try and locate 3rd and 4th door regulators. I know it's a little late but just in case someone else is watching.
__________________
Thanks to Bob and Jeanie and everyone else at Superior Performance for all their great help.  RIP Bob Parks. 1967 Burban the WMB,1991 S(stink)-10 Blazer,1969 GTO, 1970 Javelin, 1952 F2 Ford 4X4, 29 Model A, 72 Firebird. 85 Alfa Romeo If it breaks I didn't want it in the first place The WMB repair thread http://67-72chevytrucks.com/vboard/s...d.php?t=698377 Last edited by HO455; 04-01-2020 at 10:29 PM. |
|
|
|
|
04-07-2020, 12:21 PM
|
#89 | |
|
Registered User
Join Date: Jan 2019
Location: Mantua Ohio
Posts: 189
|
Re: Budget Shortbed: welding, grinding, rust oh my
Quote:
|
|
|
|
|
|
04-07-2020, 12:30 PM
|
#90 |
|
Registered User
Join Date: Jan 2019
Location: Mantua Ohio
Posts: 189
|
Re: Budget Shortbed: welding, grinding, rust oh my
The passenger door is fully populated. The rubber on the wing window from lmc...I
know....wouldn't let it shut without a ton of force, so I guess it's going to be shut for a while. I ordered new rubber from Classic parts and hopefully it will be better for the drivers side. The last few days have been rebuilding switches, installing radio, speaker, cluster re-wiring and building, dash pad, heater controls and duct. |
|
|
|
|
04-07-2020, 01:13 PM
|
#91 |
|
Registered User
Join Date: Jan 2019
Location: Mantua Ohio
Posts: 189
|
Re: Budget Shortbed: welding, grinding, rust oh my
Does the middle heater cable go on the firewall side of the duct? Seems like the only way, and it sure bends the cable making the tight radius.
Also the duct on the passenger side seems like it will interfere with the glove box at the dash top. I guess the duct is just squeezed around in there. |
|
|
|
|
04-07-2020, 03:28 PM
|
#92 | |
|
Registered User
Join Date: Oct 2017
Location: Hudson Valley, New York
Posts: 609
|
Re: Budget Shortbed: welding, grinding, rust oh my
Quote:
 The duct should be fine too. Again yours looks the same. BTW, the extra wires in there, ...radio, speaker, courtesy lights and added glove box light. Getting it all done now while it's apart... 
__________________
'68 C20 Utility 396 4sp (BuildThread: http://67-72chevytrucks.com/vboard/s...d.php?t=806904 ) '68 C10 50th |
|
|
|
|
|
04-07-2020, 09:00 PM
|
#93 |
|
Registered User
Join Date: Jan 2019
Location: Mantua Ohio
Posts: 189
|
Re: Budget Shortbed: welding, grinding, rust oh my
Kevin, I think you really helped me out here, I have the two dash vents backwards, I hope. Thank you for posting pics! Nice job on the wiring. It doesn't seem too bad to get up in there, but one you've spent a few hours under the dash it really starts to frustrate me.
Where are you running the courtesy lights and glovebox light to? I need to do those as well but the stock wires were cut so I'm unsure of the correct way. |
|
|
|
|
04-07-2020, 11:28 PM
|
#94 | |
|
Registered User
Join Date: Oct 2017
Location: Hudson Valley, New York
Posts: 609
|
Re: Budget Shortbed: welding, grinding, rust oh my
Quote:
Not that you have to use 'factory' harnesses/connectors, but since I've done a few 1st Gen Camaros, the connectors are the same, and since I had an extra courtesy light harness, it's literally 'plug n play'. Near the left side of the fuse box, you'll find the connector for the cab dome light (orange and white wires). The courtesy light harness is meant to be 'patched in'. Just unplug the cab light connector and put the courtesy harness in, and you're good to go. Regarding the glove box light, since I was installing a aftermarket radio (Retroradio) that needed 12V, I made up a harness that brought power to the radio (and tapped for the glove box light (another left over Camaro harness, but again a typical 'Chevy' harness)) and plugged it in. For the record, I have a few old harnesses that I've been 'sourcing' the necessary connectors from. Besides those, ...some solder and shrinktubing I'm doing my best to keep the costs manageable. In the photo, the RED WIRE(S) "12V" tap, This is the wire to the cigarette lighter, I tapped into it for the radio 12V (and Glovebox light). The WHITE wire ("ACC") is the accessory wire going to the radio. Lastly, the OrangeWhite wires (circled in red) that is the cab light, plugged into the Auxilary Lighting harness I patch it. I've got the harness tucked in, so you barely see it in person, and/or in pics... 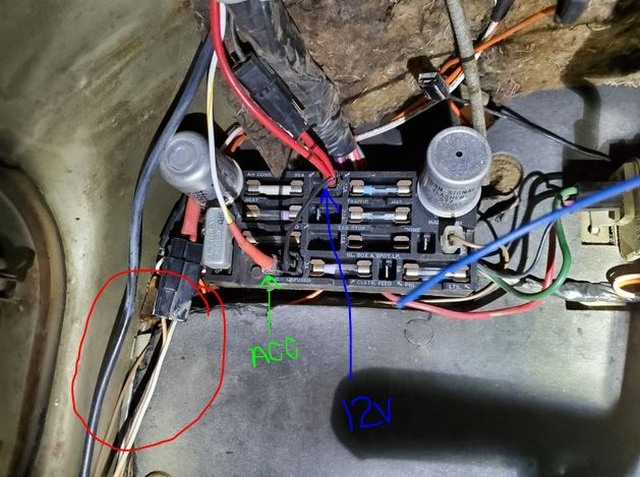 As for getting up into the dash, it could be worse lol, but it ain't fun I did get a 6x9 dual coil speaker up above the radio, but it was tight. My dash was already cut by the prior owner, so I needed to make up my own faceplate for the radio. It's not factory, but it works just fine. For the record, ...that RUN in the dash paint, ...that's factory 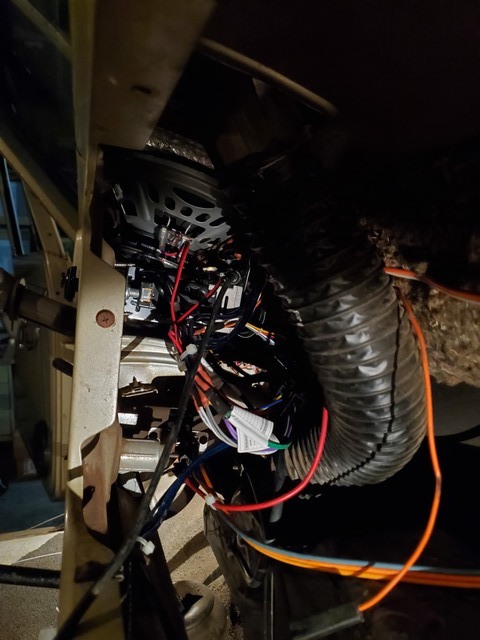 
__________________
'68 C20 Utility 396 4sp (BuildThread: http://67-72chevytrucks.com/vboard/s...d.php?t=806904 ) '68 C10 50th Last edited by KevinK7; 04-07-2020 at 11:38 PM. |
|
|
|
|
|
04-08-2020, 06:58 AM
|
#95 |
|
Registered User
Join Date: Jul 2019
Location: New Boston, NH
Posts: 456
|
Re: Budget Shortbed: welding, grinding, rust oh my
KevinK7: "I am just going to fix this one wire...."
|
|
|
|
|
04-08-2020, 07:42 AM
|
#96 | |
|
Registered User
Join Date: Oct 2017
Location: Hudson Valley, New York
Posts: 609
|
Re: Budget Shortbed: welding, grinding, rust oh my
Quote:
__________________
'68 C20 Utility 396 4sp (BuildThread: http://67-72chevytrucks.com/vboard/s...d.php?t=806904 ) '68 C10 50th |
|
|
|
|
|
04-09-2020, 12:56 PM
|
#97 |
|
Registered User
Join Date: Jan 2019
Location: Mantua Ohio
Posts: 189
|
Re: Budget Shortbed: welding, grinding, rust oh my
Thanks again Kevin for the great explanation and pictures. I have about an 1/8th inch clearance between the retrosound 4x10 and the radio body, and a run in the dash paint too, hmmm..lol. Is your fuse block mounted sideways?
I did all my dash wiring, then had to re run the radio wires, then re run the cig wire, then re run the tach power wire with the filter, and maybe I'm close to done now? I'm leaving fuseblock connections off until I fire the truck just to be sure. |
|
|
|
|
04-09-2020, 07:28 PM
|
#98 |
|
Registered User
Join Date: Oct 2017
Location: Hudson Valley, New York
Posts: 609
|
Re: Budget Shortbed: welding, grinding, rust oh my
It's kind of ironic, ..since you asked me about the wiper motor, etc. I've been checking switches and wiring as I go along. Still have the cluster out ( shipment from Brother's is due tomorrow) so I went through that. As I am sure most know (but to note) I did have a bad wiper motor switch, but when I plugged the new one in, ...it still didn't work. Make mental note, ...need to GROUND the switch itself
, works fine now, ...even the pump was working, so that's staying. Checked the heater blower motor, but no good there. I'm getting 12V to the connecter (orange wire) atop the inside heater box, but no go.The other 'hurdle' I'm hopefully almost over is the turn signal switch. Getting that darn thing out was a pain, and almost as challenging getting the new on in. Anyway, it's back in, I just need to plug the new wires into the halfmoon connector, plug it back in and confirm that all works again.
__________________
'68 C20 Utility 396 4sp (BuildThread: http://67-72chevytrucks.com/vboard/s...d.php?t=806904 ) '68 C10 50th |
|
|
|
|
05-08-2020, 10:13 PM
|
#99 |
|
Registered User
Join Date: Jan 2019
Location: Mantua Ohio
Posts: 189
|
Re: Budget Shortbed: welding, grinding, rust oh my
Ok quick overdue update. I finished the interior minus a few details, went through the front suspension and replaced some things and added about a dozen missing bolts, checked and replaced front brake items, repacked wheel bearings and added new seals, replaced the booster and master cylinder, rebuilt the th350 transmission, and finished freshening up the small block 307.
I discovered the 12 bolt rear has bad gears and axle seals, so I'm trying to replace the entire rear, just for times sake. I'm happy with the way the seats came out, since they were Dodge seats I had to do a decent amount of fab work to make them fit right. Tomorrow I hope to have the drivetrain in. |
|
|
|
|
05-08-2020, 10:38 PM
|
#100 |
|
Registered User
Join Date: Jan 2019
Location: Mantua Ohio
Posts: 189
|
Re: Budget Shortbed: welding, grinding, rust oh my
Sticking with part of my original plan of painting and cleaning as little as needed, I decided to do an oil finish on the frame, it dried quite nicely and I like the look. I did spend a night scraping and cleaning it first. I had to in order to inspect it for issues. Everything I'm doing now is just putting together a complete working reliable truck, nothing too fancy or pretty.
The 307 is from my first car I still have, I rebuilt it 20 years ago then replaced it with a supercharged 383. I just replaced the intake and pan gaskets, fingers crossed the head gaskets are still in as good of shape as when I pulled it. |
|
|
|
|
| Bookmarks |
| Thread Tools | |
| Display Modes | |
|
|


 Linear Mode

