
|
 09-26-2013, 04:40 PM
|
#376 | |
|
Registered User
 Join Date: Jun 2011
Location: Springfield, MO
Posts: 677
|
Re: Project 69SWB
Quote:
Posted via Mobile Device |
|

|

|
|
09-26-2013, 06:02 PM
|
#377 |
|
Registered User
Join Date: Dec 2011
Location: Ottawa, KS
Posts: 337
|
Re: Project 69SWB
I used seam sealer in my jams. Just the stuff from advanced auto parts in a caulking tube. Squirted it in there with a good caulking gun then smoothed it out with my finger wearing nitryl gloves, you have to dip your fingers in clean water as you're smoothing it out to help keep it from sticking to your glove. Using filler up there would be tough because getting it smoothed out it would all have to be hand sanded. And if those seams have any potential to flex a filler could crack I would think. I can take a picture tonight of mine and put it up to see if it's something you'd be happy with if you want me to. I'm going for a good looking solid driver on mine though, not sure if you'd be happy with what I did.
Good to see an update! Nice job getting busy on the doors. Looking good! Last edited by KSWes; 09-26-2013 at 06:08 PM. |
|
|
|
|
09-26-2013, 09:04 PM
|
#378 | |
|
Registered User
Join Date: Jun 2011
Location: Springfield, MO
Posts: 677
|
Re: Project 69SWB
Quote:
Posted via Mobile Device |
|
|
|
|
|
09-26-2013, 11:25 PM
|
#379 | |
|
Registered User
Join Date: Aug 2012
Location: Topeka Kansas
Posts: 2,655
|
Re: Project 69SWB
Quote:

|
|
|
|
|
|
09-27-2013, 08:06 AM
|
#380 |
|
Registered User
Join Date: Apr 2003
Location: Indep, MO
Posts: 5,893
|
Re: Project 69SWB
I used the Lord seam sealer from the body shop supply. Can be used in a normal caulk gun and spreads like buttah. Lacquer thinner on a finger and swipe. Truck looks good!
__________________
Boppa's Old Yeller Truck Build, Old Yeller's New Heart! Project Buzz Bomb Flyin' Low! |
|
|
|
|
09-27-2013, 08:26 AM
|
#381 | |
|
Still Learning
Join Date: Jul 2009
Location: Central Oklahoma
Posts: 10,108
|
Re: Project 69SWB
Quote:
I have seen something I wish I would have done since then, tape off the edges on both sides of the seams. Then you just peel the tape off both side before it completely sets up. good luck |
|
|
|
|
|
09-27-2013, 10:37 AM
|
#382 |
|
Registered User
Join Date: Dec 2011
Location: Ottawa, KS
Posts: 337
|
Re: Project 69SWB
Sounds like some good ideas from the other fella's since my post. The seam sealer I put in is sand-able but it's easier to get it smooth before it sets up for sure.
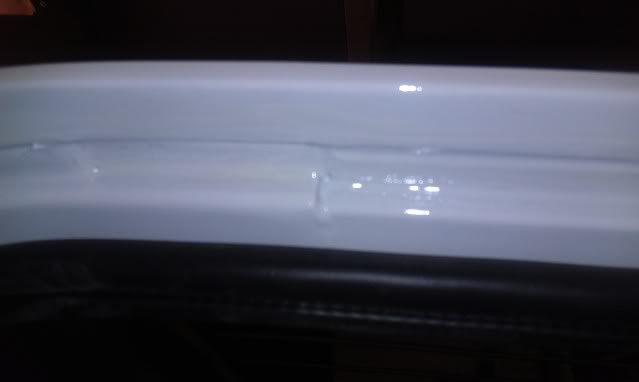 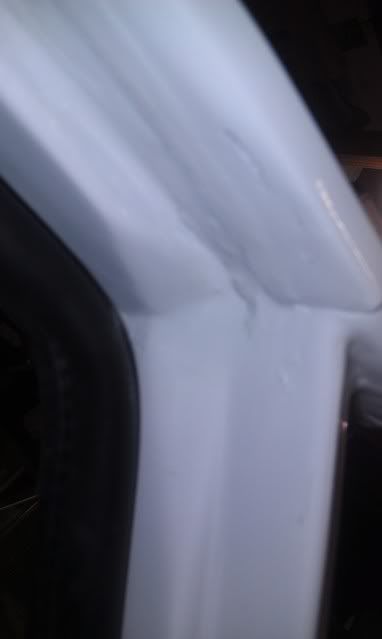 Not perfect but I think it looks ok. |
|
|
|
|
09-27-2013, 03:04 PM
|
#383 | ||||
|
Registered User
Join Date: Jun 2011
Location: Springfield, MO
Posts: 677
|
Re: Project 69SWB
Quote:
Quote:
Quote:
Quote:
I appreciate all the input from you guys. Thanks!! |
||||
|
|
|
|
09-27-2013, 07:09 PM
|
#384 | |
|
Registered User
Join Date: Apr 2012
Location: Denver, CO
Posts: 232
|
Re: Project 69SWB
Quote:
__________________
Another 71 My truck In tank fuel pump how to LS factory gauges wiring how to-post 18 |
|
|
|
|
|
12-09-2013, 04:04 AM
|
#385 |
|
Registered User
Join Date: Mar 2011
Location: Kansas City, Missouri
Posts: 3,541
|
Re: Project 69SWB
Jimmy, how's the truck project coming along?
__________________
Scott |
|
|
|
|
12-09-2013, 11:11 AM
|
#386 |
|
Registered User
Join Date: Apr 2003
Location: Indep, MO
Posts: 5,893
|
Re: Project 69SWB
Yeah! Yeah! What's up heah? Hope you're well!
__________________
Boppa's Old Yeller Truck Build, Old Yeller's New Heart! Project Buzz Bomb Flyin' Low! |
|
|
|
|
01-07-2014, 12:50 PM
|
#387 | ||
|
Registered User
Join Date: Jun 2011
Location: Springfield, MO
Posts: 677
|
Re: Project 69SWB
Quote:
Quote:
I've basically welded up all the holes from trim and mirrors mounted over the years, filled/layered in the welded area with All-Metal, then I really soaked the insides with Eastwood's Rust Encapsulator and I'm ready to put some primer on these dudes. I think I'll still use some seam sealer on the seams inside the doors. First layer of All-Metal after welding up the holes mostly level, I'll finish it out with putty. The runs are from the Rust Encapsulator I spray on the insides. It'll sand off. Coated pretty nice, got a few small spots to hit again. Once I get the doors in primer I can mount them and really start knocking out the body work. - |
||
|
|
|
|
01-07-2014, 12:54 PM
|
#388 |
|
Registered User
Join Date: Mar 2011
Location: Kansas City, Missouri
Posts: 3,541
|
Re: Project 69SWB
Jimmy, I was starting to look for your truck on craigslist, thought you abandoned ship
 . Glad everything's good and your still at it, doors look good. . Glad everything's good and your still at it, doors look good.
__________________
Scott |
|
|
|
|
01-07-2014, 01:11 PM
|
#389 | |
|
Registered User
Join Date: Jun 2011
Location: Springfield, MO
Posts: 677
|
Re: Project 69SWB
Quote:
|
|
|
|
|
|
01-07-2014, 02:09 PM
|
#390 |
|
Registered User
Join Date: Apr 2003
Location: Indep, MO
Posts: 5,893
|
Re: Project 69SWB
Glad you're still on this. Gotta see the end!
__________________
Boppa's Old Yeller Truck Build, Old Yeller's New Heart! Project Buzz Bomb Flyin' Low! |
|
|
|
|
01-07-2014, 08:59 PM
|
#391 |
|
Registered User
Join Date: Dec 2006
Location: Toms River, NJ
Posts: 5,518
|
Re: Project 69SWB
Glad to see your back at it Jimmy, nice job on the doors
__________________
Keith 66 Suburban Burb Build Thread: http://67-72chevytrucks.com/vboard/s...d.php?t=751361 IG: bennett68c10 |
|
|
|
|
01-09-2014, 12:19 AM
|
#392 |
|
Registered User
Join Date: Sep 2006
Location: Riverton KS
Posts: 832
|
Re: Project 69SWB
I was starting to get worried about ya! Glad to see your still at it.
__________________
1970 SWB Build |
|
|
|
|
01-12-2014, 07:45 PM
|
#393 | |||
|
Registered User
Join Date: Jun 2011
Location: Springfield, MO
Posts: 677
|
Re: Project 69SWB
Quote:
Quote:
Quote:
I decided to take a little detour here from the sanding and the sanding and the sanding and the sanding.. You guys get the idea I'm sure. I've had ordered my whole interior from a board vendor Truckseats a while back, real nice guy and has the got hookup with some really fantastic products. The quality of everything has been top notch. So on with the pics.. the best part of any post.  Old and new foam Laying it all out New cover and foam installed. My grandson loves to come in my Chevy room (spare bedroom used to store my junk) and get into my stuff! My dear sweet wife says I can work in the kitchen sometimes if it makes my life easier. I'm blessed. Closet in the Chevy room is a good place to hang small parts to dry when it's too cold for paint drying in the garage. The brackets I wire brushed, used Eastwoods Fast Etch, painted first with Eastwoods Rust encapusaltor, the top coated with Rustoleum High Performance Paint, says it dries in 15 minutes. Yeah right. No paint dries in 15 minutes. paaalease. But it is good stuff if you let it dry a couple days. Last edited by ~Whitey~; 01-12-2014 at 09:32 PM. |
|||
|
|
|
|
01-12-2014, 07:53 PM
|
#394 |
|
Registered User
Join Date: Jun 2011
Location: Springfield, MO
Posts: 677
|
Re: Project 69SWB
Here's the seat all done, brackets installed.
Nacho thought he was in trouble when I put him up there on the seat. Only thing I didn't do and I would have if I were made out of money is to have the seat frame blasted and powder coated. But I'd say that's a little overkill for a driver. Here is a pic of the drivers side. It's all there except for the bigger spring, I have it somewhere just got to find it. This is the side I am not sure about. I think it should have a small spring and clip on the outside of that key that slides back and forth. Can one of you guys verify what the passenger side bracket is supposed to look like (both sides) where the rod attaches? Last edited by ~Whitey~; 01-12-2014 at 09:14 PM. |
|
|
|
|
01-12-2014, 07:55 PM
|
#395 |
|
Registered User
Join Date: Mar 2011
Location: Kansas City, Missouri
Posts: 3,541
|
Re: Project 69SWB
Seat looks great Jimmy
__________________
Scott |
|
|
|
|
01-12-2014, 09:03 PM
|
#396 |
|
Registered User
Join Date: Apr 2011
Location: .
Posts: 3,104
|
Re: Project 69SWB
Seat looks great.
Storage closet and (room In the House no less) for drying paint, you are one lucky guy. Grandson, camo jammies and diggin in truck parts (truck guy in the making)  Looks great. |
|
|
|
|
01-12-2014, 09:17 PM
|
#397 | ||
|
Registered User
Join Date: Jun 2011
Location: Springfield, MO
Posts: 677
|
Re: Project 69SWB
Quote:
Quote:
|
||
|
|
|
|
01-13-2014, 09:29 AM
|
#398 |
|
Registered User
Join Date: Apr 2003
Location: Indep, MO
Posts: 5,893
|
Re: Project 69SWB
I was gonna say, you need to get your wife one 'a them pope hats and sing a song, or somethin'. If I tried to bring curing enamel parts in the house, I'd get shot! Lucky man!
__________________
Boppa's Old Yeller Truck Build, Old Yeller's New Heart! Project Buzz Bomb Flyin' Low! |
|
|
|
|
01-14-2014, 12:44 PM
|
#399 |
|
Registered User
Join Date: Dec 2011
Location: Ottawa, KS
Posts: 337
|
Re: Project 69SWB
That seat looks great! Nice progress, sometimes you gotta take a break from one thing and work on another to keep your motivation going. Glad to see the updates!
|
|
|
|
|
01-14-2014, 02:15 PM
|
#400 | ||
|
Registered User
Join Date: Jun 2011
Location: Springfield, MO
Posts: 677
|
Re: Project 69SWB
Quote:
Quote:
Next item up for some loving is a fine fine specimen... A 1968 C10 Steering Wheel in all it's glory. Picked this up on Craiglist for $60 Column, Horn Cap (great shape), and all. I never really cared for the look of the 69 Wheels. I won't be using the column as I have a tilt column that was in my truck already. This is what I'll be using to fill in the cracks after I open them up a bit with a v-cut. I've heard that just using bondo/filler doesn't last but a couple years before it's cracking again, but this stuff or similar products last forever pretty much. |
||
|
|
|
 |
| Bookmarks |
| Tags |
| 1969, black, custom 10, fleetside, shortbed |
|
|


 Linear Mode

