
|
 03-29-2012, 09:18 AM
|
#201 |
|
Registered User
Join Date: Oct 2009
Location: avoca,mi
Posts: 230
|
Re: Project Goldilocks, '66 C10 SWB BBW Build
What did you do with the inner tube that is inside the column that the shifter housing slides onto?did you cut this as well? And did you pull it out from the main tube?if so how did you get the lower released with the spring?
__________________
MY ADDICTION STAN THE MAN |

|

|
|
03-29-2012, 09:51 AM
|
#202 | |
|
Registered User
Join Date: May 2011
Location: Anderson SC
Posts: 3,868
|
Re: Project Goldilocks, '66 C10 SWB BBW Build
Quote:
It's a column from a floor shift truck, so there's only the outer tube and the inner shaft. I'm guessing that you're using an auto or three speed column with the shifter tube in it? Wish I could help you more with your column! I've got an extra three speed column that I can tear down to see how it goes together, and what it would take to shorten it.
__________________
Project Goldilocks '66 C10 Short Fleet BBW Build '65 C10 Highly Detailed Stock Restoration Thread '78 Camaro Targa Roof Build '55 International Metal/Body/Paint Work '66 F100 Full Rotisserie Restoration '40 Packard 120 Convertible Coupe Restoration How To Restore and Detail an Original Gauge Cluster How To Detail Sand Body Panels, Edges, Corners, Etc |
|
|
|
|
|
03-29-2012, 10:45 AM
|
#203 |
|
Registered User
Join Date: May 2011
Location: Anderson SC
Posts: 3,868
|
Re: Project Goldilocks, '66 C10 SWB BBW Build
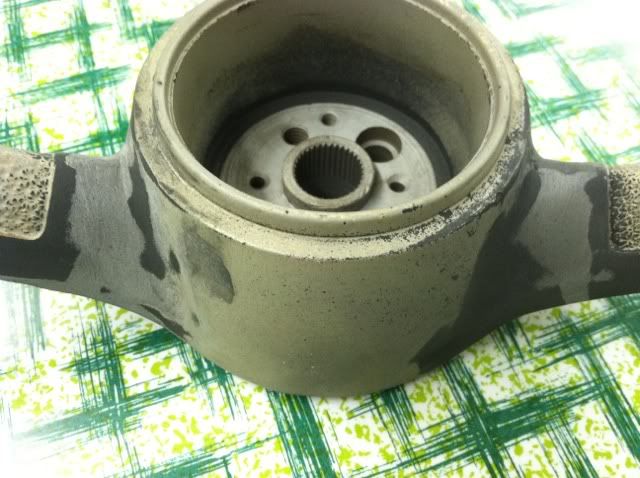
Here's how I shortened the steering shaft. It was also stripped to bare metal, but I didn't have any hose clamps small enough to fit around the shaft tightly. I used a framing square and masking tape to get the tape on exactly 90* to the shaft, so the tape edge would make for a straight cut line.
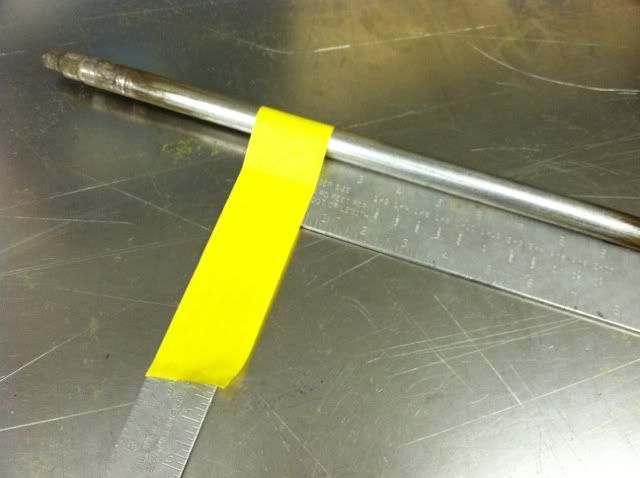 3" cut out and the edges beveled. I cranked the welder up and burned the welds in pretty good, don't want this thing coming apart!  Welds ground down and smoothed out. 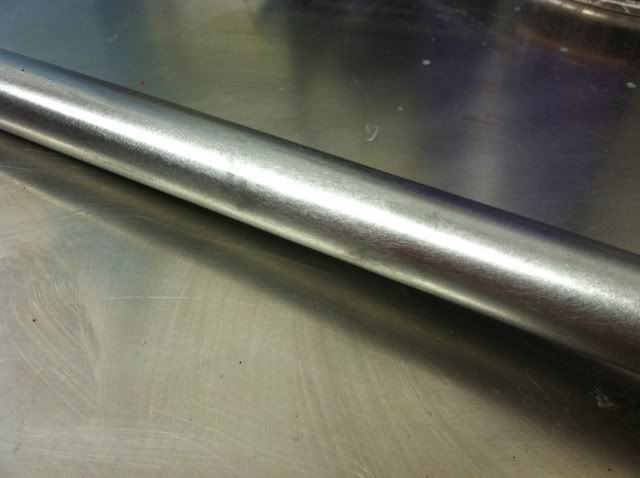
__________________
Project Goldilocks '66 C10 Short Fleet BBW Build '65 C10 Highly Detailed Stock Restoration Thread '78 Camaro Targa Roof Build '55 International Metal/Body/Paint Work '66 F100 Full Rotisserie Restoration '40 Packard 120 Convertible Coupe Restoration How To Restore and Detail an Original Gauge Cluster How To Detail Sand Body Panels, Edges, Corners, Etc |
|
|
|
|
03-29-2012, 11:42 AM
|
#204 |
|
Artist
 Join Date: Jan 2010
Location: Rockwell NC
Posts: 422
|
Re: Project Goldilocks, '66 C10 SWB BBW Build
Fantastic work!! Your a pretty brilliant fella!
__________________
66 Chevy C10 283ci~cough~ SBW Fleet Buttercup '66 |
|
|
|
|
03-29-2012, 12:05 PM
|
#205 | |
|
Registered User
Join Date: May 2011
Location: Anderson SC
Posts: 3,868
|
Re: Project Goldilocks, '66 C10 SWB BBW Build
Quote:
__________________
Project Goldilocks '66 C10 Short Fleet BBW Build '65 C10 Highly Detailed Stock Restoration Thread '78 Camaro Targa Roof Build '55 International Metal/Body/Paint Work '66 F100 Full Rotisserie Restoration '40 Packard 120 Convertible Coupe Restoration How To Restore and Detail an Original Gauge Cluster How To Detail Sand Body Panels, Edges, Corners, Etc |
|
|
|
|
|
03-29-2012, 01:34 PM
|
#206 |
|
Artist
Join Date: Jan 2010
Location: Rockwell NC
Posts: 422
|
Re: Project Goldilocks, '66 C10 SWB BBW Build
Ya but the ones you buy NEVER have your level of detail for under 200K
__________________
66 Chevy C10 283ci~cough~ SBW Fleet Buttercup '66 |
|
|
|
|
03-29-2012, 02:47 PM
|
#207 |
|
Registered User
Join Date: Jun 2010
Location: Vancouver Island BC
Posts: 652
|
Re: Project Goldilocks, '66 C10 SWB BBW Build
WOW, did you just take a pic further up the rod. I'm amazed how you and Frizzle etc make your welds disappear. Brilliant!! I always have flat spots, or dips what is your secret to the roundness, looks like it was in a lathe?
Also was this a '69 or '72 column, and this is why the shortening? I have one and noticed they are too long, if this is the fix I better pay attention. Thanks for the great instruction.
__________________

|
|
|
|
|
03-29-2012, 02:58 PM
|
#208 | ||
|
Registered User
Join Date: May 2011
Location: Anderson SC
Posts: 3,868
|
Re: Project Goldilocks, '66 C10 SWB BBW Build
Quote:
Quote:
It's a floor shift column (smooth bell, no shift rods) from a four speed floor shift 64-65-66 truck. I drove the blue '65 this past weekend and my arms are still cramped from wheel being so close to the seat!
__________________
Project Goldilocks '66 C10 Short Fleet BBW Build '65 C10 Highly Detailed Stock Restoration Thread '78 Camaro Targa Roof Build '55 International Metal/Body/Paint Work '66 F100 Full Rotisserie Restoration '40 Packard 120 Convertible Coupe Restoration How To Restore and Detail an Original Gauge Cluster How To Detail Sand Body Panels, Edges, Corners, Etc |
||
|
|
|
|
03-29-2012, 11:28 PM
|
#209 | |
|
Registered User
Join Date: Jun 2010
Location: Vancouver Island BC
Posts: 652
|
Re: Project Goldilocks, '66 C10 SWB BBW Build
Quote:
__________________
|
|
|
|
|
|
03-30-2012, 11:06 AM
|
#210 |
|
Artist
Join Date: Jan 2010
Location: Rockwell NC
Posts: 422
|
Re: Project Goldilocks, '66 C10 SWB BBW Build
[QUOTE=theastronaut;5282184]Shoot, I'd take $200k for it when finished!! I think you got a little fat-fingered with the keyboard there!
What!?!?!?! You do good work brother!!
__________________
66 Chevy C10 283ci~cough~ SBW Fleet Buttercup '66 |
|
|
|
|
04-01-2012, 09:22 AM
|
#211 |
|
Registered User
Join Date: May 2011
Location: Anderson SC
Posts: 3,868
|
Re: Project Goldilocks, '66 C10 SWB BBW Build
Ive been wanting a smaller diameter steering wheel since I'll have power steering but I couldn't find a 15" rim with similar grips to swap over. Do instead of swapping rims I section the original wheel from 16 3/8" down to 15". I've still got to grind the plastic back from the inner steel frame so I can weld it all together, then build up the joints with epoxy.
The original '66 deluxe wheel. 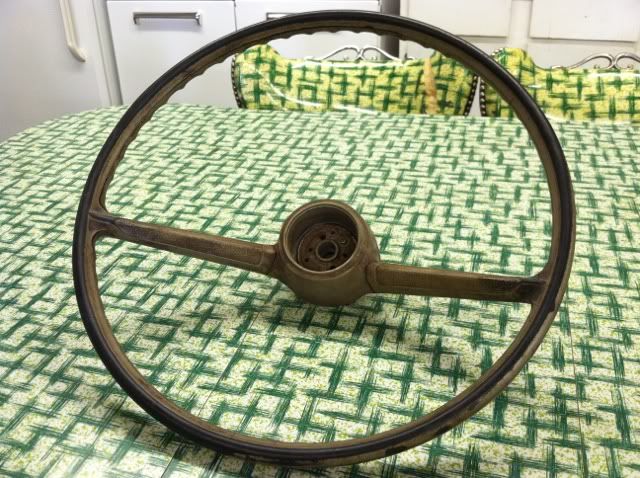 After cutting. 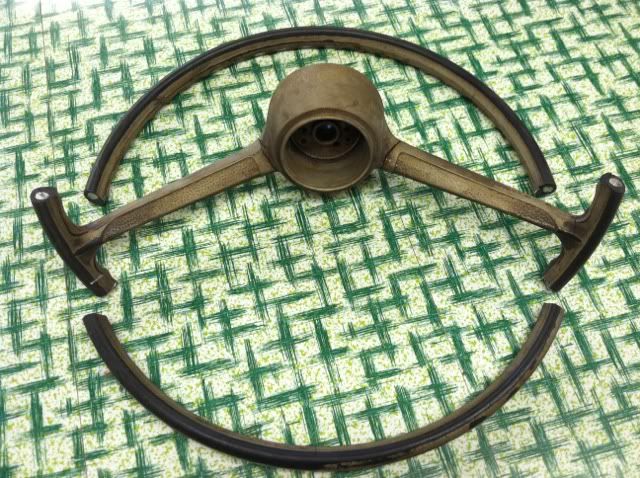 Marking the spokes for the cut. I've got a plan in mind that I think will make remaking the tapered end of the dimpled indention pretty simple when it's time to start epoxying and reshaping the wheel. 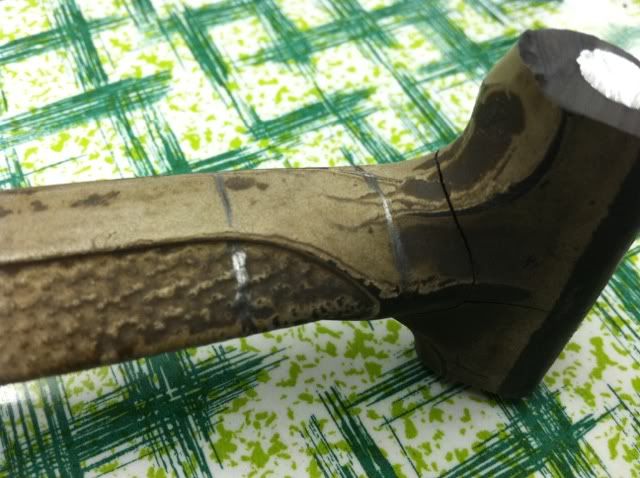 Spokes shortened, super glued in place temporarily for mock up purposes. 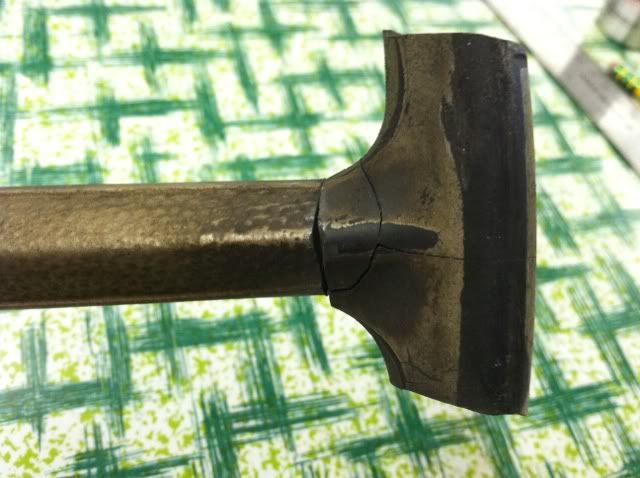 First mock up (after also shorting the two pieces of the rim). To get the hub centered, the edges of the rim and spokes on one side didn't meet up. I shortened one edge and will have to lengthen the other. 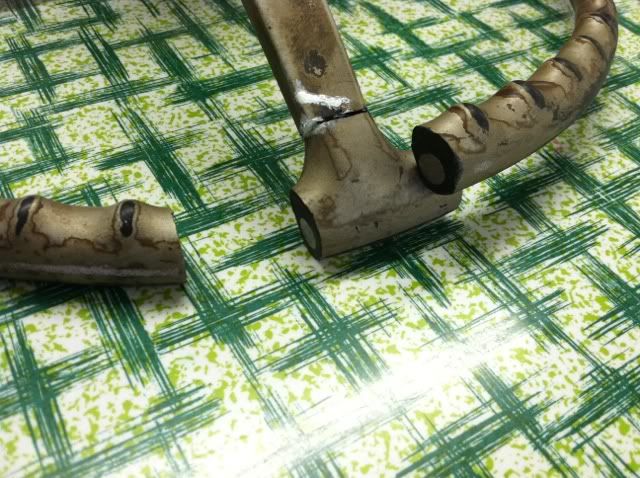 After getting everything roughly in the right position and the center hub centered in the rim, using one of the cut pieces to fill in the gap. 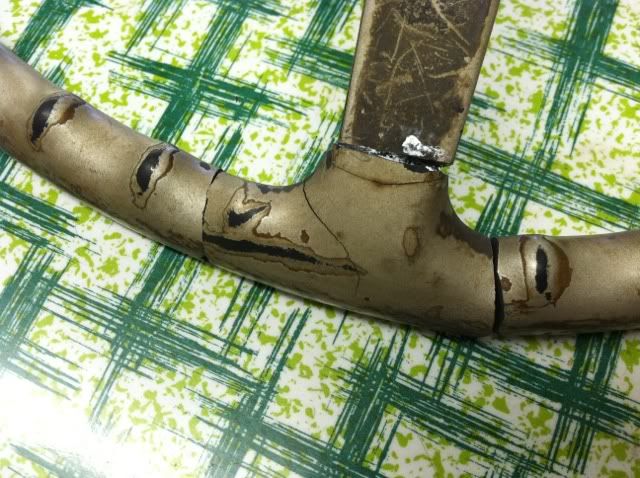 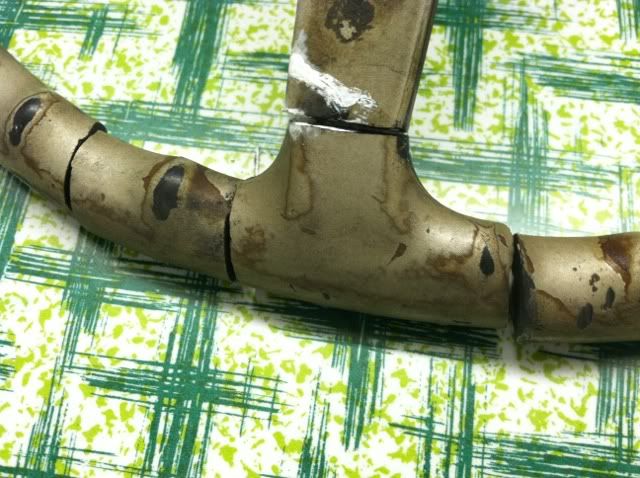 Roughed in and ready to start grinding back the plastic to weld the rim in place. It measures 15 inches now. I'll grind the edges back and glass bead the old paint and grime off, then use the steering shaft with a level and make sure the hub is level and centered, and 90* to the rim before welding the rim back together. I'll post pics once I get all that done. 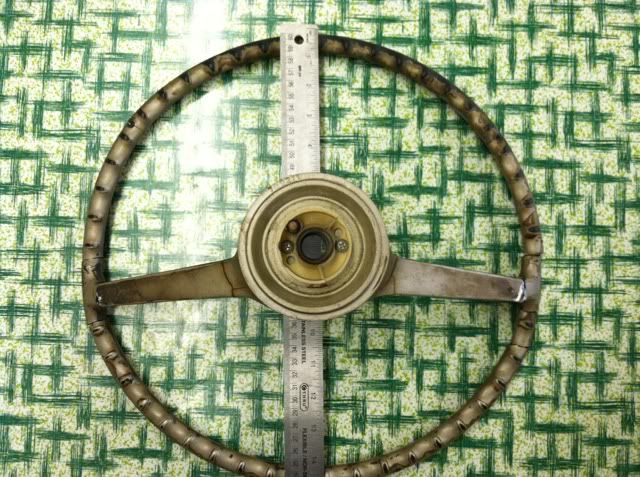 Posted via Mobile Device
__________________
Project Goldilocks '66 C10 Short Fleet BBW Build '65 C10 Highly Detailed Stock Restoration Thread '78 Camaro Targa Roof Build '55 International Metal/Body/Paint Work '66 F100 Full Rotisserie Restoration '40 Packard 120 Convertible Coupe Restoration How To Restore and Detail an Original Gauge Cluster How To Detail Sand Body Panels, Edges, Corners, Etc |
|
|
|
|
04-01-2012, 03:00 PM
|
#212 |
|
Registered User
Join Date: Mar 2012
Location: Shallow Lake Ontario,Canada
Posts: 201
|
Re: Project Goldilocks, '66 C10 SWB BBW Build
Great purchace and some nice work . You have got me tuned in from Canada. Not to many in this part of the world in that nice of condition to start with. Great work keep us posted
|
|
|
|
|
04-03-2012, 02:55 PM
|
#213 | |
|
Registered User
Join Date: May 2011
Location: Anderson SC
Posts: 3,868
|
Re: Project Goldilocks, '66 C10 SWB BBW Build
Quote:
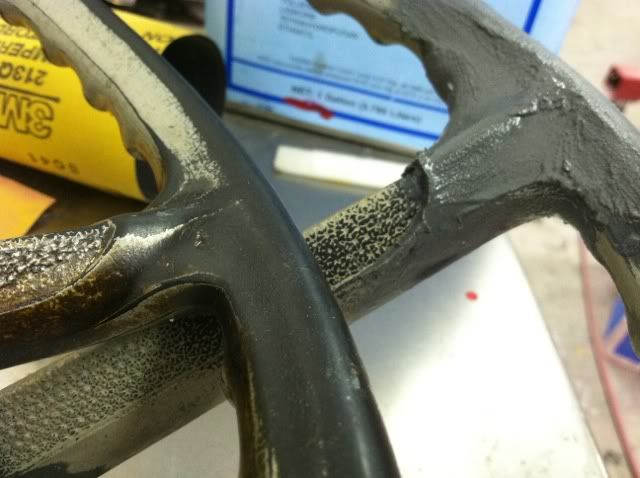
A little more work on the wheel. It's ready to epoxy and start shaping the bare areas. 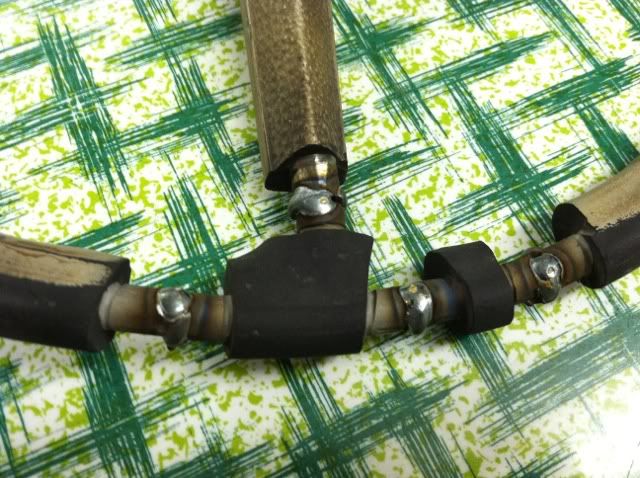 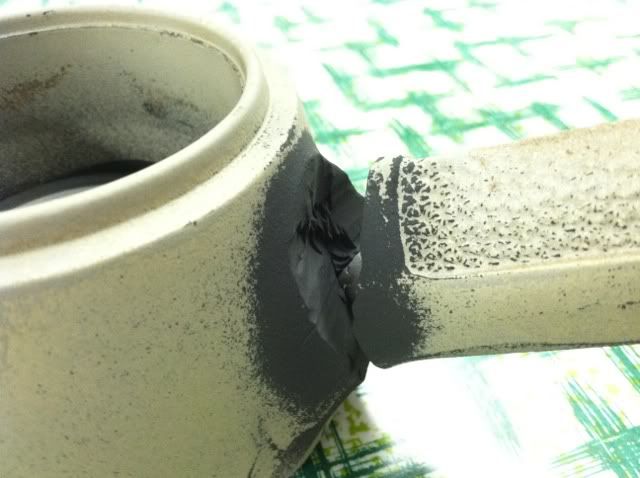
__________________
Project Goldilocks '66 C10 Short Fleet BBW Build '65 C10 Highly Detailed Stock Restoration Thread '78 Camaro Targa Roof Build '55 International Metal/Body/Paint Work '66 F100 Full Rotisserie Restoration '40 Packard 120 Convertible Coupe Restoration How To Restore and Detail an Original Gauge Cluster How To Detail Sand Body Panels, Edges, Corners, Etc |
|
|
|
|
|
04-03-2012, 04:51 PM
|
#214 |
|
Registered User
Join Date: Aug 2005
Location: Hillsboro Oregon
Posts: 6,449
|
Re: Project Goldilocks, '66 C10 SWB BBW Build
Awesome
 Posted via Mobile Device |
|
|
|
|
04-03-2012, 05:04 PM
|
#215 | |
|
Registered User
Join Date: May 2011
Location: Anderson SC
Posts: 3,868
|
Re: Project Goldilocks, '66 C10 SWB BBW Build
Quote:
Started working the epoxy. It's gunna take a couple coats on some of the rim areas. 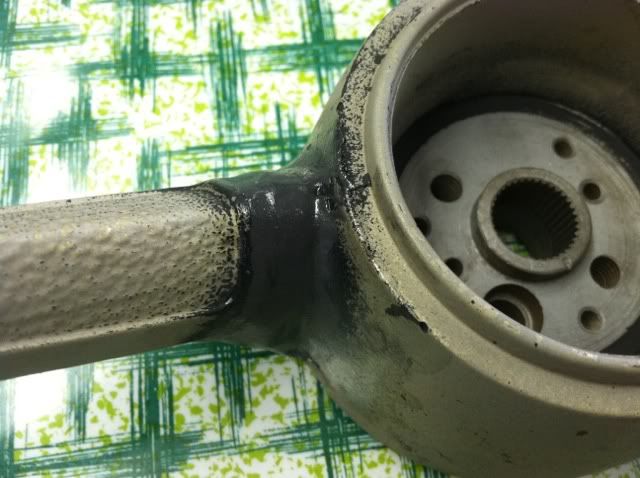 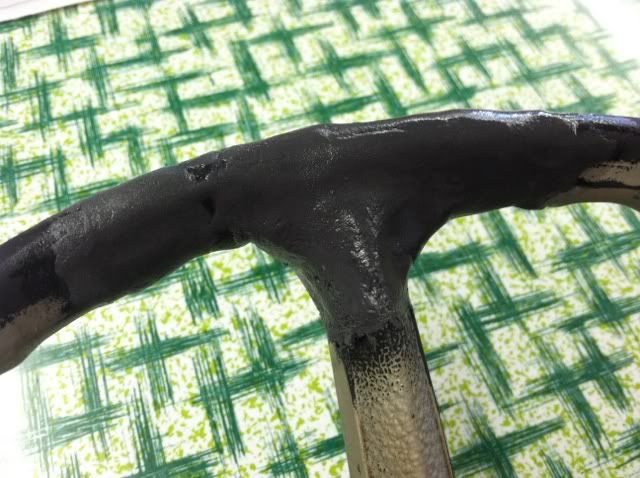
__________________
Project Goldilocks '66 C10 Short Fleet BBW Build '65 C10 Highly Detailed Stock Restoration Thread '78 Camaro Targa Roof Build '55 International Metal/Body/Paint Work '66 F100 Full Rotisserie Restoration '40 Packard 120 Convertible Coupe Restoration How To Restore and Detail an Original Gauge Cluster How To Detail Sand Body Panels, Edges, Corners, Etc |
|
|
|
|
|
04-03-2012, 07:20 PM
|
#216 |
|
Registered User
Join Date: May 2007
Location: Deale Md
Posts: 4,663
|
Re: Project Goldilocks, '66 C10 SWB BBW Build
With your attention to detail it will be perfect.
__________________
James 63 GMC V6 4speed carryall 65 chevy swb bbw V8 auto 68 K20 327/4 speed, buddy buckets 2002 GMC CC Dually Duramax 64 GMC lwb 3/4 V6 4speed SOLD 66 GMC swb bbw buddy buckets SOLD IG duallyjams The only thing that stays the same is constant change! |
|
|
|
|
04-03-2012, 09:11 PM
|
#217 |
|
Registered User
Join Date: Dec 2010
Location: sanford nc
Posts: 499
|
Re: Project Goldilocks, '66 C10 SWB BBW Build
Nice looking job on the steering wheel. My wheel is just like yours and has some cracks. What name brand epoxy are your using and is it the kind you squeeze from the tube and mix the 2 parts together?? I have to repair my cracks so I can repaint mine. Thanks
__________________
  69 chevelle malibu, 64 C-10 shortbed 69 chevelle malibu, 64 C-10 shortbed
|
|
|
|
|
04-03-2012, 10:34 PM
|
#218 | ||
|
Registered User
Join Date: May 2011
Location: Anderson SC
Posts: 3,868
|
Re: Project Goldilocks, '66 C10 SWB BBW Build
Quote:
Quote:
Posted via Mobile Device
__________________
Project Goldilocks '66 C10 Short Fleet BBW Build '65 C10 Highly Detailed Stock Restoration Thread '78 Camaro Targa Roof Build '55 International Metal/Body/Paint Work '66 F100 Full Rotisserie Restoration '40 Packard 120 Convertible Coupe Restoration How To Restore and Detail an Original Gauge Cluster How To Detail Sand Body Panels, Edges, Corners, Etc |
||
|
|
|
|
04-05-2012, 10:54 AM
|
#219 |
|
Registered User
Join Date: May 2011
Location: Anderson SC
Posts: 3,868
|
Re: Project Goldilocks, '66 C10 SWB BBW Build
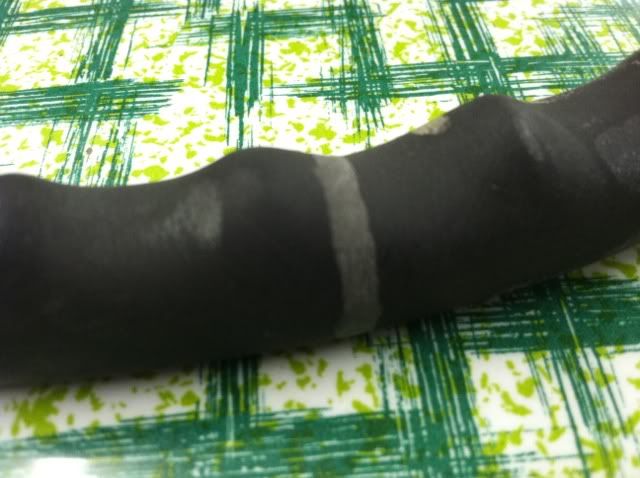
Got a little more work done on the wheel, started sanding the repaired areas. Also tried out remaking the pointed tip of the recessed textured area, and that looks like it's going to work out well. I pulled our lawnmower into work today, so since I had the trailer I went ahead and picked up the rest of the steel tubing for the frame bracing. I guess I'll be on the hunt for another T56; the guy I was going to get one from has already sold his, that's what I get for waiting too long.
__________________
Project Goldilocks '66 C10 Short Fleet BBW Build '65 C10 Highly Detailed Stock Restoration Thread '78 Camaro Targa Roof Build '55 International Metal/Body/Paint Work '66 F100 Full Rotisserie Restoration '40 Packard 120 Convertible Coupe Restoration How To Restore and Detail an Original Gauge Cluster How To Detail Sand Body Panels, Edges, Corners, Etc |
|
|
|
|
04-05-2012, 04:10 PM
|
#220 |
|
Rollin' Old Skool
Join Date: Jun 2007
Location: Hattiesburg, MS
Posts: 5,371
|
Re: Project Goldilocks, '66 C10 SWB BBW Build
wow, that's turning out really nice! i love seeing the work of you guys with such attention to detail
__________________
_____________________________________________ Phillip My Build threads: 1966 Chevy C-10 "Black Betty" shortbed, fleetside, BBW, 327 V8/ Powerglide (under construction) http://67-72chevytrucks.com/vboard/s...ighlight=betty 1997 Chevy Tahoe, 2dr/2wd, mild custom (Daily driver) http://67-72chevytrucks.com/vboard/s...d.php?t=601142 Pics: '66 C-10 https://flic.kr/s/aHsjHWD4h9 '97 Tahoe https://flic.kr/s/aHsjGZ7wKP '93 C-1500 https://flic.kr/s/aHskxdpdnQ '88 S-10 Blazer https://flic.kr/s/aHsjYGx4Md Previous Rides: 1993 Chevy S-10 ext. cab, 4.3L, 4/5 drop (Sold) 1993 Chevy C-1500 short/step Retro-Rod (Sold) 1988 S-10 Blazer 2dr/2wd mild custom (Sold) |
|
|
|
|
04-05-2012, 07:49 PM
|
#221 |
|
Registered User
Join Date: May 2007
Location: Deale Md
Posts: 4,663
|
Re: Project Goldilocks, '66 C10 SWB BBW Build
Nope you were simply not ment to have that T56 so there must be a better one waiting.
The wheel looks good.
__________________
James 63 GMC V6 4speed carryall 65 chevy swb bbw V8 auto 68 K20 327/4 speed, buddy buckets 2002 GMC CC Dually Duramax 64 GMC lwb 3/4 V6 4speed SOLD 66 GMC swb bbw buddy buckets SOLD IG duallyjams The only thing that stays the same is constant change! |
|
|
|
|
04-05-2012, 09:26 PM
|
#222 | ||
|
Registered User
Join Date: May 2011
Location: Anderson SC
Posts: 3,868
|
Re: Project Goldilocks, '66 C10 SWB BBW Build
Quote:
Quote:
I've got one side nearly finished.  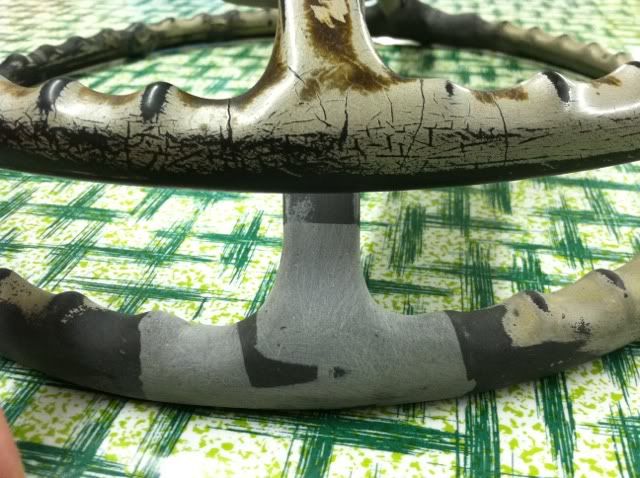
__________________
Project Goldilocks '66 C10 Short Fleet BBW Build '65 C10 Highly Detailed Stock Restoration Thread '78 Camaro Targa Roof Build '55 International Metal/Body/Paint Work '66 F100 Full Rotisserie Restoration '40 Packard 120 Convertible Coupe Restoration How To Restore and Detail an Original Gauge Cluster How To Detail Sand Body Panels, Edges, Corners, Etc |
||
|
|
|
|
04-05-2012, 10:55 PM
|
#223 |
|
1 thing at a time is progress.
Join Date: Jun 2007
Location: Ball Ground GA
Posts: 5,511
|
Re: Project Goldilocks, '66 C10 SWB BBW Build
Very cool idea. It looks good.
__________________
Alan
Philippians 2:14-16 |
|
|
|
|
04-06-2012, 12:55 AM
|
#224 |
|
Registered User
Join Date: Jun 2010
Location: Vancouver Island BC
Posts: 652
|
Re: Project Goldilocks, '66 C10 SWB BBW Build
Nice work Spaceman, that wheel looks great. I'll have to look for that epoxy.
__________________
|
|
|
|
|
04-12-2012, 08:25 PM
|
#225 | ||
|
Registered User
Join Date: May 2011
Location: Anderson SC
Posts: 3,868
|
Re: Project Goldilocks, '66 C10 SWB BBW Build
Quote:
Quote:
Got a little more done on the wheel last night. I re-did the tip of the indentions so that the indentions would be the same length on both sides. Guess I should have checked that already.  Once the epoxy finishes hardening it'll be almost ready for sanding and primer. I say almost because I had an idea that I want to incorporate into the wheel. More on that below. Once the epoxy finishes hardening it'll be almost ready for sanding and primer. I say almost because I had an idea that I want to incorporate into the wheel. More on that below.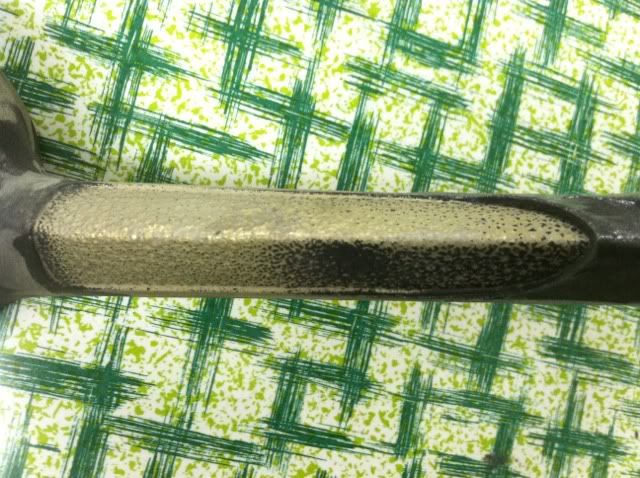 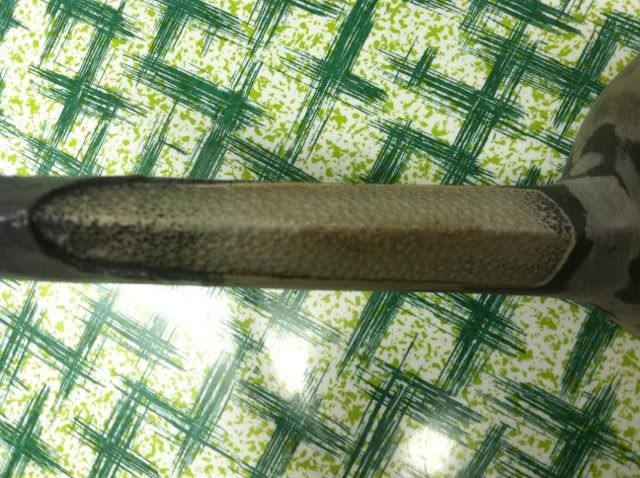 I also checked the fit of the horn ring, and it looks great on the smaller wheel. I was worried that the proportions would be off, but it looks fine.  After running this by MalibuKasey (co-conspirator/Goldilocks' official project consultant)  and recieving the green light of approval, I'll be adding two chrome rings to the top of the rim from a mid 60's Nova wheel. They'll be spaced one inch apart, and the rim will be painted dark fawn to match the dash color inbetween the chrome rings. The rest of the wheel will be fawn like stock. I wanted a stripe at the top of the wheel like race/drift/rally cars have as a reference, which supposedly is helpful when you're sideways. Of course, I'll need to test out that theory once she's back on the road... and recieving the green light of approval, I'll be adding two chrome rings to the top of the rim from a mid 60's Nova wheel. They'll be spaced one inch apart, and the rim will be painted dark fawn to match the dash color inbetween the chrome rings. The rest of the wheel will be fawn like stock. I wanted a stripe at the top of the wheel like race/drift/rally cars have as a reference, which supposedly is helpful when you're sideways. Of course, I'll need to test out that theory once she's back on the road...  I thought about adding just a dark fawn stripe, but I remembered that Impala's had chrome rings that were used to separate the two tone rim colors. Impala's had a different grip profile though, and those rings wouldn't work. MalibuKasey had a Nova wheel and confirmed that the rim profile was the same as on truck wheels, so I'll be using Nova rings to add to my wheel. This will keep with the OEM/factory styling trend, and also give nod to the suspension mods, and the type of driving I'll be doing.  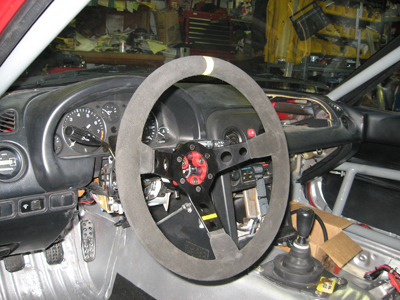 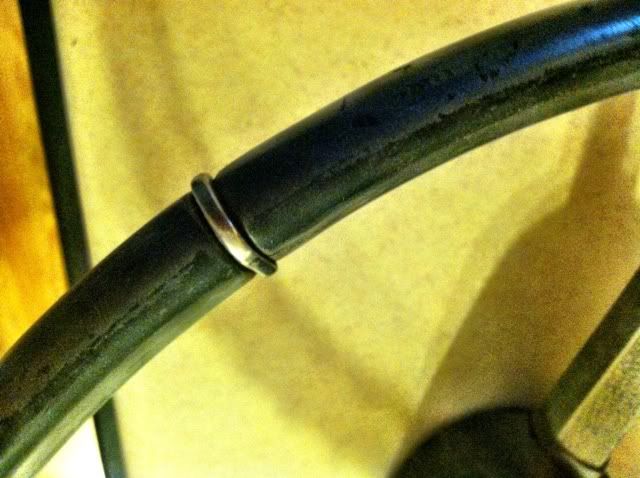 
__________________
Project Goldilocks '66 C10 Short Fleet BBW Build '65 C10 Highly Detailed Stock Restoration Thread '78 Camaro Targa Roof Build '55 International Metal/Body/Paint Work '66 F100 Full Rotisserie Restoration '40 Packard 120 Convertible Coupe Restoration How To Restore and Detail an Original Gauge Cluster How To Detail Sand Body Panels, Edges, Corners, Etc |
||
|
|
|
 |
| Bookmarks |
|
|


 Linear Mode

