Door latches
I have wasted more time trying to find door latches for this build than you can possibly imagine. Original replacement latches for this truck simply cannot be had. The factory that has the tooling has apparently been promising the vendors that it will ship next month for the last year or two. The used supply has dried right up (you would not believe the calls I made trying to find some). I need some way to operate these doors, so I decided to go with some bear claws/jaws (Ive seen them referred to both ways). Once the new latches become available, I can easily toss in a set.
With this being said, I had to decide whether or not to post what I did on this forum. I have focussed so far on posting S10 swap details, or generic old truck stuff, as my truck is not an AD or TF. Im going to deviate just a bit here, as I had to figure out how to make a latch system for the Fargo. The process is however just a bunch of old truck stuff so I figured Id post anyhow, as some members may someday be faced with a similar situation on one of their builds. Of course for AD/TF trucks you can simply go and buy a brand new latch for $41.99 (I swear my next build will be something more popular so that I can actually get parts!).
Here was the problem and the fix:
This is what I started with. The truck came with the complete passenger side assembly, as well as the arm that runs from the inner handle remote to the latch on the driver side (I found that arm sitting in the bottom of the drivers door). The passenger assembly was in ghastly condition, with all springs broken and all moving parts worn down to nothing. The remote also had its moving parts worn smooth.

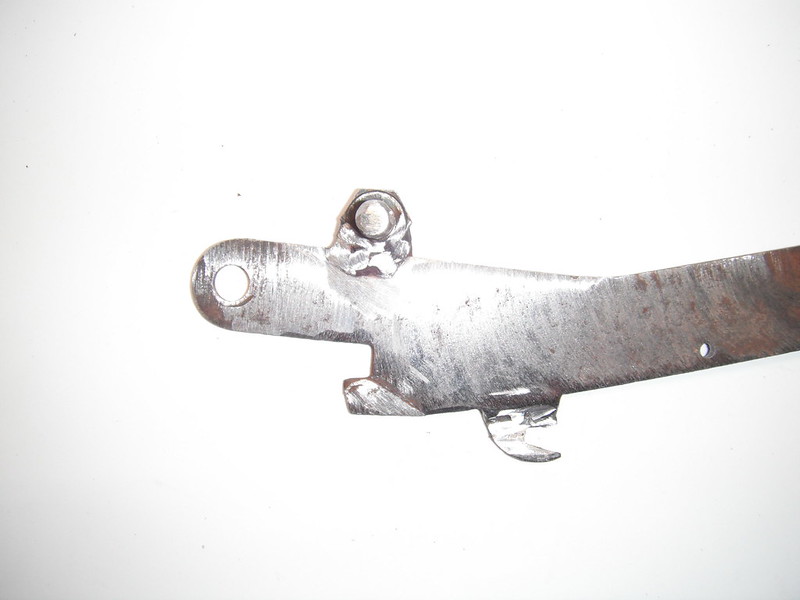
While I had previously posted a pic of the drivers side latch that came with the truck, I feel compelled to post it again!!!

I made a mockup of the small size latch assembly sold by hotrodlatches.com (they post excellent detailed dimensions on their website and have been favourably reviewed on other forums).

The original location of the factory latch assembly would not have been optimal, due to the large divot in the B-pillar where the factory striker was mounted. I was also hoping to leave things alone so that I have the option of returning to original latches and locks once they become available again. I played around, and sure enough I found a sweet spot where a new latch could sit above the old location. Now that I saw it would work, I ordered the latches (as an fyi, the owner of the company that sells the latches is very decent to deal with and he replies to tech questions quickly). Once I had the latches, I grabbed one and placed it where the old passenger side latch sat, then slid it upwards until it hit a glass run channel brace. In this position it leaves the old latch opening unobstructed. This turned out to be a very good thing during subsequent fab work. Id like to say I planned it this way, but as usual it was dumb luck. After examining the space available for the striker bolt on the cab body, I installed the bear claw on the door. I slid it ¼ inch away from the door corner to allow more room for linkages inside the door. Here is the latch, bolted in place, and the door cut away where the claws and striker pin sit.

I then fooled around with the factory handles to see if it would be feasible to hook these up to a bearclaw. Once again, dumb luck intervened on my behalf. The original arm that connects the interior handle remote control to the original latch reached the bearclaw location without any modifications. Hooking it up was simple. I needed to add a linkage post to that arm in order for it to attach to the bearclaw, so I just cut the threads off of a ¼ inch bolt, leaving the smooth round shoulder on. I then drilled a hole in the shortened bolt, so that later on I could assemble things using R clips (also called hitch pin clips, hair pin clips, etc.). Access is tight, so I needed something that could be installed and removed using needle nose pliers.

I tacked the post onto the arm, and a quick test showed that this would work. Heres a shot of that arm (actually this pic was taken a fair while later, as I eventually needed a 2nd post).

Now that I knew the inner handle would operate the bearclaw, I tackled the outer handle. This proved to be a little trickier. The outside handle assembly consists of the chrome handle, the small housing that screws against the door, and a 5/16 square rod that goes inside the door. It also has an internal spring and some sort of ball & socket cup that allows the handle and square rod assembly to swivel within the chrome housing (likely to allow for somewhat sloppy production tolerances). Heres a shot of me holding that assembly (Im squeezing it a bit to show how it can swivel within the chrome mounting housing).

The problem was that the 5/16 square rod was designed to be supported on the end where it slides into the stock latch assembly. Trying to fab up a mechanism that attached to the end of the square rod was futile (I tried!) because the swiveling of the rod & handle within the chrome mount always led to binding problems. The only solution I could see was to fab something that would anchor that loose end. Heres what I did:
The square rod needed to be made a bit longer, so I welded on a piece of round rod to get the required length. I then added an arm, along with a ¼ inch attachment pin that would connect the handle assembly to the bearclaw latch via another arm. I then made a small cup assembly that would attach to the door and keep that handle assembly from flopping around and binding.


I had something a little more elegant in mind for all this, but then I remembered that whatever I add to that square rod has to fit through a rather small opening in the door. Here it is, being weaseled into place through that hole:

The cup was spot welded to the inner door, a bit of grease was added, and I now had a square shaft that rotated along a fixed line.

This made all the difference in the world, as the binding problem vanished. The location of the outer handle and square rod was not optimal for attaching directly to the bearclaw latch, so I simply fabbed an arm that connected the square shaft to the inner remote arm:

The next issue was the fact that the original factory latch mechanism had the springs that returned the 2 door handles to their resting position. Bearclaw latches do not provide this, so I needed to make something. This turned out to be quite easy, as all I needed to do was add a spring to what I had already fabbed. I added a hook to the inner remote arm
..
.and then I whipped up a little hook on a bracket
..

The hook/bracket combo was just bolted into the existing (and no longer needed) lower factory latch holes:


The fact that the bearclaw location left the original factory latch hole exposed really paid off during all of this work. Lots of stuff could easily be worked on, and now it was a simple task to use a pair of needle nose pliers to get a spring hooked up between the 2 hooks that I had just added. By adding the spring to the remote arm, both the inner and the outer door handles return to their resting position when released. Here is a shot of the works, laid out on a table:

And heres an idea of how it goes together (its impossible to get a pic of it inside the door):

I tossed it all back inside the door, and did some fine tuning. The return spring was too weak, so I grabbed a bigger spring which I had to mount a little differently, but what a difference it made.

I then made up a fresh arm for the outer door handle. Heres a pic of the old arm (the upper one in the pic), and the new arm.

The old arm design resulted in the outer door handle moving when you used the inner door handle. By adding an oblonged hole, the outer door handle now sits still when you open the door from within the truck. Just when I thought I had it all licked, I discovered that the oblonged hole also allows some unrestricted rotation of the outside door handle in a counter clockwise direction:

This would result in the handle bouncing upwards whenever I hit a bump (which is constant on the gravel roads around me). Thankfully the solution to this problem was simple. I added a small tab to the square rod of the handle, and a small shelf to the spring retaining bracket. This creates a hard stop, and ensures that the outer handle remains horizontal (the way it came from the factory):

Another reassembly of the entire system showed that things were finally in order. The outer handle sits level, and it is not influenced by the inner handle. Now all that was needed was some sort of cover that can be easily removed if I have to take things apart:


I still have to do the driver side, but thats only a couple of hours work. It was the sittin, starin and thinkin that burned off countless hours on the passenger side.