Worked on the rear brakes and installed most of the Rear Pro Performance Revelator Kit.
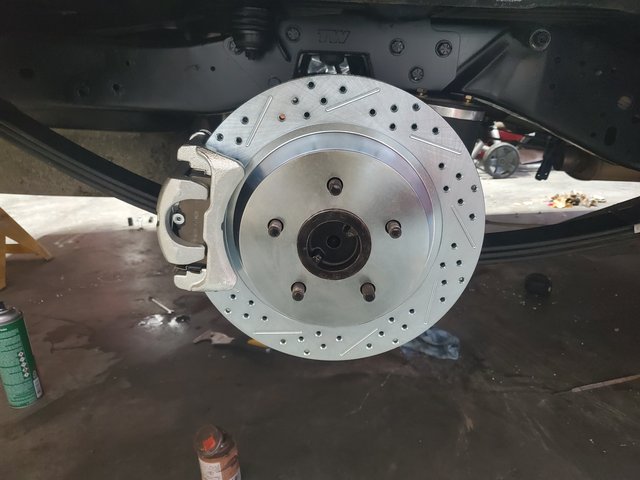
The rear is a 13" rotor if I recall correctly.
Installation was very straight forward, and when looking back at some of their earlier kits install instructions, this latest version is very simple and straight forward to install. All of the components came packaged in one box and were neatly organized and easy to identify. I believe the rear uses Mustang calipers, not sure which year or model though.


I did have one hiccup along the way, due to my own fault.
After pulling the axles to install the main bracket that attaches to the ends of the axle housing, I didn't tap it on to ensure it was seated flat against the surface and only lined up the 4 bolt holes, as a result the bracket caught partially and bent on the small lip and shown in the picture below and I didn't notice it after installing and torqueing everything up. This caused the caliper to not be centered over the rotor and to drag when rotated. After scratching my head for quite a while trying to figure it out I left it for the night and resumed the next day with fresh eyes, I eventually laid down and looked from underneath noticed a slight gap between on two different sides of the bracket. The bracket had bowed out as a result of catching on the lip and caused everything to no longer be centered. The fix was easy enough, pulled everything off, (unfortunately I had just sealed up the diff cover with fresh gasket the night before and had to yank the axles again to get bracket off), pulled off the brackets, marked which side bowed out, straightened them out in the vice and then reinstalled flipped over, thinking that even though the metal is straightened out, it might have a tendency to bend back in the direction it was bent already, so why not flip it preventing that from happening... I have no idea if this matters and ultimately it was reinstalled flat and seat properly so it shouldn’t matter, but my brain said to do this. After getting everything back together everything rotated freely as it should, and all is good.

Getting the rotor installed onto the axle took some effort and persuasion with a sand filled dead blow hammer. After initially not making much progress trying to get the rotor on, I yanked it, and cleaned all the paint off of the axle register and took a file and cleaned up the surface a little more after the paint was removed and put a little bit of grease on the register to help out with sliding the rotor over the register. Then I put 3 lug nuts on, and snugged them up, and then would hit around the lug nuts with the dead blow hammer, re-snugging the lug nuts after every blow. Eventually it worked its way evenly all the way on the axle.
The kit allows you to clock your caliper however you feel, can be to the rear, or front or just upp a little from either way, just make sure the bleeder is up.
I ended up moving the caliper one bolt hole up on the bracket after this picture was taken, so now the caliper sits at 10 o-clock vs 9 o-clock in the picture.
I still need to plumb the lines and hook up the emergency brake cables, hopefully I will get around to this later in the week and I think I might make new brake lines for the rear. Next up after that, install new Master Cylinder and Proportioning Valve.
-Dexter