Cleaning up the tool.
I've had this for several years and I don't have any before pictures. It was pretty black in places.
This fellow took his apart and took lots of pictures.
https://gtsparkplugs.com/Snap-On-MT2500.html
If you don't have a great deal of patience, I wouldn't open one of these. The plastic ribbon cables to the display are similar to the printed circuits on the squarebody instrument clusters and the old Sinclair Spectrum keyboards. They're a fiddly PITA to get back in place and the case closed without the ribbon(s) slipping out of the sockets. I've done a bunch of this kind of work and I had to step away to collect myself before sitting down and doing more battle.
These were originally built in 1987 through the 1990's. There are several electrolytic capacitors on the mainboard and tantalums in the cartridges. I would test all of the electrolytics for capacitance and ESR and make sure the tantalum caps in the cartridges aren't dead shorted before applying power to the unit. Replace any that are out of spec. The caps on mine were very high quality Panasonic and Sprague parts. I didn't find any electrolytics that were out of spec after 30+ years and the tantalums were in good shape too.
I disassembled it and thoroughly scrubbed the empty case bits, rubber bumpers, and the Y/N buttons with Dr Bronners Castile soap and HOT water. It's soap not detergent so it's fairly mild and does a number on grease without damaging the plastics.
The YN circuit board cleaned up with 91% Isopropyl just ike a TV remote circuit board. Be VERY careful of the wires and the mainboard connector. I had to use needle nose pliers to carefully take it out. This is NOT keyed so pay attention to the direction of the RED wire and put it back the way you found it.
The rotary encoder wheel will clean up with 91% Isopropyl and a cloth. If it's really nasty pull the knob off the encoder and scrub it with Dr Bronners.
I did thoroughly spray the female cartridge ports down with DeOxit D5, let sit, scrubbed with an old power toothbrush, and sprayed the loosened crud out with more D5. Then I inserted and pulled out a chunk of sanded PC board and wiped it off til the contacts stopped leaving much crud on it. Then I sprayed out with D5 again. I did this with my Nephews NES and Super NES cartridge slots, and it seemed to do the trick on those.
The female connectors were available in 2018 from the usual suspects if you need one or two. I wouldn't be looking forward to removing and replacing one of these. The pin spacing and number of pins makes for a miserable time at the microscope.
A trick I use when re-installing screws in old plastic/ABS computer hardware, games, test gear cases, automobile controllers, etc. Drop the screw in the hole and turn them backwards very slowly til you feel the screw start to climb up the threads in the plastic hole. Then you can turn it forward without cutting new threads and weakening or cracking the plastic. Only turn it far enough that you can feel more resistance then stop.
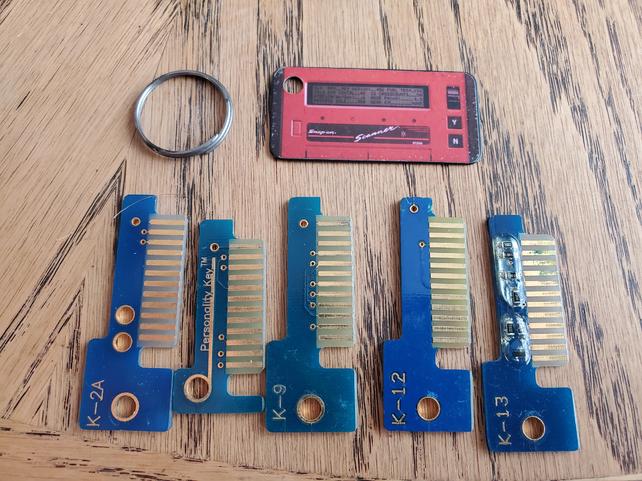
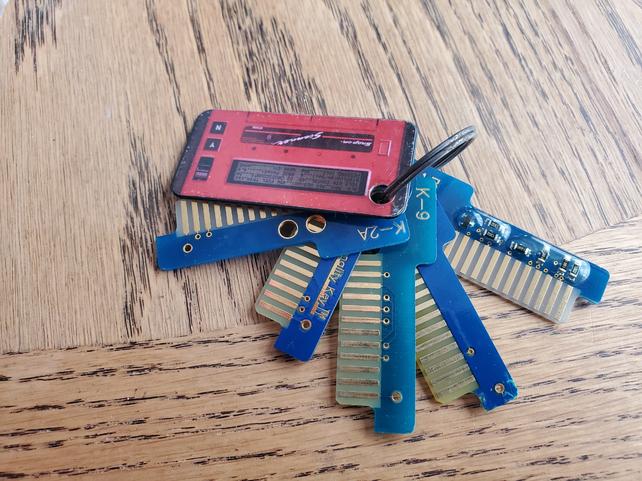
The personality keys and cartridges have exposed copper/nickel contacts.
The cartridges were filthy too. I dis-assembled and scrubbed the cases with Dr Bronners. I scrubbed the personality keys with it too. Lots of greasy fingerprints on them.
The keys got a dose of 91% IPA (Isopropyl alcohol) and air dried.
The contacts on the cartridges and the Personality keys got the same treatment as my Nephews game cartridges.
Washcloths, Q-Tips, Wieman brass polish, 91% IPA, and Deoxit D5.
Sanding and erasers are abrasive and remove base metal. The chemicals will just remove the crud and corrosion. You just have to be very fastidious about cleaning up. Any polish left behind will quickly make a big mess.
- Put a spot of Wieman on a cloth, soak the spot into the cloth, then scrub the card edge contacts, being careful to not push polish onto the rest of the PC board. Be especially careful to not get any polish in the tiny through hole vias that are close to the fingers on the boards and keys and make sure to rinse it out with IPA if you do. If there's stubborn corrosion, scrub with a Q-tip with a tiny amount of polish on it.
- Wipe the excess off with the polishing cloth then wipe off the rest with another cloth using 91%IPA. I usually use three or four spots to make sure the ammonia is removed from the exposed copper.
- Spray some Deoxit D5 on another cloth and wipe on the exposed contacts. D5 will lubricate and protect the bare metal from oxidation.
Here are my MT2500 Keys before and after scrubbing with soap and cleaning off corrosion.
Notice the bad corrosion on K-13 and how clean it is after. No serious pitting shows even under the microscope.