While the bed is off, there are several other things that need attention and now is a good time to do them because I have good access to everything. Besides, I doubt much anything I can see now that requires regular service or replacement has been touched for many years. After the pinion seal, I had the following items on my List.
1. Replace the u-joints and bearing support
2. Replace the exhaust system
3. Clean the frame
4. Replace the shocks
5. Replace the rear brake hose
6. Redo the rear end cover seal that I apparently didnt do very well the first time
So here goes with Numero Uno, Replace the u-joints and bearing support (aka DRIVESHAFT).
DRIVESHAFT (1 of 3)
Ive taken out one-piece driveshafts and replaced u-joints before, but this two-piece shaft looked a little more complicated. I made sure I marked the original orientation of all the parts so I would reassemble them in the same position (assuming they were all in the proper positions to begin with, of course). I cleaned up as best I could around the transmission tailshaft seal to minimize introduction of dirt when I removed and replaced the driveshaft assembly. I then removed the entire two-piece driveshaft (this was easy).
U-Joints
Since I dont know the service history of this truck, I decided to replace all three u-joints (UJs). The two forward UJs are the same size (Series 1310), and the rearmost one is larger (Series 1350). However, the auto parts stores think all three should be the same, but on a C20, they arent. 67-72chevytrucks.com and the Chevrolet Truck Parts Catalog provided the details regarding the anomalous part. I bought sealed Precision UJs so I wont add three fittings to grease in the future. The ones I removed were sealed Spicers. The truck probably came from the factory with sealed UJs, according to the Service Manual. Its been many years since I worked on UJs, so I fiddled around a while until I got a method worked out. I ended up using my hydraulic press to remove them and a 6" C-clamp to install them (both in combination with an appropriate size socket) which worked reasonably well.
I had some difficulty installing a couple of them. After the lock rings were in, the joint was binding, I could feel that it was stiff and not rotating freely. I wasnt too sure what was happening, so I took one of the old Spicers, tore it down, cleaned it, greased it, reassembled it, and reinstalled it at a joint (a good exercise, probably something people did a lot way back when, too, rebuilding UJs). No binding. I began to think my new Precision UJs were at fault. I read a few threads where people disliked them, but they didnt give any specific reason why. I made a lot of measurements to compare new and old UJs (Ive got a decent set of mics and calipers) and I found both almost deadnuts the same. So something was amiss in the way they ended up after I installed them, I thought. Maybe the binding I felt was because the trunnion end faces were being forced into the bottom of their bearing caps. So I went back and made sure all the yoke surfaces were clean, the lock rings and their slots were undamaged, and everything was free of debris or damage. I found a few places that needed attention, so I got out my Dremel, small files, wire brushes, and solvent and did what I felt necessary. The lock ring slot on the splined center yoke was definitely tweaked (more about that below). Once I took care of all this, all the UJs went in fine and did not bind.
Here, in greater detail, is a procedure I wrote based on how I did my UJ work (with lots of pics).
http://67-72chevytrucks.com/vboard/s...d.php?t=492271
Bearing Support
The Service Manual calls this innocuous looking contraption a bearing support, so I guess I will, too. The bearing support consists of a stamped metal frame, the lower section of which is formed into a cylinder. Held within the cylindrical section is a rubber isolator that grips the outer race of a roller bearing. The bearings inner race is pressed onto the splined section of the front driveshaft. By virtue of its being attached to a frame crossmember, support is provided for the driveshaft near the center UJ. My driveshaft obviously sagged here. It was way off-center relative to the bearing support. With the bed off, I could hear it squeaking when I drove at slow speed. The last pic below shows the support after it was removed from the driveshaft.
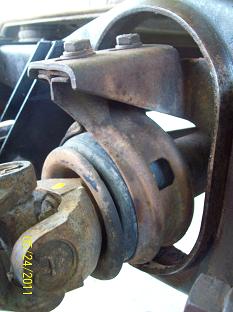
Bearing support
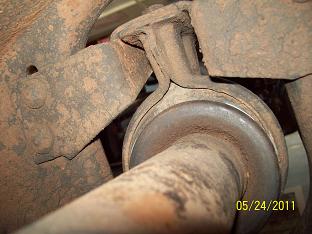
From beneath cab
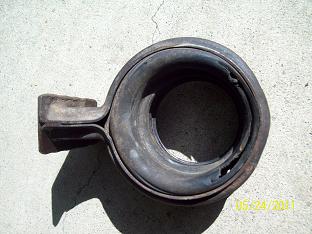
Cut and sagging rubber isolator