
|
|
|
 07-03-2023, 06:03 PM
|
#1 |
|
Registered User
Join Date: Nov 2010
Location: calgary alberta
Posts: 7,918
|
Re: Long Time Coming......
I like those strip it discs for that too. Just be careful not to overheat a spot.
|

|

|
|
07-04-2023, 01:37 PM
|
#2 |
|
Registered User
Join Date: Jan 2022
Location: Conn.
Posts: 184
|
Re: Long Time Coming......
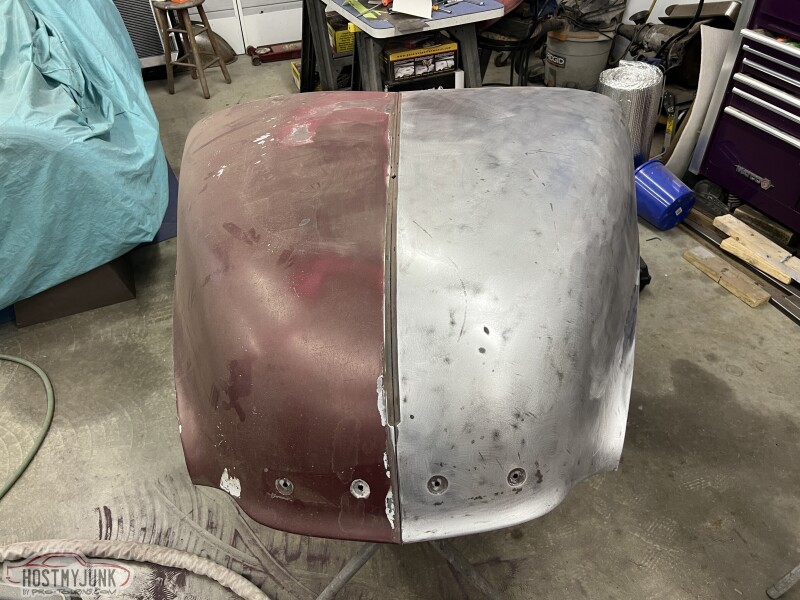
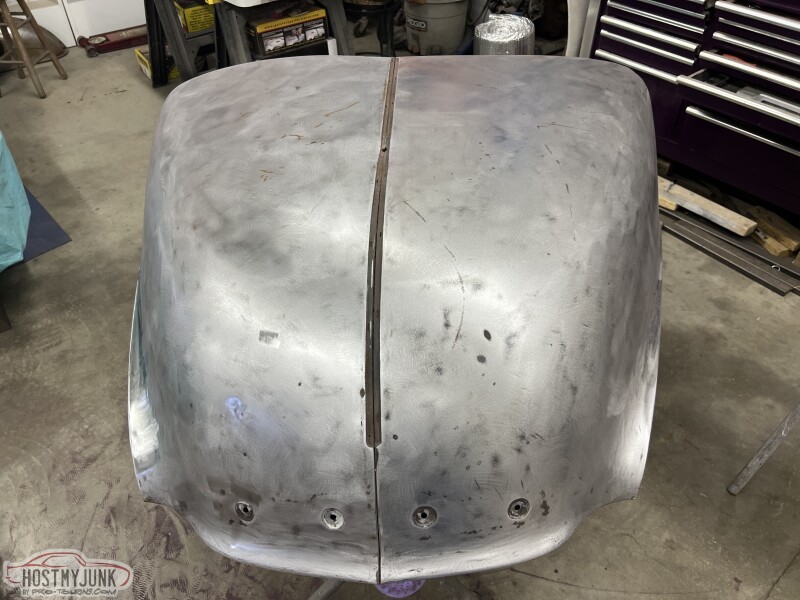
Todays adventure in the sjop was to strip the hood inside and out. Still some detail areas to get to under the hood, but all in all it's done. I'm pleased with the condition of the hood.
     I then jumped back on the door. I had already gotten most of the paint off but then I hit a fairly large area of body filler. This became a huge disappointment. It appears as though someone in the past decided to "fix" the dents by drilling holes and pulling. They then loaded the area with some mud that was still about a 1/4". Which makes me wonder how big the dent must havebeen if it was still this deep afterwards. These leaves me contemplating whether or not to fix it, or just get another door. All those worm holes would need to be plug welded up, all while dealing with any warpage and oil canning that is likely to surface. 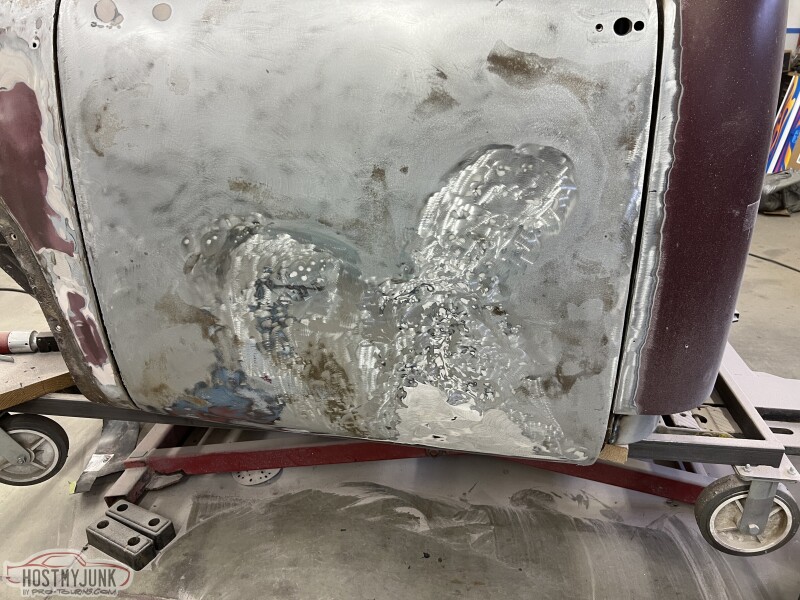 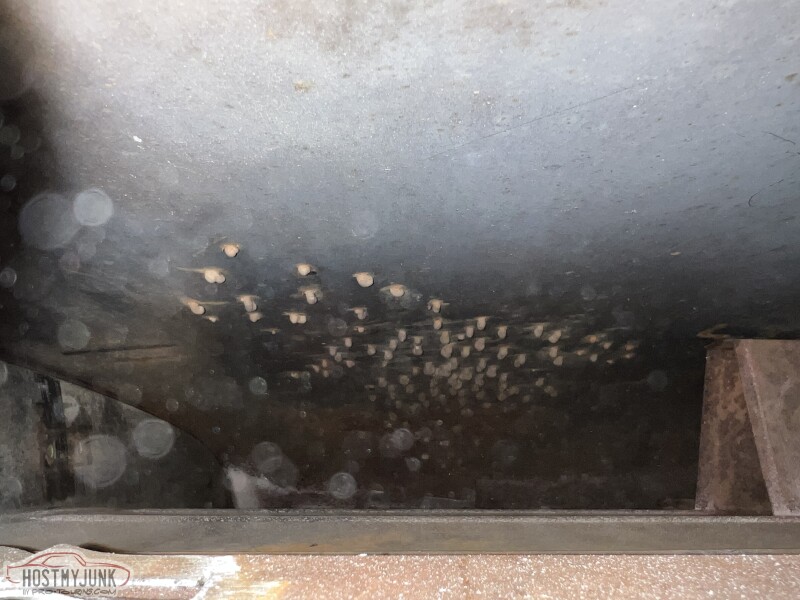
__________________
Glenn 1951 3100, Area51 1955 BelAir, 4EVER17 1987 R10, Ethel Copper Hill Rod & Custom http://67-72chevytrucks.com/vboard/s...d.php?t=829856 |
|
|
|
|
07-04-2023, 03:59 PM
|
#3 |
|
Registered User
Join Date: Nov 2010
Location: calgary alberta
Posts: 7,918
|
Re: Long Time Coming......
Fix it if it fits the truck.
Flatten the areas, get one of those step drill bits. Drill the holes all the same size. Then make yourself a punch die that side by getting a block of steel, slice a groove in one side wide enough for a piece of sheet metal to slip into, then drill a hole through the block at 90 degrees to that hole so when your sheet is in the slice you can use a pin punch that fits the drilled hole to punch out some circles for filler plugs. |
|
|
|
|
07-07-2023, 04:25 PM
|
#4 | |
|
Registered User
Join Date: Jan 2022
Location: Conn.
Posts: 184
|
Re: Long Time Coming......
Quote:
I am more than likely going to fix it, however someone local to me happen to have a still in the box AMD door waiting to be used. So I now have it and hoping to try and see how well it fits before I move forward.
__________________
Glenn 1951 3100, Area51 1955 BelAir, 4EVER17 1987 R10, Ethel Copper Hill Rod & Custom http://67-72chevytrucks.com/vboard/s...d.php?t=829856 |
|
|
|
|
|
07-07-2023, 04:31 PM
|
#5 |
|
Registered User
Join Date: Jan 2022
Location: Conn.
Posts: 184
|
Re: Long Time Coming......
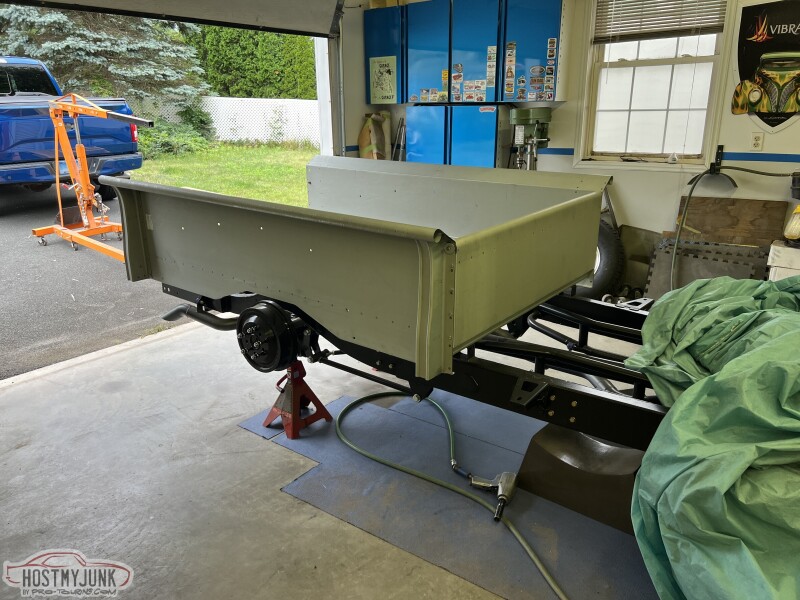
When I changed directions with the build and decided to go all in I sold off the old used, well worn bed. A few weeks ago I was dealing with Apicella Design about some of their own manufactured parts, at the same time I inquired about ordering a new bed from them. They made me a deal I couldn't pass up.
Today the Fed Ex Freight truck showed up with the new Mar-K bed. Sire I could have saved a couple hundred bucks on another brand, but the Mar-K products are stellar in fit, finish and everything in between. The metal thickness is good and heavy and it all comes in a nice galvanized coating. Just look at the way they box/crate their products. You can tell they go above and beyond. 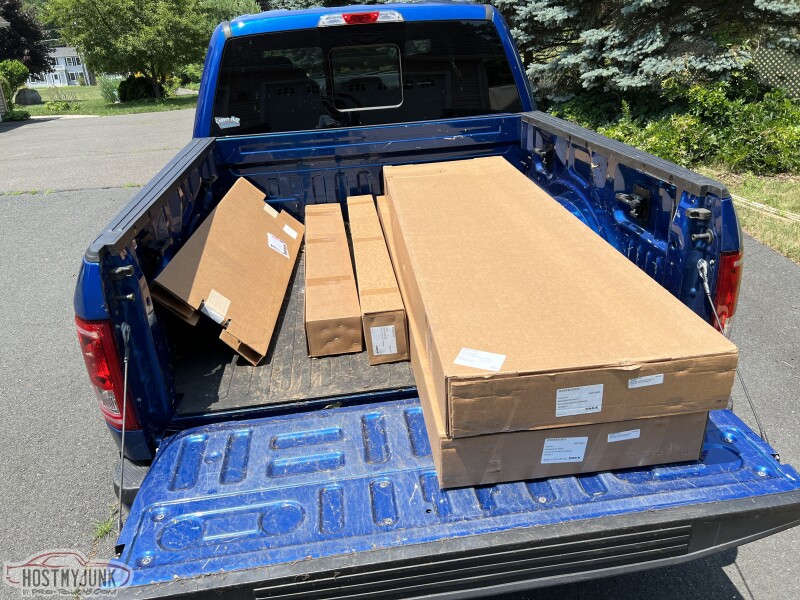 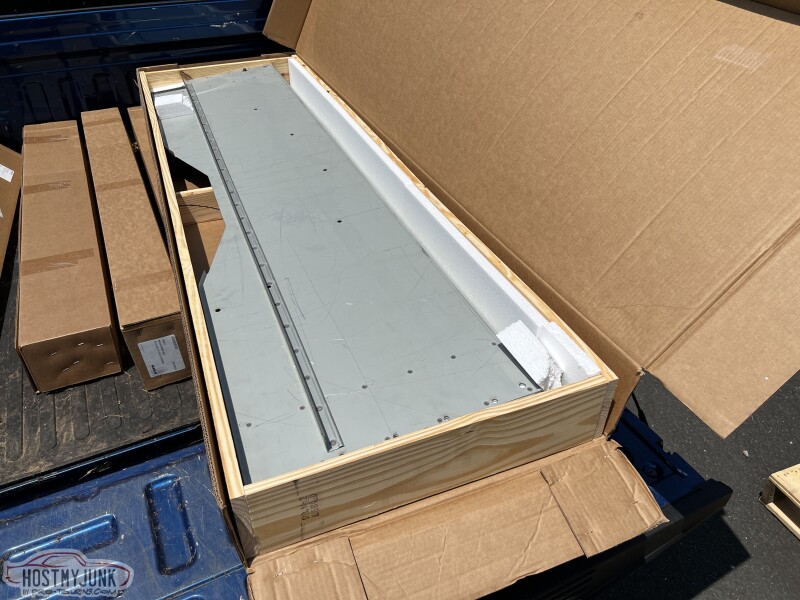 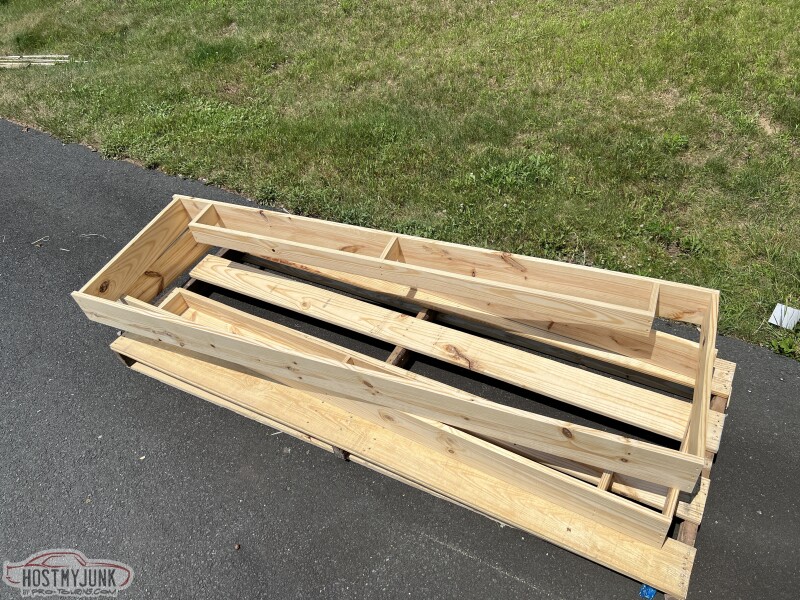 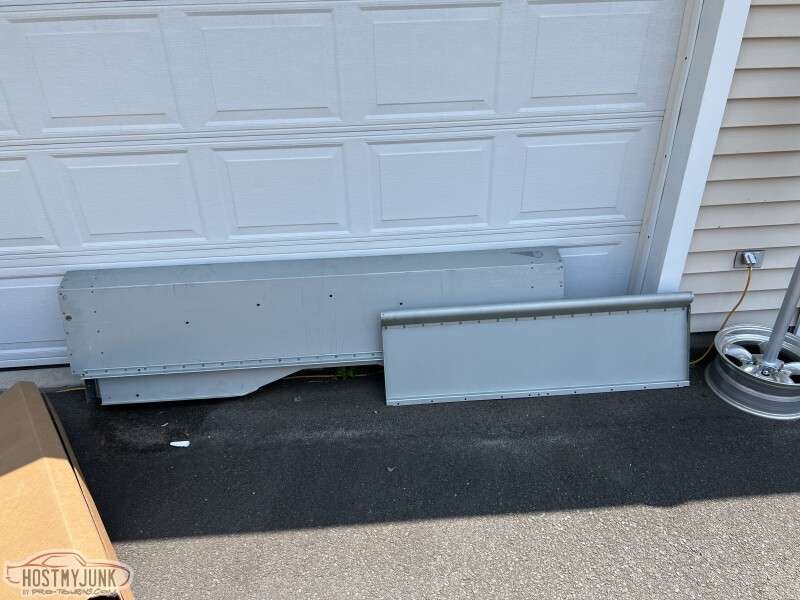 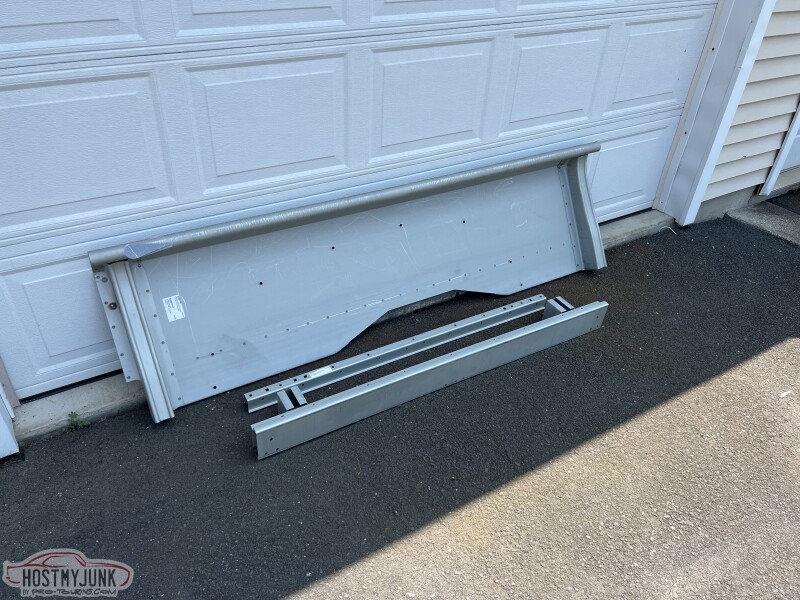
__________________
Glenn 1951 3100, Area51 1955 BelAir, 4EVER17 1987 R10, Ethel Copper Hill Rod & Custom http://67-72chevytrucks.com/vboard/s...d.php?t=829856 |
|
|
|
|
07-08-2023, 01:46 AM
|
#6 |
|
Registered User
Join Date: Nov 2010
Location: calgary alberta
Posts: 7,918
|
Re: Long Time Coming......
nice.
doors, though, were fit to the truck along with the hinges so if possible use the old iron or at least try the fit on the new parts before you get rid of the old parts |
|
|
|
|
07-14-2023, 01:40 AM
|
#7 |
|
Registered User
Join Date: May 2018
Location: Phoenix, AZ
Posts: 318
|
Re: Long Time Coming......
Wow great work!!!! This truck is going to be awesome.
__________________
Project "Eagle Spirit" 52 Chevy http://67-72chevytrucks.com/vboard/s...d.php?t=763085 Project "LS Scout" https://67-72chevytrucks.com/vboard/...d.php?t=844133 |
|
|
|
|
07-14-2023, 07:01 AM
|
#8 | |
|
Registered User
Join Date: Jan 2022
Location: Conn.
Posts: 184
|
Re: Long Time Coming......
Quote:
__________________
Glenn 1951 3100, Area51 1955 BelAir, 4EVER17 1987 R10, Ethel Copper Hill Rod & Custom http://67-72chevytrucks.com/vboard/s...d.php?t=829856 |
|
|
|
|
|
07-14-2023, 07:09 AM
|
#9 |
|
Registered User
Join Date: Jan 2022
Location: Conn.
Posts: 184
|
Re: Long Time Coming......
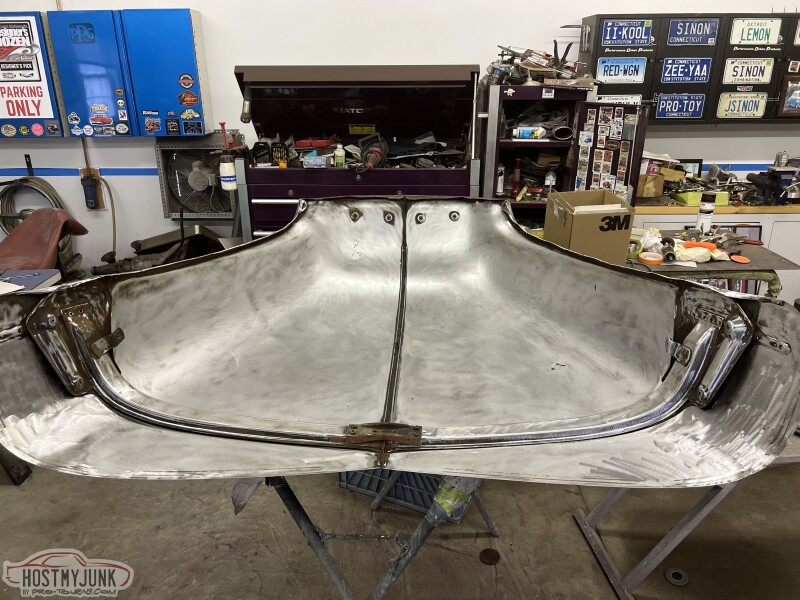
With the new bed having arrived I decided to change gears and play with it and let the cab rest for a little bit. In the last few days I assembled it loosely on the shop floor. Then had my wife and daughter come out and help me lift it up onto the chassis.
  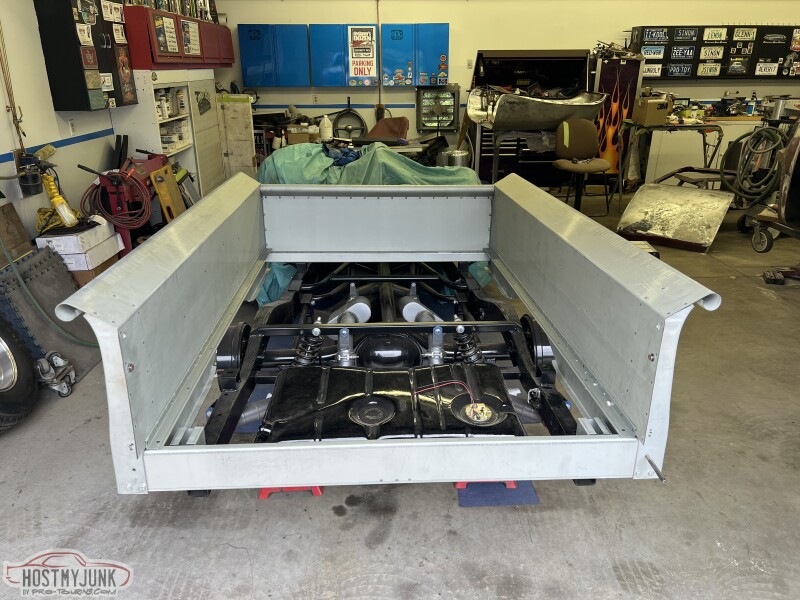 I then grabbed the tailgate and got it installed as well. 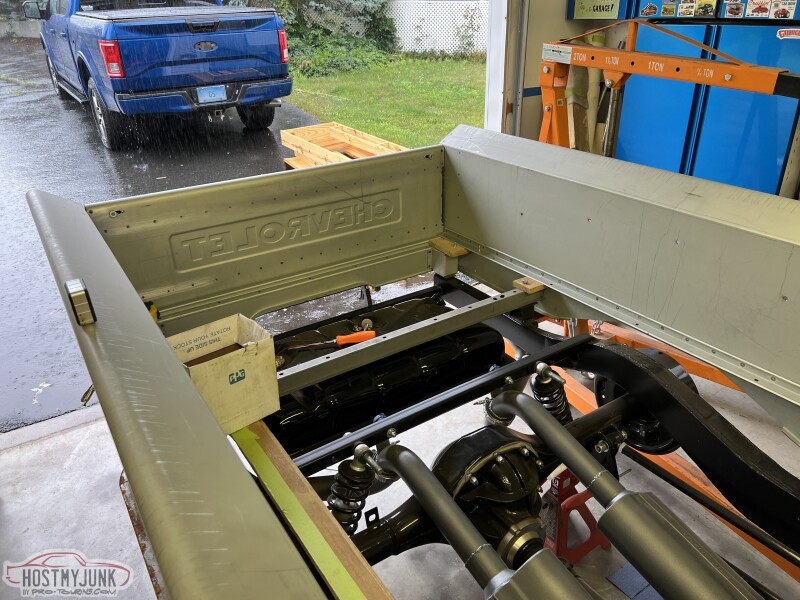 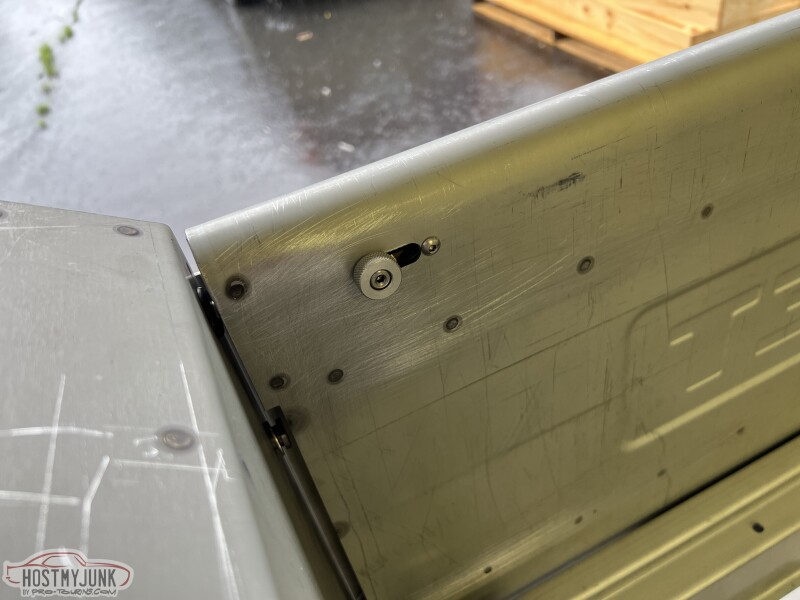 I've decided against the factory hinge mount for the gate. I like them, but want something a little cleaner. So I fabbed up some brackets out of 1/4" thick steel plate I have on hand. They fit the contour of the vertical bed side perfectly, once welded in place they will look like a continuation of the bed side. From the profile they also will blend in with my rolled pan. 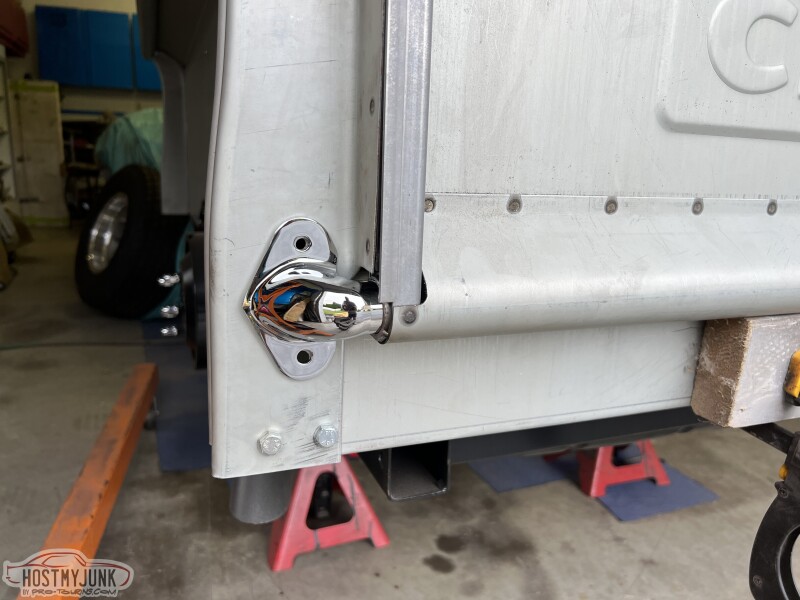 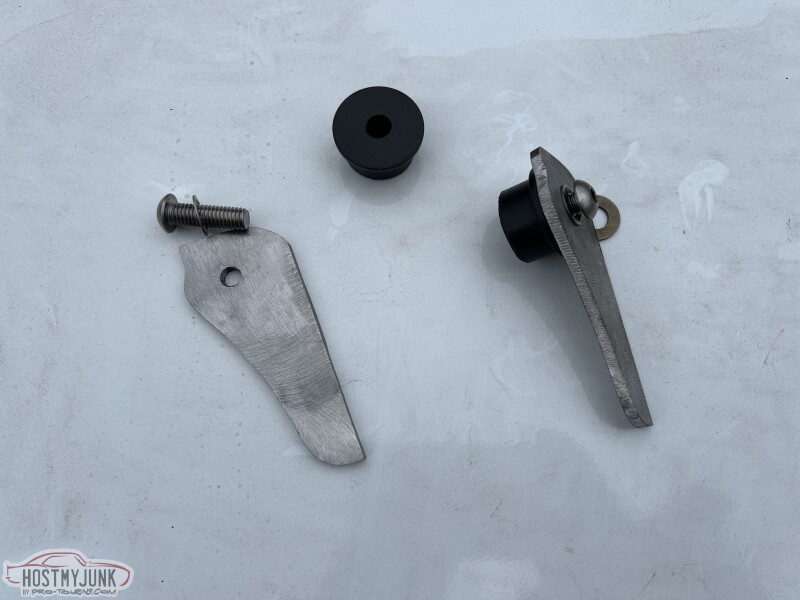 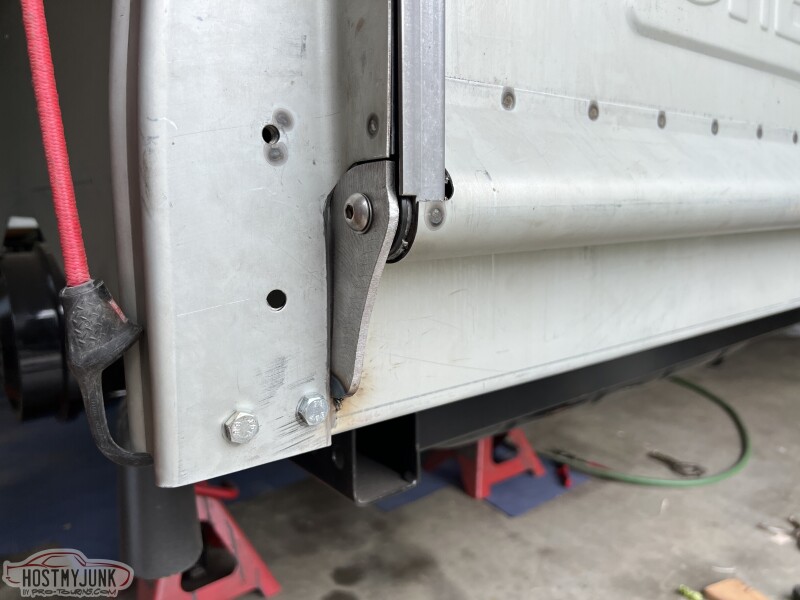
__________________
Glenn 1951 3100, Area51 1955 BelAir, 4EVER17 1987 R10, Ethel Copper Hill Rod & Custom http://67-72chevytrucks.com/vboard/s...d.php?t=829856 |
|
|
|
|
07-14-2023, 07:18 AM
|
#10 |
|
Registered User
Join Date: Jan 2022
Location: Conn.
Posts: 184
|
Re: Long Time Coming......
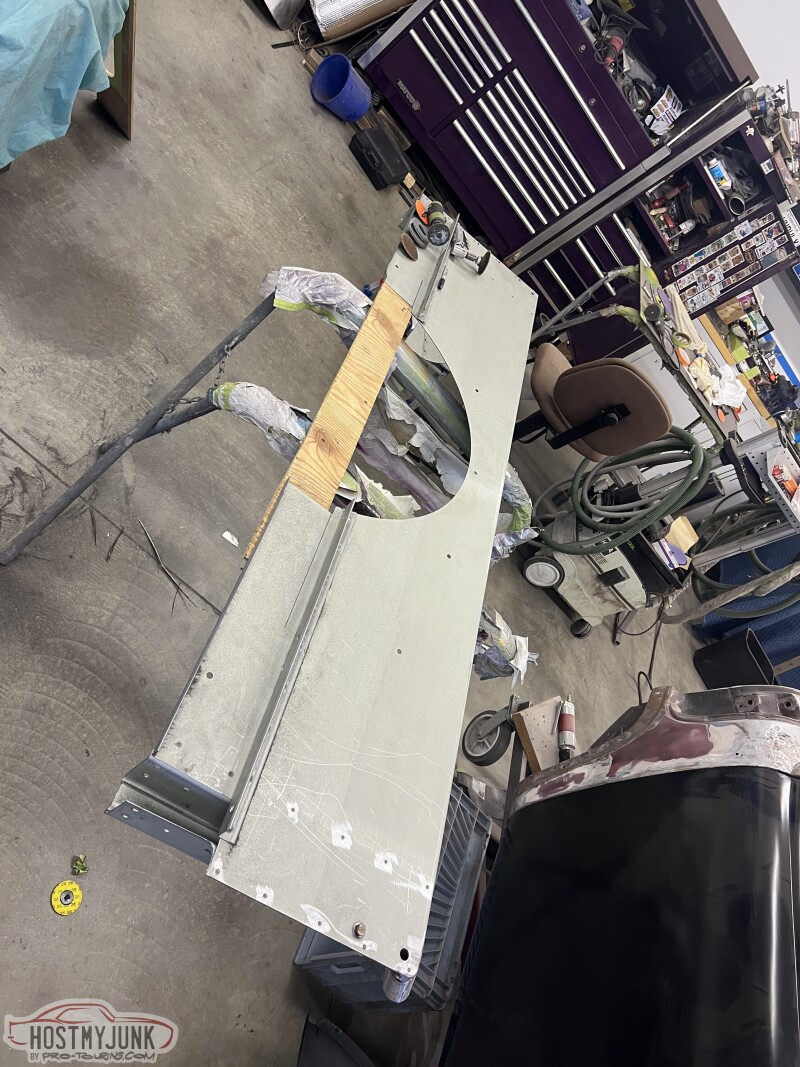
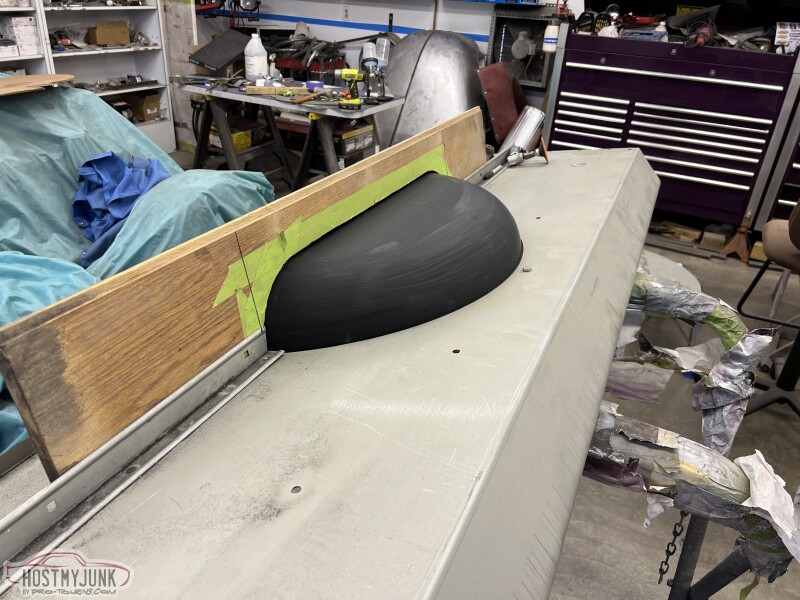
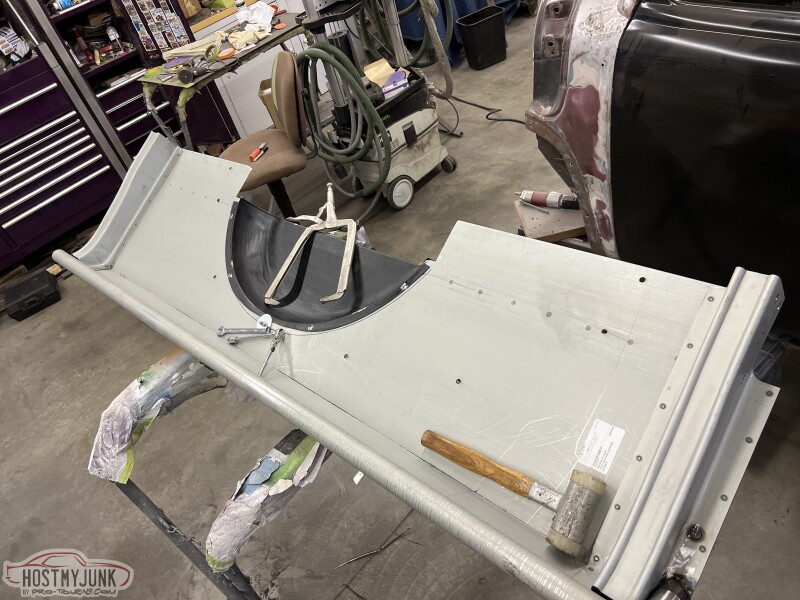
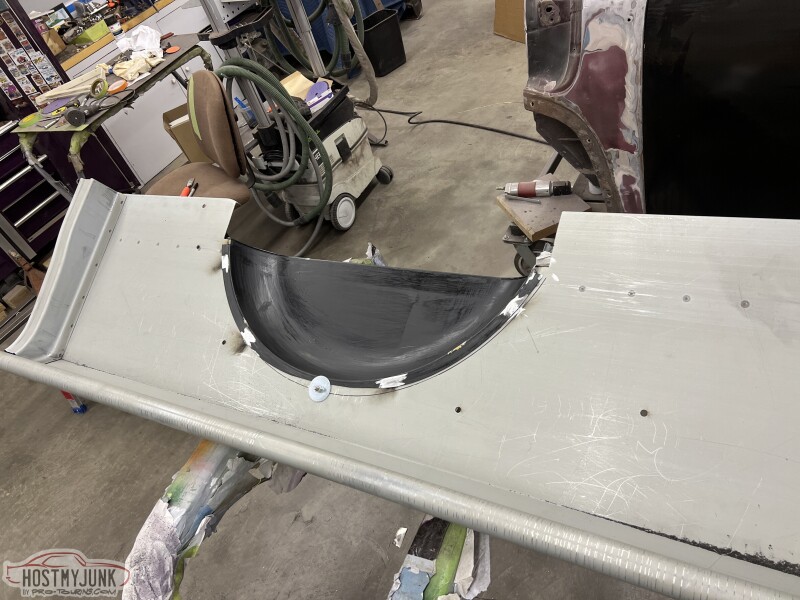
Once the bed was squared up and fit nicely it was time to install the radious bed corners from Apicella Design. To me this really does a great job of cleaning up the end of the bed rails for a finished look.
Before.... 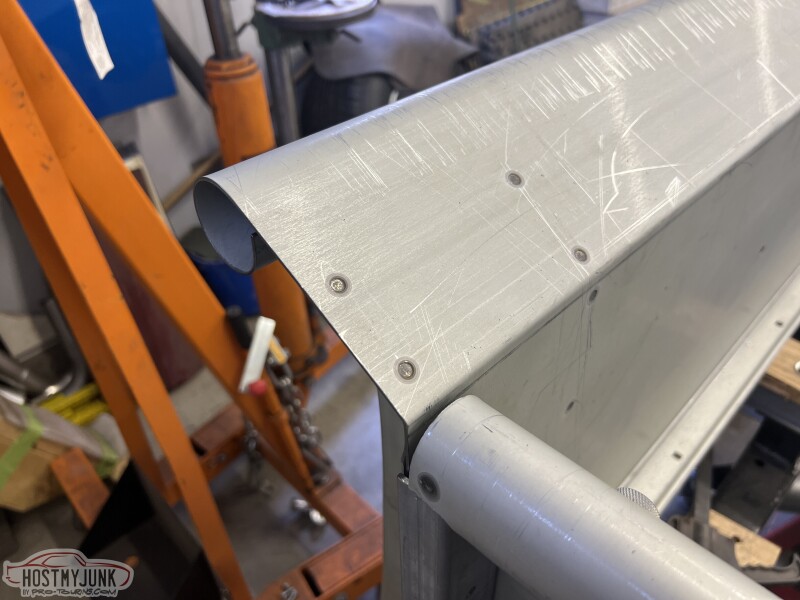 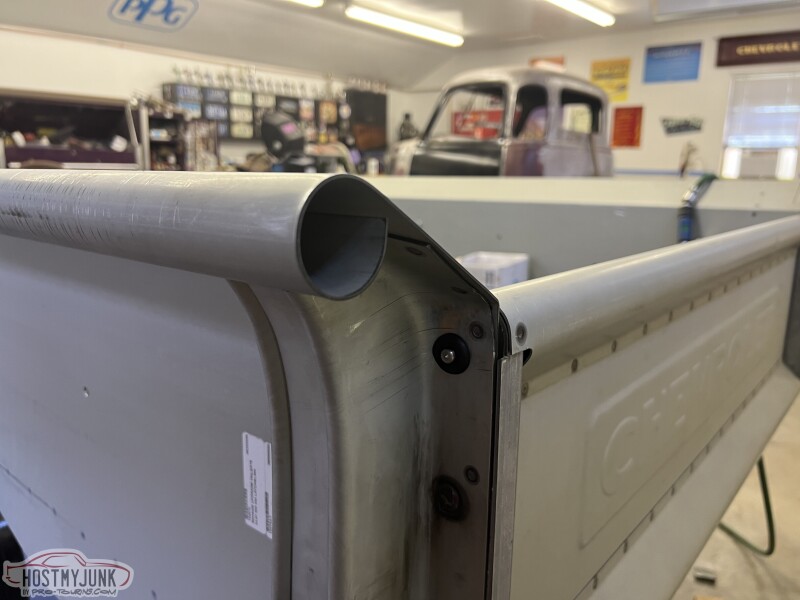 During.... 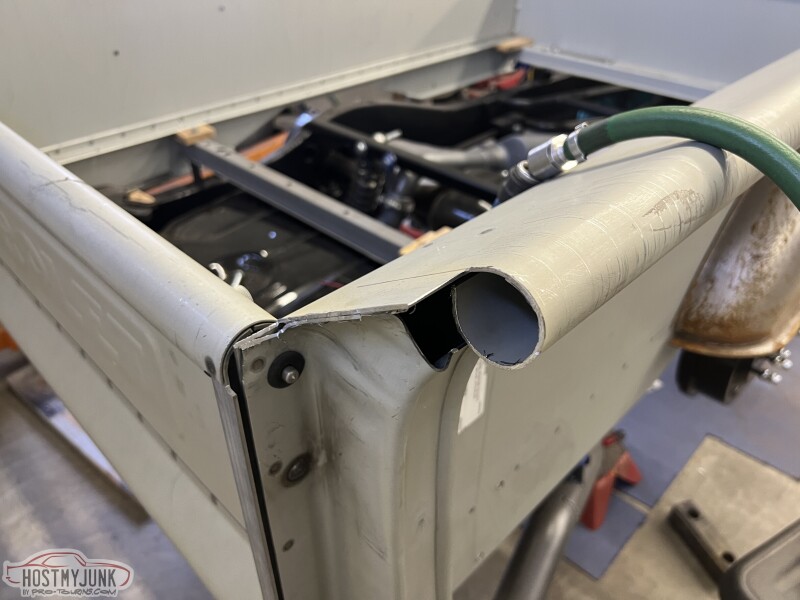 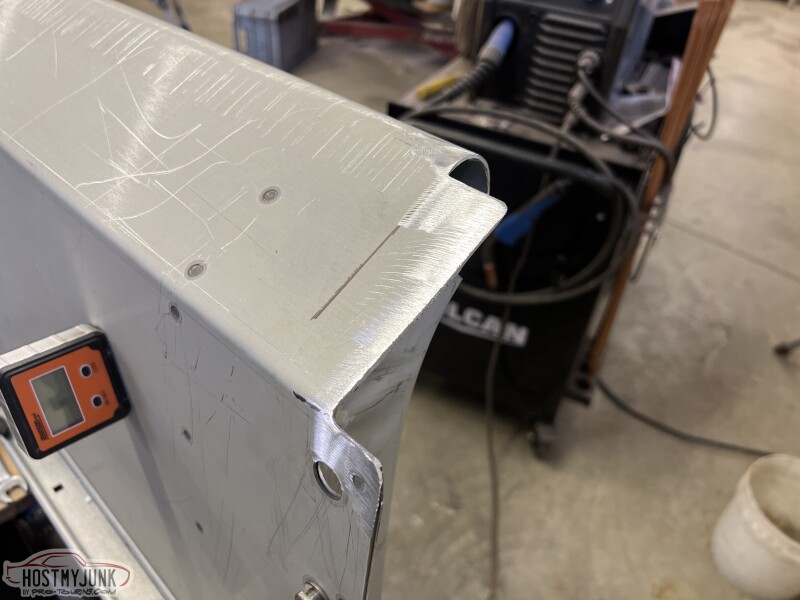 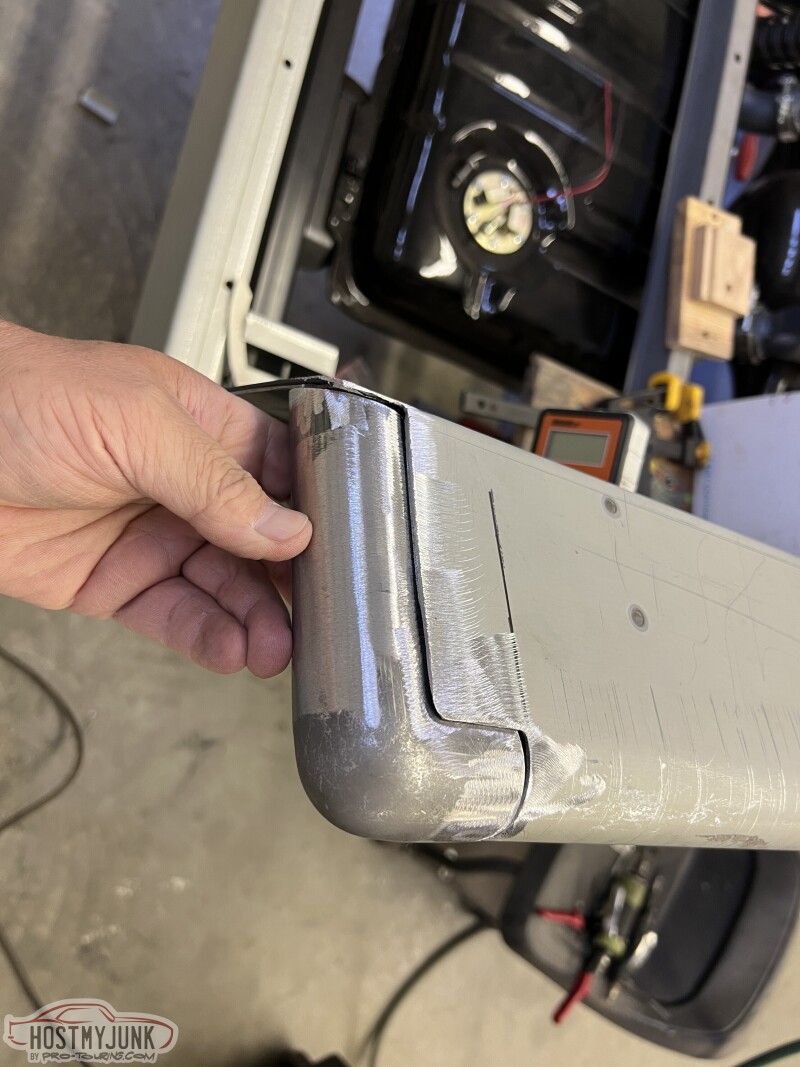 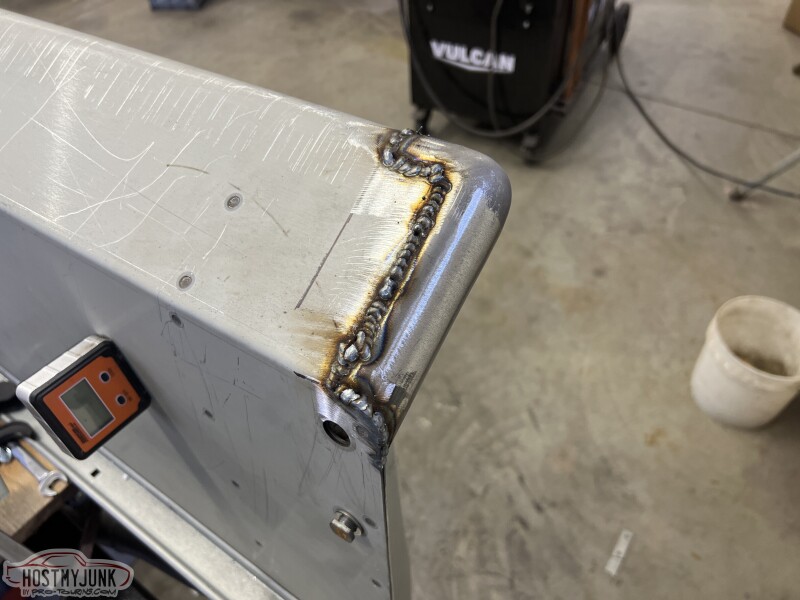 And finally the finished look..... 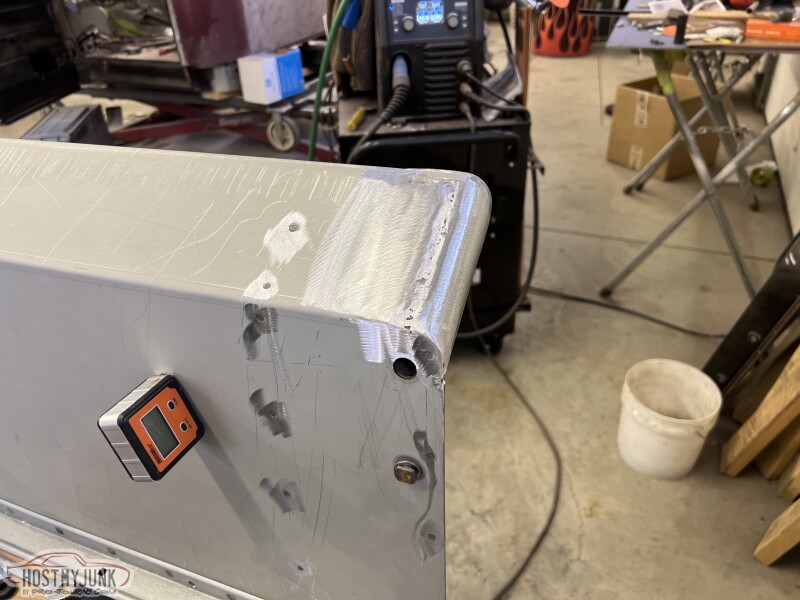 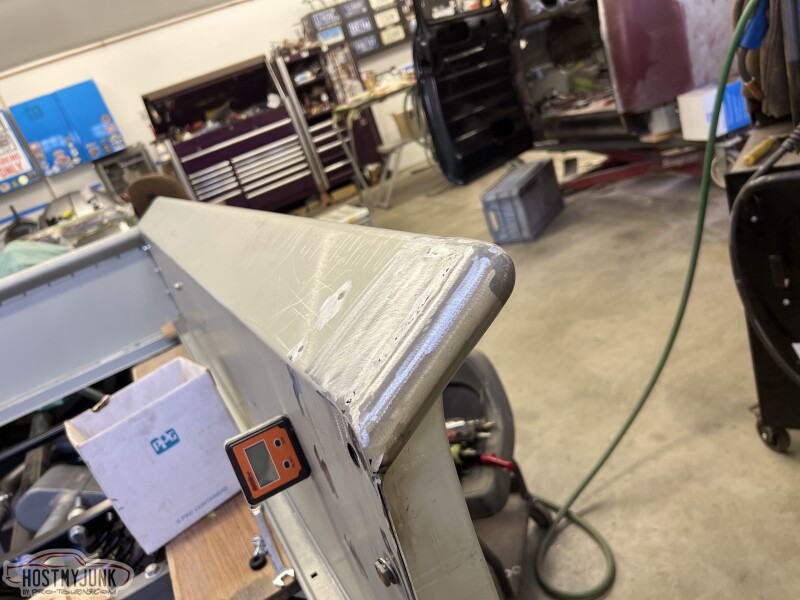
__________________
Glenn 1951 3100, Area51 1955 BelAir, 4EVER17 1987 R10, Ethel Copper Hill Rod & Custom http://67-72chevytrucks.com/vboard/s...d.php?t=829856 |
|
|
|
|
07-14-2023, 08:59 AM
|
#11 |
|
Senior Member
 Join Date: Sep 2017
Location: Bryan, Texas
Posts: 2,292
|
Re: Long Time Coming......
Nice work on that hinge.
__________________
8man-aka Robert 1948 on a S10 Frame, small block with a carb 1954 Cab, 53 Front and Bed, 50 Doors, S10 Frame, Power TBD Build thread: "]http://67-72chevytrucks.com/vboard/showthread.php?t=746899&highlight=wife%27s+48[/URL] [/URL]http://67-72chevytrucks.com/vboard/showthread.php?t=840204 |
|
|
|
|
07-14-2023, 09:36 AM
|
#12 |
|
Registered User
 Join Date: Mar 2007
Location: Scotts, Michigan
Posts: 3,765
|
Re: Long Time Coming......
Very nice details on the bed. Sometimes its best to work on something else more fun/rewarding then come back to the frustrating items like the doors later.
Well done. Marc
__________________
...........__________ .................. ((__|__||___\____ ..;.;;.:;:;.,;..;((_(O))____ (_(O)) 1948 Chevy Truck - Finished SOLD!! 1953 Chevy Suburban "Family Truckster" Completed: Spring of 2021 http://67-72chevytrucks.com/vboard/s...d.php?t=605484 1994 4x4 Blazer - "Field Find" https://67-72chevytrucks.com/vboard/...ferrerid=30857 |
|
|
|
|
07-14-2023, 11:25 AM
|
#13 |
|
Senior Member
Join Date: Mar 2011
Location: West Plains, Missouri
Posts: 7,555
|
Re: Long Time Coming......
Beautiful job on the bed mod's...Jim
__________________
my build thread: http://67-72chevytrucks.com/vboard/s...d.php?t=459839 Jimbo's long bed step build:http://67-72chevytrucks.com/vboard/s...t=464626<br /> |
|
|
|
|
07-14-2023, 01:49 PM
|
#14 | |||
|
Registered User
Join Date: Jan 2022
Location: Conn.
Posts: 184
|
Re: Long Time Coming......
Quote:
Quote:
Quote:
__________________
Glenn 1951 3100, Area51 1955 BelAir, 4EVER17 1987 R10, Ethel Copper Hill Rod & Custom http://67-72chevytrucks.com/vboard/s...d.php?t=829856 |
|||
|
|
|
|
07-14-2023, 02:03 PM
|
#15 |
|
Registered User
Join Date: Jan 2022
Location: Conn.
Posts: 184
|
Re: Long Time Coming......
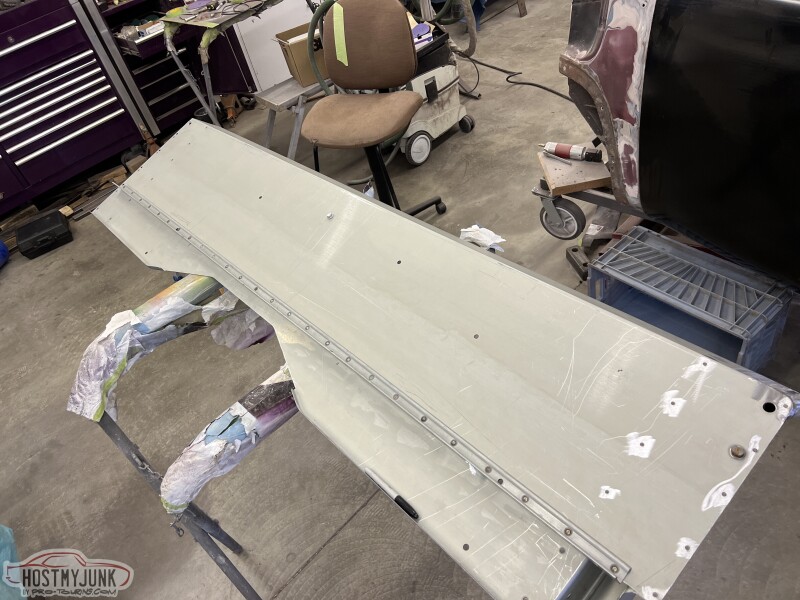
Between yesterday and today I pulled off each bed side one at a time and cut them for the wheel tubs I need. I definitely used the old adage of measure 100 times and cut once!! I really did not want to mess up on brand bed sides. But it needed to be done.
     With the passenger side done and reinstalled I yanked the driver side off and did the same. The big difference here was I made a template off of the first one with good reference points and it made for a much quicker job. 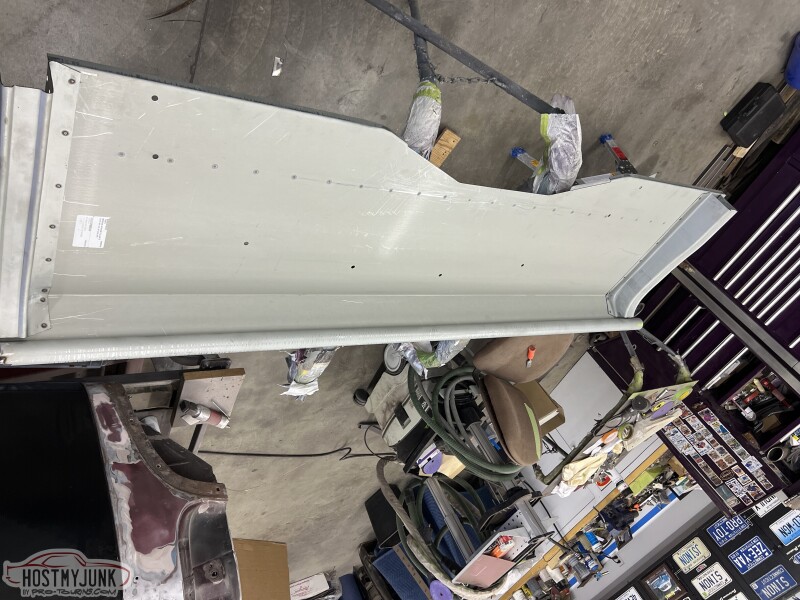 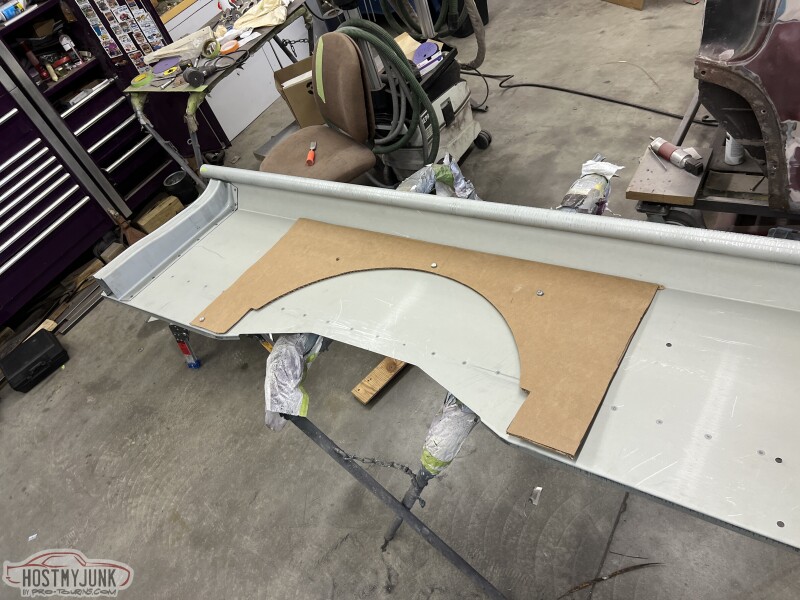 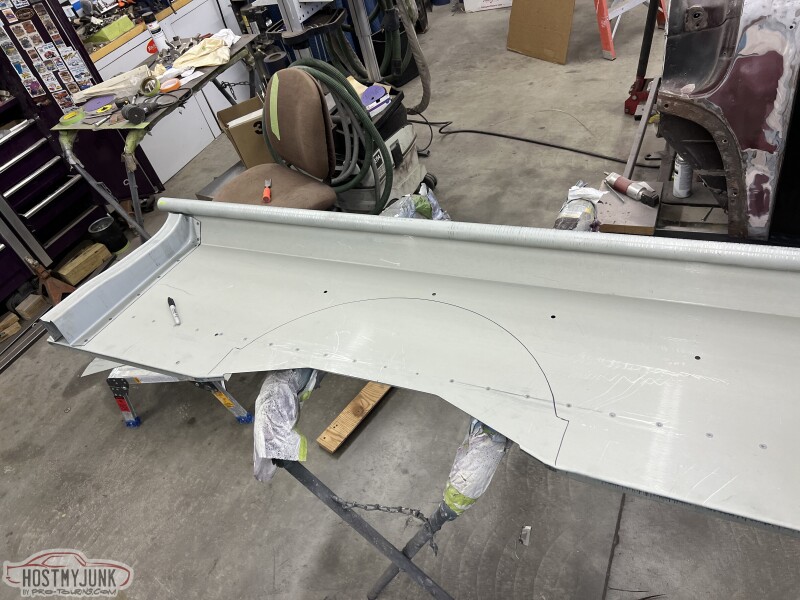 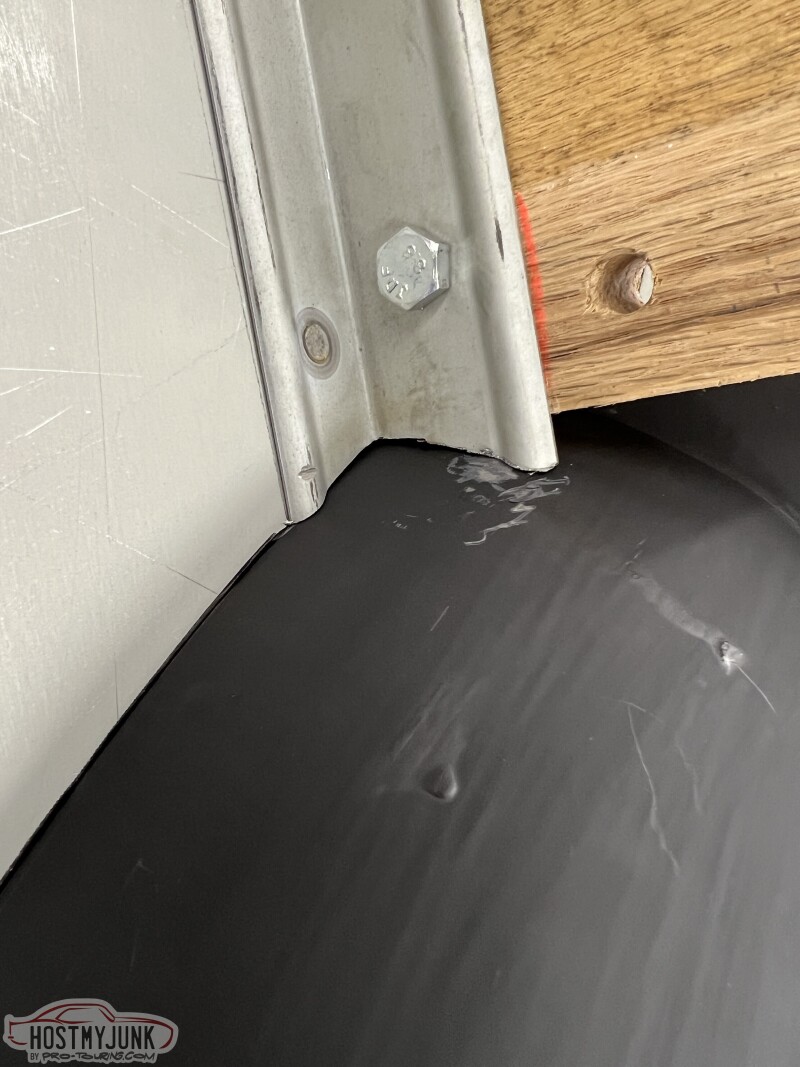 And now with both sides back on..... 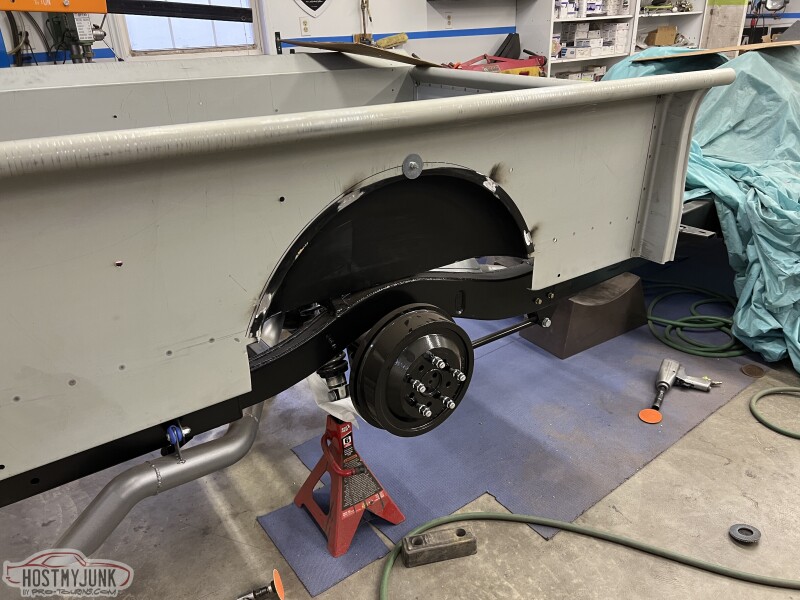 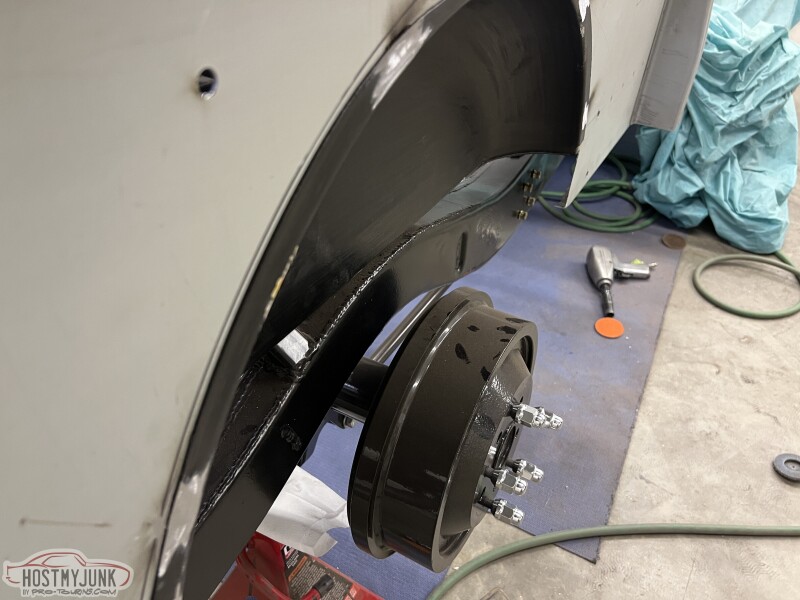 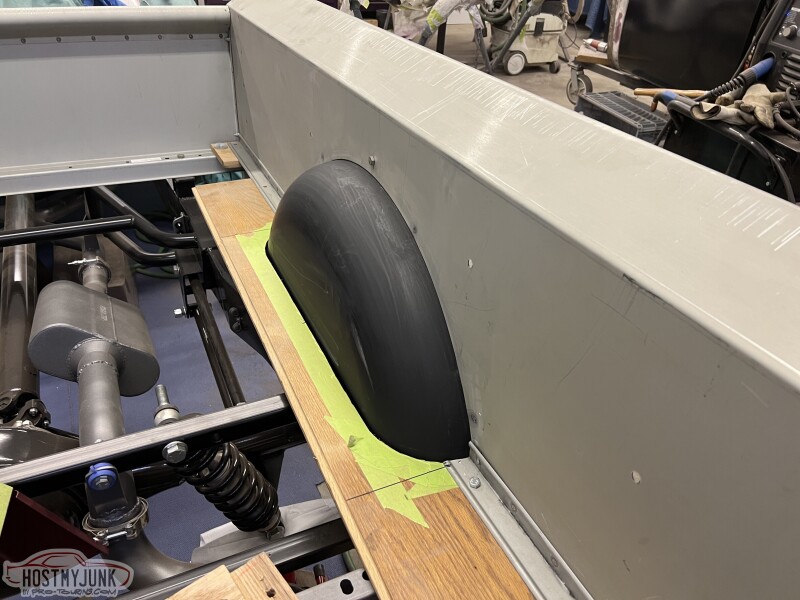 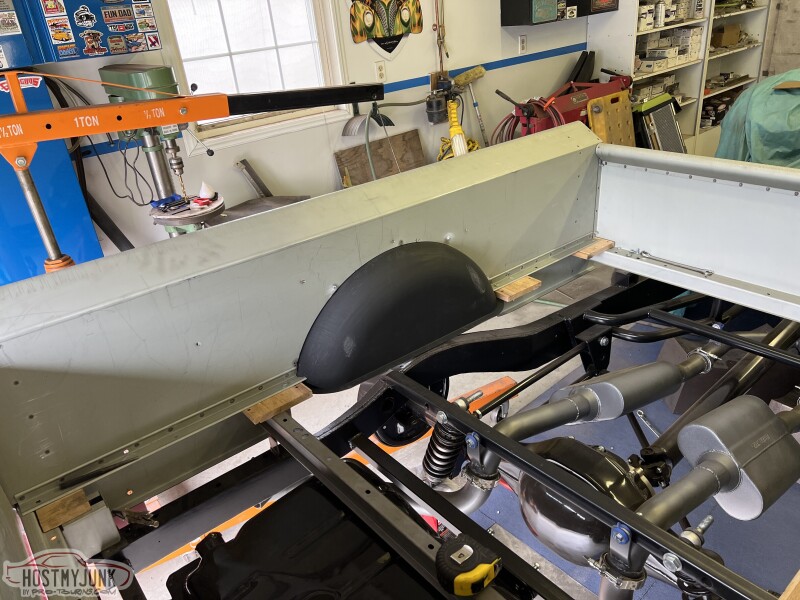 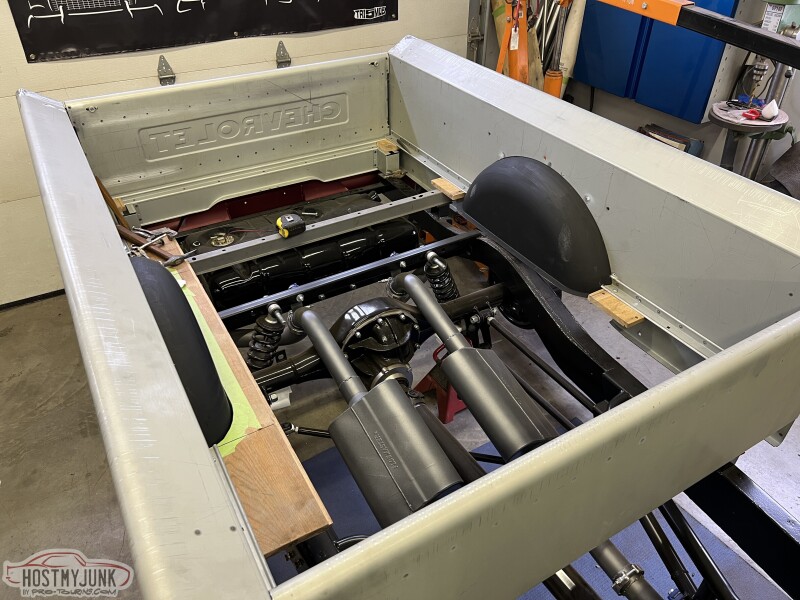 Lastly I installed the gate and just clamped the rolled pan on. It also gives you a good reference for how the new hinges blend in, especially once painted. The rolled pan is hanging somewhat as I did not screw it to the rear cross member, so it is making a bigger gap to the tailgate than it should. 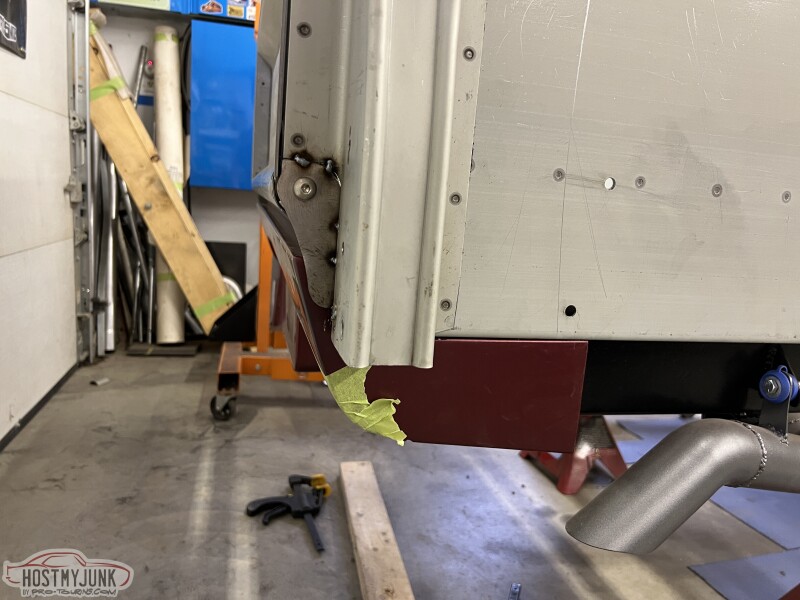 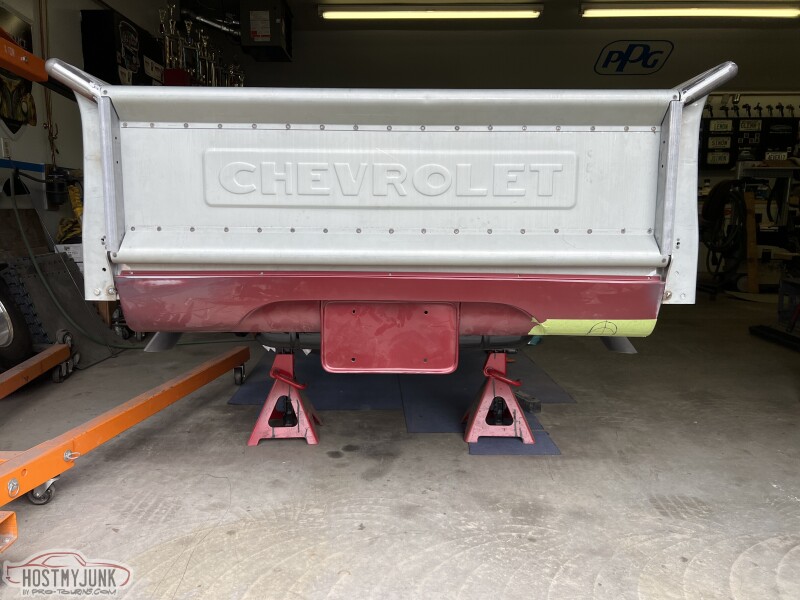 
__________________
Glenn 1951 3100, Area51 1955 BelAir, 4EVER17 1987 R10, Ethel Copper Hill Rod & Custom http://67-72chevytrucks.com/vboard/s...d.php?t=829856 |
|
|
|
|
07-15-2023, 10:09 AM
|
#16 |
|
Registered User
Join Date: Nov 2010
Location: calgary alberta
Posts: 7,918
|
Re: Long Time Coming......
nice work, its going to look awesome painted. happy you went that route.
|
|
|
|
|
07-15-2023, 10:10 AM
|
#17 |
|
Registered User
Join Date: Nov 2010
Location: calgary alberta
Posts: 7,918
|
Re: Long Time Coming......
nice fab skills too, by the way.
|
|
|
|
|
07-17-2023, 09:23 AM
|
#18 |
|
Registered User
Join Date: Mar 2007
Location: Scotts, Michigan
Posts: 3,765
|
Re: Long Time Coming......
Looks really great. For the money those are the nicest looking tubs for these trucks IMHO.
Well done on refining the look of the back end of the bed. Marc
__________________
...........__________ .................. ((__|__||___\____ ..;.;;.:;:;.,;..;((_(O))____ (_(O)) 1948 Chevy Truck - Finished SOLD!! 1953 Chevy Suburban "Family Truckster" Completed: Spring of 2021 http://67-72chevytrucks.com/vboard/s...d.php?t=605484 1994 4x4 Blazer - "Field Find" https://67-72chevytrucks.com/vboard/...ferrerid=30857 |
|
|
|
|
07-17-2023, 09:54 AM
|
#19 |
|
Registered User
Join Date: Nov 2010
Location: calgary alberta
Posts: 7,918
|
Re: Long Time Coming......
nice work, and thanks for posting up lots of pics. it helps the rest of us think about what we will do and where. sometimes just getting us thinking about the next little job is good. better than piling more stuff in front of the project. you seem to have done a lot of work in a short time. congrats.
will the patch panel on the cowl be big enough to cover the damages you found there? |
|
|
|
|
07-17-2023, 03:28 PM
|
#20 | ||||
|
Registered User
Join Date: Jan 2022
Location: Conn.
Posts: 184
|
Re: Long Time Coming......
Quote:
Quote:
Quote:
Quote:
And yes I am getting a lot done right now. Remember I'm a school teacher with my summer off. So I get up every morning and am in the shop by 8am and work until about 2-3pm. Then I clean up and spend some time with my wife. The top of the cowl is also a mess, but I wasn't about to spend all the coin for the entire cowl replacement panel. I have already made a template of that and will just cur out the ugly and patch in what I need.
__________________
Glenn 1951 3100, Area51 1955 BelAir, 4EVER17 1987 R10, Ethel Copper Hill Rod & Custom http://67-72chevytrucks.com/vboard/s...d.php?t=829856 Last edited by gsinon; 07-17-2023 at 03:45 PM. |
||||
|
|
|
|
07-18-2023, 09:35 PM
|
#21 |
|
Registered User
Join Date: Mar 2017
Location: Western Colorado
Posts: 30
|
Re: Long Time Coming......
On here I get so few comments I sometimes wonder if people are paying attention, or even care.
I am absolutely paying attention to your talented work. It inspires me to get off my butt and keep my project motivated. If I respond to each of your posts, I would feel like a troll. Im sure that I am not the only one who hides in the dark! Please keep posting your progress - I do keep up on it. |
|
|
|
|
07-17-2023, 03:45 PM
|
#22 | ||||
|
Registered User
Join Date: Jan 2022
Location: Conn.
Posts: 184
|
Re: Long Time Coming......
Quote:
Quote:
Quote:
Quote:
In the end I share what I do in hopes it inspires in one form or another.
__________________
Glenn 1951 3100, Area51 1955 BelAir, 4EVER17 1987 R10, Ethel Copper Hill Rod & Custom http://67-72chevytrucks.com/vboard/s...d.php?t=829856 |
||||
|
|
|
|
07-17-2023, 03:42 PM
|
#23 |
|
Registered User
Join Date: Jan 2022
Location: Conn.
Posts: 184
|
Re: Long Time Coming......
Today's adventures in the garage....
I got out to the shop early this morning with a plan to finish the rough fab on the bed. To do what I wanted I needed to reinstall the cab first. Kind of nice seeing it like this for the first time in more then a year. 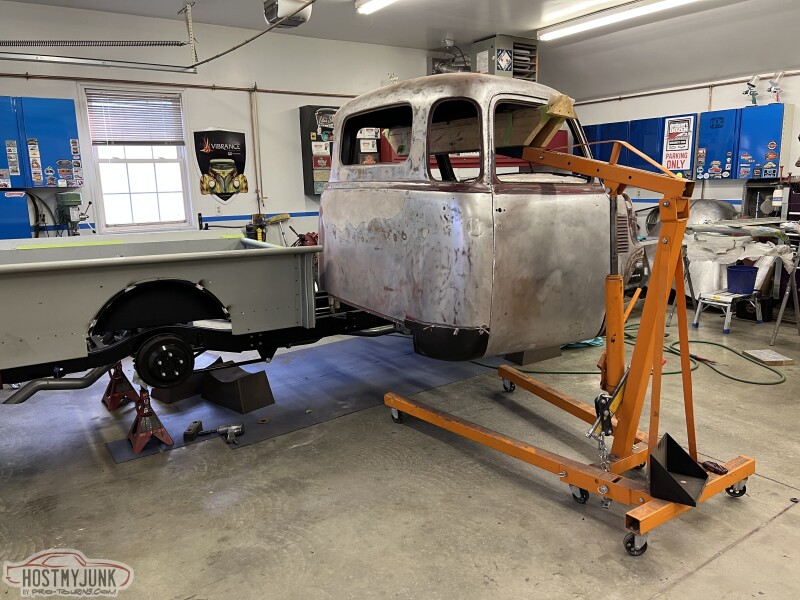 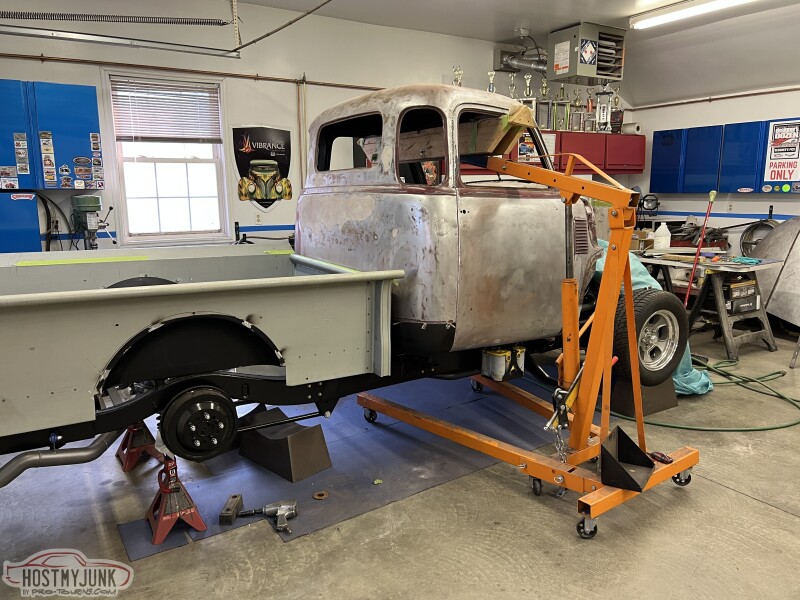 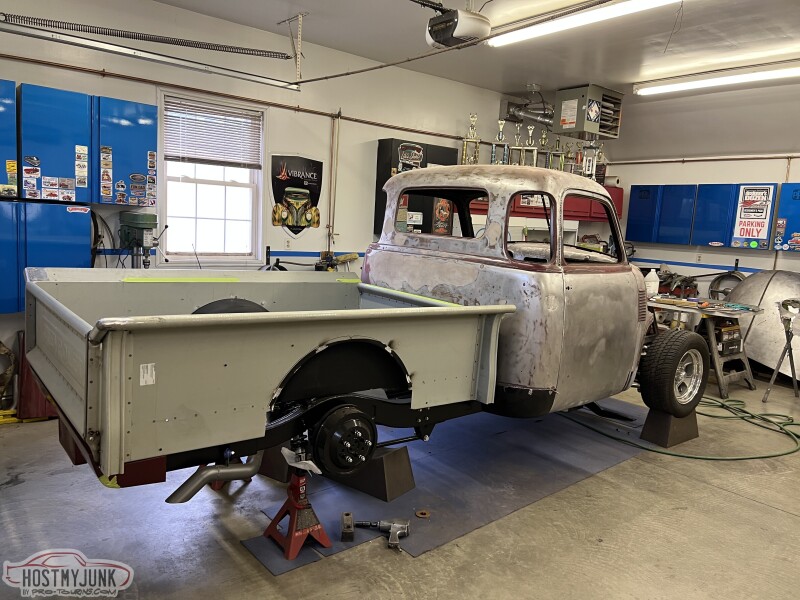 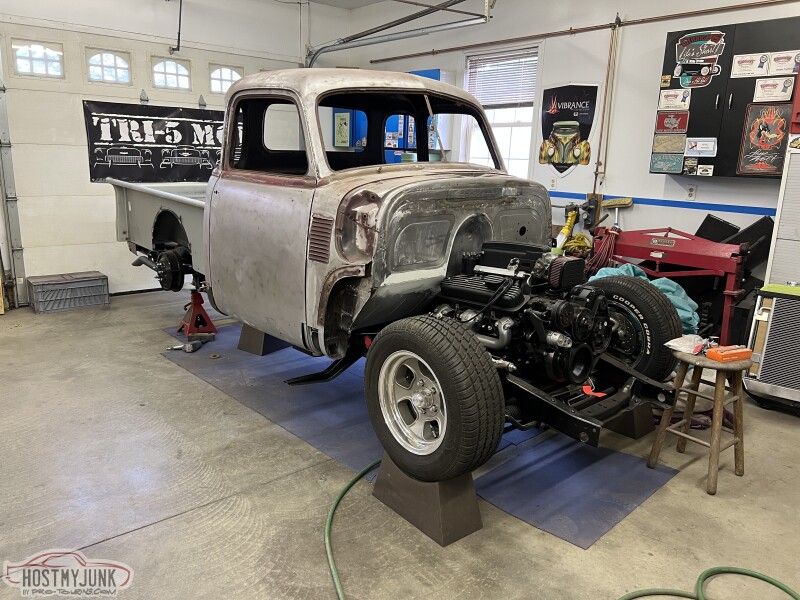 With the cab on and both it and the bed squared to eachother it was time to address one of my biggest pet peeves with these trucks. The rounded back of the cab and the flat front of the bed. Ugh. I've seen some metal masters go all in and make a new front bed panel that is curved. And while I would love to attempt that it is beyond my skill level, or at least it is with the very basic of metal tools I have on hand. 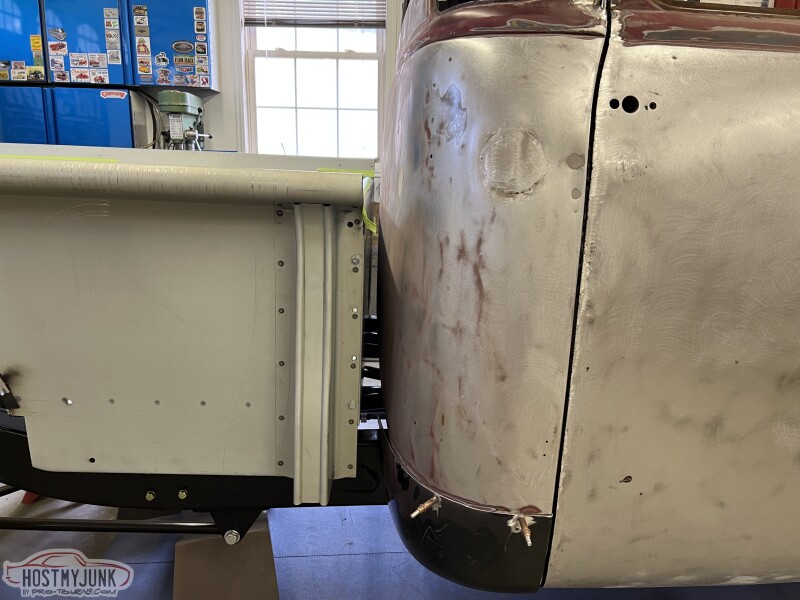 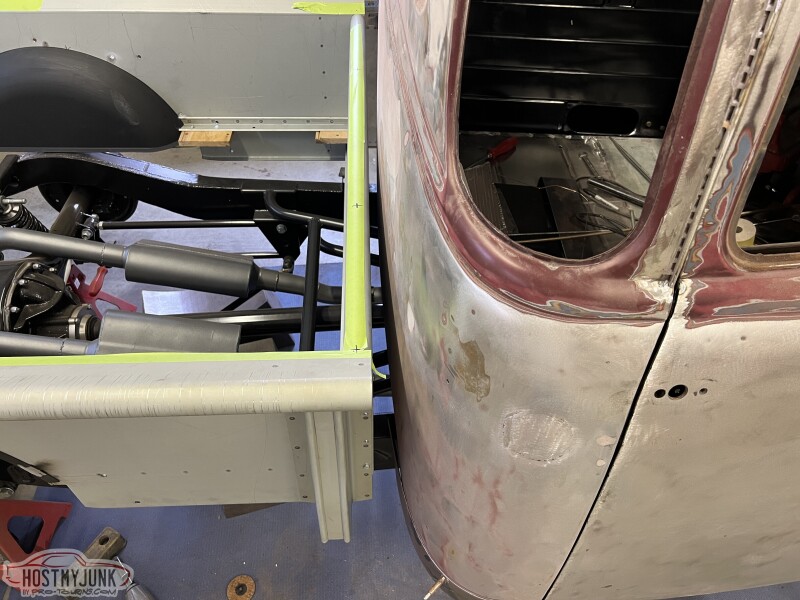 So instead of doing all of that, I am just going to make a filler piece that will go between the top rail of the bed and the cab so it matches the arc of the cab. I started by taping some foam I had oaying around, then I used some poster board to make some templates. 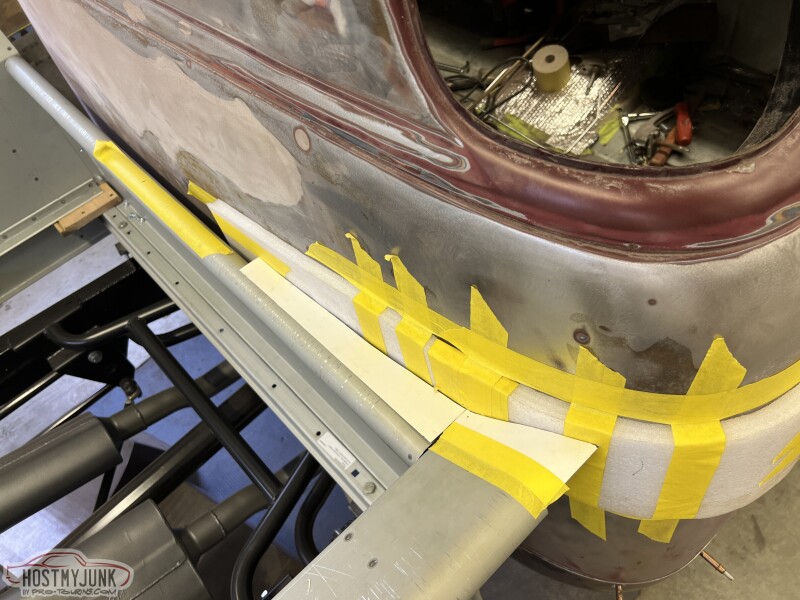 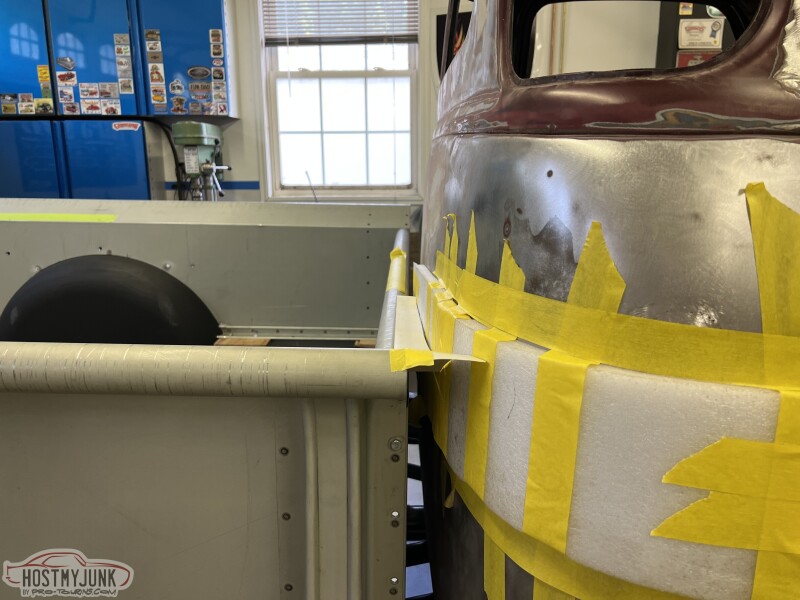 With that figured out, I ran to the parts store for a couple pieces of 1.75" round exhaust pipe to use for the bed rail extensions. I got them trimmed and tacked in place. 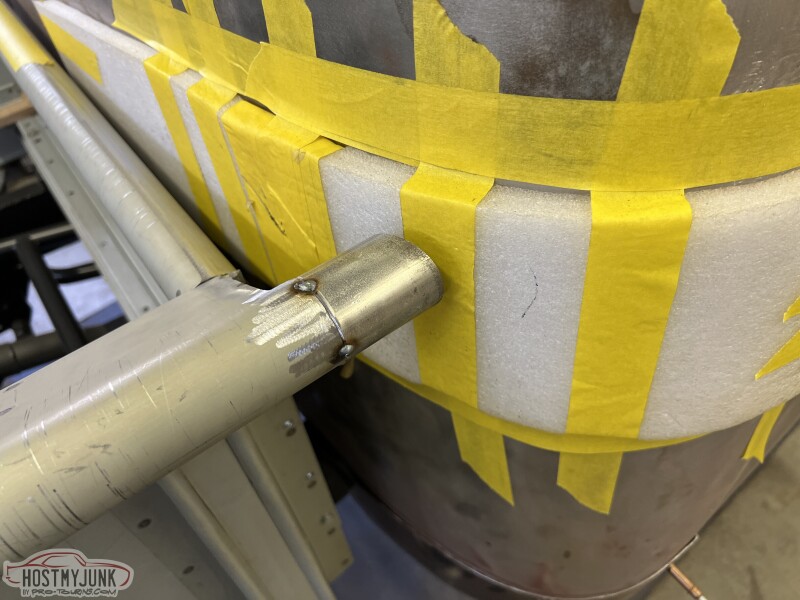 I then trimmed back the bed side to make room for the filler panel I would need. 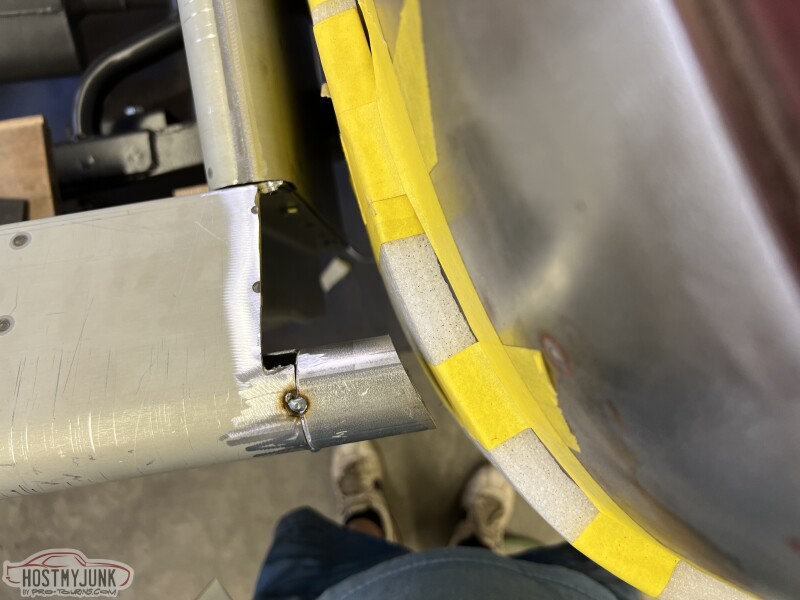  Using my trusty poster board, I transferred the template to some 16g sheet metal I had. I also tacked on some round 3/16 bar to the edge to give it a finished look instead of just having the metal just end. 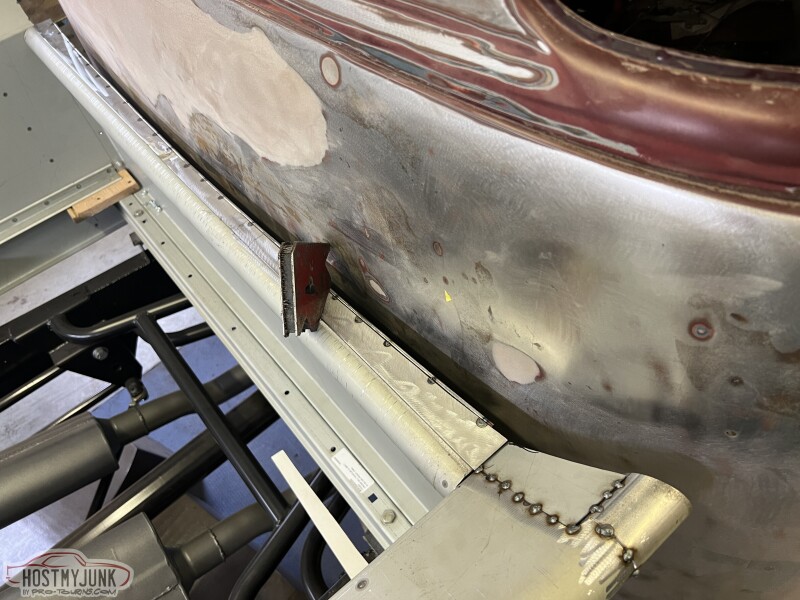 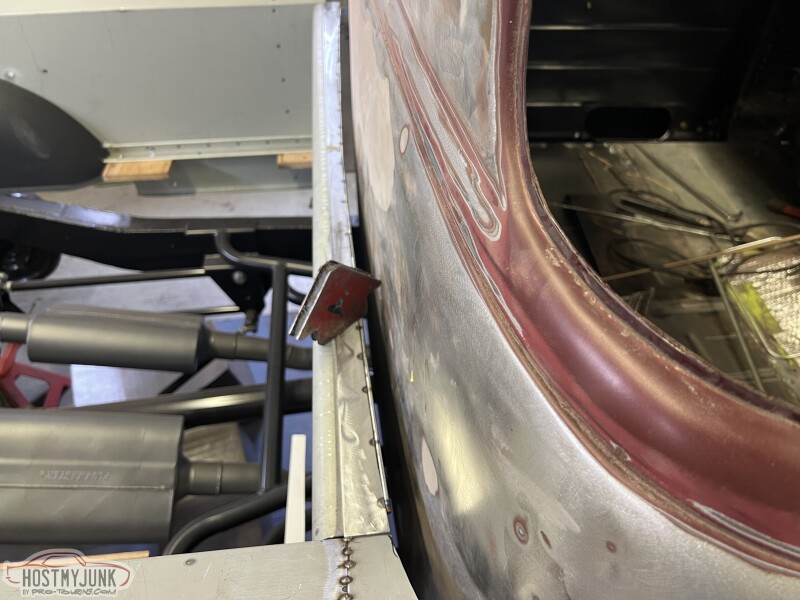 This is the finished look. Still a lot more welding to do. Then at some point body work it all in. But you get the idea I'm after. Much better in my opinion then the first two pics. 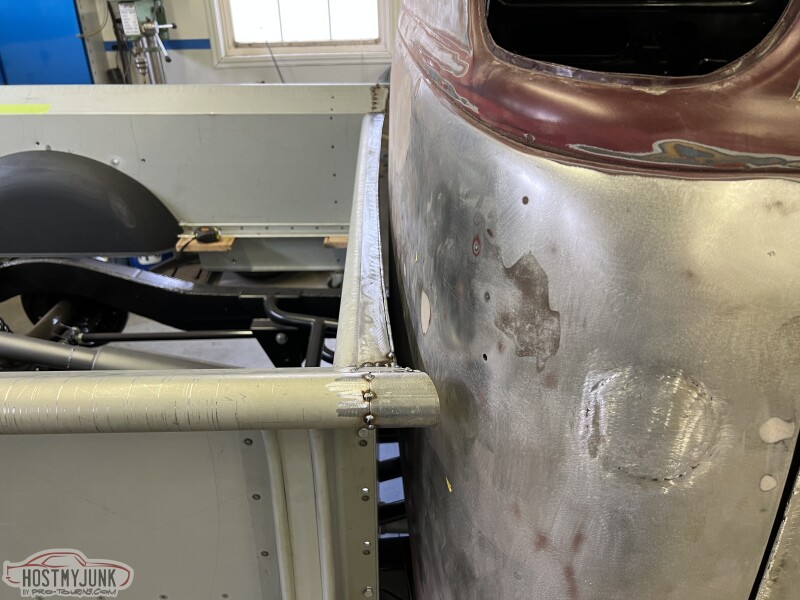 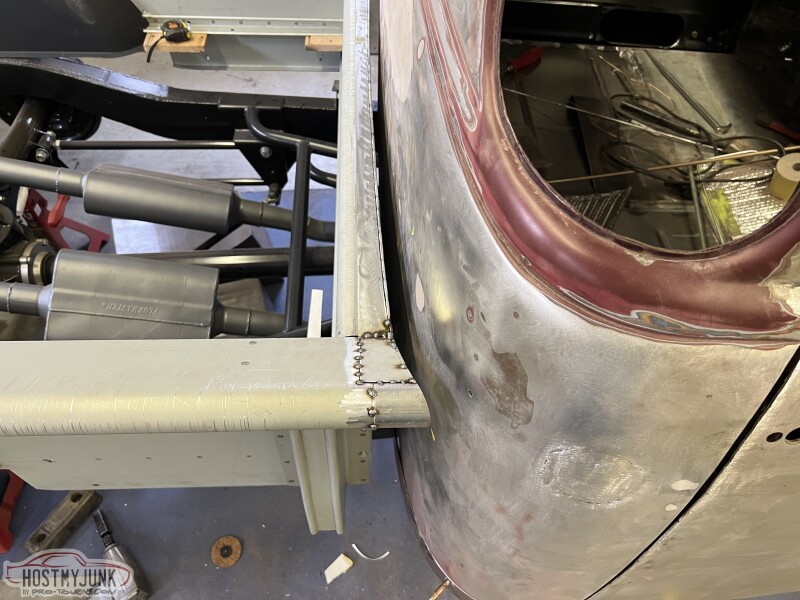
__________________
Glenn 1951 3100, Area51 1955 BelAir, 4EVER17 1987 R10, Ethel Copper Hill Rod & Custom http://67-72chevytrucks.com/vboard/s...d.php?t=829856 |
|
|
|
|
07-18-2023, 05:32 PM
|
#24 |
|
Registered User
Join Date: Jan 2022
Location: Conn.
Posts: 184
|
Re: Long Time Coming......
Today's episode of What did Glenn do in the Garage Today...
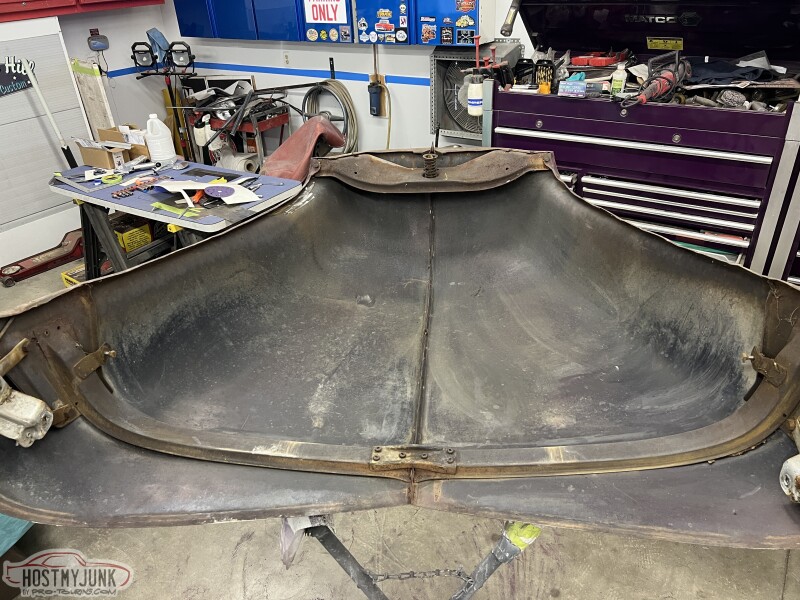
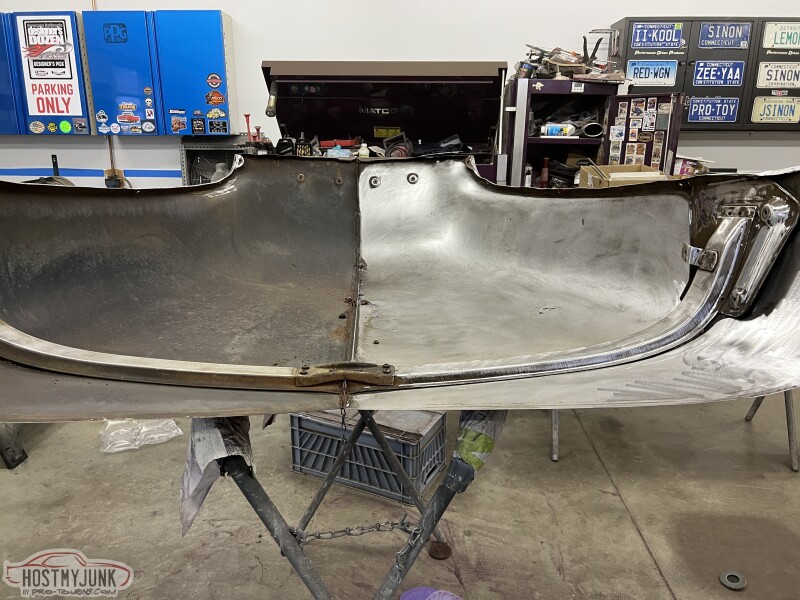
In an effort to get all the rough fab work done on the bed I decided to tackle the rolled pan and taillights. I am using 1939 Chevy passenger car bullt style taillights. I wanted to get them to mount to the bottom of the rolled pan. But I don;t want them to hang off, but rather be cut up into the pan roughly 50%. With the pan on a stand I measured and started vutting to get the buckets to fit.  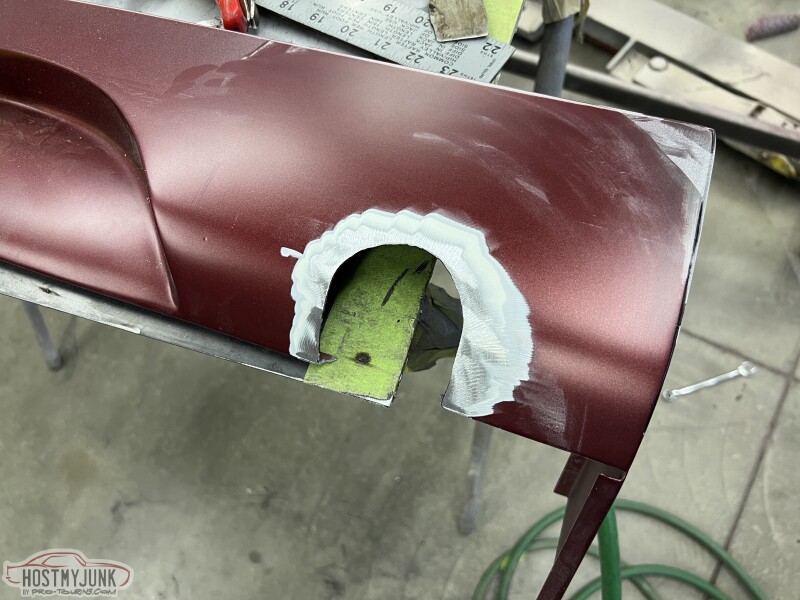 Once trimmeed to fit the bucket nicely I used some rectangular steel stock I have and a long level to make sure the buckets are on the same angle as the license plate panel. 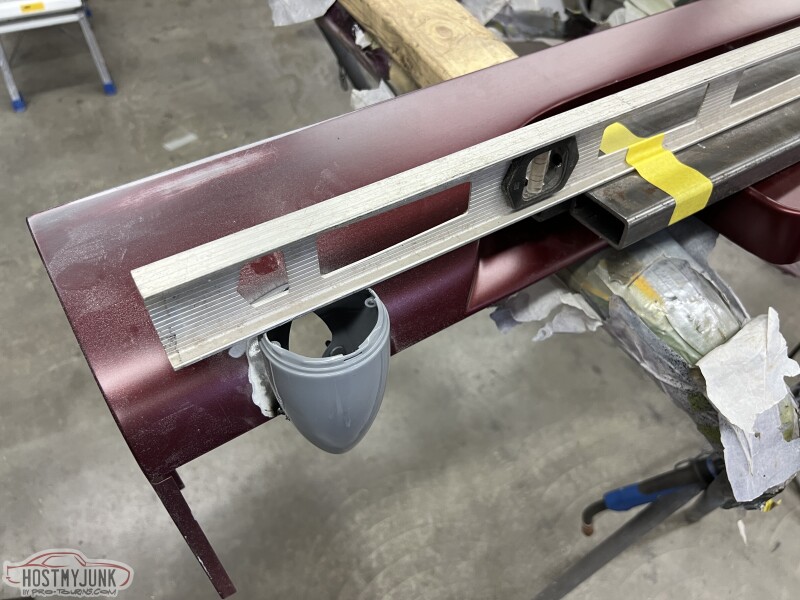 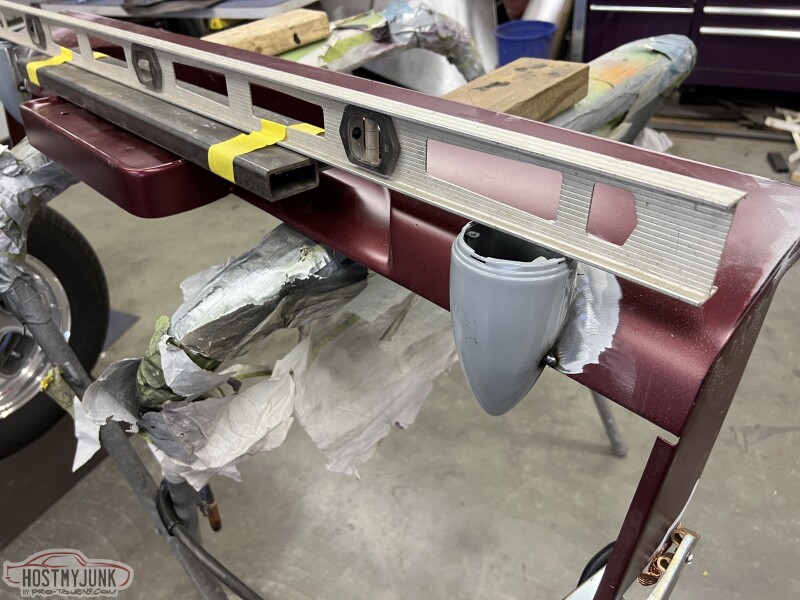 Once I liked the position I welded them in place. I welded them from the back side so I don't have to worry about foing a ton of grinding. 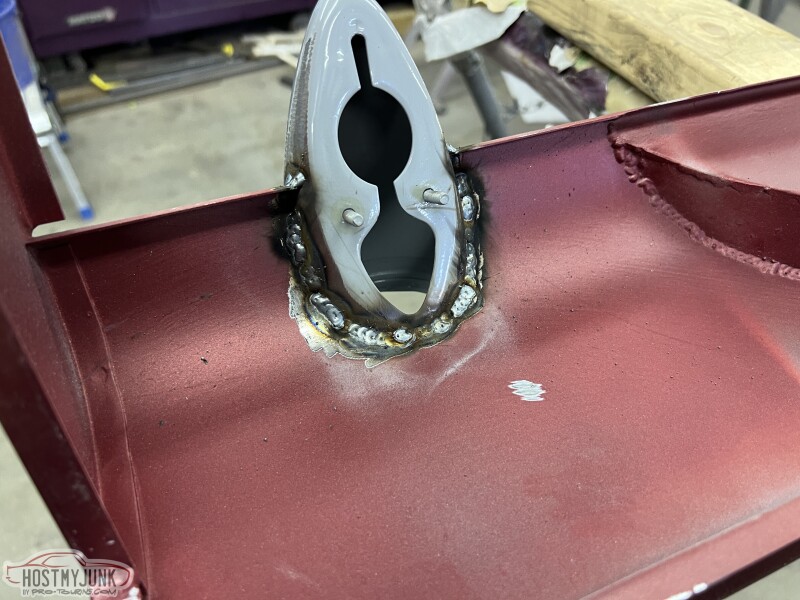 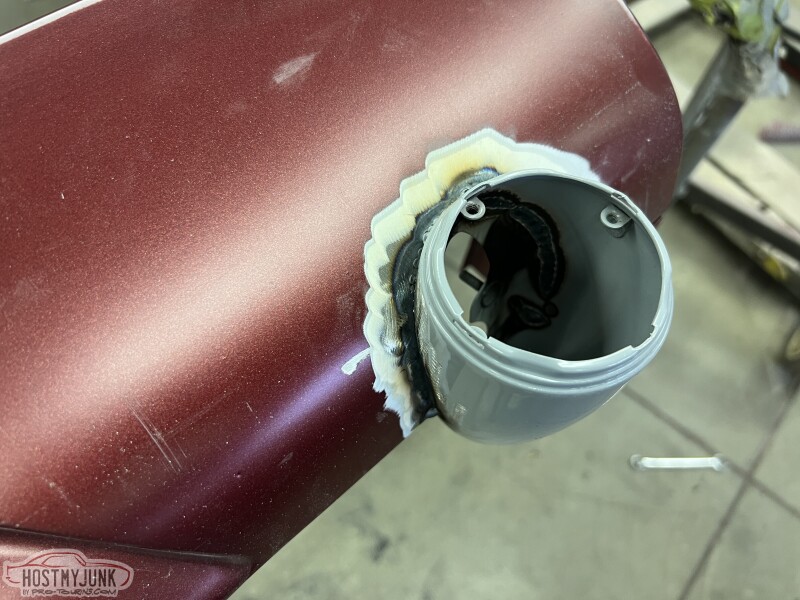 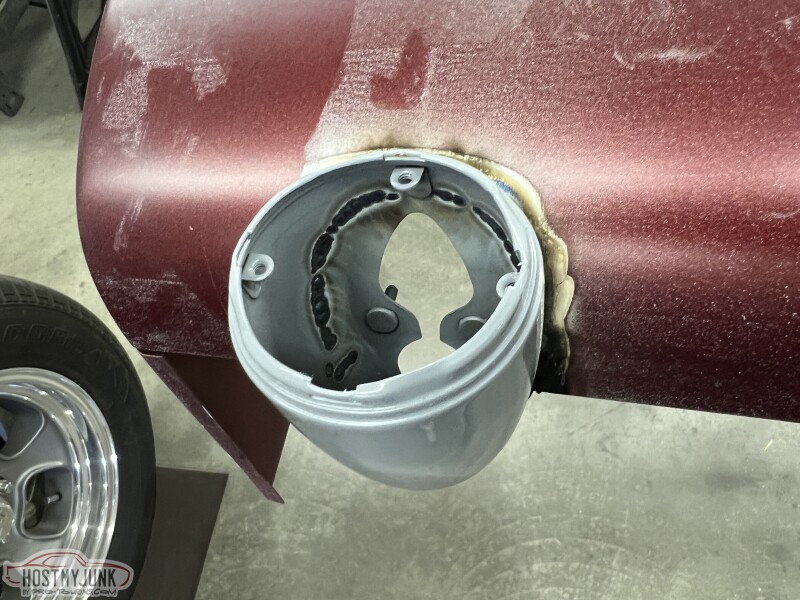 Then it was time for a fit up and be able to step back and see how it looked. 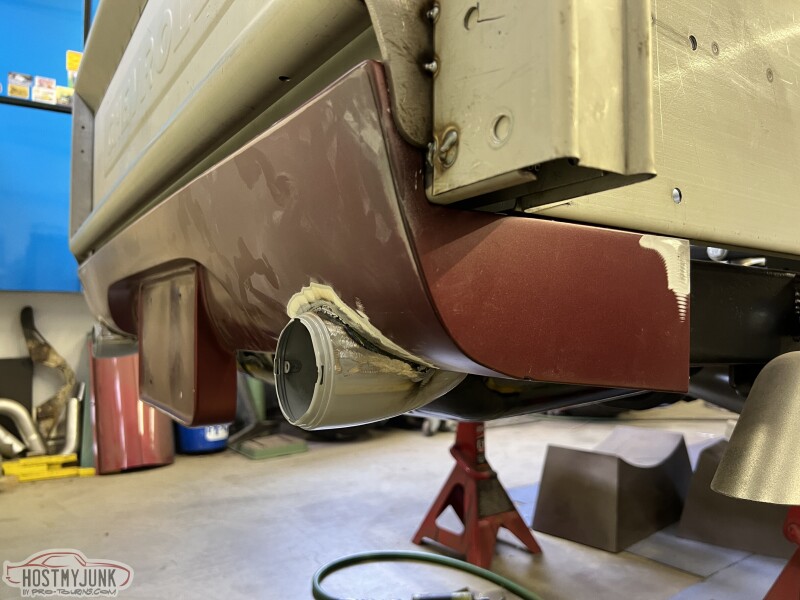 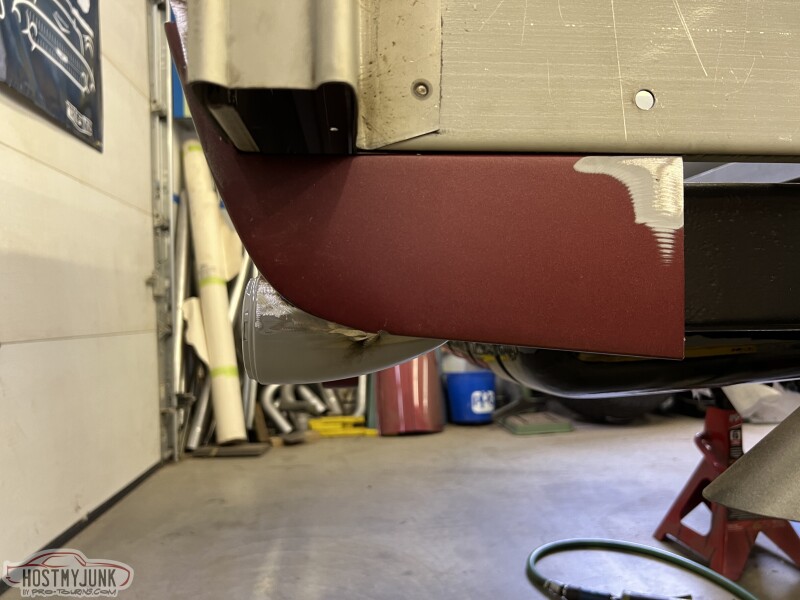 I put the lens and trim rings on to show what it will look like when done. 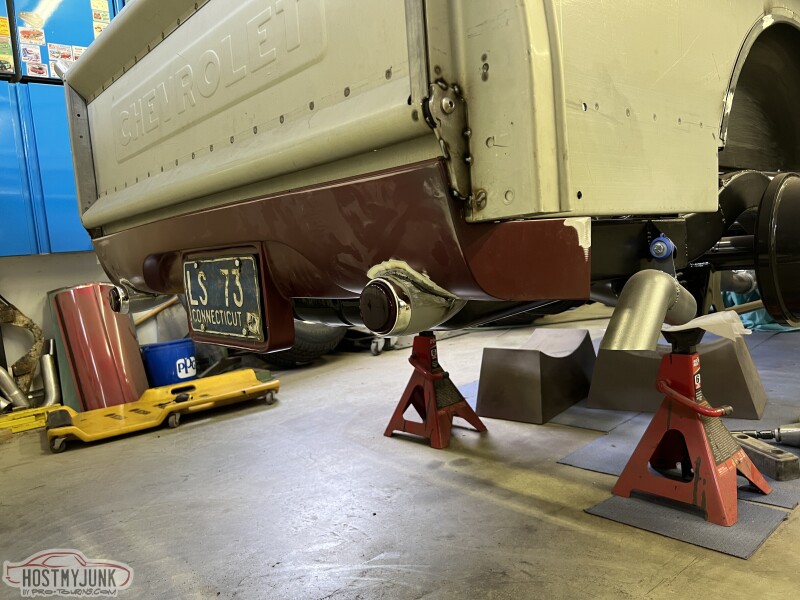 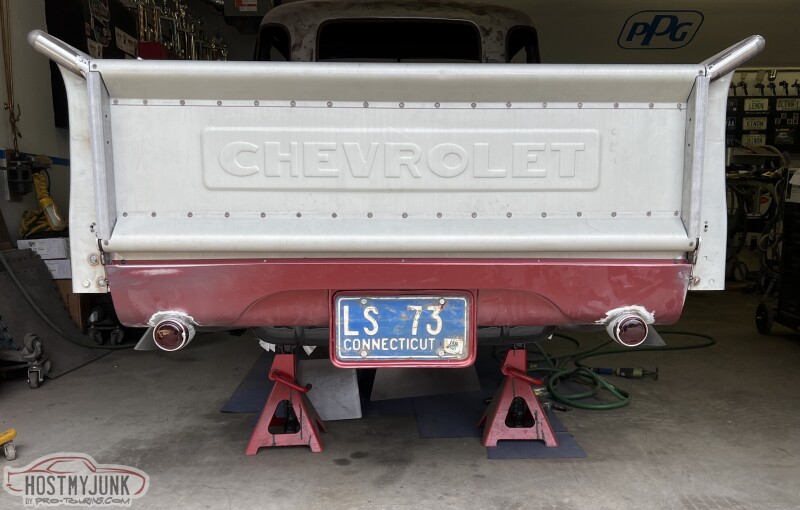 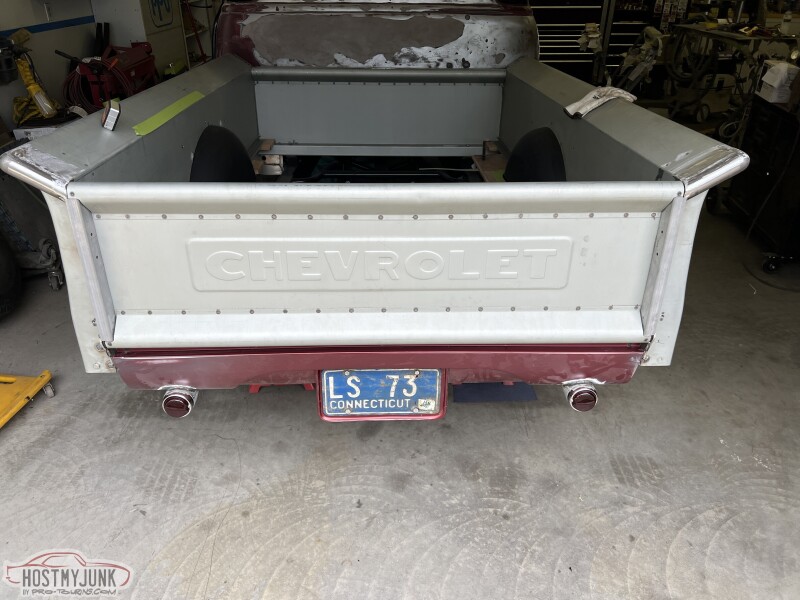
__________________
Glenn 1951 3100, Area51 1955 BelAir, 4EVER17 1987 R10, Ethel Copper Hill Rod & Custom http://67-72chevytrucks.com/vboard/s...d.php?t=829856 |
|
|
|
|
07-18-2023, 07:24 PM
|
#25 |
|
Registered User
Join Date: Nov 2010
Location: calgary alberta
Posts: 7,918
|
Re: Long Time Coming......
Nice work.
They will be hard for other drivers to see down low like that so go fast ALL THE TIME! Haha |
|
|
|
 |
| Bookmarks |
|
|


 Hybrid Mode
