
|
 01-22-2012, 02:42 AM
|
#376 |
|
Registered User
Join Date: Jul 2011
Location: Des Moines, Iowa
Posts: 3,016
|
"My Happy Mess"
The entire field broke at once, in a mad dash for position, ...it's "My Happy Mess" out front!
  Video: Before Dynomax mufflers and After, with. The camera picks up higher pitches easier than my ears - in person the sound is more soft than the video's audio, not to mention it's facing a back wall vs. being outdoors. Installing 2.5" pipes will def. tone it down nicely. Sounds great in person! Even better after it warms up.    the ending is kind of quiet but The Fixer is reving the engine, you can see the cab jump a little  I prob. won't be updating for a while but will post when I can. 
__________________
project: "my happy mess" Last edited by litew8; 01-22-2012 at 03:09 AM. |

|

|
|
01-22-2012, 03:15 AM
|
#377 |
|
Registered User
Join Date: Jul 2011
Location: Des Moines, Iowa
Posts: 3,016
|
Re: Project "My Happy Mess"
fyi
Video's audio - the chattering sound coming from the engine is coming from the roller rockers. The camera picks up on their sound but it isn't as loud in person.
__________________
project: "my happy mess" |
|
|
|
|
01-23-2012, 12:11 AM
|
#378 |
|
Registered User
Join Date: Jul 2011
Location: Des Moines, Iowa
Posts: 3,016
|
Re: Project "My Happy Mess"
One last video. Wish I could edit out the noise, but listen carefully and you can hear The Fixer revving the engine. Like how the mufflers softens the sound. I'll be able to punch it and not draw too much attention - at idle, it'll be heard nice. Not sure when I'll update the exhaust, but I'm not in any rush.
Who wants to race?
__________________
project: "my happy mess" Last edited by litew8; 01-23-2012 at 12:17 AM. |
|
|
|
|
01-23-2012, 04:59 PM
|
#379 |
|
Registered User
Join Date: Jul 2011
Location: Des Moines, Iowa
Posts: 3,016
|
Re: Project "My Happy Mess"
Just a few pics to cap the segment off.
Tapped up defrost vent -  Old timing gun -   New temp. sending unit - 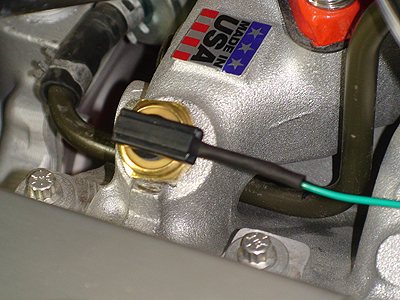 New mufflers installed - 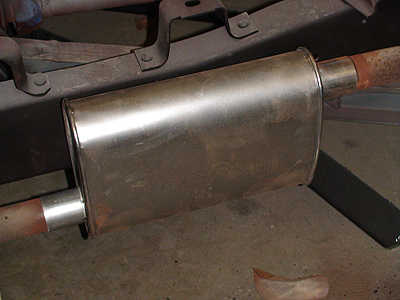  Behind the shop, spot the deer -  
__________________
project: "my happy mess" |
|
|
|
|
01-24-2012, 11:15 AM
|
#380 |
|
Registered User
Join Date: Apr 2009
Location: Cody, WY
Posts: 292
|
Re: Project "My Happy Mess"
subscribed. Nice build
|
|
|
|
|
01-25-2012, 11:52 AM
|
#381 |
|
Registered User
Join Date: Jul 2011
Location: Des Moines, Iowa
Posts: 3,016
|
Re: Project "My Happy Mess"
Thanks. Going to bleed the brakes, put the transmission through the motions (w/o moving, go through the gears) to circulate fluid. Then replace the trailing arms and pumpkin's gasket. Prob. repack with grease and check rear brakes. Then paint differential with Zero Rust.
__________________
project: "my happy mess" Last edited by litew8; 01-25-2012 at 12:02 PM. |
|
|
|
|
01-25-2012, 04:50 PM
|
#382 |
|
Registered User
Join Date: Jul 2011
Location: Des Moines, Iowa
Posts: 3,016
|
Re: Project "My Happy Mess"
Got the brakes bleed. Ran into an issue with a rear bleeder valve being stripped out. Went to the auto store (you know, what I hate) to get a replacement. Wow, what a racket they got going on. I couldn't buy what I needed individually or as a pair, so I had to buy an entire assortment of 10. What a rip-off. Donated what I didn't use to The Fixer's shop. Glad my trips to the auto store are near an end, entirely.
Anyway, brakes bleed good. Tomorrow we'll run the transmission through its gears and then probably take the truck out into the driveway to spin it around - if the weather is good.
__________________
project: "my happy mess" |
|
|
|
|
01-25-2012, 05:59 PM
|
#383 |
|
Registered User
Join Date: Nov 2010
Location: Carlsbad, CA
Posts: 1,584
|
Re: Project "My Happy Mess"
Mostly sunny and high of 42 according to forecast so you should be good to go.
__________________
- Jim - My Daily Driver is a 1969 Chevrolet Custom/20 Fleetside 350/TH400/Eaton H052 4.10 and its Project thread is here http://67-72chevytrucks.com/vboard/s...d.php?t=456911 |
|
|
|
|
01-26-2012, 04:57 PM
|
#384 |
|
Registered User
Join Date: Jul 2011
Location: Des Moines, Iowa
Posts: 3,016
|
Re: Project "My Happy Mess"
The weather was nice enough, but my schedule and The Fixer's didn't work out. I greased the front suspension, will run the transmission through gears (a couple of times), before actually moving the truck - tomorrow. We'll see.
__________________
project: "my happy mess" |
|
|
|
|
01-27-2012, 04:42 PM
|
#385 |
|
Registered User
Join Date: Jul 2011
Location: Des Moines, Iowa
Posts: 3,016
|
Re: Project "My Happy Mess"
Decided not to take the truck out just yet (it snowed some earlier too). Didn't circulate transmission fluids either. Instead, we're tackling the trailing arms. Ending up having to cut the U bolts off to remove. Rusted up nice. The bottom brackets where the U bolts go through looked to be rusted some. Not sure, but it looks like there are two holes where water would drain?, next to where the U bolts go through. Well, if they were for the draining of water - they've rusted away a little, making the opening larger. We'll weld up some plates to the bottom side of the brackets for better security when we cross that road. Have pics, will post when I have time.
__________________
project: "my happy mess" |
|
|
|
|
02-14-2012, 04:30 PM
|
#386 |
|
Registered User
Join Date: Jul 2011
Location: Des Moines, Iowa
Posts: 3,016
|
Re: Project "My Happy Mess"
Status Report - Update
We've been working diligently on the rear suspension/brakes. Got the trailing arms, shocks, new pre-bent brake lines and track (panhard) bar bushings all installed. Painted afterward. Here are some pics: Before:  The trailing arm U bolts were severely rusted, hard to remove. We had to use a little elbow grease to get them both off. Cutting torch, pry bar and the use of a sledge hammer did the trick.         For sale, a slightly bent trailing arm j/k - not for sale U-bolts after:  Original spiral shock, condition:  Lower shock mount and lower coil cups/clamps, painted (Zero Rust):   Then started to paint other pieces:    Haven't taken the truck out for the first drive because of...   Took off the differential cover, cleaned up, painted, installed new gasket -      The pre-bent rear brake lines arrived from LMC. These are a different bend than what was currently on there. The old ones weren't really bent like factory, guessing it's because they were regular lines installed when they switched out the rear axle/differential 20+ years ago. One of the lines got smashed when we were taking off a trailing arm (thanks sledgehammer) - so I replaced them both. We had to modify the bracket though, by relocating/welding it to the right. The bracket that goes onto the differential cover was also bent upwards to hold the line steady. The Fixer fabricated a bracket for the rubber lines, and welded in place.    Next up, the panhard (track) bar bushings, replaced w/new polyurethan.         Putting the cover back on -      ...refilled w/gear oil. New trailing arms installed, finished painting -      And finally (older pic, track bar has been painted), After:  Took the vent doors out of the cab. Not good. Need new seals for both. We decided to invest in a new toy. It had to be good quality - so we got a blast cabinet.       Bench seat rails, now NOS!     And finally, we're beginning to move forward -  Also, I found 2 OEM lighters for 6 bucks on fleabay. I blasted them clean and will paint soon. I'll post pics when finished.
__________________
project: "my happy mess" Last edited by litew8; 02-14-2012 at 04:49 PM. |
|
|
|
|
02-20-2012, 04:17 PM
|
#387 |
|
Registered User
Join Date: Jul 2011
Location: Des Moines, Iowa
Posts: 3,016
|
Monday Update: Starting interior
Here are the two OEM cigar lighters I bought. I made one good one out of two.
The face on one was pitting bad, so I used parts from it to use on the good one. Before:  After (I've never had this cigar lighter during ownership).Sand blasted and painted. Polished aluminum (?) button was masked off.    Found another color code. This time on the gas tank, 441:  Pictures of parts being sand blasted (in our new blast cabinet) and painted (ZR):      Some "how it was done" shots, before and after: Before:            After:      No more "windows being jacked up, rolling up/down"! All my original door guts are now NOS! --------------------- Next up, I tackled the cab floor. Installed Hushmat and placed the jute pad and rubber mat. We'll be repairing pass. door (top/inside), assembling the doors guts, painting door jams and kick panels next. Before installing the Hushmat, I wanted to prep (clean) the surface some. I blew it clean with air hose, then wiped it down with degreaser. After, I spot sprayed areas with ZR just for peace of mind.   Not really necessary, but I used a paint pen to mark where holes are beneath.      Turned out sweet! Turned out sweet!Considering going to the local auto store and have them match/mix up some sandalwood paint in an aresol can - to paint the rubber floor mat to match the dash pad and steering column. My old mat is a light beige (factory Color Keyed mat). Then I'll probably put another (different size/black) mat on top of this one for better protection. ------------- Picture puzzle for the Pit Boss. Name this area.   
__________________
project: "my happy mess" Last edited by litew8; 02-20-2012 at 04:27 PM. |
|
|
|
|
02-21-2012, 04:45 PM
|
#388 |
|
Registered User
Join Date: Jul 2011
Location: Des Moines, Iowa
Posts: 3,016
|
Re: Project "My Happy Mess"
Took my old rubber mat to the car wash. De-greased with the tire spray then soap/water to rinse. Aside from the two tears on the inner corners, it still looks great! For sure they don't make this style/quality any longer (I've looked). This is the rubber mat that will lay on top of the rubber floor cover.
Went to the auto store and took a chunk of the old rubber floor cover to try and match paint. Might be hard to do since the good colored portions are small and not so flat. They'll figure something out, and we'll shoot it with a gun instead of it being in spray cans. The black mat below will sit on top, so I'll end up having Sandalwood (bottom/outline) with black on top. Full floor mat with Chevy truck on it! How COOL is that!!   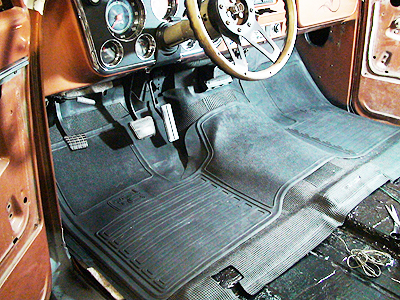 Also, today I stuck the door panels into the blasting cabinet and shot both sides! Painted the metal back w/ZR and I'll paint the front w/fresh white.  
__________________
project: "my happy mess" Last edited by litew8; 02-21-2012 at 04:52 PM. |
|
|
|
|
02-23-2012, 02:44 AM
|
#389 |
|
Registered User
Join Date: Jul 2011
Location: Des Moines, Iowa
Posts: 3,016
|
Re: Project "My Happy Mess"
Previous owner from 1991 mentioned this full width floor mat when I spoke to him the one time. That makes this [real] rubber floor mat 21yrs old! There's no shoe wear!
__________________
project: "my happy mess" |
|
|
|
|
02-24-2012, 04:52 AM
|
#390 |
|
Registered User
Join Date: Jul 2011
Location: Des Moines, Iowa
Posts: 3,016
|
Re: Project "My Happy Mess"

Last edited by litew8; 02-24-2012 at 05:01 AM. |
|
|
|
|
02-24-2012, 04:53 AM
|
#391 |
|
Registered User
Join Date: Jul 2011
Location: Des Moines, Iowa
Posts: 3,016
|
Re: Project "My Happy Mess"
A ps rendition of what it should look like -
 Pics below, my original mat was kept even though torn up. De-greased and matched a piece against the dash and steering column. The only known [by me] imagery of an authentic OEM [elusive] Sandalwood Rubber Floor Cover/Mat   Colors made up at the auto store. The red outlines are failed attempts. Green is what I settled for (may want a hint darker). Everything else is true Sandalwood vinyl paint from the factory.   Unmasked the OEM vent windows and wiped clean The chrome is nearly perfect still, 41 year old QUALITY The rubber is still dark black and pliable! wow  
__________________
project: "my happy mess" Last edited by litew8; 02-24-2012 at 05:15 AM. |
|
|
|
|
02-24-2012, 06:47 AM
|
#392 |
|
Registered User
Join Date: Mar 2010
Location: Forest Hill, MD
Posts: 171
|
Re: Project "My Happy Mess"
Very very nice job litew8!! Can tell this one will be awesome.
__________________
72Kay20 Bel Air, MD 1972 Hugger Orange K20 LWB 350, 4wd, 4spd Sm465, Dana 44, HO52 Other Toys 69 Cortez Silver Z28 86 White Buick T Type |
|
|
|
|
02-24-2012, 04:37 PM
|
#393 |
|
Registered User
Join Date: Jul 2011
Location: Des Moines, Iowa
Posts: 3,016
|
Re: Project "My Happy Mess"
Thanks man! A couple hours a day, things are looking better.
Funny how you don't realize something is nice, until you sandblast, paint and clean it. Proud of my 41 year old chrome vent windows Here's what today brought -   This is the "Ivory" paint sample (right side) for door panels, etc... A dash of White (to brighten it up) was added -  And a couple more shots of my vent windows, sorry - I'm impressed too  
__________________
project: "my happy mess" |
|
|
|
|
02-24-2012, 04:51 PM
|
#394 |
|
Burnouts are therapeutic
Join Date: Jun 2007
Location: lancaster, south carolina
Posts: 852
|
Re: Project "My Happy Mess"
Very nice build....... I like the new blast cabinet, I use mine all the time it's one of the best tools I own.
__________________
1969 CHEVELLE SS 1972 C10 ALMOST DAILY DRIVER 1968 C10 RUSTBUCKET (MISSION IMPOSSIBLE) 1972 PONTIAC LEMANS CONVERTIBLE (WIFE'S CAR) "My wife and I were happy for twenty years. Then we met." - Rodney Dangerfield "The difference between genius and stupidity is that genius has its limits." - Einstein |
|
|
|
|
02-25-2012, 01:06 PM
|
#395 |
|
Registered User
Join Date: Jul 2011
Location: Des Moines, Iowa
Posts: 3,016
|
Re: Project "My Happy Mess"
Thanks red69ss.
Growing up, we had pretty cool shop classes/teachers [mid-late 80's] in high school - [auto shop] included a blast cabinet similar to the one we got. Cleaning (parts cleaner) and blasting parts was just the normal course of work whenever we wrenched in class. We had some pretty cool teachers back in the day that taught us great work ethics. Have you ever found a solution to the inner protective screen (replacing)? We're looking for something to use besides the clear plastic sheets.
__________________
project: "my happy mess" Last edited by litew8; 02-25-2012 at 01:19 PM. |
|
|
|
|
02-25-2012, 02:01 PM
|
#396 |
|
Burnouts are therapeutic
Join Date: Jun 2007
Location: lancaster, south carolina
Posts: 852
|
Re: Project "My Happy Mess"
No, I use the clear plastic sheets I can't think of any other way. I replaced the glass in mine last year and have been using the sheets since, but they don't last very long before having to be replaced.
__________________
1969 CHEVELLE SS 1972 C10 ALMOST DAILY DRIVER 1968 C10 RUSTBUCKET (MISSION IMPOSSIBLE) 1972 PONTIAC LEMANS CONVERTIBLE (WIFE'S CAR) "My wife and I were happy for twenty years. Then we met." - Rodney Dangerfield "The difference between genius and stupidity is that genius has its limits." - Einstein |
|
|
|
|
02-25-2012, 04:34 PM
|
#397 |
|
Registered User
Join Date: Jul 2011
Location: Des Moines, Iowa
Posts: 3,016
|
Re: Project "My Happy Mess"
We "think" we've found a "solution". If it works well, we won't have to replace the inner plastic nearly as much (or maybe at all). We'll test it out and I'll post the results.
What brand cabinet do you have? Is the window size on yours 1'x2' or close?
__________________
project: "my happy mess" |
|
|
|
|
02-25-2012, 05:31 PM
|
#398 |
|
Burnouts are therapeutic
Join Date: Jun 2007
Location: lancaster, south carolina
Posts: 852
|
Re: Project "My Happy Mess"
cool can't wait to hear the results. Mine is a infa-blast, I bought it used from a machine shop. It is built almost identical to yours. The glass is close to 1'x2' I can't remember the exact size.
__________________
1969 CHEVELLE SS 1972 C10 ALMOST DAILY DRIVER 1968 C10 RUSTBUCKET (MISSION IMPOSSIBLE) 1972 PONTIAC LEMANS CONVERTIBLE (WIFE'S CAR) "My wife and I were happy for twenty years. Then we met." - Rodney Dangerfield "The difference between genius and stupidity is that genius has its limits." - Einstein |
|
|
|
|
03-02-2012, 04:08 AM
|
#399 |
|
Registered User
Join Date: Jul 2011
Location: Des Moines, Iowa
Posts: 3,016
|
Re: Project "My Happy Mess"
Not much of an update other than we're starting to work on the cab.
We're not going to bring the whole thing down to bare metal, but maybe some. Here's a pic of the entire floor covered with Hushmat, and today did some wire wheeling to remove the old weatherstrip adhesive. Looks good underneath!     Should be able to get a lot more done this weekend.
__________________
project: "my happy mess" |
|
|
|
|
03-02-2012, 09:29 AM
|
#400 |
|
GEARHEAD
Join Date: Aug 2003
Location: MN
Posts: 6,119
|
Re: Project "My Happy Mess"
Those vent windows looked great. Nice progress on the cab.
__________________
If no one knows what you're doing, they can't tell you you're doing it wrong HG's Dream Car Build - Shelby Cobra Kit Build your own adjustable track bar 71  Long Fleet C/10 Long Fleet C/10 72  Jimmy 4x4 (Junkyard Jimmy) Jimmy 4x4 (Junkyard Jimmy)HG's Plow Truck '78  K35 Dually K35 DuallyBigass Farm Truck HG's thread of miscellaneous stuff |
|
|
|
 |
| Bookmarks |
|
|


 Linear Mode

