
 |
Register or Log In To remove these advertisements. |
|
|
|
|||||||
 |
|
|
Thread Tools | Display Modes |
|
|
#26 |
|
Senior Member
   Join Date: Jan 2018
Location: Hickory Flat, GA
Posts: 4,483
|
Re: 1964 GMC Palomino Tan Survivor
I got quoted 400 to re-core my radiator back in 2016. I also went with a Champion. Many trouble free miles since then
__________________
Christian Carpenter 1963 C10 - Frankentruck 283, Muncie 3 speed with overdrive Overdrive wiring here1963-ish truck bed trailer - Half-Wit 1981 C10 - Penny 305, th350 --> Soon to be 350, Saginaw 4 speed 1995 Dodge Dakota Sport "I'll put it simple: if you're going hard enough left, you'll find yourself turning right." - Doc Hudson |
|
|

|
|
|
#27 |
|
Senior Member
 Join Date: Nov 2013
Location: Portland, OR
Posts: 542
|
Re: 1964 GMC Palomino Tan Survivor
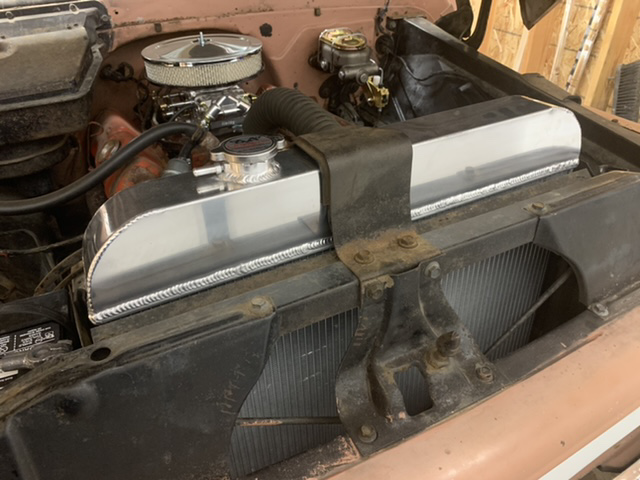
New radiator arrived and is installed. I cut strips from a leftover fuel filler hose to replace the original rubber bumpers in the brackets, since the tanks on the new radiator don't have the same shape as the original Harrison. Otherwise it fit up well.
 With that, I was able to take the truck for a run around the block with the new suspension and brakes. First impressions are that the brake feel isn't as good as I had hoped and it needs the c-notches before I drive it anymore. I need to put some steering stop bolts on the spindles, too. It looks great though! Saturday morning, tried to roll it onto the street to back it into the garage and it stalled and wouldn't start...neighbors helped me push it out of traffic and I ran out to get a new battery. Pushed my luck with the one that came in the truck, I knew it wasn't good for much more than one start on an overnight charge. Got it turned around and stripped off the bondo on the passenger rear of the bed. It was was oil-canned out with a bunch of hidden damage. I spent the better part of today pounding on it, learning to use a shrinking disc, re-welding the brace over the wheel opening and teaching myself how hammer and dolly works. Now the bed side holds shape in a relatively straight line from front to back. There's still a big concave area and some high spots in bad places that I need to work on. This photo is from when I bought it:  This photo is just after I stripped out the bondo.  This is after all the beating and shrinking:  I'm going to get this bed side pretty close and then start cutting it down to a short bed. Last edited by caseyjones; 10-05-2021 at 01:16 AM. Reason: Pictures. People love pictures. |
|
|

|
|
|
#28 |
|
Registered User
Join Date: Mar 2015
Location: Washington State
Posts: 1,651
|
Re: 1964 GMC Palomino Tan Survivor
Great job!!
__________________
John 3:16 - Saved me... God Bless |
|
|

|
|
|
#29 |
|
Registered User
Join Date: Dec 2014
Location: portland oregon
Posts: 292
|
Re: 1964 GMC Palomino Tan Survivor
nice work! good to see another local, my current truck is a 64 GMC swb with chevy front sheetmetal..I plan to coil convert mine soon
__________________
1961 c10 longbed - gone 1964 c10 swb |
|
|

|
|
|
#30 | |
|
Senior Member
 Join Date: Nov 2013
Location: Portland, OR
Posts: 542
|
Re: 1964 GMC Palomino Tan Survivor
Quote:
Speaking of rivets, took out a few more so I could install the notches.  Have to figure out shock placement/mounting next. Had some bad rubbing between the front wheels and the lower control arms. I looked at grinding back the control arms but didn't like how much it looked like I'd have to remove. I'm trying out some 1/4" wheel spacers instead to see if that helps. Does anyone make 16" OE-style steelies that take 10.5" hubcaps? |
|
|
|

|
|
|
#31 |
|
Senior Member
 Join Date: Nov 2013
Location: Portland, OR
Posts: 542
|
Re: 1964 GMC Palomino Tan Survivor
Got to take it for a bouncy cruise without those rear shocks. The wheel spacers in the front seem to have solved the wheel-to-control arm issue. The c-notches solved the axle-to-frame issue. The engine seems pretty strong, the trans makes a lot of noise even for an SM420 and the clutch is hammered.
I also converted to a 66-up style parking brake setup. I just used the stock '65 cables that came with the rear end, a reproduction cable support rod and coupler kit, and made my own cable to join the two coming from the rear wheels. The cable kept stretching so I had to keep making it shorter, but I got it eventually. I actually used my MIG welder to zap the ends of the cables to hold the cable stops...soldering the cable stops was not working. I decided to go with this rear shock setup. Made the new uppers tonight, the paint is drying and hopefully i can install tomorrow. https://67-72chevytrucks.com/vboard/...errerid=134070 |
|
|

|
|
|
#32 |
|
Senior Member
 Join Date: Nov 2013
Location: Portland, OR
Posts: 542
|
Re: 1964 GMC Palomino Tan Survivor
I was able to put some test miles on the truck last weekend and it felt great to get it out and moving. I got the shock mounts made and the shocks mounted and the ride is pretty good. No bottoming out with this setup, even on some pretty big whoops in the road. The brakes take just a little too much effort so I bought a 7" booster for a little bit of assist. Felt like there might still be some contact between the front wheels and the control arms so I probably need to take a grinder to them. For looks I found some Oldsmobile dog dish caps - they get the job done.
The trans and clutch sound so bad though. Growling, banging, squealing...good thing I have this hanging around the garage...  Its an AX15 from a Jeep Comanche that I totally lucked into. I bought the front adapter from another forum member, and after some panic that I might not find a slip yoke, I found a part number on a Jeep forum and thank goodness it worked!  I need to pick up front and rear seals and a pilot bushing. I'm waiting to install until I shorten the truck so I'm only buying the driveshaft once. I spent a little time polishing on the paint to see if it has any life left. I think it'll shine up pretty good!  Progress is gonna have to stall for a little bit - my buddy's '62 C20 developed a leaky head gasket, and since he has no garage and it's rainy season it's gonna get fixed in my garage. Once we have him running again, I think I'll bust out the sawzall... |
|
|

|
|
|
#33 |
|
Moderator
  Join Date: Aug 2011
Location: China Spring, TX
Posts: 7,280
|
Re: 1964 GMC Palomino Tan Survivor
Good find on the transmission, keep us posted.
__________________
Master Chief, US Navy, Retired 1964 C10 Step-side Short Bed - In Progress 2009 2500HD Duramax LTZ 1948 GMC Panel 1956 Big Window Stepside 1953 5 Window Chevy Stepside 1932 Coupe New Seat Foam for Bench Seats? |
|
|

|
|
|
#34 |
|
Registered User
Join Date: Sep 2007
Location: gilbert, az
Posts: 802
|
Very Cool truck!! Keep the pics coming!
Posted via Mobile Device |
|
|

|
|
|
#35 |
|
Senior Member
 Join Date: Nov 2013
Location: Portland, OR
Posts: 542
|
Re: 1964 GMC Palomino Tan Survivor
Thanks for the encouragement! I can't wait to see your red truck come together hardwaa...
Waiting on schedules to align with my buddy so I got a few more projects started. I installed the little brake booster. I used a Speedway 7" booster, and I ordered the 55-57 brackets along with the aluminum plate adapter that I used on my C10. Turns out I didn't need that, since the bolt pattern on the GMC matches the master cylinder and the 55-57 brackets (I should have realized this since I had already replaced the MC). I could still add a couple of bolts but I don't think I need it, the pedal force is all in line so it shouldn't flex. I'm waiting on a pedal clevis and I'll see how much it moves around once the pushrod is connected.  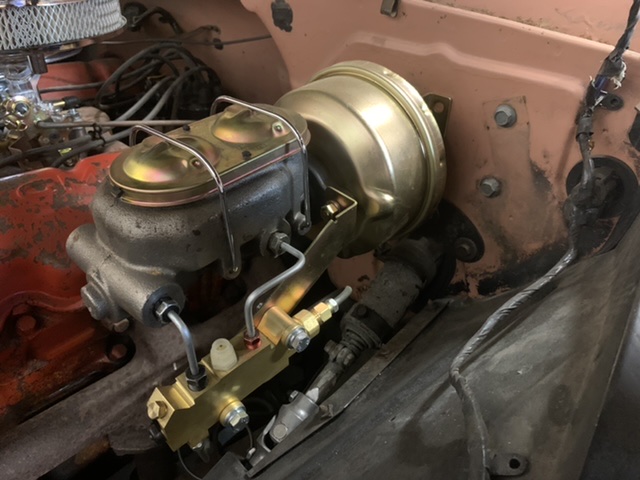 The truck was converted to an SM420 a long time ago, and it already had the removable floor panel, but it never had the firewall filler panel swapped over. I can confirm that the panel that's advertised for the 60-63 trucks will fit in the 64-66 trucks. The only difference I found was that the area where the accelerator pedal is mounted is flat for the pedal that bolts through the floor, rather than the style that snaps onto the ball studs. Maybe this is how all the 4-speed trucks would have been for all years?  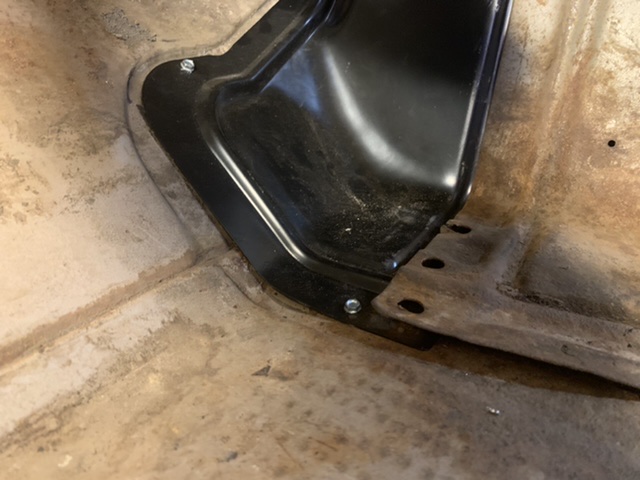 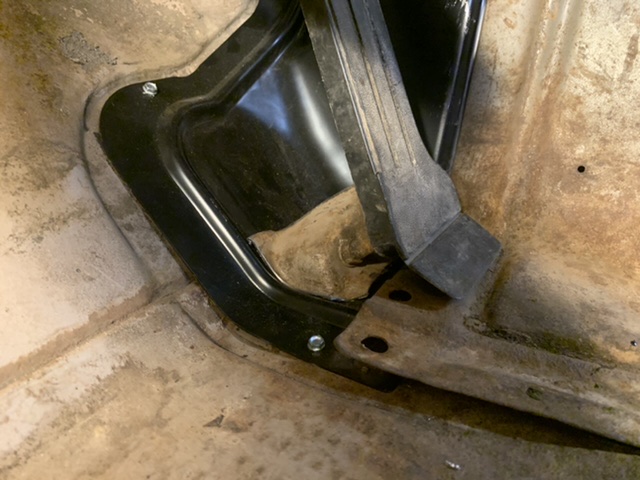 I ordered a new pedal and a rivnut tool - I'll use rivnuts to hold down the floor panels too. I'm not going to weld in the firewall filler panel - it's way too convenient to have access to the bellhousing bolts. |
|
|

|
|
|
#36 |
|
Senior Member
 Join Date: Feb 2011
Location: Corona, CA
Posts: 1,841
|
Re: 1964 GMC Palomino Tan Survivor
Subscribed!
Beautiful color, it's a GMC and you kept he V6!! Thanks for that AX15 info and look forward to that swap coming up... 
__________________
MusicMan70 1961 GMC Suburban |
|
|

|
|
|
#37 |
|
Registered User
Join Date: Jun 2016
Location: Wiltshire / UK
Posts: 110
|
Re: 1964 GMC Palomino Tan Survivor
For the shock placement - I installed notches and shorter springs.
I swapped the lower shock mounts L-R and re-drilled the holes more inboard to allow the shocks to mount outside the frame - almost vertical. I used standard front shocks on the rear and although I have not driven the truck with this setup - it seems to be a common modification that puts the shocks in a far better angle to work well. worth considering now you have a really solid fixture on the notch - the truck's looking really good... Quote:
__________________
1965 c10 project - how does all this stuff go back together... |
|
|

|
|
|
#38 |
|
Senior Member
 Join Date: Nov 2013
Location: Portland, OR
Posts: 542
|
Re: 1964 GMC Palomino Tan Survivor
I did exactly what you described on my green truck and it worked well. I found the plans and a Monroe part number for another mounting method that seemed pretty simple so Iím trying that out. So far, with limited testing, it seems like itís effective. The overall ride is softer than my green truck but I also seem to have some pretty stiff dampers on the green truck. I can always switch to the outboard mount later and do some head to head comparisons!
|
|
|

|
|
|
#39 |
|
Senior Member
 Join Date: Nov 2013
Location: Portland, OR
Posts: 542
|
Re: 1964 GMC Palomino Tan Survivor
Finished up my buddy's engine refresh, survived Christmas travel and illness, and now back on the truck. I was able to chop down the bed over the last couple of weekends. 8" behind the tire and 12" in front of the tire. I kept the stake pockets and placed my cuts on the top rail to get rid of the most severe damage. I had more warp/shrink on this truck than I did on my Chevy, so I had to do some dolly work and use a little filler. I hope it all disappears when I get some color-matched paint.
  Now I can pull the bed off again and start laying out the cuts on the frame and borrow some more jack stands... |
|
|

|
|
|
#40 |
|
Senior Member
 Join Date: Nov 2013
Location: Portland, OR
Posts: 542
|
Re: 1964 GMC Palomino Tan Survivor
 More room to move around in the garage now! My buddy and I pulled the transmission and started looking at the AX15 and realized we have a problem. The GMC bellhousing doesn't appear to be removable without removing the flywheel. The AX15 and Novak adapter, as designed, need to be mounted from inside the bellhousing. In order to run the top transmission mounting bolts into the bellhousing from the transmission side, I'll have to carve away at the transmission case to make room for the socket head cap screws. I'm thinking about it for a bit longer before I start grinding, hoping for a better answer. The area to be cleared out for the bolt is as wide as the sharpie outline, but would have to extend further back along that rib. It looks pretty much the same on the other side, except it also gets really close to a locating dowel pin. I wouldn't have to cut all the way through that lip, probably a little over .125" deep into it.  I doubt the transmission would ever be stressed enough for the case to break if I cut into those ribs. What do you guys think? |
|
|

|
|
|
#41 |
|
Registered User
Join Date: Sep 2010
Location: Hancock Md
Posts: 410
|
Re: 1964 GMC Palomino Tan Survivor
Considering all the aluminum case 4spd's running around with only 4 little ears connecting them to bellhousing I would think you should be fine with that much beef around the relief cuts.
|
|
|

|
|
|
#42 |
|
Senior Member
 Join Date: Nov 2013
Location: Portland, OR
Posts: 542
|
Re: 1964 GMC Palomino Tan Survivor
That puts it in perspective for me. I'm going to carve into that transmission case and make it work.
I've had a couple of guys ask for details about the frame shortening process. I should have taken more pictures, but I can describe what I did... I put a couple of jackstands under the front of the frame near the front bumper, about as high as they can go, and then I put another set somewhere behind the front cab mounts. I shim them up so they make solid contact with the frame. Then I remove the rear cab mount bolts and set the rear of the cab on jack stands after I take out the rubber bushings. I use a floor jack under the trailing arm crossmember to hold the rear half of the frame after it's cut so I can roll it back out, and use the jack to lift or lower the frame to keep my sawzall blade from binding. I use the CPP frame strengthening plates to bridge the cuts. The nice thing about the CPP plates is that they help with keeping the frame straight too. They are a really tight fit inside the frame channel so make sure you clean up the frame with a wire wheel and get all the rust and undercoat out of there. I measure from the front cab mount to a spot to the rear of the frame cuts so I have a reference to measure after I take out the 12" under the cab. I mark the rear cut about 9inches in front of the trailing arm crossmember. After I cut the frame I move the rear cab mounts back 12". I just use a carpenter square to mark the front holes for the cab mount, drill the holes and use the mount to mark the rear holes. I use 3/8" grade 8 bolts to attach the cab mount back to the frame. Then I tap the CPP channels into the rear sections of the frame, at an angle toward the center of the truck. They are a really tight fit so they won't just slip into the front section of the frame, they need to be pounded in from the sides. I roll the rear frame forward and pull everything together with tie-downs and measure and grind until I get the frame cuts square and get a matching measurement between my reference marks, side to side. Once I have the frame cuts where I want them, I pound the CPP channels all the way into the frame. I put 4 bolts along the bottom of the frame and 4 bolts through the side of the frame on each side of the cut. I put the bed back on the truck before welding to make sure the body lines match up and are straight. I had to use a floor jack to lift the center of the frame on my green truck to get everything straight on the driver's side. I'm putting new rubber mounts on my GMC before I finish welding to make sure the cab is in it's correct height from the frame. I get a 1pc driveshaft made, but I'm swapping transmissions to ones with slip yokes. If your transmission has a fixed yoke you might need to just shorten your 2-pc driveshaft. I use regular short wheelbase parking brake cables, they are pretty cheap on Rockauto.com You can check out the videos of the Brothers frame shortening kit being installed, it's pretty much exactly what I do, I just make my own marks instead of using their template. Hope this helps! |
|
|

|
|
|
#43 |
|
Senior Member
 Join Date: Nov 2013
Location: Portland, OR
Posts: 542
|
Re: 1964 GMC Palomino Tan Survivor
Got out the die grinder and went to work on the transmission this weekend. Went much easier than I thought it would. I just snuck up on it, taking small cuts until everything just cleared.
 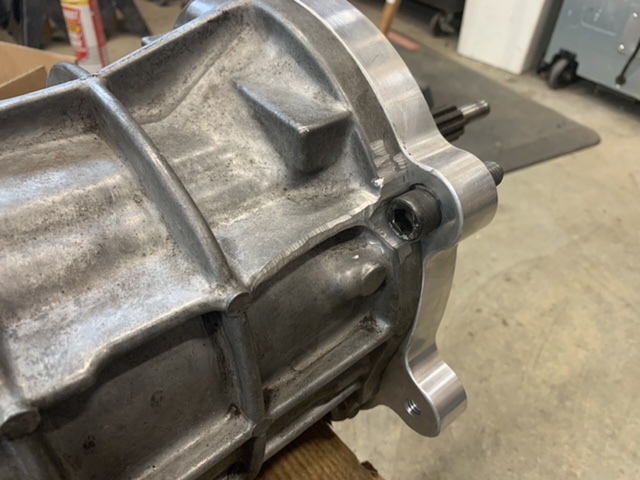 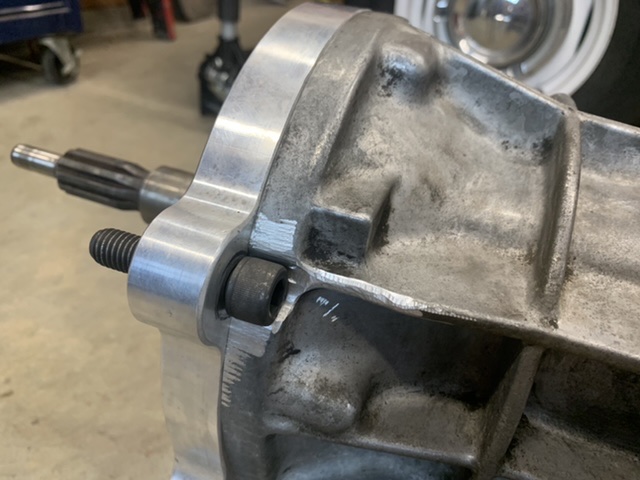 Definitely still have a lot of material left where I carved so I'm not worried about strength. Popped some new seals in the trans and took the flywheel to be resurfaced this morning. I'm gonna hold off on getting the clutch fully rebuilt - there's a good bit of material left on the clutch disc and the pressure plate is in decent shape so I'm gonna risk it. I'm hoping to have the trans installed this week so I can measure for the driveshaft. Still need to get my frame welded up too. |
|
|

|
|
|
#44 |
|
Senior Member
 Join Date: Nov 2013
Location: Portland, OR
Posts: 542
|
Re: 1964 GMC Palomino Tan Survivor
|
|
|

|
|
|
#45 |
|
Senior Member
 Join Date: Feb 2011
Location: Corona, CA
Posts: 1,841
|
Re: 1964 GMC Palomino Tan Survivor
Boy how exciting! Congratulations
You’ve got some fun shifting ahead of you… The AX15 is a split-case, top shifting, overdrive transmission with the shifter being located in the rear section of the transmission. The AX15 is fully synchronized in all gears. All gears are helically cut. Gear ratios for the AX15 are: 3.83, 2.33, 1.44, 1.00, 0.79, for first through fifth, respectively.
__________________
MusicMan70 1961 GMC Suburban |
|
|

|
|
|
#46 |
|
Senior Member
   Join Date: Jan 2018
Location: Hickory Flat, GA
Posts: 4,483
|
Re: 1964 GMC Palomino Tan Survivor
Nice! Looks like it fits well in there and the shifter looks to be in a good spot.
Did you have to cut out the low hump for clearance?
__________________
Christian Carpenter 1963 C10 - Frankentruck 283, Muncie 3 speed with overdrive Overdrive wiring here1963-ish truck bed trailer - Half-Wit 1981 C10 - Penny 305, th350 --> Soon to be 350, Saginaw 4 speed 1995 Dodge Dakota Sport "I'll put it simple: if you're going hard enough left, you'll find yourself turning right." - Doc Hudson |
|
|

|
|
|
#47 |
|
Registered User
Join Date: Aug 2020
Location: Braunschweig, Lower Saxony, Germany
Posts: 804
|
Re: 1964 GMC Palomino Tan Survivor
Wow, great work
__________________
------------------------------------------- Greetings Harald My 62 build thread http://67-72chevytrucks.com/vboard/s...d.php?t=829782 |
|
|

|
|
|
#48 |
|
Senior Member
 Join Date: Nov 2013
Location: Portland, OR
Posts: 542
|
Re: 1964 GMC Palomino Tan Survivor
The floor had been cut out before I bought the truck. But I think it would have to be cut to clear the shift tower and rear part of the transmission anyway. And it makes installation way easier when you can wrestle with it from above.
|
|
|

|
|
|
#49 |
|
Senior Member
 Join Date: Nov 2013
Location: Portland, OR
Posts: 542
|
Re: 1964 GMC Palomino Tan Survivor
Not a lot of visual progress this week, but I am getting closer to driving:
-driveshaft is on order -brake lines modified and brakes bled -parking brake cables installed -frame is finish welded -new speedometer cable on the way -new hole cut in floor for shifter I’m contemplating the shifter solution, it’s pretty obvious that the current shifter is going to end up in the seat. I’m hoping to snag one from a Dakota at the pick n pull to at least get the truck driving, then figure out a way to adapt a Hurst stick later. Still need to cobble up the exhaust system too. But it feels like it’s close to being back on the road. |
|
|

|
|
|
#50 |
|
Registered User
Join Date: Feb 2022
Location: US of A
Posts: 71
|
Re: 1964 GMC Palomino Tan Survivor
This truck is coming together nice! I couldnt figure out my gas pedal, seemed like i was missing something and your pic confirms it i can't find that lower mounting peice, might have to look harder. i wonder if a guy could swap it for a more modern style pedal. hmmmm
__________________
"Just do it! Dont let your dreams be dreams" -Shia LaBeouf |
|
|

|
 |
| Bookmarks |
|
|