
|
|
|
 04-09-2015, 10:34 PM
|
#1 |
|
Registered User
Join Date: Jan 2015
Location: Arizona
Posts: 86
|
Re: "Albert" -- 1949 AD, S10 Chassis
Glad you posted about the mounts, I was looking into those mounts. I hope they work out as I am in the same boat.
My S10 donor has a 350 in it but it looks way too far forward, I will know better once I get it stripped down. |

|

|
|
04-09-2015, 10:50 PM
|
#2 | |
|
Registered User
Join Date: May 2013
Location: Kansas City
Posts: 572
|
Re: "Albert" -- 1949 AD, S10 Chassis
Quote:
|
|
|
|
|
|
07-25-2018, 02:53 PM
|
#3 | |
|
Registered User
Join Date: May 2018
Location: Phoenix, AZ
Posts: 318
|
Re: "Albert" -- 1949 AD, S10 Chassis
Quote:
|
|
|
|
|
|
07-25-2018, 03:50 PM
|
#4 | |
|
Senior Member
 Join Date: Sep 2016
Location: Hershey, PA
Posts: 1,004
|
Re: "Albert" -- 1949 AD, S10 Chassis
Quote:
__________________
Current Build Thread 1930 Ford Model A Modern Twist: Ford Model A Rat Rod With a Modern Twist Build Thread Phase 1 "The Swap": 1949 3100 with S10 swap. Beginner build with ambition! Build Thread Phase 2 "The Drop": Beginner Build with Ambition gets Air Ride |
|
|
|
|
|
07-25-2018, 03:59 PM
|
#5 | |
|
Registered User
Join Date: May 2018
Location: Phoenix, AZ
Posts: 318
|
Re: "Albert" -- 1949 AD, S10 Chassis
Quote:
|
|
|
|
|
|
07-25-2018, 05:15 PM
|
#6 |
|
Registered User
Join Date: Sep 2017
Location: Sudbury, Ontario
Posts: 42
|
Re: "Albert" -- 1949 AD, S10 Chassis
On my build, I was 1/4 inch from the firewall on the passenger side. After much thought and measuring, I decided to recess the firewall 2 inches. The whole thing worked out perfect with extra valve cover clearance and the wheels now centered in the fenders. This also allowed me to move the cab mounts forward 1 inch while also gaining 1 inch of clearance behind the engine. It actually didn't take that long to do once I got rolling.
Brendan |
|
|
|
|
04-09-2015, 11:48 PM
|
#7 |
|
Registered User
Join Date: Feb 2015
Location: Centerton, AR
Posts: 433
|
Re: "Albert" -- 1949 AD, S10 Chassis
Great work!
|
|
|
|
|
04-16-2015, 01:49 PM
|
#8 |
|
Registered User
Join Date: May 2013
Location: Kansas City
Posts: 572
|
Re: "Albert" -- 1949 AD, S10 Chassis
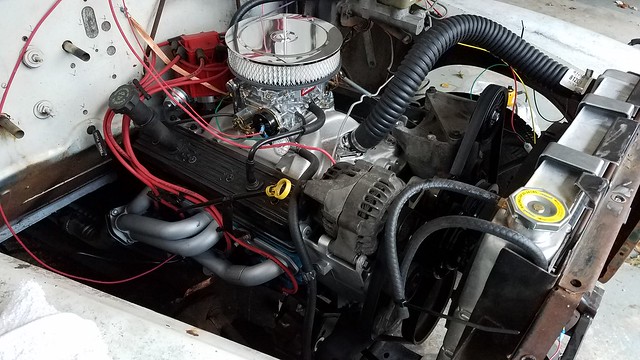
Once I got the motor set on the chassis I built the exhaust from mandrel u-bends back to the muffler. I’m running Headman S10 V8 conversion headers. The y-pipe is 2.5 inch out of the headers with a 3 inch pipe back to the muffler. The muffler is a Flowmaster 40 Series and has dual 2.5 inch pipes out. Once I get the bed and rear bumper on I’ll figure out the routing back and under the bumper.
    
Last edited by HUSSEY; 08-25-2015 at 04:08 PM. |
|
|
|
|
04-16-2015, 03:18 PM
|
#9 |
|
Registered User
Join Date: Nov 2012
Location: Post Falls, Idaho
Posts: 1,757
|
Re: "Albert" -- 1949 AD, S10 Chassis
Subscribed.........looks great so far!
|
|
|
|
|
04-18-2015, 10:55 PM
|
#10 |
|
Senior Member
 Join Date: May 2007
Location: Doodah Kansas
Posts: 7,761
|
Re: "Albert" -- 1949 AD, S10 Chassis
that exhaust is gorgeous, nice work
__________________
the mass of men live lives of quiet desperation if there is a problem, I can have it. new project WAYNE http://67-72chevytrucks.com/vboard/s...d.php?t=844393 |
|
|
|
|
05-31-2015, 09:56 PM
|
#11 |
|
Registered User
Join Date: May 2013
Location: Kansas City
Posts: 572
|
Re: "Albert" -- 1949 AD, S10 Chassis
Been working on the truck on and off lately and don’t have my pics yet organized to show what I’ve done. For now I thought I’d share how I went about building my exhaust. For cutting the mandrel bends I have a jig I made up that works well for me. You can see how I made the jig and how it works in a couple of the pics below. Picture of the jig below:
 I used MDF to make the jig. The jig body is built up from several pieces of MDF. The thickness of the jig will need to be less than the diameter of the pipe. Here, I used three pieces of MDF. The width of the jig will be the inside bend width of the u-bend. U-bends will have a long radius bend of 1.5xD (diameter). To get the inside width of the u-bend you can calculate it as 1.5xDx2-D, or measure it. You will find out most of the time it’s a little greater than “theoretical”.     Once you have the jig body assembled, find the center and put a half circle on it with a compass as show below. I then nibble away the excess with a chop saw then finish it off on a sander.    You will also need to drill a through hole on your center mark. I also recess the hole a little on the back for a carriage bolt. You will attach a radius cutting guide with the center bolt. The radius cutting guide is simply a strip of metal with a hole drilled in the middle of it and a slit cut down the center of it. I stack a couple of wasthers under it to get it to the height of the pipe.   The finished jig is show below. The finished jig allows you to cut the correct anle to match the routing of your exhuast. The jig also ensures you cut along a line that intersects the radiaus center point of the bend to esure the plane end of the cut is round. [/img] 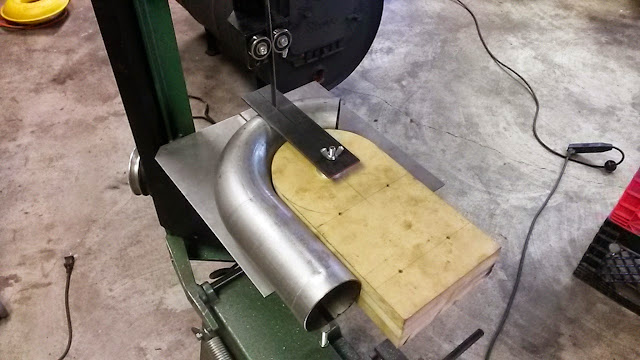  I use an adjustable square to find the angle of the cut.  Once you know the angle of the cut from your adjustable square, use it to set up the appropriate angle on the jig. No mesuring or math here. The two pictures below show two different methods for finding the correct angle on the jig from your adjustable square.   Once the jig is adjusted, cut the pipe.  The picture below shows the final cut piece and the angle of the cut.  Below shows how to jig up a pipe angle without the straight leg of the u-bend. I usually make use of the straight leg but if you have some left over and un-utilized bends you can cut angle sections out of it. The first picture shows setting the piece in the jig. The second and third pictures show the two different methods for finding the correct angle on the jig from your adjustable square.    I use an inexpensive Harbor Freight band saw. I like to use the bi-metal blades by SuperCut. They don’t alawys have them at Harbor Freight. I think the bi-metal blades are worth ordering because the last much longer. You can tilt the chop arm up and turn it into a table top band saw as show in the previouse pictures.  For my exhaust supply I use all aluminized piping and u-bends. U-bends can be hard to find other than mail order. There’s a muffler shop in Tokepa, KS that has a mandrel bending machine, which is really rare given how expensive the machines are. I live about an hour from there so I made a trip to pick up some pieces from him. He may be willing to ship; the shops name is Hogan Muffler & Brake, www.hoganmuffler.com. For the straight sections, I would check with a local exhaust shop first before a parts store. In my experience, an exhaust shop will give you a better price on exhaust piping. You will need a separate jig for each size of exhaust piping you are working with since they all have a different bend radius. For far I have one made up for 2, 2-1/2 and 3 in. pipe. I had also built the exhaust for a 52 Chevy that I used to own after splitting the stock manifold. Here are some pictures of my 52 exhaust whose routing was a little tighter and more complicated than my AD/S10 project. Building exhaust like this is pretty easy to do, it’s just a little time consuming.     
Last edited by HUSSEY; 10-06-2015 at 05:21 PM. |
|
|
|
|
06-05-2015, 01:27 PM
|
#12 |
|
Registered User
Join Date: May 2013
Location: Kansas City
Posts: 572
|
Re: "Albert" -- 1949 AD, S10 Chassis
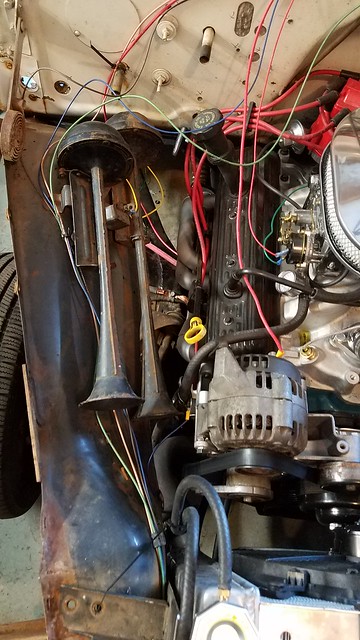
After I got the exhaust routed back to the muffler I got the engine running and test fired with a stand-alone wiring harness. The stand-alone engine wiring harness came from FuelInjectionConnection.com. They sell on-line and on eBay. At first I was going to use a stock harness but everyone I looked at the yards was old and brittle. I was happy spending the $245 on the new engine wiring harness given its quality and ease of install. I mocked up the engine wiring harness and ignition switch so I could test fire the engine.
The engine came from Pick N’ Pull so I was rolling the dice a bit. The truck it came out of showed to have right at 100,000 miles on it. But when I got the motor home and cleaned it up, I discovered it had a GM rebuild tag on it so who knows how many miles are actually on it. The motor turned over fine by hand at the yard. I pulled the valve cover at the yard and it looked nice and clean underneath, not all sludged up. When I got it home I pulled all the plugs, oiled the cylinder walls, and ran a compression test on it. Compression showed to be consistent among all cylinders and around 175-185 psi. The engine ended up running out fine with good oil pressure, hopefully it drives out ok. There’s a video of the test fire here Test Fire Chevy 350 TBI. 
Last edited by HUSSEY; 08-25-2015 at 04:07 PM. |
|
|
|
|
06-06-2015, 10:17 AM
|
#13 |
|
Senior Member
Join Date: Jul 2012
Location: Oblong, Illinois
Posts: 7,017
|
Re: "Albert" -- 1949 AD, S10 Chassis
Hussey, that was a great tutorial, and great work, on the exhaust. Thanks for sharing that!
Really good mock up on the harness too. |
|
|
|
|
06-10-2015, 08:10 PM
|
#14 | |
|
Registered User
Join Date: May 2013
Location: Kansas City
Posts: 572
|
Re: "Albert" -- 1949 AD, S10 Chassis
Quote:
|
|
|
|
|
|
06-10-2015, 08:11 PM
|
#15 |
|
Registered User
Join Date: May 2013
Location: Kansas City
Posts: 572
|
Re: "Albert" -- 1949 AD, S10 Chassis
I’ve been buttoning up a couple small things on the chassis and I think I’ve just about got a rolling chassis ready to go. I still have to run the brake lines which I’ll do after the booster and master cylinder get mounted. This is where the chassis sits as of now. The original chassis cab mounts have been cut off and the front frame horns have been cut off just in front of the steering gear box.

Last edited by HUSSEY; 08-25-2015 at 04:06 PM. |
|
|
|
|
06-11-2015, 12:06 AM
|
#16 |
|
Registered User
Join Date: Jul 2014
Location: Dallas, TX
Posts: 155
|
Re: "Albert" -- 1949 AD, S10 Chassis
Hussey nice work and great video. I have learned that on the later model Chevy 350s, those that come with center bolt valve covers, Chevy went to a thin 1/16 compression and oil ring. The low tension rings seal well and the cylinder walls last a long time. With any reasonable care taken the cylinder walls still show the cross hatches after well over 100,000 miles.
|
|
|
|
|
06-11-2015, 07:01 AM
|
#17 |
|
Registered User
Join Date: Feb 2005
Location: Idaho Falls, Id
Posts: 86
|
Re: "Albert" -- 1949 AD, S10 Chassis
That jig for cutting the bends is pretty clever.
It's tought to get a straight cut through tubing with a band saw, maybe I'll make one and give it a try
__________________
My projects 53 GMC, 54 GMC, 67 GMC, 01 GMC DMAX 67, 68, 69, 72 Firebirds, 79 TA, 68 Camaro, 68 Mustang |
|
|
|
|
06-25-2015, 02:00 PM
|
#18 |
|
Registered User
Join Date: May 2013
Location: Kansas City
Posts: 572
|
Re: "Albert" -- 1949 AD, S10 Chassis
So far I have done a bit of clean up on the cab. I’ve stripped just about everything out of it. The interior had been a mouse motel for who knows how long. I bet I have a good 40 hours stripping out the interior, cleaning, and blowing out all the nooks and crevices. Because of the mice, I scrubbed out the interior with hospital grade germicidal cleaner and flushed out the cab as best I could.
 I went ahead and removed the lower seat surround. I have split bench seat out of a 60’s Chevelle that I think should work well. To get the lower seat surround off I used a saws all to first cut it down then I came back with a chisel point on my air hammer.     A flexible scraper on my Dremel multi tool made quick work of removing all the factory insulation.   The cab is fairly solid. No rust on the bottom of the doors. Some through rust on the cab corners but it’s on the bottom edge where you have to get down to see it. There’s also some rust through on the both the drivers and passengers side where toe board meets the floor. I don’t plan on doing much patching now. I’m more focused on getting it mechanically complete then go back and do some of the body work.   My daughter Emily is always interested in what I’m up to. I hope to get another project in the future where I can actually get the kids involved.   Also got the body stripped down. The bed wood wasn’t in all that good of shape so most of it got tossed. I did save the metal strapping off of it. I also pulled the hood and front clip to get the cab ready to move over to the S10 chassis.     Before I pulled the front clip I marked the fenders where the wheels lined up. The big tires and wheels on the truck made it easier to see that the wheels were centered in the front wheel wells. I first jacked up the front a little to level the cab, then dropped a plum bob and centered it on the front axle, then marked the fender. That way, I can then use this as a reference point when mounting the sheet metal on the S10 chassis.     Last edited by HUSSEY; 08-25-2015 at 04:05 PM. |
|
|
|
|
07-08-2015, 01:18 PM
|
#19 |
|
Registered User
Join Date: May 2013
Location: Kansas City
Posts: 572
|
Re: "Albert" -- 1949 AD, S10 Chassis
A monumental day in the build has finally arrived, the moving of the cab to the S10 chassis. I had been looking forward to getting this done but also dreading it, not knowing how I was actually going to get the cab moved.
I had seen several other builders post pics of a cab moving rig they built and attached to their engine hoist, so I thought I would give it a shot. The hoist picked up the cab without any issues.  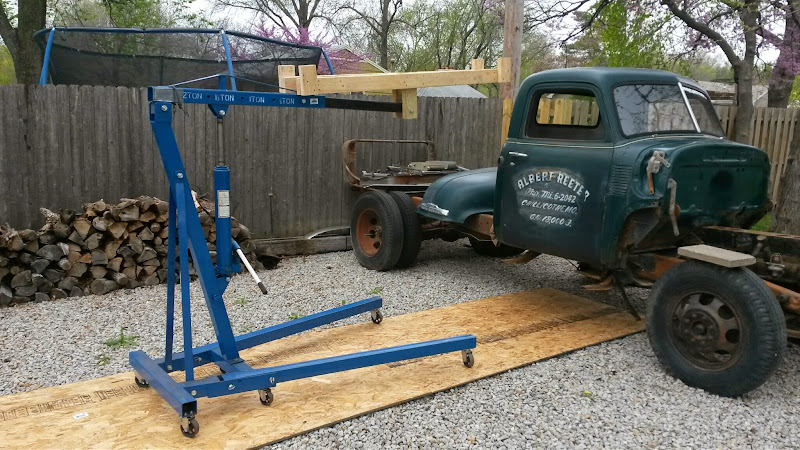   My plan was to pull the cab off to the side and roll the S10 chassis underneath. I was going to swing the back end of the S10 chassis around with a jack in my drive to get it into position but the gravel drive makes that a pain in the ass. We ended up pushing the cab into the garage with the engine hoist, rolling it over one sheet of plywood at a time. It took a while but it all ended up getting done.  The cab is just sitting on some 4x4’s waiting on me to get it some cab mounts made up. It is satisfying finally seeing the cab on the chassis though.   I also go the floor trimmed a little to get the cab to sit down on the 4x4s. 
Last edited by HUSSEY; 11-23-2015 at 10:11 PM. |
|
|
|
|
07-08-2015, 04:57 PM
|
#20 |
|
Senior Member
Join Date: Jul 2012
Location: Oblong, Illinois
Posts: 7,017
|
Re: "Albert" -- 1949 AD, S10 Chassis
Great work and I love the cab lift. That cab is really solid too. Looks very good.
|
|
|
|
|
07-10-2015, 01:37 PM
|
#21 | |
|
Registered User
Join Date: May 2013
Location: Kansas City
Posts: 572
|
Re: "Albert" -- 1949 AD, S10 Chassis
Quote:
|
|
|
|
|
|
07-13-2015, 11:51 PM
|
#22 |
|
Registered User
Join Date: Jul 2015
Location: Shreveport, LA
Posts: 209
|
Re: "Albert" -- 1949 AD, S10 Chassis
Looking good so far! The cab looks in great condition, and great work on the exhaust.
I'm working on a '48 3100 with the '94 S10 frame swap. I'm going with an LS1 with a 4L60E transmission. I'll definitely be keeping an eye on your progress. Keep up the good work! |
|
|
|
|
07-14-2015, 12:18 AM
|
#23 |
|
Registered User
Join Date: Mar 2013
Location: Edmonton, AB
Posts: 298
|
Re: "Albert" -- 1949 AD, S10 Chassis
Nice dude!
Subscribed |
|
|
|
|
07-28-2015, 02:04 PM
|
#24 |
|
Registered User
Join Date: May 2013
Location: Kansas City
Posts: 572
|
Re: "Albert" -- 1949 AD, S10 Chassis
I’ve been working on getting my cab position set. I had been forewarned in that setting the cab height, the position of the motor, and the steering column and linkage is a bit of a juggling act.
After some back and forth, I decided to set the front of the cab 4 in. from the top of the frame to the cab floor board’s support. I think if I were to do it all over, I may consider block type hugger exhaust manifolds over the S10 conversion headers. With the engine set about 0.5 in. to the passenger’s side I think the steering linkage would have cleared it, but, since I had already purchased the S10 headers, I decided to just go ahead and commit. I would have liked to go a little lower but in the end I think the 4 in. works out well. It provides good clearance between the S10 gas tank and the cab, doesn’t require too much of a transmission tunnel, and from the looks of it, I don’t think I will have any driveshaft clearance issues. No pics to really post here, up next will be constructing the cab mounts. |
|
|
|
|
07-28-2015, 05:31 PM
|
#25 |
|
Registered User
Join Date: Oct 2013
Location: South Dakota
Posts: 48
|
Re: "Albert" -- 1949 AD, S10 Chassis
Project is looking really good. I like the jig you have set up. I may have to consider doing that blazer front brake swap.
|
|
|
|
 |
| Bookmarks |
|
|


 Hybrid Mode
