
|
|
|
 09-04-2012, 10:43 AM
|
#1 |
|
Registered User
Join Date: Aug 2007
Location: Corona, California
Posts: 7,998
|
Re: 1957 Chevy truck re-rebuild
The BB should give it plenty of get up and go.
Kim |

|

|
|
09-04-2012, 11:53 AM
|
#2 |
|
Certified Car Nut
Join Date: Jan 2005
Location: Inglewood, California
Posts: 3,118
|
Re: 1957 Chevy truck re-rebuild
Nice tail light mod and very nice truck. Thanks for posting pics and keep them coming.
|
|
|
|
|
09-04-2012, 10:49 PM
|
#3 |
|
Registered User
Join Date: Aug 2012
Location: Salem Mo
Posts: 647
|
Re: 1957 Chevy truck re-rebuild
Hi Kim57, definetly he would have liked the power of the Big Block. I was also hoping to give him a truck that when he opened the hood, the engine bay would have the visual impression he would be happy to show off.
Since dad was coming to visit during the beginning of the project, I was working on both the drivetrain and body work at the same time. One reason was to give him a moment of excitement when he saw the progress. Plus he wanted to be a part of the work. He had his choice to work on body or engine, which he did both. 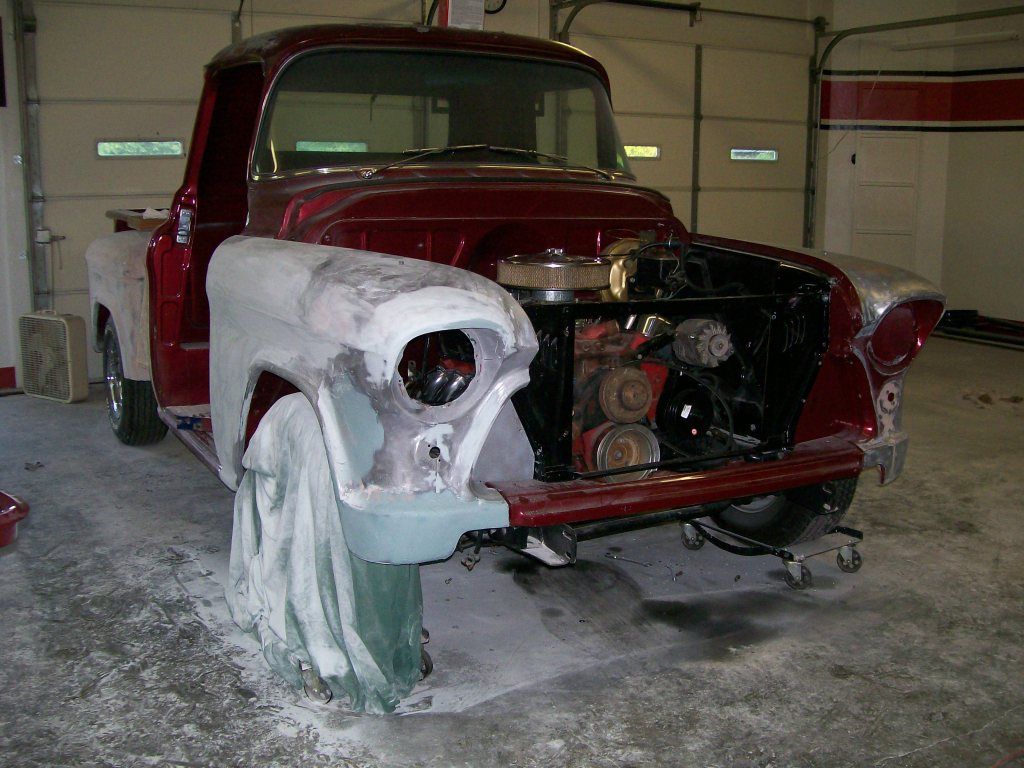 After checking and measuring and fitting and checking again, I finally settled on engine placement. When done, I had about an inch clearance from side to side and front to back. The front, between the engine and radiator was a tight fit. I used an alternator and power steering brackety from a 1960's corvette. If I had used a newer, say 1970 or newer, the water pump and bracketry are moved forward about 3/4". I went to a dual electric fan, With the dual fan motors, the space between the two motors gave me an open area that the water pump pulley fits between. Altough a close fit, everything is still easy to work on. 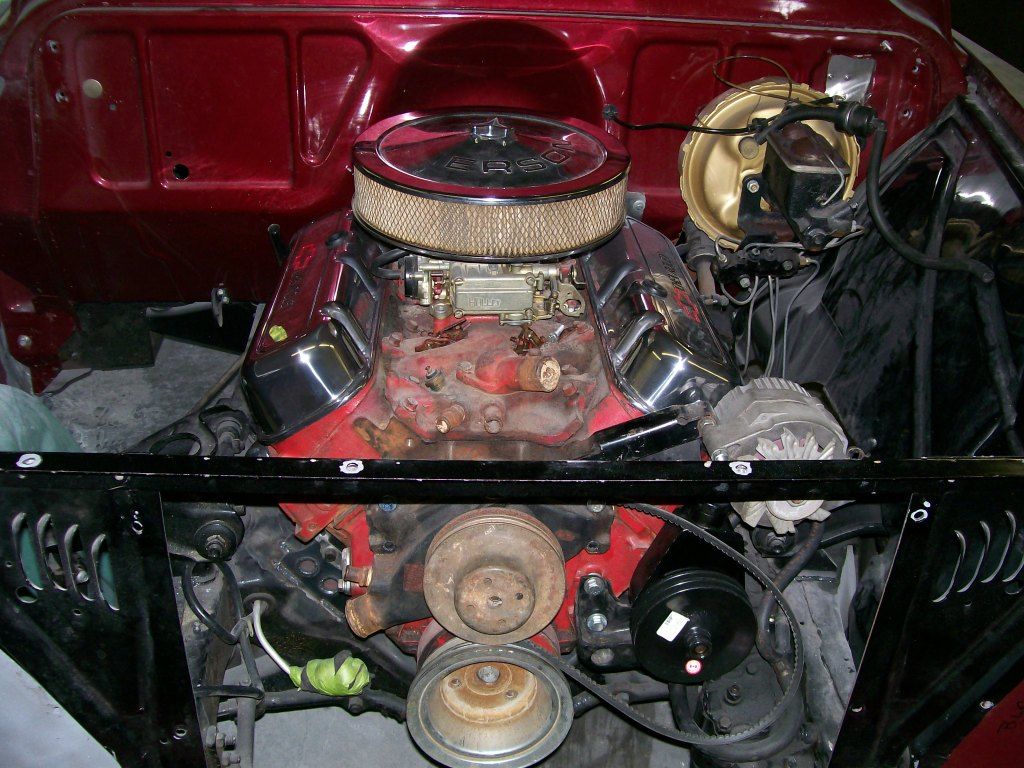 More on the engine later. One small detail I did to the bed was the same as many, I closed off the rolled edge of the top rail of the bed. Before I closed off the ends I extended them 3/4". Such a small addition, but it added something to the visual of the flow of the back of the bed. 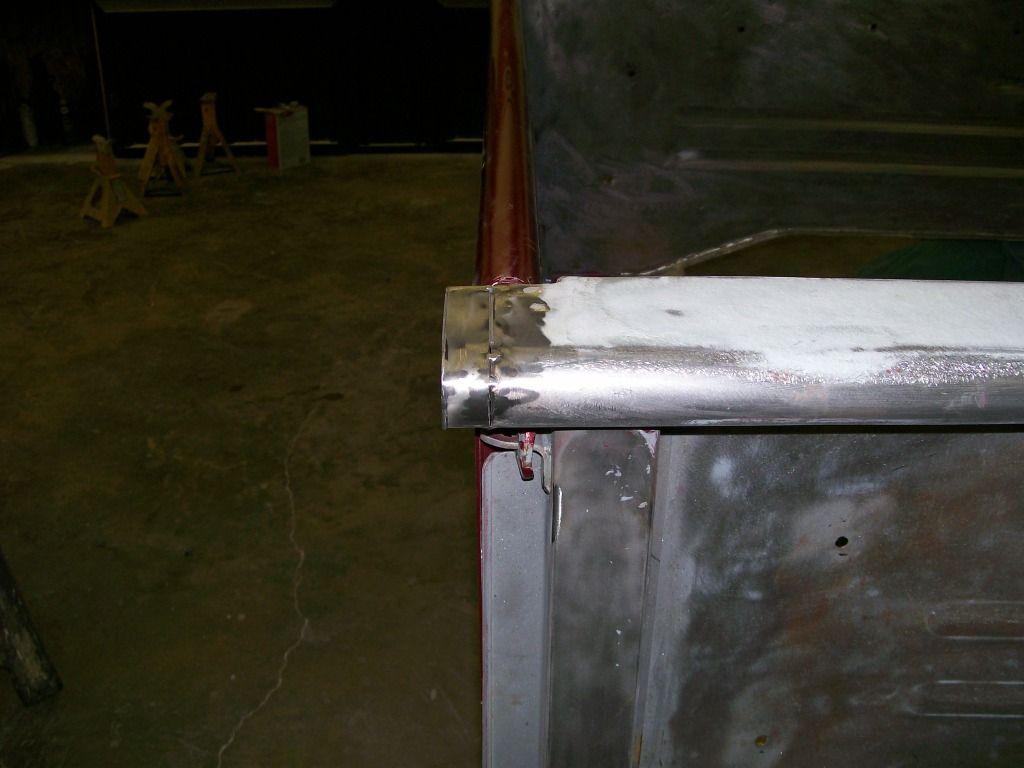 I originally closed the ends, then I noticed from the side I could see into the edge of the top of the tailgate. It had an unfinished look, this was my remedy. |
|
|
|
|
09-05-2012, 09:46 AM
|
#4 |
|
Registered User
Join Date: Aug 2007
Location: Corona, California
Posts: 7,998
|
Re: 1957 Chevy truck re-rebuild
Looking good.
Kim |
|
|
|
|
11-03-2012, 08:24 PM
|
#5 |
|
'57 Rosa
 Join Date: Sep 2009
Location: Fitzgerald,GA
Posts: 162
|
Re: 1957 Chevy truck re-rebuild
Awesome build Jim. You have some mad skills. Keep the pics and ideas coming. Great job.

__________________
My '57 Truck Build "Rosa" (Current Project) http://67-72chevytrucks.com/vboard/s...21#post4118721 2003 Dodge Dakota 4X4 (Daily Driver) Only two defining forces have ever died for us: CHRIST died for our salvation and VETERANS died for our freedoms. Glorify CHRIST and thank VETERANs  Dru~ USN Retired Dru~ USN Retired
|
|
|
|
|
11-04-2012, 10:28 PM
|
#6 | |
|
Registered User
Join Date: Aug 2012
Location: Salem Mo
Posts: 647
|
Re: 1957 Chevy truck re-rebuild
Quote:
I've got pics of the air filter housing loaded, let's play this out. I got the idea of using the construction paper from Paul jr., It gives a realistic idea of the size and dimesions before cutting metal, or in this case, aluminum. 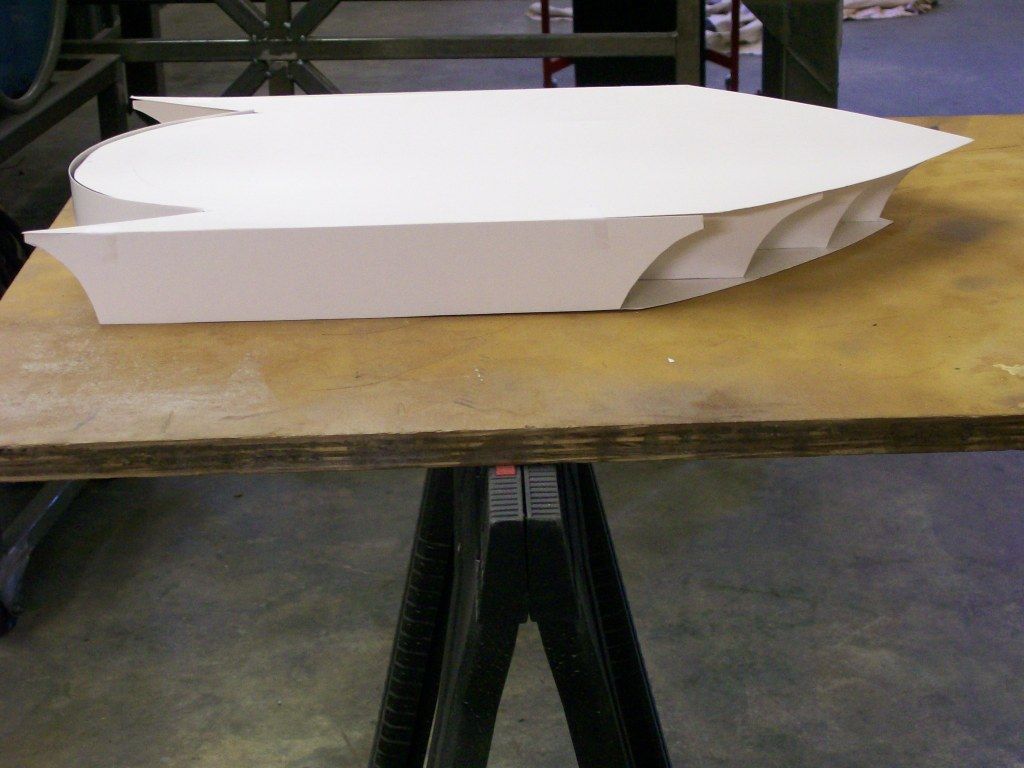 Once I cut the bottom plate I cut the upward fins. Thinking ahead I cut the slots in the bottom plate to match the interlocking tabs on the fins. Then using clamps and using angle iron I held the fins securely in place. The razor blade was placed there so the clamp wouldn't leave a mark in the softer aluminum. 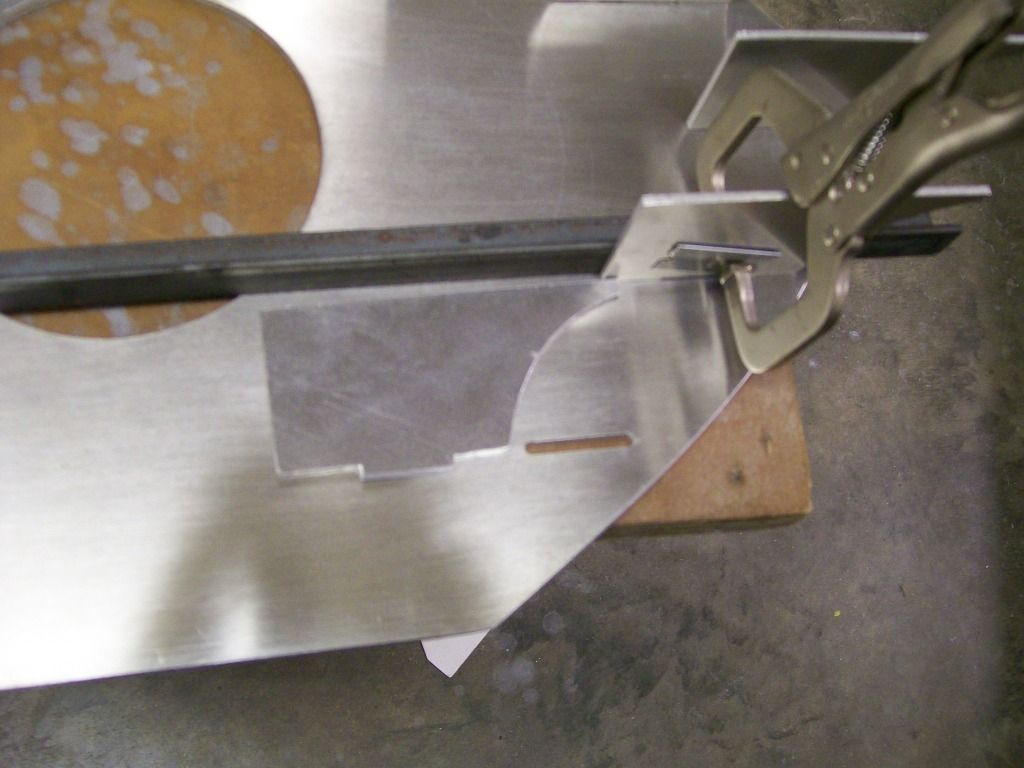 My Tig welder took a crapper so I had to use a Mig spool gun. The propane torch I use to throw some heat to the welding area. The aluminum accepts and spreads the heat so fast when cold, I found by preheating the area the Mig welder is more consistant. 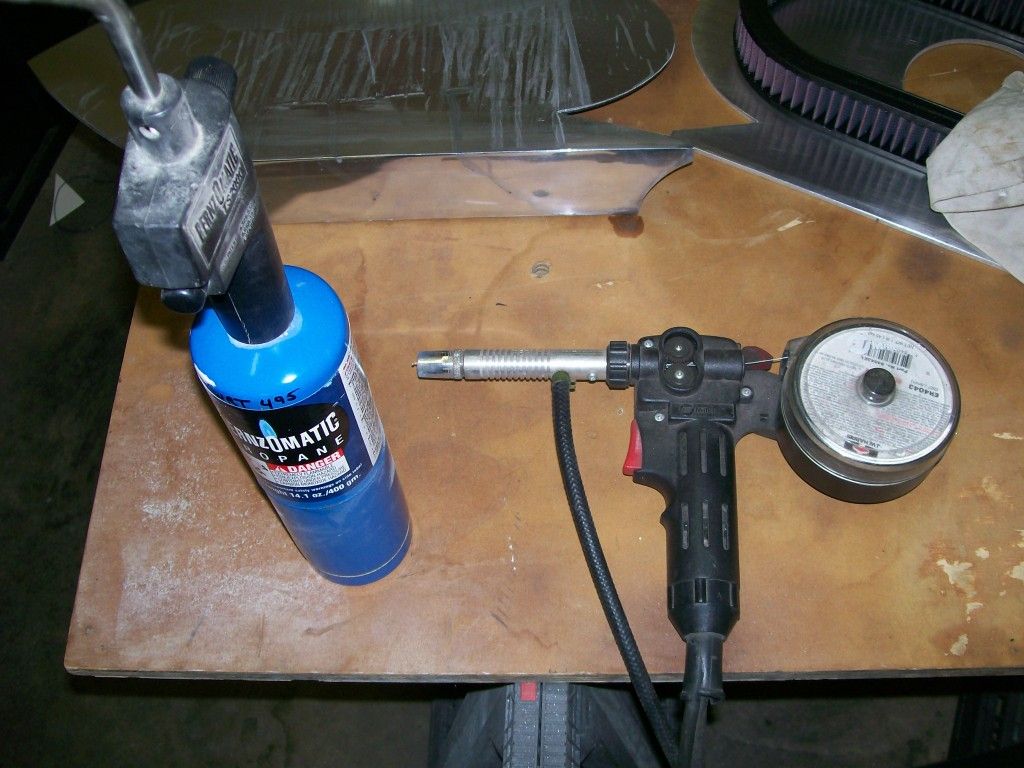 After fitting the fins to the bottom plate I was able to weld the fins from the bottom, now there is no weld to be seen when finished. 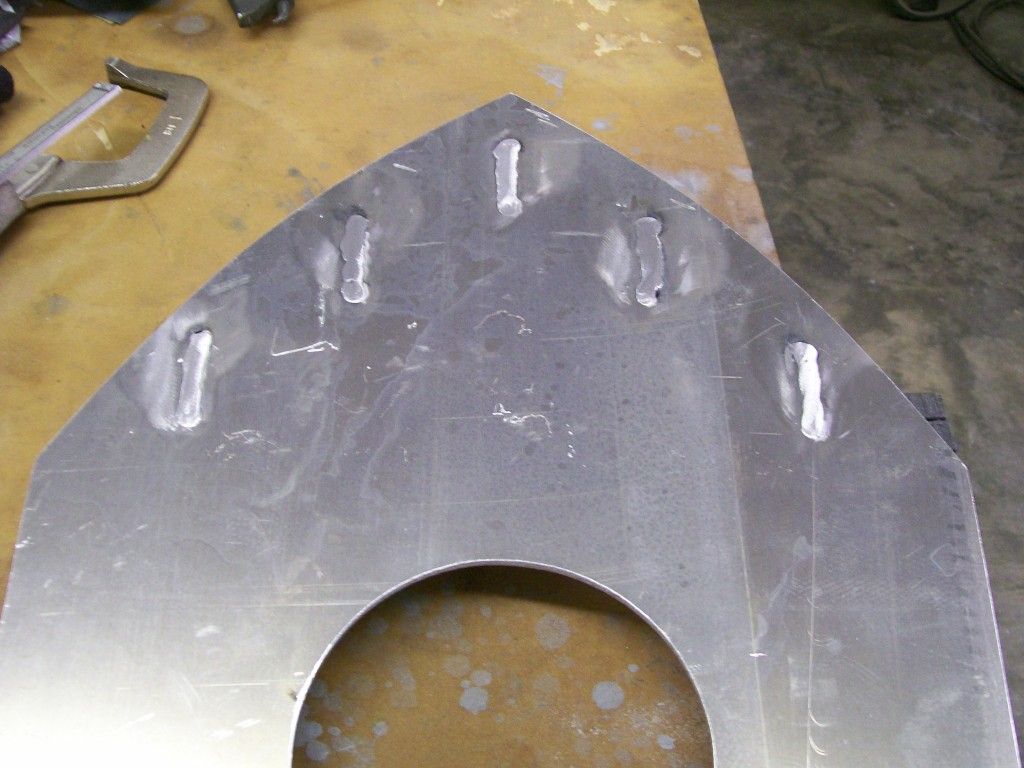 More to follow... |
|
|
|
|
|
11-07-2012, 12:15 AM
|
#7 |
|
Registered User
Join Date: Aug 2012
Location: Salem Mo
Posts: 647
|
Re: 1957 Chevy truck re-rebuild
Next project was to make the top and the sides. They started as three pieces, now I want them as one piece. Now I know I could have cut the whole thing as one piece then used the press to bend over the sides. If I was to make multiple air filter housings, that would be the way to go, I'm making one so I'm going at it the long way.
I started by clamping the pieces in place. I then did a couple of short welds. The idea is by doing these welds I can remove the clamps and I can weld the bottom side. By welding the bottom side I can go back to doing the full welding on the outside without much distortion. 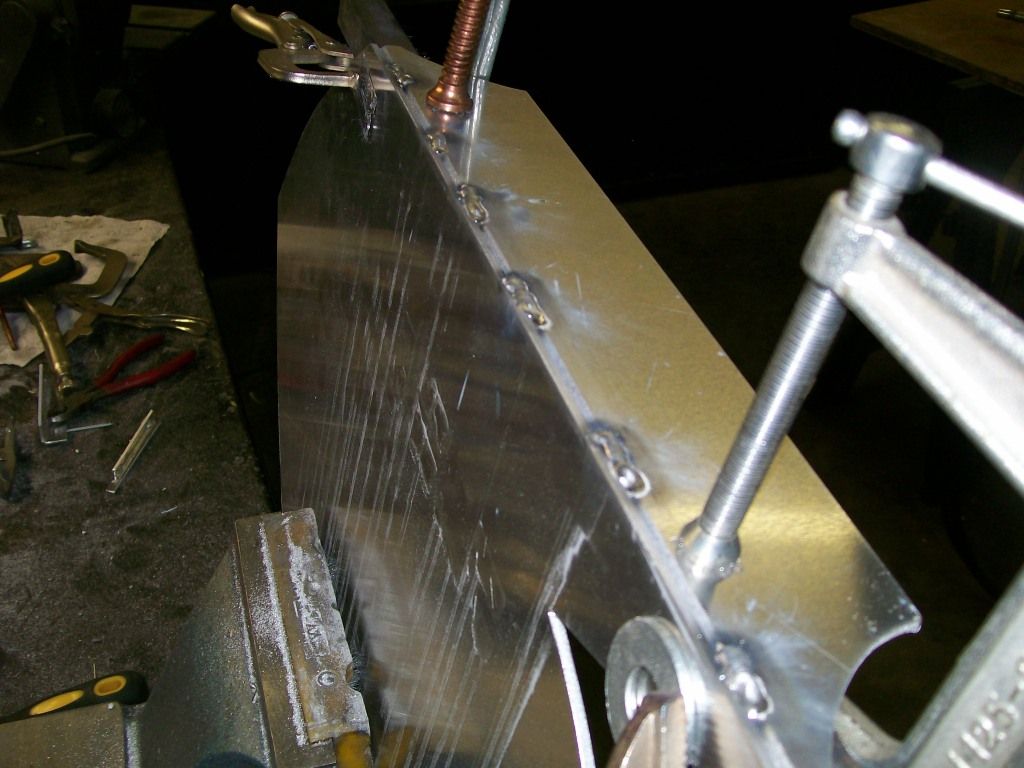 The couple of underside welds. 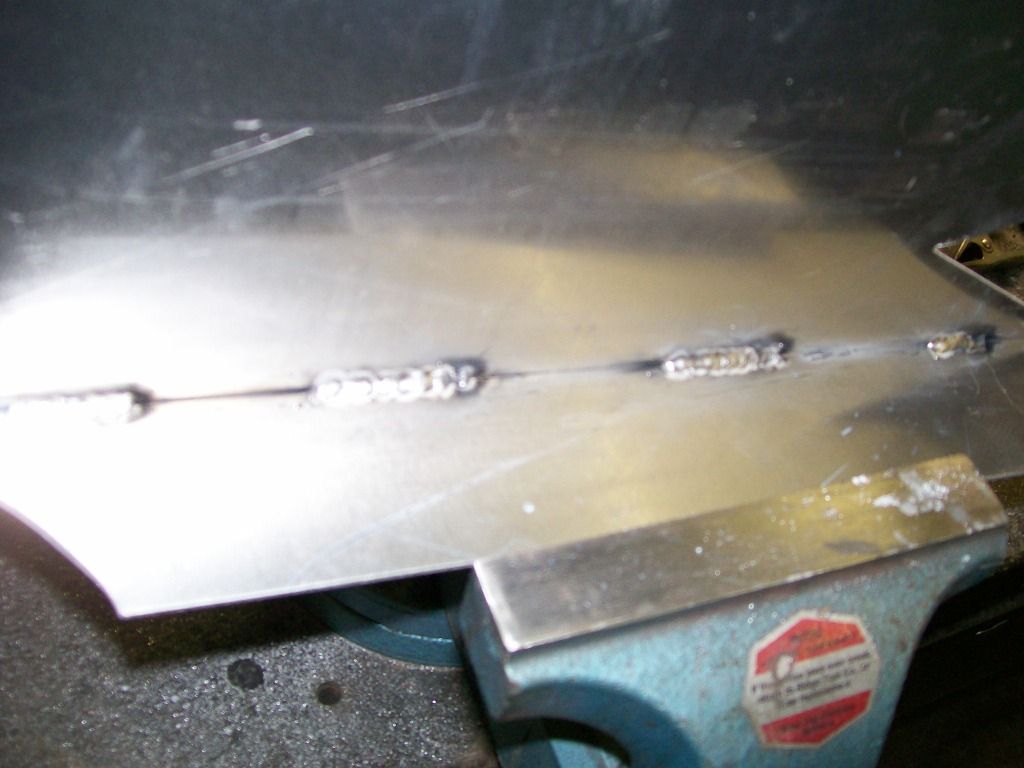 As I mentioned, the tig welder is not working right. No big deal, my main concern is to attach and fill. Since I'm gonna grind anyway, the mig weld will do the job. 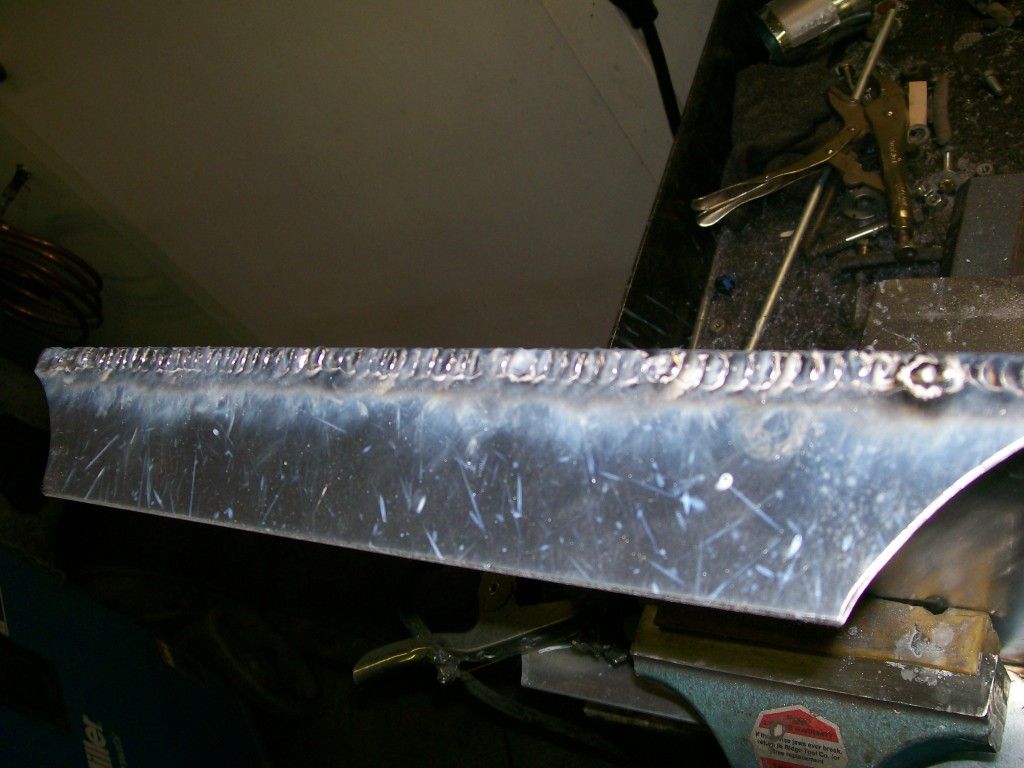 Once the welding was done I very carefully used the grinder to smooth the weld. 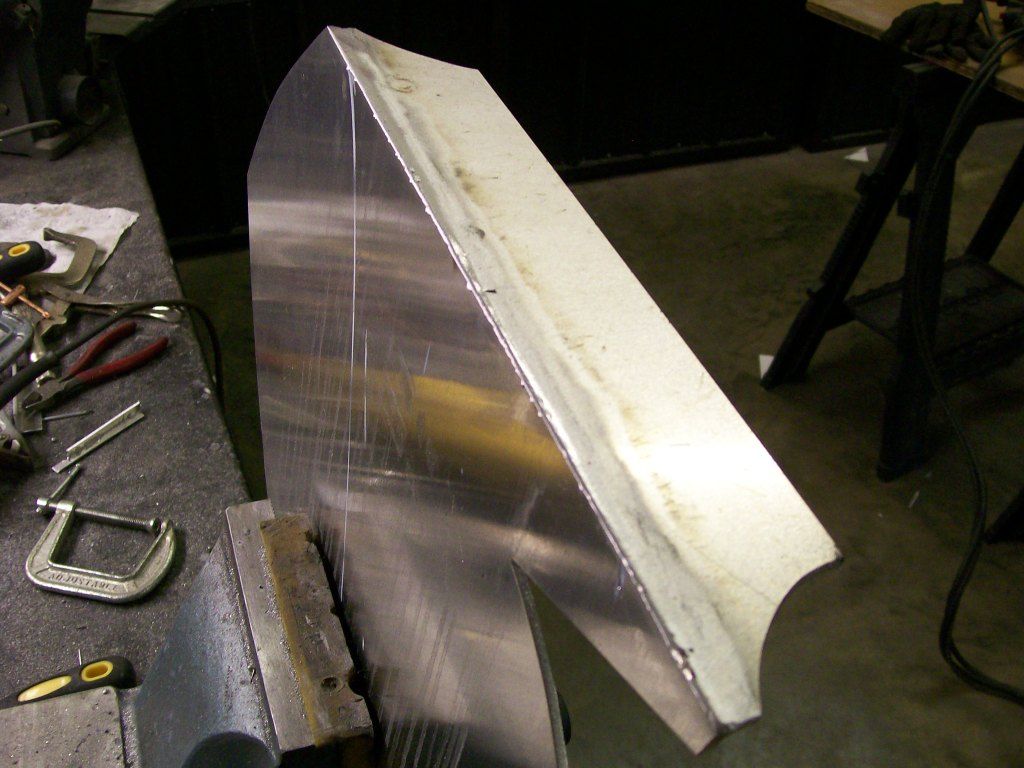 After the grinding was done I used 320 grit wet sand paper and block sanded the weld area. This left a nice level surface. 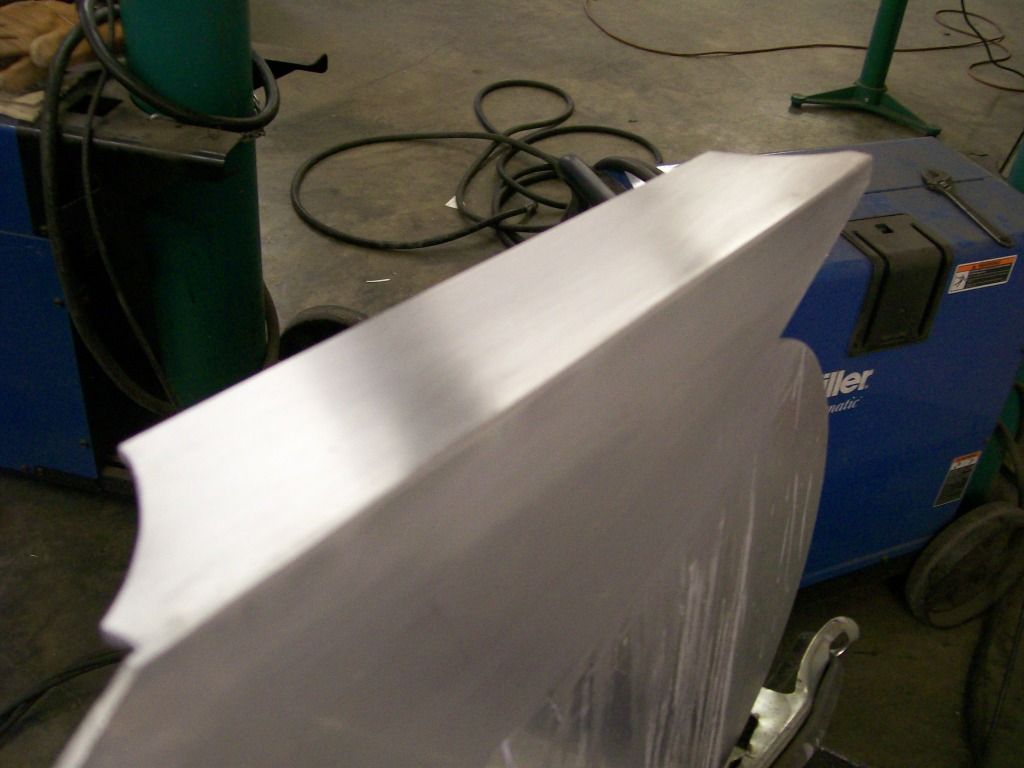 I then went to 1200 grit paper and a test polishing. I have a little more finishing to do but it's looking coming along nicely. 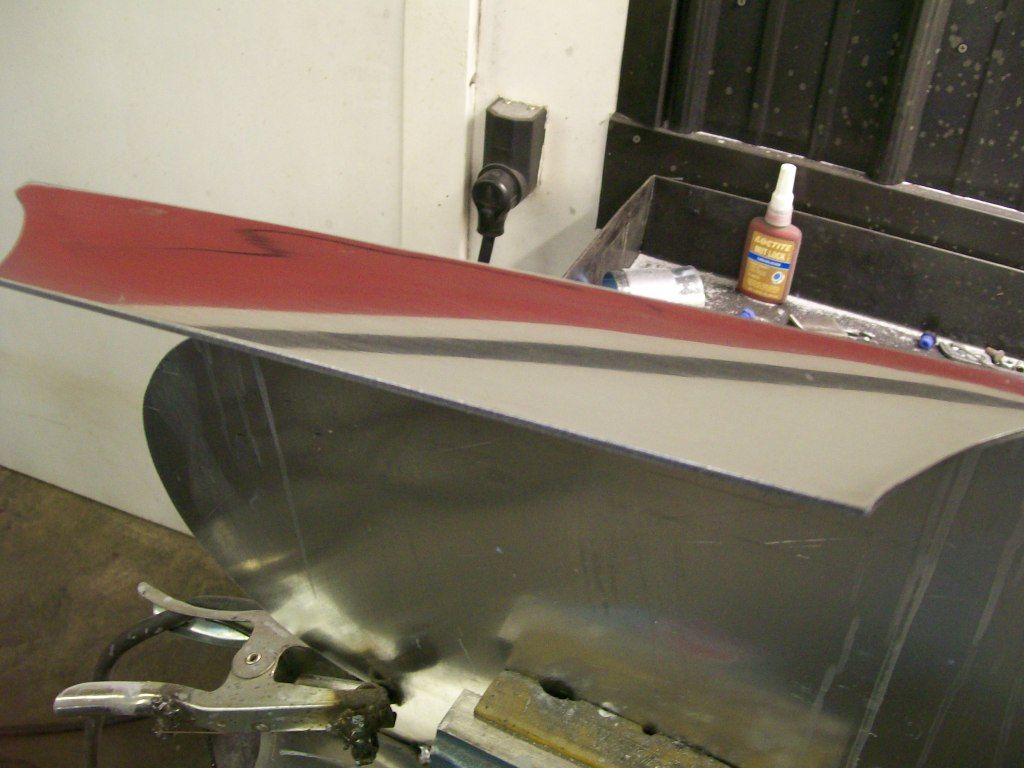 More to follow. |
|
|
|
|
09-06-2012, 12:43 AM
|
#8 |
|
Registered User
Join Date: Aug 2007
Location: Corona, California
Posts: 7,998
|
Re: 1957 Chevy truck re-rebuild
Looks real good.
Kim |
|
|
|
|
09-06-2012, 11:11 PM
|
#9 |
|
Registered User
Join Date: Aug 2012
Location: Salem Mo
Posts: 647
|
Re: 1957 Chevy truck re-rebuild
Still looking at the rear of the truck, I'm gonna bring a picture of the filler panel between the bumper and bed.
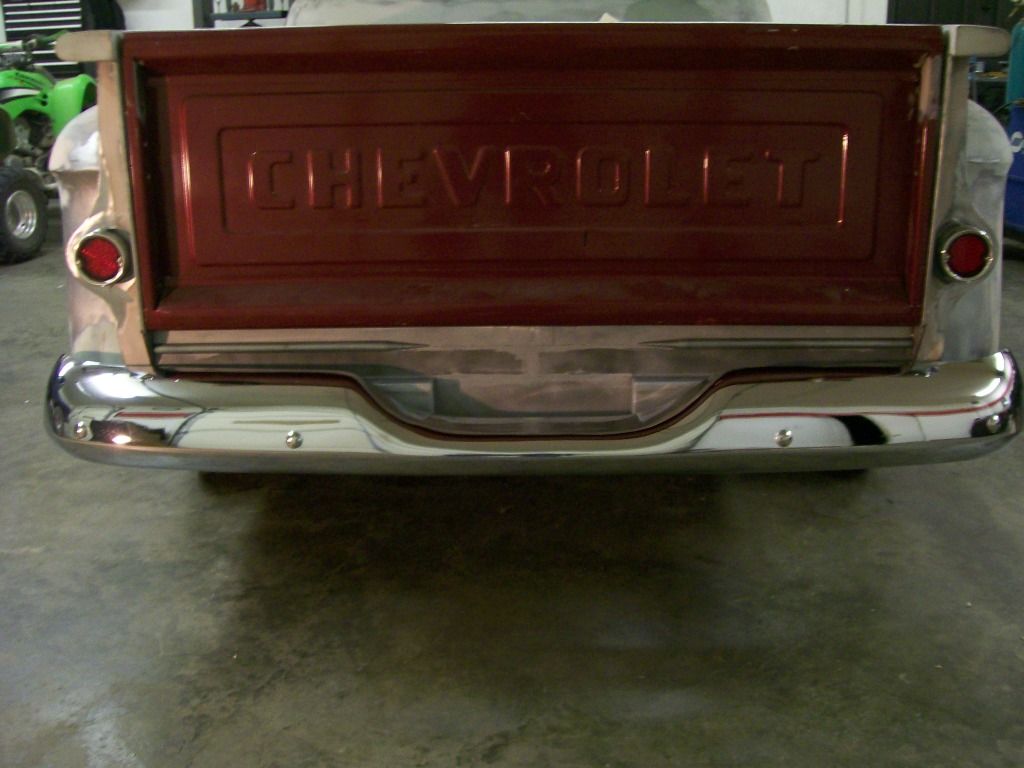 Building the panel was one challenge. As I progressed I knew I had to mount it to the flat area just below the tailgate. I didn't want to just use bolts or screws to attach it to the bed. Looking at the picture above, you can see a couple spear like bars that come in from the sides. If I used bolts or screws, I would have an indentation in the panel where the screws are tight against the panel. I have a plan.....  Starting with a piece of 3/4" tube, I cut it in half length wise. Starting with a piece of 3/4" tube, I cut it in half length wise. 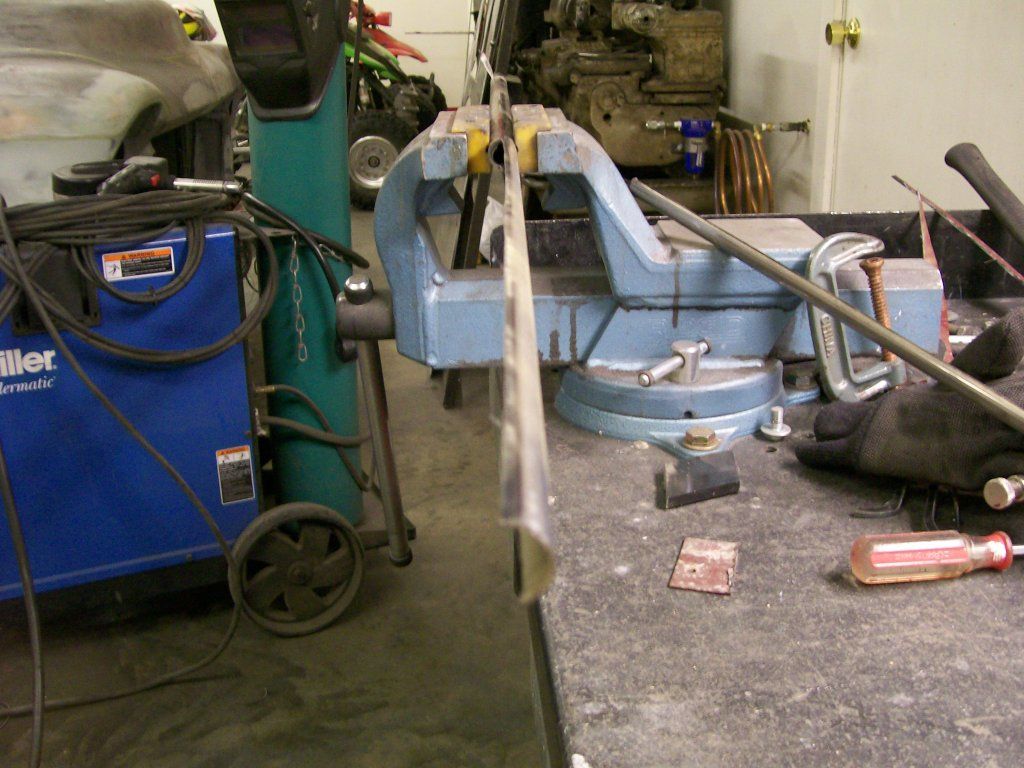 Using a cut off wheel on the 4 1/2" grinder, I cut 3" inward. 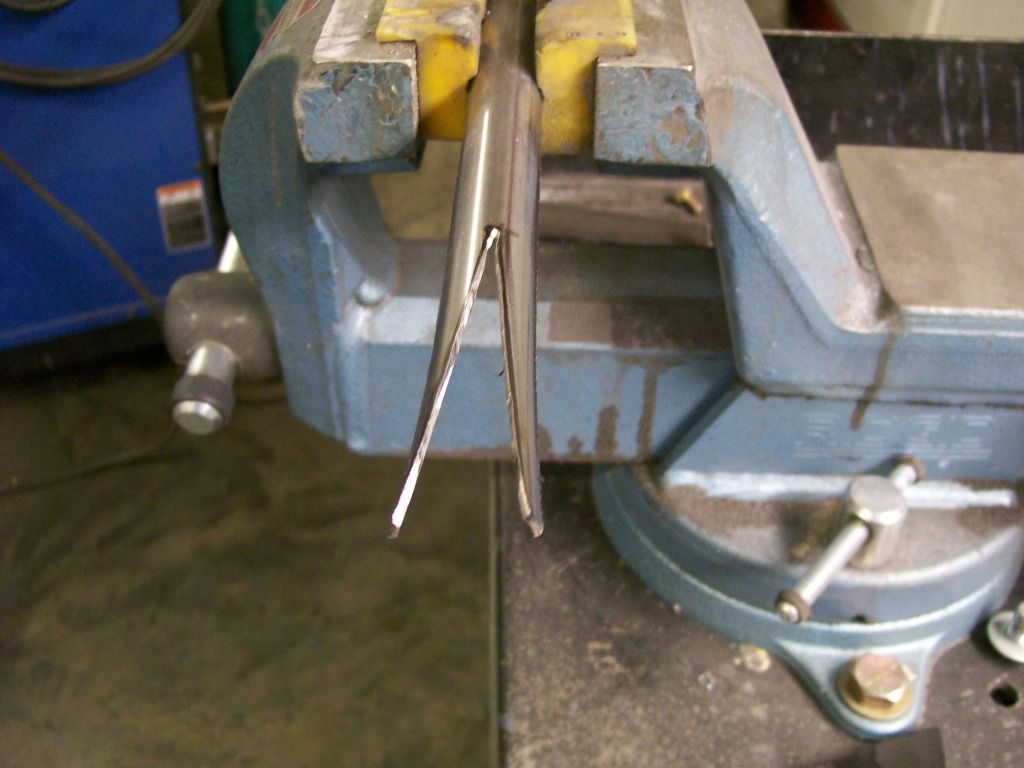 I put a small relief cut crossways at the end of the 3" cut. Then with a pair of pliars I sqeezed the ends together. 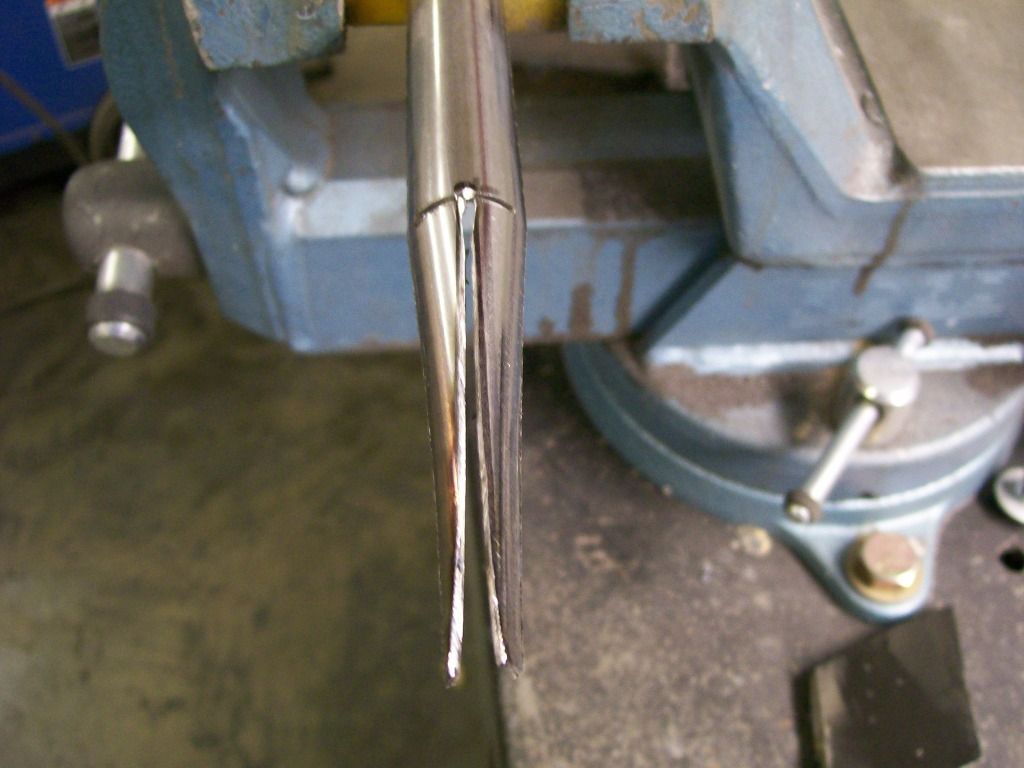 One together I stitch welded. 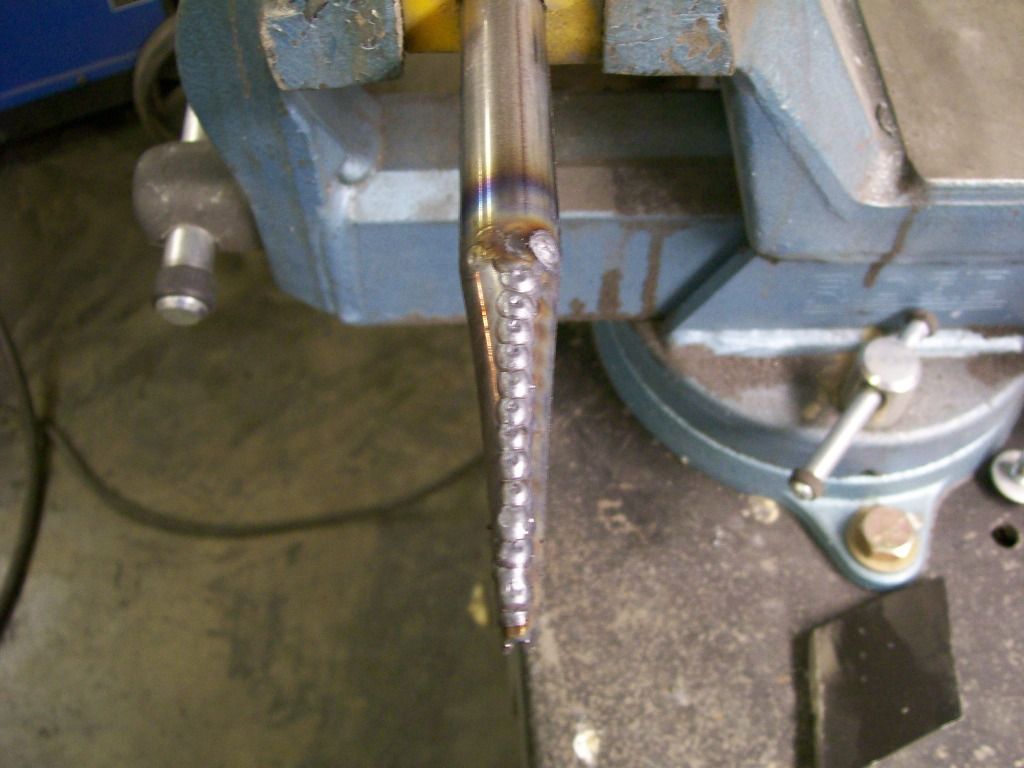 In the first picture above, you can see how after a little grinding I ended up with smooth spear ends. I made 6 of these tabs for mounting. I welded 3 these to the under side of each of the spears. Then drilled the panel and the bed flat to match the screws on the spears. Now just tighten the nuts on the back side. 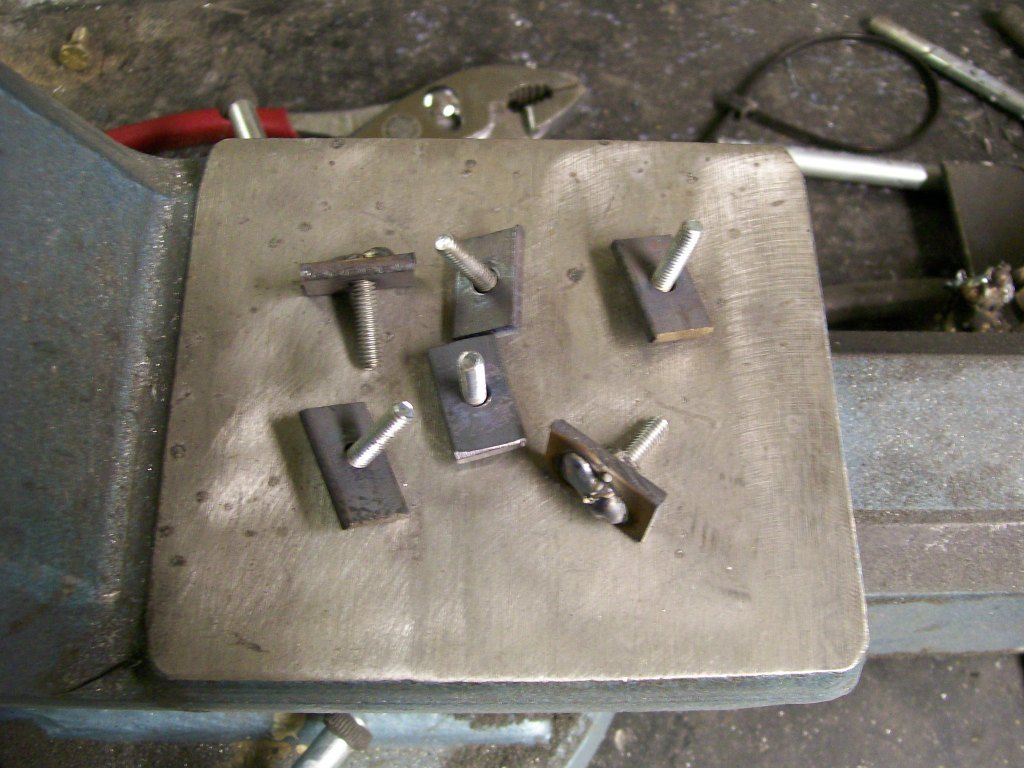 The nice thing about these mounting spears is the clamping force is distributed across a large area, now there is no bolt indentations. |
|
|
|
|
09-06-2012, 11:55 PM
|
#10 |
|
Registered User
Join Date: Jul 2011
Location: Auburn ca.
Posts: 2,886
|
Re: 1957 Chevy truck re-rebuild
Looks pretty cool There used to be a custom car show here once a year I really miss it!
|
|
|
|
|
09-07-2012, 12:10 AM
|
#11 |
|
Registered User
Join Date: Aug 2007
Location: Corona, California
Posts: 7,998
|
Re: 1957 Chevy truck re-rebuild
Very nice.
Kim |
|
|
|
|
09-08-2012, 12:29 AM
|
#12 |
|
Registered User
Join Date: Aug 2012
Location: Salem Mo
Posts: 647
|
Re: 1957 Chevy truck re-rebuild
Trying to cover the list of changes that Dad wanted, I remember he wanted "exhaust cut outs".
Ok. now we're stepping back into his teenage years, cut outs I thought, I was already concerned with how I'm gonna get the exhaust to fit since it looks like it's gonna run right into where I'd like the transmission crossmember to be. By time I was done, I fulfilled his request. I believe I went above and beyond what he would have expected. It started with the idea that I didn't want the tail pipes going out the back. Next, I don't like the sound of an 8 cylinder engine with the tailpipes coming out the sides of the vehicle. To me it sounds like 2 four cylinder engines since there is one bank of cylinders sounding from each side. Well, I did do the tailpipes out the sides, I ran them right through the steps. 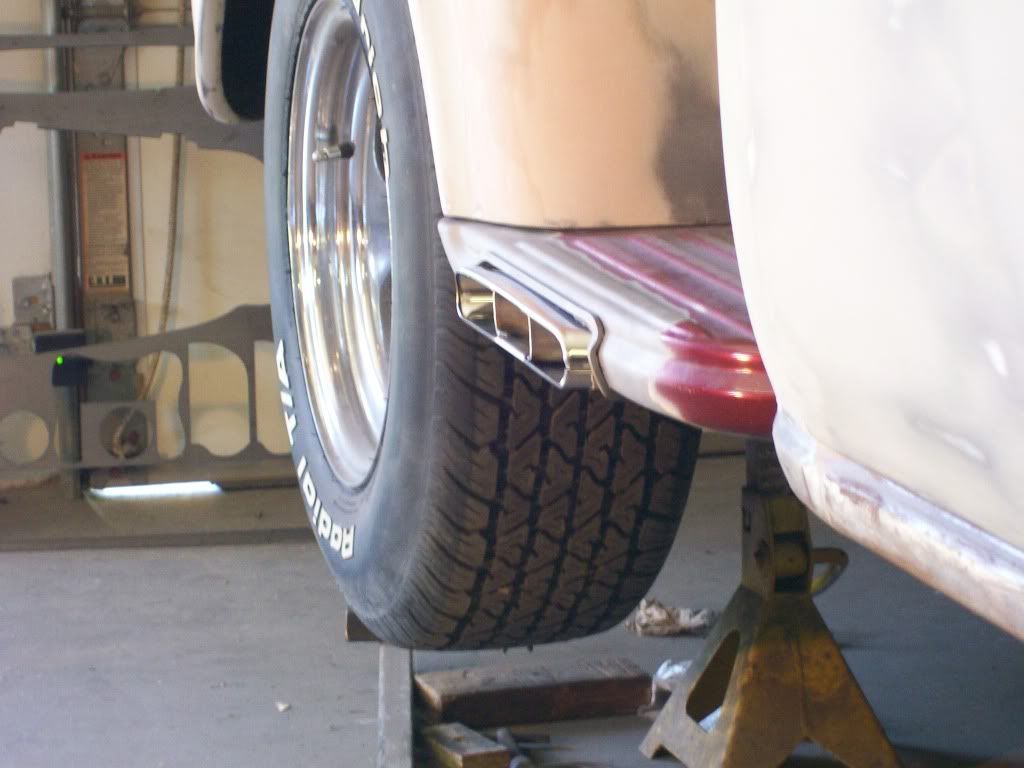 By time I finished the exhaust, wow, what a project. I solved the cut out issues, I have no pipes out the back and I took care of the 4 cylinder sound. 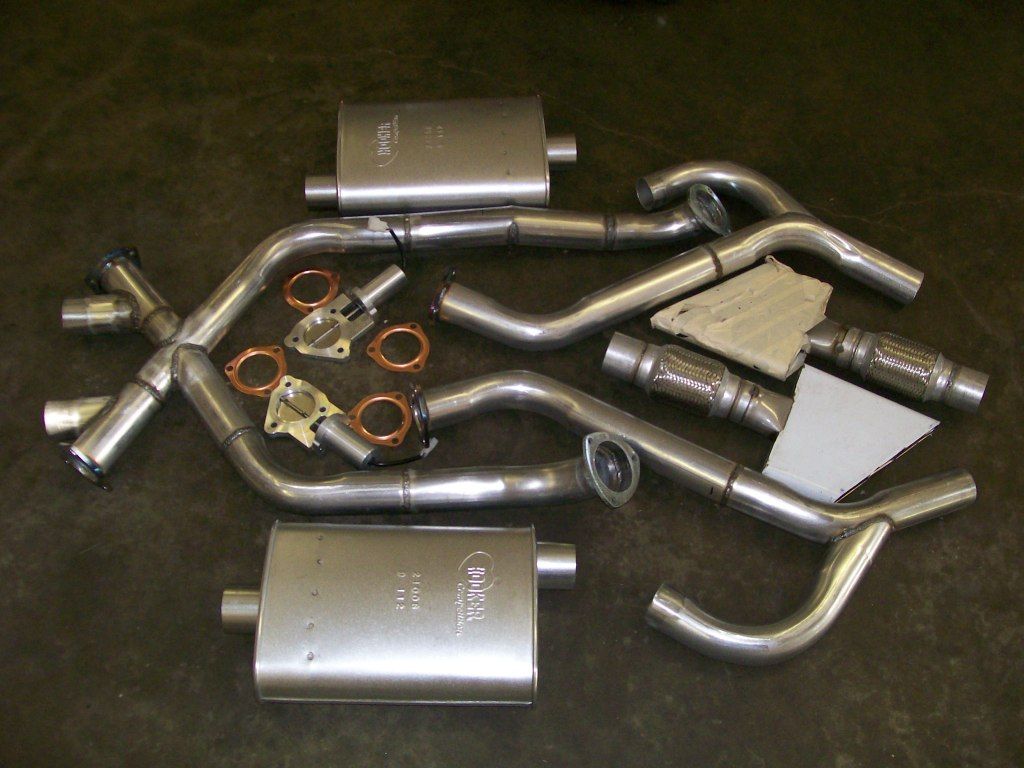
|
|
|
|
|
09-08-2012, 02:18 PM
|
#13 | |
|
Registered User
Join Date: May 2012
Location: zaandam netherlands
Posts: 240
|
Re: 1957 Chevy truck re-rebuild
Quote:
i like them Sander, |
|
|
|
|
|
07-14-2013, 09:20 AM
|
#14 | |
|
'57 Rosa
Join Date: Sep 2009
Location: Fitzgerald,GA
Posts: 162
|
Re: 1957 Chevy truck re-rebuild
Quote:
that you purchased your tips and cut out valves from JEGS. Can you let me know where you purchased the rest of your kit from. I am assuming the pipes and mufflers came in a kit? Thanks!
__________________
My '57 Truck Build "Rosa" (Current Project) http://67-72chevytrucks.com/vboard/s...21#post4118721 2003 Dodge Dakota 4X4 (Daily Driver) Only two defining forces have ever died for us: CHRIST died for our salvation and VETERANS died for our freedoms. Glorify CHRIST and thank VETERANs Dru~ USN Retired
|
|
|
|
|
|
07-14-2013, 09:38 AM
|
#15 | |
|
Registered User
Join Date: Aug 2012
Location: Salem Mo
Posts: 647
|
Re: 1957 Chevy truck re-rebuild
Quote:
Pretty much the rest is all fabricated from going to the local muffler shop and giving them a drawn image and have them do some bending. The x-pipe was home made with a couple pieces of 2 1/2" pipe. The flanges were cut with the torchmate plasma cutting system. Otherwise, I spent alot of time on my back trying to imagine how I can make it all fit together. I've had the system all together and running in the garage and it worked perfect. Now that I'm getting closer to finishing this truck I can't wait to drive and have some fun with it. |
|
|
|
|
|
07-14-2013, 10:43 AM
|
#16 |
|
'57 Rosa
Join Date: Sep 2009
Location: Fitzgerald,GA
Posts: 162
|
Re: 1957 Chevy truck re-rebuild
Thanks. You have done a great job. I appreciate your attention to detail. I plan on using a MagnaFlow System. I had planned on my tips exiting thru the steps also but had not gotten as far as you. You saved me a lot of time. I do have a question about the mesh adapter connected to the tips. I assume you are using it for vibration purposes? Where did you find those? Also, keep up the great work and keep the pictures coming.
__________________
My '57 Truck Build "Rosa" (Current Project) http://67-72chevytrucks.com/vboard/s...21#post4118721 2003 Dodge Dakota 4X4 (Daily Driver) Only two defining forces have ever died for us: CHRIST died for our salvation and VETERANS died for our freedoms. Glorify CHRIST and thank VETERANs Dru~ USN Retired
|
|
|
|
|
09-08-2012, 01:30 AM
|
#17 |
|
Registered User
Join Date: Aug 2007
Location: Corona, California
Posts: 7,998
|
Re: 1957 Chevy truck re-rebuild
That should do the trick. Very nice.
Kim |
|
|
|
|
09-08-2012, 01:34 PM
|
#18 |
|
Registered User
Join Date: Nov 2011
Location: Langley, BC
Posts: 702
|
Re: 1957 Chevy truck re-rebuild
I'm liking this build. Good work!
__________________
56 Chevy PU http://67-72chevytrucks.com/vboard/s...d.php?t=531955 Question: Know how to sell your truck for $50,000? Answer: Spend $100,000 building it. |
|
|
|
|
09-08-2012, 03:08 PM
|
#19 |
|
Registered User
Join Date: Jul 2012
Location: indy
Posts: 55
|
Re: 1957 Chevy truck re-rebuild
what are the butterflies for?
|
|
|
|
|
09-08-2012, 06:27 PM
|
#20 |
|
Registered User
Join Date: Aug 2012
Location: Salem Mo
Posts: 647
|
Re: 1957 Chevy truck re-rebuild
Ohhh, I've started the truck, I've tested the exhaust, I'm so excited to drive it, maybe soon.
seanery, The butterflies are what makes the exhaust totally unique. In the old days, guys would run and exhaust to the mufflers, along the way, before the mufflers they would have a "Y" pipe. This extra outlet had a cap over it that was held in place with a couple of bolts. These are called cut outs. Once they got to the race track they would unbolt the caps and now the exhaust had a free flowing outlet. These were call "cut outs", the exhaust cut out before the mufflers. 63split, I found the exhaust tips in the Jegs catalog. I was very pleased with the design and how they were made. Everybody else, thanks for checking in. The encouragement is always appreciated. seanery, with these next pictures, you'll be able to follow the flow of the exhaust. I replaced the idea of using the old style of removing bolts to open the exhaust. Jegs has these electric powered butterflies that opens the exhaust cut outs by pushing a button. Also, instead of dumping the exhaust out under the truck, I made a bypass pipe that routes the cut out exhaust around the muffer and reconnects to the side outlets.  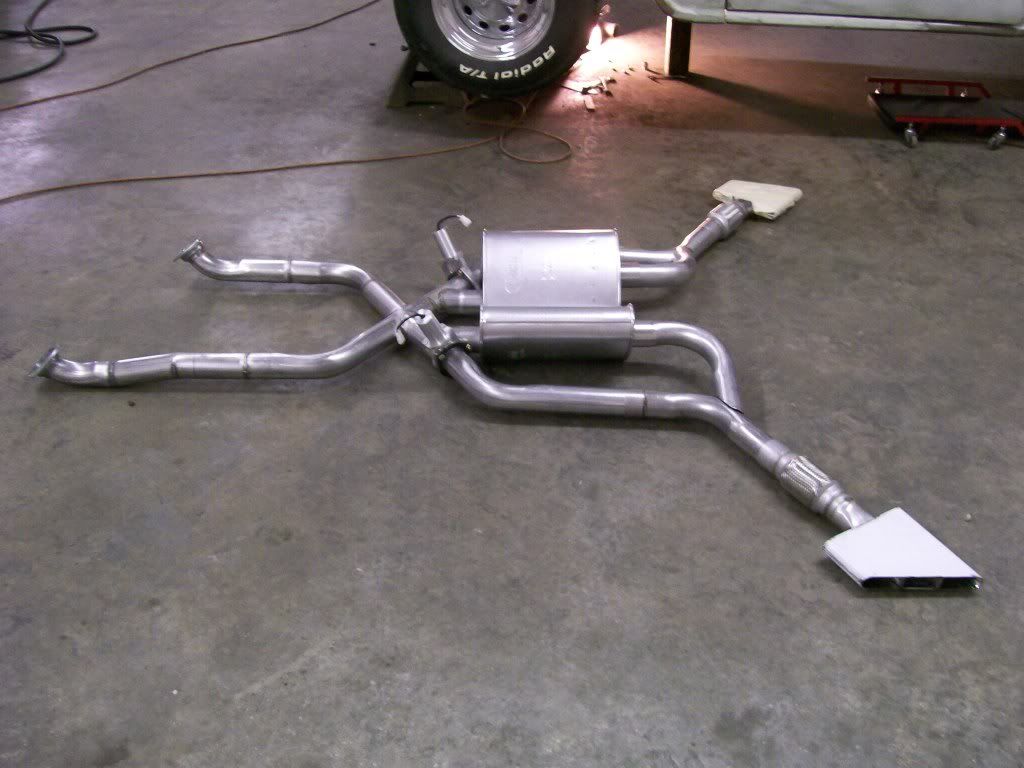 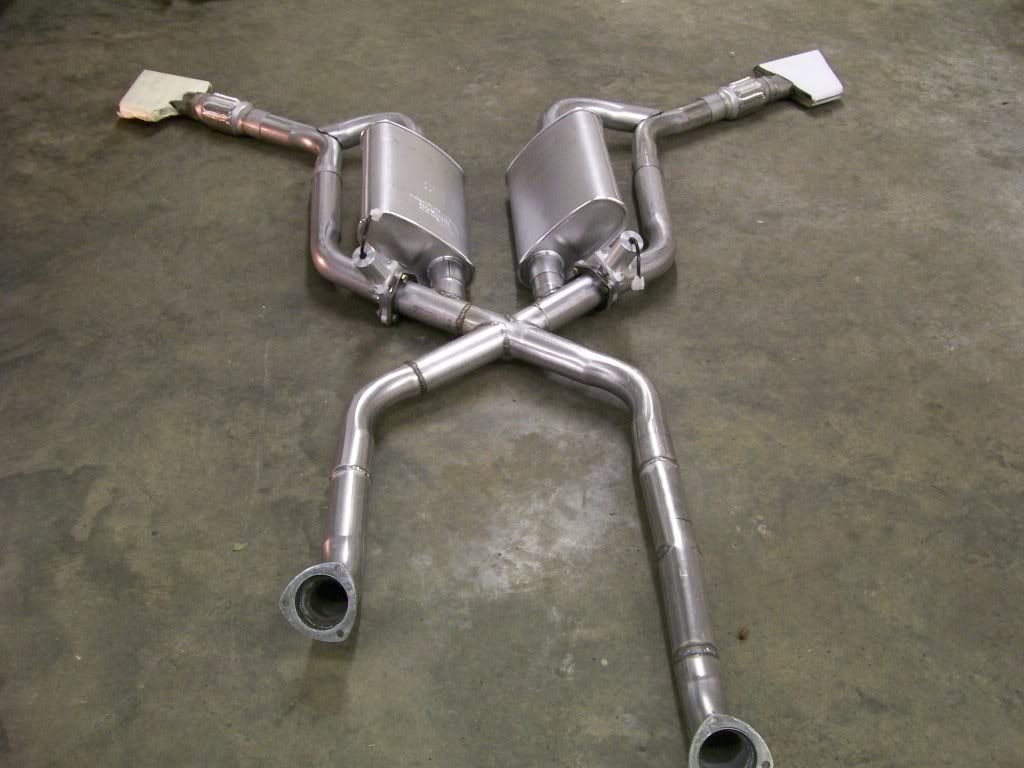 Due to the amount of space under these trucks I was able to fit this all together. With a car I'd be cramped to get this to fit. |
|
|
|
|
09-08-2012, 07:17 PM
|
#21 |
|
Registered User
Join Date: May 2012
Location: zaandam netherlands
Posts: 240
|
Re: 1957 Chevy truck re-rebuild
thank you for the tip ! on the tips
nicely done on the total setup with the cutouts i will use this one as an example on mine thanks Sander, |
|
|
|
|
09-08-2012, 11:09 PM
|
#22 |
|
Registered User
Join Date: Jul 2012
Location: indy
Posts: 55
|
Re: 1957 Chevy truck re-rebuild
very nicely done!
|
|
|
|
|
09-08-2012, 11:38 PM
|
#23 |
|
Registered User
Join Date: Aug 2007
Location: Corona, California
Posts: 7,998
|
Re: 1957 Chevy truck re-rebuild
I like the exhaust.
Kim |
|
|
|
|
09-09-2012, 09:02 AM
|
#24 |
|
A320 Pilot/USAF Retired
Join Date: Mar 2009
Location: Charleston, SC
Posts: 2,622
|
Re: 1957 Chevy truck re-rebuild
Nice work!
__________________
JJ My 1957 build: http://67-72chevytrucks.com/vboard/s...d.php?t=334552 http://www.trifive.com/forums/showthread.php?t=22037 Instagram - Chuckdriver57 |
|
|
|
|
09-09-2012, 09:45 AM
|
#25 |
|
Registered User
Join Date: Oct 2009
Location: Broken Arrow, OK
Posts: 1,220
|
Re: 1957 Chevy truck re-rebuild
Liking the truck alot so far. All those little details make the difference.
__________________
56 GMC BUILD THREAD: http://67-72chevytrucks.com/vboard/s...d.php?t=368649 69 long bed Chevy turned 67 gmc jimmy roadster: https://67-72chevytrucks.com/vboard/...d.php?t=851167 |
|
|
|
 |
| Bookmarks |
|
|


 Hybrid Mode
