
|
 01-12-2012, 12:22 AM
|
#576 |
|
Registered User
Join Date: May 2011
Location: Covington, Wa
Posts: 5,240
|
Re: Junkyard Jimmy Super Low Buck Build Thread
Subscribed
|

|

|
|
01-12-2012, 12:32 AM
|
#577 |
|
GEARHEAD
Join Date: Aug 2003
Location: MN
Posts: 6,117
|
Re: Junkyard Jimmy Super Low Buck Build Thread
Thanks Jud, nice find there. I didn't come across that one when I was looking, but I'm going to stick with the sleeve to save some cash. Kind of getting anxious to get it back together and try it out.
*edit* I haven't updated my money spent in a while, but with the new t-case gaskets, seals, etc and the tranny cooler and electric fan, plus a new vacuum guage I'm at a total spent of $3617. I know I've sold some more of my jimmy parts because I've cleaned out just about everything I no longer needed, but I didn't keep track of those lately to lower my actual out going costs, but it was probably $200 or less. Overall I'm doing ok cost wise. The biggest expense yet to come will be paint supplies.
__________________
If no one knows what you're doing, they can't tell you you're doing it wrong HG's Dream Car Build - Shelby Cobra Kit Build your own adjustable track bar 71  Long Fleet C/10 Long Fleet C/10 72  Jimmy 4x4 (Junkyard Jimmy) Jimmy 4x4 (Junkyard Jimmy)HG's Plow Truck '78  K35 Dually K35 DuallyBigass Farm Truck HG's thread of miscellaneous stuff Last edited by hgs_notes; 01-12-2012 at 01:01 AM. |
|
|
|
|
01-12-2012, 03:39 PM
|
#578 |
|
I miss this truck.
Join Date: Dec 2001
Location: Lexington, KY U.S.A.
Posts: 2,863
|
Re: Junkyard Jimmy Super Low Buck Build Thread
Are you painting it yourself?
__________________
'07 GMC Acadia SLT. Sweet ride. '08 Crew Cab Z-71 short bed. Really like this truck A LOT. |
|
|
|
|
01-12-2012, 03:54 PM
|
#579 |
|
Registered User
Join Date: Jul 2011
Location: Des Moines, Iowa
Posts: 3,016
|
Re: Junkyard Jimmy Super Low Buck Build Thread
Nice fan find. I just finished installing that exact mod.. Not sure I'd trust a used fan myself (why I bought new, read life-span), and some were made defective from what I had read.
__________________
project: "my happy mess" |
|
|
|
|
01-12-2012, 06:01 PM
|
#580 | ||
|
GEARHEAD
Join Date: Aug 2003
Location: MN
Posts: 6,117
|
Re: Junkyard Jimmy Super Low Buck Build Thread
Quote:
Quote:
We can talk about trusting parts if you want. This is not directed at litew8, but more open discussion on a topic that probably doesn't get talked about a lot. Everyone likes to find those elusive cool parts for a couple bucks, but not everyone knows what to look for or even if it's worth it if you find it. I read a lot, look at what others are doing or find alternate uses for things to solve my own problems. Check out the parts classified sections and see what it selling or not selling, what are people looking for. New or used you take your chances. You have a new oil pressure guage, it sorta works. You decided to live with it, trusting that you will notice a change in the reading before you wipe all your bearings. There are too many problems with new items to mention here. Pick any parts store and look at reviews for parts from them and you will see how common it is to get bad rebuilt units, multiple times. Even brand new (non-refurbished) parts are not always reliable. Now every part on a running car or truck is used once it's out in the real world. If you drive a car for 50,000 miles and something wears out or breaks, you fix it. At 100,000 miles you start to think about it a bit more and wonder what's next on the hit list. Thing is, not every part wears the same and the expected lifetime of some parts can be quite long. Just because the tranny blew out on some beater doesn't mean the rest of the mechanical parts have no useable life left in them. The thing with these old trucks is, how many miles are they really going to see? I drive my daily driver about 50,000 miles/year. My C-10 and this Jimmy may not see 5000 in a single year (or even 1000) ever again. So if you find something in the junkyard you need to ask why it's there. Many are there because of crash damage and the insurance co totaled it out and the repairs are higher than the cars value. Typically on non-smashed or older cars it's because the tranny went out or maybe the engine is shot, it gets parked for a few years then hauled into the junkyard. Up here they tend to be pretty rusty, but not always, or at least not completely gone. I've pulled plenty of rust free parts off old trucks that had rust elsewhere. One of the criteria I use for some of my replacement parts is: how much of a pain is it to replace? Is it something fairly easy to get at and not that expensive? Or is it an all day job to replace and costs a bunch? Also, what are the ramifications if a part fails? If my cooling fan fails the engine will get hot if I'm not on the move. Not exactly disaster there. Now if the radiator blows out I could be stranded, I'm not a fan of junkyard radiators for the older brass/copper units. I've tried a few and they all failed. Now on used parts there is some common sense involved. For instance you don't buy wear items from the junkyard. You don't buy yunkyard parts when a new one is not much more in cost. If its a u-pull-it you don't spend all day getting a replacement part that is difficult to get out of the vehicle when new ones are available for a reasonable cost. After all, our time is worth something. Things like fans, radiators, alternators, PS pumps, AC components, interior parts, axles, brake master cylinders/boosters, hinges, wire harnesses, etc are usually in ok condition, but not always, which is why it's nice when the junkyard has a warrantee like Misgens. They date the part and give you an itemized reciept and will refund everything. There are times I pull parts I know need rebuilt (such as carbs), but the price may be worth it in the end if you are just cleaning it and replacing gaskets. My point here is that many parts in the junkyard have 10's of thousands of miles left in them and it's up to you to decide if the cost in parts and time versus new is worth it. You can learn over time to check the parts over for wear before you pull them. Does it turn easily and smoothly. Does it feel loose, too much end play? Does the oil or wiring smell burnt, signs of overheating. Melted wires, carbon dust, redneck repairs, missing parts, etc are things to look for. Also, has it sat with the hood, door, windows or whatever open for years and been exposed to weather? Lastly, what is the part for? Personal use on your own truck or resale to make a buck or three? As long as you are clear to the buyer that it is a used part and what testing if any was done, then it's buyer beware. Would you really trust the part on your own vehicle? Then a lot depends on your experience, knowledge of the parts, mechanical aptitude, or frankly how dumb or smart you are? Everyone has their own level of acceptable risk, or where things go from being "comfortable" to "I don't know about this". I'm absolutely positive that I have done things or used parts on this build that made a lot of the viewers squirm or flat out think I'm nuts or just plain dumb. So far they have kept those thoughts to themselves (and I appreciate that), or asked a question about something that they thought might need a second look ( I appreciate that also). Doing a build thread has a lot of value for everyone. I have a log of everything I've done for reference, I get motivated to keep plugging away knowing that lots of people are watching and encouraging me. I hope that putting myself "out there" with both my successes and failures will help others with their own projects. I get tips from others to help me along the way. It beats the hell out of playing video games all day or staring at the TV.
__________________
If no one knows what you're doing, they can't tell you you're doing it wrong HG's Dream Car Build - Shelby Cobra Kit Build your own adjustable track bar 71 Long Fleet C/10 72 Jimmy 4x4 (Junkyard Jimmy)HG's Plow Truck '78 K35 DuallyBigass Farm Truck HG's thread of miscellaneous stuff |
||
|
|
|
|
01-12-2012, 08:25 PM
|
#581 |
|
Registered User
Join Date: Jul 2011
Location: Des Moines, Iowa
Posts: 3,016
|
Re: Junkyard Jimmy Super Low Buck Build Thread
Good write up hgs. I agree, to an extent. New or used you run the risk of the part failing, true. Though the longetivity, as in failure ratio (%) for used parts being higher. Having said that, you must factor in costs to replace the part (again, in the event of failure) and the time to repair; compared vs. new. For a fan failure, not sure it's something you'd notice immediately - and at what rate damage could incur as a result (depending on senerio). You make many good points, and I'm sure they stem from your line of work (vise versa).
__________________
project: "my happy mess" |
|
|
|
|
01-12-2012, 11:11 PM
|
#582 | |
|
GEARHEAD
Join Date: Aug 2003
Location: MN
Posts: 6,117
|
Re: Junkyard Jimmy Super Low Buck Build Thread
Quote:
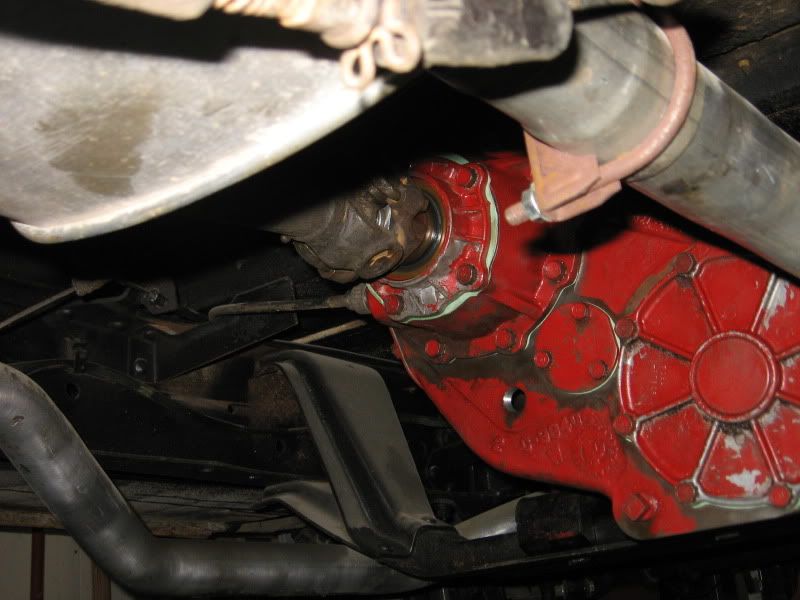
Here's a "lessons learned" story for y'all. Remember the left over needle bearing? Well it wasn't as simple as finding which bearing was short a needle. Turns out the needles are different between the 2 bearings. One shaft is a bit larger, so you have more needles there. What I found was that the rear bearing set up for the front output shaft has needles that are .001" smaller. My left over needle would not fit in the carrier. Double checking the rear output shaft needle bearing set up showed the correct number of needles. So I spot checked a few with my dial indicator and saw a difference of .001" and figured that would be within tolerance. It's not. So I started pulling out all the needles and measuring and sorting. Went through them at least twice and got it right, repacked them into the carriers (they all fit this time) and got the case back together, again. Let this be a lesson to you, keep the needles separate and counted. Don't trust the manual because it may be for a slightly different gearbox. The NP205 has an early and late version that have different bearings. I got the redi-sleeve installed on the front yoke, no problems there. The little flange on the sleeve was removed later. 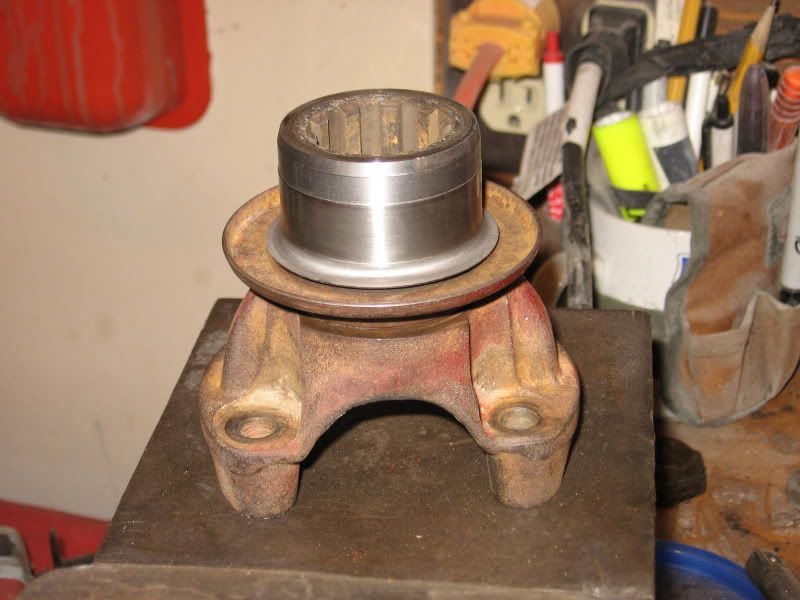 The t-case is all back together, I just need to torque everything to spec. The yokes are installed, and there is a little rubber gasket part that goes on the rear output shaft after the yoke, before the washer and nut go on. It wasn't there when I disassembled it. 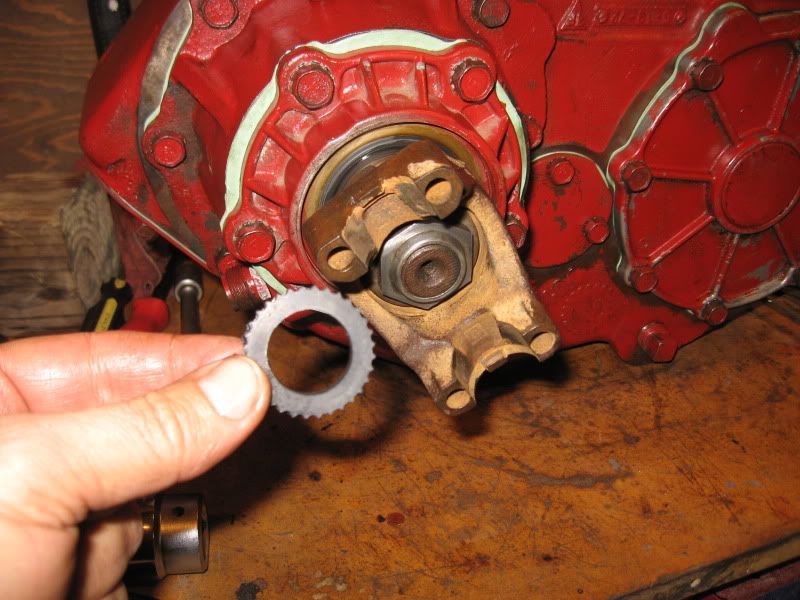 So there we are. Hopefully I'll get it back together this weekend.
__________________
If no one knows what you're doing, they can't tell you you're doing it wrong HG's Dream Car Build - Shelby Cobra Kit Build your own adjustable track bar 71 Long Fleet C/10 72 Jimmy 4x4 (Junkyard Jimmy)HG's Plow Truck '78 K35 DuallyBigass Farm Truck HG's thread of miscellaneous stuff |
|
|
|
|
|
01-12-2012, 11:30 PM
|
#583 |
|
Vintage 4x4s
Join Date: Sep 2010
Location: Prior Lake, MN
Posts: 4,305
|
Re: Junkyard Jimmy Super Low Buck Build Thread
Mike,
Good to hear you got it sorted out. Its surprising that 0.001" would make a difference. Thats a pretty tight tolerance these days, let alone for 1970. I suspect they were produced the same and what you measured for difference was wear. Its hard to believe they'd engineer it that way, since it would be a real risk for incorrect assembly at the factory, keeping the almost identical rollers separate and all. I can't tell you why they wouldn't fit though, i agree that suggests the tolerance is critical. I could measure my new sets and see if there is any difference. I will also check my manual. Sleeve looks good, did you warm that up and chill the yoke to aid in assembly?
__________________
67 GMC K1500 Custom- 305V6 SM420, PTO, Ram Assist, yellow (the outcast) (project period correct upgrades) 67 GMC C2500 351V6 TH400, AC, PS, PB (can't decide what to do with. Update, decided to keep and will restore  ) )86 CHV K30 502 th400, apple red NEW 71 CHV K20 350 SM465, ochre (saved work truck) 71 CHV K20 292 SM465, white, tach, PTO, (future project) 72 CHV K20 350 350th, medium blue (project stocker) 01 CHV K2500hd crew, indigo blue ^3 dont run and the others don't see winter either '86 K30 Cummins "Fireside" thread: http://67-72chevytrucks.com/vboard/s...d.php?t=649649 '71 K20 "get driveable" thread: http://67-72chevytrucks.com/vboard/s...d.php?t=590642 '72 K20 Build Thread: http://67-72chevytrucks.com/vboard/s...=493477&page=6 |
|
|
|
|
01-13-2012, 01:41 AM
|
#584 |
|
GEARHEAD
Join Date: Aug 2003
Location: MN
Posts: 6,117
|
Re: Junkyard Jimmy Super Low Buck Build Thread
Well .001" is tight, but when you consider that there are 41 needles and if half of them were .001" too big, they would need .020" clearance to fit the circumference. I don't think it was wear because the one extra needle just would not fit. Also, when I measured them and sorted them it came out to the right number for each set which is too much of a coincidence. The change in the clearance with the shaft they support is just a couple thousandths, but the overall circumference difference is relatively big.
The sleeve is a press fit. No heating or cooling needed. I used my vise and just slowly pushed it on the yoke. The hardest part of the job was getting the flange off. You need a side cutter or needle nose pliers to get it started and once you get to the scribed line around the circumference and it starts to tear away, it gets easy. The whole job took about 5 minutes.
__________________
If no one knows what you're doing, they can't tell you you're doing it wrong HG's Dream Car Build - Shelby Cobra Kit Build your own adjustable track bar 71 Long Fleet C/10 72 Jimmy 4x4 (Junkyard Jimmy)HG's Plow Truck '78 K35 DuallyBigass Farm Truck HG's thread of miscellaneous stuff |
|
|
|
|
01-13-2012, 01:57 AM
|
#585 | |
|
Registered User
Join Date: Jul 2011
Location: Des Moines, Iowa
Posts: 3,016
|
Re: Junkyard Jimmy Super Low Buck Build Thread
Quote:
You could have saved the thesis and simply said the above.
__________________
project: "my happy mess" |
|
|
|
|
|
01-13-2012, 09:00 AM
|
#586 |
|
Registered User
Join Date: Mar 2008
Location: Powhatan, Va.
Posts: 376
|
Re: Junkyard Jimmy Super Low Buck Build Thread
Your build is inspiring. Subscribed!!
__________________
Sean "If your gonna be dumb, you gotta be tough" 1960 Chevy Impala Sedan - my 25 year search is over!! 1969 C-10 longbed - Nice day DD  1970 Chevy Nova - Street and Strip Project 2002 Acura MDX my DD 2007 Honda Odssey - My Wife's "Mommy Van" |
|
|
|
|
01-13-2012, 10:00 AM
|
#587 | ||
|
GEARHEAD
Join Date: Aug 2003
Location: MN
Posts: 6,117
|
Re: Junkyard Jimmy Super Low Buck Build Thread
Quote:
In my mind there are at least 4 types of cars, daily drivers, parked tools, total show or like mine, built mainly for the build, could be a daily driver but wouldn't be embarrassed to park at the show. (other catagories are the racers and the never ending or even started projects) Daily drivers will occassionally get junkyard parts, but will mostly go with new because that's what the repair shop is going to use. Most people don't work on their daily drivers much. A lot of DIY people willing to work on their own will have older (>8-10 year old) cars and these will see more junkyard parts. Then we have the few brave souls that drive the classics all the time and I wish we had the climate to do that up here. This group is really more like mine in mind set and are the exception to the daily driver rule. Parked tools are all those old trucks that are capable of being used but the owner mostly has it sitting around with a plow on it waiting to use it for work as needed. These are typically junkyard trucks in waiting and if not already a source for parts, soon will be. They are typically too used up or beat up for a future restoration. Total show are primarily trailer queens or if they are driven it is only to the shows or in the local parade. They may get a junkyard part but it will be completely refurbished before it gets close to their car. Junkyard parts are used on these when new or acceptable reproductions are not available. Then there are the bulk of old car nuts that want to build something they have a passion for. They want it to be dependable, but affordable. It should look good, but not so nice that they are afraid to park it at the walmart. They would drive it anywhere but typically don't. Junkyard parts for us becomes more about availability of new or old. Finding classic car parts at a junkyard gets harder every year. Whats left in many cases is stuff that is just not worth the trouble. New or reproduction is more and more common now and with chinese manufacturing, they are typically cheap to get. Junkyards for me are becoming more of a source for newer things I can adapt to my older trucks or if I need some part that is not a high wear item, like the guage clusters, engine brackets, shrouds, and the occasional near rust free body panel. Ebay and forums like this have become the new virtual junkyard in my opinion. Racers will rarely use the junkyard as a source for anything that makes it move. The never ending projects. Some of these people are avid junkyard fans. Some have tore down or at least made a start on their cars and have an idea of what they need or want for it. They will hit the junkyards and accumulate all sorts of parts. Then for reasons that out number the amount of cars in this group, the project stalls. Trust me, I know what I'm talking about on this. My other truck took me most of 3 decades to get done and I'm still working on it. The never started group are the ones that have aquired a vehicle and they may have even driven it for a while, but it's parked now waiting for the magical day when all the planets align and they win the lottery and the kids move out on their own and blah blah blah... The only way that thing is ever getting built is by someone else as the owner or it ends up on Overhaulin. In many cases it will end up at the junkyard where the rest of us can scavenge it for parts. These people have no idea junkyards still exist. Quote:
__________________
If no one knows what you're doing, they can't tell you you're doing it wrong HG's Dream Car Build - Shelby Cobra Kit Build your own adjustable track bar 71 Long Fleet C/10 72 Jimmy 4x4 (Junkyard Jimmy)HG's Plow Truck '78 K35 DuallyBigass Farm Truck HG's thread of miscellaneous stuff |
||
|
|
|
|
01-14-2012, 12:32 PM
|
#588 |
|
GEARHEAD
Join Date: Aug 2003
Location: MN
Posts: 6,117
|
Re: Junkyard Jimmy Super Low Buck Build Thread
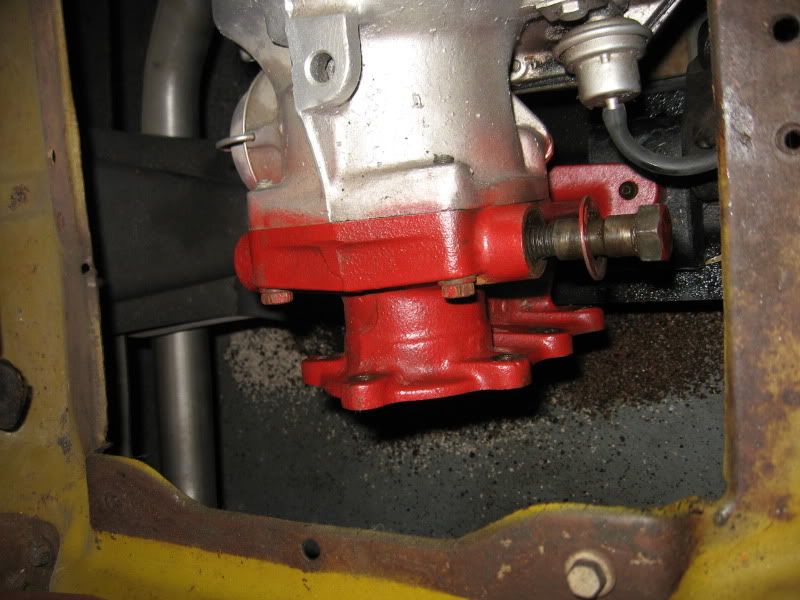
Back to the build and off the junkyard philosophy. I got the adapter bolted back to the tranny with the new o-ring installed.
 Then I torqued the bolts on the t-case. The output shaft yoke nuts are kind of hard to do. The front goes to 200 ft-lbs and the rear to 150 ft-lbs. Without having the case installed the shafts all rotate pretty easy so I used a pipewrench on the yoke, held down by my vise to couter balance the torque I needed on the nuts. It worked fine and so the case is ready to go back in the truck. Probably tomorrow because I'm getting ready to take my oldest girl back to Minneapolis for school and my son wants to go to guitar center as a birthday treat. Talk at ya later... 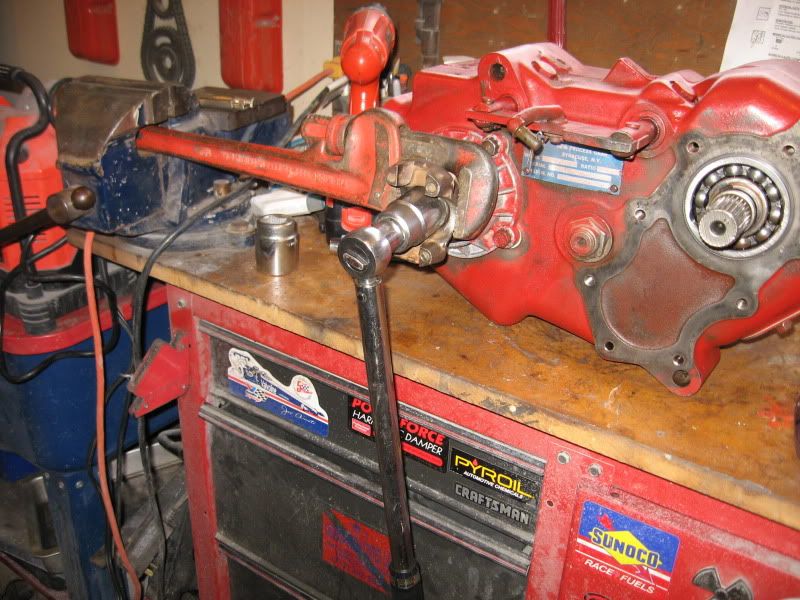
__________________
If no one knows what you're doing, they can't tell you you're doing it wrong HG's Dream Car Build - Shelby Cobra Kit Build your own adjustable track bar 71 Long Fleet C/10 72 Jimmy 4x4 (Junkyard Jimmy)HG's Plow Truck '78 K35 DuallyBigass Farm Truck HG's thread of miscellaneous stuff |
|
|
|
|
01-15-2012, 07:12 PM
|
#589 |
|
GEARHEAD
Join Date: Aug 2003
Location: MN
Posts: 6,117
|
Re: Junkyard Jimmy Super Low Buck Build Thread
Wrestled the t-case back into the truck today. They sure come out easier than they go in. No major difficulties other than it's heavy and I had to pick it up to put on the jack from the prone position. If it was on the jack and slid under the truck it hit the exhaust before you could get it in position, so I slid it under and then tipped it onto the jack and up, then jacked it up. Once the input shaft was lined up with the adapter sleeve it went pretty easy from there. All thats left to do is add oil to it and the tranny and do a test drive. Maybe tomorrow. I'm beat right now and need some motrin.
 While I was under there I routed the air lines for the rear shocks but now can't remember where I stashed the rest of the hardware kit.  I've been needing a bookshelf in the garage for a while now. I took my shelf space for some parts storage and the books have been moved around for months. I was looking through the parts and pulled out this nice original driver side battery tray I plan on using on the jimmy, but for now it is my bookshelf. I thought the voltage regulator on it makes a nice touch. 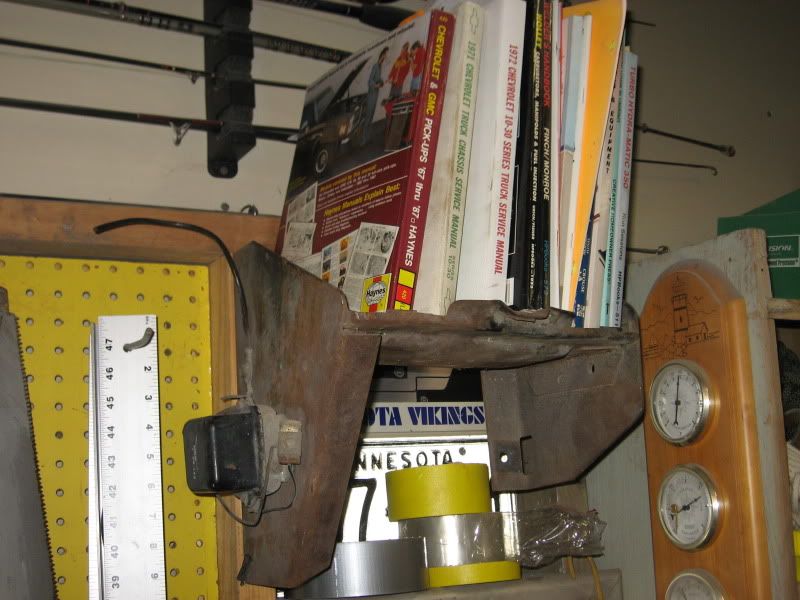
__________________
If no one knows what you're doing, they can't tell you you're doing it wrong HG's Dream Car Build - Shelby Cobra Kit Build your own adjustable track bar 71 Long Fleet C/10 72 Jimmy 4x4 (Junkyard Jimmy)HG's Plow Truck '78 K35 DuallyBigass Farm Truck HG's thread of miscellaneous stuff |
|
|
|
|
01-16-2012, 10:35 AM
|
#590 |
|
I miss this truck.
Join Date: Dec 2001
Location: Lexington, KY U.S.A.
Posts: 2,863
|
Re: Junkyard Jimmy Super Low Buck Build Thread
That's cool, most people will think you had it hanging there, and it collected books. Little do they know how much thought you put into that...
I'm guessing probably three and half seconds or more... 
__________________
'07 GMC Acadia SLT. Sweet ride. '08 Crew Cab Z-71 short bed. Really like this truck A LOT. |
|
|
|
|
01-16-2012, 08:54 PM
|
#591 | |
|
GEARHEAD
Join Date: Aug 2003
Location: MN
Posts: 6,117
|
Re: Junkyard Jimmy Super Low Buck Build Thread
Quote:
Not much to say except I got fluid back into the t-case. I found my hardware for the air shock lines so that is almost done. Tried to start it up but no gas to the carb. It might be real low, can't remember when I put any in it. So maybe tomorrow will be test drive day. For anyone interested it takes 2-1/2 qts to fill a NP-205 t-case with oil. I couldn't find the capacity for it anywhere in my books. After the test drive, assuming it goes alright and it's not an oil sprinkler with random bits of steel flying about, I think I'll open up the front and rear diffs and check those out and change the fluid. Probably should have done that a long time ago, but I'm not the brightest bulb in the drawer.
__________________
If no one knows what you're doing, they can't tell you you're doing it wrong HG's Dream Car Build - Shelby Cobra Kit Build your own adjustable track bar 71 Long Fleet C/10 72 Jimmy 4x4 (Junkyard Jimmy)HG's Plow Truck '78 K35 DuallyBigass Farm Truck HG's thread of miscellaneous stuff |
|
|
|
|
|
01-17-2012, 01:24 AM
|
#592 |
|
Registered User
Join Date: Nov 2010
Location: Marion, IL
Posts: 719
|
Re: Junkyard Jimmy Super Low Buck Build Thread
I read your entire build today, I have missed it bc I spend most of my time in the blazer section. Its a far cry from where you started. What is actually left from the original Junkyard Jimmy? How does the wife feel about it now? I think it looks great! Keep up the good work!
__________________
1972 K5 Auto 4x4 factory air 2007 Silverado extended cab Z71 |
|
|
|
|
01-17-2012, 09:41 AM
|
#593 | |
|
GEARHEAD
Join Date: Aug 2003
Location: MN
Posts: 6,117
|
Re: Junkyard Jimmy Super Low Buck Build Thread
Quote:
The wife is still not really liking it, but is resigned to the fact that I do and my son likes it. I told her she gets to pick the color, which will help. She had an attachment to my C-10 since it was my driver when we met. No attachment to this project though. She doesn't complain anymore now, which is about as good as I can expect. I think a cruise around town with the top off might sway her my way a little more. I will say this though, she absolutely loves my truck. She has kept me from selling it in the past when money was tight and I grew frustrated from not being able to do anything with it. She has encouraged me to finally push through the body work and get it painted. And she loves to ride in it as much as I love driving it. I think she is looking forward to the first show more than me because in her eyes it is a show truck. To me it is the nice driver I always wanted.
__________________
If no one knows what you're doing, they can't tell you you're doing it wrong HG's Dream Car Build - Shelby Cobra Kit Build your own adjustable track bar 71 Long Fleet C/10 72 Jimmy 4x4 (Junkyard Jimmy)HG's Plow Truck '78 K35 DuallyBigass Farm Truck HG's thread of miscellaneous stuff Last edited by hgs_notes; 03-02-2012 at 08:56 AM. |
|
|
|
|
|
01-17-2012, 04:14 PM
|
#594 | |
|
Registered User
Join Date: Nov 2010
Location: Marion, IL
Posts: 719
|
Re: Junkyard Jimmy Super Low Buck Build Thread
Quote:
My fiancé is the same as your wife, but she is in love with the blazer and has kept me from selling my Camaro several times. I feel lucky to have someone that understands how I feel about cars and trucks. She says that I could have worse hobbies. Posted via Mobile Device
__________________
1972 K5 Auto 4x4 factory air 2007 Silverado extended cab Z71 |
|
|
|
|
|
01-18-2012, 08:13 PM
|
#595 | |
|
GEARHEAD
Join Date: Aug 2003
Location: MN
Posts: 6,117
|
Re: Junkyard Jimmy Super Low Buck Build Thread
Quote:
Put some gas in it, fired it up and it ran good, added about a gallon of tranny fluid back into the tranny. I used 80-90 weight in the t-case. Drove it out of the garage, cleaned up the floor in the garage and backed it in so I could have better access to the other bedside for body work and primering. I didn't see any puddles under it before I started it, so lets all hope for the best and that no new puddles show up.
__________________
If no one knows what you're doing, they can't tell you you're doing it wrong HG's Dream Car Build - Shelby Cobra Kit Build your own adjustable track bar 71 Long Fleet C/10 72 Jimmy 4x4 (Junkyard Jimmy)HG's Plow Truck '78 K35 DuallyBigass Farm Truck HG's thread of miscellaneous stuff |
|
|
|
|
|
01-23-2012, 10:15 PM
|
#596 |
|
GEARHEAD
Join Date: Aug 2003
Location: MN
Posts: 6,117
|
Re: Junkyard Jimmy Super Low Buck Build Thread
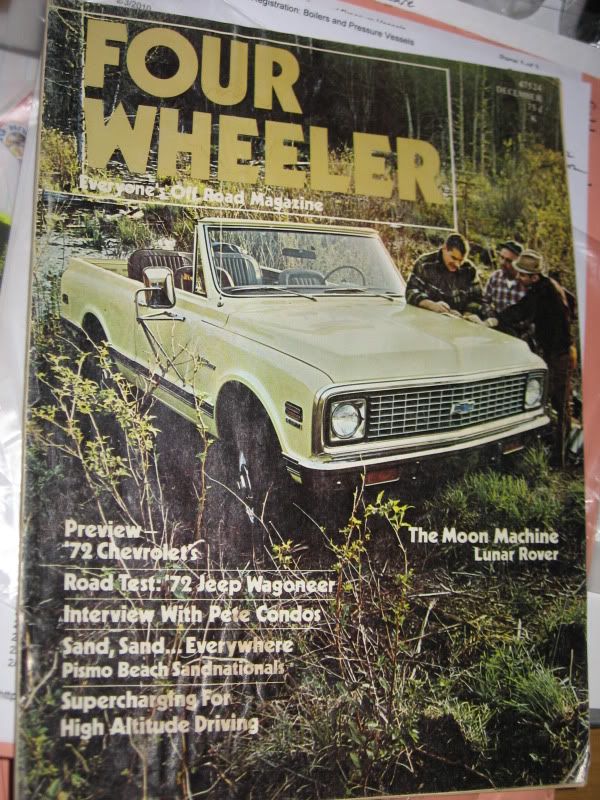
First off, I collect things related to these trucks other than parts. I have a huge diecast collection and I'm also getting quite a few old advertisements and brochures. I also like to find magazines with them on the cover or articles about them. Here's my latest find, Dec 1971 Four Wheeler, anyone ever seen mirrors like that on a blazer before? I know I haven't...
 I just did a tach/vac conversion on my C-10 so I decided to work on the jimmy cluster today. I started with an old camaro tach made a few cuts on the front gauge tin for it to fit in there.  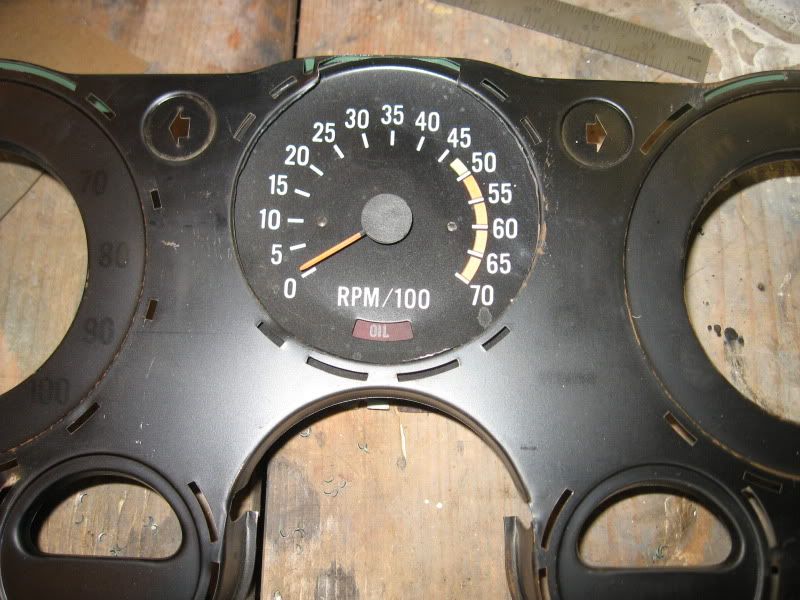 Today I started cutting up the back tin for the tach to fit in and mount to. At first I just eyeballed it and made a few marks with a marker, then drew that out and started cutting. The wider part allows the gauge face to slide through, the rest of the shape allows for room for the circuit board of the tach. 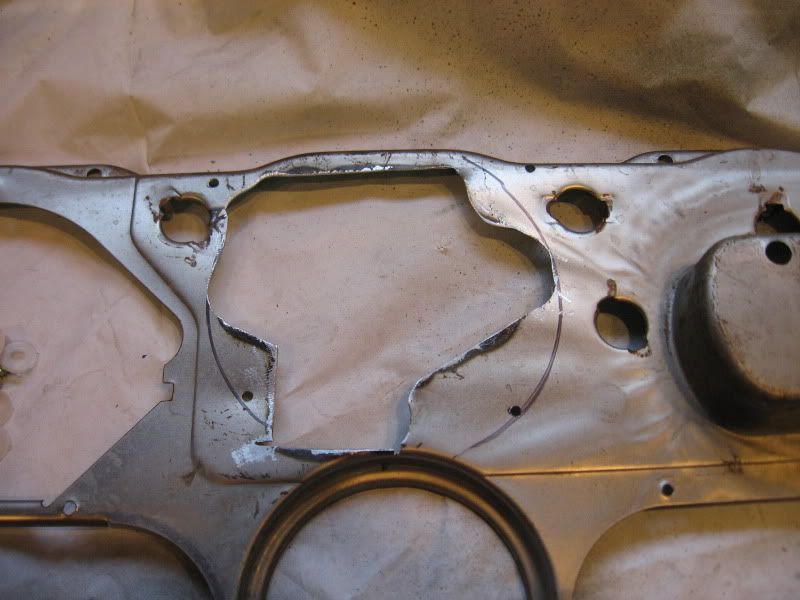 It took some clearancing with a die grinder but eventually it fit well. 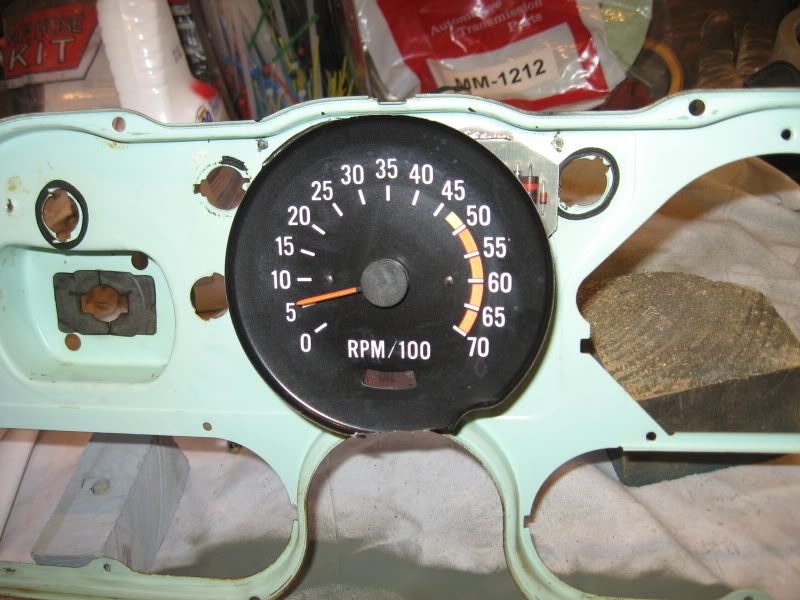 There is about 1.5" between the front and back tins assembled, the camaro tach is about 1-5/8" deep. I had these little plastic washers in the parts bin and used them as a little shim on the back tin when I mounted it. 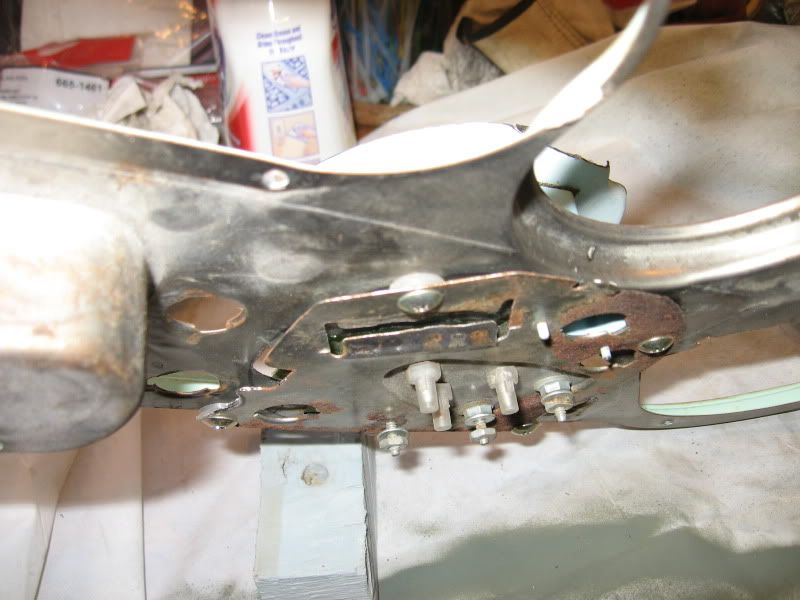 I had to clearance the tach around the blinker light tubes and I'm not sure yet how the printed circuit will fit, but I'll figure it out. This tach does not stick out the back of the cluster like the originals do so I might even be able to use a regular circuit and not have to buy the tach cluster style. As you can see I also got the vacuum gauge installed. That is easy to do, just drill a hole through the boss in the gauge holder and tighten the nut thingy on it, done. 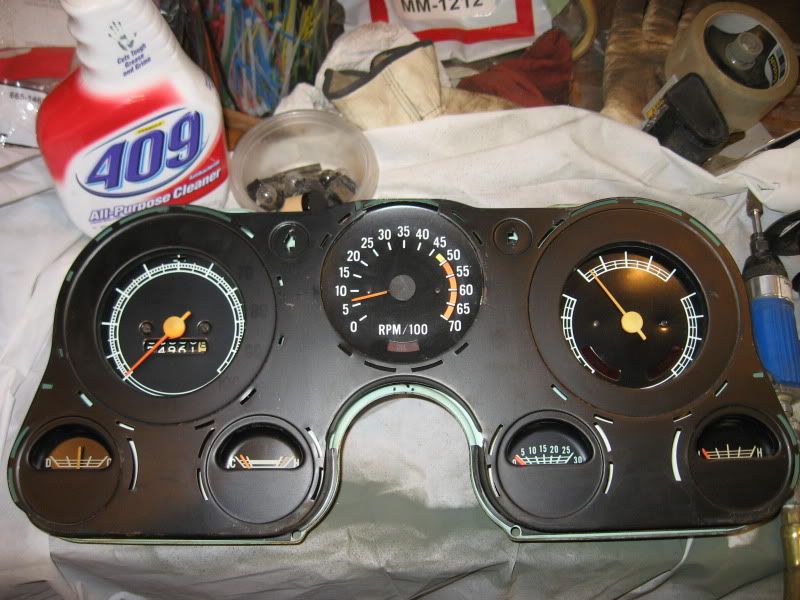 The bezel is pretty crappy looking, so I am going to see if I can improve that a bit. I had an extra lense around for a tach/vac cluster. I had to modify it though because the camaro gauge has the numbers on it already so the numbers for the tach on the lense need to go. From my research I don't think you can buy a lense with the vacuum written w/out the tach numbers also. After some trial and error on the old lense I finally found a substance that would remove the lettering without ruining the lense, spray carb/choke cleaner. Just a small amount on a paper towel and a gentle rub will remove it. Have to be carefull because the new reproduction lenses have the green background color on the same side as the lettering (originals don't). 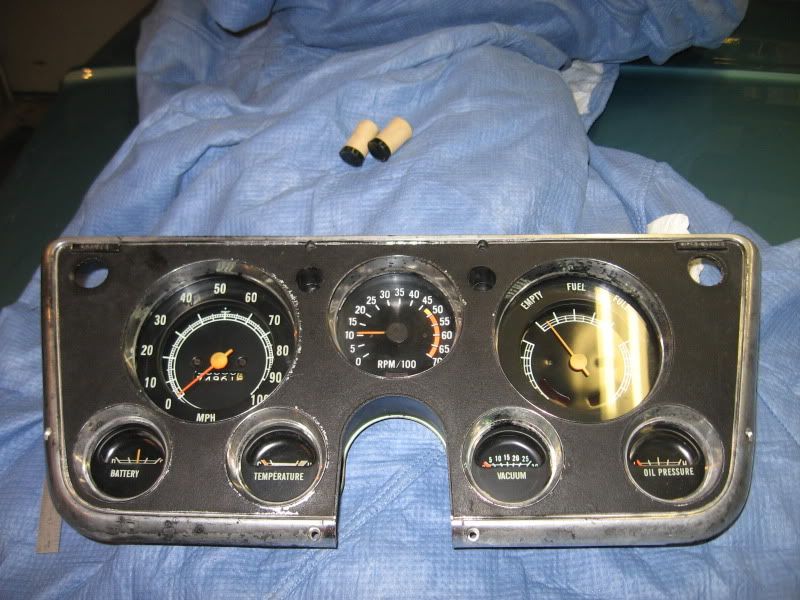 I pulled the bezel off and started with some rustoleum chrome rattle can paint from their metalics line. Its actually shinier than I hoped for. I'll put on another coat then mask it for the black later. I want this stuff to cure as long as possible before I tape it. 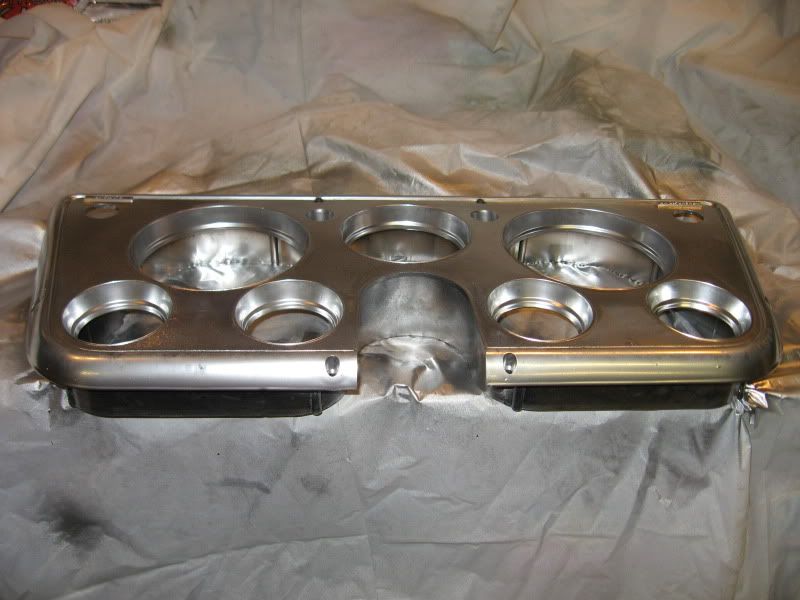
__________________
If no one knows what you're doing, they can't tell you you're doing it wrong HG's Dream Car Build - Shelby Cobra Kit Build your own adjustable track bar 71 Long Fleet C/10 72 Jimmy 4x4 (Junkyard Jimmy)HG's Plow Truck '78 K35 DuallyBigass Farm Truck HG's thread of miscellaneous stuff |
|
|
|
|
01-23-2012, 10:52 PM
|
#597 |
|
VA72C10
 Join Date: Mar 2008
Location: Midlothian, VA
Posts: 25,269
|
Re: Junkyard Jimmy Super Low Buck Build Thread
Nice work on the cluster. I've found you can use the std printed circuit but you have to cut little holes out inside the circuit (between the metal of course
) to allow the screws to fit through
__________________
Looking for a 67-72 swb or blazer project in or around VA.
|
|
|
|
|
01-23-2012, 11:21 PM
|
#598 | |
|
GEARHEAD
Join Date: Aug 2003
Location: MN
Posts: 6,117
|
Re: Junkyard Jimmy Super Low Buck Build Thread
Quote:

__________________
If no one knows what you're doing, they can't tell you you're doing it wrong HG's Dream Car Build - Shelby Cobra Kit Build your own adjustable track bar 71 Long Fleet C/10 72 Jimmy 4x4 (Junkyard Jimmy)HG's Plow Truck '78 K35 DuallyBigass Farm Truck HG's thread of miscellaneous stuff |
|
|
|
|
|
01-24-2012, 09:01 AM
|
#599 |
|
I miss this truck.
Join Date: Dec 2001
Location: Lexington, KY U.S.A.
Posts: 2,863
|
Re: Junkyard Jimmy Super Low Buck Build Thread
Sweet find on the mag.
__________________
'07 GMC Acadia SLT. Sweet ride. '08 Crew Cab Z-71 short bed. Really like this truck A LOT. |
|
|
|
|
01-24-2012, 11:57 PM
|
#600 |
|
GEARHEAD
Join Date: Aug 2003
Location: MN
Posts: 6,117
|
Re: Junkyard Jimmy Super Low Buck Build Thread
No leaks under the transfer case, but looks like I need to pull the tranny pan and do that again. It's either the pan gasket itself, or might be the o-rings on the dipstick and/or the shift lever shaft. I need to install my new kickdown cable anyway, so I'll have to add that to the punch list. Speaking of which, I should start one here...
Punch list (in no particular order): Primer pass bedside finish bedside body work Find GMC tailgate Finish roll bar install seat covers Al's liner inside of tub mark/drill holes for single wall top in bed rails fix dent on driver side fender finish body work on fenders body work on hood body work on doors sandblast and paint front bumper and pushbar electric fan install tranny o-rings and kickdown cable new e-brake cables installed adjust rear brakes change fluid in both differentials rear lift 2" (either springs or blocks) heater install repair windshield frame replace windshield wiper washer pump finish and install gauge cluster make sure wire for gas gauge is hooked up to sender manual throttle glove box lights, lights and more lights tranny cooler lines hammer out dents in grill fix seat mount driver side seat belts door panels, dash pad, visors, etc. stereo paint, well eventually (yellow, gold, copper, bronze, who knows?)
__________________
If no one knows what you're doing, they can't tell you you're doing it wrong HG's Dream Car Build - Shelby Cobra Kit Build your own adjustable track bar 71 Long Fleet C/10 72 Jimmy 4x4 (Junkyard Jimmy)HG's Plow Truck '78 K35 DuallyBigass Farm Truck HG's thread of miscellaneous stuff Last edited by hgs_notes; 01-28-2012 at 09:20 AM. |
|
|
|
 |
| Bookmarks |
|
|


 Linear Mode

