
|
 03-12-2009, 09:58 PM
|
#701 |
|
1 thing at a time is progress.
Join Date: Jun 2007
Location: Ball Ground GA
Posts: 5,511
|
Re: My 1965 build thread
Started working on the rear wheel tubs. I used a zizz wheel to cut off bolts that were spinning. Then scraped all undercoating off.
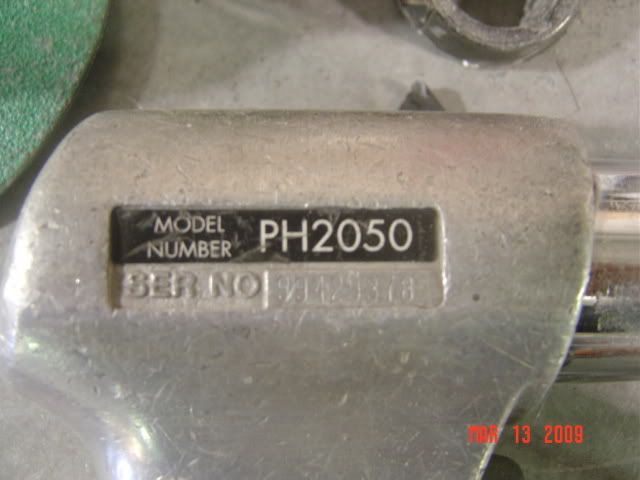
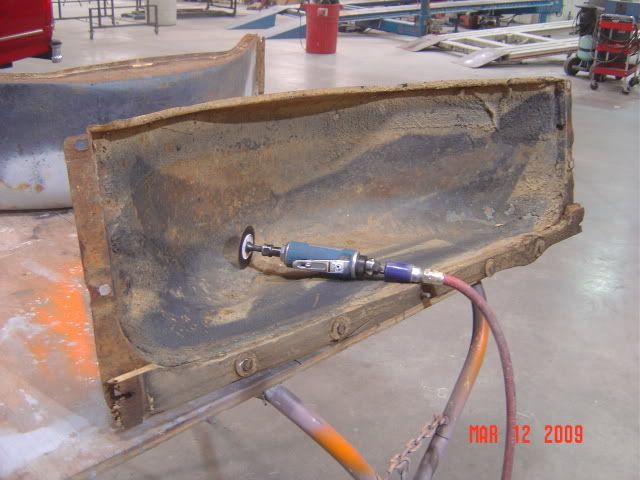 Some prior attempts at body work by PO's 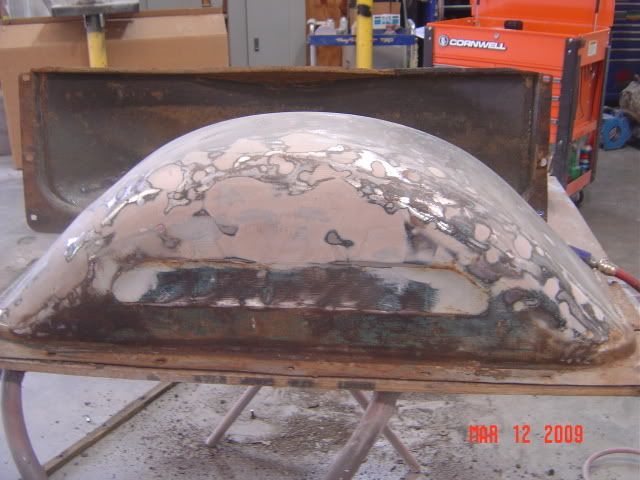 I used this air hammer bit (it's my mobile plannishing hammer) to help massage the metal back into shape. I used a big piece of iron (frame rack) as a back plate while using the hammer. 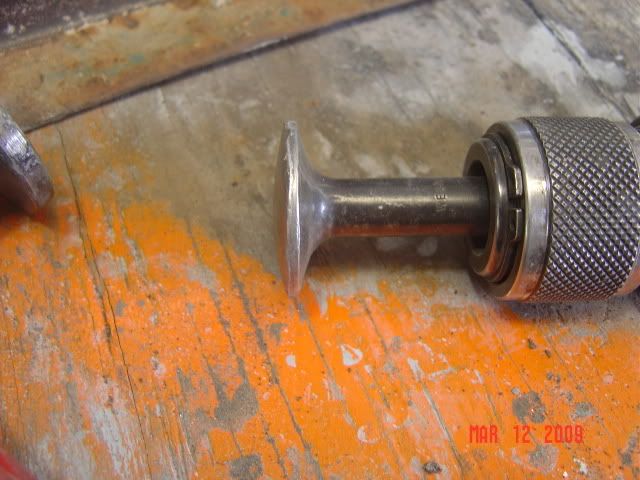 Here is the metal almost back in shape and some of the tools used in the process. I also used a ball peen hammer. 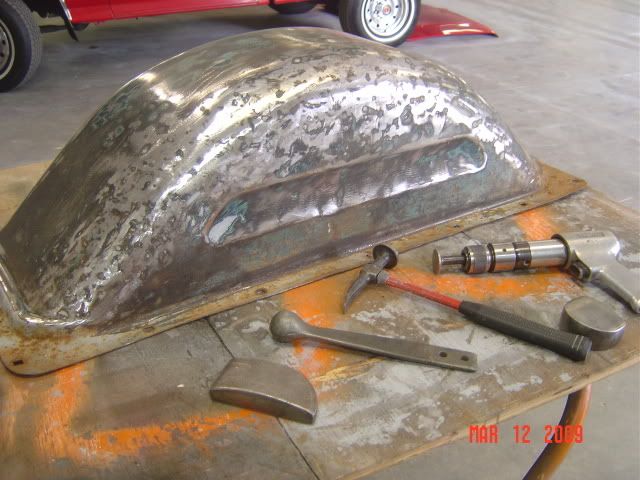 Here is what the other side looked like when I started on it. 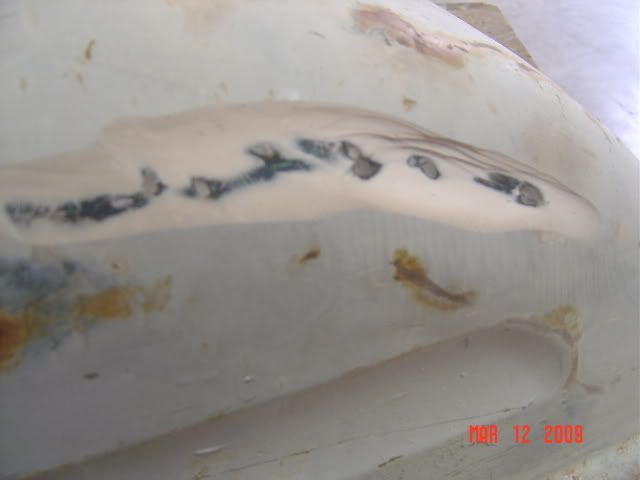 Also primed the column. 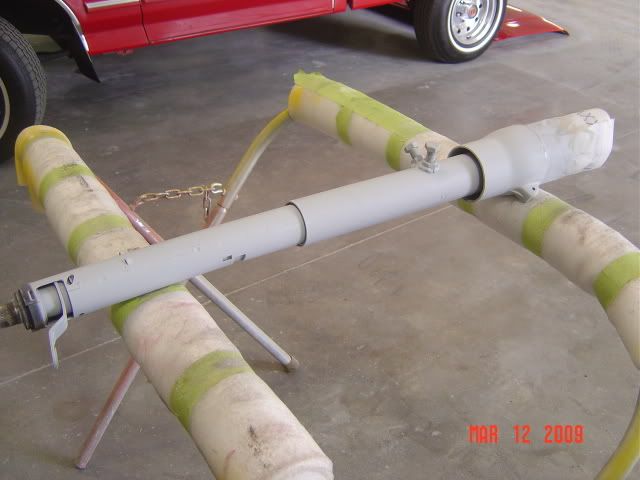 And then based with the same color as the gauge pods. This is base only no pix of it cleared yet. 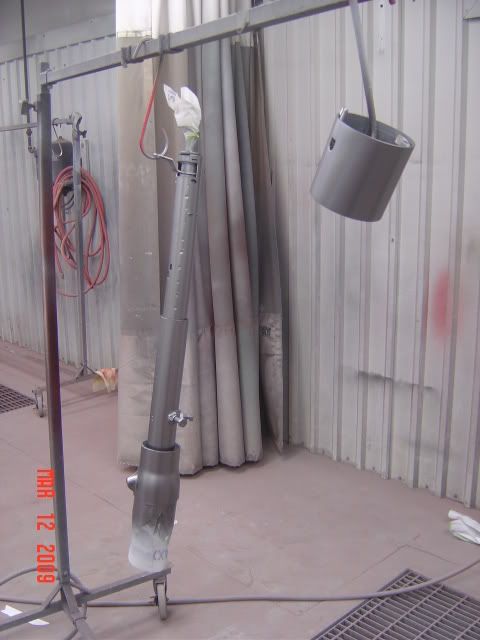
__________________
Alan
Philippians 2:14-16 |

|

|
|
03-12-2009, 10:51 PM
|
#702 |
|
Hey Y'all!!
Join Date: Dec 2007
Location: Bay Minette, Alabama
Posts: 1,755
|
Re: My 1965 build thread
Looking good!!
Wish I had your skills Alan. I'm trying though! 
__________________
Just hopin' I live long enough to finish something!!! |
|
|
|
|
03-13-2009, 12:23 AM
|
#703 |
|
60-66 Nut
  Join Date: Mar 2007
Location: Coeur d'Alene, Idaho
Posts: 23,246
|
Re: My 1965 build thread
Hey Alan is this something that can be bought or was it custom made? Is that a regular air hammer you use it in? Your truck is coming along nicely. This thread is one of the ones I have to check everyday.
__________________
Power Steering Box Adapter Plates For Sale HERE Power Brake Booster Adapter Brackets For Sale '63-'66 HERE and '67-'72 HERE and '60-'62 HERE and "60-'62 with clutch HERE Rear Disc Brake Brackets For Sale. Impala SS calipers HERE Camaro Calipers HERE D52 Calipers HERE 6 Lug HERE Hydroboost Mounting Plates HERE Last edited by Captainfab; 03-13-2009 at 12:31 AM. |
|
|
|
|
03-13-2009, 07:46 AM
|
#704 |
|
Registerd User
Join Date: Sep 2008
Location: Oklahoma
Posts: 2,118
|
Re: My 1965 build thread
Looking good Alan. What are you gonna do for a bed floor?
|
|
|
|
|
03-13-2009, 08:42 AM
|
#705 |
|
Hollister, CA.
Join Date: Sep 2006
Location: Hollister, Ca.
Posts: 6,147
|
Re: My 1965 build thread
Nice job on the column Alan...the end result looks like perfection !!
__________________
John What the Heck is that ?? CURRENT BUILDS: 62 BurbMaster  Other Builds: My '63 C-10,LWB,CC,BBW '06 HD StrAight Axle Swap Father/Son '67 C-20, LQ9,4L80,Bagged,8-Lugger !!Good Friend Richard's Build AMERICAN CUSTOMS & CLASSICS (831) 630-1965 www.ACCHOLLISTER.com ACC on FACEBOOK "Rest in Peace, Mom & Dad ... I will see you again someday!" |
|
|
|
|
03-13-2009, 11:11 AM
|
#706 |
|
Daring to be Different
Join Date: Aug 2008
Location: Hesperia, Ca
Posts: 4,499
|
Re: My 1965 build thread
Looken good Allan. I use the same end on my air hammer. It works on other things too. I ground off a little on the edge so it would fit some King Pin bearings. It worked perfectly.
__________________
Dennis  Check out my 65/73 Cheap Build Thread. Check out my 65/73 Cheap Build Thread. http://www.67-72chevytrucks.com/vboa...d.php?t=327644 KUSTOM RIDES FACE BOOK PAGE: https://www.facebook.com/groups/291198124258863/ 1965 C-10 Short Bed 350/700r4 2012 Silverado 1500 Crew Cab 2016 Honda Accord w/ 18" rims 2007 Honda Goldwing Trike w/ NAVI 2001 Yamaha Roadstar Indian look alike "Life's journey is not to arrive at the grave safely in a well preserved body, but rather to skid in sideways, totally worn out, shouting "...WOW!...what an amazing ride!" Live Life Passionately!!! [/COLOR]  I AM WE TODD IT, I AM SOFA KING WE TODD IT |
|
|
|
|
03-13-2009, 10:56 PM
|
#707 | |||||
|
1 thing at a time is progress.
Join Date: Jun 2007
Location: Ball Ground GA
Posts: 5,511
|
Re: My 1965 build thread
Quote:
Quote:
  Quote:
Quote:
On to new news. Got another shelving unit. Nice and clean for now........ 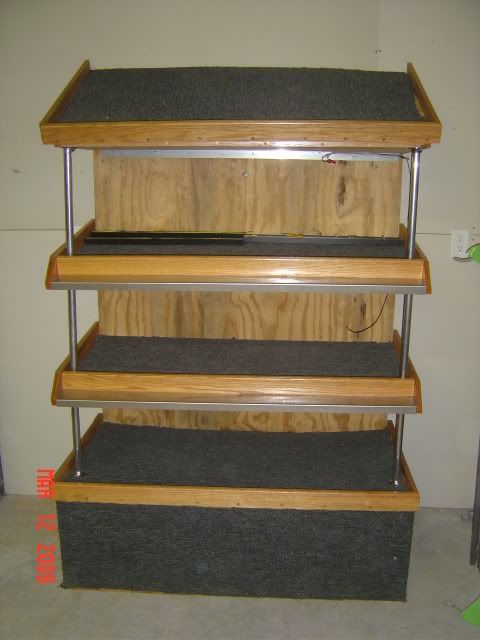 I can finally get all or most of my loose pieces for the truck back in one spot. 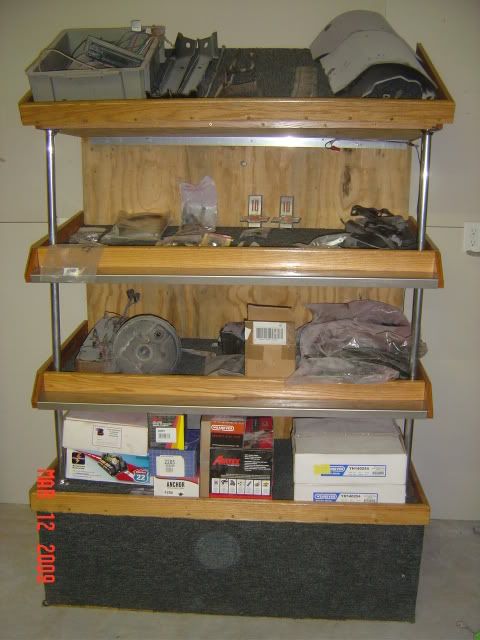 Also picked up this air compressor. It's a 7.5HP 80 gal 2 stage pump. I need to locate a pump and pully and test the motor. If anyone has any connections for a pump please let me know. 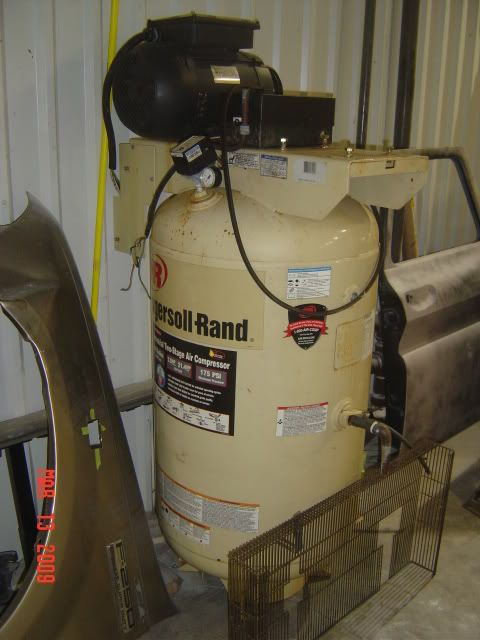 Blocked both the doors with 400 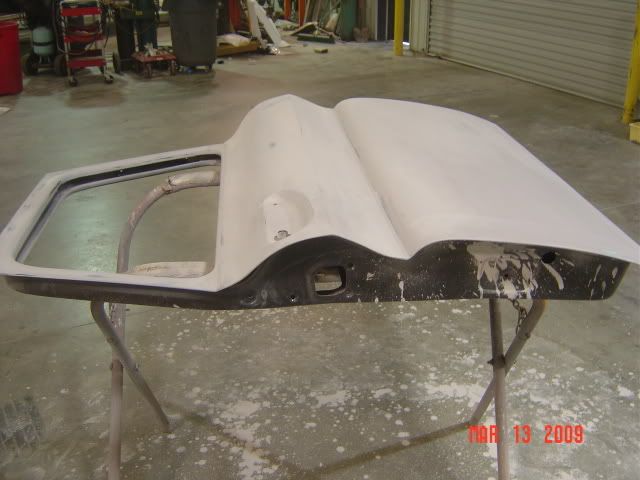 Used a mini DA with 400 on some rough areas of the jamb and scuffed the rest down with a grey scotch brite pad. Ready for sealer and some color. 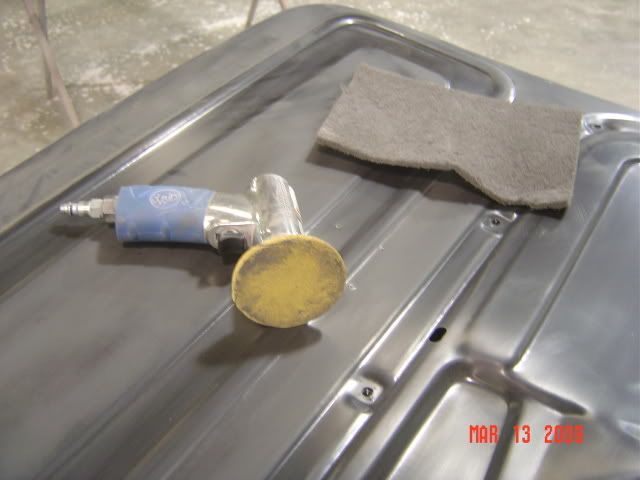
__________________
Alan
Philippians 2:14-16 |
|||||
|
|
|
|
03-14-2009, 12:45 AM
|
#708 |
|
Registered User
Join Date: Mar 2007
Location: East Texas
Posts: 429
|
Re: My 1965 build thread
Dang Alan, You sure know your metal work. I noticed this thread is always at the top. You have em sittin on the edge.
I enjoy lookin through here,always somethin new. |
|
|
|
|
03-15-2009, 11:19 AM
|
#709 | |
|
Daring to be Different
Join Date: Aug 2008
Location: Hesperia, Ca
Posts: 4,499
|
Re: My 1965 build thread
Quote:
http://www.northerntool.com/webapp/w..._6970_87+90145
__________________
Dennis Check out my 65/73 Cheap Build Thread. http://www.67-72chevytrucks.com/vboa...d.php?t=327644 KUSTOM RIDES FACE BOOK PAGE: https://www.facebook.com/groups/291198124258863/ 1965 C-10 Short Bed 350/700r4 2012 Silverado 1500 Crew Cab 2016 Honda Accord w/ 18" rims 2007 Honda Goldwing Trike w/ NAVI 2001 Yamaha Roadstar Indian look alike "Life's journey is not to arrive at the grave safely in a well preserved body, but rather to skid in sideways, totally worn out, shouting "...WOW!...what an amazing ride!" Live Life Passionately!!! [/COLOR] I AM WE TODD IT, I AM SOFA KING WE TODD IT |
|
|
|
|
|
03-15-2009, 04:47 PM
|
#710 | ||
|
1 thing at a time is progress.
Join Date: Jun 2007
Location: Ball Ground GA
Posts: 5,511
|
Re: My 1965 build thread
Quote:
Quote:
Got out in the shop for quite a while today. Spent most of it cleaning up. Tony and Strodder's shop is my inspiration. Maybe someday I'll get it right. The pile in the floor is trash. 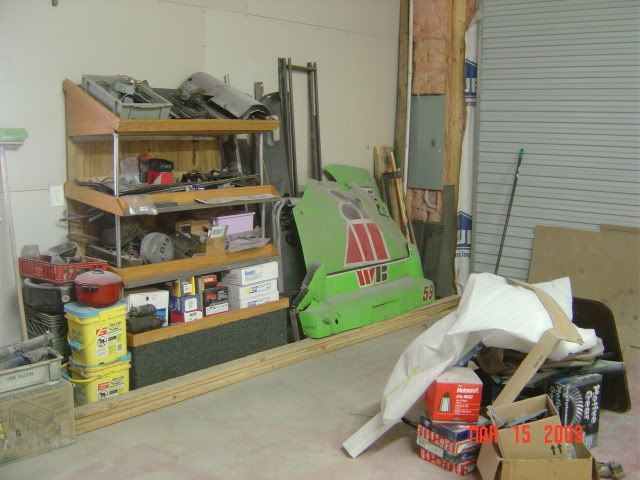 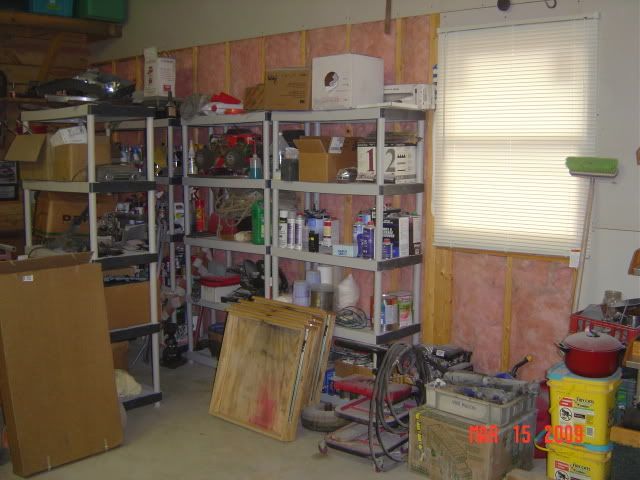 Got a blind hung and somemore family antiques hung. 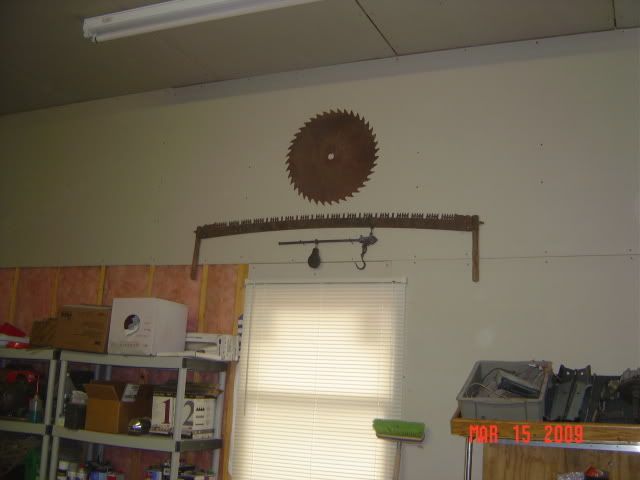 On too the truck. The column is back in. 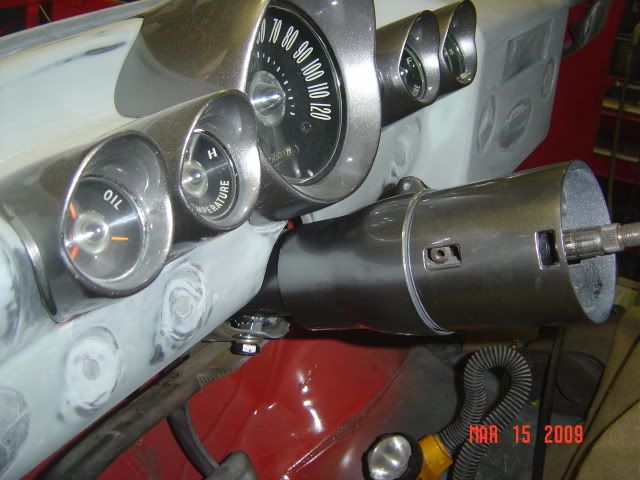 Nuetral safety 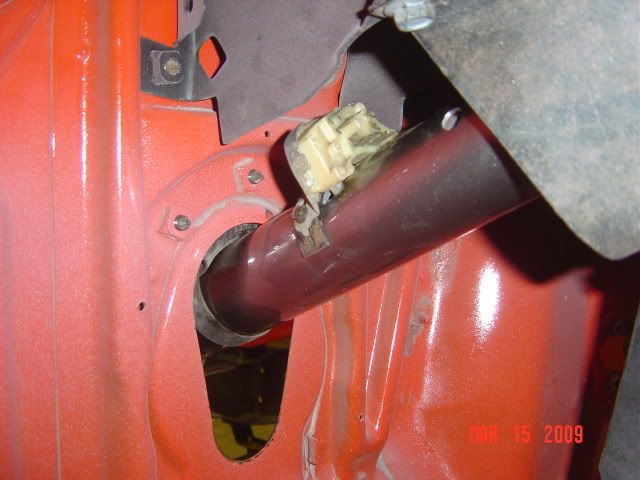 Ummmmmm..........I think I know where everything goes. 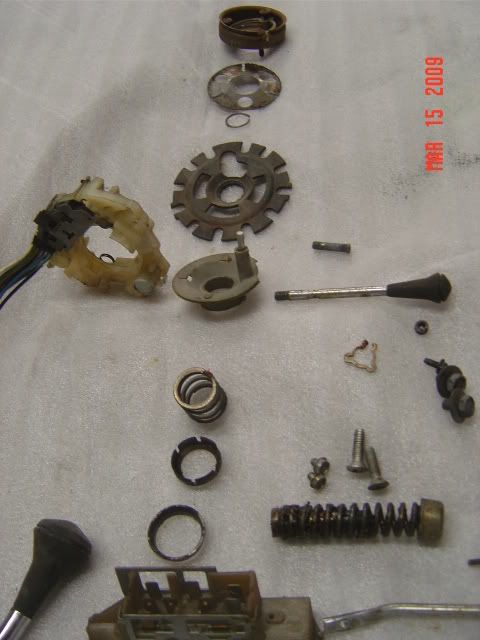 Now the fun part sanding the jambs getting the cab ready for paint. There is still alot of work to do to get the cab ready. 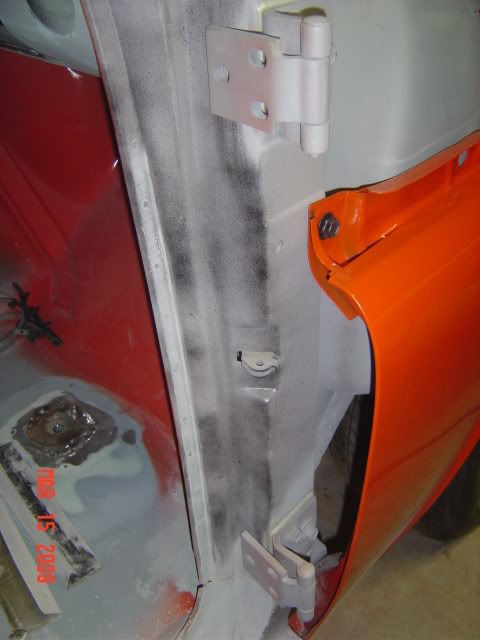
__________________
Alan
Philippians 2:14-16 |
||
|
|
|
|
03-15-2009, 09:52 PM
|
#711 |
|
One day...
Join Date: Apr 2008
Location: Tuttle, Ok
Posts: 9,240
|
Re: My 1965 build thread
Wow man its looking really good!!

|
|
|
|
|
03-16-2009, 03:16 PM
|
#712 | |
|
1 thing at a time is progress.
Join Date: Jun 2007
Location: Ball Ground GA
Posts: 5,511
|
Re: My 1965 build thread
Quote:
Left work early today due to lack of work. Worked again on the column to see if I could get it back together. Here is kind of a step by step. The tilt mechanism is already in. Here is the tilt spring going in. 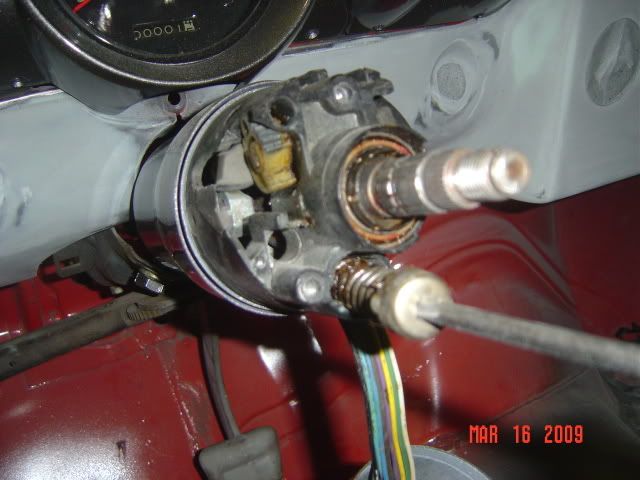 I found that a #2 phillips does a great job of pushing the spring and doing a 1/4 turn to lock in place. 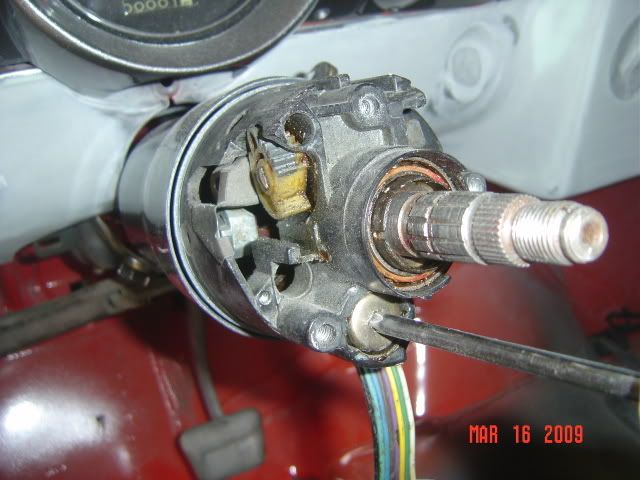 Go ahead and run the turn signal switch wires if you haven't done so yet. Then install the upper shroud. 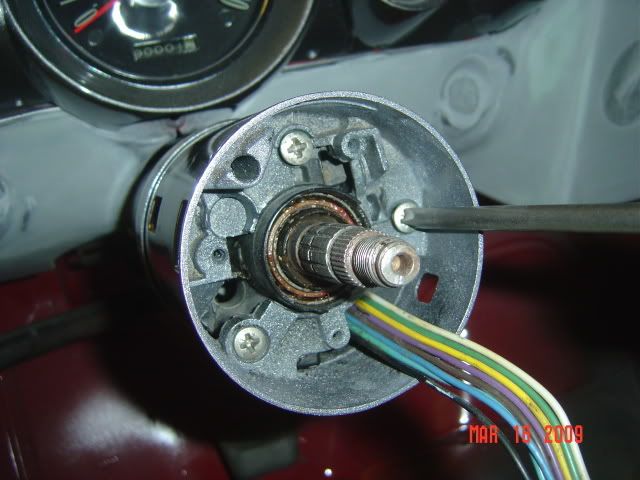 Install the turn signal switch 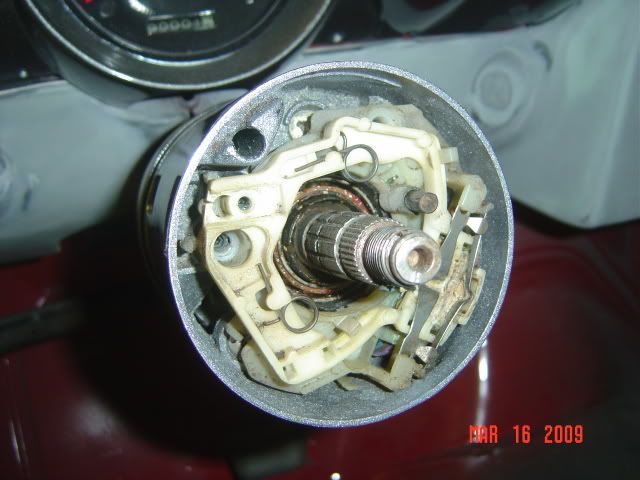 Install the hazard light knob, turn signal lever and horn contact with spring under it. 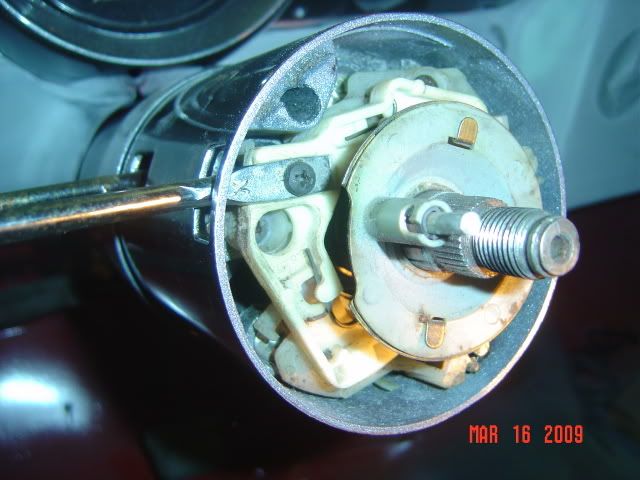 Here's a fun part. Make sure the column shaft to the gearbox is installed. If not the steering shaft will push down into the column and will be impossible to get the snap ring on. Getting it off wasn't fun either. It probably would have been easier with it installed in the truck when removing it (snap ring). I don't have the special tool that they called for. I used 2 medium common screw drivers and pushed evenly on both sides of the snap ring until I got the snap ring to lock into place. 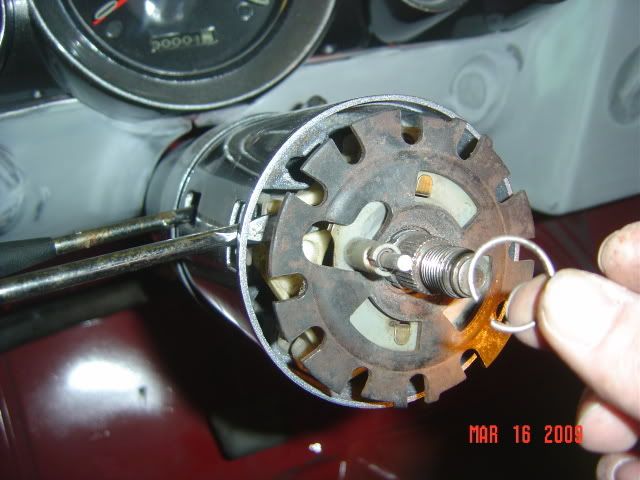 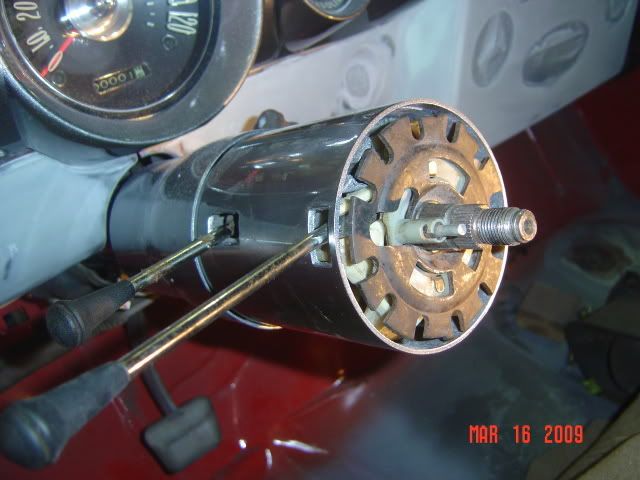 Other than getting a new steering wheel and some new (bling) levers. I can call this done. As long as it works. 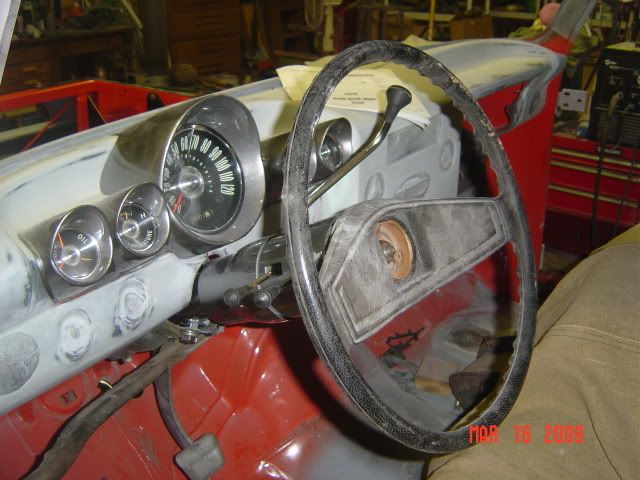 While I was down in the floor I noticed that the holes that I drilled to mount the fuse panel have an issue. The top left hole is right behind the inner fender flange. Uh Oh. 
__________________
Alan
Philippians 2:14-16 |
|
|
|
|
|
03-16-2009, 03:42 PM
|
#713 |
|
The Few, The Proud
Join Date: Jun 2007
Location: Ball Ground, Georgia
Posts: 1,830
|
Re: My 1965 build thread
Good job on getting that column back together.
 Bummer about the bolt holes though.
__________________
Shannon |
|
|
|
|
03-16-2009, 06:44 PM
|
#714 | |
|
1 thing at a time is progress.
Join Date: Jun 2007
Location: Ball Ground GA
Posts: 5,511
|
Re: My 1965 build thread
Quote:
I got something else completed today. The sway bar brackets got mounted to the frame. I was just dreading drilling upside down. 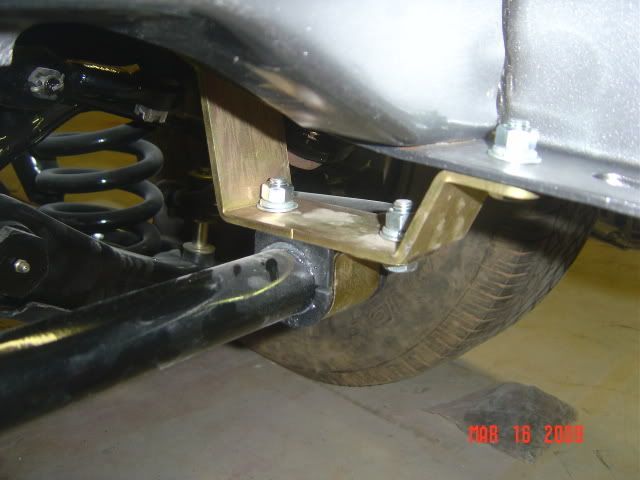 Also ripped the front sheet metal off again to finish up the cab. Notice the gloves to protect the paint on the frame. 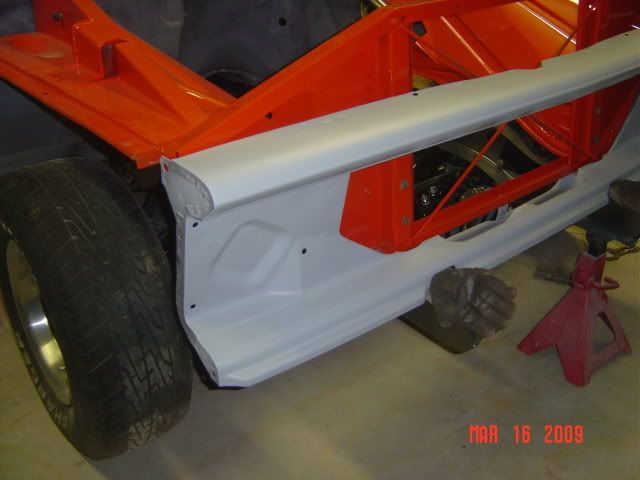
__________________
Alan
Philippians 2:14-16 |
|
|
|
|
|
03-16-2009, 10:40 PM
|
#715 |
|
Shloooooong bed member #2
Join Date: Aug 2008
Location: Millington Tn.
Posts: 1,864
|
Re: My 1965 build thread
Super work Alan,
Ever thought about doing a show on the PBS channel? You could call it "THIS OLE TRUCK"
__________________
David, Daughters 66 truck: http://67-72chevytrucks.com/vboard/s...d.php?t=484601 Learning to drive a 3 on the tree: http://www.youtube.com/watch?v=CcCMvRgBo1Q |
|
|
|
|
03-16-2009, 11:02 PM
|
#716 | |
|
1 thing at a time is progress.
Join Date: Jun 2007
Location: Ball Ground GA
Posts: 5,511
|
Re: My 1965 build thread
Quote:
  
__________________
Alan
Philippians 2:14-16 |
|
|
|
|
|
03-17-2009, 08:06 PM
|
#717 |
|
1 thing at a time is progress.
Join Date: Jun 2007
Location: Ball Ground GA
Posts: 5,511
|
Re: My 1965 build thread
Found this damaged F$rd Ranger tailgate at work today and the wheels started turning.
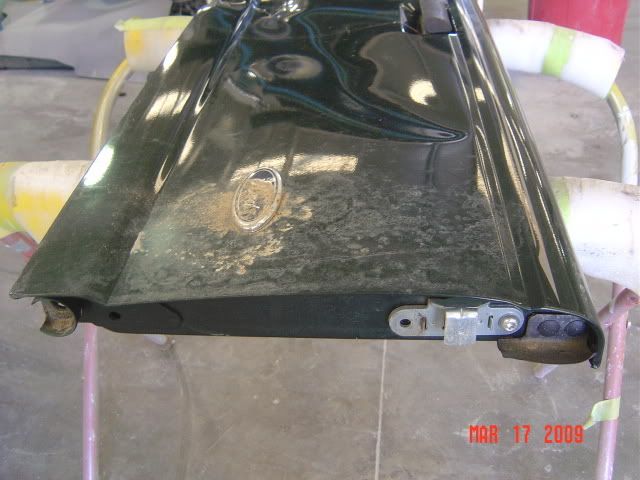 I think ya'll know where I'm going with this. 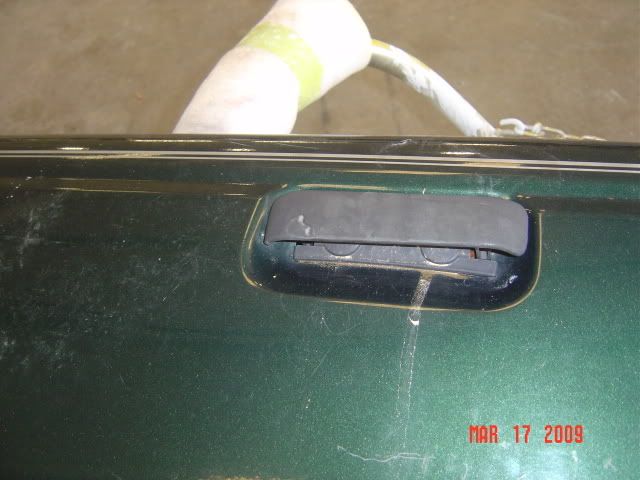 I can do body work, but I struggle with custom stuff. I believe I can make this work. The latch on the bedside post is just stuck in there. The center of the latch hole needs to be about 3" from the top according to my quick measurements. Actually the top hole of the stricker might line up with the factory bolt hole at the top on the bedside. 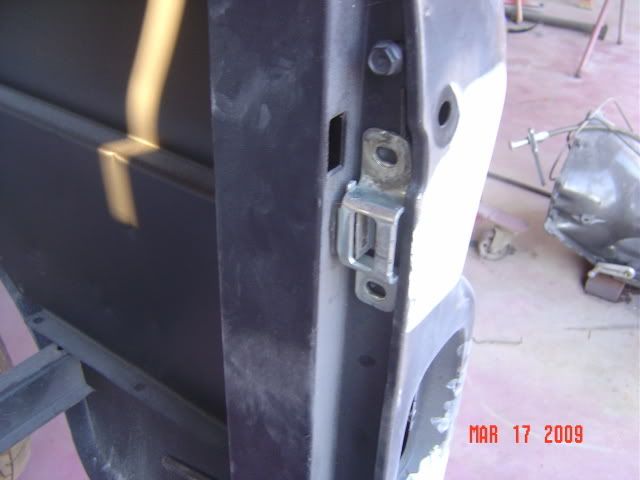 Here are all of the pieces laid out. 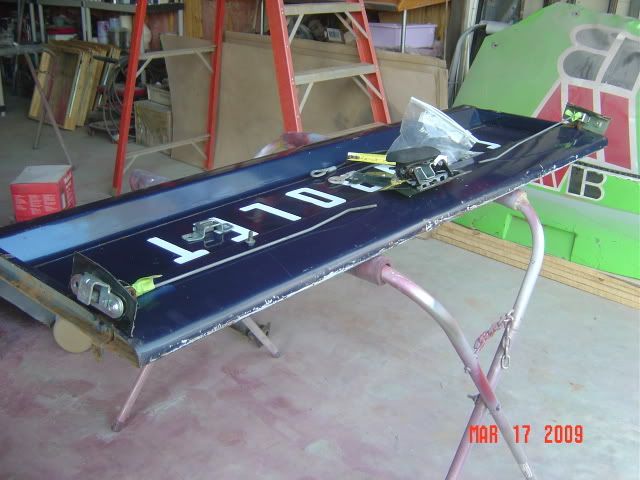 I think with a little modifications this will fit. 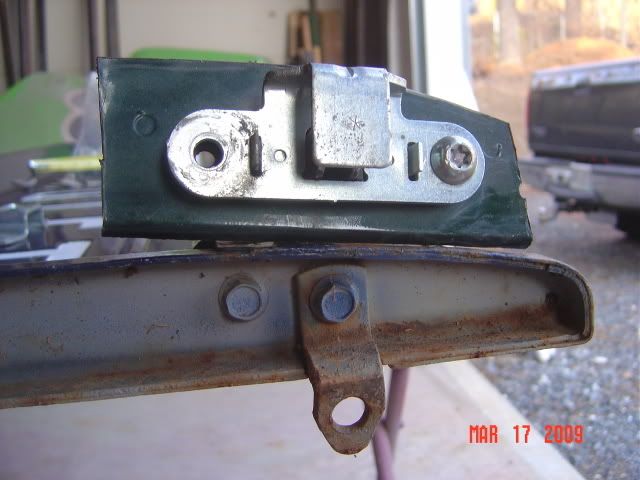 The complete handle assy is a little thick. But if I put a curved raised access panel on the inside of the tailgate it might work. I've got to do some more measurements. No matter how much I think about it I won't think of everything. I've seen alot of ideas posted about chainless tailgates, but haven't seen one done like this. If I have I can't recall it. Please give me some feedback about possible problems I might incur. 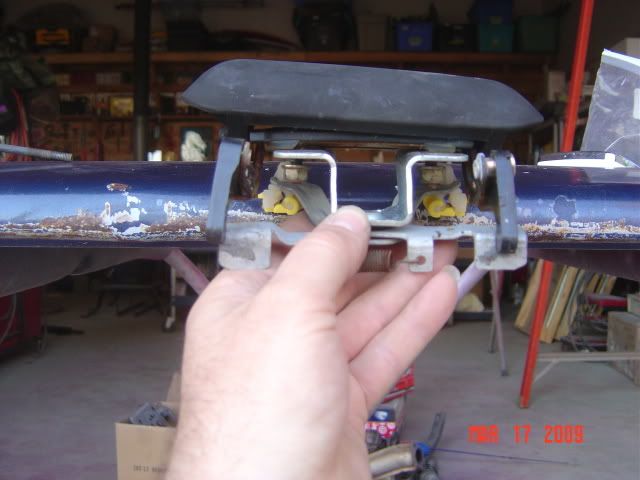
__________________
Alan
Philippians 2:14-16 |
|
|
|
|
03-17-2009, 09:03 PM
|
#718 |
|
Daring to be Different
Join Date: Aug 2008
Location: Hesperia, Ca
Posts: 4,499
|
Re: My 1965 build thread
Just a thought Allan. Put the handle on the inside, and keep the tailgate smooth. Like they do on the newer trucks. They make a handle relocation kit for them. Like this one.
https://www.carolinaclassictrucks.co...relocator.html
__________________
Dennis Check out my 65/73 Cheap Build Thread. http://www.67-72chevytrucks.com/vboa...d.php?t=327644 KUSTOM RIDES FACE BOOK PAGE: https://www.facebook.com/groups/291198124258863/ 1965 C-10 Short Bed 350/700r4 2012 Silverado 1500 Crew Cab 2016 Honda Accord w/ 18" rims 2007 Honda Goldwing Trike w/ NAVI 2001 Yamaha Roadstar Indian look alike "Life's journey is not to arrive at the grave safely in a well preserved body, but rather to skid in sideways, totally worn out, shouting "...WOW!...what an amazing ride!" Live Life Passionately!!! [/COLOR] I AM WE TODD IT, I AM SOFA KING WE TODD IT Last edited by Strodder; 03-17-2009 at 09:05 PM. |
|
|
|
|
03-17-2009, 09:54 PM
|
#719 |
|
Registered User
Join Date: Jan 2008
Location: Satsop, WA
Posts: 606
|
Re: My 1965 build thread
Allen your progress is looking good. Love the silver on the insterments and column. I did a similar deal on the tailgate using a wrecked late models S10 gate. I also thought about putting the handle on the inside but as you said it was to wide for the gate and would have had to build a panel to accommodate the depth of the handle. I cut down the strikes and latches and they nicely into the bedsides and gate. In order to attach them I drilled holes were they needed to attach and then drilled and tapped some 5/16" flat bar. Then pulled the flat bar up in form behind with a piece of tie wire welded to the end of some alltread that I had screwed into the mounting holes. Then plug welded it in. I decided to just weld some nuts onto the latches and use some nice chrome Pike nuts and made some stainless bezels for the pikes to slide on instead of messing with the latch. I also welded up the detent on the bedside. I will use the pike nuts on the outside of the tailgate were the cable attaches as well.
__________________
1963' Chev Custom Cab 502, 67' 435hp 3X2 intake, 9" 4:30 Posi 1961 Impala SS 348/350 4-speed 3:70 Posi 1961 Bel-Air Bubble Top 283 Turboglide soon to have a 348 3X2 4-speed 1950 17' Fairliner twin cockpit barrel stern 312 Y block 1X1 intake Borg Warner 1:1 gear 1957 Fleetform 14' twin cockpit barrel stern 1969 BP-125 Merc 1949 Transitier 3-wheel forklift Crosley 4-Banger 98' FXD 2002 2500HD Last edited by 502tripower; 03-17-2009 at 09:56 PM. |
|
|
|
|
03-17-2009, 10:16 PM
|
#720 |
|
Registerd User
Join Date: Sep 2008
Location: Oklahoma
Posts: 2,118
|
Re: My 1965 build thread
Example.
|
|
|
|
|
03-17-2009, 10:49 PM
|
#721 |
|
Registered User
Join Date: Jan 2007
Location: Madera, California
Posts: 291
|
Re: My 1965 build thread
Alan I have been thinking of doing the same thing because I haven't seen it before either and would like the one handle tailgate. I can't wait to see how you do it. Hey is there enough room in the upper part of the tailgate to fit the linkage?
|
|
|
|
|
03-17-2009, 11:04 PM
|
#722 | ||||
|
1 thing at a time is progress.
Join Date: Jun 2007
Location: Ball Ground GA
Posts: 5,511
|
Re: My 1965 build thread
Quote:
Quote:
Quote:
Quote:
__________________
Alan
Philippians 2:14-16 |
||||
|
|
|
|
03-18-2009, 08:49 PM
|
#723 |
|
Registered User
Join Date: Aug 2008
Location: Cedar Creek, TX
Posts: 167
|
Re: My 1965 build thread
What about using a couple door actuators attached directly to each latch. You could hide a button or make it remote activated. Then there is no handle or rods to deal with.
|
|
|
|
|
03-19-2009, 12:24 AM
|
#724 |
|
60-66 Nut
Join Date: Mar 2007
Location: Coeur d'Alene, Idaho
Posts: 23,246
|
Re: My 1965 build thread
Alan
For a handle/latch on your tailgate, you could possibly use a universal paddle latch like is used on toolboxes and comercial vehicles. I've used them on custom toolboxes and such that I've fabricated. I usually buy that type of hardware from these guys http://www.austinhardware.com/catego...%20&%20Catches They have ones that actuate rods or cables. You might have to search a little bit to find the one you want. I believe they have a warehouse in GA also. Just an idea
__________________
Power Steering Box Adapter Plates For Sale HERE Power Brake Booster Adapter Brackets For Sale '63-'66 HERE and '67-'72 HERE and '60-'62 HERE and "60-'62 with clutch HERE Rear Disc Brake Brackets For Sale. Impala SS calipers HERE Camaro Calipers HERE D52 Calipers HERE 6 Lug HERE Hydroboost Mounting Plates HERE |
|
|
|
|
03-19-2009, 01:46 AM
|
#725 |
|
Its Deja Vu time again
Join Date: Aug 2008
Location: Marysville, North of Seattle WA
Posts: 815
|
Re: My 1965 build thread
Say its not so..... Ford parts in your Chevy.
Never mind I have ford parts in my Jeep so Who am I to talk. hahahaha I posted this a while back when I found it, but here it is again. Just to give you more ideas to kick around. 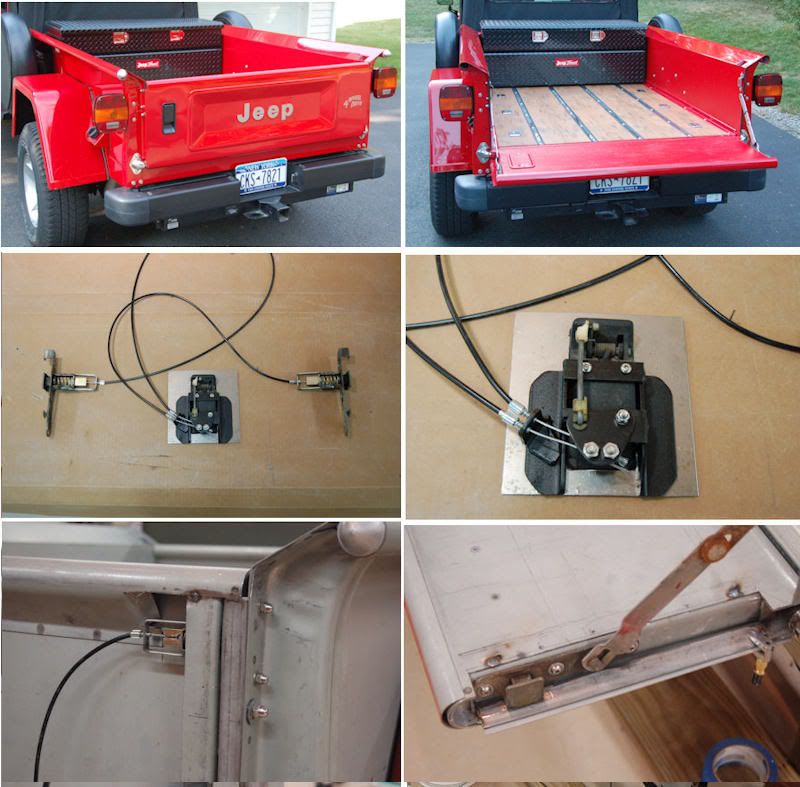 Some info on this page http://www.cj-8.com/forum/showthread...=18796&page=12 Latches seem to be from a mazda. Paddle handle from a Jeep TJ. Says he went with a TJ since its metal opposed to a YJ that uses plastic. YJ are the square headlight model just in case you don't know the difference. Of course I'd center it on the inside of the bed, but using a Jeep handle it would give you a more narrow throw unless of course its to long. I didn't measure it or put any research into it. Just another idea.
Last edited by kizer; 03-19-2009 at 01:59 AM. |
|
|
|
 |
| Bookmarks |
| Tags |
| 1959, 1960, 1964, 1965, 1966, c10, hugger, impala, orange |
|
|


 Linear Mode

