
|
 01-20-2015, 06:55 PM
|
#51 |
|
Registered User
Join Date: Oct 2014
Location: uk
Posts: 621
|
Re: timing
It's a new EZ wiring loom
__________________
yoshi's 49 project |

|

|
|
01-20-2015, 07:34 PM
|
#52 |
|
Registered User
Join Date: Mar 2012
Location: Lakes Region NH
Posts: 3,158
|
Re: timing
Do you have an alternator in the truck? If the wire to the coil+ is the same size as the large alternator wire then it will work.
|
|
|
|
|
01-20-2015, 08:08 PM
|
#53 |
|
Registered User
Join Date: Jun 2006
Location: Idaho
Posts: 8,800
|
Re: timing
EZ has the right size wire for HEI dist from switched ignition source.
__________________
1959 Chevy Short Fleetside w/ 74 4WD drive train (current project) OrrieG Build Thread 1964 Chevelle Malibu w/ 355-350TH (daily driver) Helpful AD and TF Manual Site Old Car Manual Project |
|
|
|
|
01-20-2015, 08:18 PM
|
#54 |
|
Registered User
Join Date: Jan 2009
Location: Calgary, AB
Posts: 1,181
|
Re: timing
TDC is when the #3 intake valve is fully open. This means that your 0 on the pointer should be lined up with the cut line on the harmonic balancer. IF this does not line up your harmonic balancer maybe worn and not showing correctly.
You should either have an adjustable timing light which it sounds like you do or install a timing tape as well. Pull the distributor out and then find TDC #1. When your at TDC #1 go slightly past till the mark on the harmonic balancer is at the 10 degree number. At this point reinstall the distributor and ensure the rotor points to the #1 cylinder. This is called Base Timing. Your truck SHOULD start and run just fine. From here you can adjust your base timing and SBC may like between 8-14 degrees depending on your truck and motor setup. Once you have your base setup then adjust the idle to 3000 RPM and then see what your truck is running for timing. It should be in the 33 degrees range if everything is proper. Then what you want to do is subtract your BASE timing from the all in timing meaning if your base is 10 degrees subtract that from 33 to give you 23 degrees. The 23 degrees is what you need to recurve your distributor to with the different springs. Make sense? |
|
|
|
|
01-20-2015, 08:34 PM
|
#55 |
|
Registered User
Join Date: Jan 2015
Location: Santa Monica
Posts: 264
|
Re: timing
__________________
Déjà vu. It's that feeling you get when you hit your thumb with the hammer a second time '59 Chevy 3100 Stepside |
|
|
|
|
01-21-2015, 08:17 AM
|
#56 | |
|
Registered User
Join Date: Mar 2012
Location: Lakes Region NH
Posts: 3,158
|
Re: timing
Quote:
You do not want this type of spade terminal: 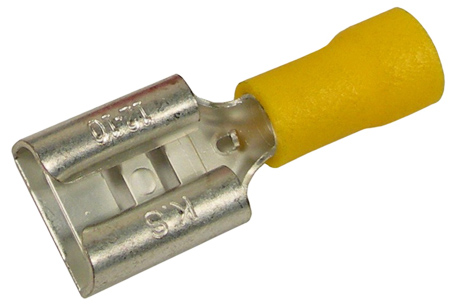 This terminal only makes contact with the spade in a few places and the only tension to keep the terminals together is provided by the shape of the rounded "sides." You do want this type of terminal:  The flat tab inside the terminal provides much better contact with the male spade and there's a dimple which helps lock the terminal onto it's counterpart in the distributor. You can find some terminals constructed similarly but without the locking feature. Without the matching plastic connector, I'd use the locking variety. The proper connector is available from several sources although I don't know where you could get it locally. Search for HEI Pigtail online. 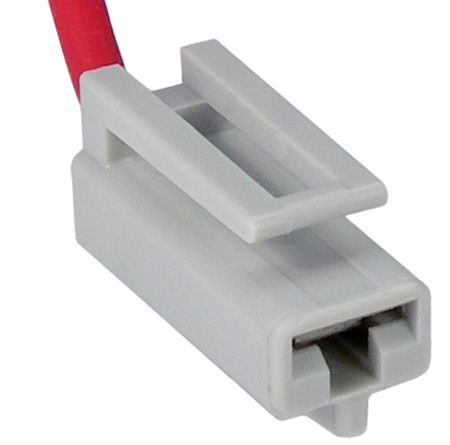
Last edited by 1project2many; 01-21-2015 at 08:28 AM. |
|
|
|
|
|
01-21-2015, 08:52 AM
|
#57 |
|
Registered User
Join Date: Jan 2009
Location: Calgary, AB
Posts: 1,181
|
Re: timing
HEI Pigtail Repair Kit Part # F50001 from Napa or lots of places. Comes with the lead for the power and tach.
http://www.rockauto.com/dbphp/x,cata...TS_F50001.html |
|
|
|
|
01-21-2015, 08:53 AM
|
#58 |
|
Registered User
Join Date: Mar 2012
Location: Lakes Region NH
Posts: 3,158
|
Re: timing
enaberif... OP is in the UK. Is NAPA in the UK?
|
|
|
|
|
01-21-2015, 08:56 AM
|
#59 |
|
Registered User
Join Date: Jan 2009
Location: Calgary, AB
Posts: 1,181
|
Re: timing
Not sure hence the RA link as well.
|
|
|
|
|
01-21-2015, 01:19 PM
|
#60 |
|
Registered User
Join Date: Oct 2014
Location: uk
Posts: 621
|
Re: timing
This is what I've been advised to do- find out from TSP when maximum advance occurs, mark the balancer at 36deg, drop dizzy in & set to 12deg. Whatever rpm TSP says max advance occurs set rpm to that, then move dizzy so marks line up at 36deg. Any thoughts? Thanks
__________________
yoshi's 49 project |
|
|
|
|
01-21-2015, 01:56 PM
|
#61 |
|
Registered User
Join Date: Aug 2011
Location: Tucson, AZ
Posts: 917
|
Re: timing
reasonable way to do it. I don't know who TSP is, but assuming it's the distributor manufacturer. After setting by your method, I'd blip the engine a little higher with the light on it to make sure what is said works out with what is happening.
|
|
|
|
|
01-21-2015, 04:46 PM
|
#62 |
|
Registered User
Join Date: Oct 2014
Location: uk
Posts: 621
|
Re: timing
Is this what I need to mark the balancer - http://www.ebay.com/itm/390980330956
__________________
yoshi's 49 project |
|
|
|
|
01-21-2015, 05:03 PM
|
#63 | |
|
Registered User
Join Date: Apr 2012
Location: Solvang, Ca 93463
Posts: 323
|
Re: timing
Quote:
|
|
|
|
|
|
01-21-2015, 05:06 PM
|
#64 | |
|
Registered User
Join Date: Jan 2009
Location: Calgary, AB
Posts: 1,181
|
Re: timing
Quote:
|
|
|
|
|
|
01-21-2015, 05:16 PM
|
#65 |
|
Registered User
Join Date: Oct 2014
Location: uk
Posts: 621
|
Re: timing
Yes TSP is the manufacturer & replied to me saying 3500 rpm is max. I thought I'd use the tape to mark the balancer while the engine isn't running
__________________
yoshi's 49 project |
|
|
|
|
01-21-2015, 05:23 PM
|
#66 | |
|
Registered User
Join Date: Jan 2009
Location: Calgary, AB
Posts: 1,181
|
Re: timing
Quote:
The timing tape is designed so that you can see where your timing is when the engine is running. |
|
|
|
|
|
01-21-2015, 05:34 PM
|
#67 | ||
|
Registered User
Join Date: Mar 2012
Location: Lakes Region NH
Posts: 3,158
|
Re: timing
Quote:
Quote:
Measure balancer diameter, multiply by pi, divide by 10. A balancer that measures at 8" is 25.128 inches around, with 36 degrees equal to 25.13 / 10 or 2.51", just a hair over 2 1/2". Last edited by 1project2many; 01-21-2015 at 05:46 PM. |
||
|
|
|
|
01-21-2015, 05:36 PM
|
#68 |
|
Registered User
Join Date: Oct 2014
Location: uk
Posts: 621
|
Re: timing
I think it's an 8" balancer
__________________
yoshi's 49 project |
|
|
|
|
01-21-2015, 05:47 PM
|
#69 |
|
Registered User
Join Date: Mar 2012
Location: Lakes Region NH
Posts: 3,158
|
Re: timing
I caught that and corrected my post. You should measure across it just to be sure. I can calculate metric dimensions if needed.
|
|
|
|
|
01-21-2015, 05:51 PM
|
#70 | |
|
Registered User
Join Date: Jan 2009
Location: Calgary, AB
Posts: 1,181
|
Re: timing
Quote:
|
|
|
|
|
|
01-21-2015, 05:55 PM
|
#71 |
|
Registered User
Join Date: Oct 2014
Location: uk
Posts: 621
|
Re: timing
Just found receipt for marker it is 8"
__________________
yoshi's 49 project |
|
|
|
|
01-21-2015, 06:35 PM
|
#72 |
|
Registered User
Join Date: Oct 2014
Location: uk
Posts: 621
|
Re: timing
Ok many thanks for that, so I'll mark the balancer 2 33/64" to the right of the tdc mark.
__________________
yoshi's 49 project |
|
|
|
|
01-21-2015, 06:47 PM
|
#73 | |
|
Registered User
Join Date: Jan 2009
Location: Calgary, AB
Posts: 1,181
|
Re: timing
Quote:
|
|
|
|
|
|
01-21-2015, 06:55 PM
|
#74 | |
|
Registered User
Join Date: Mar 2012
Location: Lakes Region NH
Posts: 3,158
|
Re: timing
Quote:
|
|
|
|
|
|
01-21-2015, 06:59 PM
|
#75 |
|
Registered User
Join Date: Mar 2012
Location: Lakes Region NH
Posts: 3,158
|
Re: timing
Duplicate Post
|
|
|
|
 |
| Bookmarks |
|
|


 Linear Mode

