
|
 12-03-2009, 01:57 AM
|
#851 |
|
Senior Member
Join Date: Jul 2005
Location: Winters Ca. 95694
Posts: 4,843
|
Re: LFD's 4dr Tahoe Build
I then did the same for the drivers side but had to do a bit more trimming to get everything in place. After the face holes were drilled and the top of the cowl was cut to get the box inside I found that the holes did not line up. The box was tight against the left side of the opening in the cowl and as you can see in the pic it still has to go over a bit. So I trimmed more off the one side of the cowl until it lined up then I found I need to do a bit more for the bolt head to clear as well.
[IMG] 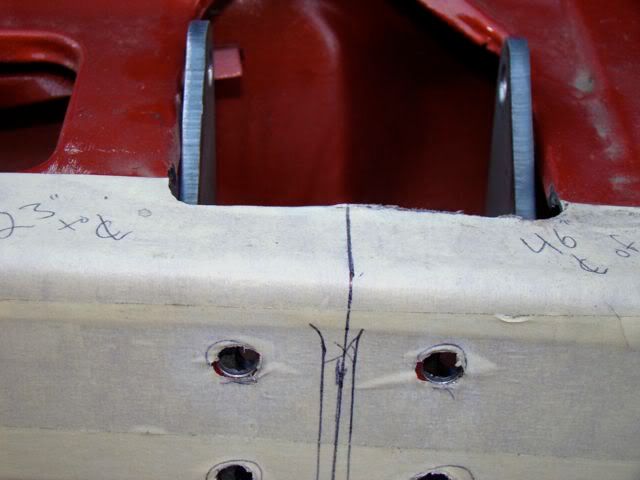 [/IMG] [/IMG][IMG] 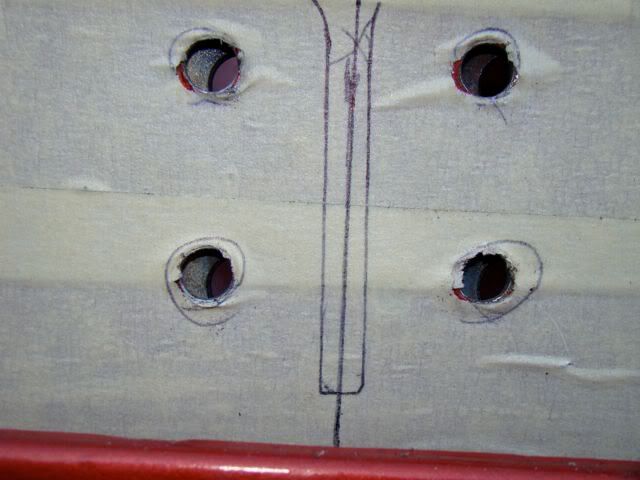 [/IMG] [/IMG][IMG] 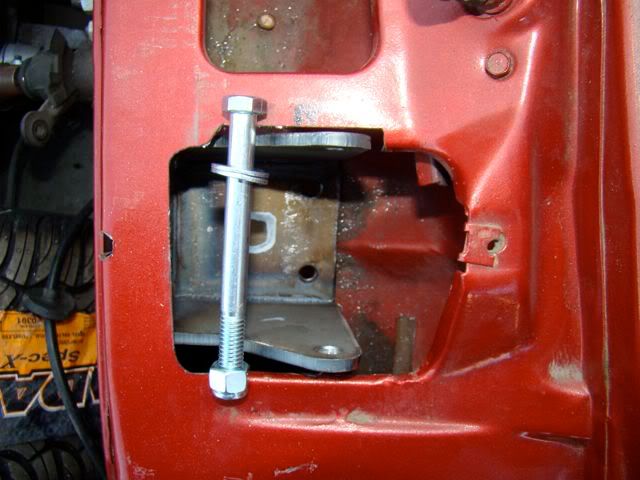 [/IMG] [/IMG]Next it was time to install the hinge arm before bolting in the boxes! If you bolt the box in first you will not be able to slide the bolts into place to hold the arms. Now their is a P and a D to the arms as well. The angle on the end of the mounting plate of the arm will slope in towards the center of the cowl. So imagine a line going from the head light to the center of the cowl and the angle in the arm will follow this same line. Note If you are already painted or going to be driving it for some time you will want to paint these parts and seal up the bottom bolt holes with silicone. To do this put a large amount of silicone under the box around the two holes and then put some more in the holes before inserting the bolts. Yes this is a bit messy but better that then water or rust coming through later. So I assembled the arms on the boxes with everything setting in the cowl openings. Once the arms were bolted in I went ahead and started the 4 front bolts but before tightening them up I dropped the other 2 bolts in place going into the cabin. Then tighten them all up starting with the 4 in front and moving on to the 2 on the bottom. Now that the boxes are tight you can set the tension on the hinge arms. What I did was tighten them up just so the arm will stay up and require a very small amount of force to lower. What this does is makes everything nice and snug and does not allow any slop in the operation of the hinges. Next you will want to adjust the up travel of the hinge arms so they are even with each other like in the pic below. [IMG] 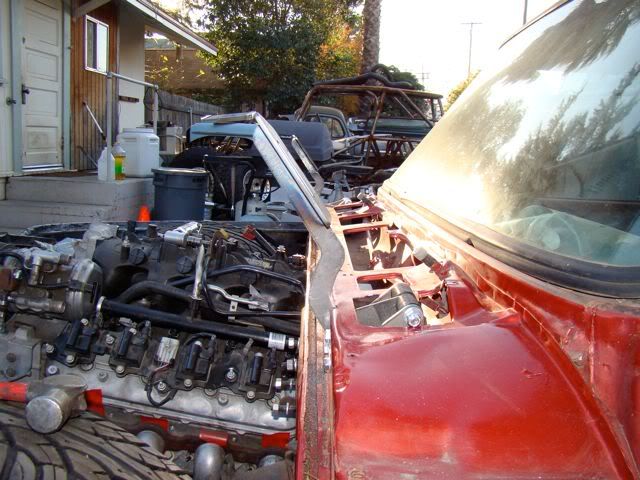 [/IMG] [/IMG]To do this you will take your die grinder or file and adjust the top of the slot so the arms will come up to the same point. You may want to sit the cowl back in place and see where the front edge is location to the top of the slot. You do not want the slot to go into the cowl panel so make a mark at the front edge and work towards that. [IMG] 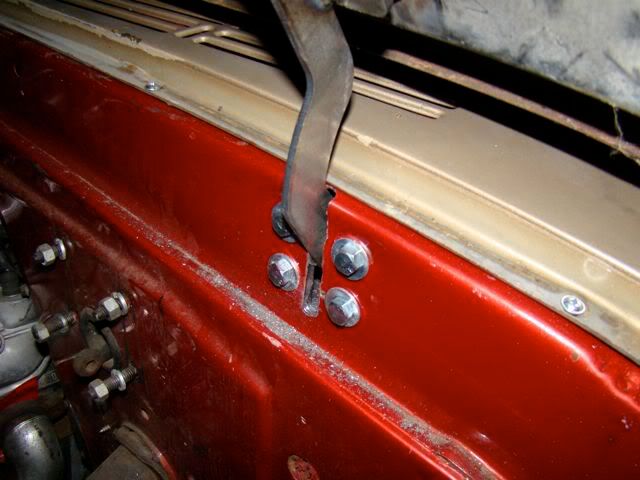 [/IMG] [/IMG][IMG] 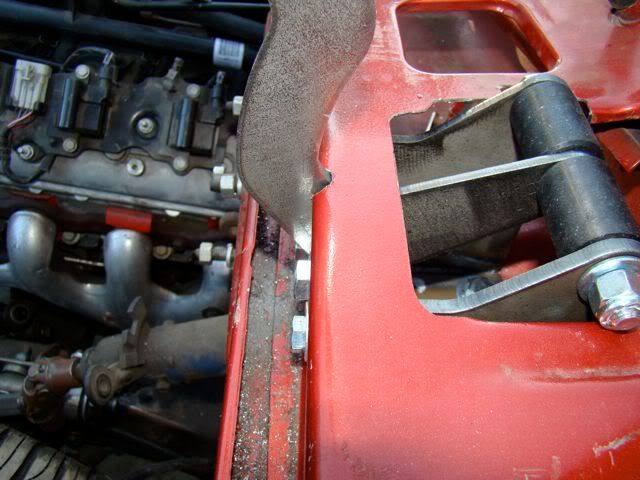 [/IMG] [/IMG]Once you are happy with both sides you can bolt the cowl panel back in place and start on the hood. Note The very first thing you want to do is make sure all the bolts can be screwed all the way into the mounting plate. If you have any problems you should run a tap through the hole first. I had one that did not go and found out after it was welded in place. I have already spoke with Nate about this and he is fixing this so it will not even be a possible problem on later kits. Also note their is a passenger and a driver side to these plates as well. The angle on the plate will follow the angle on the hood brace. So find a good place to lay your hood up side down and grab your tape measure. You will once again want to find the center of the hood along the rear brace. Their is a factory hole that is almost exactly center but double check it before moving to the next step. Once you find center you will want to measure out 23" each way just like on the cowl. This again is the center of the hinge mounting plate but since these plates are 2 1/2" wide now measure to one side 1 1/4" so you have a good mark to line the edge of the plate up with. Put the plate down and trace around it withy a pen then remove the plate and clean all the paint off this area so you will get a good weld in a later step. Now re measure and place your marks one more time (don't forget the 1 1/4" offset line) and using a framing square you will want to make sure these plates are square with the rear of the hood and 1" in front of the back of the brace. This should also be about 2 1/2" from the very back edge of the hood. Once you have this I recommend just doing one tack weld per piece first. After both sides are tacked re-check your 46" number to make sure it is correct then finish welding. I only did about a 1" weld in each corner and I feel that is more than enough to secure the hood for good. [IMG] 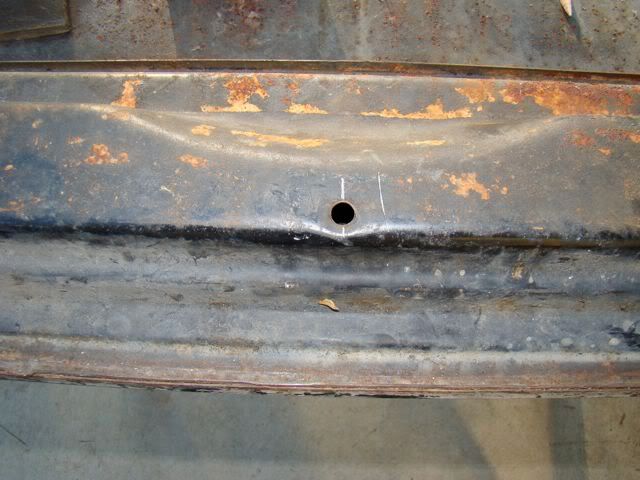 [/IMG] [/IMG][IMG] 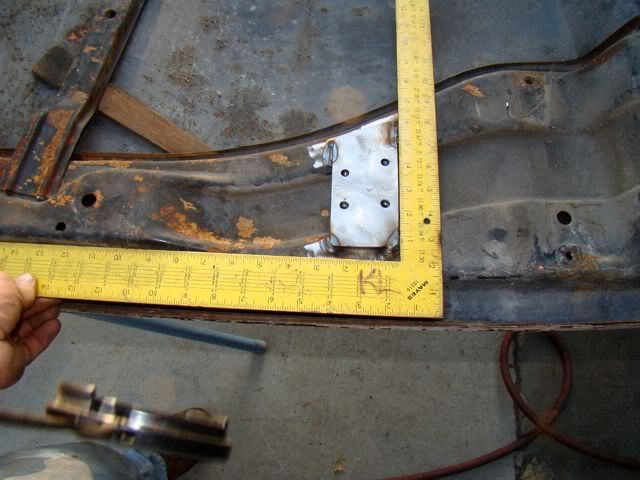 [/IMG] [/IMG][IMG] 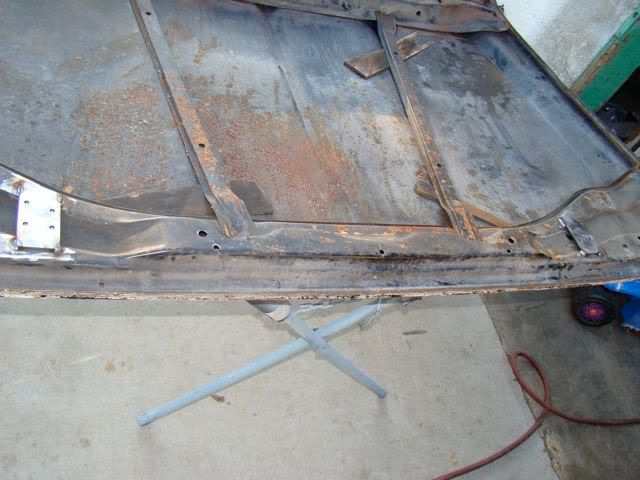 [/IMG] [/IMG]Kevin LFD Inc. |

|

|
|
12-03-2009, 01:58 AM
|
#852 |
|
Senior Member
Join Date: Jul 2005
Location: Winters Ca. 95694
Posts: 4,843
|
Re: LFD's 4dr Tahoe Build
Now just bolt the hood on a drive, well almost. With the hood up (helps with 2 guys) I started all the bolts (do not use the SS bolts for this step yet) and once they were snug I adjusted the hood so that the mounting plate for the hood was about 1/4" in front of the plate on the arm. This gave some extra clearance for the cowl on the first shutting but still be careful that the hood does not contact the cowl. I did mine this way and when it was said and done I only had the hood slid out about 1/16" past the plate on the arm.
Now my hood was 1/8" lower than the cowl and needed to come up. I had some spacers that were 1/8" so I loosened one side at a time and slid in the shims and re-tightened the bolts. This put the hood perfectly flush with the cowl and the hood to fender gap was great as well. I have Talked with Nate and he will be suppling (2) 1/8" and (2) 1/16" shims with the next kits. [IMG] 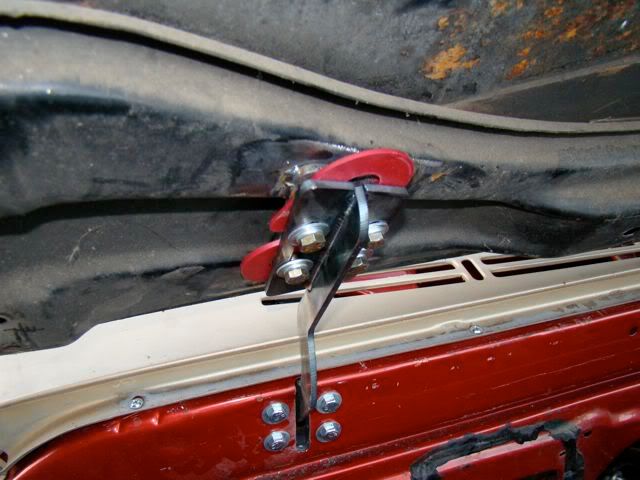 [/IMG] [/IMG][IMG] 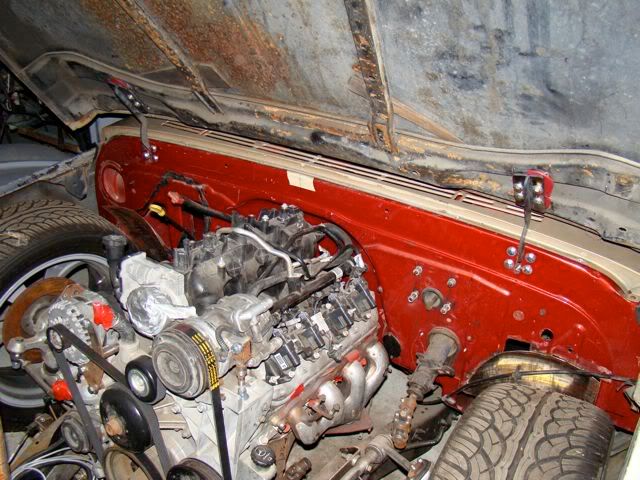 [/IMG] [/IMG]No worries about chipping paint with these hinges, once they are set correctly. [IMG]  [/IMG] [/IMG][IMG]  [/IMG] [/IMG][IMG] 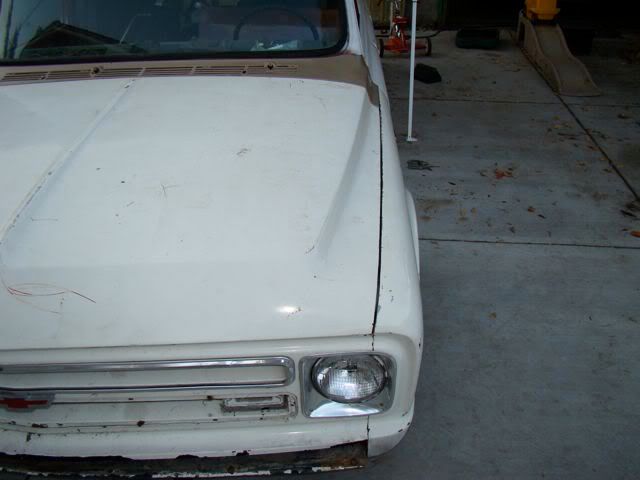 [/IMG] [/IMG][IMG] 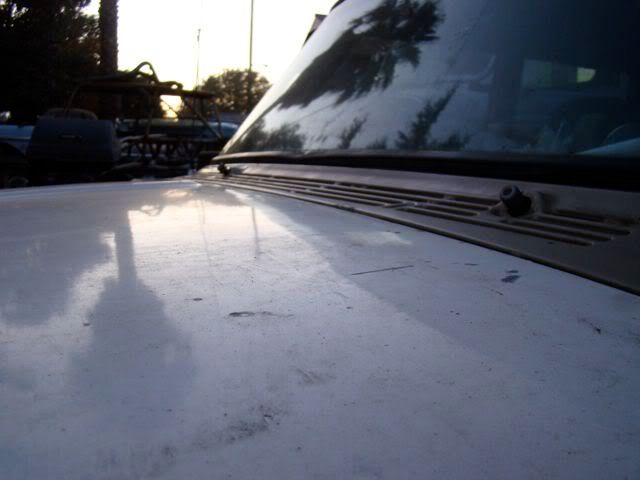 [/IMG] [/IMG]How is this for a hood opening! I checked on low buck and had an opening of 39" (blue hood) between the hood latch and latch pin and on the Tahoe ( white hood) with Nate's kit I had 46"! A total gain of 7"! [IMG] 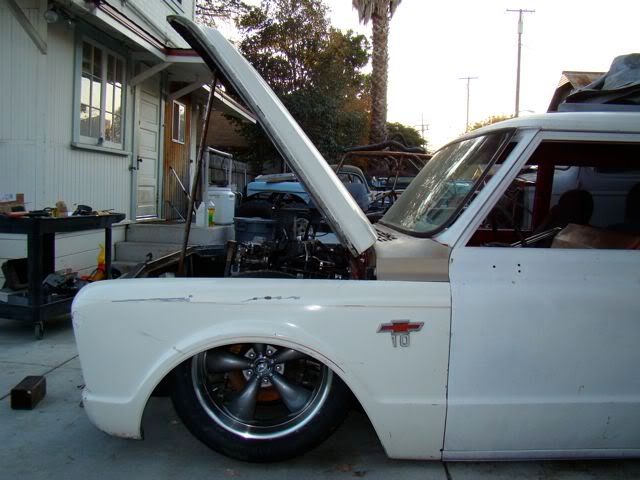 [/IMG] [/IMG][IMG] 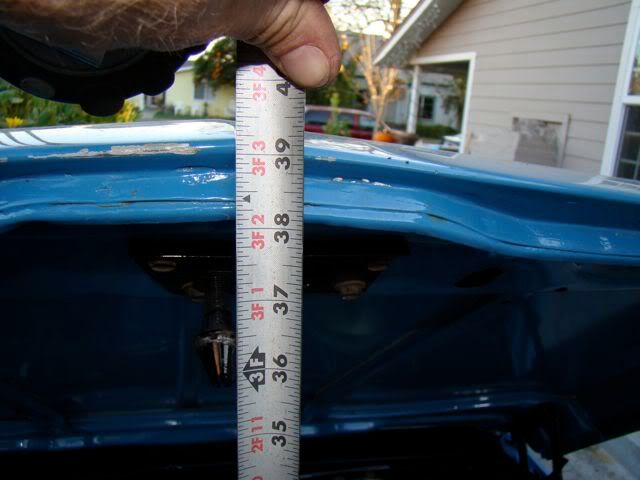 [/IMG] [/IMG][IMG] 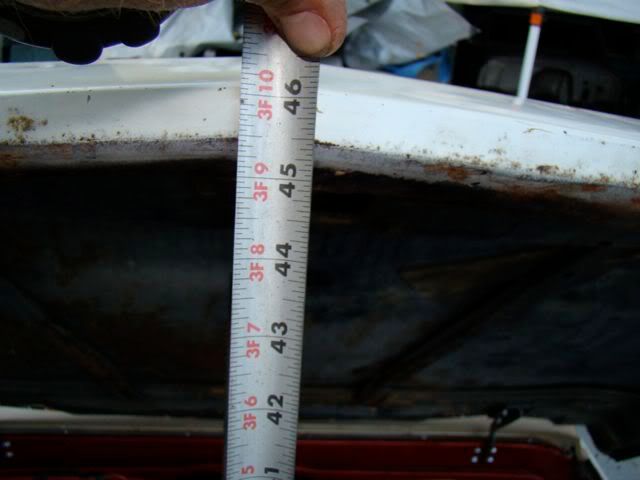 [/IMG] [/IMG]So now you can be this low, rolling on 30" tires and still take your hood with you all for about 4 hours work. [IMG] 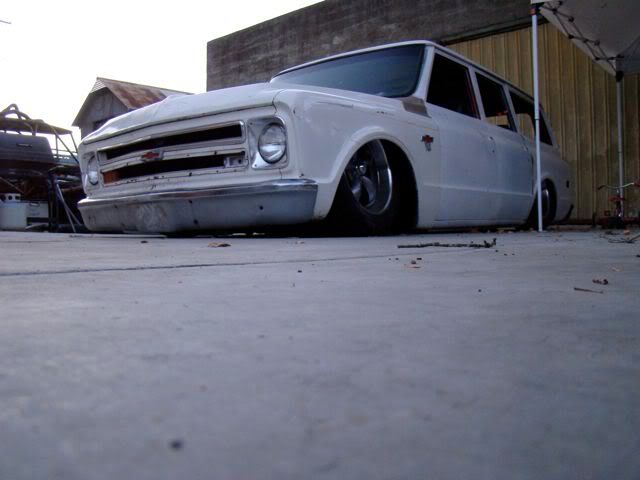 [/IMG] [/IMG]Kevin LFD Inc. |
|
|
|
|
12-03-2009, 01:58 AM
|
#853 |
|
Senior Member
Join Date: Jul 2005
Location: Winters Ca. 95694
Posts: 4,843
|
Re: LFD's 4dr Tahoe Build
Now for the changes I would like to see Nate make or do and after talking with him tonight it looks like he will be doing all of them.
1) Is to enlarge the holes in the hood mounting plate about 3/32" to avoid any problem screwing the bolts in. 2) To provide the template needed for marking out the cowl bolts and slots on the face. You will still be on your own for the 2 bottom bolts in to the cabin and the opening of the cowl top to fit the boxes. 3) Pre mark all the pieces with a P (passenger side) or a D (driver side) just so their is less of a chance to make a mistake as you are rushing to get this done. 4) Provide (4) shims with the kit for hood adjustment (2) 1/8" and (2) 1/16" same shape as the mounting plate but with larger holes. 5) Maybe include some mock up hardware so you can save the SS for final assembly. This one he does not know about yet but it would be great at least for the hood to arm connection because this is the easiest part to mess up a SS bolt and ruin the threaded plate causing some big nightmares.  Just to clarify none of these changes are needed but knowing how anal Nate is with his quality I knew he would want my feed back to make it even better of a kit (if that is even possible)! So if you have any questions or need other pics just ask! Kevin LFD Inc. Last edited by Rokcrln; 12-03-2009 at 03:02 AM. |
|
|
|
|
12-03-2009, 02:16 AM
|
#854 |
|
Hittin E-Z Street on Mud Tires
 Join Date: Nov 2004
Location: Greenville, SC
Posts: 23,090
|
Re: LFD's 4dr Tahoe Build
Wow, that's really cool Kevin!
Won't the hood to cowl weatherstripping piece bump the front of the cowl up some?
__________________
Jesse James 1967 C10 SWB Stepside: 350/700R4/3.73 1965 Ford Mustang: 289/T5-5spd/3.25 Trac-Loc 1968 Pontiac Firebird: Project Fire Chicken! 2015 Silverado Double Cab 5.3L Z71 2001 Jeep Wrangler Sport 4.0L 5spd 2020 Chevrolet Equinox Premium 2.0L Turbo 2011 Mustang V6 ~ Wife's ride  American Born, Country by the Grace of God  1967 CST Shop Truck Rebuild! My 1967 C-10 Build Thread My Vintage Air A/C Install Project "On a Dime" Trying my hand at Home Renovation! 1965 Mustang Modifications! |
|
|
|
|
12-03-2009, 03:01 AM
|
#855 | |
|
Senior Member
Join Date: Jul 2005
Location: Winters Ca. 95694
Posts: 4,843
|
Re: LFD's 4dr Tahoe Build
Quote:
Kevin LFD Inc. |
|
|
|
|
|
12-03-2009, 03:45 AM
|
#856 |
|
I Like Mine With No Shine!
Join Date: Apr 2009
Location: SC
Posts: 2,705
|
Re: LFD's 4dr Tahoe Build
Subscribed! And awesome write up on the hood hinge install. Looks great.
__________________
Michael  1967 Chevrolet C10 Short Fleet (Literal Ground Up....One Day) 1967 Chevrolet C10 Short Fleet (Literal Ground Up....One Day) 2006 GMC Sierra Crew Cab 4x4 1969 Lincoln Continental Coupe Project FOR SALE 2006 GMC Sierra Crew Cab 4x4 1969 Lincoln Continental Coupe Project FOR SALEhttp://67-72chevytrucks.com/vboard/c...ct=4578&cat=17  1981 Honda CM400 C Bobber SOLD 1981 Honda CM400 C Bobber SOLDhttp://67-72chevytrucks.com/vboard/s...d.php?t=384152 |
|
|
|
|
12-03-2009, 08:44 AM
|
#857 |
|
low n' slo
Join Date: Mar 2009
Location: rosenberg, texas
Posts: 5,143
|
Re: LFD's 4dr Tahoe Build
ya I didn't think the explorer ones would work, i just thought it was funny they work the same way. cool write up, those hinges look great
__________________
67 1/2 ton Suburban - Project DRGNWGN. Build thread  -_--_--_ _________ _--_-_ -/____|__|__\__ ,.,,,.,.,,.,|_O _______ O_] |
|
|
|
|
12-03-2009, 08:57 AM
|
#858 | |
|
Hittin E-Z Street on Mud Tires
Join Date: Nov 2004
Location: Greenville, SC
Posts: 23,090
|
Re: LFD's 4dr Tahoe Build
Quote:
__________________
Jesse James 1967 C10 SWB Stepside: 350/700R4/3.73 1965 Ford Mustang: 289/T5-5spd/3.25 Trac-Loc 1968 Pontiac Firebird: Project Fire Chicken! 2015 Silverado Double Cab 5.3L Z71 2001 Jeep Wrangler Sport 4.0L 5spd 2020 Chevrolet Equinox Premium 2.0L Turbo 2011 Mustang V6 ~ Wife's ride American Born, Country by the Grace of God 1967 CST Shop Truck Rebuild! My 1967 C-10 Build Thread My Vintage Air A/C Install Project "On a Dime" Trying my hand at Home Renovation! 1965 Mustang Modifications! Last edited by 67ChevyRedneck; 12-03-2009 at 08:58 AM. |
|
|
|
|
|
12-03-2009, 09:52 AM
|
#859 |
|
A320 Pilot/USAF Retired
Join Date: Mar 2009
Location: Charleston, SC
Posts: 2,622
|
Re: LFD's 4dr Tahoe Build
Is it just the slot in the cowl area that limits the opening of the hood. I could see this leading to some chipped paint and or a bent slot.
__________________
JJ My 1957 build: http://67-72chevytrucks.com/vboard/s...d.php?t=334552 http://www.trifive.com/forums/showthread.php?t=22037 Instagram - Chuckdriver57 |
|
|
|
|
12-03-2009, 11:49 AM
|
#860 | |
|
Senior Member
Join Date: Jul 2005
Location: Winters Ca. 95694
Posts: 4,843
|
Re: LFD's 4dr Tahoe Build
Quote:
But good call! Kevin LFD Inc. |
|
|
|
|
|
12-03-2009, 12:18 PM
|
#861 | |
|
Still Learning
Join Date: Jul 2009
Location: Central Oklahoma
Posts: 10,108
|
Re: LFD's 4dr Tahoe Build
Quote:
|
|
|
|
|
|
12-03-2009, 12:46 PM
|
#862 |
|
Senior Member
Join Date: Jul 2005
Location: Winters Ca. 95694
Posts: 4,843
|
Re: LFD's 4dr Tahoe Build
Not yet but it is in design I have been told.
Kevin LFD Inc. |
|
|
|
|
12-03-2009, 01:44 PM
|
#863 |
|
A320 Pilot/USAF Retired
Join Date: Mar 2009
Location: Charleston, SC
Posts: 2,622
|
Re: LFD's 4dr Tahoe Build
Sounds good Kevin. You do great work!!
__________________
JJ My 1957 build: http://67-72chevytrucks.com/vboard/s...d.php?t=334552 http://www.trifive.com/forums/showthread.php?t=22037 Instagram - Chuckdriver57 |
|
|
|
|
12-03-2009, 02:38 PM
|
#864 | |
|
Senior Member
Join Date: Jul 2005
Location: Winters Ca. 95694
Posts: 4,843
|
Re: LFD's 4dr Tahoe Build
Quote:
I just went out and opened the hood and over opened it to see what would happen and here is what I found. The hinge arms will contact the cowl but only right were the top of the slot is and not up on the top corner of the cowl. When I pushed up harder to see what would happen the hood brace were the mounts weld to flexed a small amount but the cowl did not. So I think if you were to really cram the hood open it may chip paint on the lower edge of were the cowl bolts down to the cab. Also I noticed that in the pic where I measure the opening of the hood, that was not all the way up but just as far as my hood prop would hold. So it pushes up another 2-3" more so I really thing it would not become an issue unless it was being abused. Kevin LFD Inc. |
|
|
|
|
|
12-03-2009, 07:57 PM
|
#865 |
|
A320 Pilot/USAF Retired
Join Date: Mar 2009
Location: Charleston, SC
Posts: 2,622
|
Re: LFD's 4dr Tahoe Build
Kevin,
I was not at all try to find fault with your work or the design of Nate's product. I was just making an observation. But thanks for checking and clearing it up for the many folks who I'm sure will be jumping on the Hinges!!!
__________________
JJ My 1957 build: http://67-72chevytrucks.com/vboard/s...d.php?t=334552 http://www.trifive.com/forums/showthread.php?t=22037 Instagram - Chuckdriver57 |
|
|
|
|
12-03-2009, 10:26 PM
|
#866 | |
|
Senior Member
Join Date: Jul 2005
Location: Winters Ca. 95694
Posts: 4,843
|
Re: LFD's 4dr Tahoe Build
Quote:
Kevin LFD Inc. Last edited by Rokcrln; 12-03-2009 at 10:26 PM. |
|
|
|
|
|
12-04-2009, 02:00 AM
|
#867 | |
|
GEARHEAD
Join Date: Aug 2003
Location: MN
Posts: 6,120
|
Re: LFD's 4dr Tahoe Build
Quote:
You got a link to these parts for ordering?
__________________
If no one knows what you're doing, they can't tell you you're doing it wrong HG's Dream Car Build - Shelby Cobra Kit Build your own adjustable track bar 71  Long Fleet C/10 Long Fleet C/10 72  Jimmy 4x4 (Junkyard Jimmy) Jimmy 4x4 (Junkyard Jimmy)HG's Plow Truck '78  K35 Dually K35 DuallyBigass Farm Truck HG's thread of miscellaneous stuff |
|
|
|
|
|
12-04-2009, 09:32 AM
|
#868 |
|
PROJECT 7DEUCE
Join Date: Dec 2002
Location: GRANTS PASS OR
Posts: 21,590
|
Re: LFD's 4dr Tahoe Build
__________________
GO BIG GREEN GO DUCKSMEMBER #6377 72 k-5 daily driver 6'' lift 35'' 350-350-205 slowly getting rust free. Project "7DEUCE" check out my build http://67-72chevytrucks.com/vboard/s...d.php?t=267665 Tim Powell..R.I.P EastSideLowlife..... R.I.P.. |
|
|
|
|
12-04-2009, 01:58 PM
|
#869 |
|
I'M TRUCK CRAZY!
Join Date: Oct 2006
Location: Sachse, TEXAS
Posts: 1,737
|
Re: LFD's 4dr Tahoe Build
Good work Kevin. Your wright up was very good.
|
|
|
|
|
12-04-2009, 03:24 PM
|
#870 |
|
Still Learning
Join Date: Jul 2009
Location: Central Oklahoma
Posts: 10,108
|
Re: LFD's 4dr Tahoe Build
Kevin,
I was looking at the install pics on Nates site. Just wondering if the cab has multiple layers of sheetmetal or do you think a backing plate would help keep metal fatigue from happening where the mount bolts go inside the cab. It might distribute the load? Just a thought. And maybe we won't be opening the hood that often to cause damage. Anyway, he has them for $200 that seems like a steal! mount bolts here: 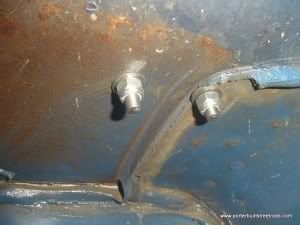
|
|
|
|
|
12-04-2009, 09:39 PM
|
#871 | |
|
Senior Member
Join Date: Jul 2005
Location: Winters Ca. 95694
Posts: 4,843
|
Re: LFD's 4dr Tahoe Build
Quote:
Kevin LFD Inc. |
|
|
|
|
|
12-05-2009, 12:55 AM
|
#872 | |
|
Still Learning
Join Date: Jul 2009
Location: Central Oklahoma
Posts: 10,108
|
Re: LFD's 4dr Tahoe Build
Quote:
Your right with it mounting to the firewall and through the cab....it shouldn't be a problem unless you have to check your oil every day. Looks like a very sturdy design, props to Porterbuilt. |
|
|
|
|
|
12-06-2009, 04:16 AM
|
#873 |
|
Cochino_Racing_909
Join Date: Oct 2006
Location: California
Posts: 280
|
Re: LFD's 4dr Tahoe Build
very nice build as usual...... Would not expect anything less.....
|
|
|
|
|
12-10-2009, 01:59 AM
|
#874 |
|
Senior Member
Join Date: Jul 2005
Location: Winters Ca. 95694
Posts: 4,843
|
Re: LFD's 4dr Tahoe Build
Here is the first part of my rear door hinges. I am going with the lift gate but I cut down the barn doors to half doors and I want them to open 180*. The only real 180* hinges that I have found are the super singles and they are fairly bulky for how small and light the doors are. So I am taking 2 sets of 90* hidden hinges and blending them together to get 180's. The body side will be welded in and the door side will have adjustable mounting tabs for in/out up/down and left/right. I may try one out Thursday if I have time.
Kevin LFD Inc. Closed [IMG] 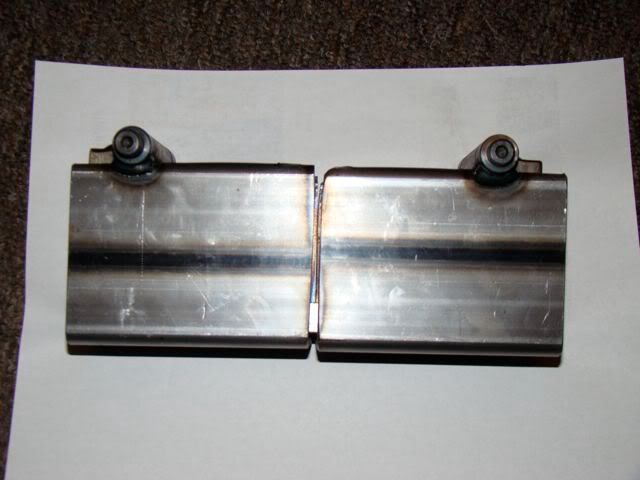 [/IMG] [/IMG]Open 90* [IMG] 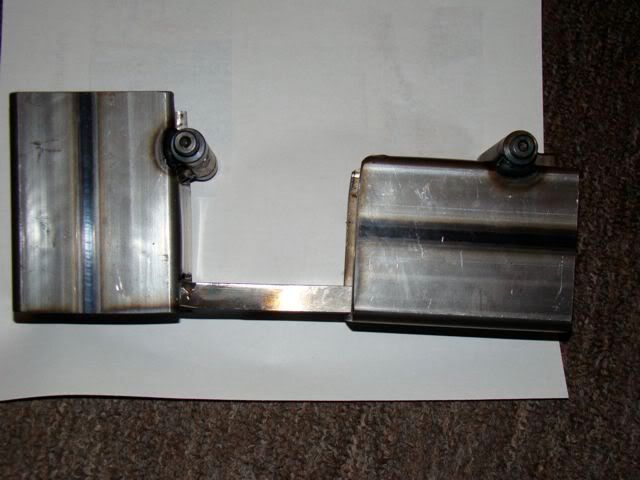 [/IMG] [/IMG]Open 180* [IMG] 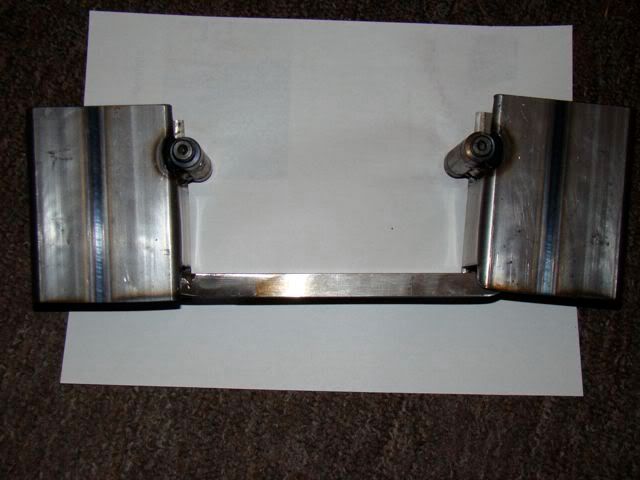 [/IMG] [/IMG]
|
|
|
|
|
12-10-2009, 02:24 AM
|
#875 |
|
Registered User
Join Date: Aug 2005
Location: Hillsboro Oregon
Posts: 6,449
|
Re: LFD's 4dr Tahoe Build
Nice! You'll probably want to at least spring-load the door side in the closed position so that the cab side swings to full open before the door side moves. Mine have a complicated cam-over mutual lock-out set-up so that only one half can move at a time.
|
|
|
|
 |
| Bookmarks |
|
|


 Linear Mode

