
|
 04-04-2013, 08:41 PM
|
#976 |
|
not enough hours in the day
Join Date: Jan 2009
Location: Axtell, NE
Posts: 550
|
Re: Tbi swap build thread
I have ground at the following plugs.
A12- blk/wht- System ground B3- blk/red- Distributor plug B10-orange/blk- park neutral switch wire D1- brn/wht- system ground D6- Tan- O2 sensor ground to engine
__________________
65 K-10 Short Step 68 C-50 70 K-5 85 K-10 & piles of spare parts |

|

|
|
04-04-2013, 10:38 PM
|
#977 |
|
not enough hours in the day
Join Date: Jan 2009
Location: Axtell, NE
Posts: 550
|
Re: Tbi swap build thread
Installed the new IAC valve and did the reset procedure. Now it idles at 2,500rpm.
I'm at a loss. It's hard to search for a vacuum leak when you don't want to let the motor run. Just a thought, but could too much fuel pressure cause this? The fuel pump is rated at 29 GPH @ 12 PSI which should be right. Would a blocked return line boost the pressure? I ran into that on an 87 Dodge pickup once, but the increased fuel pressure caused it to shut down after a couple seconds, not run fast. Any ideas? I appreciate it.
__________________
65 K-10 Short Step 68 C-50 70 K-5 85 K-10 & piles of spare parts |
|
|
|
|
04-04-2013, 10:50 PM
|
#978 | |
|
Registered User
Join Date: Oct 2003
Location: OC CA
Posts: 1,374
|
Re: Tbi swap build thread
Quote:
There are no grounds at ECM - there are two multi pin plugs that plug into dual row connectors. The grounds that I referring are harness grounds - 3/8 ID lugs in the engine bay. //RF
__________________
"The Beast" 1975 Chevrolet C20 longbed 350/700R4! with 3inch body lift Dual Flowmasters Super 40's! TBI retrofit completed (2007-07-29)  New 383CID (+030) 08-304-8 9.5:1CR x36,005 (2012-12-17) |
|
|
|
|
|
04-05-2013, 12:23 PM
|
#979 |
|
not enough hours in the day
Join Date: Jan 2009
Location: Axtell, NE
Posts: 550
|
Re: Tbi swap build thread
Having run out of ideas and remembering late last night that a friends 87 body swap project was in one of my storage units I swaped throttle bodys. It now idles like it should. I must have gotten something messed up when I put the kit in my throttle body. I'll have to go throught it again.
Thanks for the help RF.
__________________
65 K-10 Short Step 68 C-50 70 K-5 85 K-10 & piles of spare parts |
|
|
|
|
04-06-2013, 08:38 AM
|
#980 |
|
Registered User
Join Date: Feb 2013
Location: Mandan
Posts: 80
|
Re: Tbi swap build thread
all i got left is my drac to wire up . has any body got info on were to wire each wire to, 90 suburban 350
|
|
|
|
|
04-10-2013, 05:00 PM
|
#981 | |
|
not enough hours in the day
Join Date: Jan 2009
Location: Axtell, NE
Posts: 550
|
Re: Tbi swap build thread
Quote:
__________________
65 K-10 Short Step 68 C-50 70 K-5 85 K-10 & piles of spare parts |
|
|
|
|
|
04-11-2013, 02:17 AM
|
#982 | |
|
Registered User
Join Date: Oct 2003
Location: OC CA
Posts: 1,374
|
Re: Tbi swap build thread
Quote:
RED line is the temperature curve for SW5051 with a series 22 Ohm resistor added. Below 75C (165F) the temperature gauge will be displaying very low temperatures due to higher resistance offered by SW5051. Above 75C with 22Ohm series resistor SW5051 appear to track TU5 very closely. 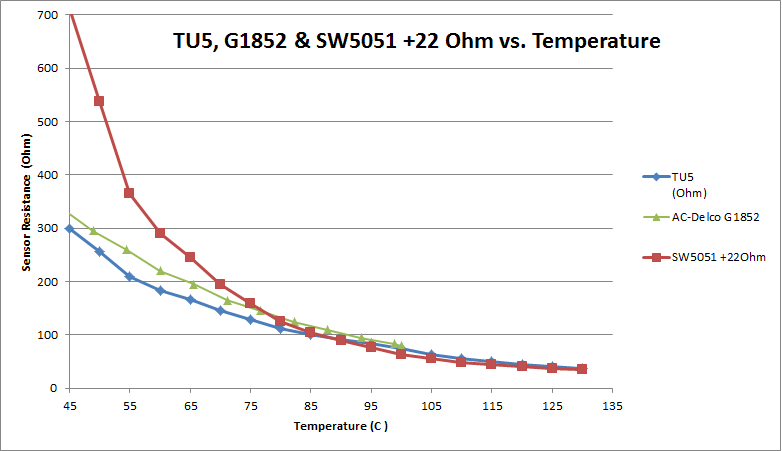 I have not had a chance to verify this, but test data supports this conclusion. //RF
__________________
"The Beast" 1975 Chevrolet C20 longbed 350/700R4! with 3inch body lift Dual Flowmasters Super 40's! TBI retrofit completed (2007-07-29) New 383CID (+030) 08-304-8 9.5:1CR x36,005 (2012-12-17) |
|
|
|
|
|
04-11-2013, 08:27 AM
|
#983 |
|
not enough hours in the day
Join Date: Jan 2009
Location: Axtell, NE
Posts: 550
|
Re: Tbi swap build thread
Thanks RF. I was thinking around 30 Ohm would be needed. I'll get a resistor to add and post the results.
__________________
65 K-10 Short Step 68 C-50 70 K-5 85 K-10 & piles of spare parts |
|
|
|
|
04-11-2013, 09:17 AM
|
#984 |
|
Slots go on anything!
Join Date: May 2003
Location: Richardson, TX
Posts: 5,957
|
Re: Tbi swap build thread
Just a quick fuel question, for a swap into an older vehicle. I am getting ready to help a friend do a TBI swap into a '74 Blazer, but it does not have a return line. What is the best way to do one? Should I use rubber line going back to the tank, (and does the return need to be FI rated?), or does it need to be hard line. I am planning on using an inline fuel pump and using the original feed line. Also, where are you guys putting the fuel filter when doing an inline pump?
|
|
|
|
|
04-11-2013, 11:05 AM
|
#985 | |
|
Registered User
Join Date: Oct 2003
Location: OC CA
Posts: 1,374
|
Re: Tbi swap build thread
Quote:
2) If you have a baffled tank - use in tank fuel pump. In case of conventional tank use largest fuel filter you can find before inline FP inlet port. Large fuel filter will act as a mini surge tank and prevent fuel starvation when fuel sock gets uncovered. It is not a perfect solution, but it is as close as you can get away with without building a full surge tank system and lift pump. //RF
__________________
"The Beast" 1975 Chevrolet C20 longbed 350/700R4! with 3inch body lift Dual Flowmasters Super 40's! TBI retrofit completed (2007-07-29) New 383CID (+030) 08-304-8 9.5:1CR x36,005 (2012-12-17) |
|
|
|
|
|
04-11-2013, 11:10 AM
|
#986 |
|
Slots go on anything!
Join Date: May 2003
Location: Richardson, TX
Posts: 5,957
|
Re: Tbi swap build thread
Wow. I would have thought that the feed line would have been 3/8 already. Guess that's what I get for trying to engineer a TBI swap from 250 miles away. Thanks for the heads up.
|
|
|
|
|
04-11-2013, 01:05 PM
|
#987 | |
|
Registered User
Join Date: Oct 2003
Location: OC CA
Posts: 1,374
|
Re: Tbi swap build thread
Quote:
//RF
__________________
"The Beast" 1975 Chevrolet C20 longbed 350/700R4! with 3inch body lift Dual Flowmasters Super 40's! TBI retrofit completed (2007-07-29) New 383CID (+030) 08-304-8 9.5:1CR x36,005 (2012-12-17) |
|
|
|
|
|
04-11-2013, 01:08 PM
|
#988 | |
|
Registered User
Join Date: Oct 2003
Location: OC CA
Posts: 1,374
|
Re: Tbi swap build thread
Quote:
//RF
__________________
"The Beast" 1975 Chevrolet C20 longbed 350/700R4! with 3inch body lift Dual Flowmasters Super 40's! TBI retrofit completed (2007-07-29) New 383CID (+030) 08-304-8 9.5:1CR x36,005 (2012-12-17) |
|
|
|
|
|
04-11-2013, 07:51 PM
|
#989 |
|
not enough hours in the day
Join Date: Jan 2009
Location: Axtell, NE
Posts: 550
|
Re: Tbi swap build thread
I added a 22 Ohm resistor. The guage is now about 2/3 of the way up the normal range.
__________________
65 K-10 Short Step 68 C-50 70 K-5 85 K-10 & piles of spare parts |
|
|
|
|
04-11-2013, 08:56 PM
|
#990 | |
|
Registered User
Join Date: Oct 2003
Location: OC CA
Posts: 1,374
|
Re: Tbi swap build thread
Quote:
//RF
__________________
"The Beast" 1975 Chevrolet C20 longbed 350/700R4! with 3inch body lift Dual Flowmasters Super 40's! TBI retrofit completed (2007-07-29) New 383CID (+030) 08-304-8 9.5:1CR x36,005 (2012-12-17) |
|
|
|
|
|
04-11-2013, 09:19 PM
|
#991 |
|
not enough hours in the day
Join Date: Jan 2009
Location: Axtell, NE
Posts: 550
|
Re: Tbi swap build thread
I'm fine with where it reads now. I tried a 22 Ohm resistor, but it put the guage at about 1/3 of the way into the normal range. A 27 Ohm would probably put it in the middle, but the local Radio Shack didn't have one.
__________________
65 K-10 Short Step 68 C-50 70 K-5 85 K-10 & piles of spare parts |
|
|
|
|
04-15-2013, 03:33 PM
|
#992 |
|
Registered User
Join Date: Oct 2012
Location: Louisiana
Posts: 37
|
Re: Tbi swap build thread
I apologize for coming in late in the thread. I have a 72 K5. What did you guys do to tackle the return fuel line to the tank?
Posted via Mobile Device |
|
|
|
|
04-15-2013, 08:25 PM
|
#993 | |
|
not enough hours in the day
Join Date: Jan 2009
Location: Axtell, NE
Posts: 550
|
Re: Tbi swap build thread
Quote:
http://www.tanksinc.com/index.cfm/pa...prod/prd84.htm. It is item PA-TBI. The customer service was excellent also. For a stock Blazer tank let them know you need longer tubes for a 13" deep tank and you will have to improvise a little on mounting the sump pump to the bracket. I welded mine together and it works fine.
__________________
65 K-10 Short Step 68 C-50 70 K-5 85 K-10 & piles of spare parts |
|
|
|
|
|
04-15-2013, 10:09 PM
|
#994 |
|
Registered User
Join Date: Oct 2012
Location: Louisiana
Posts: 37
|
Re: Tbi swap build thread
That's pretty awesome! So this one mounts directly to the stock tank?? I'll be honest, I've never actually seen the top if my tank.
Posted via Mobile Device |
|
|
|
|
04-16-2013, 08:21 AM
|
#995 |
|
not enough hours in the day
Join Date: Jan 2009
Location: Axtell, NE
Posts: 550
|
Re: Tbi swap build thread
I didn't take any pictures while putting it together. You would cut about a 4" hole in the top of the tank, be careful if reusing your existing tank. I put the unit in just behind the existing sending unit which you will still need for the gauge. I had to move the tank forward about 2" to clear the crossmember. The fuel pump could be located toward the right front corner of the tank and then the tank could stay in the original location. Just make sure there is no interference between the pump unit and the sending unit for the gauge.
__________________
65 K-10 Short Step 68 C-50 70 K-5 85 K-10 & piles of spare parts |
|
|
|
|
04-16-2013, 08:38 AM
|
#996 |
|
Registered User
Join Date: Oct 2012
Location: Louisiana
Posts: 37
|
Re: Tbi swap build thread
Thanks again!! I can't wait to start on mine.
Posted via Mobile Device |
|
|
|
|
04-22-2013, 11:36 PM
|
#997 |
|
Registered User
Join Date: Oct 2012
Location: Louisiana
Posts: 37
|
Re: Tbi swap build thread
Guys! This is a very long thread and I've read through it. Thanks for all of the information! I have a question though. I probably just overlooked this in the thread but which intake manifold would I use on a '72 small block. The two center holes are at different angles on the later manifold.
Posted via Mobile Device |
|
|
|
|
04-23-2013, 01:49 AM
|
#998 | |
|
Registered User
Join Date: Oct 2003
Location: OC CA
Posts: 1,374
|
Re: Tbi swap build thread
Quote:
Holes in intake manifold can be slotted to accommodate 72 degree angle or manifold adapter bushings from Professional Products part number 52110 can be used in place of washers. //RF
__________________
"The Beast" 1975 Chevrolet C20 longbed 350/700R4! with 3inch body lift Dual Flowmasters Super 40's! TBI retrofit completed (2007-07-29) New 383CID (+030) 08-304-8 9.5:1CR x36,005 (2012-12-17) |
|
|
|
|
|
09-03-2013, 09:43 PM
|
#999 |
|
Registered User
Join Date: Apr 2011
Location: bowling green, ky
Posts: 439
|
Re: Tbi swap build thread
So what is the least about of componits you need for the engine to fire up. ....
Posted via Mobile Device |
|
|
|
|
09-09-2013, 01:00 PM
|
#1000 |
|
Registered User
Join Date: Oct 2003
Location: OC CA
Posts: 1,374
|
Re: Tbi swap build thread
The thread has been quiet for a while! For those who are looking to upgrade TBI harness from JY pulled rat nest or contemplating clean carb to TBI swap Northern Autoparts has a special on Painless EFI TBI swap harness #60101 this week:
http://www.northernautoparts.com/Pro...ProductId=1468 //RF
__________________
"The Beast" 1975 Chevrolet C20 longbed 350/700R4! with 3inch body lift Dual Flowmasters Super 40's! TBI retrofit completed (2007-07-29) New 383CID (+030) 08-304-8 9.5:1CR x36,005 (2012-12-17) |
|
|
|
 |
| Bookmarks |
|
|


 Linear Mode

