
|
|
|
 03-07-2012, 01:46 PM
|
#1 |
|
Registered User
Join Date: Feb 2011
Location: Lake, Michigan
Posts: 219
|
Re: Build #2 Crusader!
Nice progress Mike and family.
|

|

|
|
04-15-2012, 07:25 PM
|
#2 |
|
Registered User
Join Date: Dec 2011
Location: Elkhart, IN
Posts: 1,308
|
Re: Build #2 Crusader!
Any updates on this build or the truck?
__________________
1985 Chevrolet K10 Custom Deluxe---SOLD 1997 Ram 2500 5.9 Cummins 1985 Chevrolet Camaro Z28 1987 Chevrolet K10 Silverado "The Beast" build 1987 Silverado http://67-72chevytrucks.com/vboard/s...=1#post6150257 |
|
|
|
|
04-16-2012, 01:00 PM
|
#3 |
|
Registered User
Join Date: Apr 2003
Location: Indep, MO
Posts: 5,893
|
Re: Build #2 Crusader!
Business or truck, hows it going? Hopefully well!
Posted via Mobile Device
__________________
Boppa's Old Yeller Truck Build, Old Yeller's New Heart! Project Buzz Bomb Flyin' Low! |
|
|
|
|
04-18-2012, 09:16 PM
|
#4 |
|
Senior Member
 Join Date: Jun 2011
Location: Washburn, IA
Posts: 600
|
Re: Build #2 Crusader!
Awesome build. Looking forward to more
|
|
|
|
|
04-21-2012, 09:22 AM
|
#5 |
|
Account Suspended
Join Date: Aug 2007
Location: USA
Posts: 1,223
|
Re: Build #2 Crusader!
Holy crap! Boy, what the hell are you doing!
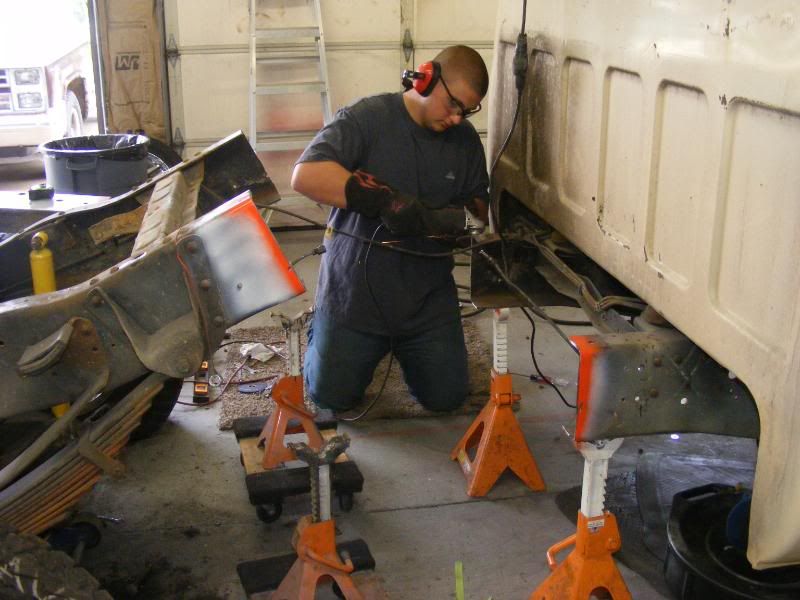 I know its been awhile since I posted anything on the truck. It takes time to download photos and think of clever things to write. and It just seams like i cant find time to get everything I want too done. I try to work on the truck every night. somtimes i go out and just stare at it, trying to figure out my next move. and other days i can actually spend a few hours on it. either way it just doesnt seam like i cant get that much done on it. so my apologies for slacking on the thread. When i last left off we had a sanding party, getting ready for some paint on the door jams, lower dash, and inside of the doors. well we got it painted. it turned out pretty good. I didnt do any body work just scuffed it and shot it with some epoxy primer, then painted it black then sprayed some SPI clear. Everything went ok till I shot the first coat of clear. As soon as i was done I got terribly sick to my stomach. spent the rest of the night... Incapacitated, therefor I only got one coat of clear on the jams. But no worries it looks pretty good, and SPI is the best clear in the world, so it should hold up good. 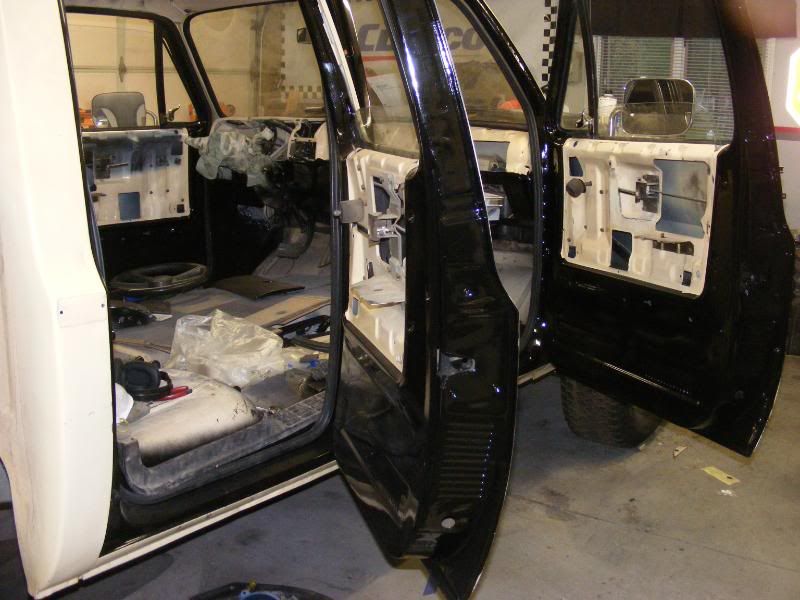 Before I painted I went out to the scrape yard and took off some OH sh!t handles from a burb and fabricated a mounting system in the crew. I also grabbed all the power window regulators and motors as well as the power locks and harnesses. I measured and drilled some holes 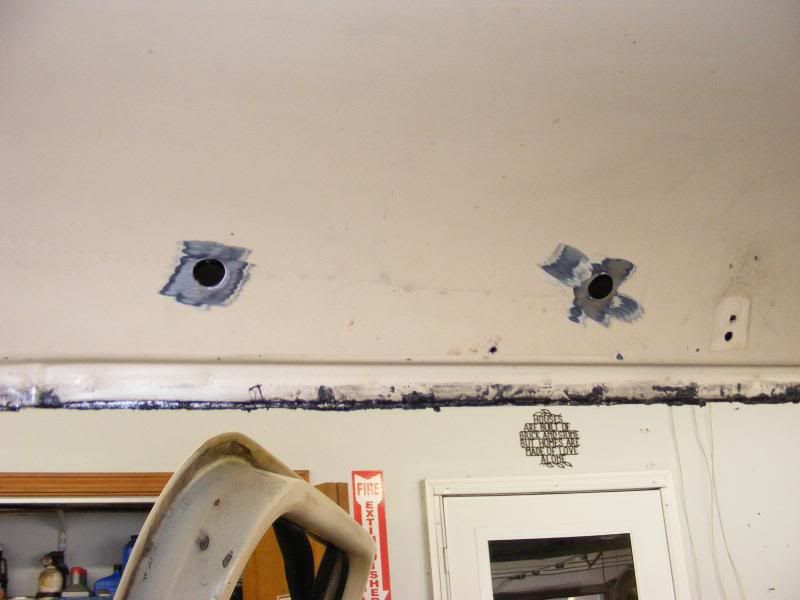 ground down to bare metal. then welded in a 1/4 lock nut 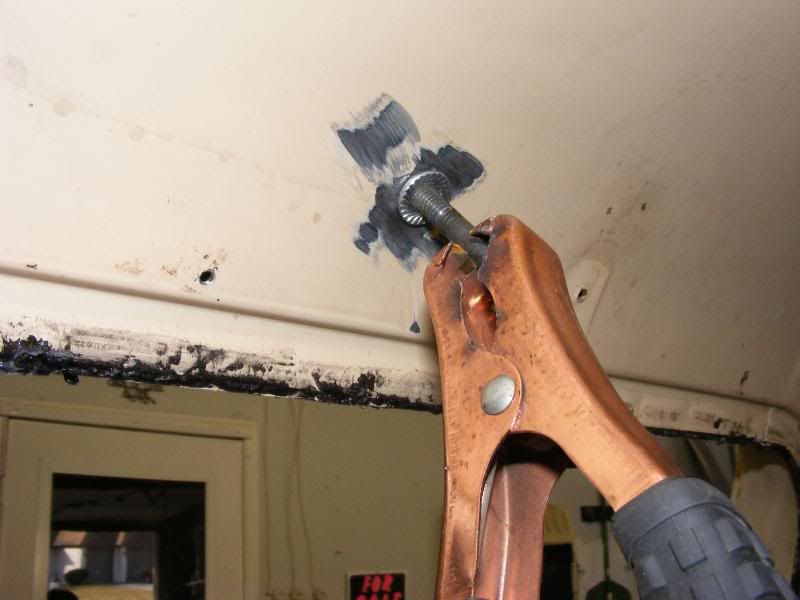 once the headliners is in they should bolt right up. 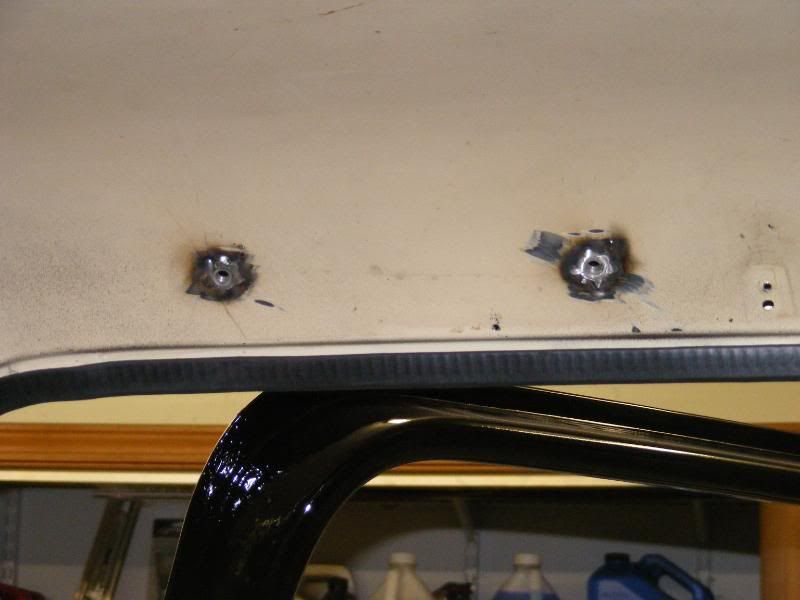 I had planned to put the interior back together and start driving it till the fall again. But like everything else in my life, it never goes as planned. I been going back and forth with making this truck a short bed. Short beds up here are not very common. and when you do find one its either a rusted p.o.s. or it way too much money. 2 weeks ago I found a guy on craigslist looking for a long bed. I gave him a email, sent some pictures and the next thing I know He's on his way to come pick it up. Great! ( I really wasn't expecting it to happen that fast.) Now I thinking where the heck am I going to get a bed. I think it was the next day or the same day (dont remember) I found a "rust free" shortbed on craigslist about 3 hours away. fearing some other nut job would buy it out from under me. Me and a buddy drove down that night to check it out/ buy it. Well it was Rust free unfortunately it was not dent free. somebody was awfully mad at the left side of their truck. it will probably need a new bedside. but I got it for less then I sold my long bed for. so at this point Im ahead. With the new bed in storage for one month. I started measuring and cutting the frame. 14 inches in the front is what needs removed. 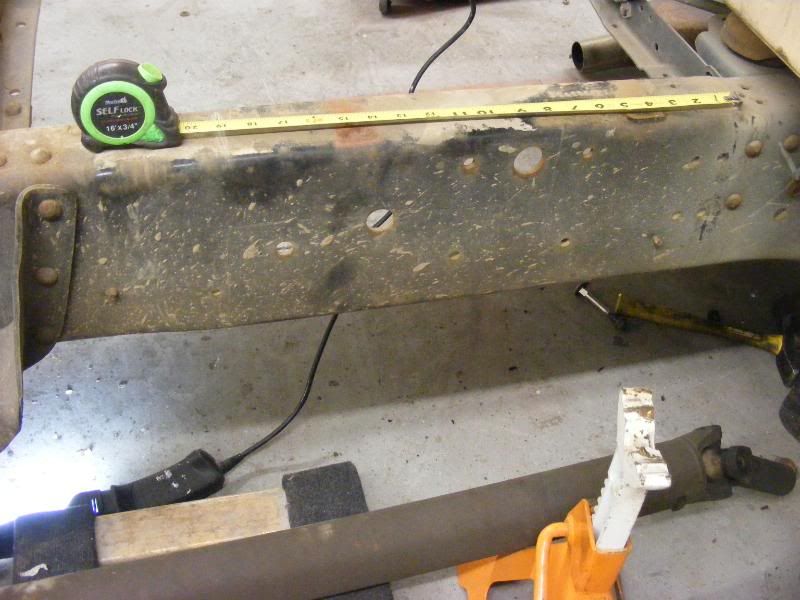 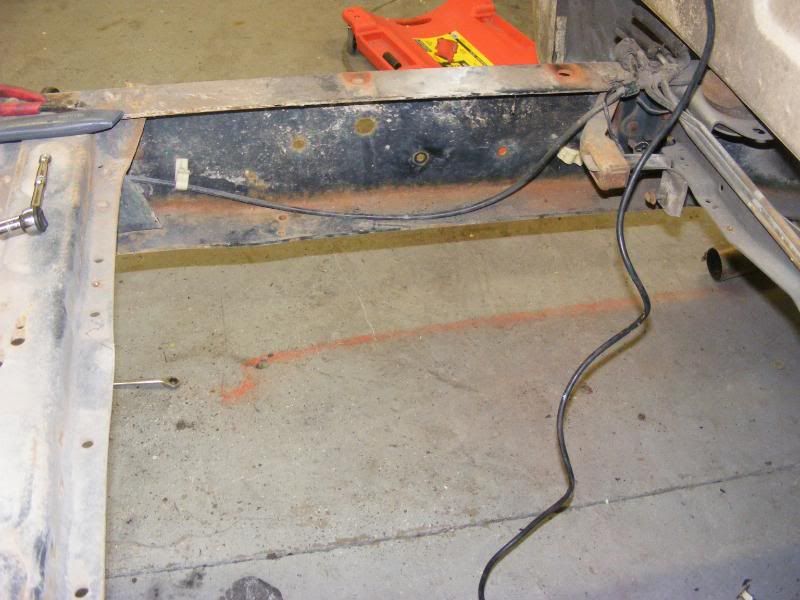 I went back and forth on how to cut this. I have seen some use diagonal cuts, z cuts, and the straight cut. I did a little research I couldnt find a true answer on which one is better. each one has its week points. (pun intended) I live and work in the RV capitol of the world. Out of the 30 or so plants I make deliveries too 6 of those build or have units with extended frames including ARI they build and and add custom sleepers to semi's. every one of them uses the straight cut and butt weld. I figure if its good enough for them it should be good enough for me. Plus its easier. and it cant be wrong Lou and Jared did it! 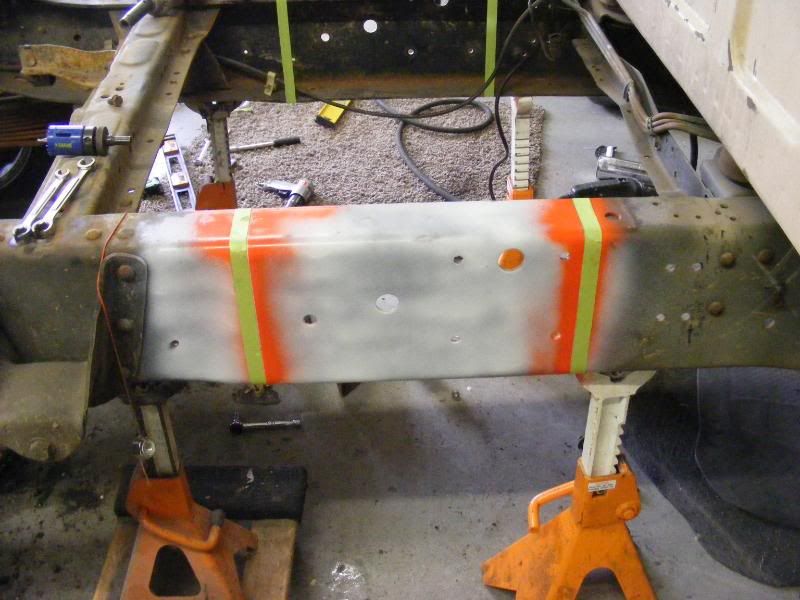 I marked the frame and cut it! tyler finished all the edges and got it ready to weld. I had to rent a welder because my little 110v welder is not going to get it. at least i didnt feel safe using it. so I rented one from the local rent a center. I got a huge one. I had to tow it behind the truck. So im sure it was over kill but it got the job done. 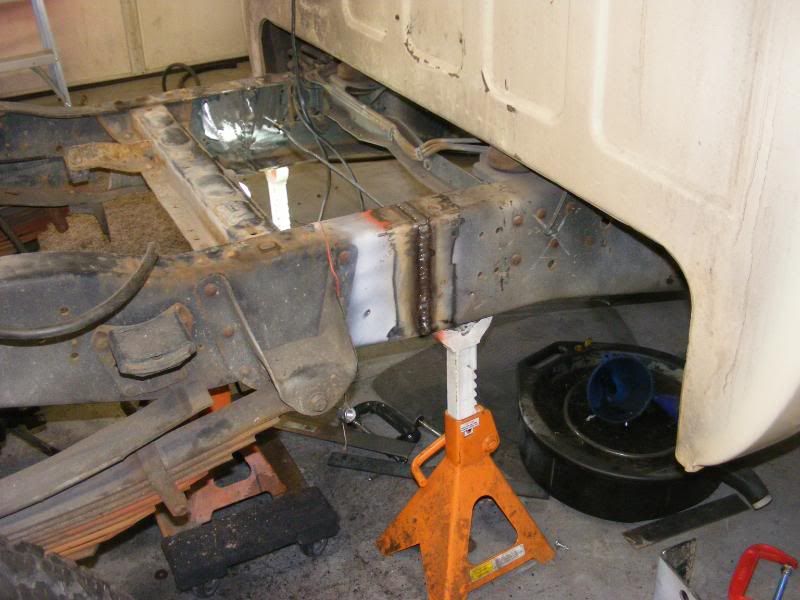 With the 14 inch piece we removed I cut 4 1/2 diamond out of it and welded that to the back side fusing the two half's together.  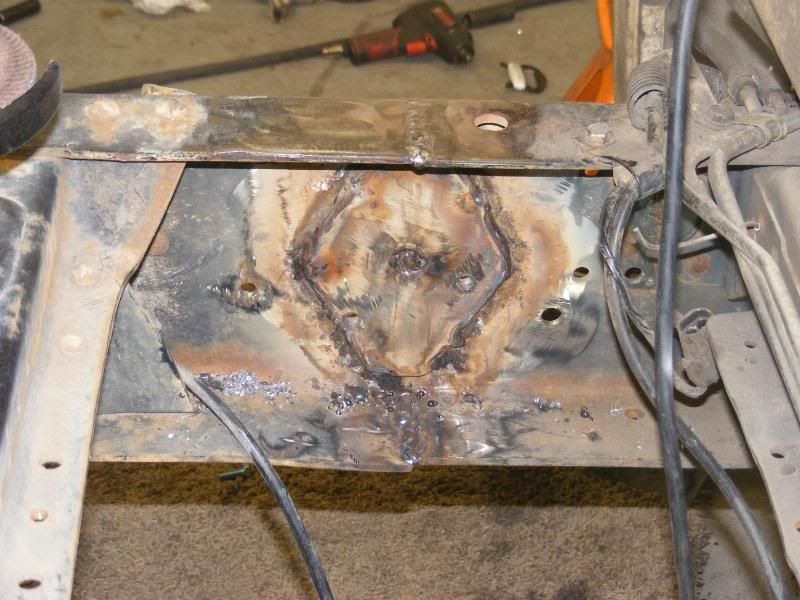  The remaining 9 1/2" piece is where the gas tank saddles were mounted. so I cut the top part off, drilled it so it would mount to the side and bottom of the frame. the top part I cut off slide under the top part of the frame and bolted it in. Now it is braced on both sides of the weld and the top and bottom.  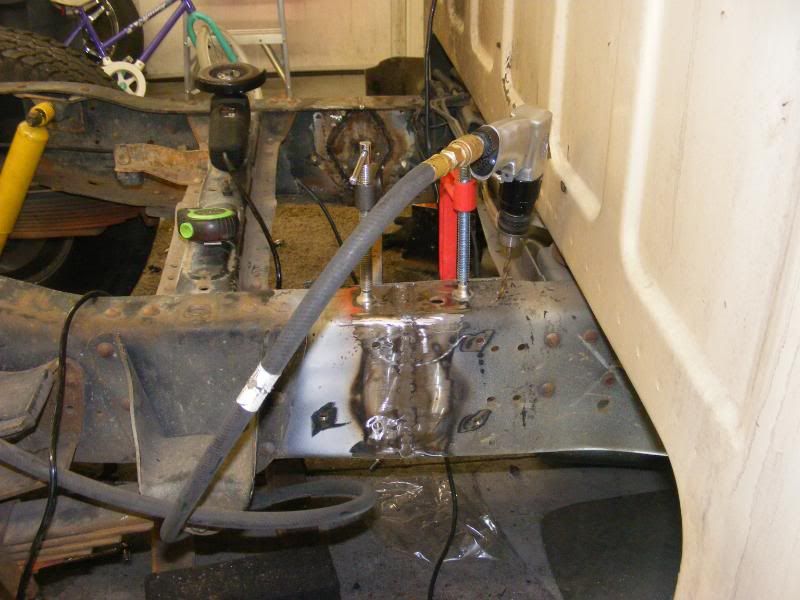  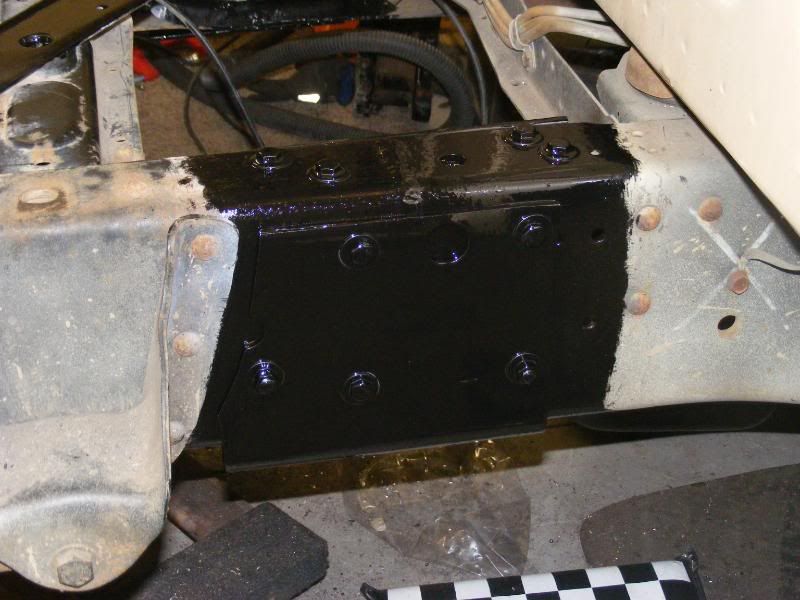 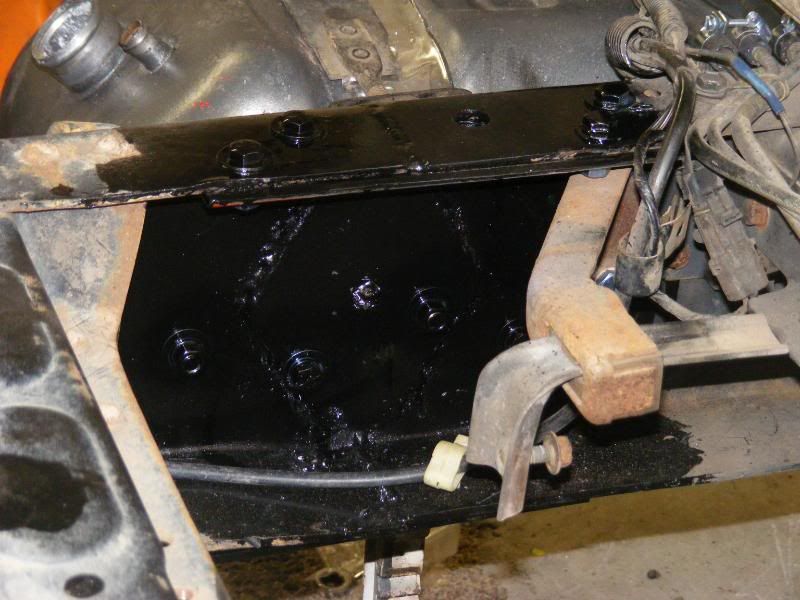 Obviously the 20 gallon tank is going to be to long. Craigslist to the rescue again. Found a guy about 25 min. away sell a 16 gallon tank and thats it. Its the only thing he had for our trucks. I gave him $40 for it. Turns out he is wanting a long bed tank for a buddy. so I sold him one. for you guessed it $40. Cleaned the inside good, and transfered over my pump and hanger, got some new hose. ( from 3 different parts stores). incompetent freaking autoparts stores now days. You would think I was asking for a fuel hose for the left side rocket booster on the space shuttle. god dont get me started on them tards 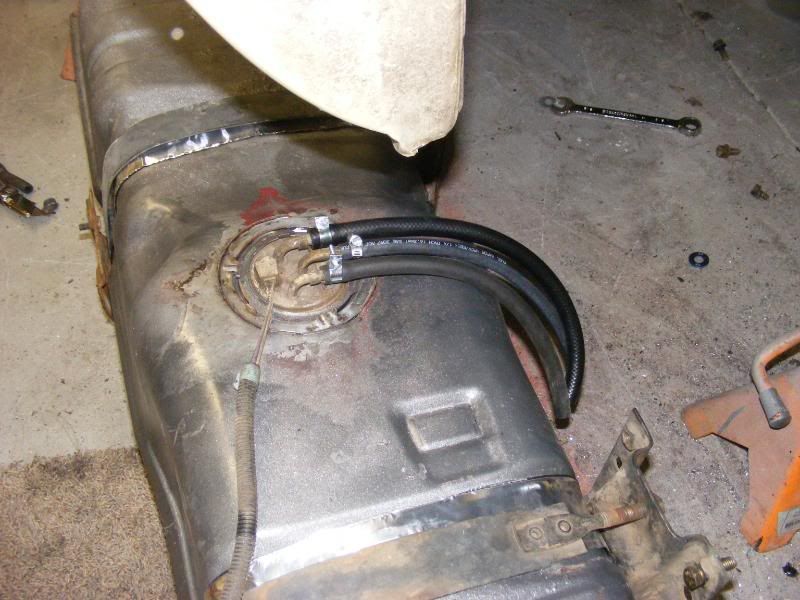 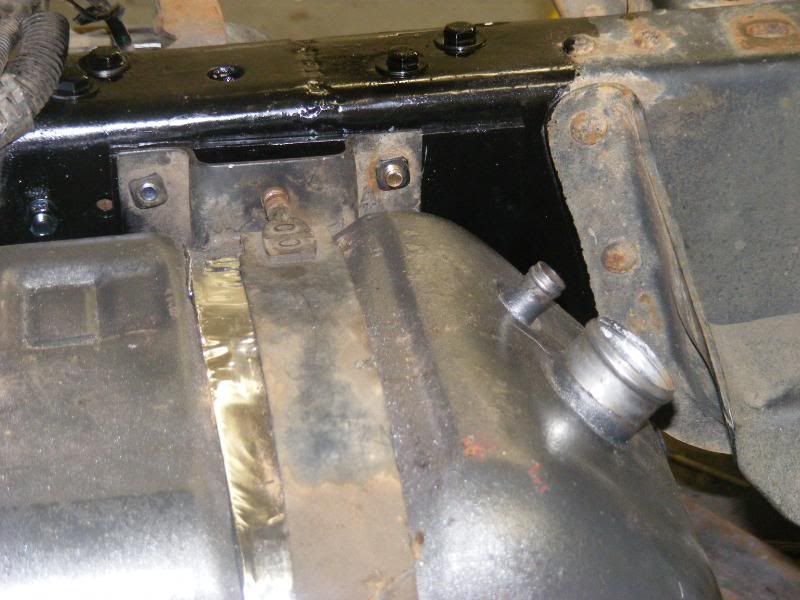 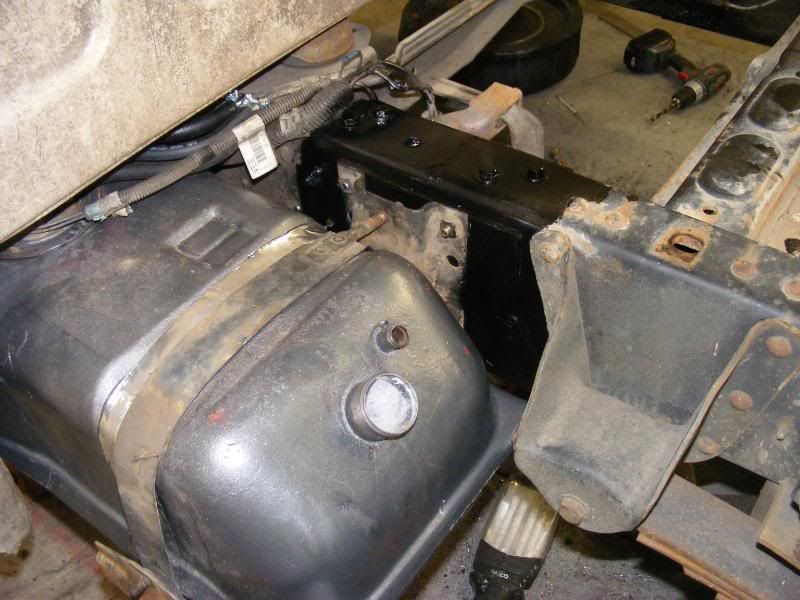 The rear section is suppose to get cut 6" but I going to put on a different hitch. I'm questioning the one me and Tyler just put on. so its getting a different one and it is long I don't think i can cut the full 6" off. and still make it work. Iv measured a couple of times now and it looks like I can cut as few as 4" off. Today is trying to get the hitch mounted up along with the bumper. and hopefully I can get the short bed out of storage and mounted on the truck. Im anxious to see what it looks like shortened up. |
|
|
|
|
04-21-2012, 09:45 AM
|
#6 |
|
Registered User
Join Date: Dec 2011
Location: Elkhart, IN
Posts: 1,308
|
Re: Build #2 Crusader!
Cool man good to hear more updates on this truck. Good luck with it, can't wait to see this thing around town.
__________________
1985 Chevrolet K10 Custom Deluxe---SOLD 1997 Ram 2500 5.9 Cummins 1985 Chevrolet Camaro Z28 1987 Chevrolet K10 Silverado "The Beast" build 1987 Silverado http://67-72chevytrucks.com/vboard/s...=1#post6150257 |
|
|
|
|
04-21-2012, 09:48 AM
|
#7 |
|
67cheby
 Join Date: Sep 2008
Location: siloam springs ar 72761
Posts: 17,890
|
Re: Build #2 Crusader!
great progress !!
|
|
|
|
|
04-21-2012, 10:03 AM
|
#8 |
|
Registered User
Join Date: Feb 2011
Location: Beverly, MA
Posts: 472
|
Re: Build #2 Crusader!
I am a fan of the z cuts. Either way, with the plating you did, it should be fine, since you moved the stress zones out and they're not in direct shear. By going | up and down, you add a stress point by heating the frame on either side, baking the carbon out of it and making it more brittle. So, when you add weight, it's focused on the frame straight up and down. Instead of Z or / like.
Remember, the big truck frames are heat treated, which is why they say not to weld on them. So, when they cut, butt and weld, they re-treat it to some degree, no carbon to bake out, it's all steel with little chance of inclusions. At least the shops I use do. |
|
|
|
|
04-21-2012, 04:23 PM
|
#9 |
|
Registered User
Join Date: Feb 2011
Location: Lake, Michigan
Posts: 219
|
Re: Build #2 Crusader!
Just think how much easier it will be to park now. Not to mention being able walk around now in your garage rather than having to climb over it! Liking the progress.
|
|
|
|
|
04-21-2012, 11:27 PM
|
#10 |
|
Registered User
Join Date: Jan 2010
Location: Brewton AL
Posts: 236
|
Re: Build #2 Crusader!
Nice build and documentation!
__________________
1989 Chevy Crew Cab Dually - 454/400, Trans Am Hauler, Future bagged project. 96 Trans Am: 383/m6 - 11.98@115 on 315 M/T D/R's - 408rwhp 394 rwtq 05 VW Passat TDI - 38mpg @75mph  07 Bandit 1250S - Two wheeled fun! Click here to see my FQuick Garage! |
|
|
|
|
04-22-2012, 11:52 AM
|
#11 |
|
Registered User
Join Date: Apr 2003
Location: Indep, MO
Posts: 5,893
|
Re: Build #2 Crusader!
Looks great!
__________________
Boppa's Old Yeller Truck Build, Old Yeller's New Heart! Project Buzz Bomb Flyin' Low! |
|
|
|
|
05-10-2012, 06:15 AM
|
#12 |
|
Account Suspended
Join Date: Aug 2007
Location: USA
Posts: 1,223
|
Re: Build #2 Crusader!
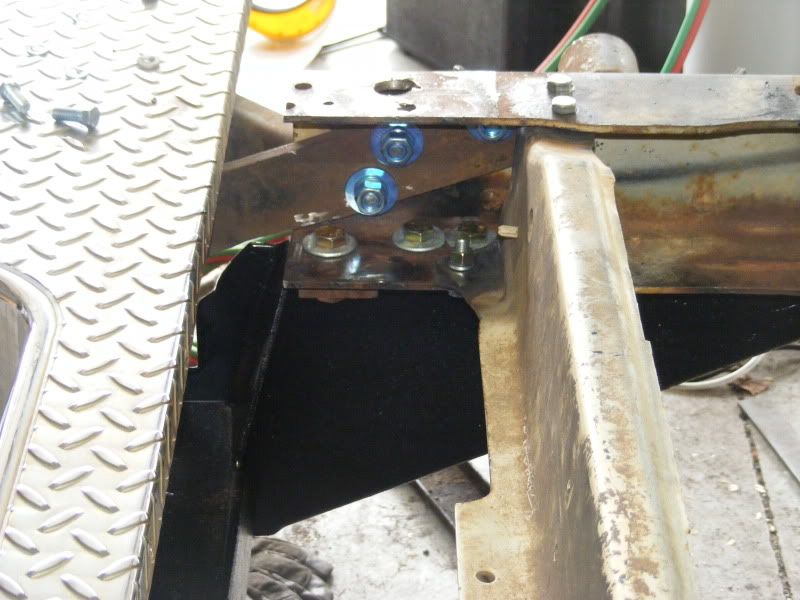
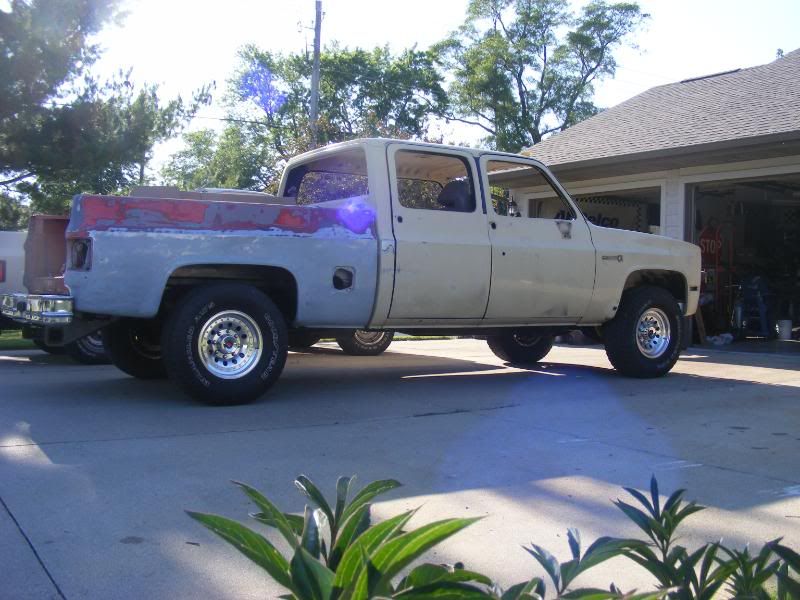
Finished up the frame shorting. we ended up taking 4" off the back it looks like you can take up to 6" and be safe. I hope 4" is enough, I wanted to leave room for diffrent Hitch I put on. I was unsure about the first hitch I made fit, so I cut off those extension pieces and mounted a different hitch that was made for the truck, I feel much better about using that one.
 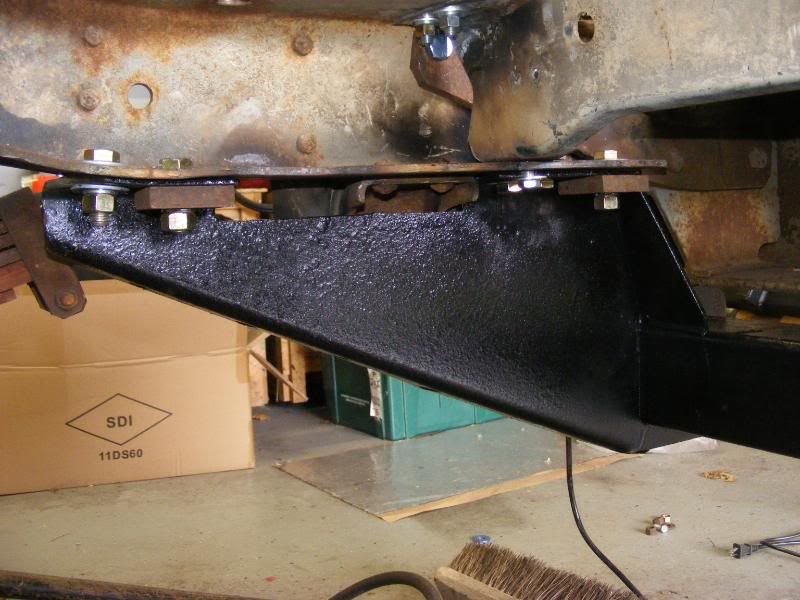 I Got the drive shaft back from the machine shop and installed that. Poured in a few gallons of fuel, and fired it up. It was nice to see it move under its own power Again. 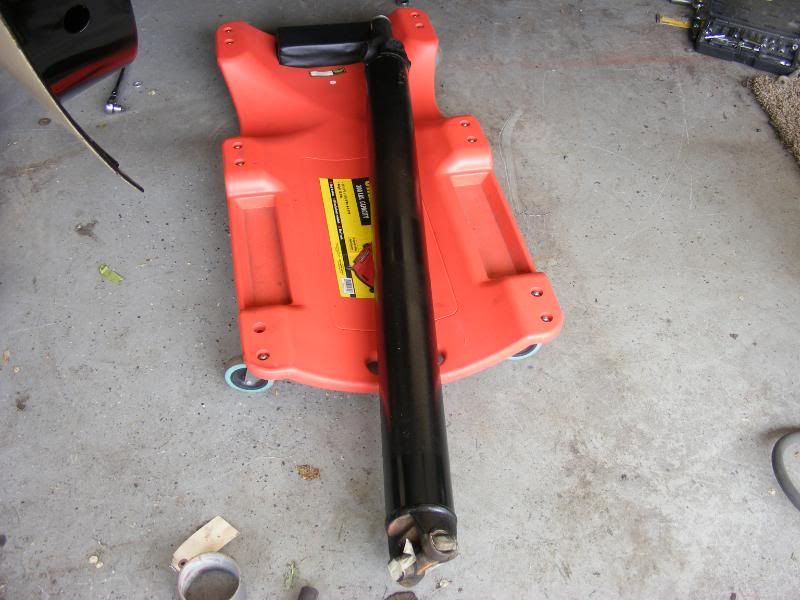 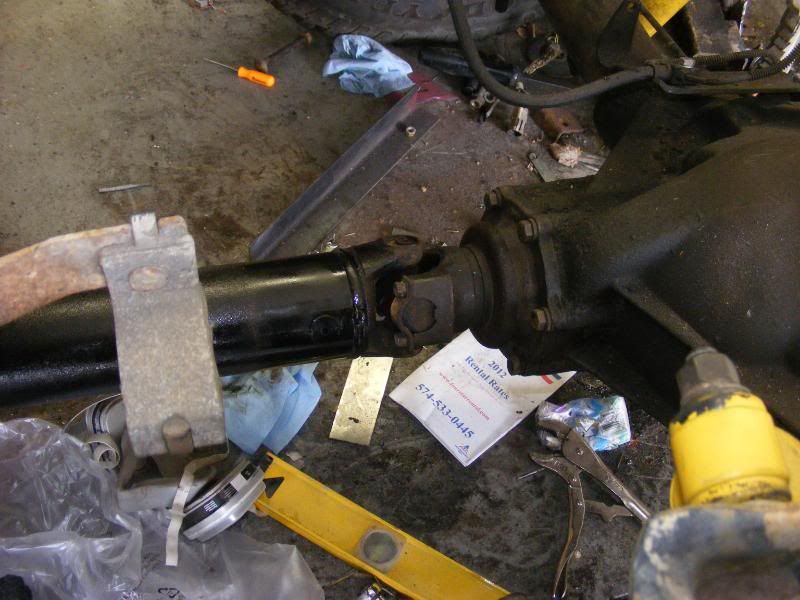 Now that its shortened it sure made it easier to get out of the garage. We then cleaned and degreased the frame, and Deb and Sara coated it with KBS rust seal. Rust seal is a good Product, iv used it before on project Silver Dollar. 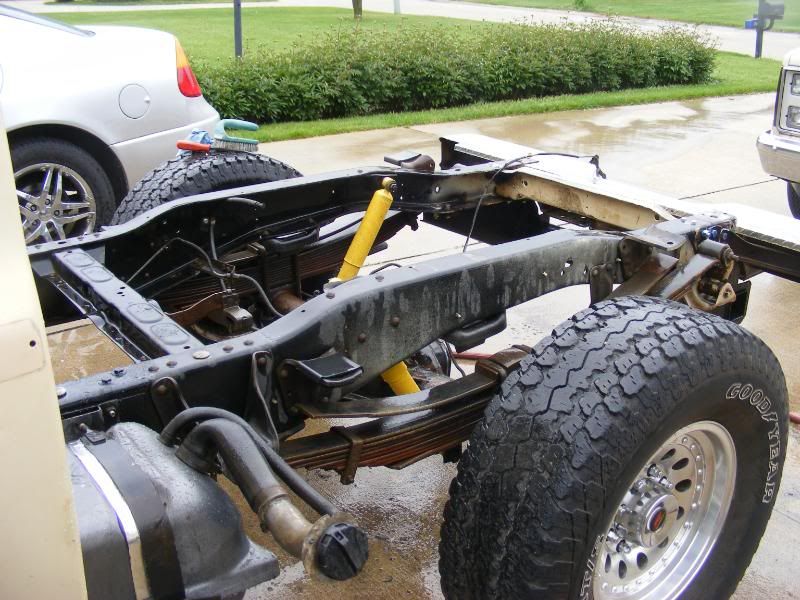 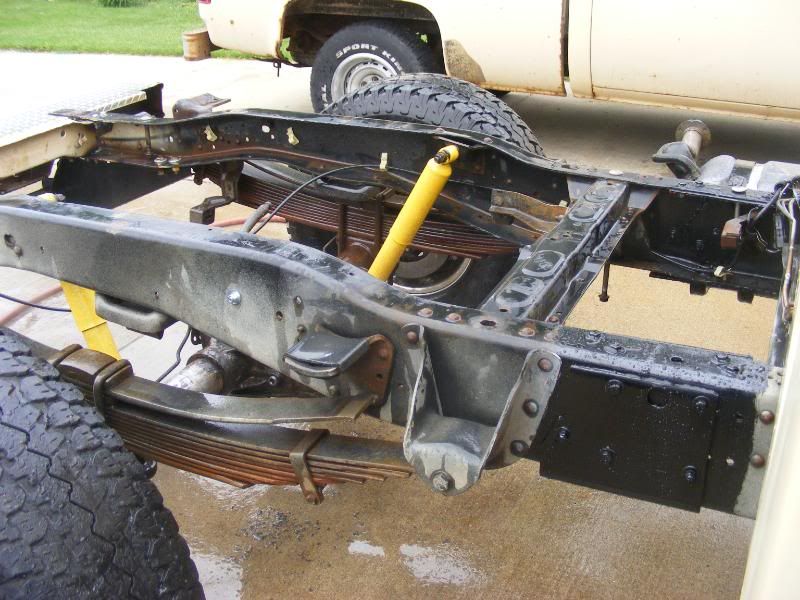 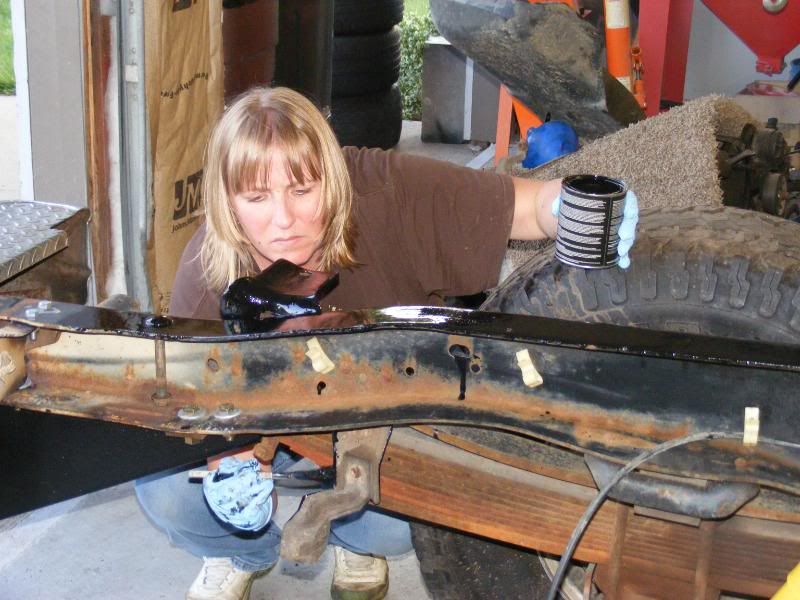 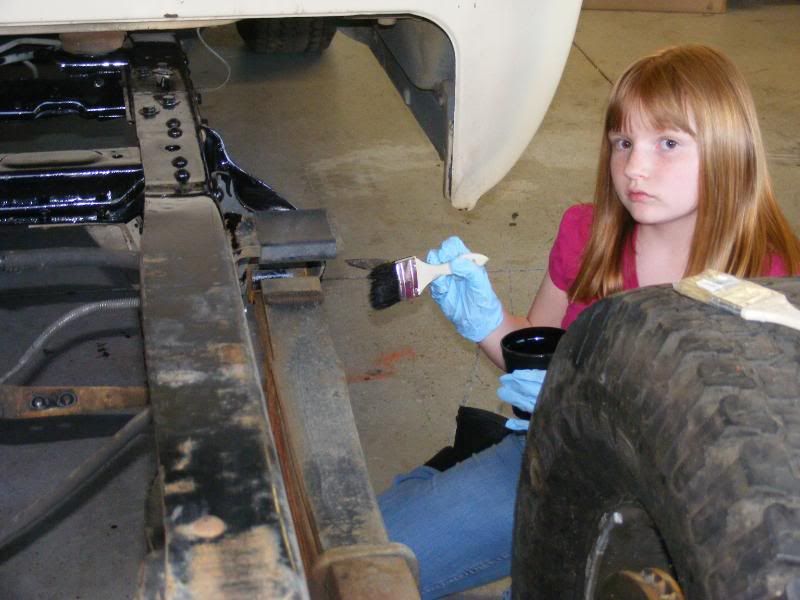 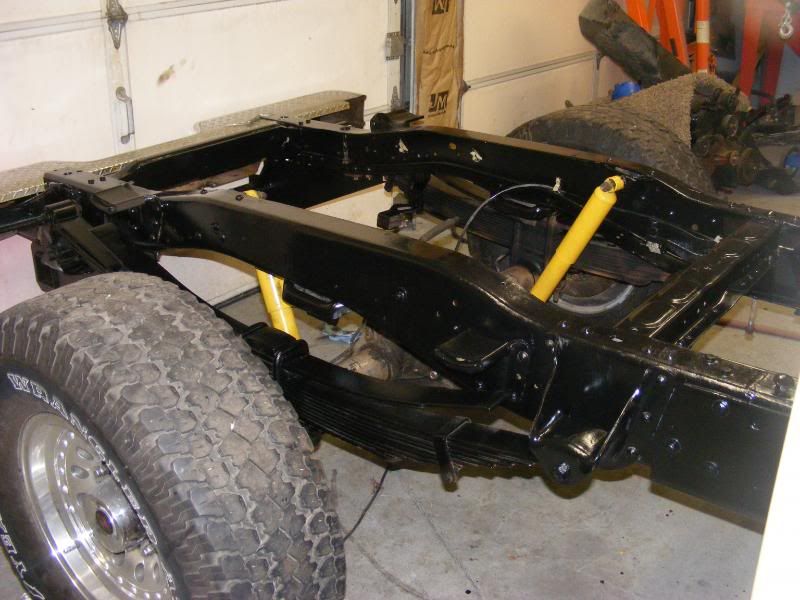 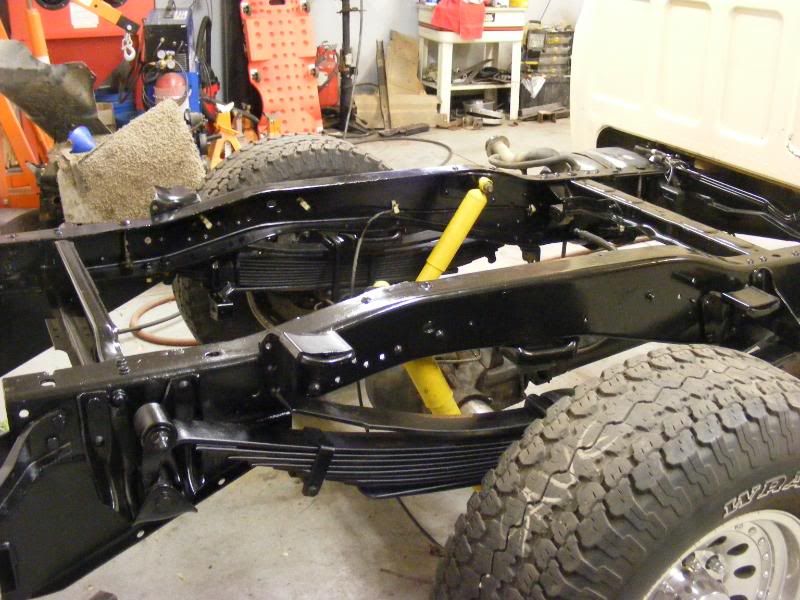
|
|
|
|
|
05-10-2012, 06:42 AM
|
#13 |
|
Registered User
Join Date: Apr 2003
Location: Indep, MO
Posts: 5,893
|
Re: Build #2 Crusader!
Always good to have em move on their own again. Looks good!
Posted via Mobile Device
__________________
Boppa's Old Yeller Truck Build, Old Yeller's New Heart! Project Buzz Bomb Flyin' Low! |
|
|
|
|
05-10-2012, 07:04 PM
|
#14 |
|
Senior Member
Join Date: Jun 2011
Location: Washburn, IA
Posts: 600
|
Re: Build #2 Crusader!
Looking good man!
|
|
|
|
|
05-10-2012, 08:54 PM
|
#15 |
|
Registered User
Join Date: Feb 2008
Location: Houston
Posts: 970
|
Re: Build #2 Crusader!
Man i wish i had a crew to help me. hahaha
__________________
2014 LTZ Z71 Silverado 82 C15 LQ4/4L80E Conversion 78 Suburban build (SOLD) 83 4x4 Suburban(SOLD) 82 C15 (my first truck) |
|
|
|
|
06-04-2012, 08:02 PM
|
#16 |
|
Account Suspended
Join Date: Aug 2007
Location: USA
Posts: 1,223
|
Re: Build #2 Crusader!
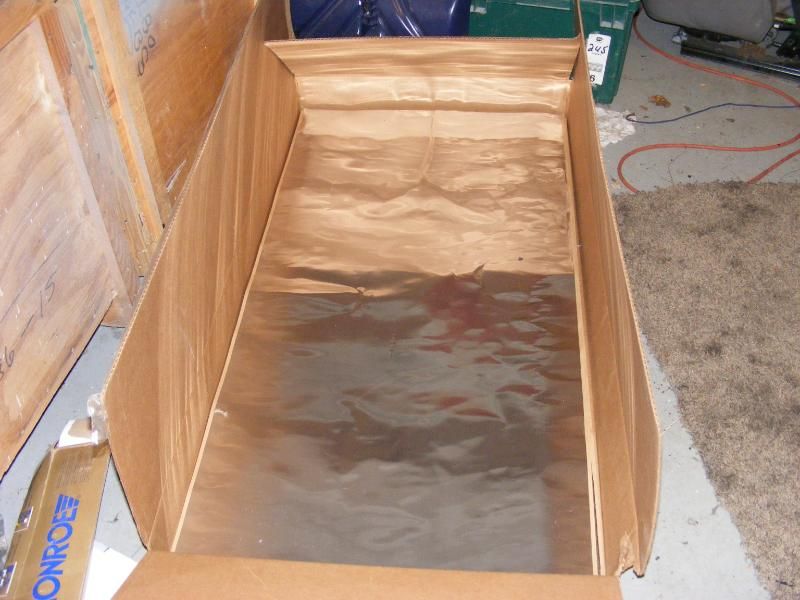 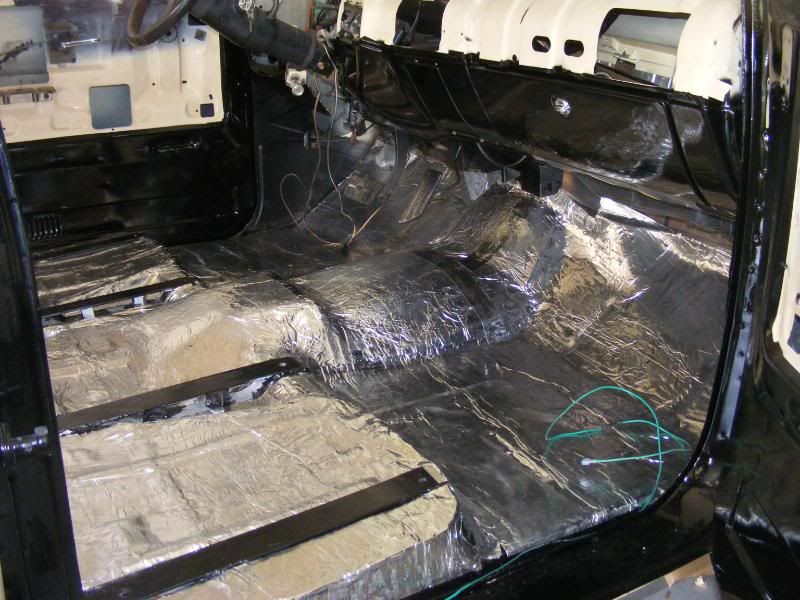 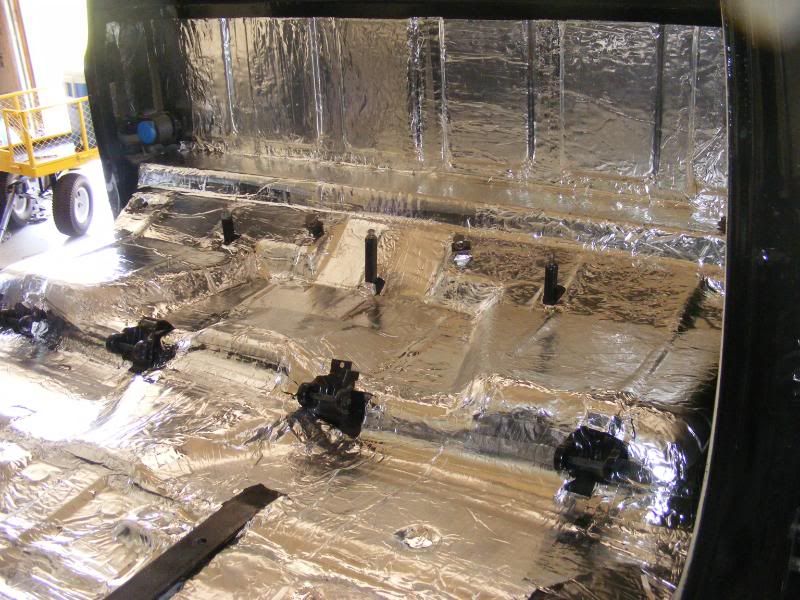 finally Got some sound deadner down. This stuff works great. Im going to be putting a kits together, to sell to fourm members. Starting with enough material to cover A reg cab floor and the back of the cab. then enough to do a crew, then doors and roof. the cost will probably be around $150. to do a regular cab. Im still working on the packaging as of right now. Im looking to get at least 11 verbal commitments to get the ball rolling. Ill post something in the sale area in the coming days. I used the 24x48 but I think the 18x 32 will be better to start off with. This acoustical damping material is comparable to brand leader Dynamat extream. In fact I really cant tell you how comparable it is. Its almost like they come from the same manufacturer.  .067 thick, peel away craft paper, sticks very well and has foil face. it comes in 18"x32" or 24X48 if any one is interested please feel free to ask. .067 thick, peel away craft paper, sticks very well and has foil face. it comes in 18"x32" or 24X48 if any one is interested please feel free to ask.
|
|
|
|
|
06-04-2012, 08:06 PM
|
#17 |
|
Registered User
Join Date: Dec 2011
Location: Elkhart, IN
Posts: 1,308
|
Re: Build #2 Crusader!
Cool great to see an update on this truck.
__________________
1985 Chevrolet K10 Custom Deluxe---SOLD 1997 Ram 2500 5.9 Cummins 1985 Chevrolet Camaro Z28 1987 Chevrolet K10 Silverado "The Beast" build 1987 Silverado http://67-72chevytrucks.com/vboard/s...=1#post6150257 |
|
|
|
|
06-04-2012, 11:11 PM
|
#18 |
|
Still Learning
Join Date: Jul 2009
Location: Central Oklahoma
Posts: 10,108
|
Re: Build #2 Crusader!
Very nice progress!
|
|
|
|
|
06-06-2012, 05:29 AM
|
#19 |
|
Account Suspended
Join Date: Aug 2007
Location: USA
Posts: 1,223
|
Re: Build #2 Crusader!
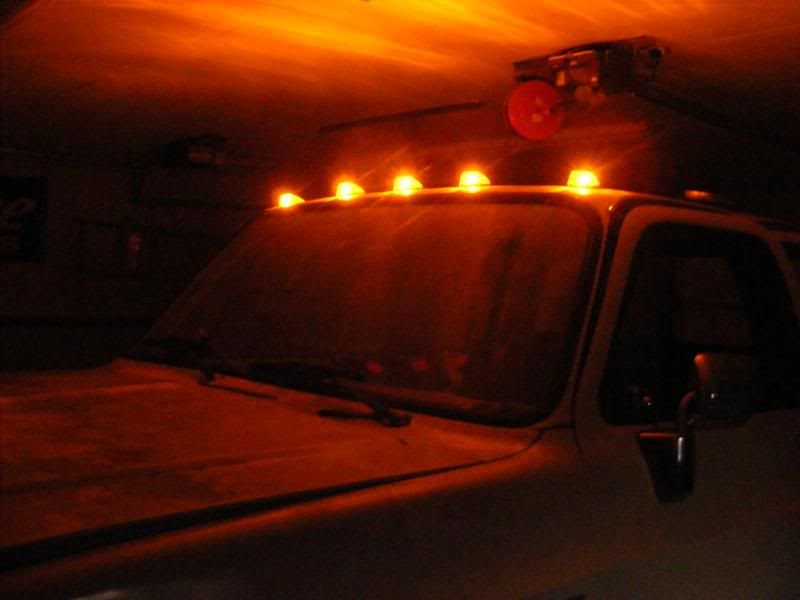
Deb has I always like cab clearance lights and this truck didnt have any. So I ordered some from ebay. I marked, then drilled holes and got the new lights mounted, and wired up.
|
|
|
|
|
06-06-2012, 08:04 PM
|
#20 |
|
Registered User
Join Date: Jan 2010
Location: butler pa
Posts: 328
|
Re: Build #2 Crusader!
id be intrested in the sound deadner kit if your gonna sell any, and project is looking good
|
|
|
|
|
06-07-2012, 05:48 AM
|
#21 | |
|
Account Suspended
Join Date: Aug 2007
Location: USA
Posts: 1,223
|
Re: Build #2 Crusader!
Quote:
|
|
|
|
|
|
06-09-2012, 08:12 AM
|
#22 |
|
Account Suspended
Join Date: Aug 2007
Location: USA
Posts: 1,223
|
Re: Build #2 Crusader!
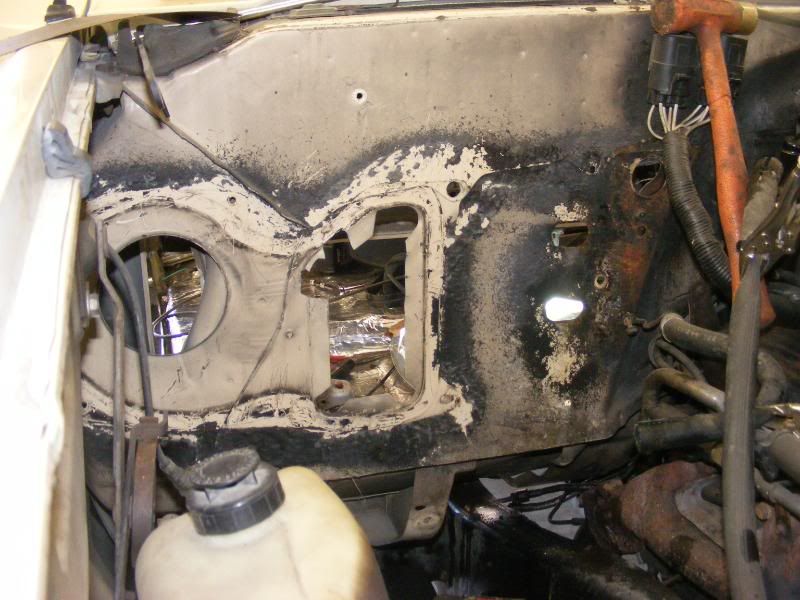
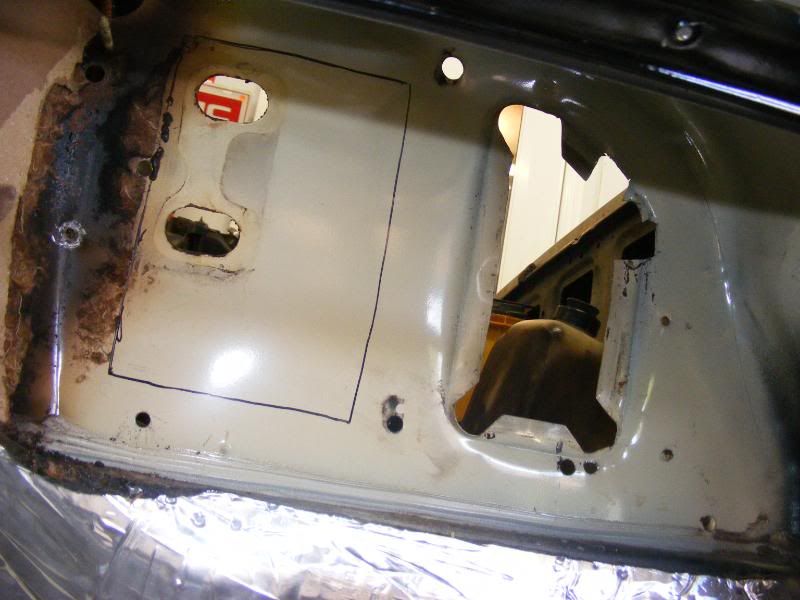
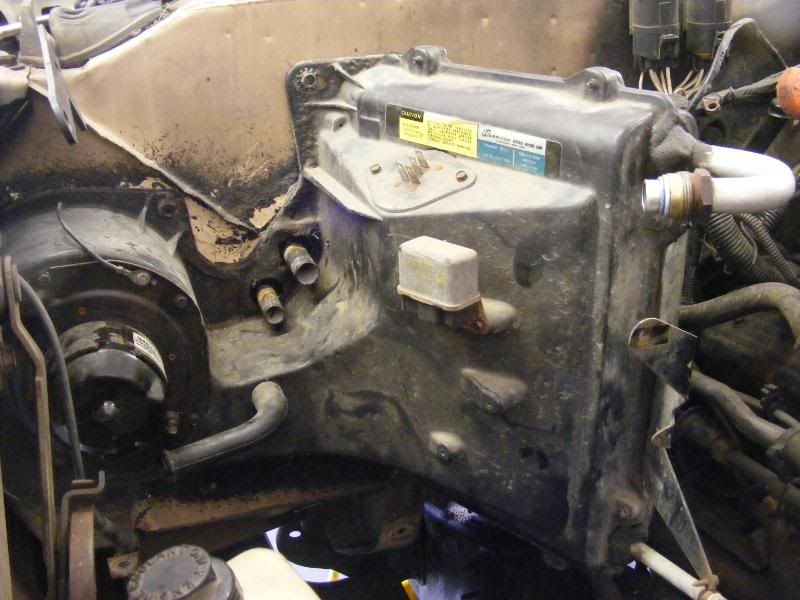
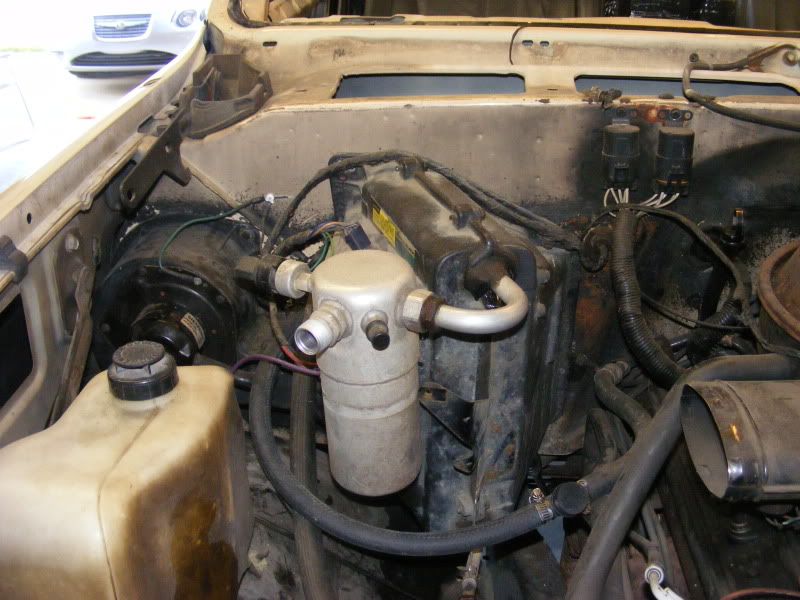
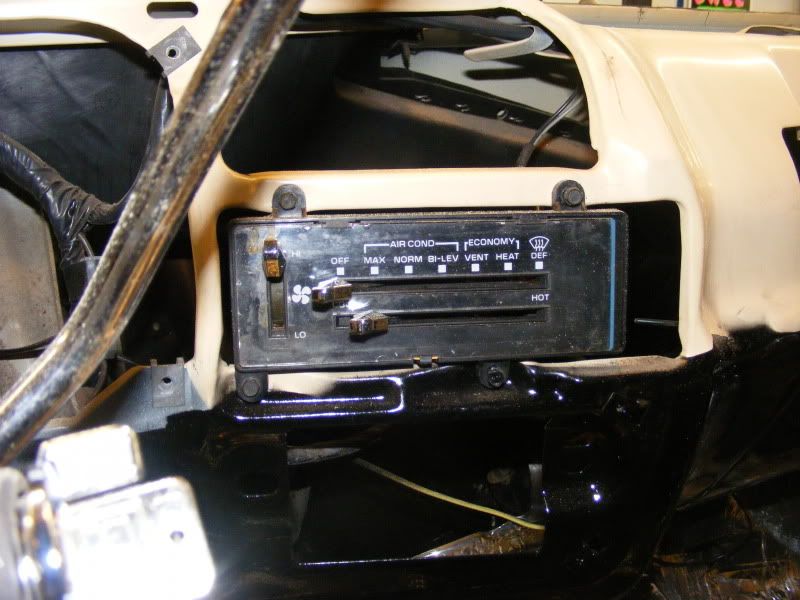
decided now would be as good time as any to replace the the old heater box with a A/C unit from a donor truck. Call me dumb, But to my surprise it was not just a bolt in replacement. I honestly figured all the firewalls were the same coming down the assembly line. I had to cut the firewall on the evaporator side . Also needed to drill new hole for the heater box. but other than that it wasn't to hard. when I stripped the donor truck I was careful to take all the wiring, cables, and vacum lines on the control unit, so it made the transferring everything very easy. now just need to get a condenser mounted in and get the compressor mounted when I rebuild the engine and install that.
|
|
|
|
|
06-14-2012, 08:55 PM
|
#23 |
|
Account Suspended
Join Date: Aug 2007
Location: USA
Posts: 1,223
|
Re: Build #2 Crusader!
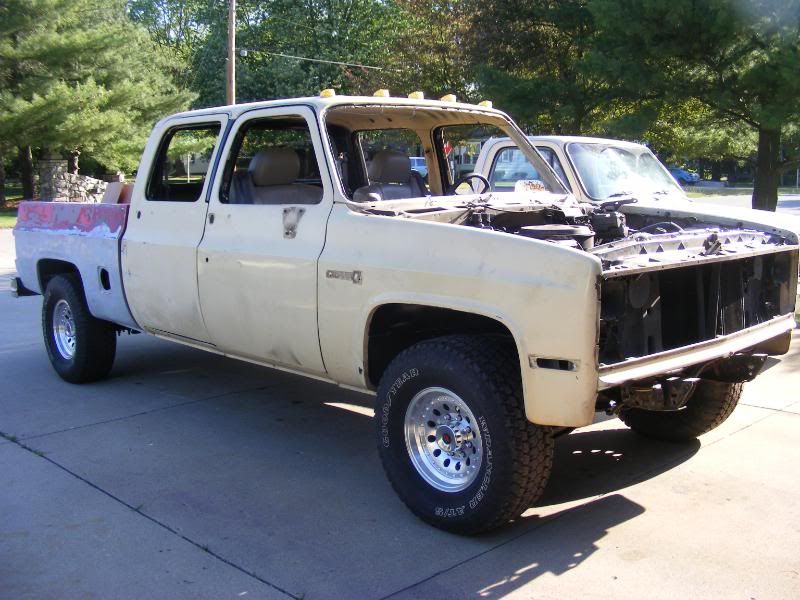
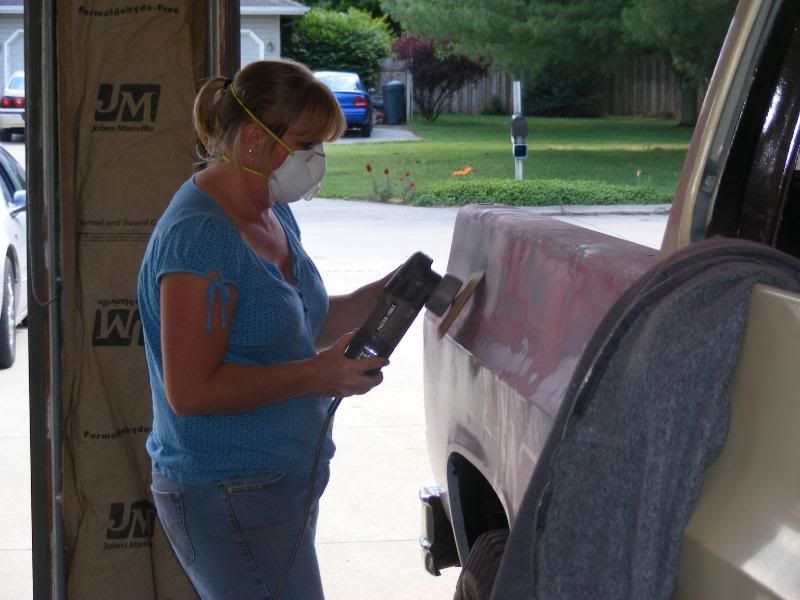
got the truck out, put the bed on, stripped it of all its glass, grill, markers, and seals and started sanding on it getting it ready for some epoxy.
|
|
|
|
|
06-14-2012, 09:00 PM
|
#24 |
|
Registered User
Join Date: Dec 2011
Location: Elkhart, IN
Posts: 1,308
|
Re: Build #2 Crusader!
Very cool look forward to seeing more of it.
__________________
1985 Chevrolet K10 Custom Deluxe---SOLD 1997 Ram 2500 5.9 Cummins 1985 Chevrolet Camaro Z28 1987 Chevrolet K10 Silverado "The Beast" build 1987 Silverado http://67-72chevytrucks.com/vboard/s...=1#post6150257 |
|
|
|
|
06-15-2012, 09:18 PM
|
#25 |
|
Registered User
Join Date: Feb 2006
Location: sharpsville, indiana
Posts: 122
|
Re: Build #2 Crusader!
very nice build. like the short bed on it.
|
|
|
|
 |
| Bookmarks |
| Tags |
| black, disc, paint, seats, shortbed |
|
|


 Hybrid Mode
