
|
|
|
 10-12-2016, 08:19 AM
|
#1 |
|
Registered User
Join Date: Feb 2012
Location: Ruskin Florida
Posts: 4,553
|
Re: My caster mod (with pictures)
I am sorry? WHY did you do this? I would not run those even with bracing and plating. Seems to have defeated the purpose and created a dangerous situation. Please explain.
__________________
70 swb 4x4 406sbc 700r4 203/205 d60/14blt locker yadda yadda http://67-72chevytrucks.com/vboard/s...88#post6935688 Yeller 72 Blazer 2wd conversion project "No Daggum Money" http://67-72chevytrucks.com/vboard/s...d.php?t=550804 LS1-T56 3.73 LSD super budget build Blanco-2014 Sierra SWB https://67-72chevytrucks.com/vboard/...d.php?t=810350 |

|

|
|
10-12-2016, 08:46 AM
|
#2 |
|
Registered User
Join Date: May 2010
Location: Stillwater,MN
Posts: 39
|
Re: My caster mod (with pictures)
Lol what purpose was defeated here? Little dramatic aye?
Posted via Mobile Device |
|
|
|
|
10-12-2016, 12:31 PM
|
#3 | |
|
Registered User
Join Date: Feb 2012
Location: Ruskin Florida
Posts: 4,553
|
Re: My caster mod (with pictures)
Quote:
__________________
70 swb 4x4 406sbc 700r4 203/205 d60/14blt locker yadda yadda http://67-72chevytrucks.com/vboard/s...88#post6935688 Yeller 72 Blazer 2wd conversion project "No Daggum Money" http://67-72chevytrucks.com/vboard/s...d.php?t=550804 LS1-T56 3.73 LSD super budget build Blanco-2014 Sierra SWB https://67-72chevytrucks.com/vboard/...d.php?t=810350 |
|
|
|
|
|
10-12-2016, 09:57 AM
|
#4 |
|
Registered User
Join Date: May 2010
Location: Stillwater,MN
Posts: 39
|
Re: My caster mod (with pictures)
Thanks. I have two more sets of arms so if these don't work
I'll try a different method. Posted via Mobile Device |
|
|
|
|
10-12-2016, 11:24 AM
|
#5 |
|
A guy with a truck
Join Date: Sep 2005
Location: Germany, for now
Posts: 5,920
|
Re: My caster mod (with pictures)
Definitely plate top/bottom. Don't want that breaking off while driving!
__________________
-Chris Instagram _elgringoloco_ '70 Short-Wide How to: Ruin a perfectly good C10 70 Blazer ConversionHow To: Ruin a Perfectly Good 4wd '72 Highlander How To: Ruin a Perfectly Good K/5 (SOLD) '72 Blazer 2WD How to: Ruin a perfectly good Blazer (SOLD) '05 Yukon Daily Driven (not so stock) Yukon (SOLD) 07 Yukon Denali (daily) Members met list: SCOTI, darkhorse970, 67cheby, 67cheby'sGirl, klmore, porterbuilt, n2billet, Fastrucken, classicchev, Col Clank, GSFMECH, HuggerCST, Spray-Bomb, BACKYARD88, 5150, fine69, fatbass, smbrouss70, 65StreetCruiser, GAc10boy |
|
|
|
|
10-12-2016, 11:33 AM
|
#6 |
|
Registered User
Join Date: Dec 2002
Location: Cactus Patch So. Az
Posts: 4,749
|
Re: My caster mod (with pictures)
Have you installed "skid plates" on the lower parts of your front end
__________________
53 TuTone Extended Cab 350 4-Spd 3:08 (SOLD) 53 Chevy Moldy pearl green ZZ-4 4L60E 9" 3:25 55 GMC 1st Black Mll (ZZ4) ZZ6 TKO 600 5 sp 3:73 62 Solidaxle Corvette Roman Red (327 340hp 4spd 3:36) C4 & C5 suspension tube chassis LS 3 4L70E 65 Corvette Coupe 327 350hp 4spd 4:11 78 Black Silverado SWB (350/350) 5.3 & 4L60E 3:42 2000 S-Type 3.0 (wife cruiser) 2003 GMC SCSB 5.3 4L60E 3:42 |
|
|
|
|
10-12-2016, 11:39 AM
|
#7 |
|
Registered User
Join Date: May 2010
Location: Stillwater,MN
Posts: 39
|
Re: My caster mod (with pictures)
Ok bad idea, I get it. As soon as I did it I wasn't very confident, not sure if bracing will be enough??
Ill just do the way Rob did it with moving the BJ hole over with another set of arms I have. |
|
|
|
|
10-12-2016, 11:51 AM
|
#8 |
|
Registered User
Join Date: Dec 2002
Location: Cactus Patch So. Az
Posts: 4,749
|
Re: My caster mod (with pictures)
I have had a experience with skid plates and lower suspension parts!
__________________
53 TuTone Extended Cab 350 4-Spd 3:08 (SOLD) 53 Chevy Moldy pearl green ZZ-4 4L60E 9" 3:25 55 GMC 1st Black Mll (ZZ4) ZZ6 TKO 600 5 sp 3:73 62 Solidaxle Corvette Roman Red (327 340hp 4spd 3:36) C4 & C5 suspension tube chassis LS 3 4L70E 65 Corvette Coupe 327 350hp 4spd 4:11 78 Black Silverado SWB (350/350) 5.3 & 4L60E 3:42 2000 S-Type 3.0 (wife cruiser) 2003 GMC SCSB 5.3 4L60E 3:42 |
|
|
|
|
10-12-2016, 12:15 PM
|
#9 |
|
Registered User
Join Date: Feb 2012
Location: Ruskin Florida
Posts: 4,553
|
Re: My caster mod (with pictures)
OH my! Are you ok? Do tell the story.
__________________
70 swb 4x4 406sbc 700r4 203/205 d60/14blt locker yadda yadda http://67-72chevytrucks.com/vboard/s...88#post6935688 Yeller 72 Blazer 2wd conversion project "No Daggum Money" http://67-72chevytrucks.com/vboard/s...d.php?t=550804 LS1-T56 3.73 LSD super budget build Blanco-2014 Sierra SWB https://67-72chevytrucks.com/vboard/...d.php?t=810350 |
|
|
|
|
10-12-2016, 12:25 PM
|
#10 |
|
Registered User
Join Date: Dec 2002
Location: Cactus Patch So. Az
Posts: 4,749
|
Re: My caster mod (with pictures)
Long story !
Very interesting ride, until we got the truck off the road! All fixed and gaining more confidence every day
__________________
53 TuTone Extended Cab 350 4-Spd 3:08 (SOLD) 53 Chevy Moldy pearl green ZZ-4 4L60E 9" 3:25 55 GMC 1st Black Mll (ZZ4) ZZ6 TKO 600 5 sp 3:73 62 Solidaxle Corvette Roman Red (327 340hp 4spd 3:36) C4 & C5 suspension tube chassis LS 3 4L70E 65 Corvette Coupe 327 350hp 4spd 4:11 78 Black Silverado SWB (350/350) 5.3 & 4L60E 3:42 2000 S-Type 3.0 (wife cruiser) 2003 GMC SCSB 5.3 4L60E 3:42 |
|
|
|
|
10-12-2016, 12:58 PM
|
#11 |
|
Registered User
Join Date: Dec 2009
Location: Kirkland, WA
Posts: 1,302
|
Re: My caster mod (with pictures)
I don't see any problem with modding the arms the way ranger has, as long as he ties in the sides and welds a plate across the bottom. He's just moving the balljoint over to improve caster while leaving the spring pocket in the correctly aligned location.
@solidaxel, how did you manage to drag your lower balljoint on the ground? Did your wheel fall off?
__________________
1968 LWB C20 / AC / Wood Bed |
|
|
|
|
10-12-2016, 01:24 PM
|
#12 |
|
Registered User
Join Date: Jul 2009
Location: San Jose Ca
Posts: 2,871
|
Re: My caster mod (with pictures)
I did my first set of arms in a similar way.
 The plating is more important on the sides than top and bottom. You lost the strength of the arms when you cut through the sides. Think of bending a ruler when it is flat vs standing on its side.
__________________
David Used parts build: http://67-72chevytrucks.com/vboard/s...d.php?t=638991 My brother's Nova: http://www.67-72chevytrucks.com/vboa...d.php?t=727985 Rear suspension rework: http://www.67-72chevytrucks.com/vboa...d.php?t=750557 Instagram: myfabguy |
|
|
|
|
10-13-2016, 11:36 AM
|
#13 | ||
|
Registered User
Join Date: May 2010
Location: Stillwater,MN
Posts: 39
|
Re: My caster mod (with pictures)
Quote:
Quote:
Might just do the cross shaft mod on another set of arms if I messed these up too much. I do appreciate all the feedback, as Im not the best at this. |
||
|
|
|
|
10-13-2016, 12:05 PM
|
#14 |
|
Registered User
Join Date: Jul 2009
Location: San Jose Ca
Posts: 2,871
|
Re: My caster mod (with pictures)
I dont have any pics of them done. You could easily weld a piece of steel to connect the sides.
Here is a pic of how I did a second set 
__________________
David Used parts build: http://67-72chevytrucks.com/vboard/s...d.php?t=638991 My brother's Nova: http://www.67-72chevytrucks.com/vboa...d.php?t=727985 Rear suspension rework: http://www.67-72chevytrucks.com/vboa...d.php?t=750557 Instagram: myfabguy |
|
|
|
|
10-13-2016, 12:30 PM
|
#15 | |
|
Registered User
Join Date: Dec 2009
Location: Kirkland, WA
Posts: 1,302
|
Re: My caster mod (with pictures)
Quote:
__________________
1968 LWB C20 / AC / Wood Bed |
|
|
|
|
|
10-13-2016, 02:15 PM
|
#16 |
|
Registered User
Join Date: May 2010
Location: Stillwater,MN
Posts: 39
|
Re: My caster mod (with pictures)
I will probably do my next set like that, just tight on funds and wanted to take a stab at it with the resources I had. Will be a long winter so I have time.
Still would have to figure out the other side with some bracing. 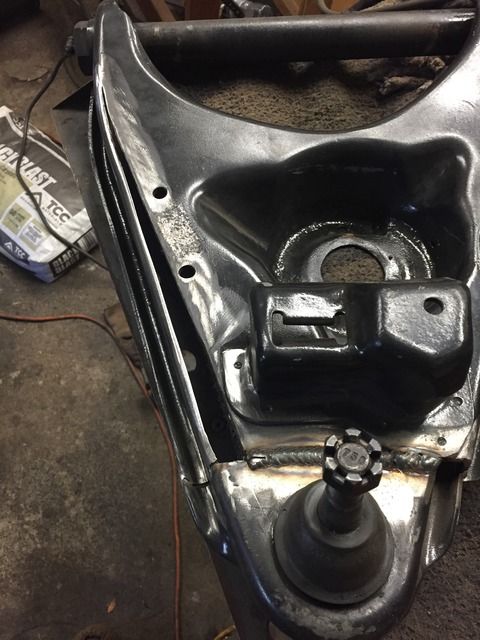 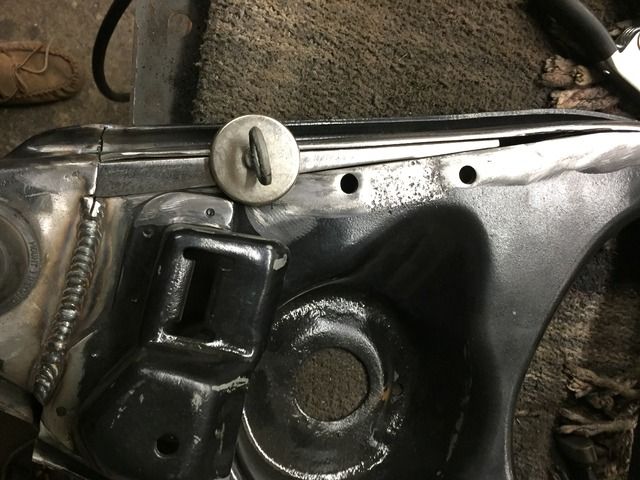 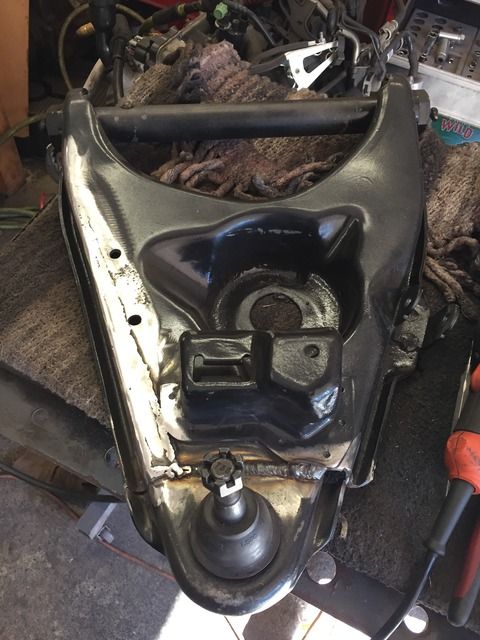
|
|
|
|
|
10-13-2016, 03:47 PM
|
#17 |
|
Registered User
Join Date: Dec 2009
Location: Kirkland, WA
Posts: 1,302
|
Re: My caster mod (with pictures)
It'll be really hard to get your camber right unless you also take in the upper arm, and then you'll need to think about wheel backspacing (which you'd already have to do anyway most likely.
__________________
1968 LWB C20 / AC / Wood Bed |
|
|
|
|
10-13-2016, 04:38 PM
|
#18 |
|
Registered User
Join Date: May 2010
Location: Stillwater,MN
Posts: 39
|
Re: My caster mod (with pictures)
Yea I did not shorten the arm much so camber should be ok. Just made some relief cuts and bent the arms u bend side supports in and welded them up. In the end should work, seems strong, but will probably be doing the BJ cup replacement mod as it seems the strongest and leaves the spring pocket and integrity of the arm in place?!
Sorry to hijack the thread, I just value the opinions here. I'm done now. 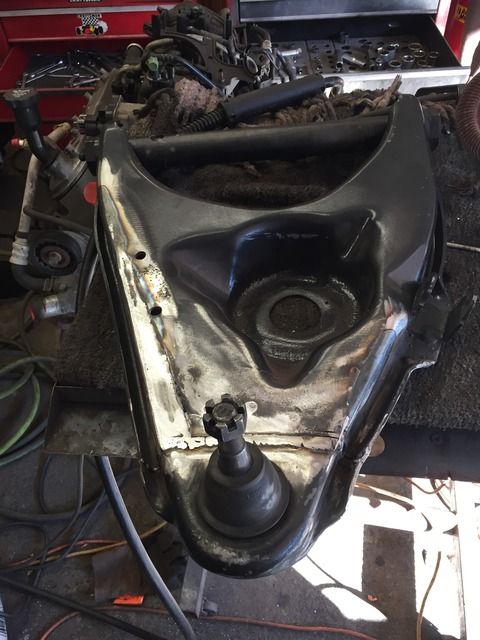 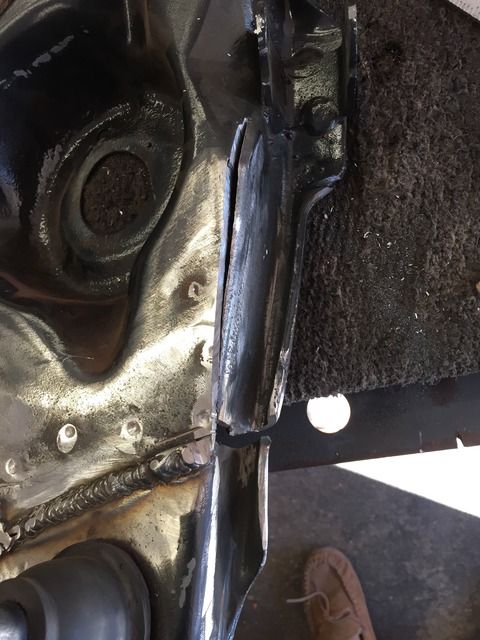
|
|
|
|
|
10-13-2016, 04:49 PM
|
#19 |
|
Registered User
Join Date: Jul 2009
Location: San Jose Ca
Posts: 2,871
|
Re: My caster mod (with pictures)
I don't have my album set to private. Im not logged in and can see the pics. Maybe photobucket was down for a bit.
Anyway. The relief cut should work. I put ball joint cuts in my first set of arms and welded a tab to the airbag cup. Probably overkill. I shortened the lowers 7/8'' and the uppers 1/2''. Camber was fine with one shim. I know it would reduce camber gain but I was more concerned with fender clearance.
__________________
David Used parts build: http://67-72chevytrucks.com/vboard/s...d.php?t=638991 My brother's Nova: http://www.67-72chevytrucks.com/vboa...d.php?t=727985 Rear suspension rework: http://www.67-72chevytrucks.com/vboa...d.php?t=750557 Instagram: myfabguy |
|
|
|
|
10-13-2016, 07:00 PM
|
#20 |
|
Registered User
 Join Date: May 2011
Location: Missoula, MT
Posts: 934
|
Re: My caster mod (with pictures)
ranger2339,
No apologies needed this is not high-jacking. You brought a new idea to the table and with some adjustments to your idea we all learned something and that is what we are here for. I like your modifications especially with the recent adjustments. I would plate both the inside and outside of both the leading side and trailing side with some rosette welds and a good perimeter weld all around. also run a "skid plate across the bottom that strattles the welded joint to prevent any outward deflection of the sides. Let us know how it ends up!
__________________
69 GMC C10 build thread- http://67-72chevytrucks.com/vboard/s...d.php?t=501676 03 Silverado build thread-http://67-72chevytrucks.com/vboard/s...d.php?t=591582 |
|
|
|
|
07-24-2017, 09:10 PM
|
#21 |
|
Post Whore
Join Date: Feb 2016
Location: Portland Oregon
Posts: 10,944
|
Re: My caster mod (with pictures)
I thought I would add some additional information to this thread. I went this route on my Burban by obtaining an extra set of used control arms and rebuilding them. By the time I was done I had four used control arm shafts off of three trucks. The measurements I show in the photos below. All of the used ones were 3" plus or minus a 1/16". The two new Moogs (K6147) I used were at 2 15/16". The measurements are from the end of the shaft to the center of the index hole. I did this to avoid the differences in the machined areas for the seals between old and new shafts as previously discussed. (Second photo) After much measuring and double checking I milled a 3/4" index hole (and finished it off with an 5/8 drill bit just in case the rivet was taller than I expected) at 3 3/4" from the end of the shaft.
I haven't got the truck on the alignment rack yet. (Still waiting for a tie rod end). But I will post the spec's when I get them. A couple of things I noticed when doing this. One is as the lower control arm moves forward it changes how the brake hoses flex and I had to tweek the brackets on the cross member to keep the hoses from rubbing when the wheels are hard over. In addition I had to move my sway bar frame mounts forward 3/4" to keep the ends of the factory sway bar from rubbing on the airbags. The factory index holes measured 11/16" and the Moogs were 23/32". The index rivets were 19/32" in diameter. That means with the replacement shafts there is 1/8" of slop forward and back. As both of my shafts had been knocked back and had damaged the rivets, I had to drill them out and replace them with 1/2" socket head cap screws as the OP did. The old rivet holes had to be drilled out to half inch. As I didn't machine the index holes deep enough I had to grind a 1/16" off the top of the cap screws to keep them from holding the shaft away from the saddles.
__________________
Thanks to Bob and Jeanie and everyone else at Superior Performance for all their great help.  RIP Bob Parks. 1967 Burban (the WMB),1988 S10 Blazer (the Stink10 II),1969 GTO (the Goat), 1970 Javelin, 1952 F2 Ford OHC six 4X4, 29 Model A, 72 Firebird (the DBP Bird). 85 Alfa Romeo If it breaks I didn't want it in the first place The WMB repair thread http://67-72chevytrucks.com/vboard/s...d.php?t=698377 |
|
|
|
|
07-26-2017, 09:45 PM
|
#22 |
|
Post Whore
Join Date: Feb 2016
Location: Portland Oregon
Posts: 10,944
|
Re: My caster mod (with pictures)
Also when doing this modification on a bagged truck you will have an additional shock issue. The shock will contact the brake line bracket or the cross member at full drop. To solve the problem I removed the stock shock mounts and made new ones that hold the shock away from the control arm farther and about an inch closer to the frame. I apologize for the poor photos.
__________________
Thanks to Bob and Jeanie and everyone else at Superior Performance for all their great help. RIP Bob Parks. 1967 Burban (the WMB),1988 S10 Blazer (the Stink10 II),1969 GTO (the Goat), 1970 Javelin, 1952 F2 Ford OHC six 4X4, 29 Model A, 72 Firebird (the DBP Bird). 85 Alfa Romeo If it breaks I didn't want it in the first place The WMB repair thread http://67-72chevytrucks.com/vboard/s...d.php?t=698377 |
|
|
|
|
11-20-2020, 09:47 PM
|
#23 |
|
Post Whore
Join Date: Feb 2016
Location: Portland Oregon
Posts: 10,944
|
Re: My caster mod (with pictures)
[QUOTE=HO455;7998948 In addition I had to move my sway bar frame mounts forward 3/4" to keep the ends of the factory sway bar from rubbing on the airbags.
.[/QUOTE] Just a note on this quote. If you need to reposition the sway mounts for clearance try to keep the bar as close as possible to the control arm. The theory is the shorter the distance between the mount on the arm and the front of the bar the stiffer the bar will be. As little as 1/2 " either way will be noticeable. In the photo the shiny spots near the ends of the bar shows the location of the end mounts as the factory installed them. If the bar is repositioned in the direction of the arrow the mounts can now ride where the blue line is. Basically instead of 1/2" of bar sticking past the mount there will be one inch sticking past. Cheap sway bar upgrade!
__________________
Thanks to Bob and Jeanie and everyone else at Superior Performance for all their great help. RIP Bob Parks. 1967 Burban (the WMB),1988 S10 Blazer (the Stink10 II),1969 GTO (the Goat), 1970 Javelin, 1952 F2 Ford OHC six 4X4, 29 Model A, 72 Firebird (the DBP Bird). 85 Alfa Romeo If it breaks I didn't want it in the first place The WMB repair thread http://67-72chevytrucks.com/vboard/s...d.php?t=698377 |
|
|
|
|
07-26-2017, 11:34 PM
|
#24 |
|
Registered User
Join Date: Dec 2009
Location: Kirkland, WA
Posts: 1,302
|
Re: My caster mod (with pictures)
Thanks for the heads up on that, nice to know what I'll be running into

__________________
1968 LWB C20 / AC / Wood Bed |
|
|
|
|
07-26-2017, 11:55 PM
|
#25 |
|
Post Whore
Join Date: Feb 2016
Location: Portland Oregon
Posts: 10,944
|
Re: My caster mod (with pictures)
You're welcome. I posted some more photos of the shock mount project and a little more information on "The WMB" thread on page 11 (I think its page 11)
__________________
Thanks to Bob and Jeanie and everyone else at Superior Performance for all their great help. RIP Bob Parks. 1967 Burban (the WMB),1988 S10 Blazer (the Stink10 II),1969 GTO (the Goat), 1970 Javelin, 1952 F2 Ford OHC six 4X4, 29 Model A, 72 Firebird (the DBP Bird). 85 Alfa Romeo If it breaks I didn't want it in the first place The WMB repair thread http://67-72chevytrucks.com/vboard/s...d.php?t=698377 |
|
|
|
 |
| Bookmarks |
|
|


 Hybrid Mode
