
|
|
|
 04-01-2009, 08:45 PM
|
#1 |
|
GEARHEAD
Join Date: Aug 2003
Location: MN
Posts: 6,119
|
Re: Junkyard Jimmy Super Low Buck Build Thread
I got my shipment of new engine parts today. Oil pump, oil pump drive shaft, oil pick up screen, front cover and bolts, etc., oil dipstick, new timing chain set. I also got the whole cam and lifter kit from summit. I kind of planned on reusing the cam, but I needed lifters. Once I saw the prices it was only another $40 to get a cam with them.
I got the rings, rod and main bearings and a gasket set from a ebay store for like $80 shipped, the summit parts were another $159 shipped. Got the rear main seal for $10 at napa. I paid $75 for the short block off ebay about 2 years ago. I spent some money getting the block tanked, honed, new cam bearings and freeze plugs and painted, and the crank journals polished. I don't remember what that cost me, but I think it was about $120. So my short block with rebuild will cost around $444. Cripes, that more than doubled my investment. All the top end stuff will be transferred from the other engine. I need to get another vibration damper too, but they are cheap. I might be able to get one for free. I got the pistons and rods all cleaned up last night. I need to check the ring end gap and then start putting those in. I might have time tommorow, otherwise it will wait til the weekend. It may be a while before the swap happens, but we'll see. I will be using the short block from the Jimmy for a more solid rebuild for my C-10. It's a 4 bolt main block. I would like to build a stroker, but might just settle for a robust 350. I have a 283 in it now I built back in high school. That will smoke the tires just fine, I just want more grunt, with maybe a shot of NOS for a trip down the 1/8 mile. That engine will be $200 coming off my total, since the engine will be used elsewhere or maybe sold. To be fair I need to keep the cost of the heads on this project though. They typically will go for $65 around here, so the total is at $722 and I'll sell the exhaust manifolds later. There are so many things to fix, I can't let myself think about it. I just need to focus on the task at hand.
__________________
If no one knows what you're doing, they can't tell you you're doing it wrong HG's Dream Car Build - Shelby Cobra Kit Build your own adjustable track bar 71  Long Fleet C/10 Long Fleet C/10 72  Jimmy 4x4 (Junkyard Jimmy) Jimmy 4x4 (Junkyard Jimmy)HG's Plow Truck '78  K35 Dually K35 DuallyBigass Farm Truck HG's thread of miscellaneous stuff Last edited by hgs_notes; 04-01-2009 at 08:53 PM. |

|

|
|
04-03-2009, 12:20 AM
|
#2 |
|
GEARHEAD
Join Date: Aug 2003
Location: MN
Posts: 6,119
|
Re: Junkyard Jimmy Super Low Buck Build Thread
I had an off day today so I went out to start the beast. It's been sitting out side all winter and turned right over. I just had to put some gas in it and away she went. What's kind of sad is that this engine has no oil pressure, low compression but runs great. It started and ran better than my C-10, which gets 10 times the attention. I added some water and tranny fluid, put some air in a couple tires and sprayed some lube into a couple hinges and the shifter and beat around the friends farm for a while. Almost forgot, I also got a little poison to help fight the critter invasion. Little buggers started eating my original manual.
Then I came home and got started putting rings on the pistons. I picked up a vibration damper at the local yard for $20 and got a line a posi rear axle for the blazer project. He has a 87 blazer 4x4 with a posi, and other trucks that are 2wd. I'm going to see if the axles are a direct swap so I don't have to redrill the rotors to 5 lug. $150 for that. I might see if he will trade me for that ford engine I have.
__________________
If no one knows what you're doing, they can't tell you you're doing it wrong HG's Dream Car Build - Shelby Cobra Kit Build your own adjustable track bar 71 Long Fleet C/10 72 Jimmy 4x4 (Junkyard Jimmy)HG's Plow Truck '78 K35 DuallyBigass Farm Truck HG's thread of miscellaneous stuff Last edited by hgs_notes; 04-03-2009 at 12:26 AM. |
|
|
|
|
04-04-2009, 06:51 PM
|
#3 |
|
GEARHEAD
Join Date: Aug 2003
Location: MN
Posts: 6,119
|
Re: Junkyard Jimmy Super Low Buck Build Thread
It's been a good day. Cool outside, but I kicked the heater on for a while and got the garage comfortable. I got the short block assembly pretty much together. I had one problem on re-assembly. One of the main bearing bolts wouldn't reach the torque number, the bolt was stretching. I found one at the junkyard for a $1.
I need to figure out a fix for the nose of the crankshaft because a piece is broke out where the keyway is for the dampener. I'll add a picture later. I think I'll put a key in it, then make a small piece of metal to fill in the broke area. When the dampener is on, it will lock it all together tight. Or I could grind out and file the broke are so it is square and os some key stock to fill it in. Hmmm, I like that better. I should have bought the new oil pan from summit while I was buying stuff anyway. I just figured on using the old one, but summit has brand new chevy orange powdercoated pans for like $21. Maybe on my next order. That way I can button up the bottom end completely. The swap of the engines will probably be later in the month.
__________________
If no one knows what you're doing, they can't tell you you're doing it wrong HG's Dream Car Build - Shelby Cobra Kit Build your own adjustable track bar 71 Long Fleet C/10 72 Jimmy 4x4 (Junkyard Jimmy)HG's Plow Truck '78 K35 DuallyBigass Farm Truck HG's thread of miscellaneous stuff |
|
|
|
|
04-06-2009, 02:52 PM
|
#4 |
|
Registered User
Join Date: Mar 2009
Location: seaside,ca
Posts: 778
|
Re: Junkyard Jimmy Super Low Buck Build Thread
How come people find great deals on k5s, i can ownly find them on trucks. It makes me mad, but nice jimmy.
__________________
72 gmc 2500 2wd drive convert  My 72 thread http://67-72chevytrucks.com/vboard/s...d.php?t=346712 THe other truck, wheeler 69 1/2 4x4, yellow and rusty. http://67-72chevytrucks.com/vboard/s...d.php?t=350300 |
|
|
|
|
04-21-2009, 09:49 PM
|
#5 |
|
GEARHEAD
Join Date: Aug 2003
Location: MN
Posts: 6,119
|
Re: Junkyard Jimmy Super Low Buck Build Thread
Crankshaft repair, JB Weld, already had some, no cost. Seems to work ok. I'm not too worried about it. The threads in the crank for the balancer bolt were kind of stripped, so I drilled it out and tapped it for the next larger size, 1/2"-20 and bought a new bolt, $1.34. I had to order some stuff for my C-10 so I got the new oil pan for $21. I also found my receipt for the block prep and I was off by about $40. So now the cost of the rebuild went up, we'll call it $62 for a total spent of $784. I think this engine is going to kick some...dirt.
__________________
If no one knows what you're doing, they can't tell you you're doing it wrong HG's Dream Car Build - Shelby Cobra Kit Build your own adjustable track bar 71 Long Fleet C/10 72 Jimmy 4x4 (Junkyard Jimmy)HG's Plow Truck '78 K35 DuallyBigass Farm Truck HG's thread of miscellaneous stuff |
|
|
|
|
04-21-2009, 10:23 PM
|
#6 |
|
Senior Member
Join Date: Nov 2003
Location: Brookings, SD
Posts: 10,497
|
Re: Junkyard Jimmy Super Low Buck Build Thread
I see a spot of oil on the floor, better get that cleaned up!!
My floor is covered with "oil camo". There are spots all over, so you never notice a new one. 
__________________
Some people are like slinkies, they aren't good for anything, but you can't help but smile when you see one tumble down the stairs. Last edited by 71swb4x4; 04-21-2009 at 10:24 PM. |
|
|
|
|
04-21-2009, 11:22 PM
|
#7 | |
|
GEARHEAD
Join Date: Aug 2003
Location: MN
Posts: 6,119
|
Re: Junkyard Jimmy Super Low Buck Build Thread
Quote:
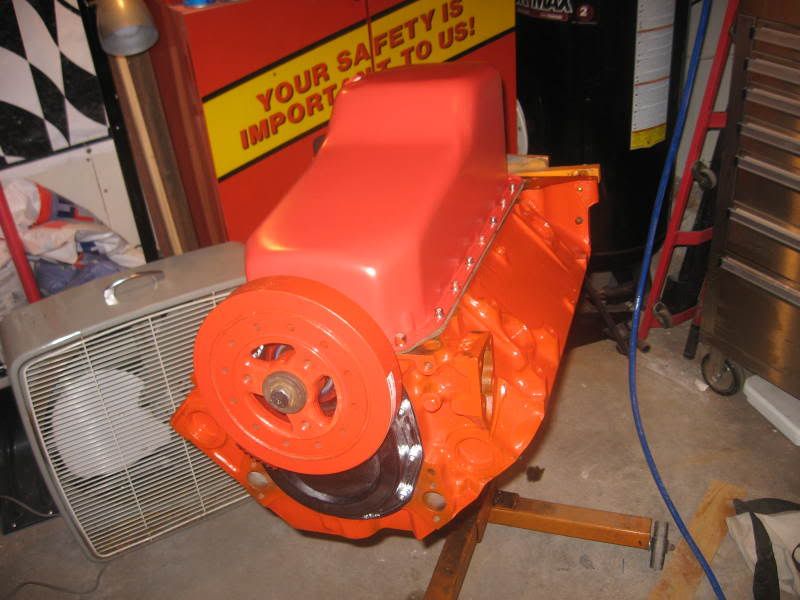
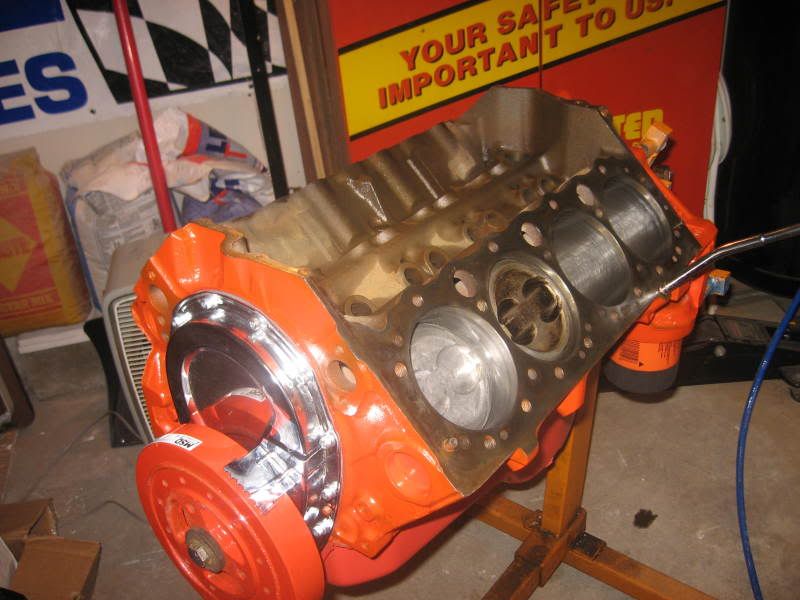
I thought again today that I should get some of that fancy garage floor paint, then I realize that I am always dragging things across the floor and would just scrape it off anyway. Maybe I should just liberally spray the floor with used motor oil to even it up. I've got almost 5 gallons in a pail right now. Isn't that shortblock a thing of beauty though?
__________________
If no one knows what you're doing, they can't tell you you're doing it wrong HG's Dream Car Build - Shelby Cobra Kit Build your own adjustable track bar 71 Long Fleet C/10 72 Jimmy 4x4 (Junkyard Jimmy)HG's Plow Truck '78 K35 DuallyBigass Farm Truck HG's thread of miscellaneous stuff |
|
|
|
|
|
04-22-2009, 07:52 AM
|
#8 |
|
Registered User
 Join Date: Jan 2007
Location: Columbus, Ohio
Posts: 4,339
|
Re: Junkyard Jimmy Super Low Buck Build Thread
Looks great to me - nice to see it coming back together...
I can't wait to get started here - now that the cold and rain has stopped for a bit - 
|
|
|
|
|
04-22-2009, 08:57 PM
|
#9 |
|
GEARHEAD
Join Date: Aug 2003
Location: MN
Posts: 6,119
|
Re: Junkyard Jimmy Super Low Buck Build Thread
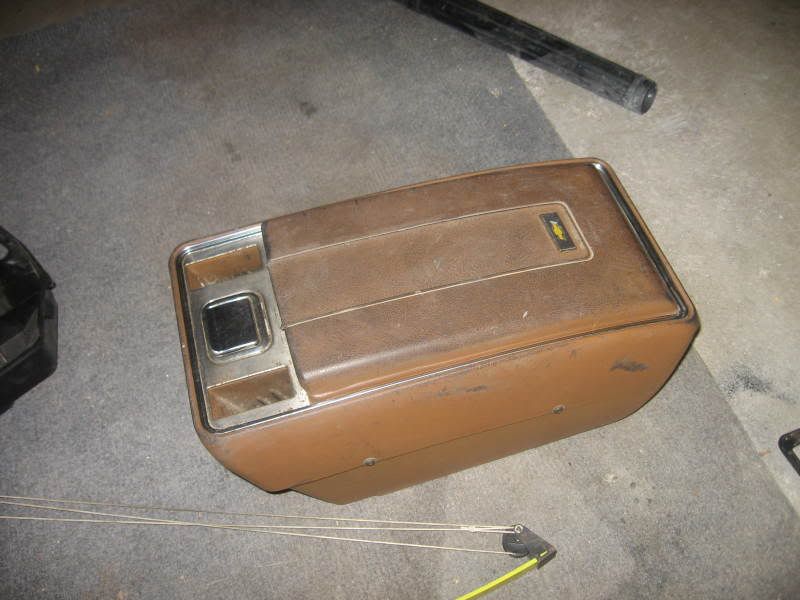
Just a couple notes here. I was visiting my sister sunday and her husband has a bunch of junker trucks out on his property, mostly abandoned mudders. One of those was his dads mid 70's blazer and he's going to scrap it. The console was in good shape so I pulled it. Don't need it for this jimmy, but it will come in handy for the other blazer project and it was free. No cracks, just rubbed off paint and some rust on the shiny insert part. Anyone no if there is any difference between this and the original 72 style?
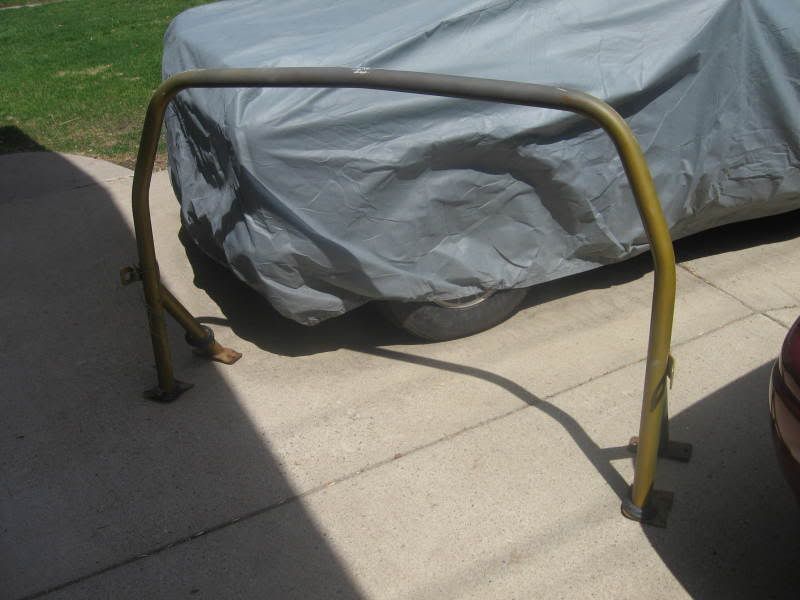
 I also went to the local junkyard today and found a gas tank from a 75 blazer to use in my C-10. That blazer also had a roll bar, so I took some measurements and it looks like it should fit OK in the jimmy. I plan on adding some supports to go from this bar to the windshield frame or to another bar bent to fit the front door frame and windshield frame. Not a true rollbar, but it will look good and add some support to the windshield so the top can come off before the rocker boxes and floor get repaired. I should get it in the next few days and will post pics then. There was at least one other console out there to if anyone is interested.
__________________
If no one knows what you're doing, they can't tell you you're doing it wrong HG's Dream Car Build - Shelby Cobra Kit Build your own adjustable track bar 71 Long Fleet C/10 72 Jimmy 4x4 (Junkyard Jimmy)HG's Plow Truck '78 K35 DuallyBigass Farm Truck HG's thread of miscellaneous stuff Last edited by hgs_notes; 04-22-2009 at 08:59 PM. |
|
|
|
|
04-22-2009, 11:31 PM
|
#10 | ||
|
Not a bad nut after all..
Join Date: Dec 2000
Location: ND
Posts: 1,756
|
Re: Junkyard Jimmy Super Low Buck Build Thread
Quote:
Quote:
__________________
'05 Chevy 2500HD 4x4 '72 GMC LWB 4x2 driver '72 Chevy LWB 4x4 plow truck '71 Blazer 4x4 driver '70 GMC LWB trailer |
||
|
|
|
|
04-22-2009, 11:44 PM
|
#11 |
|
GEARHEAD
Join Date: Aug 2003
Location: MN
Posts: 6,119
|
Re: Junkyard Jimmy Super Low Buck Build Thread
Thanks for the info badpeanut. I know the bar will fit, the newer blazer is a little shorter than the 1st gen, in hieght, width is the same. Distance from front floor edge to wheel well is shorter on the 75 also. I'll have plenty of room.
__________________
If no one knows what you're doing, they can't tell you you're doing it wrong HG's Dream Car Build - Shelby Cobra Kit Build your own adjustable track bar 71 Long Fleet C/10 72 Jimmy 4x4 (Junkyard Jimmy)HG's Plow Truck '78 K35 DuallyBigass Farm Truck HG's thread of miscellaneous stuff |
|
|
|
|
04-28-2009, 02:58 PM
|
#12 |
|
GEARHEAD
Join Date: Aug 2003
Location: MN
Posts: 6,119
|
Re: Junkyard Jimmy Super Low Buck Build Thread
Here it is for $50. Needs a little cleaning on the bottom ends and some black paint. Total spent is up to $834.
__________________
If no one knows what you're doing, they can't tell you you're doing it wrong HG's Dream Car Build - Shelby Cobra Kit Build your own adjustable track bar 71 Long Fleet C/10 72 Jimmy 4x4 (Junkyard Jimmy)HG's Plow Truck '78 K35 DuallyBigass Farm Truck HG's thread of miscellaneous stuff |
|
|
|
|
09-04-2009, 07:12 PM
|
#13 |
|
GEARHEAD
Join Date: Aug 2003
Location: MN
Posts: 6,119
|
Re: Junkyard Jimmy Super Low Buck Build Thread
I went out to the farm today and started it up and drove it out of the weeds. Still want to do the motor and brakes before winter. My oldest just got her driver license yesterday. She waited quite a while because she didn't have much interest in driving. Now that she has the license however, I need to find her something to drive, and well, the Jimmy came up as an option. I took her out today to give it another look, and she said it looks better than she remembers it. I'm not pushing it on her though, because it does need a lot of work yet and the gas mileage would be bad. I'll let her decide over the weekend. If it's a go, then I'll be back to work on it, if not, back burner again.
__________________
If no one knows what you're doing, they can't tell you you're doing it wrong HG's Dream Car Build - Shelby Cobra Kit Build your own adjustable track bar 71 Long Fleet C/10 72 Jimmy 4x4 (Junkyard Jimmy)HG's Plow Truck '78 K35 DuallyBigass Farm Truck HG's thread of miscellaneous stuff Last edited by hgs_notes; 09-04-2009 at 07:12 PM. |
|
|
|
|
09-07-2009, 09:33 PM
|
#14 |
|
GEARHEAD
Join Date: Aug 2003
Location: MN
Posts: 6,119
|
Re: Junkyard Jimmy Super Low Buck Build Thread
I bought an oil pressure test gage to use a while back, knowing that I was going to try it on this engine before I did the swap. You know, why fix it if it aint broke. I never really trusted the one in the cluster. VTBlazer suggested this a long time ago and I finally got around to it. Anyway, turns out I got 45 psi at idle.
 So there had to be enough pressure during the first start up to at least keep the bearings from being wiped. This makes a big difference in the cost of the project. Total layout rests at $528 because I'll stick with this engine. It starts as good as my wifes denali as long as you pump the hell out of it first. I tried figuring out some of the electrical today. I want to get the flashers working so when I'm cruising down the shoulder of the highway to get it to my driveway, I'm more or less legal. It's about 1 mile from town, 1.5 from my house. The only wiring stuff I did prior to today was just to get the engine running. I hooked up a few more plugs to the harness, replaced some fuses, found a couple things to replace, but got no closer really to having any of the lights working. I've got broken ground wires, broken bulbs, corroded terminals, wires that don't match the published diagrams, etc. Now that I don't have to swap shortblocks, I just want to get it home to put in the exhaust, replace the brakes, and sort through some wiring. Oh yeah, and use my pressure washer on the beast to brighten it up just a bit. I ordered a set of headers for my C-10, but they won't fit a 2wd, so I will use them on this. They are very nice Hooker Competition headers, ceramic coated for $125 shipped. The rest of the exhaust is the stuff I took off my C-10 because it's all getting replaced. So now the total will creep up to $653. I think I'll bring it home this week. It's just easier to work on by the garage, rather than in the weeds. I am not looking forward to this brake job. I really don't think it will go well at all.
__________________
If no one knows what you're doing, they can't tell you you're doing it wrong HG's Dream Car Build - Shelby Cobra Kit Build your own adjustable track bar 71 Long Fleet C/10 72 Jimmy 4x4 (Junkyard Jimmy)HG's Plow Truck '78 K35 DuallyBigass Farm Truck HG's thread of miscellaneous stuff |
|
|
|
|
09-07-2009, 09:55 PM
|
#15 |
|
VA72C10
 Join Date: Mar 2008
Location: Midlothian, VA
Posts: 25,269
|
Re: Junkyard Jimmy Super Low Buck Build Thread
This has been an interesting thread to follow. thanks for the updates. Best wishes with the brakes.....
I must have missed it but are you using the original tub or the donor you got?
__________________
Looking for a 67-72 swb or blazer project in or around VA. 
|
|
|
|
|
09-07-2009, 11:03 PM
|
#16 | |
|
GEARHEAD
Join Date: Aug 2003
Location: MN
Posts: 6,119
|
Re: Junkyard Jimmy Super Low Buck Build Thread
Quote:
I'm using the original tub. The rust free one I bought is now sitting on a 2wd blazer frame. That's another build thread, but nothing being done on that until my truck is painted and back on the road. Cripes I need some money... 
__________________
If no one knows what you're doing, they can't tell you you're doing it wrong HG's Dream Car Build - Shelby Cobra Kit Build your own adjustable track bar 71 Long Fleet C/10 72 Jimmy 4x4 (Junkyard Jimmy)HG's Plow Truck '78 K35 DuallyBigass Farm Truck HG's thread of miscellaneous stuff |
|
|
|
|
|
09-08-2009, 07:27 PM
|
#17 | |
|
I miss this truck.
Join Date: Dec 2001
Location: Lexington, KY U.S.A.
Posts: 2,863
|
Re: Junkyard Jimmy Super Low Buck Build Thread
Quote:
What did #1 Daughter decide on the Jimmy as a first car daily driver plan?
__________________
'07 GMC Acadia SLT. Sweet ride. '08 Crew Cab Z-71 short bed. Really like this truck A LOT. |
|
|
|
|
|
09-08-2009, 07:34 PM
|
#18 | |
|
GEARHEAD
Join Date: Aug 2003
Location: MN
Posts: 6,119
|
Re: Junkyard Jimmy Super Low Buck Build Thread
Quote:
The things we do for our kids. Yikes!
__________________
If no one knows what you're doing, they can't tell you you're doing it wrong HG's Dream Car Build - Shelby Cobra Kit Build your own adjustable track bar 71 Long Fleet C/10 72 Jimmy 4x4 (Junkyard Jimmy)HG's Plow Truck '78 K35 DuallyBigass Farm Truck HG's thread of miscellaneous stuff |
|
|
|
|
|
09-11-2009, 06:04 PM
|
#19 |
|
GEARHEAD
Join Date: Aug 2003
Location: MN
Posts: 6,119
|
Re: Junkyard Jimmy Super Low Buck Build Thread
I brought it home today. I used a trailer because the lights wouldn't work and I didn't want a hassle from the local cops. I drove it on and off the trailer though. Anyway, I got started figuring out the electrical situation. It's kinda bad, but fixable. I got the headlights to work, except one high beam, which is probably a bad bulb. Did you know that not having a dimmer switch hooked up prevents the headlights from working?
 Good thing I had a spare hanging around the garage. I have power to both front parking lights, but bad bulbs. I have power to the rear tail light harness, but that is probably the worst part of all. The tail light assemblies are corroded beyond use. The tail light harness is a bit messed up in a couple spots. All the ground wires are corroded off. I'll have to swing by the junkyard in the morning, because I didn't keep any spares of those tail lights around. Maybe I'll get lucky and find a good harness too. I got power to the dome lights, but there is a ground problem on the wires running through the top wall. I unplugged it to keep it from draining the battery. I had to patch the harness from the fuse block to the top, that's when I found the other problem. Good thing I had a spare hanging around the garage. I have power to both front parking lights, but bad bulbs. I have power to the rear tail light harness, but that is probably the worst part of all. The tail light assemblies are corroded beyond use. The tail light harness is a bit messed up in a couple spots. All the ground wires are corroded off. I'll have to swing by the junkyard in the morning, because I didn't keep any spares of those tail lights around. Maybe I'll get lucky and find a good harness too. I got power to the dome lights, but there is a ground problem on the wires running through the top wall. I unplugged it to keep it from draining the battery. I had to patch the harness from the fuse block to the top, that's when I found the other problem.So all in all, I think I have it diagnosed and know what needs to be done to get the lights working properly. I love my pressure washer. It cleaned the top off beautifully. It's actually white again. I didn't have the camera today for a good comparison shot, but it was unbelievable. I'll post some after pics later. Got a bit of a rain storm coming through at the moment. I found some rusted out rear body mounts. I'm not even sure yet how I'm going to fix this. I'll post pics of that also, and hopefully someone will chime in with a suggestion. More later.
__________________
If no one knows what you're doing, they can't tell you you're doing it wrong HG's Dream Car Build - Shelby Cobra Kit Build your own adjustable track bar 71 Long Fleet C/10 72 Jimmy 4x4 (Junkyard Jimmy)HG's Plow Truck '78 K35 DuallyBigass Farm Truck HG's thread of miscellaneous stuff Last edited by hgs_notes; 09-11-2009 at 06:06 PM. |
|
|
|
|
09-11-2009, 07:34 PM
|
#20 |
|
VA72C10
Join Date: Mar 2008
Location: Midlothian, VA
Posts: 25,269
|
Re: Junkyard Jimmy Super Low Buck Build Thread
Top came out great....the mounts...not so much....lol
__________________
Looking for a 67-72 swb or blazer project in or around VA.
|
|
|
|
|
09-12-2009, 10:34 PM
|
#21 |
|
GEARHEAD
Join Date: Aug 2003
Location: MN
Posts: 6,119
|
Re: Junkyard Jimmy Super Low Buck Build Thread
It was a long day, got some things done, got other things started. I should have called Mike Rowe and told him to come by today.
(Big guy voice) Tonight, on a special episode of Dirty Jobs, Mike takes on a day of Dirty Hobbies. (Mike Rowe) Today, I'm spending some time with another Mike on a special episode for dirty hobbies. Now Mike spends his work days as a boiler inspector, and we could have an entire episode on just that. But nope, we're here in Mikes driveway working on this hunk'o $^#*&. You see, Mikes on a mission to take this rattle trap from a junker to the road. (HG) OK Mike, what I need you to do is lay down here under the rear bumper. See those wires running across there? OK, take 'em out. Yeah, watch for that stuff falling into your eyes, no don't rub it, that makes it worse. Well sure you can slide out a bit, but then the sun will be blinding you. Just don't work with your mouth open, rust is not for internal use. (Mike Rowe) Hey Mike, this harness doesn't look so hot, and niether do these light assemblies. (HG) Well lets go out to the junkyard then. (At the junkyard) See that truck in the 6 foot high burr bushes? That's where we're going. See the yard owner recently cleared a path to the front of the truck. But the parts we need are on the back. So just climb up on the front fender there, with your bucket of tools, then avoid the large burr bush in the engine compartment, climb over the cab, and walk along the bed rail avoiding all the loose body parts in the bed, and jump down into the weeds and stomp 'em flat. Quit your whining, those burrs will pull right off when we get back to the car. What's that, a truck frame is resting against the rear corner of the bed. Awe, you can work around that. Now just climb back over the way you came or else you'll be one giant burr yourself. Don't forget the bucket of tools and the tail lights, definitely need those. (back at the car) see, those burrs come right off, and stick else where. You're not getting in the car 'til there gone though. (Driveway) OK, now I need you to pull that old exhaust pipe out of there. Oops, forgot to remind you not to work with your mouth open under there... No don't rub your eyes. You better just come back out of there and get some eye wash.... Well, that was the first couple hours of my day. What I got done was a cheap refurbish of the tail light wire harness. Heres what I started with: 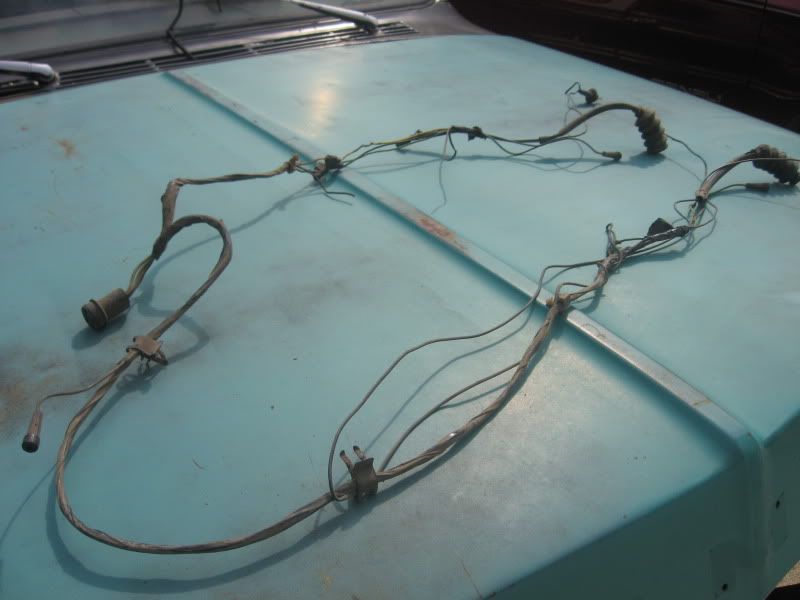 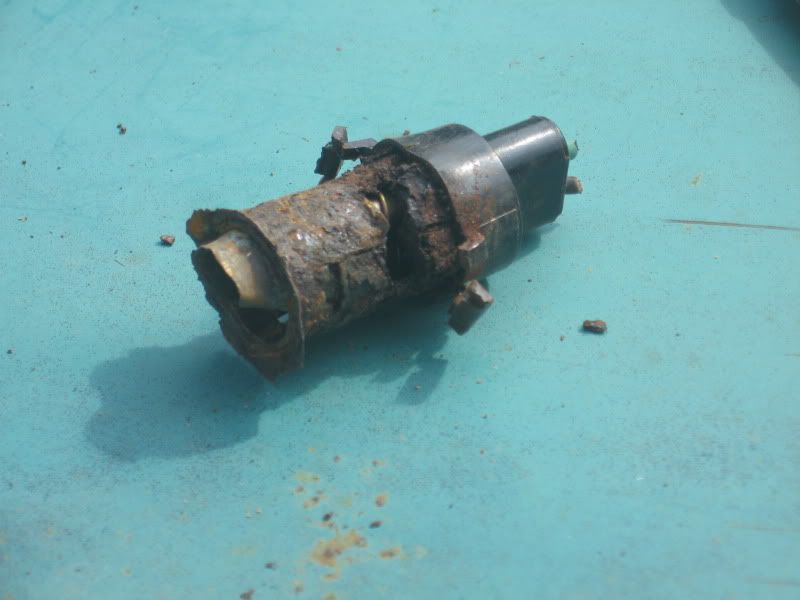 I clipped out some bare wires where some trailer wiring was put in, put newer bulb holders in the brake lights, put on some new ground wires, cleaned up a couple broken wires and tested it all out. I got that put back in, then attempted to repair the rusted out area behing the tail lights. 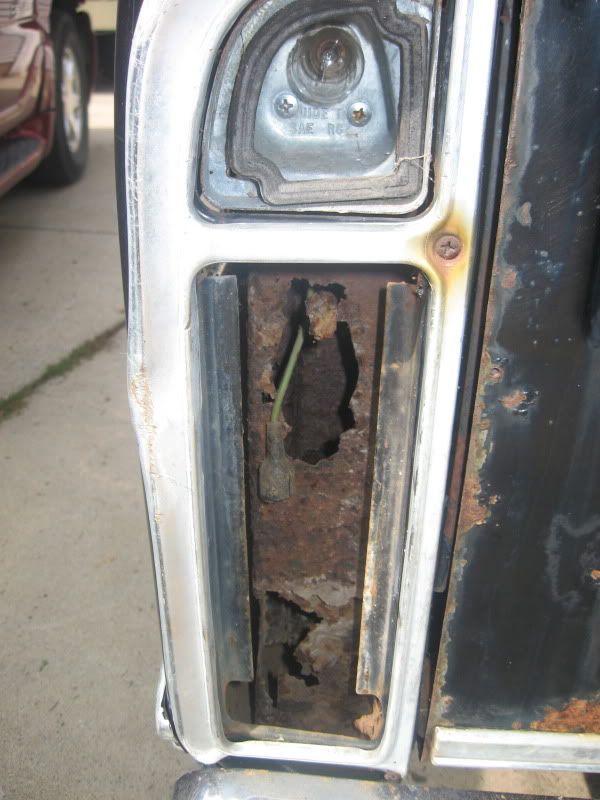 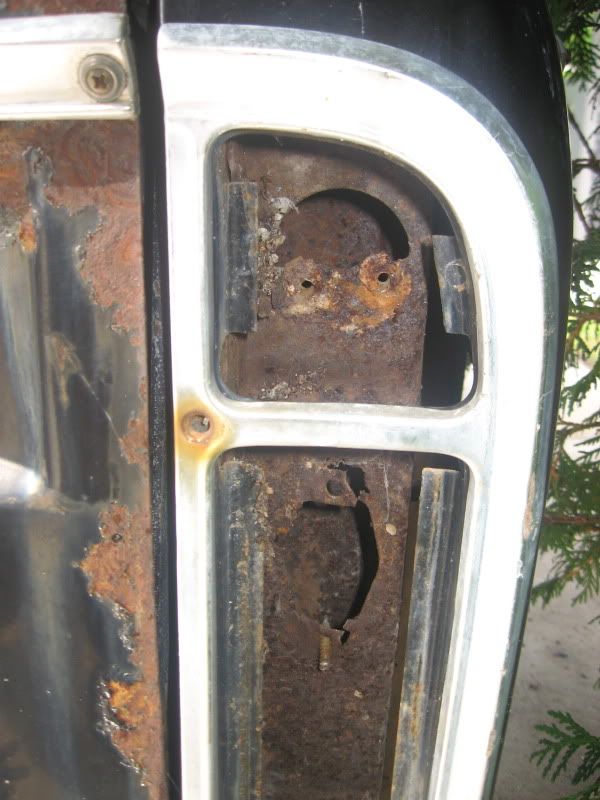 There was nothing to bolt the tail lights too there. So I made some plates and used some body adhesive to hold them in. 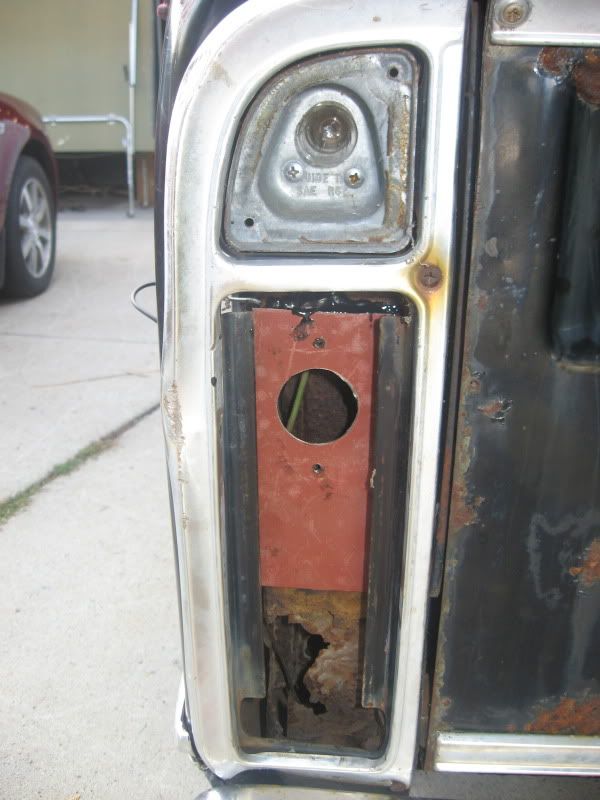 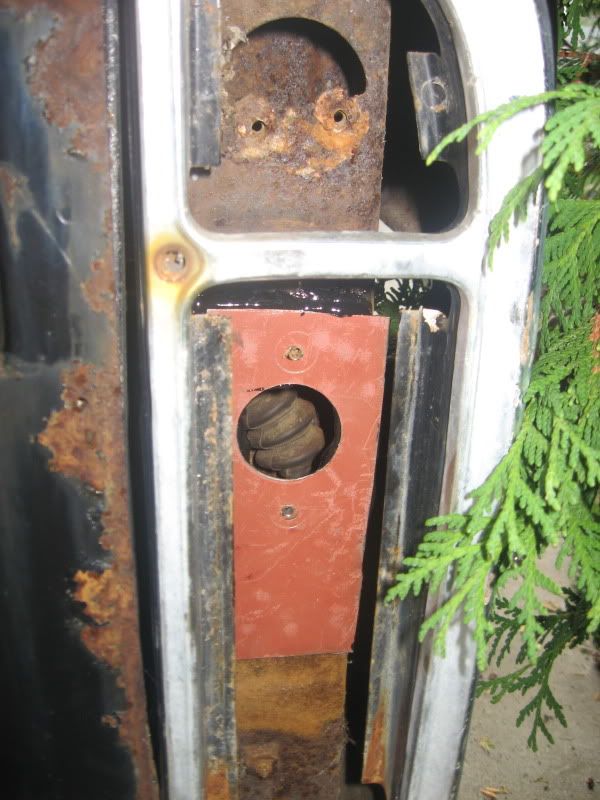 That's just some scrap from my C-10 floor. It was kinda tricky though, because the plates wanted to slide down. So I put the plate in, then quickly put the tail light in and got a screw started as the hole slid down to the right spot. I didn't tighten the screws much though so I could push the plate against the rusted area. Once it cured I could remove the tail lights and they were rock solid. Not a bad repair if I say so myself. I had to let that set, so I started putting in the headers. I got the driver side in. That rear bolt was a total pain in the A55. 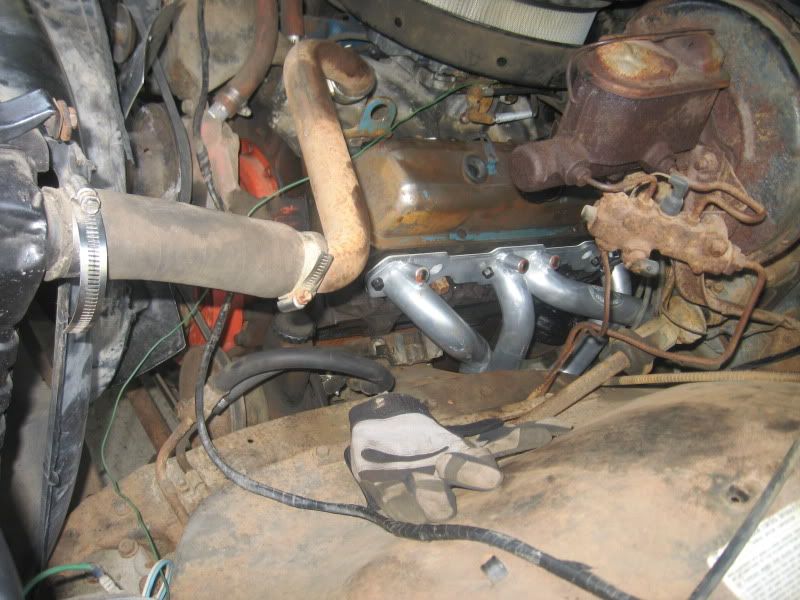 What was left of the old exhaust. 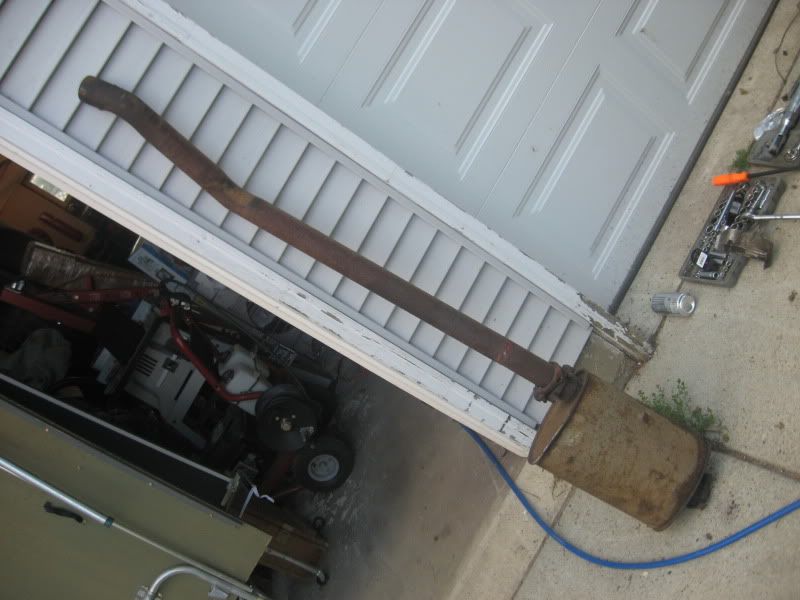 I got the passenger side manifold out, but the starter has to come out too for the header to slide in and I got hungry, tired and will get back to it later. And here's a tip for tool shoppers at NAPA. I needed a socket universal joint ot knuckle. The napa brand was like $18. The Evercraft was like $5 and has a warrantee also. I got a set of 1/4, 3/8 & 1/2 for less than the cost of one napa brand. edit: forgot to mention the lights cost me $25, kinda high, but they are close and I don't have to pay for shipping. So the total is at $678.
__________________
If no one knows what you're doing, they can't tell you you're doing it wrong HG's Dream Car Build - Shelby Cobra Kit Build your own adjustable track bar 71 Long Fleet C/10 72 Jimmy 4x4 (Junkyard Jimmy)HG's Plow Truck '78 K35 DuallyBigass Farm Truck HG's thread of miscellaneous stuff Last edited by hgs_notes; 09-12-2009 at 10:46 PM. |
|
|
|
|
09-19-2009, 07:39 PM
|
#22 |
|
GEARHEAD
Join Date: Aug 2003
Location: MN
Posts: 6,119
|
Re: Junkyard Jimmy Super Low Buck Build Thread
You have no idea how nice it is to be able to make regular updates. When I injured my arm back in July, and had to stop most of everything I love to do to relieve stress, it just plain sucked. My arm still is not 100%, but I can use it and there is very little discomfort, as long as I take it easy on that side.
Anyway, update for today. Checked out the left rear blinker and turns out to be just a poor connection between the tail light harness and the one that comes back from the firewall. So all the main driving lights are working. I just need to find some screws for the tail light lenses. Got the pass side header in, re-wrapped most of the front light harness, re-routed the starter wires to keep them from burning up, tightened some loose crossmember bolts, and took it for a ride around the block. Open headers OMG that thing is a beast. The floor is pretty open and the header outlet is right there. It's like being in a resonance chamber. BTW, I love the headers. They were supposed to be for my C-10, but hit the crossmember on that because these are for 4x4's only. There is a bunch of clearnace on both sides. They tuck up in the frame rail. The only thing I had to do extra was take out the shift rod from the column to linkage and make a slight bend in it. 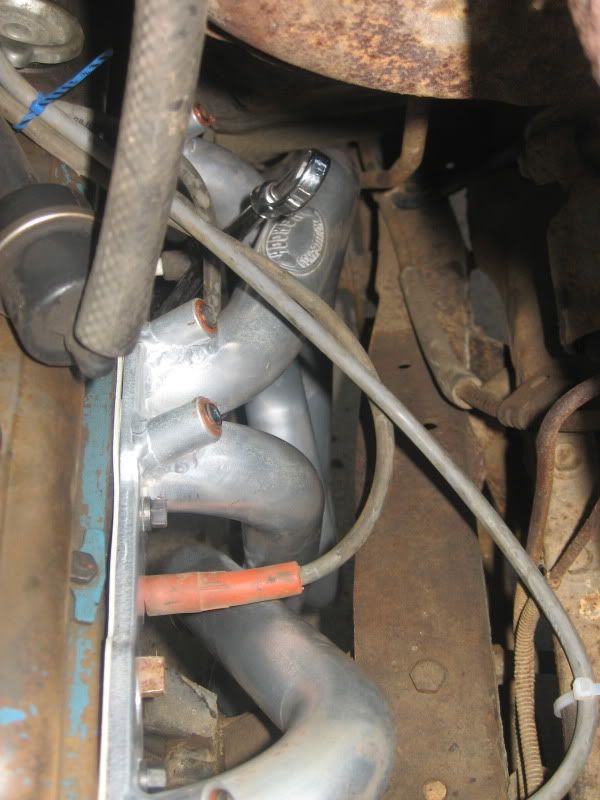 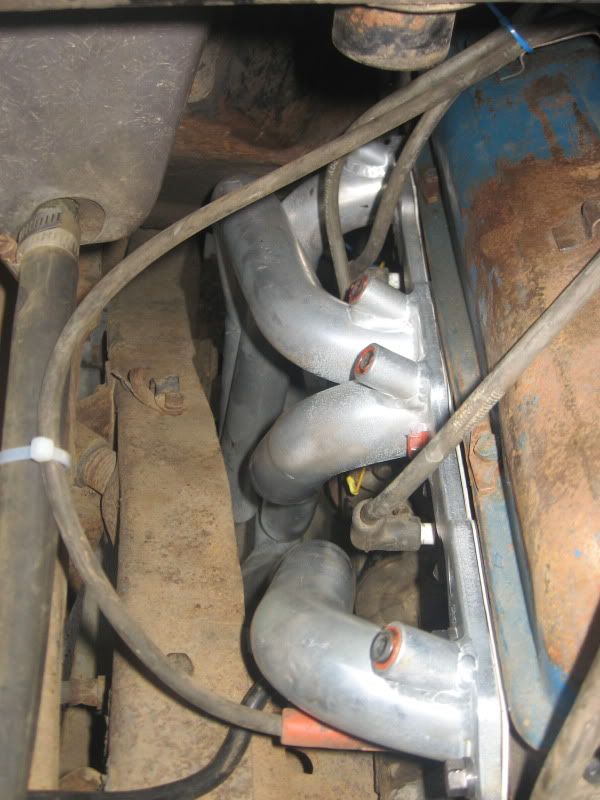 You can see the rod there now after the bend, before it rubbed the header.   The only odd thing with them is that one outlet is shorter than the other. This picture was taken pretty much perpendicular to the frame. You can see how high they sit up, and the offset. 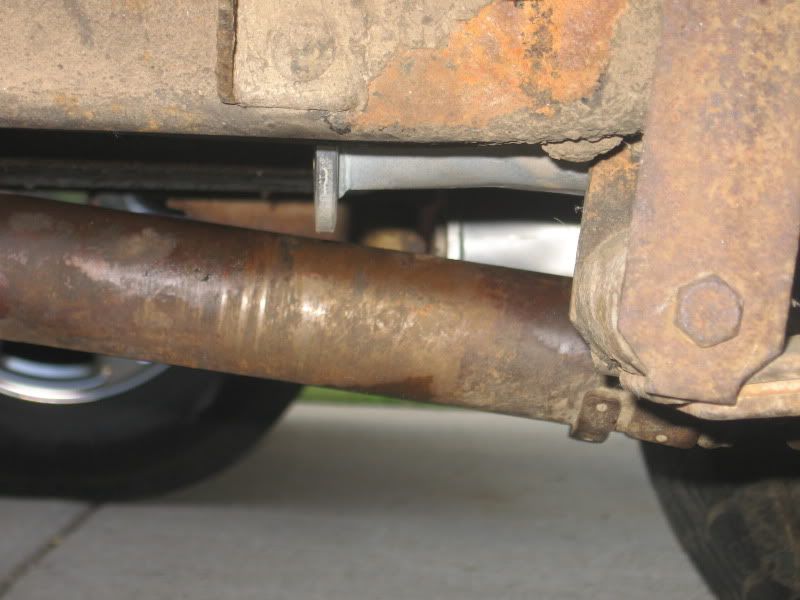 The only money I spent this week on it was for bulbs, about $15. So the total is now $693. I'm not sure what I'll do next, brakes or exhaust. I'm kinda tired of laying under it and washing the grit out of my eyes. There are a couple things on the tranny I'd like to take care of that might be easier without the exhaust pipes there. And the brakes are seriously bad. I think I just talked myself into a brake job. 
__________________
If no one knows what you're doing, they can't tell you you're doing it wrong HG's Dream Car Build - Shelby Cobra Kit Build your own adjustable track bar 71 Long Fleet C/10 72 Jimmy 4x4 (Junkyard Jimmy)HG's Plow Truck '78 K35 DuallyBigass Farm Truck HG's thread of miscellaneous stuff |
|
|
|
|
09-13-2009, 01:57 PM
|
#23 |
|
Registered User
Join Date: Mar 2004
Location: Sacramento, CA
Posts: 1,084
|
Re: Junkyard Jimmy Super Low Buck Build Thread
LOL
Great post!
__________________
'71 Jimmy, 350, SM465, NP205, 2in Tuff Country lift, 33s on rallies, TBI, softtop and hardtop"If life was fair you'd be able to afford one of each and a garage large enough to house them all." |
|
|
|
|
09-13-2009, 04:05 PM
|
#24 |
|
Registered User
Join Date: Jan 2007
Location: Columbus, Ohio
Posts: 4,339
|
Re: Junkyard Jimmy Super Low Buck Build Thread
Wow - those mounts are pretty crappy - sorry to see that. Also - nice fix on the taillight panels.
I looked at the pix wondering what you were going to do to resolve that - and you came through with a pretty good plan for a fix. Nice work! |
|
|
|
|
09-13-2009, 04:10 PM
|
#25 | ||
|
GEARHEAD
Join Date: Aug 2003
Location: MN
Posts: 6,119
|
Re: Junkyard Jimmy Super Low Buck Build Thread
Quote:
Quote:
__________________
If no one knows what you're doing, they can't tell you you're doing it wrong HG's Dream Car Build - Shelby Cobra Kit Build your own adjustable track bar 71 Long Fleet C/10 72 Jimmy 4x4 (Junkyard Jimmy)HG's Plow Truck '78 K35 DuallyBigass Farm Truck HG's thread of miscellaneous stuff |
||
|
|
|
 |
| Bookmarks |
|
|


 Hybrid Mode
