
|
 01-01-2022, 02:26 AM
|
#51 |
|
Senior Member
 Join Date: Jun 2014
Location: Mocksville, NC
Posts: 1,723
|
Re: Sullii the 72 GMC 1500
On to 2022! Now let's get back to finishing up that body drop. I decided 1" was as much as I could drop the body without major modifications, and this was achieved in a straightforward manner by lowering the four body mount brackets by, you guessed it, one inch.
The first order of business was to pull the cab and drill out all the rivets holding the body mounts on. I prefer to drill them out and then knock the heads off with one good smack on a chisel. While I had the cab off, it was also a good time to clean up the center section of the frame.    I definitely wasn't going to go this far and then reuse the original cab mounts. I deliberated between poly and rubber mounts and ultimately chose rubber. This isn't a race truck afterall. Of course, after 50 years of being squashed between the frame and cab you would expect the original mounts to be compressed somewhat. As you can see, the new mounts were about 1/4" taller than the originals. There goes some of my drop! In all likelyhood these new mounts will compress some once snugged up and the variance between old and new mounts will be minimal. 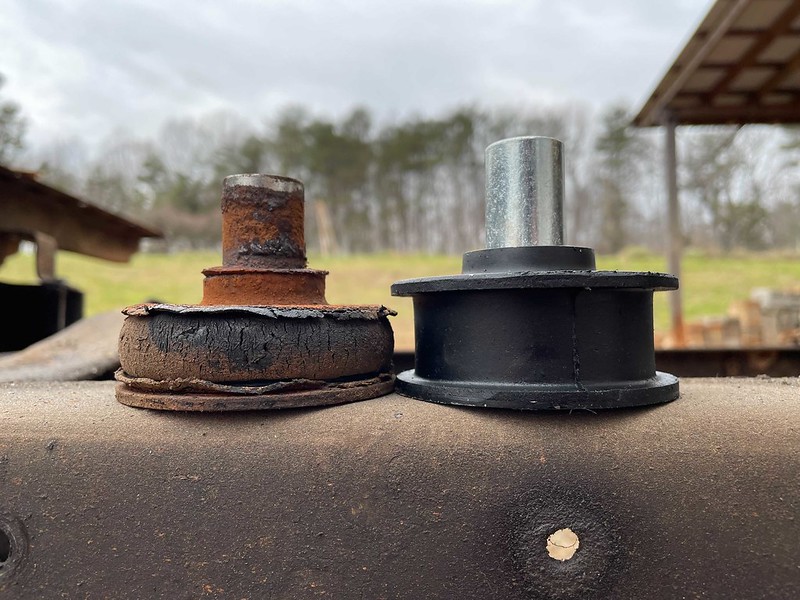 After drilling new holes in the frame, I simply bolted the mounts back on with some grade 8 hardware. Well, it wasn't quite this simple for the front mounts. Since the lower mounting holes drop below the frame when the bracket is lowered 1", I actually had to drill new lower holes in the brackets that matched up with the original lower holes in the frame.  At this point, it was time to drop the cab back on the frame. This was accomplished fairly easily with the use of a lift. I have occasional access to this at my father-in-laws shop. Once the cab was back on and the mounting bolts tightened up, all that was left to do was sit back and admire the new lower stance which is completely unnoticeable without the fenders on!   One thing I left out up to this point was the cab clearancing required. I will show this now after reinstallation of the cab for clarity on why this was necessary. Up front, I had to trim a notch in the pinch weld along the floorboard. Don't worry, I only cut off the 90 degree lip on this seam, not the weld itself. Also requiring clearance was the rear panel of the cab. Very minor 1/8" notches were cut in the bottom edge of the panel. Lastly, a sizeable hole must be cut in the cab floor to allow room for the stock crossmember. Notice I angled the corners of the rear cut so that the seatbelts can still be bolted up even after I add a 1" raised filler piece over this hole.    Now back to admiring the progress thus far: 
__________________
Builds: Green Gus the 68 C10 ; Sullii the 72 1500 - Instagram: @dr.hewitt - C10 Concept/Development Photos: Master Thread Last edited by hewittca; 01-05-2022 at 09:46 AM. |

|

|
|
01-03-2022, 10:58 PM
|
#52 |
|
Senior Member
Join Date: Jun 2014
Location: Mocksville, NC
Posts: 1,723
|
Re: Sullii the 72 GMC 1500
I had one more day off before its back to the grind, so I had some time to work on the truck again. It has been a very productive two weeks! After enjoying the shop for a while, I was banished to the unfinished half of the garage. No bother, NC weather is crazy this time of year with 70s one day and snow the next (literally). The next order of business was to start piecing the truck back together. First up, the nose. This really starts to give you an idea of how low the truck will be, and this is before the engine is in! My favorite static truck is gringoloco's, and I know he has all sorts of fancy suspension components but I'm hoping to get somewhere near the stance of his truck. This will just be a cruiser so it doesn't have to handle much better than a 50 year old truck. Presently, I am about 2" higher than his truck and should be within 1" once the motor is in. Not too bad for a lot of labor and a little money. Like his truck, mine will also require clearancing on the inner fenders. I have 2" of suspension travel available before I crash into the fenders. Luckily that is easily fixable with relocated hood hinges and a little more cutting and grinding, however, I will save that for a later date.
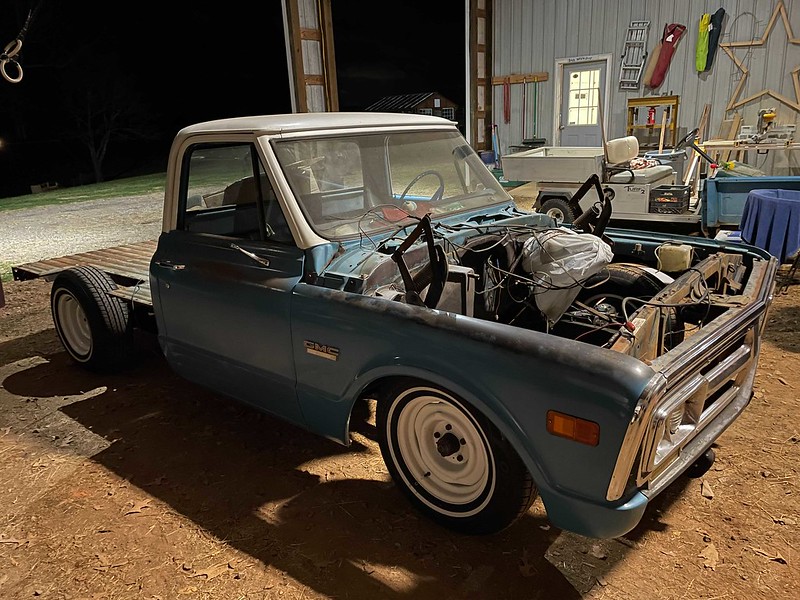   Next up was the hood. Everything fit back together like it was before without no readjustment, which was nice. The only thing that needed some tweaking for a better fit was the driver door, but that was an issue when I got the truck. At this point, reassembly had progressed as far as I could go. The bed still needs to be modified for the raised floor, so to gain some motivation a mockup was necessary. This is close to the final ride height, but still needs some tweaking once the motor is in. I don't like a 2" rake (if you do a 1 to 1 drop front to rear), but I also don't like the level look (2" more drop in rear than front). I'm somewhere in the middle and will fine tune that with blocks once the truck is fully assembled again.     With my newfound inspiration it was time to dig into the bed floor raise. For now, this just consisted of a brainstorming session and some cutting on the front bed panel. Without the bedsides, you can see where the bed floor will sit. This is 4" higher due to the rear frame raise and an additional 1" higher relative to the body drop, thus a 5" shallower bed is required. Now, I learned my lesson on my last truck that you don't want to go exactly as far as necessary because you may need some adjustment in the bed positioning. You box yourself in when the floor is raised exactly as much as theoretically determined, therefore, I will raise it an additional 1/2" to give me some room for adjustment. My plan is to section this out of the middle of the recessed region in the bedsides and front panel and then weld the pieces back together. This will give the bed a factory appearance just shallower, but wow I didn't realize how shallow it would be until I saw it sectioned! Oh well, I will still be able to make my casual trips to the hardware store and throw some lumber or other odds and ends in the bed. I have never loaded up a truck to max capacity anyway.     Now that I have my plan in place for the bed, it's time to fully execute. Some time in the next few weeks I will update with the details on that process.
__________________
Builds: Green Gus the 68 C10 ; Sullii the 72 1500 - Instagram: @dr.hewitt - C10 Concept/Development Photos: Master Thread |
|
|
|
|
01-05-2022, 07:26 AM
|
#53 |
|
Senior Member
 Join Date: Aug 2019
Location: Cheraw
Posts: 1,305
|
Re: Sullii the 72 GMC 1500
Did you lower the Rad support brackets 1" as well?
|
|
|
|
|
01-05-2022, 08:13 AM
|
#54 | |
|
Senior Member
Join Date: Jun 2014
Location: Mocksville, NC
Posts: 1,723
|
Re: Sullii the 72 GMC 1500
Quote:

__________________
Builds: Green Gus the 68 C10 ; Sullii the 72 1500 - Instagram: @dr.hewitt - C10 Concept/Development Photos: Master Thread |
|
|
|
|
|
01-05-2022, 08:39 AM
|
#55 |
|
Registered User
Join Date: Mar 2016
Location: hickory, ky
Posts: 1,249
|
Re: Sullii the 72 GMC 1500
Nice fab work. It will be interesting to see how you approach the tubs. I'm watching.
__________________
:My build thread http://67-72chevytrucks.com/vboard/s...d.php?t=807535 1971 c10 swb/1972 K10 swb/1968 Camaro 350/4spd 1955 210 2 dr sedan/1998 RCSB Z71 |
|
|
|
|
01-05-2022, 11:32 PM
|
#56 |
|
Registered User
Join Date: Aug 2010
Location: Asheville, North Carolina
Posts: 1,838
|
Re: Sullii the 72 GMC 1500
Man I didn't know you had a build thread for this thing! You're moving quickly, can't wait to see the progress.
__________________
ANDREW 1972 Chevy SWB Cheyenne Super JANE http://67-72chevytrucks.com/vboard/s...d.php?t=462072 1972 GMC Jimmy PENNY http://67-72chevytrucks.com/vboard/s...d.php?t=735827 1968 GMC patina swb PEARL http://67-72chevytrucks.com/vboard/s...d.php?t=731315 1972 Chevy K20 BRUCE http://67-72chevytrucks.com/vboard/s...d.php?t=805788 1972 Chevy SWB Highlander OLIVE Build thread coming |
|
|
|
|
01-06-2022, 12:49 PM
|
#57 | |
|
Senior Member
Join Date: Jun 2014
Location: Mocksville, NC
Posts: 1,723
|
Re: Sullii the 72 GMC 1500
Quote:
The plan is to have it done by the Fall Revival '22.
__________________
Builds: Green Gus the 68 C10 ; Sullii the 72 1500 - Instagram: @dr.hewitt - C10 Concept/Development Photos: Master Thread |
|
|
|
|
|
01-08-2022, 10:23 PM
|
#58 |
|
Senior Member
Join Date: Jun 2014
Location: Mocksville, NC
Posts: 1,723
|
Re: Sullii the 72 GMC 1500
I've been highly motivated lately to get this thing back together, so it's time for another update. Continuing where I left off last time, I made more progress on the bed floor raise. After cutting the front panel down to size it was just a matter of welding it back together. Again, my friend helped me here to get this right. After completing the weld through a series of tacs, we ground it down and cleaned up the edges of the paint. At this point, I have not decided how I will finish off this surgery. I know leaving bed scars is popular these days, and I'll admit it does look kinda cool, but I'm not completely sold on it yet. I also don't want to run the risk of attempting to blend it in and it end up being really obvious. For now, I will defer the decision until I am completely done with the bed.
 Next, it was on to the bedsides. The same principle applies here except you have a few more things to consider. First is how to incorporate the wheel tub into the shortened sides. I am going to section the tubs so that the top lines up exactly with the top of the recessed area on the sides. That being the case, I can cut a straight line across my bedside to remove the excess material. I chose to make the cut at what will be the center of the recessed area like I did on the front panel.  I actually just needed the side panels here since I am eliminating the outer wheel well for more tire clearance. You can see here the cuts I made to achieve this. I also had to drill out a few spot welds on the ends of the panels. Once removed, I simply slid them up until they were 5 1/2" higher and the edges served as my cut lines for the sectioning job. The width of my cutoff wheel (0.040") left me the perfect gap for butt welding the panels together. Once cut, the extra section was removed and ultimately will end up in scrap.   Finally, it was time to weld the pieces back on. For now, we just tacked it in a few spots so I could test fit everything. I also took this opportunity to roll the fender lip over so it made a smooth edge on the tire side. Eventually, I will add some sort of filler pieces or bracing to the outer fender because the bottom edges are prone to flopping around while driving. I learned this on my last truck. The only other thing that must be done is moving the bottom edge profile of the rear bed post up 5 1/2" so it mates up with the bed floor like stock. Once everything is assembled for good, I will tac the fender to the bed floor like stock.   At this point, I was at a good spot to take the time and test fit everything. We made quite significant modifications to the frame, suspension, and bed sides and it was a good sanity check to make sure everything was close to lining up. Within minutes I was able to throw a few bolts in the front panel and bed side. A pleasant surprise was that the holes that are used to bolt the front panel and bedsides together are spaced 5 1/2", so I didn't even have to redrill these! Other than being shallower, the bed bolted back together like stock while retaining the same character lines. the tailgate will also close up like normal. I will just have to make a filler panel to go in the gap created between the bed floor and tailgate when it is open.   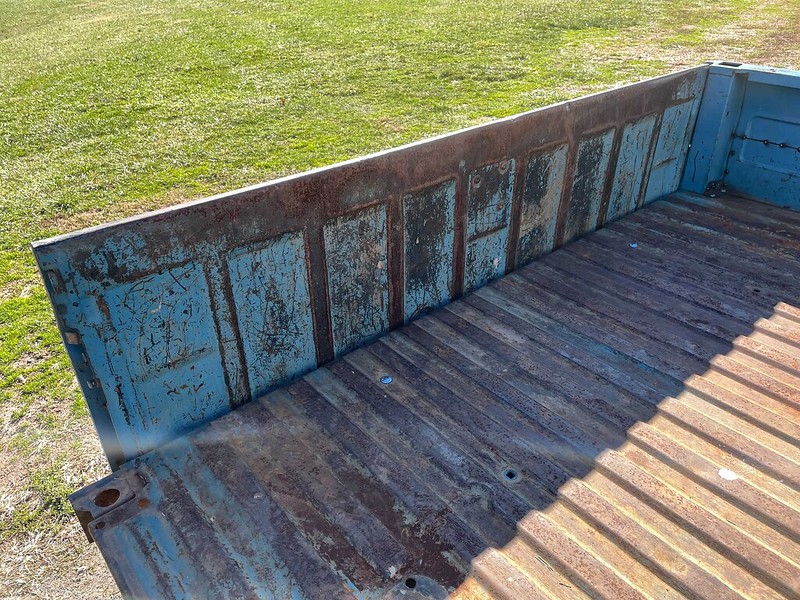 Now it was time to step back and get the first solid look at how the ride height will come together once everything is reassembled. I don't think I could be any more pleased with the stance. It will change slightly once I get the full drivetrain in, but overall it is exactly how I envisioned. The tire clearance front and rear is excellent as well and I was able to achieve just the right amount of tire tuck that I was looking for. Also, the body lines matched up perfectly with no shimming to the bed. Guess I didn't need that extra 1/2" afterall!     From here, it's back to the grinder and welder to finish off the bedsides and wheel tubs. Once these are completed the suspension mods will officially be complete. Then I can redirect my focus to the powerplant since, afterall, I would actually like to drive this thing!
__________________
Builds: Green Gus the 68 C10 ; Sullii the 72 1500 - Instagram: @dr.hewitt - C10 Concept/Development Photos: Master Thread |
|
|
|
|
02-13-2022, 09:29 AM
|
#59 |
|
Senior Member
Join Date: Jun 2014
Location: Mocksville, NC
Posts: 1,723
|
Re: Sullii the 72 GMC 1500
For the wheel tubs, I wanted to shorten those instead of just moving them up with the bed floor. Without shortening them, they would cross over the top edge of the recessed area and I didn't like the way I thought that would look. Instead, I shortened them such that the top of the tub was in line with the top edge of the recessed area. The stock spacing here is 3" and since I raised the bed 5.5" I had to shorten the tub 2.5". These are the cut lines I had to make to accomplish this. As with the crossmember sectioning, I used the laser to make the cut lines around the radiused corners and this made it line up perfectly.
 As you can see, I had to cut a vertical line as well since the tub gets wider as it gets shorter. This resulted in a gap that needed to be filled. Luckily, I had plenty of OG paint scrap left over from the bed raising process! I used whatever I had in the shop (vice, pliers, hammer, rake handle) to bend up the filler piece and overall it matched fairly well.   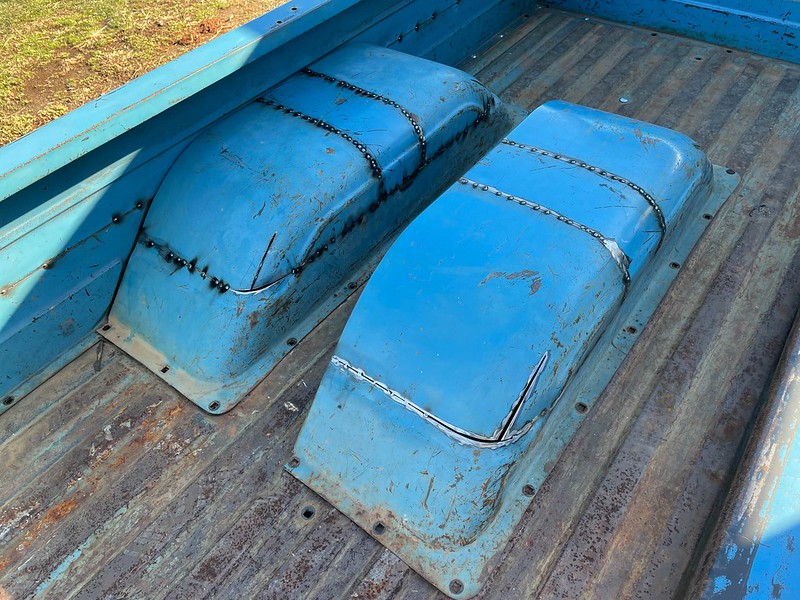 The relief cut along the corner of the tub turned out to be necessary due to a slightly reduced radius of the corner towards the top of the tub. In the end, the tubs retain all the stock styling elements. I also have plenty of tire clearance as well. All that's left to do on these is finish welding and grinding. 
__________________
Builds: Green Gus the 68 C10 ; Sullii the 72 1500 - Instagram: @dr.hewitt - C10 Concept/Development Photos: Master Thread |
|
|
|
|
02-13-2022, 02:04 PM
|
#60 |
|
Registered User
Join Date: Mar 2015
Location: Utah
Posts: 748
|
Re: Sullii the 72 GMC 1500
Those turned out fantastic!
__________________
72 GMC highlander nicknamed by my then 6-year-old brother "stripes" http://67-72chevytrucks.com/vboard/s....php?p=7378180 Check out my Youtube channel @Chad's Fab |
|
|
|
|
02-13-2022, 07:35 PM
|
#61 |
|
Senior Member
Join Date: Jun 2014
Location: Mocksville, NC
Posts: 1,723
|
Re: Sullii the 72 GMC 1500
With the tubs mostly done, there were only a few things left to finish up before I could put the suspension and bed back together for good. One thing I did that I did not take a picture of was flip my truck arm mounts on the crossmember. This helps gain back some pinion angle that you lose by dropping the rear so much. I also tested adding a 1/2" spacer between the mount and crossmember to counteract the problem of the rear moving forward as it drops, but 1/2" was too much. In the end, I did not add a spacer because the rear looks fairly centered when you look at the rear wheel straight on. I'm not sure why some trucks look like the rear end is moved too far forward, but on both of my trucks the rear looked just fine even with a big drop. Another thing to note for those who want to flip these brackets is I lost about 1/2" of my total drop because the truck arm pivots around the spring, so when the front mounting point goes up the rearend has to go down. Ultimately this doesnt matter for me because I'm dropping it less than 2" more and this can be accomplished with blocks.
The other thing that needed to be addressed was the bumper mounting location. Since the bed floor is raised 5" I had to drop the bumper mounting points by an equal amount. This put the holes below the frame, so I had to make extension brackets. These were boxed and welded to the frame and relocate the bumper perfectly.  With the brackets done and all other component modifications complete, it was time to reassemble the bed. I used the bed bolt kits from Classic Parts. Everything bolted back up like stock and the bed floor even bolted to the exact same position on the mounts as it was before any modifications!  You can see here that the bed basically looks stock, just shallower. For my intended purposes it will not be a hindrance to have reduced bed volume. Eventually I may paint the bed scars, but for now I will leave them. The one on the front panel has been exposed sitting in the garage for two months now and still looks clean, so I'm not too worried about these rusting any time soon.  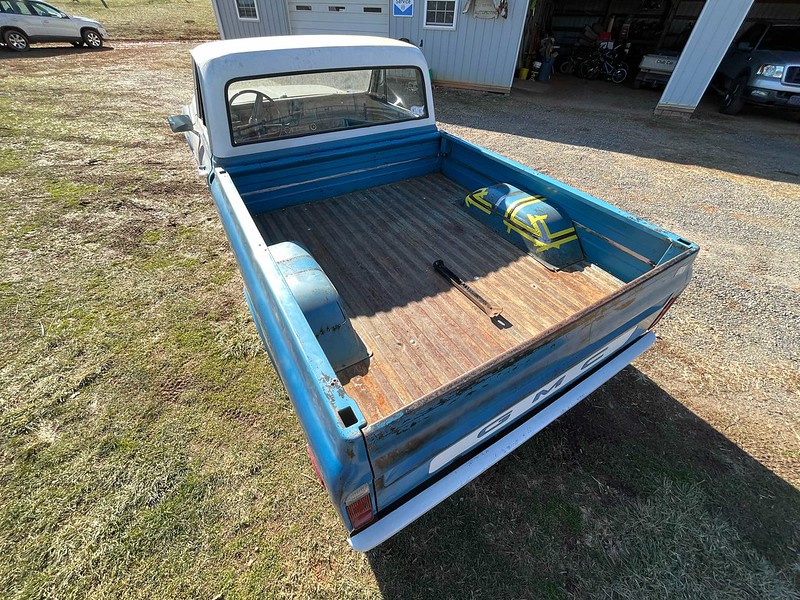 Outside, you can get a better idea of what the truck will look like when complete. This is close to the final ride height. Once I add the drivetrain and blocks it will drop roughly one more inch. This will still leave me 5" of crossmember clearance, plenty for our relatively nice roads here in NC. Even Muttley loves it and is looking forward to riding in it one day, I think.    After reassembly, I noticed that I do have a few filler panels to make. One is at the rear to fill in between the bottom of the bed floor and the tailgate. The other is in the rear wheel wells. With the bed floor raised so much, and the original rear wheel well filler piece obsolete for this application, it leaves an awkward open space behind the wheel. I will eventually make some piece and paint it black to hide this and make it look more solid.   At this point, the truck is basically just yard art until I get going on the engine. I am currently following several leads on an engine for a 5.3 swap, but have not picked anything up yet. Until then, I will just have to enjoy looking at the truck for now. 
__________________
Builds: Green Gus the 68 C10 ; Sullii the 72 1500 - Instagram: @dr.hewitt - C10 Concept/Development Photos: Master Thread |
|
|
|
|
02-14-2022, 02:22 PM
|
#62 |
|
Registered User
Join Date: Mar 2016
Location: hickory, ky
Posts: 1,249
|
Re: Sullii the 72 GMC 1500
Nice work on the tubs. Lots of finish work to do on them, but very nice indeed. I'm impressed.
__________________
:My build thread http://67-72chevytrucks.com/vboard/s...d.php?t=807535 1971 c10 swb/1972 K10 swb/1968 Camaro 350/4spd 1955 210 2 dr sedan/1998 RCSB Z71 |
|
|
|
|
02-14-2022, 05:25 PM
|
#63 |
|
Registered User
Join Date: Aug 2010
Location: Asheville, North Carolina
Posts: 1,838
|
Re: Sullii the 72 GMC 1500
Man that stance is awesome, gonna be even better with the 1" in the front. You're making quick work out of it! Hope the engine search is successful

__________________
ANDREW 1972 Chevy SWB Cheyenne Super JANE http://67-72chevytrucks.com/vboard/s...d.php?t=462072 1972 GMC Jimmy PENNY http://67-72chevytrucks.com/vboard/s...d.php?t=735827 1968 GMC patina swb PEARL http://67-72chevytrucks.com/vboard/s...d.php?t=731315 1972 Chevy K20 BRUCE http://67-72chevytrucks.com/vboard/s...d.php?t=805788 1972 Chevy SWB Highlander OLIVE Build thread coming |
|
|
|
|
03-16-2022, 09:34 PM
|
#64 |
|
Senior Member
Join Date: Jun 2014
Location: Mocksville, NC
Posts: 1,723
|
Re: Sullii the 72 GMC 1500
I've not been able to work on the truck much lately, but I did find a few minutes to finish off the rear suspension with some 2" drop blocks. This puts the rear as low as I can go without notching the rear frame. With the 4" springs, 4" stepped frame, 1" body drop, and 2" blocks that nets me an 11" static drop in the rear!
The truck has a slight reverse rake right now without a motor, and after the drivetrain is reinstalled the truck should be close to level. If I have to, I can mill the blocks down to get a slight rake which is what I want. 
__________________
Builds: Green Gus the 68 C10 ; Sullii the 72 1500 - Instagram: @dr.hewitt - C10 Concept/Development Photos: Master Thread |
|
|
|
|
04-02-2022, 05:07 PM
|
#65 |
|
Senior Member
Join Date: Jun 2014
Location: Mocksville, NC
Posts: 1,723
|
Re: Sullii the 72 GMC 1500
I took a big step in the right direction towards getting the truck running again by finally securing a 5.3 for a swap! I had been patiently working with someone to get this motor and waiting on him to get a chance to pull it from the donor. Two months later and it was finally time to go pick up the motor.
 I am glad I waited on this one because the person I was buying it from was genuinely nice and was trying to get it pulled as quickly as he could, he's just been busy with life! I can relate to that. The motor also appears to be in good condition given the 180k miles on the clock. With the help of a friend, we tore it down to the long block and inspected the internals under the valve covers and oil pan. The valvetrain had no buildup and was a nice golden color, and the bottom end was all intact. There was even still crosshatching on the cylinder walls. Satisfied with the condition of the motor, we replaced the oil galley plug and rear main seal for insurance and dropped on a Holley knockoff 302-1 oil pan to provide extra ground clearance. The motor also got a thorough degreasing.    After cleaning it was time for some paint. My friend suggested painting the block black and leaving the aluminum parts natural but I insisted on orange, ALL orange! There's just something about an orange small block in old Chevys that I love, so orange it had to be. I eventually plan on modifications to make it look more like an old SBC but for now I will be putting all the 5.3 parts back on in their stock configuration. My goal at this point is to just have a clean, functional, and complete engine swap as my baseline.   The next step is to source a transmission, bolt it up to the engine, and drop the assembly into the truck. From there we will work on reinstalling all the components that were removed from the engine. At the moment I am leaning towards an NV3500 manual transmission, but I have not secured one yet. For the time being, the truck sits patiently in the barn. I suppose this is how trucks eventually end up as a barn find, but I will persevere and not let that happen! 
__________________
Builds: Green Gus the 68 C10 ; Sullii the 72 1500 - Instagram: @dr.hewitt - C10 Concept/Development Photos: Master Thread |
|
|
|
|
04-24-2022, 04:01 PM
|
#66 |
|
Senior Member
Join Date: Jun 2014
Location: Mocksville, NC
Posts: 1,723
|
Re: Sullii the 72 GMC 1500
The first thing I would like to accomplish before getting the engine installed in the truck is to sort out the stock harness. I briefly considered just throwing this swap together and getting it running first, but ultimately I knew I wouldn't be happy with the way it looked. I want to clean the harness up since there are quite a few components that will not be needed on my install. I also want to rearrange the wiring so I can get the pcm in the cab. Here is the stock harness before any modifications.
 I used lt1swap.com to understand this harness and what could be removed. For the most part this site was invaluable, however, it did leave me with a few questions. After some searching on various forums I was able to answer all my questions and build enough confidence to tear it apart. Creating a "standalone" harness requires building a new fuse panel, pulling wires that need to go to external locations (like fuel pump relay, VSS, 12V power, etc), reworking the ground circuit, and weeding out any plugs that go to components that will not be used (like AC, EVAP, automatic trans, etc). Once the harness is stripped down you lose about half of the wires which makes it much easier to work with and reroute. 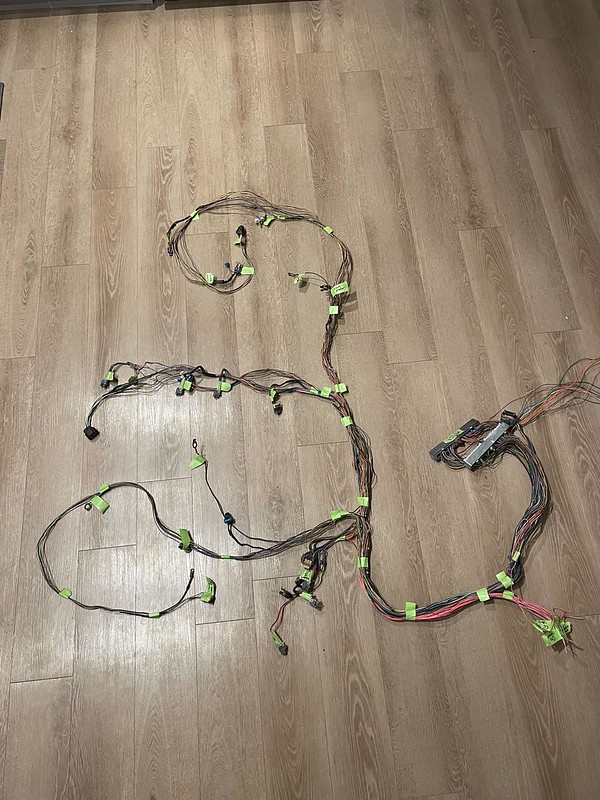 In order to reroute the wires, I started by plugging in the injector and coil plugs as my starting point. Then from here, I could reroute wires to exit where I wanted.   To get the main pcm plugs to route where I want them it would require shortening quite a few wires from the passenger side portion of the harness. Total length is limited by the drivers side section. I am hesistant do splice all these wires, so for now I am just going to tie them up within the harness at the rear of the intake. Since this is all an experiment and a first for me, I would like to not make too many wire splices and potentially introduce issues later on down the road.  I was also able to secure a transmission for the truck. I chose to go with a NV3500 from a 2001 Blazer Xtreme. I know, I know, this transmission is "weak" and I will blow it up. I've read many comments about the NV3500 and I am willing to give it a try given the price differential between this and a T56. I am not doing any power adding mods nor will I be driving this with any aggression, so it should be fine for cruising around. Down the road I may do some upgrades and will revisit my transmission choice at that time.  That's it for now. Hopefully on the next update I will be able to have the engine/trans joined and installed in the truck! 
__________________
Builds: Green Gus the 68 C10 ; Sullii the 72 1500 - Instagram: @dr.hewitt - C10 Concept/Development Photos: Master Thread |
|
|
|
|
04-26-2022, 10:30 PM
|
#67 |
|
Registered User
Join Date: Apr 2003
Location: Indep, MO
Posts: 5,893
|
Re: Sullii the 72 GMC 1500
Great Progress, Can't wait!
__________________
Boppa's Old Yeller Truck Build, Old Yeller's New Heart! Project Buzz Bomb Flyin' Low! |
|
|
|
|
08-21-2022, 09:21 PM
|
#68 |
|
Senior Member
Join Date: Jun 2014
Location: Mocksville, NC
Posts: 1,723
|
Re: Sullii the 72 GMC 1500
Work on the truck has completely stalled out as we try to get our house finished up. If you look closely in the background of some of my pics you can see the house in its various stages. We are getting final inspections done this week and then we should be cleared to move in. Once that happens, it's time to refocus on the truck.
Just about the only thing I've done on the truck over the last 4 months is get a custom plate made for it. This is from a site called licenseplates.tv and they reproduce old plates with whatever you want on them. Side by side, they are virtually indistinguishable from an original plate. I had one made with the new name for my truck, Bluey. Sullii was a working name and I like Bluey better. It's one of my daughter's favorite cartoon shows/characters so it's more sentimental to me. 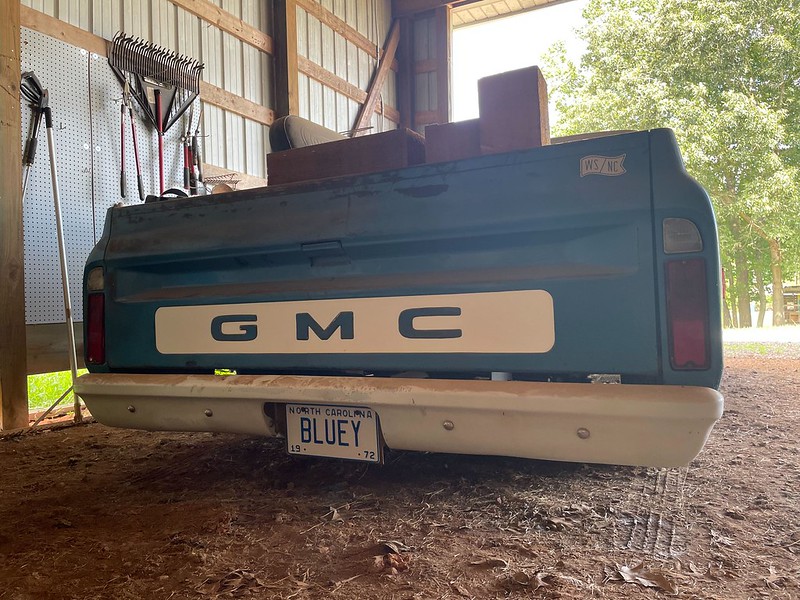 The 4" HD springs are also getting tested since I have loaded the bed up with an assortment of random items that need temporary storage. At least sitting still, they appear to be supporting a full bed exactly as I hoped they would be able to. I don't want to be afraid to throw a few things in the bed and still use Bluey as a truck once in a while. Even with the bed loaded here and me bouncing on the rear bumper I am not bottoming out. 
__________________
Builds: Green Gus the 68 C10 ; Sullii the 72 1500 - Instagram: @dr.hewitt - C10 Concept/Development Photos: Master Thread |
|
|
|
|
11-18-2022, 10:23 PM
|
#69 |
|
Senior Member
Join Date: Jun 2014
Location: Mocksville, NC
Posts: 1,723
|
Re: Sullii the 72 GMC 1500
Fast forward another three months and we are now in our new house, which means time to turn some attention back to the truck! But first, I needed a place to work on the truck which has been at my father in laws garage for the last two years. Our new garage was in the planning stages for about as long, but once we set the plan in motion it went up quickly. It was a post-frame kit, so the crew who assembled it knocked it out in one week.
 I am still working on electrical myself, but now that I have a roof it was time to move the truck to it's new home. After dragging the truck out of the corner of my FILs barn, we pulled it to my house with his tractor.     Now that I have some dedicated space to work on the truck, I'm hoping to make progress on it again. I normally have a two year cycle on projects and I am closing in on that this spring. I plan on having the engine swap completed by then and to start putting some miles on the truck. Hopefully next update is a true progress report!
__________________
Builds: Green Gus the 68 C10 ; Sullii the 72 1500 - Instagram: @dr.hewitt - C10 Concept/Development Photos: Master Thread |
|
|
|
|
12-02-2022, 02:16 PM
|
#70 |
|
Senior Member
Join Date: May 2007
Location: new jersey
Posts: 598
|
Re: Sullii the 72 GMC 1500
Cool truck! and nice job on the garage!
__________________
LUCKTRUCK 
|
|
|
|
|
12-31-2022, 06:49 PM
|
#71 |
|
Senior Member
Join Date: Jun 2014
Location: Mocksville, NC
Posts: 1,723
|
Re: Sullii the 72 GMC 1500
It's been just about one year since I had the chance to make any major progress on the truck, but I finally had the opportunity to get out in the new garage for the first time and wrench on the truck. I was stalled out wondering what my next step should be and my friend who has been helping me along the way suggested we drop the motor/trans in to get a baseline for where everything will land. I was hoping to only have to install the engine once, but considering there are quite a few variables to figure out I decided it was a good idea to go ahead and drop the engine in.
Since I do not have the clutch components yet, bolting the engine/trans together was a simple task. In the process, we discovered that someone along the way stripped out the mounting holes on the block and rethreaded them with 3/8 helicoils. Luckily I had some left over bolts to use so this will just have to be something I remember about my engine if I ever need to separate the engine/trans again. Installing the engine was fairly straightforward. I'm not doing anything that hasn't been done before, so I knew what to expect.   I decided to use ICT billet SBC to LS conversion mounts as recommended by omodified so I could bolt right up to the stock engine towers. I started in the forward-most position and it was much too far forward. I ended up using the mounting hole one forward from as far rearward as possible. This gave me plenty of clearance around the firewall and crossmember.  For the transmission I decided to use the stock mount from the vehicle the trans came from, a 2002 Blazer Xtreme. This ended up giving me a fairly simple approach to the trans crossmember. I mocked it up with wood for now, but the final version will be similar in concept while allowing for plenty of room to run the exhaust inside the frame rails. Another nice surprise was that my stock driveshaft yoke fits in the trans. The only thing I will need to do is have the front section shortened a few inches. I am sticking with the two-piece shaft because it gets me past the rear of the cab without having to cut into the main structural member for clearance. 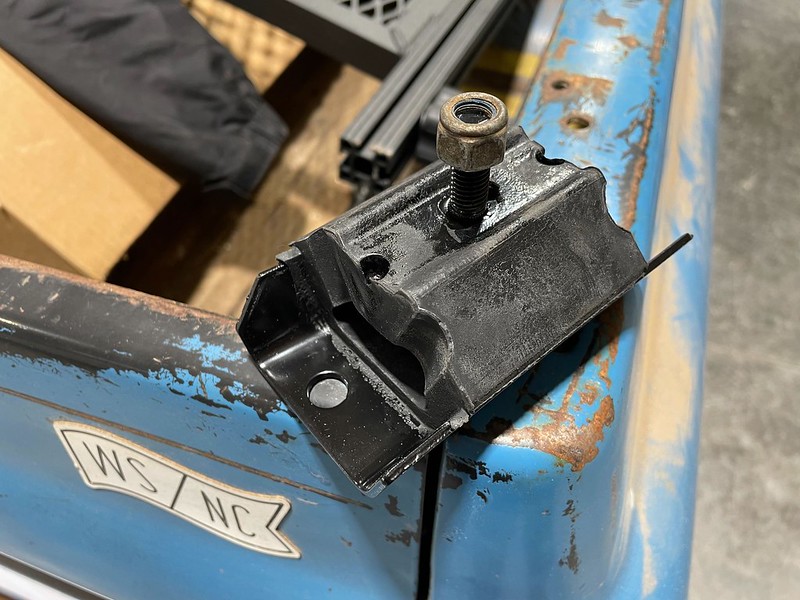   The transmission placement worked out great as well. I had to cut the floor so that I can add a high hump trans tunnel, but other than that I am happy with the positioning. There is plenty of clearance and the stock Blazer shifter gives me a good starting point for where I want the shifter to land.   With the engine/trans in the truck, it was a good chance to see where the final ride height will land. I predicted the front would come down one more inch with the weight of the engine and that's about where it ended up. I think I need to take about 1/2" out of the rear blocks and then the stance will be perfect. I like a slight rake and currently the truck sits level.  With that bit of motivation out of the way, it was time to go back up on stands to complete the trans crossmember and driveshaft. I will include these in my next update (yet to be completed). 
__________________
Builds: Green Gus the 68 C10 ; Sullii the 72 1500 - Instagram: @dr.hewitt - C10 Concept/Development Photos: Master Thread |
|
|
|
|
12-31-2022, 08:33 PM
|
#72 |
|
Registered User
Join Date: Sep 2016
Location: Ft Smith, AR
Posts: 542
|
Re: Sullii the 72 GMC 1500
Nice build.
One quick, easy improvement- The oil fill. Just take the cap off and remove the long tube. The cap fits directly on the valve cover. |
|
|
|
|
12-31-2022, 08:38 PM
|
#73 | |
|
Senior Member
Join Date: Jun 2014
Location: Mocksville, NC
Posts: 1,723
|
Re: Sullii the 72 GMC 1500
Quote:
__________________
Builds: Green Gus the 68 C10 ; Sullii the 72 1500 - Instagram: @dr.hewitt - C10 Concept/Development Photos: Master Thread |
|
|
|
|
|
01-01-2023, 10:48 PM
|
#74 |
|
Senior Member
 Join Date: Apr 2013
Location: Houston,Tx
Posts: 738
|
Re: Sullii the 72 GMC 1500
very cool...
__________________
1966 C10 "Mary" 1972 C10 Cheyenne "Betty" https://67-72chevytrucks.com/vboard/...d.php?t=847364 1976 C35 Sierra Grande "Mr. Harvey" 1979 C10 Silverado "The BIG TEN" https://67-72chevytrucks.com/vboard/...d.php?t=841339 1982 C10 Silverado "Lucy" C10 Club Texas -HMIC |
|
|
|
|
01-28-2023, 10:47 PM
|
#75 |
|
Senior Member
Join Date: Jun 2014
Location: Mocksville, NC
Posts: 1,723
|
Re: Sullii the 72 GMC 1500
Lately I've been focused on getting my pedals sorted out since they require some modifications to work with the LS swap. For the throttle pedal, I am using the stock pedal from the '04 Silverado that was the engine donor for my project. The pedal arm is kind of an awkward shape, however, Hart_Rod makes a nice adapter bracket that puts the pedal in the perfect location.
 Since I am going with a NV3500 transmission, I need to ditch the mechanical linkage from the clutch for the original 3 speed in favor for a hydraulic clutch. This required me to mount the master cylinder on the firewall. I really had no clue what my pedal ratio should be, so I based it on pedal travel for the stock clutch pedal. I ended up using the stock style master cylinder from a '04 Blazer (which is what my transmission came out of) and will pair with a stock throwout bearing and slave. I had to make my own custom pushrod to integrate between this master cylinder and my stock pedal. I am anxious to see how the pedal feels once the trans is fully installed.   I am also starting to reintroduce myself to the wiring harness for the LS so I can decide where to mount my ECM. I was able to rework the stock harness so there was enough slack to mount the ECM behind the glovebox inside the cab.  While getting the engine installed, I realized it would be much easier to work on everything if the nose was removed from the truck. This was a good opportunity to get the kids in the garage to help pull parts off the truck.     Since my truck will most likely be on jackstands for the next few months, I figured it was about time for a motivational photoshop. Here's where the truck should sit at its final drop with the motor installed. I also changed it up with blackwall tires. I always go back and forth between blackwalls and whitewalls. I think I might actually like the blackwalls better on this truck. It simplifies the look and ties in with the base model appearance that this truck left the factory with. 
__________________
Builds: Green Gus the 68 C10 ; Sullii the 72 1500 - Instagram: @dr.hewitt - C10 Concept/Development Photos: Master Thread |
|
|
|
 |
| Bookmarks |
|
|


 Linear Mode

