
|
 11-12-2011, 10:46 AM
|
#226 |
|
Senior Member
 Join Date: Mar 2011
Location: West Plains, Missouri
Posts: 7,555
|
Re: Project "My Happy Mess"
Nice job.....Jim
__________________
my build thread: http://67-72chevytrucks.com/vboard/s...d.php?t=459839 Jimbo's long bed step build:http://67-72chevytrucks.com/vboard/s...t=464626<br /> |

|

|
|
11-12-2011, 11:50 AM
|
#227 |
|
Registered User
Join Date: Nov 2010
Location: Carlsbad, CA
Posts: 1,584
|
Re: Project "My Happy Mess"
Lookin good. You have a nice supply of problems to keep you busy and havin fun !
__________________
- Jim - My Daily Driver is a 1969 Chevrolet Custom/20 Fleetside 350/TH400/Eaton H052 4.10 and its Project thread is here http://67-72chevytrucks.com/vboard/s...d.php?t=456911 |
|
|
|
|
11-12-2011, 05:44 PM
|
#228 |
|
Registered User
Join Date: Jul 2011
Location: Des Moines, Iowa
Posts: 3,016
|
Re: Project "My Happy Mess"
Thanks all!
Not sure they are a "supply" of problems, but they're definitely small irritating hurdles. I'm amazed at how fast the project has moved forward to be honest, with little to no major issues getting in the way. Especially when you have to rely on others for services. There's one issue that occurred that I haven't shared with you all (yet) that happened at the body shop (of which I strongly do not recommend now). As for the "fun" aspect - it's been very interesting (almost astonishing) to say the least to recreate the truck back to near original condition. And I've got to admit that it's a little sad seeing it go beyond the 1/2 way point of being complete. lol I guess it has been fun in a sense, but I would rather have it together and driving than sitting around. Even though it was beat up before, I've always like driving my old truck. ---------- 4 months and a week, the frame is cleaned, painted, undercoated. The front suspension redone. The engine finished. Next up is the sheet metal and other little things. I never wanted this project to last too long. Others may like to take their time and work on their trucks, but my intent was to try and knock it out quickly. I can't afford to have all these parts laying around taking up space. @steve hafner - I hadn't forgotten about the picture of letters/numbers from the bed. Got a pic a few minutes ago. The 441 matches the painted firewall numbers. Not sure what the Z DxB means.  Found the original upper radiator bracket pads in my car's trunk. They are longer and not as thick as the ones I bought to replace with. I'm headed over there now to see what the difference is with them installed. Will post pics later tonight. Who knows, I may fire this puppy tomorrow!
__________________
project: "my happy mess" Last edited by litew8; 11-12-2011 at 05:54 PM. |
|
|
|
|
11-12-2011, 06:25 PM
|
#229 |
|
Registered User
Join Date: Nov 2010
Location: Carlsbad, CA
Posts: 1,584
|
Re: Project "My Happy Mess"
I think of small irritating hurdles as problems to be solved, and there are usually many. Hope it fires right up and off you go !
__________________
- Jim - My Daily Driver is a 1969 Chevrolet Custom/20 Fleetside 350/TH400/Eaton H052 4.10 and its Project thread is here http://67-72chevytrucks.com/vboard/s...d.php?t=456911 |
|
|
|
|
11-12-2011, 07:31 PM
|
#230 |
|
Registered User
Join Date: Jul 2011
Location: Des Moines, Iowa
Posts: 3,016
|
Re: Project "My Happy Mess"
I agree Jim, though this issue is more of a puzzle. lol I fitted the old pads to the upper brackets. Guess what? The brackets do fit over the seams on the radiator, in the holes hgs_notes mentioned, with the correct old pads. The shroud matched up and will bolt on correctly. But, for some strange reason, the lower (smaller) bracket/pads are not the same length, and the seams on the radiator sit on TOP of the ends of the pads rather than inside. So... why are the lower bracket/pads smaller? Should the seams of the radiator not sit there? Should the bottom brackets be moved inward so they do not sit on the seams?
Should the bottom brackets/pads be the same size as the top? They came with the radiator support and are tack welded in (or something). We can modify them and lengthen them so that they match the top, but it seems it's a factory size, and for some reason doesn't make sense. It will no doubt fire right up! We grew up doing this stuff all the time, nothing this profound for me. The anticipation of hearing how much compression is exciting! 
__________________
project: "my happy mess" Last edited by litew8; 11-12-2011 at 07:44 PM. |
|
|
|
|
11-12-2011, 09:52 PM
|
#231 |
|
GEARHEAD
Join Date: Aug 2003
Location: MN
Posts: 6,112
|
Re: Project "My Happy Mess"
The lower pads are rivited to the support. There are longer ones for the bottom also to fit the thicker 4 core radiators. Shorter ones for 2 and 3 core radiators. Top and bottom should match. If you need to have the longer ones you'll have to ask on the parts board. They are available occassionally and its where I got mine. The new ones can be bolted in using a small carriage bolt where the rivet was. Or if the radiator fits as is, just ignore it. Also, the longer lower pad mounts will require you to bend the lip of the support in that area back to make room. I cut mine and bent it, but the factory just grabbed that spot with a tool and bent it down flat and left it like that.
__________________
If no one knows what you're doing, they can't tell you you're doing it wrong HG's Dream Car Build - Shelby Cobra Kit Build your own adjustable track bar 71  Long Fleet C/10 Long Fleet C/10 72  Jimmy 4x4 (Junkyard Jimmy) Jimmy 4x4 (Junkyard Jimmy)HG's Plow Truck '78  K35 Dually K35 DuallyBigass Farm Truck HG's thread of miscellaneous stuff |
|
|
|
|
11-13-2011, 12:19 AM
|
#232 | |
|
Registered User
Join Date: Jul 2011
Location: Des Moines, Iowa
Posts: 3,016
|
Re: Project "My Happy Mess"
So you think my originally C20 had a 3/4 core radiator? The radiator seams the top brackets rest on are seams for the transmission cooler and the passenger side, not the radiator itself where the cores are. That's why I asked if the lower brackets should fit on the inner part, where the core is - it'd fit there. Are there radiators that are skinnier than mine, 2 core? Or maybe the aftermarket rad support bottom brackets are for 2 core without tranny cooler, but that doesn't jive well with the driver's side width.
We can modify most anything. Thinking the seams are a good mounting spot for the lower, we could just remove, cut and re-weld them longer so that a longer pad will fit inside and the radiator would seat at the seams. Quote:
__________________
project: "my happy mess" Last edited by litew8; 11-13-2011 at 12:43 AM. |
|
|
|
|
|
11-13-2011, 12:51 AM
|
#233 |
|
Registered User
Join Date: Jul 2011
Location: Des Moines, Iowa
Posts: 3,016
|
Re: Project "My Happy Mess"
My radiator is a 2 core. Griffin 6-567AR-BAX
"Griffin rates this rad with a proper fan and/or shroud capable of cooling 400 to 600 horse power engines. It has 2 rows of 1.25" tube size." So that discounts the 3/4 core incompatibility. If the lower aftermarket rad support brackets are stock for 2 core, it should fit. I think we'll end up removing, cutting, separating and re-welding the lower rad brackets to match the top, and get new pads for both top and bottom, all the same length (as the old top pads). None of the pads I got from Early Classic will work. More wasted money. 
__________________
project: "my happy mess" Last edited by litew8; 11-13-2011 at 01:05 AM. |
|
|
|
|
11-13-2011, 03:56 AM
|
#234 |
|
Registered User
Join Date: Aug 2011
Location: Sacramento, California
Posts: 79
|
Re: Project "My Happy Mess"
Lol jeez, it's them little things that are the biggest pain in the ass ain't it? just have patience and don't stress (tryin to be advice-ful
 ) let's get er started! ) let's get er started!
__________________
1970 C/20 4x4, 350, sm465, np205(She tipped over... total rebuild from the frame up!)  ya gotta keep on keepin' on, Life's a garden, dig it! |
|
|
|
|
11-13-2011, 10:10 AM
|
#235 |
|
Registered User
Join Date: Jul 2011
Location: Des Moines, Iowa
Posts: 3,016
|
Re: Project "My Happy Mess"
You got that right.
It sucks when the smallest thing acts like a show stopper. lol I just hate when people send me the wrong items.  It was bad enough they took 1 month to ship them, let alone ship two wrong ones (at least wrong to me). Gotta laugh though. I'm going to look around at other peoples brackets and see where the difference is. It was bad enough they took 1 month to ship them, let alone ship two wrong ones (at least wrong to me). Gotta laugh though. I'm going to look around at other peoples brackets and see where the difference is.
__________________
project: "my happy mess" Last edited by litew8; 11-13-2011 at 10:32 AM. |
|
|
|
|
11-13-2011, 11:04 AM
|
#236 |
|
Registered User
Join Date: Jul 2011
Location: Des Moines, Iowa
Posts: 3,016
|
Re: Project "My Happy Mess"
Okay, just found some posts from 2008 where others ran into something similar. Surprisingly I saw a radiator that was skinnier than my old one. Don't care to find out why
Here's what we'll do -Modify the lower brackets - 1) Remove from rad support 2) Cut in half 3) Space the two pieces (3/4") in the middle to widen the length to match the top bracket length 4) Weld back in place I WILL make use of the wrong rubber pads sent! I will cut them in half and insert (both, for top and bottom brackets). no wasted money
__________________
project: "my happy mess" Last edited by litew8; 11-13-2011 at 11:09 AM. |
|
|
|
|
11-14-2011, 12:21 AM
|
#237 |
|
Registered User
Join Date: Jul 2011
Location: Des Moines, Iowa
Posts: 3,016
|
Re: Project "My Happy Mess"
Guess I should mention the info I read also. It seems the thinner radiator is for 6 cylinder equipped trucks. Which corresponds with the small lower radiator brackets that come installed on the aftermarket radiator support. Don't recall there being an option for having larger brackets when I bought it. Anyway, I've cut the support some and cut the rubber pads for a universal fit. Will get the brackets removed, cut and welded tomorrow if things go good. Maybe even fire it up, not sure yet. Got a few pics to post in a few.
__________________
project: "my happy mess" |
|
|
|
|
11-14-2011, 01:09 AM
|
#238 |
|
GEARHEAD
Join Date: Aug 2003
Location: MN
Posts: 6,112
|
Re: Project "My Happy Mess"
The 2 core radiators were used in many, if not most of the small block v-8 C-10 trucks also unless there were options like AC, etc. 4 cores were used mainly on the heavier trucks and with big blocks.
__________________
If no one knows what you're doing, they can't tell you you're doing it wrong HG's Dream Car Build - Shelby Cobra Kit Build your own adjustable track bar 71 Long Fleet C/10 72 Jimmy 4x4 (Junkyard Jimmy)HG's Plow Truck '78 K35 DuallyBigass Farm Truck HG's thread of miscellaneous stuff |
|
|
|
|
11-14-2011, 01:26 AM
|
#239 |
|
Registered User
Join Date: Jul 2011
Location: Des Moines, Iowa
Posts: 3,016
|
Re: Project "My Happy Mess"
Mine is a two core hgs_notes and it doesn't fit. There's a thinner radiator for 6 cylinders, which is what the lower brackets have to be for. But I'm almost certain my old support had the small ones also (don't think I have any pics), not sure about the spacing. Either way, it's getting chopped.
__________________
project: "my happy mess" |
|
|
|
|
11-14-2011, 02:10 AM
|
#240 |
|
Registered User
Join Date: Jul 2011
Location: Des Moines, Iowa
Posts: 3,016
|
Re: Project "My Happy Mess"
Lower radiator support brackets -
 Original vs. what was sent to me. Originals are old crusty looking ones of course -  After cutting the new rubber pads, 3/4" gap. Same for lower brackets after we extend them out -  ======================================= ======================================= No hints, who here can guess correctly what this (inverted) picture is depicting? 
__________________
project: "my happy mess" Last edited by litew8; 11-14-2011 at 02:26 AM. |
|
|
|
|
11-14-2011, 02:30 AM
|
#241 |
|
Registered User
Join Date: Oct 2009
Location: Denton, Texas
Posts: 1,696
|
Re: Project "My Happy Mess"
A ghost!
I really don't have a clue. Looks like part of a garage door and a wall with electrical wall jacks. Maybe some some sort of paint overspray on something? Keith |
|
|
|
|
11-14-2011, 02:55 AM
|
#242 |
|
Registered User
Join Date: Nov 2011
Location: Westville, IL
Posts: 45
|
Re: Project "My Happy Mess"
sitting in your truck, in your garage, looking out the windshield after bashing your head into the steering wheel a few times cussing the newest hiccup in your project?
__________________
Thread to my 68 gmc build, operation : in too deep |
|
|
|
|
11-14-2011, 09:45 AM
|
#243 |
|
Registered User
Join Date: Jul 2011
Location: Des Moines, Iowa
Posts: 3,016
|
Re: Project "My Happy Mess"
Damn!
You're both really close.
__________________
project: "my happy mess" Last edited by litew8; 11-14-2011 at 10:12 AM. |
|
|
|
|
11-14-2011, 10:12 AM
|
#244 | |
|
GEARHEAD
Join Date: Aug 2003
Location: MN
Posts: 6,112
|
Re: Project "My Happy Mess"
Quote:
__________________
If no one knows what you're doing, they can't tell you you're doing it wrong HG's Dream Car Build - Shelby Cobra Kit Build your own adjustable track bar 71 Long Fleet C/10 72 Jimmy 4x4 (Junkyard Jimmy)HG's Plow Truck '78 K35 DuallyBigass Farm Truck HG's thread of miscellaneous stuff |
|
|
|
|
|
11-14-2011, 10:24 AM
|
#245 |
|
Registered User
Join Date: Jul 2011
Location: Des Moines, Iowa
Posts: 3,016
|
Re: Project "My Happy Mess"
@hgs_notes - I think the radiator support came equipped with the 6 cylinder radiator lower brackets since many older years had 6 cylinders and the rad support was a universal for 69-72 years. Got it from Key Parts. Of course the site doesn't give a detailed description and they HAVE to show the opposite side, upside down no less. Resellers show the same image and description. http://www.keypartsinc.com/index_files/Page431.htm
edit: just saw your post above. The aluminum radiator is the same size as the brass one I took out, which I assume is 2 core also. Why would Griffin make/market a 2 core radiator (specifically) for our trucks but make it the size of a 4 core?
__________________
project: "my happy mess" |
|
|
|
|
11-14-2011, 04:19 PM
|
#246 |
|
Registered User
Join Date: Jul 2011
Location: Des Moines, Iowa
Posts: 3,016
|
Re: Project "My Happy Mess"
Anyway, I really don't care to dwell on what is what - the attempt to clarify was for the sake of the readers and why modifying is needed (thanks for helping to clarify hgs_notes).
Didn't do any welding this morning/afternoon. The Fixer had an appointment and I never learned to mig weld. Got the parts ready to go. Drilled out the welds holding the lower brackets on, and cleaned everything up.   Zero Rust used on bare metal -  Cleaned up, cut into halves and Zero Rust protection -  ==================== ==================== Anybody who's looked at electric fan mods for our trucks knows what this is! 
__________________
project: "my happy mess" |
|
|
|
|
11-15-2011, 04:46 PM
|
#247 |
|
Registered User
Join Date: Jul 2011
Location: Des Moines, Iowa
Posts: 3,016
|
Re: Project "My Happy Mess"
@hgs_notes - you're right. More for the sake of clarity. I was mistaken about my old radiator. It is a 3 core. The Griffin aluminum is 2 core, but has 1.25" tubes. I took some quick pics for those interested I'll post later when I have time. Didn't get any welding done today (prob. for sure tomorrow).
Messed around too much, but we did have time to take out the old instrument cluster. Quick Zero Rust of the underside of dash area, got a fitting/line for new instrument cluster Vacuum gauge.
__________________
project: "my happy mess" |
|
|
|
|
11-16-2011, 02:32 AM
|
#248 |
|
Registered User
Join Date: Jul 2011
Location: Des Moines, Iowa
Posts: 3,016
|
Re: Project "My Happy Mess"
Here are the pictures of the old and new radiator. I get caught up in so many different things at once, it's easy to not remember or even care to think about.
Old - 3 rows  New - 2 row  "Messing around" earlier today - Sorry all, but Punxsutawney Phil the ground hog visited early this year and, well, bad news - 6 more weeks of winter next year! 
__________________
project: "my happy mess" |
|
|
|
|
11-16-2011, 04:15 PM
|
#249 |
|
Registered User
Join Date: Jul 2011
Location: Des Moines, Iowa
Posts: 3,016
|
Re: Project "My Happy Mess"
Wednesday Update -
Got the lower radiator brackets welded onto the rad support. Way more cost effective to have modified existing hardware than to buy new.   Grind to clean, and welding primer.  Placed one of the old rubber pads to use as a template for the next piece of bracket.  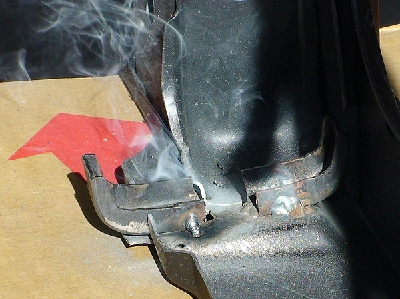  After re-painting with Zero Rust (while still hot to bake on), we installed the instrument cluster (partially). Will need to hook everything up on the backside tomorrow.  New cluster w/all gauges!
__________________
project: "my happy mess" |
|
|
|
|
11-17-2011, 04:47 PM
|
#250 |
|
Registered User
Join Date: Jul 2011
Location: Des Moines, Iowa
Posts: 3,016
|
Re: Project "My Happy Mess"
Thursday Update
Rad support, rad mounts, radiator, electric fan and transmission lines installed. Our modifications to the radiator bracket and fan turned out sweet! Lower brackets -     The Fixer's craftsmanship!    Temp/switch for fan, installed into passenger side head -   Transmission lines -    Getting closer! 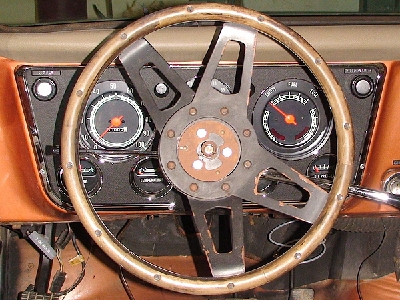 
__________________
project: "my happy mess" |
|
|
|
 |
| Bookmarks |
|
|


 Linear Mode

