
|
Register or Log In To remove these advertisements. |
|
|
|
|||||||
 |
|
|
Thread Tools | Display Modes |
 02-09-2024, 04:25 PM
|
#1 |
|
Registered User
Join Date: Feb 2006
Location: ND
Posts: 207
|
Non-Tilt Column Assembly/Disassembly Guide
I was trying to put the steering column back together for my truck that I had taken apart 15-16 years ago. My findings were inconclusive for a definitive step by step guide on reassembly. After a couple of hours searching here, trying to decipher the various assembly manual drawings, and in the end I ended up not finding much in the way of working on a non-tilt column. (Lot of love for the tilt columns though) While this is not a 100% everything guide, it should help the person sitting there with a pile of parts, or followed in reverse for the person that wants to make a pile of parts.
First things, if you don't want to assemble this whole unit and have to disassemble it twice, refer to post#4 in this thread and remove the lower retainers, and fully remove the inner tube and clean all paint and old grease from the area circled in red, as well as the internal mating surfaces of what I call the shifter cup, the piece that your shift lever will attach to with the drive pin. You'll see through out this guide that the area in question is painted, yes I did end up disassembling everything and doing it twice. This area is what is going to determine how nice your shifter feel is along with the lower retainer and spring assembly which should be cleaned thoroughly and lightly greased. *NOTE* These areas should be lightly greased as well as any areas in which you can see needing lubrication. I didn't document each piece I greased, as grease and using a camera alternating back and forth isn't the easiest. If it's a contact surface of metal to metal and moves, it should probably be greased.   Install the firewall seal/boot, followed by the firewall retainer/bracket.  I installed my neutral safety switch at this time, can be done really whenever though.  Install the dash grommet   Install the metal washer first, followed by the nylon washer aligning the notch with the notch in the column.  Pass the turn signal switch harness through the turn signal lever cup and through the shifter cup. Be sure to clip the harness into the little wire management clips on the switch to help route it the proper area of the column. A bundle of wire will not allow everything to seat and you will risk damaging the harness. Slide the shifter cup onto the steering column and align the notch with the inner tube notch. Remember to remove all paint and old grease from these surfaces and lubricate them.  Attach turn signal cup to shifter cup, lining up opening notches to allow it to seat fully, then rotate turn signal cup clockwise to retain on outer column shaft notches.  Install nylon washer with rubber aligning with notches on column shaft.   Install upper bearing and bearing holder onto turn signal switch. Pack upper bearing with fresh grease. 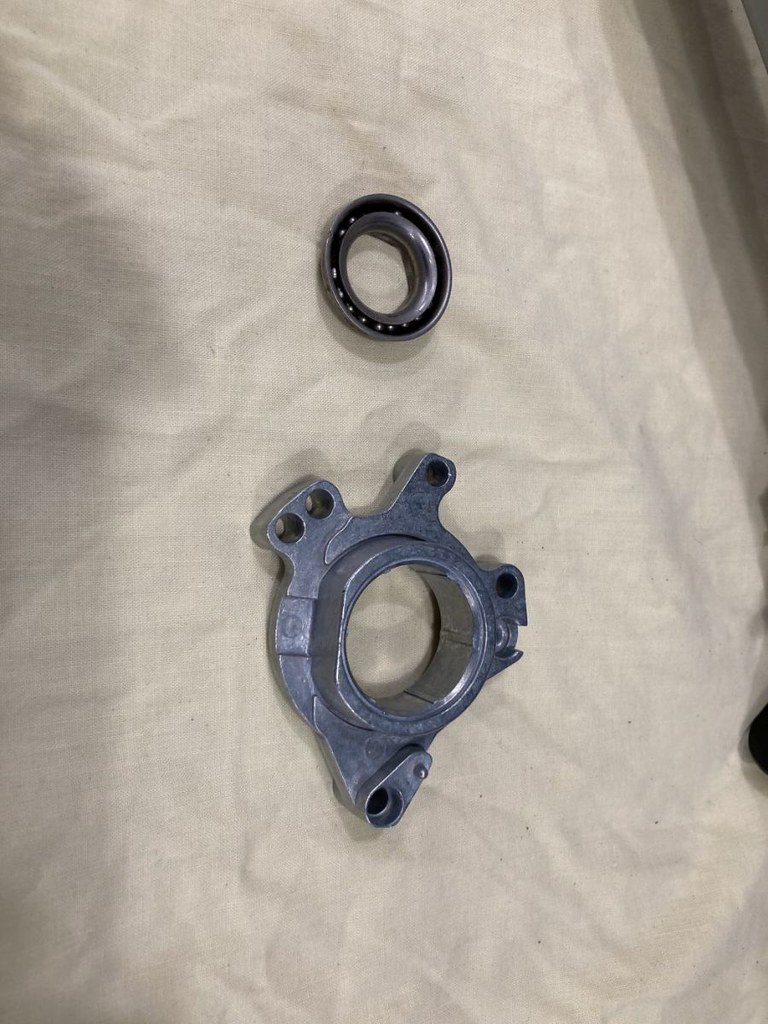  Align hazard switch with hole and push in the hazard switch to help ease install. While also feeding the wire harness through the cups, continue to work the switch into the cup.  Align with the shifter cup and install the three retaining screws.  Pictures weren't taken past this point, but the rest is fairly explanatory. Install the wire cover and secure with the bend over tabs and the dash grommet. Install your turn signal lever and shift lever when you are ready. I'm keeping mine out until I'm mostly wrapped up with interior assembly. One less thing to catch and break. Shift lever anti-rattle boot: This is the only source for the small rubber boot that I have been able to find. Happened to stumble across it. https://www.classicparts.com/1967-74...info/91%2D108/  Intermediate shaft boot: I spent a couple of hours trying to track down one of these also.  1964-79 GM Steering Shaft Swivel Rubber Boot 1pc INL12240 https://www.inlinetube.com/products/inl12240 Hopefully this helps at least one person. If I missed a similar guide, please correct me but I searched high and low within my abilities.
__________________
1972 Chevy C-10 Cheyenne Super - Buckets, A/C, "The 17 Year Revival Project" Last edited by 1972CheyenneSuper; 02-10-2024 at 03:57 PM. |

|

|
|
02-10-2024, 01:16 PM
|
#2 |
|
Senior Member
 Join Date: Feb 2009
Location: Northern Nevada
Posts: 7,120
|
Re: Non-Tilt Column Assembly/Disassembly Guide
Nice job and good looking column. How about that insulator located behind the spring on the shift tube? I've read that has a retainer of some sort, but mine didn't have one.
__________________
Tony 71 Custom Deluxe, SWB, 2WD, 402, A/C. I developed an assm. guide "kit" for restoring it from ground up. With assys, the guide accts for 1000s of OEM identifications and part numbers, all written in short order. 700+ images include assm, illust., charts, and points of interest. Much of the info. applies to all 67-72 GM trucks, and to a lessor degree all 67-72 GM vehicles. My build thread, and more on the guide https://67-72chevytrucks.com/vboard/...d.php?t=730025 |
|
|
|
|
02-10-2024, 01:30 PM
|
#3 |
|
Senior Member
Join Date: Jun 2002
Location: Murray, Kentucky
Posts: 3,373
|
Re: Non-Tilt Column Assembly/Disassembly Guide
Is this the spring at the end of the steering shaft in the engine compartment?
__________________
Roger '68 Short step - https://67-72chevytrucks.com/vboard/...d.php?t=849675 '69 ('70?) 2wd Blazer '70 GMC Jimmy 2wd |
|
|
|
|
02-10-2024, 03:11 PM
|
#4 | |
|
Registered User
Join Date: Feb 2006
Location: ND
Posts: 207
|
Re: Non-Tilt Column Assembly/Disassembly Guide
Quote:
I went out and dissected my parts column, as that is what I actually used to see how to put my painted column together, also discovered that I had lost the two upper washers in my column, so I borrowed them from this one. That's what really made me want to make this guide, because I had no idea where all of the pieces went. Hopefully the below photos help with the assembly/disassembly of the lower portion and how to get the inner shift tube removed.         I didn't separate any of these components on my column, I brake cleaned all the old gunk off and gave it all some fresh grease.  
__________________
1972 Chevy C-10 Cheyenne Super - Buckets, A/C, "The 17 Year Revival Project" Last edited by 1972CheyenneSuper; 02-10-2024 at 03:27 PM. |
|
|
|
|
|
02-10-2024, 03:29 PM
|
#5 | |
|
Registered User
Join Date: Feb 2006
Location: ND
Posts: 207
|
Re: Non-Tilt Column Assembly/Disassembly Guide
Quote:
__________________
1972 Chevy C-10 Cheyenne Super - Buckets, A/C, "The 17 Year Revival Project" |
|
|
|
|
|
02-10-2024, 04:41 PM
|
#6 | |
|
Senior Member
  Join Date: Jan 2005
Location: CA
Posts: 5,329
|
Re: Non-Tilt Column Assembly/Disassembly Guide
Quote:
|
|
|
|
|
|
02-11-2024, 12:30 PM
|
#7 |
|
Post Whore
Join Date: Feb 2016
Location: Portland Oregon
Posts: 10,805
|
Re: Non-Tilt Column Assembly/Disassembly Guide
Excellent write up! I wish I'd had it when I tore mine apart to fix the shifter.
__________________
Thanks to Bob and Jeanie and everyone else at Superior Performance for all their great help.  RIP Bob Parks. 1967 Burban the WMB,1991 S(stink)-10 Blazer,1969 GTO, 1970 Javelin, 1952 F2 Ford 4X4, 29 Model A, 72 Firebird. 85 Alfa Romeo If it breaks I didn't want it in the first place The WMB repair thread http://67-72chevytrucks.com/vboard/s...d.php?t=698377 |
|
|
|
|
02-11-2024, 02:07 PM
|
#8 | ||
|
Senior Member
Join Date: Feb 2009
Location: Northern Nevada
Posts: 7,120
|
Re: Non-Tilt Column Assembly/Disassembly Guide
Quote:
Quote:
__________________
Tony 71 Custom Deluxe, SWB, 2WD, 402, A/C. I developed an assm. guide "kit" for restoring it from ground up. With assys, the guide accts for 1000s of OEM identifications and part numbers, all written in short order. 700+ images include assm, illust., charts, and points of interest. Much of the info. applies to all 67-72 GM trucks, and to a lessor degree all 67-72 GM vehicles. My build thread, and more on the guide https://67-72chevytrucks.com/vboard/...d.php?t=730025 Last edited by 71CHEVYSHORTBED402; 02-11-2024 at 02:40 PM. |
||
|
|
|
|
02-11-2024, 03:11 PM
|
#9 | |
|
Registered User
Join Date: Feb 2006
Location: ND
Posts: 207
|
Re: Non-Tilt Column Assembly/Disassembly Guide
Quote:
__________________
1972 Chevy C-10 Cheyenne Super - Buckets, A/C, "The 17 Year Revival Project" |
|
|
|
|
|
| Bookmarks |
| Tags |
| assembly, column, disassembly, intermediate shaft boot, non-tilt |
|
|


 Linear Mode

