
|
|
|
 06-26-2023, 08:09 AM
|
#1 |
|
Senior Member
 Join Date: Aug 2004
Location: Centennial, CO
Posts: 2,905
|
Re: Sullii the 72 GMC 1500
Nice work on the pedals.
I like how you did your clutch switch. I may be copying that.
__________________
ClusterTruck: 68 C10 Bought in 89, wrecked in 03. Slow low $ rebuild started '17. 6.0 & TKO http://67-72chevytrucks.com/vboard/s...d.php?t=788602 93 K1500 Short Step, 350, NV4500, EBL flash ECU. Vortec heads & roller cam someday... 05 Jeep Wrangler Unlimited. 3 lift & 6-speed 02 E320 the insurance total free car 13 Tahoe LTZ |

|

|
|
07-03-2023, 11:46 PM
|
#2 |
|
Junior Member
Join Date: Apr 2023
Location: Anchorage, Alaska
Posts: 97
|
Re: Sullii the 72 GMC 1500
Looking good! +1 for the Tanks Inc stuff. I retrofitted using their pa5 kit.
And great tip on double checking spacing for the bed supports. I added my FI pump as a retrofit to an LMC tank and ended up having to notch the bed support, not because of the tank itself, but because of the pump fittings / hose connections. Good luck with the first start! |
|
|
|
|
07-18-2023, 02:53 PM
|
#3 |
|
Registered User
Join Date: Jun 2014
Location: Mocksville, NC
Posts: 1,737
|
Re: Sullii the 72 GMC 1500
I had a chance to connect all the fuel lines and wiring on the tank. Nothing really special or custom here. The Corvette style filter/regulator is mounted inside the left framerail and I ran the fuel lines that came with the Tanks Inc. kit. These utilize the -6 AN push on fittings. They go on quite easily so my instincts say not to trust them, but they seem well made and I'm sure they wouldn't sell these fittings if they didn't work, right...? My wiring is basically just extensions on the fuel sender and fuel pump wires so they reach to the rear. Then I tied the two grounds together and bolted it onto the crossmember and made sure I had a solid ground connection to the negative battery cable. I added a plug on the fuel pump wires just in case I ever need to pull the pump out. Overall, I would say my installation is based mainly on function and not form. It doesn't look super clean like some builds with all the custom stainless lines, but nothing on this truck is really to that level. I'm trying to keep it similar to a factory style install. You may also notice the charcoal canister on the left. The tank vent will eventually be routed through this after it loops up above the filler neck that will be mounted behind the marker light. This is in an attempt to keep gas fumes down while the truck is parked in the garage.
  On the other end of the truck, I have the gas line run and ready to connect. It uses a -6 AN to push on adapter to connect directly to the stock fuel rail.  At this point in the build, my garage has become quite the mess. I thought this would be a good time to roll the truck outside and clean up. The only remaining item to complete before I can start the truck is to make all my under dash wire connections. I could theoretically start the truck now, but all my wires are just temporarily connected from when I cranked the engine a few months ago. I'd rather have all the wiring in its final form before I try to start the truck. If things go according to plan, I should be able to start it this weekend. The results of that test will determine where my focus goes from there!   
__________________
Builds: Green Gus the 68 C10 ; Sullii the 72 1500 - Instagram: @dr.hewitt - C10 Concept/Development Photos: Master Thread |
|
|
|
|
07-18-2023, 05:57 PM
|
#4 |
|
Senior Member
Join Date: Mar 2008
Location: tyler texas
Posts: 1,532
|
Re: Sullii the 72 GMC 1500
Looks really cool and sits good.
__________________
NHRA Super Street 469C It only runs 10.90 at 156 mph |
|
|
|
|
07-18-2023, 09:56 PM
|
#5 |
|
Registered User
Join Date: Apr 2014
Location: Azle,Texas
Posts: 2,248
|
Re: Sullii the 72 GMC 1500
Looks really good. I'll be interested to see the way you handle relocating the fuel filler neck and the results of your charcoal cannister / vent set-up. I know it'll be well done that's for sure.
 
__________________
Brian 1972 C10, "Loyd", LWB to SWB, 5.3, L83/6L80e, 4:11 Tru Trac, Air Ride, VA, DD, 20" Coys, 4 wheel disc, A quick LS swap turned into a 6 year frame off resto-mod. |
|
|
|
|
02-02-2024, 09:11 PM
|
#6 | |
|
Junior Member
Join Date: Mar 2022
Location: Hinesburg Vermont
Posts: 48
|
Re: Sullii the 72 GMC 1500
Quote:
|
|
|
|
|
|
02-04-2024, 05:34 PM
|
#7 | |
|
Registered User
Join Date: Jun 2014
Location: Mocksville, NC
Posts: 1,737
|
Re: Sullii the 72 GMC 1500
Quote:
__________________
Builds: Green Gus the 68 C10 ; Sullii the 72 1500 - Instagram: @dr.hewitt - C10 Concept/Development Photos: Master Thread |
|
|
|
|
|
07-19-2023, 07:01 AM
|
#8 |
|
Registered User
Join Date: Jun 2014
Location: Mocksville, NC
Posts: 1,737
|
Re: Sullii the 72 GMC 1500
Thank you guys! My solution for the fuel filler is dependent on the 5" bed floor raise that I did. I actually didn't even plan ahead for that, but after putting a bed side on and realizing the floor is now above the marker light, I thought I must utilize that to add the fuel filler behind the marker light. I will detail it once I get it fully installed. My only concern with it is that my filler tube will be close to horizontal going into a 90 degree neck on the tank. Hopefully it isn't slow to fill. I'll find out soon enough. Most of the things I've done on this truck are the result of experiment, not experience!
As for the vent line, I think it is working so far. I have the tank full of gas and the truck has just been sitting in the garage in this 100 degree heat. So far, not even a hint of gas that I can smell.
__________________
Builds: Green Gus the 68 C10 ; Sullii the 72 1500 - Instagram: @dr.hewitt - C10 Concept/Development Photos: Master Thread |
|
|
|
|
07-22-2023, 10:43 PM
|
#9 |
|
Registered User
Join Date: Jun 2014
Location: Mocksville, NC
Posts: 1,737
|
Re: Sullii the 72 GMC 1500
The last remaining item before starting the truck was the under dash wiring. This mainly consisted of connecting all the wires from the LS swap that needed to be tied into the truck wiring. The bulk of wires coming across the top of the steering column are what were added from the swap. This includes truck power to the firewall bulkhead, clutch switch signal, brake switch signal, temp gauge, fuel sender signal, CEL, OBDII port, and 12V keyed signal. I also ran wires for the VSS and tach but do not have gauges to utilize these signals yet.
 Turning the key to the ON position demonstrated that my CEL is working. This light should be on when the key is on and goes out when the truck is started. I also checked the OBDII port and scanned the PCM which returned no codes.  After finishing the wiring, it was time to set the truck back on the ground and finally start the engine!  I made sure to prime the fuel lines before trying to start the engine. After a few revolutions of the motor it fired right up! At first it was surging a bit, but after it warmed up the idle leveled out. The only real problem encountered was the giant puddle forming under the truck. This turned out to be transmission fluid and coolant. The trans fluid was due to the lack of driveshaft. The coolant was due to a leaking heater core. Surprisingly, the local auto parts store had one in stock. After a quick trip, we had this repaired and the truck was alive again.   Overall, everything worked as it should. After the engine was up to temp it idled away smoothly. The electric fan also came on which confirmed that was working. The only thing that I was disappointed about was actually the exhaust. The Black Widow mufflers do not sound as good as I thought they would. At idle they are decent, but they really scream and get raspy at higher RPM. On deceleration they are exceptionally garbled and inconsistent. My next step here is to add some high flow cats (which I was going to do anyway) to try and even out the tone and reduce the rasp. All things considered, this isn't a big deal considering this is the only thing that needs attention after the first start.
__________________
Builds: Green Gus the 68 C10 ; Sullii the 72 1500 - Instagram: @dr.hewitt - C10 Concept/Development Photos: Master Thread |
|
|
|
|
07-23-2023, 07:19 AM
|
#10 |
|
Senior Member
Join Date: Mar 2011
Location: Hanover NJ
Posts: 4,129
|
Re: Sullii the 72 GMC 1500
Lots of progress 2 forward 1 back and then clean up the mess and then a good night of sleep I’m liking the PO1s
__________________
Doc & Kim build http://67-72chevytrucks.com/vboard/s...d.php?t=722288 I am from the desert http://67-72chevytrucks.com/vboard/s...d.php?t=650332 basket case build SOLD http://67-72chevytrucks.com/vboard/s...d.php?t=648557 |
|
|
|
|
07-23-2023, 11:09 AM
|
#11 |
|
Senior Member
Join Date: Aug 2004
Location: Centennial, CO
Posts: 2,905
|
Re: Sullii the 72 GMC 1500
Man, that’s great! It’s a good feeling to have one fire up nice AND have no codes in a swap like this.
I like your location for the charcoal can. I’ll be using one also.
__________________
ClusterTruck: 68 C10 Bought in 89, wrecked in 03. Slow low $ rebuild started '17. 6.0 & TKO http://67-72chevytrucks.com/vboard/s...d.php?t=788602 93 K1500 Short Step, 350, NV4500, EBL flash ECU. Vortec heads & roller cam someday... 05 Jeep Wrangler Unlimited. 3 lift & 6-speed 02 E320 the insurance total free car 13 Tahoe LTZ |
|
|
|
|
07-23-2023, 09:28 PM
|
#12 |
|
Registered User
Join Date: Apr 2014
Location: Azle,Texas
Posts: 2,248
|
Re: Sullii the 72 GMC 1500
Outstanding! I personally think it sounds awesome. I'll be looking forward to a full report on it's drivability, power and handling characteristics. Well done as usual my friend.

__________________
Brian 1972 C10, "Loyd", LWB to SWB, 5.3, L83/6L80e, 4:11 Tru Trac, Air Ride, VA, DD, 20" Coys, 4 wheel disc, A quick LS swap turned into a 6 year frame off resto-mod. |
|
|
|
|
07-24-2023, 06:58 AM
|
#13 | |||
|
Registered User
Join Date: Jun 2014
Location: Mocksville, NC
Posts: 1,737
|
Re: Sullii the 72 GMC 1500
Quote:
Quote:
Quote:
__________________
Builds: Green Gus the 68 C10 ; Sullii the 72 1500 - Instagram: @dr.hewitt - C10 Concept/Development Photos: Master Thread |
|||
|
|
|
|
07-24-2023, 10:02 AM
|
#14 |
|
Senior Member
Join Date: Jan 2007
Location: Turlock, CA
Posts: 8,441
|
Re: Sullii the 72 GMC 1500
Really great truck, I love the P01’s.
Remind me what you did with the paint. Is that just a coat of wax? Looks good…
__________________
I live in California, but identify as a Texan  "If a job's worth doing, it's worth doing well" Project "Little Sister" (70 c10 blue original paint refresh) Project "C10 Fever" (68 factory black 396 swb) Project "Blue Bomb" (70 c30 blue original paint refresh) Project "Vitamin C" (71 c10 orange original paint refresh) |

|
|
|
07-24-2023, 11:15 AM
|
#15 | |
|
Registered User
Join Date: Jun 2014
Location: Mocksville, NC
Posts: 1,737
|
Re: Sullii the 72 GMC 1500
Quote:
__________________
Builds: Green Gus the 68 C10 ; Sullii the 72 1500 - Instagram: @dr.hewitt - C10 Concept/Development Photos: Master Thread |
|
|
|
|
|
07-24-2023, 12:11 PM
|
#16 |
|
Junior Member
Join Date: Apr 2023
Location: Anchorage, Alaska
Posts: 97
|
Re: Sullii the 72 GMC 1500
Congrats on the successful first start, it looks and sounds great!
|
|
|
|
|
07-25-2023, 12:21 PM
|
#17 |
|
Registered User
Join Date: Jun 2014
Location: Mocksville, NC
Posts: 1,737
|
Re: Sullii the 72 GMC 1500
I decided to pull half the exhaust back out to install catalytic converters. I originally had intentions of doing this anyway, but after hearing the exhaust I wanted to move this up the list of things to do so I would know for sure what the truck would sound like. I went with some affordable high flow cats from Amazon, which actually turned out to be nice quality. I've read mixed ideologies about whether or not cats will change the sound of a vehicle. After installing them, I will say they did change the sound some, but it is subtle. Idle and accel sound the same, but decel sounds smoother and less raspy. It's more noticeably different in person than in this video for some reason. Overall, I am satisfied with it enough to keep moving on to other things.
One unintended consequence of adding cats was increased temperature under the truck. The floorboard from firewall to under the seat gets so hot you can barely touch it! Honestly, I can't say for sure how much hotter this is than without cats because I didn't touch the floor when I ran the truck before. Regardless, it is too hot to just leave it as is. I am currently brainstorming on how to add some sort of heat shield or wrap on the exhaust.  
__________________
Builds: Green Gus the 68 C10 ; Sullii the 72 1500 - Instagram: @dr.hewitt - C10 Concept/Development Photos: Master Thread |
|
|
|
|
07-25-2023, 10:23 PM
|
#18 |
|
Senior Member
Join Date: Mar 2011
Location: Hanover NJ
Posts: 4,129
|
Re: Sullii the 72 GMC 1500
sounds great ....yikes about the heat ....BB had heat shields that screwed into the firewall not sure if you are familiar with them I have one could send you a pic you may be able to fab something similar and attach to the floor boards with some spacing
__________________
Doc & Kim build http://67-72chevytrucks.com/vboard/s...d.php?t=722288 I am from the desert http://67-72chevytrucks.com/vboard/s...d.php?t=650332 basket case build SOLD http://67-72chevytrucks.com/vboard/s...d.php?t=648557 |
|
|
|
|
08-04-2023, 08:28 AM
|
#19 | |
|
Senior Member
Join Date: Mar 2011
Location: Hanover NJ
Posts: 4,129
|
Re: Sullii the 72 GMC 1500
Quote:
 truck sounds great love the stance and may have to borrow them tail lights for my maiden voyage .....
__________________
Doc & Kim build http://67-72chevytrucks.com/vboard/s...d.php?t=722288 I am from the desert http://67-72chevytrucks.com/vboard/s...d.php?t=650332 basket case build SOLD http://67-72chevytrucks.com/vboard/s...d.php?t=648557 |
|
|
|
|
|
07-26-2023, 10:02 AM
|
#20 |
|
Senior Member
Join Date: Aug 2004
Location: Centennial, CO
Posts: 2,905
|
Re: Sullii the 72 GMC 1500
I'm going to use some of this floor and tunnel shield, it should keep the floor metal cooler and works well combined with under carpet pad and insulation.
https://www.designengineering.com/pr.../heat-control/
__________________
ClusterTruck: 68 C10 Bought in 89, wrecked in 03. Slow low $ rebuild started '17. 6.0 & TKO http://67-72chevytrucks.com/vboard/s...d.php?t=788602 93 K1500 Short Step, 350, NV4500, EBL flash ECU. Vortec heads & roller cam someday... 05 Jeep Wrangler Unlimited. 3 lift & 6-speed 02 E320 the insurance total free car 13 Tahoe LTZ |
|
|
|
|
08-02-2023, 10:04 PM
|
#21 |
|
Registered User
Join Date: Jun 2014
Location: Mocksville, NC
Posts: 1,737
|
Re: Sullii the 72 GMC 1500
Finding time to drive out to Winston Salem to drop off and pick up my driveshaft was perhaps one of the trickiest parts of this build! Many people have told me that Oliver's is the best and only place to get quality driveshaft work done anywhere near me, so that's where I went. The NV3500 required 3.5" out of the front shaft compared to the original 3 speed. I also had them install new universals and carrier bearing. I welded the baseplate of the carrier mount since they normally fail there.
 To get the angles right (at least based on my original measurements) I had to add a 1/2" spacer to the plate I used to flatten the bottom of the crossmember. I didn't actually remeasure the angles with the driveshaft reinstalled, but I should have (more on this later).  The driveshaft fit perfectly and I had it installed in no time. You'll also notice the exhaust wrap that I added. This did help reduce the rate at which the floor heats up, but if you let it sit and idle long enough the floor will still reach the same temperature once it's heat soaked.  I figured I should add a tach since this truck is manual. I don't want to drop the cash or brain power required to make a stock tach work (which I don't even have), so for the short term I am using an Equus tach. Admittedly, it is quite cheaply made but it does a decent job of displaying RPM. It also matches the interior fairly well. This will be around until I get to redoing the interior (sometime next year).  ...And now for the pivotal moment of the first test drive! It was late and I have no tail lights yet, so it was just a quick 1/10 mile loop around the driveway. Everything felt like it should, so I was excited to take it out again in the daylight. This brings us to today. I was anxious all day at work to get back home and hit the road in the truck. 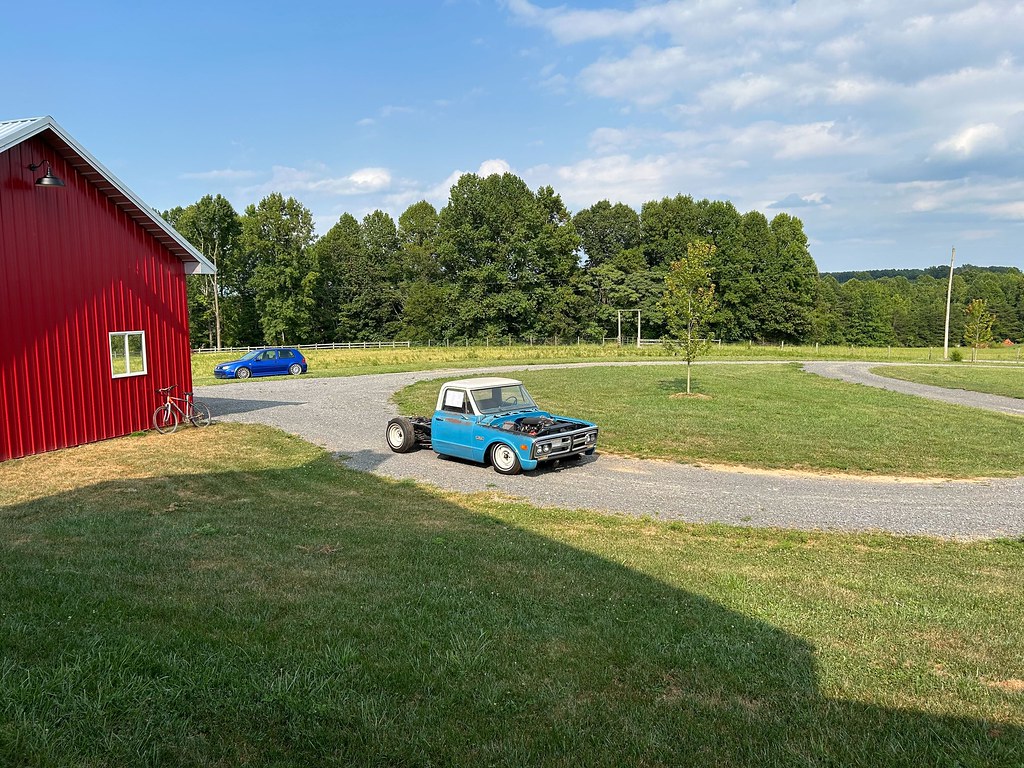 I started slow with a short 1 mile ride out and back with my wife. Then my kids took turns going for a ride as well, ending with my son and a 15 mile loop. Overall, the truck performed very well considering how many things I have changed and rebuilt. There was nothing detrimental that would keep me from throwing the bed on and driving it as is while I continue to tweak and improve the truck. Here are a few observations that may or may not need attention: 1. First and second gears in the NV3500 are quite short. It almost feels like I am spinning the rear tires because the RPMs jump up so quick and it doesn't really feel like I am going anywhere. Other than that, the transmission shifts smoothly and functions properly. 2. The intake that I used on this truck makes a noticeable swoosh sound whenever I hit the throttle. I'm not a big fan of intake noise, so I will see how long I'll go before I want to change this. Hopefully once the hood is on and I add sound deadening and carpet I won't hear it as much. 3. There is a driveshaft vibration in 1st and 2nd at low RPM. Once I'm cruising along in 3rd and above the vibration goes away. I will definitely need to look at the driveshaft angles. My last truck had a vibration after flipping my carrier bearing and all I had to do was adjust the angles. I'm hoping it's the same solution here. 4. The manual steering sucks! I don't know if my memory is failing me, or all the suspension changes I made affected steering, but I definitely did not like the steering today like I did the last time I drove the truck before all this work. The wheel was very heavy at low speed and hard to make tight radius turns. At speed it felt pretty good until I had to turn the wheel past 10 and 2 and then it got heavy and less responsive. I will definitely be looking into a power steering swap. 5. Heat is still an issue even with the exhaust wrap. While cruising around the air flow keeps the heat at bay, but as soon as I sit and idle the floor temp starts to spike again. At one point I stopped to take some pictures and left the truck running. When I got back in the floor was quite hot. I believe I will have to add additional heat shielding under the floor. 6. The truck feels very small with it this low. It was a strange feeling driving it. I never felt this way before driving it or my old truck, but it's something I will have to get used to I suppose. I do like the way it sits so I won't be changing the ride height! 7. With the caster mod my springs rub the front edge of the cup in the crossmember. I'm not sure how I will remedy this, but it does need to be resolved. Any time I go over a bump I can hear the spring pop over this edge. 8. At most RPMs the exhaust actually sounds pretty good. It's not even that loud in the cab and I currently don't have any sound deadening or carpet installed. There is only a short RPM band around 2500 where it really drones, actually, its more like a humming. It's kind of a strange sound. I'm hoping once the bed is on and the tail pipes are installed it will be better. I believe that is it for now. If I've lost you by now that's ok! I was trying to get all this down before I forget it. From here, I plan to address a few of the items above and continue installing the remaining body panels. In addition, I will put more validation miles on the truck to work out any remaining bugs.  
__________________
Builds: Green Gus the 68 C10 ; Sullii the 72 1500 - Instagram: @dr.hewitt - C10 Concept/Development Photos: Master Thread |
|
|
|
|
08-03-2023, 07:57 AM
|
#22 |
|
Senior Member
Join Date: Aug 2004
Location: Centennial, CO
Posts: 2,905
|
Re: Sullii the 72 GMC 1500
That is awesome, nothing beats that first ride! I love the pic with your son, he looks excited.
I would say that your hard steering is from the extra caster, the stock setting for these guys was pretty minimal to make them steer easier. That said, I'm adding extra caster in on mine also. I forget how small these trucks are till I get in one. My old 68 longbed was about the same length as my 93 shorty.
__________________
ClusterTruck: 68 C10 Bought in 89, wrecked in 03. Slow low $ rebuild started '17. 6.0 & TKO http://67-72chevytrucks.com/vboard/s...d.php?t=788602 93 K1500 Short Step, 350, NV4500, EBL flash ECU. Vortec heads & roller cam someday... 05 Jeep Wrangler Unlimited. 3 lift & 6-speed 02 E320 the insurance total free car 13 Tahoe LTZ |
|
|
|
|
08-03-2023, 09:32 AM
|
#23 |
|
Registered User
Join Date: Apr 2014
Location: Azle,Texas
Posts: 2,248
|
Re: Sullii the 72 GMC 1500
Great update with huge progress! Well done.

__________________
Brian 1972 C10, "Loyd", LWB to SWB, 5.3, L83/6L80e, 4:11 Tru Trac, Air Ride, VA, DD, 20" Coys, 4 wheel disc, A quick LS swap turned into a 6 year frame off resto-mod. |
|
|
|
|
08-03-2023, 08:16 PM
|
#24 | |
|
Registered User
Join Date: Jun 2014
Location: Mocksville, NC
Posts: 1,737
|
Re: Sullii the 72 GMC 1500
Quote:
 . Now I'm wondering if it's worth going back on that mod, or just keep moving forward and do the upgrade to power steering. . Now I'm wondering if it's worth going back on that mod, or just keep moving forward and do the upgrade to power steering.
__________________
Builds: Green Gus the 68 C10 ; Sullii the 72 1500 - Instagram: @dr.hewitt - C10 Concept/Development Photos: Master Thread |
|
|
|
|
|
08-03-2023, 09:51 PM
|
#25 |
|
Senior Member
Join Date: Aug 2004
Location: Centennial, CO
Posts: 2,905
|
Re: Sullii the 72 GMC 1500
Happy to provide a reminder
You could un-do it, but it won’t track as nice at highway speeds. Nor will it want to return to center as strongly after turns. I say go with power, it’s easy on these trucks.
__________________
ClusterTruck: 68 C10 Bought in 89, wrecked in 03. Slow low $ rebuild started '17. 6.0 & TKO http://67-72chevytrucks.com/vboard/s...d.php?t=788602 93 K1500 Short Step, 350, NV4500, EBL flash ECU. Vortec heads & roller cam someday... 05 Jeep Wrangler Unlimited. 3 lift & 6-speed 02 E320 the insurance total free car 13 Tahoe LTZ |
|
|
|
 |
| Bookmarks |
|
|


 Hybrid Mode
