
|
 10-09-2006, 10:41 PM
|
#1 |
|
Used Register
Join Date: May 2005
Location: Live Oak, TX
Posts: 379
|
Fuel Tank Fun
 Fuel tank repops just suck.... Got my replacement tank kit in this weekend and started working on it tonight. Picked it up from fillingstation.com, but I think most are all the same. I have read about an issue with the filler neck (too late), but wanted to post a few pics to illustrate the problem. I have an email in to the vendor I purchased from to see what their take is, if they have one. I have read about people having a raditor shop swap the original neck onto the new tank, but that is 1) an extra pain in my butt, 2) extra expense to me, and 3) ABSOLUTELY REDICULOUS for a new "replacement" part. Anyway, on to the pics... Here is the original filler neck (note the long curve): 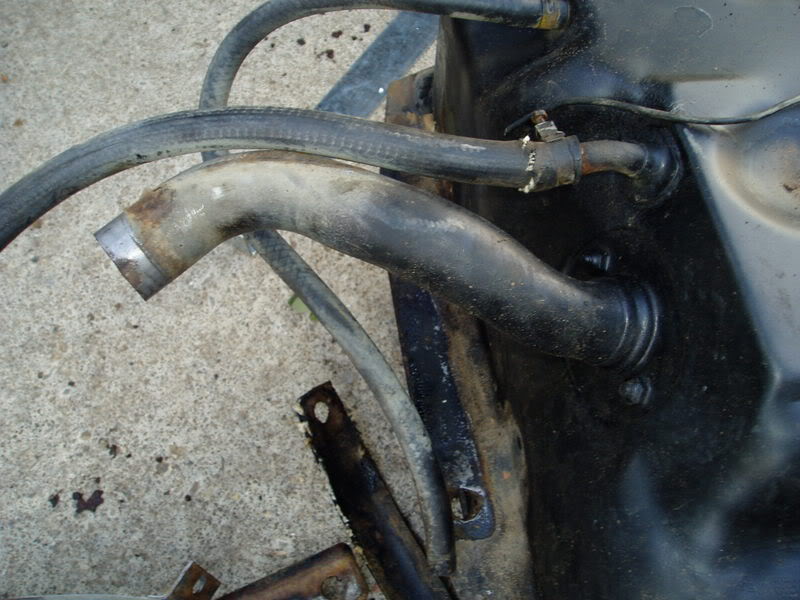 Here is the replacement tank's neck:  Here are the replacement (non-fitting) straps compared to original:  And here is the money shot....  and  See how the new neck (with the blue shop towel in it) points STRAIGHT at the body mount? The filler hose is still attached to the Blazer's fuel filler and approximates the 'proper' connection location. Anybody have any other suggestions or is modifying a brand new tank my only recourse? Thanks (and sorry for the illustrated rant)... Herb Last edited by augie; 04-17-2011 at 01:18 PM. |

|
|
10-09-2006, 11:31 PM
|
#2 |
|
Registered User
Join Date: May 2000
Location: Petrolia,Ontario,Canada but working in Port Huron,Mi.
Posts: 1,769
|
Re: Fuel Tank Fun
Can't you unbolt the old filler neck and transfer it to the new tank?
What are the two nut's on each side of the neck for?
__________________
71 blazer,350SBC,approx.375HP,700R4,factory GM TPI.Dual electric fans,33x12.5x15 ATR on stock suspension. Petrolia,Ontario,Canada but working in Port Huron,MI. See ALL my Blazer pic's HERE |
|
|
|
10-09-2006, 11:54 PM
|
#3 | |
|
Used Register
Join Date: May 2005
Location: Live Oak, TX
Posts: 379
|
Re: Fuel Tank Fun
Quote:
Herb |
|
|
|
|
10-10-2006, 01:56 AM
|
#4 |
|
Registered User
Join Date: Apr 2006
Location: oklahoma
Posts: 10,670
|
Re: Fuel Tank Fun
Since you have the old tank and I am asuming it is junk why not undo the bolts on the filler neck on it and see what happens? I bet it isnt soldered in and once you remove the bolts it should come out. Especially since you said there is sealer around where it ataches, sounds like that is waht they use for a gasket. Hay its worth a shot.
Aaron |
|
|
|
10-10-2006, 08:01 AM
|
#5 |
|
Registered User
Join Date: May 2000
Location: Petrolia,Ontario,Canada but working in Port Huron,Mi.
Posts: 1,769
|
Re: Fuel Tank Fun
Even if it is soldered on you can un-solder it.
I did it with an Old's Cutlass tank. Since the Cutlass tank was toast,I 1st drained all the gas(of course) then filled it with water.Took a propane torch to the soldered in filler neck and "gingerly" applied flame to the base of the neck and tank. Takeing my time,and while wiggleing the filler neck,I applied the heat untill the soldered neck let loose. It might work with a heat gun too...no flame with that. If your not comfortable doing it yourself,take it to your local rad. shop.
__________________
71 blazer,350SBC,approx.375HP,700R4,factory GM TPI.Dual electric fans,33x12.5x15 ATR on stock suspension. Petrolia,Ontario,Canada but working in Port Huron,MI. See ALL my Blazer pic's HERE Last edited by BobbyK; 10-10-2006 at 08:02 AM. |
|
|
|
10-10-2006, 09:59 AM
|
#6 |
|
Registered User
Join Date: Mar 2003
Location: Northern Illinois
Posts: 2,181
|
Re: Fuel Tank Fun
Guys, you're missing his point.
His point is that a new reproduction part should be just that -- a reproduction. Unless you're told at the time you make the purchase, the expectation is that the new part will be useable for the application without this kind of major modification. This tank may be cheaper to produce than a tank with the correct neck. But, since they don't show a picture and you're not TOLD, you don't know that your price of getting a FUNCTIONAL part is actually much greater. There's also the problem of missing/damaged original parts. If the vendor is assuming that the customer is going to have to tear apart his old piece to get the new piece to work, what happens if you don't HAVE the old piece or it's not useable? I don't have a problem with people selling parts like this that may have to be modified -- I understand that for old vehicles sometimes you take what you can get. The problem, I think, that Herb wasn't told that his assumption of fit and function was wrong. The vendor should do this. Brian Last edited by bpmcgee; 10-10-2006 at 10:01 AM. |
|
|
|
10-10-2006, 11:19 AM
|
#7 |
|
Registered User
Join Date: Dec 2002
Location: tally FL
Posts: 74
|
Re: Fuel Tank Fun
Desoldering the filler neck may be the only option but I say he deservs a refund because the part is incorrect. I can't stand internet sellers that reproduce inferior "made in china" junk and pass it off as a "direct replacement".
__________________
1972 GMC Jimmy - 383SBC | TH350-NP203-NP205 | D60PL | 14FF Detroit | 42 TSL's | 4Xeyes | Heavy FOotE "Trail in. Trash out." Florida4x4 dot Com |
|
|
|
10-10-2006, 11:29 AM
|
#8 |
|
Post Whore
 Join Date: Feb 2000
Location: Rose Hill, KS, USA
Posts: 12,683
|
Re: Fuel Tank Fun
That really sucks especially since the filler neck now points right at the body mount. At first I thought you could just make an extension of your rubber hose but with the filler neck pointing right at the body mount, that won't work. Good luck finding a solution.
__________________
1970 Blazer with a 400 sbc and 4" lift 1980 Pontiac Trans Am, 455 Oldsmobile 2012 Kawasaki Concours 14 |
|
|
|
10-10-2006, 01:16 PM
|
#9 | ||
|
Used Register
Join Date: May 2005
Location: Live Oak, TX
Posts: 379
|
Re: Fuel Tank Fun
Quote:
Quote:
For those that may have not seen the parts that connect, here are a couple more pics of the areas involved... Here is the connector tube from the bedside filler, down to the tank filler. My first thought was to twist this toward the tank. The smaller hose is the vent. 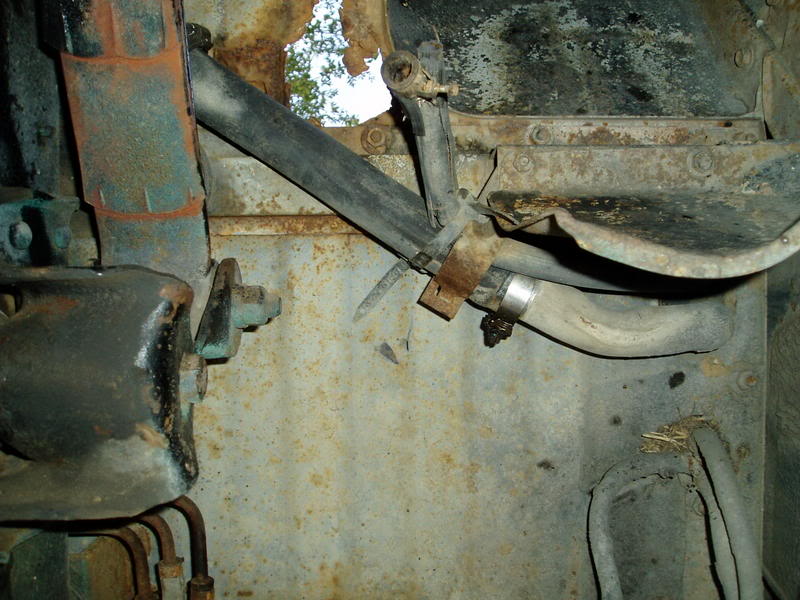 This is the bedside filler area (image rotated). Note the metal to rubber connection near the bed floor that would allow the connector tube in the previous photo to be rotated.  I have not yet heard from the vendor about this, so I'll give them a chance to make good. Sad part is that the Blazer was my DD, as my Jeep's not quite ready. I'll post whatever recourse I come down to. Herb Last edited by augie; 04-17-2011 at 01:21 PM. |
||
|
|
|
10-10-2006, 01:42 PM
|
#10 | |
|
Senior Member
Join Date: Nov 2003
Location: Brookings, SD
Posts: 10,497
|
Re: Fuel Tank Fun
Quote:
__________________
Some people are like slinkies, they aren't good for anything, but you can't help but smile when you see one tumble down the stairs. |
|
|
|
|
10-10-2006, 02:06 PM
|
#11 |
|
The Blazer King
Join Date: Sep 2000
Location: Valrico, Fl (Tampa)
Posts: 1,213
|
Re: Fuel Tank Fun
I review this product on the review board over a year ago. We have the same gripes. I had to use a radiator hose (which i got flap for and has help up perfectly) and I used the stock straps. All the different companies are selling the same tank.
http://67-72chevytrucks.com/vboard/s...d.php?t=159589
__________________
72 2wd Blazer. Its the superbichinest, megacoolinest, superflowinest. |
|
|
|
10-10-2006, 02:53 PM
|
#12 |
|
Registered User
Join Date: Dec 2004
Location: Northern AZ
Posts: 7,271
|
Re: Fuel Tank Fun
Yeah, it is a tweener, as in between the burb and Blazer tank, but not perfect for either. Just cut the angled metal pipe off of your old tank, go to NAPA and buy fuel hose (they actually have hose for fuel that looks like radiator hose). It will take like a 4-5 inch wide piece and two hose clamps to attach the old metal hose to the new shorter outlet and in the end the filler will work perfect. I would give the guy with a radiator hose on his tank flack as well, because the rubber in those hoses is not made to withstand fuel and sooner than later it will all but melt away and cause a leak. Give my advice a try and you'll be out a few $$$ and still be better off than the solder route and still be safe!!
|
|
|
|
10-10-2006, 05:24 PM
|
#13 |
|
Registered User
Join Date: Jul 2006
Location: Central PA
Posts: 12,201
|
Re: Fuel Tank Fun
Why not just cut the neck off of your old tank (saw), take it to a muffler shop and have them weld it onto the new tank? It might cost $10 for 5 min of work for both of you.... They can flare the end and run a quick weld and presto, you set. my 2 cents
|
|
|
|
10-10-2006, 06:32 PM
|
#14 |
|
Registered User
Join Date: Dec 2004
Location: Northern AZ
Posts: 7,271
|
Re: Fuel Tank Fun
even better than the hose idea I had, but either would work!! Make lemonaid out of those lemons!!
|
|
|
|
10-10-2006, 07:07 PM
|
#15 |
|
Account Suspended
Join Date: Nov 2004
Location: Deer Park, Tx.
Posts: 2,524
|
Re: Fuel Tank Fun
Why doesnt the tank manufacturer do this for us since it is so easy. I hate repro junk. Good luck. Tell them to send someone to crawl under the blazer to fill it up with gas everytime you need some and see how they like that.
|
|
|
|
10-10-2006, 07:15 PM
|
#16 |
|
Used Register
Join Date: May 2005
Location: Live Oak, TX
Posts: 379
|
Re: Fuel Tank Fun
Welp...taking the nuts loose from the original tank filler is a no-go, at least until the solder is melted off of them. On a real close inspection of the original filler tube, it looks like there is a step in the tube (soldered slip joint) about 1/2" up the neck from the tank. It looks like the S-curve tube section actually solders INSIDE the straight stub filler of the new tank (after shortening it considerably).
 To those that have removed the soldered on filler tube - a question: Is the filler tube assembly a flanged pipe that bolts to the outside of the tank, then the whole flange is filled over with solder? That is what appears to be the case. If I am going to have to have the filler modified, I would think it best to simply have the Rad shop swap the necks (after match-marking the tube for alignment) rather than cobble a union between the old and new. I did speak with the vendor today (he called me) and he is sending some filler hose to try the "splice the old tube to the new neck idea", but I'm not sure I'm going to go that route as there is only about 2" between the tube and that body mount. The new tank's stub neck is about 3" long and the S-curve in the original start less than 3" from the tank. I need to sit under it and study it a bit more, but first - I gotta finish tuning the Jeep for the new temporary DD... welcome to another day in the life........ Herb |
|
|
|
10-10-2006, 07:20 PM
|
#17 | |
|
Used Register
Join Date: May 2005
Location: Live Oak, TX
Posts: 379
|
Re: Fuel Tank Fun
Quote:
BTW - the vendor is basically a parts reseller and the tank kit actually comes from parts123.com, but it seems to match all of the photos I've seen in my oh-so-late research. I sent the pictures to the vendor in an email and he understands the problem I am having. He is getting with his vendor for the kit (the first they have sold for the Blazer - you see my luck?) Herb |
|
|
|
|
10-10-2006, 09:01 PM
|
#18 | |
|
Senior Member
Join Date: Nov 2003
Location: Brookings, SD
Posts: 10,497
|
Re: Fuel Tank Fun
Quote:
The old tank was very easy to get the solder off. I heated it, undid the nuts, and heated it a little more to get the neck assembly loose. The new tank I heated it, heated it more, bought a new torch and heated it more, took it to the radiator shop and he gave it a shot, and finally took it to another shop and they were finally able to get it off. They must use some sort of high heat solder on the new ones.
__________________
Some people are like slinkies, they aren't good for anything, but you can't help but smile when you see one tumble down the stairs. |
|
|
|
|
10-11-2006, 08:30 PM
|
#19 |
|
Used Register
Join Date: May 2005
Location: Live Oak, TX
Posts: 379
|
Re: Fuel Tank Fun
The saga continues...
Called around to Rad shop today and all of them will need to boil the old (trash) tank before they can do anything with it. Some "won't accept the liability of the work", some "don't do that kind of work", some are "just covered up right now". The ones that will do it want $45 to $75 bucks and all of them seem to be on the Southside or the industrial part of downtown (both an easy 30 minutes one-way) and they all close at 5 pm (I get off work at 5 pm). Did I mention that I need to get this thing running for a road trip/fishing trip starting Saturday at 4am? I figured I'd give it a try - looked up gas tank repair online - read horror stories about explosions and such. Basically, if you want to be able to count to ten when you're done - avoid it. Sounds like my kinda work!! So anyway - I got the filler neck off the old tank tonight and got it cleaned and prepped for install. I'll drop the new tank after dinner and see if one of the closer shops can work me a better deal first thing in the AM without having to jack with the old tank. Herb Last edited by herb101; 10-11-2006 at 08:30 PM. |
|
|
|
10-11-2006, 08:32 PM
|
#20 |
|
Senior Member
Join Date: Nov 2003
Location: Brookings, SD
Posts: 10,497
|
Re: Fuel Tank Fun
That's exactly what I did. I took it off the old tank and let someone else put it on the new tank. They questioned me thoroughly about the new tank, he asked my three times if I had ever put gas in it. You should be able to find someone to take care of it now that they don't hvae to deal with the old tank.
__________________
Some people are like slinkies, they aren't good for anything, but you can't help but smile when you see one tumble down the stairs. |
|
|
|
10-11-2006, 09:25 PM
|
#21 |
|
Registered User
Join Date: Apr 2006
Location: oklahoma
Posts: 10,670
|
Re: Fuel Tank Fun
Since they want to clean the old junk tank(why) id fill the old tank with water and take a air chiesel and cut about 6 inches from the filler neck, cut around it then take that peace and your new tank to the shop. Quick, easy and no sparks.
Aaron |
|
|
|
10-11-2006, 09:44 PM
|
#22 | |
|
Used Register
Join Date: May 2005
Location: Live Oak, TX
Posts: 379
|
Re: Fuel Tank Fun
Quote:
Pretty much what I did...Drained the gas, filled it with water, played with the soldering iron with no love, played with the heat gun with no love, never got the balls to try the propane torch as the fumes coming off were still VISIBLE  even with the water flowing through it. I finally decided to just take a good old-fashioned hack saw and, well, hack! I was able to easily cut down both sides and across the top, then just worked the bottom back and forth until the tank metal fatigued (not much work with steel tissue paper). I took it a step further and torched out the solder and removed the tank scrap and cleaned up the neck. even with the water flowing through it. I finally decided to just take a good old-fashioned hack saw and, well, hack! I was able to easily cut down both sides and across the top, then just worked the bottom back and forth until the tank metal fatigued (not much work with steel tissue paper). I took it a step further and torched out the solder and removed the tank scrap and cleaned up the neck.BTW folks, the new neck is not soldered in place, it is brazed on. I tried the propane torch first, then stepped up to the Oxy-Mapp with no progress. The whole area will get a uniform orange glow with no difference visible in the seamming material. I'll take it in to a pro manana and see what they can do for me, now that the "dangerous" part is done (wimps! - LOL). Herb edit - oh by the way, the rusty scale on the inside of the tank piece on the old filler neck supported a healthy flame for a good couple minutes during the clean-up process. Last edited by herb101; 10-11-2006 at 09:46 PM. Reason: oh by the way.... |
|
|
|
|
10-12-2006, 04:22 PM
|
#23 |
|
Post Whore
Join Date: Feb 2000
Location: Rose Hill, KS, USA
Posts: 12,683
|
Re: Fuel Tank Fun
Good luck - I'm so glad my tank was in good shape when I pulled it to have it cleaned out!
__________________
1970 Blazer with a 400 sbc and 4" lift 1980 Pontiac Trans Am, 455 Oldsmobile 2012 Kawasaki Concours 14 |
|
|
|
10-12-2006, 04:40 PM
|
#24 |
|
Used Register
Join Date: May 2005
Location: Live Oak, TX
Posts: 379
|
Re: Fuel Tank Fun
It's looking up so far....
Took the new tank and the cleaned and prepped old filler to a raditor shop this morning about 8:30. Rusty (Oh, how ironic) called me just before noon and said it was ready and bring $30. I picked it up at lunch and it looks like a thing of beauty! Rusty said the original new tank neck was silver soldered on and it take ALOT of heat to get it off. The neck was reinstalled with 'soft' solder, just like the original. The prepatory work last night made it "easy work" for Rusty today, so he could jump right on it and get it knocked out. As a bonus, I got a line on a used top and door set for the Jeep from one of the guys there - may be able to pick it up for $50. Tank goes back in tonight with new vent and supply and return and whatever-the-other-line-is hoses and new filler hose if I can find 1-3/8" locally. BTW - the original filler neck measures just at 1-3/8" od. I should be ready for a road trip and fishing on Saturday! Herb |
|
|
|
10-12-2006, 07:24 PM
|
#25 |
|
Registered User
Join Date: Apr 2006
Location: oklahoma
Posts: 10,670
|
Re: Fuel Tank Fun
Good for you. Can we see picks of the tank now that you have got the new neck on and pics once everything is in. Great on finding some other parts you wereafter.
Aaron |
|
|
 |
| Bookmarks |
| Thread Tools | |
| Display Modes | |
|
|


 Linear Mode

