
|
 06-26-2010, 12:12 PM
|
#1 |
|
Registered User
 Join Date: Jan 2010
Location: jackson
Posts: 676
|
67 Frankenstien build
The rebuild I am starting is a 67 4x4 truck that I passed on the road for over a year before I decided I was tired of building camaro's. I purchased it in March of 2010. I have never restored a 4x4 before and have gotten great information from others builds on this site so I decided to start my own thread that might help someone else with theirs.
The truck started as the following: 67 V8 2wd cab 70 TBC truck 350 67 3/4 4x4 frame 67 3/4 8 lug Dana 44/Ho62 GMC 4 light front clip 68 Chevy 8ft step side bed. 3sp T221 TC So far I have stripped the truck down to the frame, rebuilt the T221, installed a SM465, replace all U-joints and primed the cab on a dolly I made. Reinstalled the engine and planning to spary BC/CC color next week. I am shamlessly coping a 70 truck paint color from Rack Man (Lemanns Blue/White Top) Lessons learned so far. The T221 for a 3sp has an inch longer output shaft then a 4sp. Lucky the sn465 I bought had a 221 with it. So I have an extra 221 for parts. Have a NP205 but might wait until I replace the axles to switch.  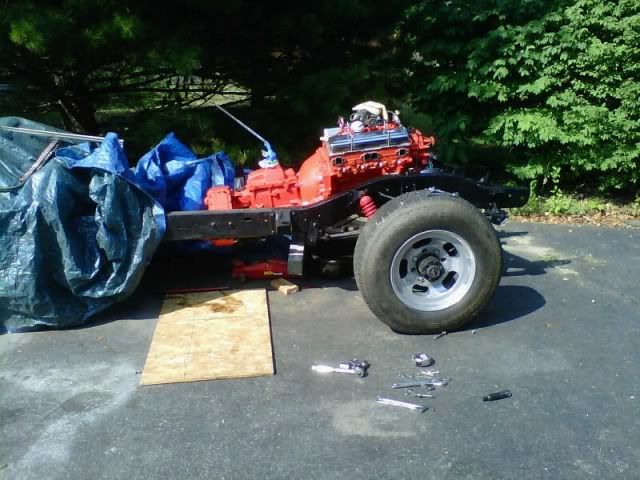 
Last edited by 67gmcstepside; 07-31-2010 at 03:02 PM. |

|

|
|
06-26-2010, 12:40 PM
|
#2 |
|
VA72C10
 Join Date: Mar 2008
Location: Midlothian, VA
Posts: 25,269
|
Re: 67 Frankenstien build
sounds like a cool project. Nice progress!
__________________
Looking for a 67-72 swb or blazer project in or around VA. 
|
|
|
|
|
07-03-2010, 12:32 PM
|
#3 |
|
Registered User
Join Date: Jan 2010
Location: jackson
Posts: 676
|
Re: 67 Frankenstien build
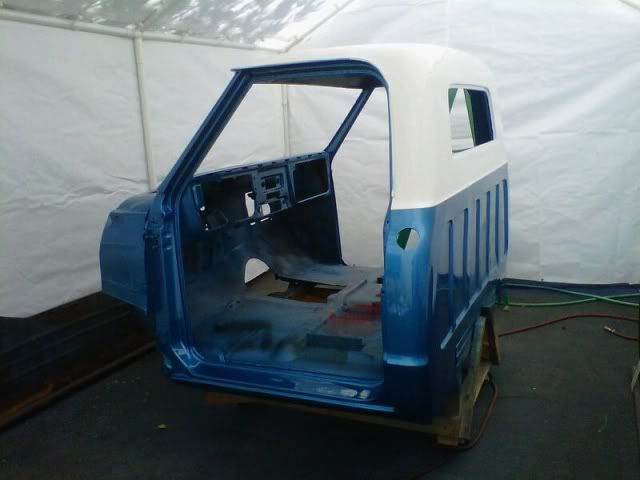
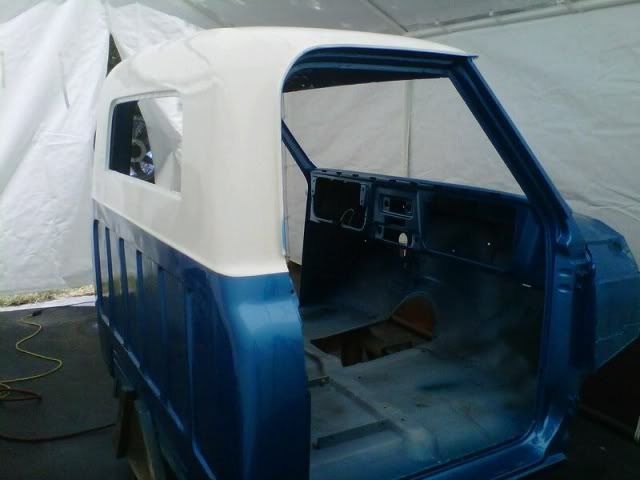
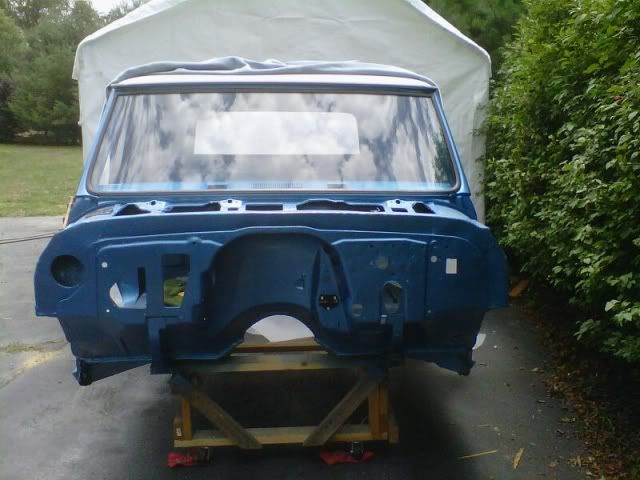
Setup my temp paint booth and painted the cab. 69 lemans blue. Starting to prep the doors. Now I have to get 4 friends over to help me get it back on the frame.
Last edited by 67gmcstepside; 07-03-2010 at 12:54 PM. |
|
|
|
|
07-03-2010, 01:31 PM
|
#4 |
|
Page intentionally left blank.
Join Date: Jul 2006
Location: Laramie, WY
Posts: 299
|
Re: 67 Frankenstien build
Looks good! Would love some info on your "temp paint booth". Is this something you had, built or bought?
__________________
There is a theory which states that if ever anyone discovers exactly what the Universe is for and why it is here, it will instantly disappear and be replaced by something even more bizarre and inexplicable.There is another theory which states that this has already happened. - Douglas Adams '67 GMC 4x4, 305 V6! Or all the parts for anyway... '17 Subaru Outback. '18 Toyota Tacoma TRD Off Road. '99 Ducati 900SS. |
|
|
|
|
07-03-2010, 03:14 PM
|
#5 |
|
VA72C10
Join Date: Mar 2008
Location: Midlothian, VA
Posts: 25,269
|
Re: 67 Frankenstien build
Looks GREAT!
I'm building my temp paint booth now...what did you use for the material? Drop cloth sheeting or something else? IS that PVC? I just picked up 2" And where did you find those pieces to work at the upper angles (Cross with the top part angled at a 45 degree angle)
__________________
Looking for a 67-72 swb or blazer project in or around VA.
|
|
|
|
|
07-03-2010, 07:20 PM
|
#6 |
|
Registered User
Join Date: Jan 2010
Location: jackson
Posts: 676
|
Re: 67 Frankenstien build
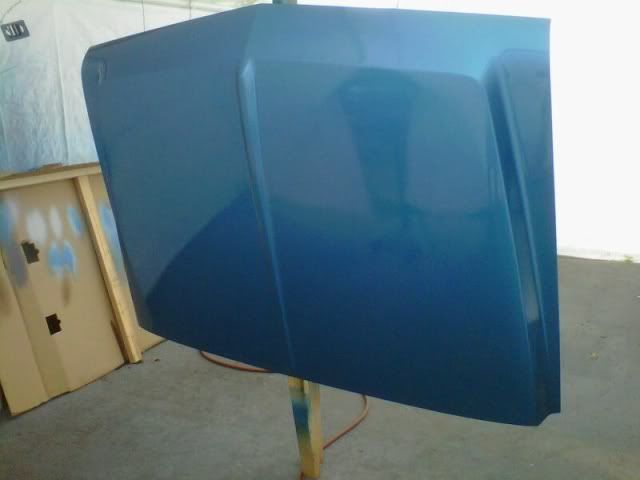
Just saw a clear coat run about 4 inches under the back window :-( Oh well sand/buff tomorrow. I am going to try to get the doors done but hope I don't scratch the heck out of them putting the vent window and roll-up window back in. Then its get the cab back on the frame, doors installed then I can start on the monster hood and fenders. I normally build camaro's so all the pieces seem hugh!!
My booth is a 12x20 temp garage kit made by powell & powell. The tubing is 2 inch steel. My friend had used just the top on his deck for a party 4 years ago and gave it to me to get it out of his shed. After painting I plan to roll the truck in and work on it inside the tent rather the covering it with a tarp. This is the link to the kit I have; http://www.kingcanopy.com/product/hc1020pcf Last edited by 67gmcstepside; 07-03-2010 at 08:30 PM. |
|
|
|
|
07-10-2010, 05:20 PM
|
#7 |
|
Registered User
Join Date: Jan 2010
Location: jackson
Posts: 676
|
Re: 67 Frankenstien build
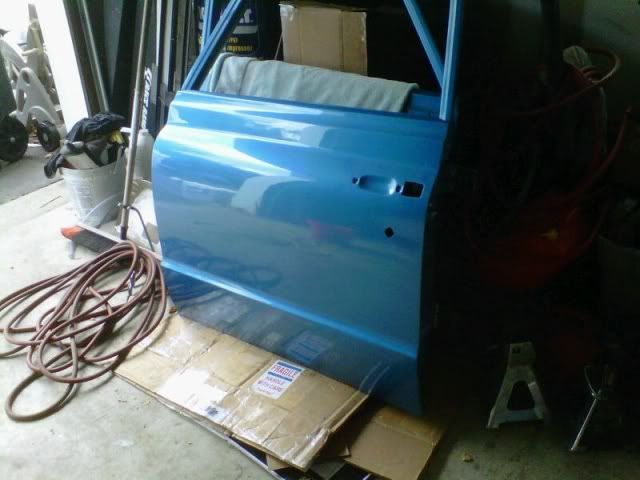
Well painted sanded and buffed the doors today, came out good. Burned through an inch of the door edge so a quick touch up is in order.
 Bought front and back axels from a 72 blazer yesterday. 3:08 gearing which I liked. I was planning to mount the cab this weekend but realized the new rear cab mounts bolt holes do not line up with the originals holes in the frame. I threw away the rusted originals so I need to figure out if I can use two of the existing holes and drill the other two or I will neeed to drill four new ones. Bought the cab mount from suicide doors. I'll call then Monday to see the they shipped me the wrong cab mount set or not.   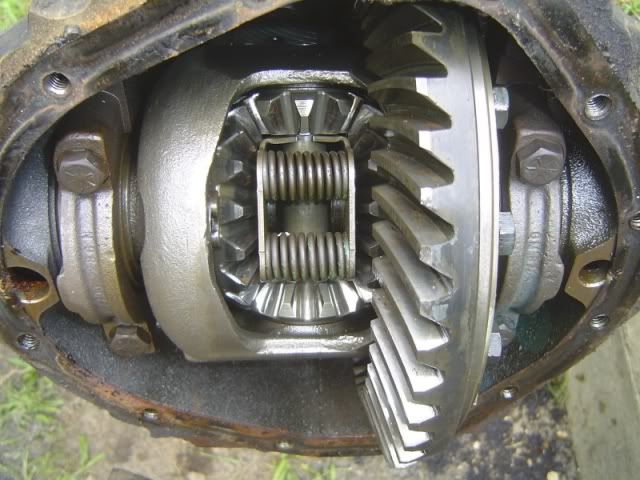 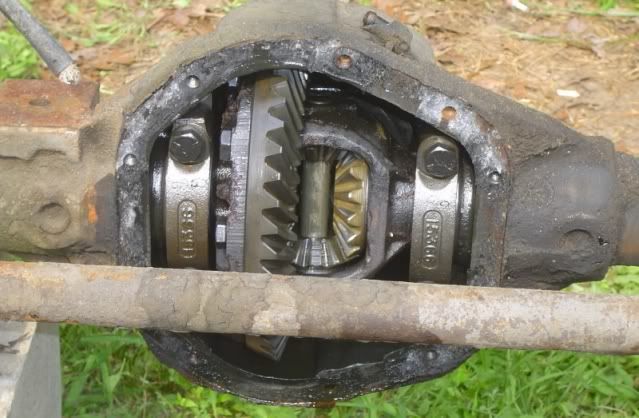 Found out I made a big mistake when I taped the color line under the rear window. I thought the cab trim would go right under the slight cab bump out but after searching on cab trim I see that the trim starts under the window drip trim. I am down about 3 inchs. Another lesson learned. So its either repaint the back of the cab or leave it and send the cab trim back to LMC. Hmmm, What to do.
Last edited by 67gmcstepside; 07-10-2010 at 06:01 PM. |
|
|
|
|
07-10-2010, 06:39 PM
|
#8 |
|
VA72C10
Join Date: Mar 2008
Location: Midlothian, VA
Posts: 25,269
|
Re: 67 Frankenstien build
does the LMC trim stick on? If not, are the studs not on the back of your cab? Normally the back of cab trim mounts to studs that are fixed on the back of the cab.
__________________
Looking for a 67-72 swb or blazer project in or around VA.
|
|
|
|
|
07-10-2010, 07:33 PM
|
#9 |
|
Registered User
Join Date: Jan 2010
Location: jackson
Posts: 676
|
Re: 67 Frankenstien build
The truck was not two tone to begin with and no studs or trim. I just like the white roof look. I was going to use the same studs that hold on 69 camaro vinyl roof trim on. I saw factory originals and they are the same. Thats when I realized my mistake with the paint line :-( They have a small screw head with a flat top that holds the trim clips in place.
Last edited by 67gmcstepside; 07-10-2010 at 07:35 PM. |
|
|
|
|
07-31-2010, 12:29 PM
|
#10 |
|
Registered User
Join Date: Jan 2010
Location: jackson
Posts: 676
|
Re: 67 Frankenstien build
I have been busy painting parts and just about to finish the hood today. Right now waiting to start to apply the CC on the hood. This morning myself and a friend installed the windshield. For those of you nervous about doing this yourself, don't be. I tooks us all of 4 minutes. I used the rope trick, fit the top in, pulled the rope, had my friend push the glass from the outside and in 3 minutes, windshield installed.
Last edited by 67gmcstepside; 07-31-2010 at 12:32 PM. |
|
|
|
|
07-31-2010, 02:57 PM
|
#11 |
|
Registered User
Join Date: Jan 2010
Location: jackson
Posts: 676
|
Re: 67 Frankenstien build
Glad to say that my painting is completed (not the bed) for the summer. Tired of sanding and spraying. This week I will mount the cab, set the doors and rad support and start getting inside ready for the new electical. Gald to move on from the paint both. Might get the sand blaster out and start on the axles and other parts.
|
|
|
|
|
08-11-2010, 06:51 PM
|
#12 |
|
Registered User
Join Date: Jul 2006
Location: Central PA
Posts: 12,201
|
Re: 67 Frankenstien build
nice work, this is going to be the fastest build in history... however, mine is the slowest..
__________________
The Garage: 1968 K-10 SWB - "Project Money Pit" 1996 Z-71 - "huntin rig" 1969 C-10 LWB (SOLD) "Project flip that truck or else" 1993 Passport, F@rd 1-ton (SOLD)"Project Cousin Eddie" My Garage Build "The 1,000 footer" |
|
|
|
|
08-11-2010, 08:40 PM
|
#13 |
|
Registered User
Join Date: Jan 2010
Location: jackson
Posts: 676
|
Re: 67 Frankenstien build
Thanks Mike. I didn't have to deal with the rust issues you did. The PO did most of the rust repair so I just had to final sand and paint. I am single, both kids in college so I have a lot of time to work on the truck and its different then the camaro's I have been building so its exciting! Installed the cab last night and now most of the easy work is done. Ready to sand blast the axles and rebuild them. Configure the PS and start to get the engine compartment ready to start the motor. Thank you very much for answering all my PM questions!!!
Don Last edited by 67gmcstepside; 08-11-2010 at 09:08 PM. |
|
|
|
|
08-11-2010, 10:35 PM
|
#14 |
|
Registered User
Join Date: Jul 2006
Location: Central PA
Posts: 12,201
|
Re: 67 Frankenstien build
no problem, I look forward to the build..
__________________
The Garage: 1968 K-10 SWB - "Project Money Pit" 1996 Z-71 - "huntin rig" 1969 C-10 LWB (SOLD) "Project flip that truck or else" 1993 Passport, F@rd 1-ton (SOLD)"Project Cousin Eddie" My Garage Build "The 1,000 footer" |
|
|
|
|
08-15-2010, 01:43 PM
|
#15 |
|
Registered User
Join Date: Jan 2010
Location: jackson
Posts: 676
|
Re: 67 Frankenstien build
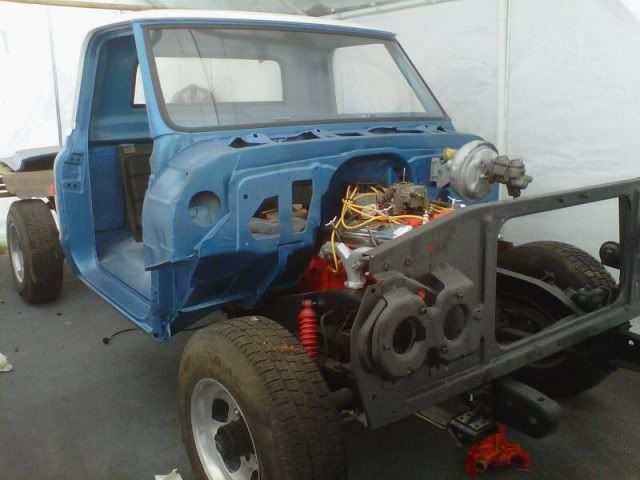
With the help from a few guys from work we mounted the cab. No issues there, bolts lined right up. I started getting the motor together. Manifolds installed (need to respray with darker grey, sand blasted-painted-installed petals and emergency brake. Installed the gas tank and connected fuel lines. Ordering the starter, fuel pump and disk brake master. Installed rad support-need to wipe down all the dust. Next step is to sand blast the axles and start those rebuilds. I hope to get the engine started in a week or two. Hope it runs OK. PO stated it ran like a top. We'll see.
Last edited by 67gmcstepside; 08-15-2010 at 01:47 PM. |
|
|
|
|
08-21-2010, 06:32 PM
|
#16 |
|
Registered User
Join Date: Jan 2010
Location: jackson
Posts: 676
|
Re: 67 Frankenstien build
Worked all day on the truck. Realigned the doors 10 times. Laid the fenders in to check the gaps. A little wide between the fender and door but I'll sleep on it and see if I like it in the morning. Installed the starter and the hump. Painted the glove box door and the grill top that I needed help from the forum if I needed it or not. Thanks for those who replied to my cry for help. Sand blasted and stripped the back axle down. Need to get the rebuild parts. I wasn't sure if the 33x12.5 tires I bought from Scott where going to fit without a lift but it looks like have plenty of room left to right and to the top of the fender. 16.5 x 8 are on it now.
Last edited by 67gmcstepside; 08-22-2010 at 09:16 AM. |
|
|
|
|
08-22-2010, 12:28 AM
|
#17 |
|
Chevy Enthusiast
Join Date: Jul 2009
Location: Canyon Lake Texas
Posts: 2,024
|
Re: 67 Frankenstien build
Cool build, very nice looking truck! Are you going from 3/4 to 1/2 ton?
__________________
Tony 1985 GMC K2500 restoration Project: Rust, White & Blue 1989 Chevy R3500 CC Cummins & 4X4 swap some day... 1989 Burb (D60, 14BFF, 12V, NV4500, NP205, 37" tires in progress) |
|
|
|
|
08-22-2010, 08:10 AM
|
#18 |
|
Registered User
Join Date: Jan 2010
Location: jackson
Posts: 676
|
Re: 67 Frankenstien build
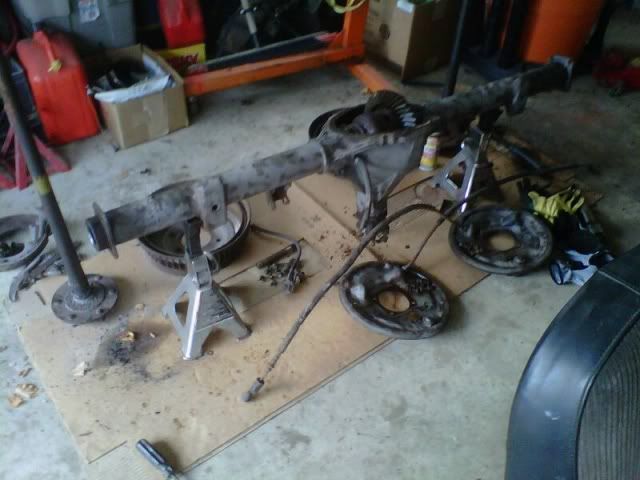
Thanks, I am leaving the 3/4 leafs but changing over to 72 blazer 1/2 ton axles. 12 bolt posi and disk brake, open knuckle Dana 44 for the front. Has 3:07 gears but I do not do much serious off roading anyway. Its going to be my ATV/deer hauling truck when its done.
Last edited by 67gmcstepside; 10-30-2010 at 08:03 PM. |
|
|
|
|
09-13-2010, 07:15 PM
|
#19 |
|
Registered User
Join Date: Jan 2010
Location: jackson
Posts: 676
|
Re: 67 Frankenstien build
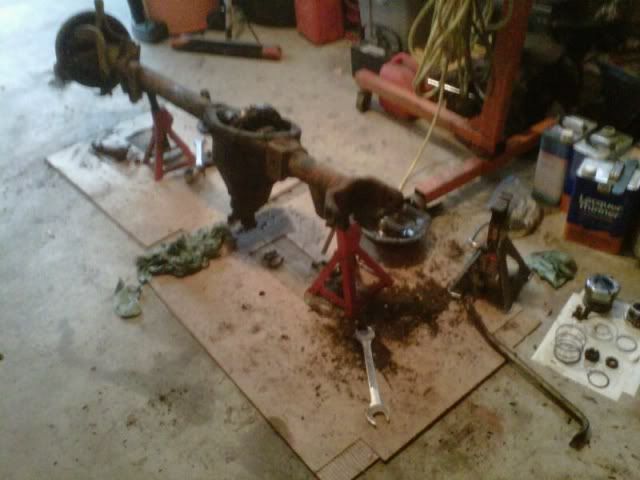
Been busy reading and trying to get the parts I need to move forward. I have everything 90% done waiting on some part. Need the correct manifolds, need the ignition bezel, need the u-bolts for the rear, need a battery tray, etc... the list goes on and on. So much for a complete truck in boxes per the PO. Made a big order and should arrive this week. I hope to start the engine and see if it runs this week. I finished the 12 bolt rear axle rebuild and swapped out the ho52 this past weekend. Started the open knuckle Dana front tear down. I have to assume that the u-joints for the axle is pressed in cause it didn't budge with repeated hammer/socket blows. I only took apart the right side so I can use the left as a guide. Doesn't seem that difficult.
Last edited by 67gmcstepside; 09-13-2010 at 07:22 PM. |
|
|
|
|
09-13-2010, 08:17 PM
|
#20 |
|
Chevy Enthusiast
Join Date: Jul 2009
Location: Canyon Lake Texas
Posts: 2,024
|
Re: 67 Frankenstien build
Did you pull the clips off the u joints? They are on the inside instead of the out side like regular u joints. http://www.google.com/imgres?imgurl=...0&tx=119&ty=83
__________________
Tony 1985 GMC K2500 restoration Project: Rust, White & Blue 1989 Chevy R3500 CC Cummins & 4X4 swap some day... 1989 Burb (D60, 14BFF, 12V, NV4500, NP205, 37" tires in progress) Last edited by 1985-GMC; 09-13-2010 at 08:18 PM. |
|
|
|
|
09-13-2010, 08:52 PM
|
#21 |
|
Registered User
Join Date: Jan 2010
Location: jackson
Posts: 676
|
Re: 67 Frankenstien build
Ah, no. :-( Another lesson learned. Thanks for the pic and information!!! Work for tomorrow.
Last edited by 67gmcstepside; 09-13-2010 at 08:54 PM. |
|
|
|
|
09-13-2010, 09:06 PM
|
#22 |
|
Chevy Enthusiast
Join Date: Jul 2009
Location: Canyon Lake Texas
Posts: 2,024
|
Re: 67 Frankenstien build
Yeah that usually helps.

__________________
Tony 1985 GMC K2500 restoration Project: Rust, White & Blue 1989 Chevy R3500 CC Cummins & 4X4 swap some day... 1989 Burb (D60, 14BFF, 12V, NV4500, NP205, 37" tires in progress) |
|
|
|
|
09-14-2010, 07:49 AM
|
#23 |
|
Registered User
Join Date: Jan 2010
Location: jackson
Posts: 676
|
Re: 67 Frankenstien build
It wouldn't be that last stupid thing I do nor was it the first :-).
Thanks again for the help!!! |
|
|
|
|
09-14-2010, 08:07 AM
|
#24 |
|
Registered User
Join Date: Jan 2010
Location: jackson
Posts: 676
|
Re: 67 Frankenstien build
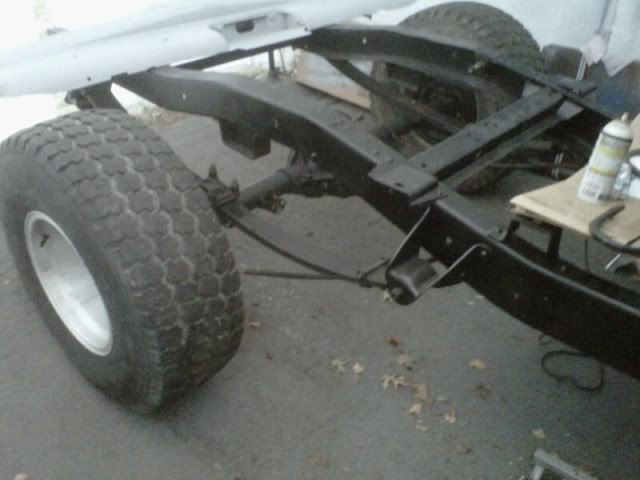
The rear axle is in but waiting on the correct 1/2 ton u-bolts and top plates.
Last edited by 67gmcstepside; 09-14-2010 at 08:07 AM. |
|
|
|
|
10-05-2010, 08:11 PM
|
#25 |
|
Registered User
Join Date: Jan 2010
Location: jackson
Posts: 676
|
Re: 67 Frankenstien build
A happy day. Finally got enough of the truck together to fire up the engine. So the coil is laying across the manifold (need the coil mount) and the wires are all just hanging but she ran! Fired right up and even idled smooth. Have no exhaust system on it yet but it held good oil presure, no smoke and no knocks. Just sat there listening and watching it run until I notice my make shift tent/garage was filling up with exhaust gases. Can't time it due to the 70 engine timing marks are now hiden by the short water pump. So its time to replace the 2bl with a 4 bl setup and get some cash up for an exhaust system. I'll do some more searching but it seems like the LMC systems fit and are inexpensive. Its so much easier working on the engine when you can stand on the front axles. No front clip on yet. Once I have something worth shooting I'll post some more pics.
|
|
|
|
 |
| Bookmarks |
|
|


 Linear Mode

