
|
 06-23-2014, 08:01 PM
|
#351 |
|
Rollin' Old Skool
Join Date: Jun 2007
Location: Hattiesburg, MS
Posts: 5,371
|
Re: My Luxurious late model truck (not so much)
Nice job on the door panels. It does tie everything together better. Glad my old truck could be a little bit of inspiration. Like you, I'm not a huge fan of wood interiors, but I rolled with mine for a long time. As you said, it works for now until you can come up with something better.
__________________
_____________________________________________ Phillip My Build threads: 1966 Chevy C-10 "Black Betty" shortbed, fleetside, BBW, 327 V8/ Powerglide (under construction) http://67-72chevytrucks.com/vboard/s...ighlight=betty 1997 Chevy Tahoe, 2dr/2wd, mild custom (Daily driver) http://67-72chevytrucks.com/vboard/s...d.php?t=601142 Pics: '66 C-10 https://flic.kr/s/aHsjHWD4h9 '97 Tahoe https://flic.kr/s/aHsjGZ7wKP '93 C-1500 https://flic.kr/s/aHskxdpdnQ '88 S-10 Blazer https://flic.kr/s/aHsjYGx4Md Previous Rides: 1993 Chevy S-10 ext. cab, 4.3L, 4/5 drop (Sold) 1993 Chevy C-1500 short/step Retro-Rod (Sold) 1988 S-10 Blazer 2dr/2wd mild custom (Sold) |

|

|
|
06-24-2014, 08:12 AM
|
#352 |
|
Registered User
Join Date: May 2011
Location: Fort Worth, Tx
Posts: 63
|
Re: My Luxurious late model truck (not so much)
I got new armrests for mine. You can have my old ones. They aren't great but they are better than what you have and are the right color.
|
|
|
|
|
06-24-2014, 08:26 AM
|
#353 |
|
I'm just glad to be here!
Join Date: Jan 2008
Location: Longview, TX
Posts: 4,788
|
Re: My Luxurious late model truck (not so much)
Door panels turned out great. Can't even tell they where all busted up. I like it!
On to the next step - Headlight relays!!
__________________
Karl  1965 Chevy Stepside(Grandpa's Old Blue) and (July 2015 Shop Build!)(2020, the Saga Continues) http://67-72chevytrucks.com/vboard/s...d.php?t=372424 The LST Challenge: http://67-72chevytrucks.com/vboard/s...=1#post7812257 Korbin's 1st Square: "Sunburn" http://67-72chevytrucks.com/vboard/s...d.php?t=418618 1985 GMC Sierra: "White Trash", Korbin's 2nd now... http://67-72chevytrucks.com/vboard/s...d.php?t=632305 Henry - 1984 Chevrolet, Owen's 1st Square |
|
|
|
|
06-24-2014, 08:42 AM
|
#354 | ||
|
Registered User
Join Date: Sep 2009
Location: Beaverton, OR from WA State
Posts: 1,515
|
Re: My Luxurious late model truck (not so much)
Quote:
Quote:
 I've never seen before/after shots of this upgrade on your configuration of front end, I am looking forward to the results. I've never seen before/after shots of this upgrade on your configuration of front end, I am looking forward to the results.
__________________
Devin 1983 GMC High Sierra 2500, 4x4, RC/LB, 400 S.B., SM-465, NP-208, Corporate 10 bolt & 9.5" 14 bolt 1996 GMC Sierra SLE 3500 DRW, 4x4, EC/LB, Vortec 454, NV-4500, BW-4401, AAM 925 & AAM 1050 1997 GMC Sierra SLT 1500 4x4, Z71/F44, EC/SB, Vortec 350 My Introduction with my '83s History New Daily, the '96 |
||
|
|
|
|
06-24-2014, 09:24 AM
|
#355 |
|
Registered User
Join Date: Jun 2004
Location: El Lago, TX
Posts: 1,668
|
Re: My Luxurious late model truck (not so much)
Nice work. I did the same thing to spruce up the door panels on my square with the SEM paint and the wood. However, I took it to another level with some camo from the fabric store.
 
|
|
|
|
|
06-24-2014, 02:23 PM
|
#356 |
|
Watch out for your cornhole !
 Join Date: Jun 2003
Location: Azle, Texas
Posts: 14,162
|
Re: My Luxurious late model truck (not so much)
Thunderwagon, I might be interested in seeing if we can work a deal since you're local to me. Greenlee, thank you for the offer too.
Today was headlight relay mod day. I showed a picture above of a relay pack I had scavenged from some junk car in the past. I wasn't happy with their condition though, so I dug through my stock of relays. Mind you, I'm the guy that won't turn down the opportunity to scavenge over a junk car, so I tend to collect things like this. I found a box of very nice Nissan relays I had saved that looked promising. 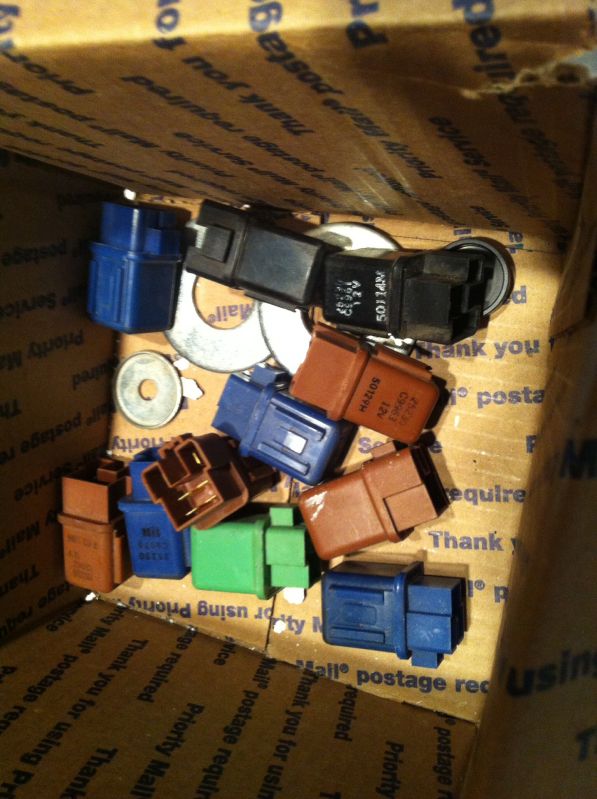 The blue ones have the proper configuration that I need. Plus, they're good quality Jaoanese made units, which I'm confident are better than typical Chinese 5 dollar relays. 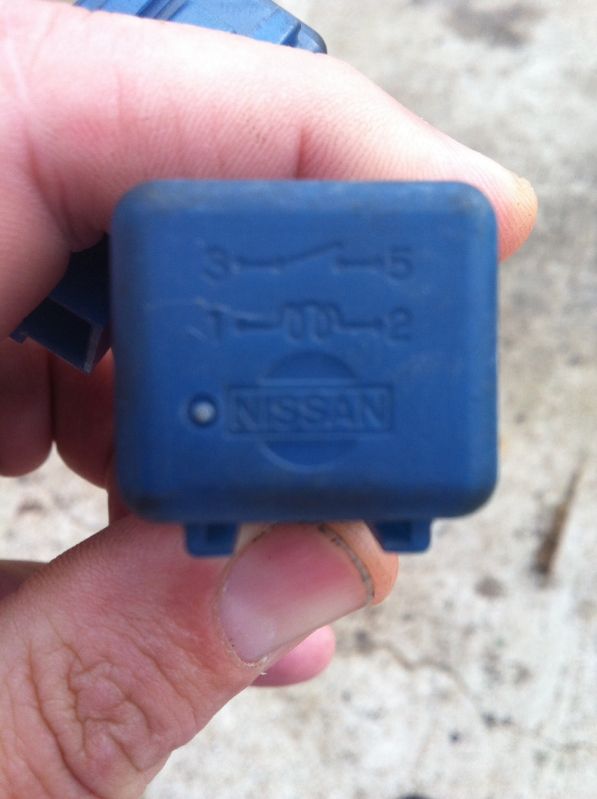 Now, let's talk theory here. I said they had the right configuration for my needs. Notice the diagram on the top of them. Terminals one and two are the latch circuit and terminals three and five are the load circuit. What this means is that when you supply power to terminal one, it flows through the relay to ground, and activates the circuit. When it is activated (terminal 1 powered), terminals 3 and 5 connect. When terminal 1 doesn't have power, the latch circuit opens and terminals 3 and 5 are not connected. That's what we need. I was fortunate that a few years ago someone gave me a very high quality bench type of power supply. It plugs into 110v and supplies a steady 12 volts. Using this I could use jump wires and my multimeter and test the relays to make sure they work.  The downside to using these OEM Asian relays is difficulty mounting them. The common generic relays have a nice little screw tab on them to facilitate mounting. These obviously did not. So, I dug around my shop and turned up something I could work with.  Using a Dremel and files I cut into it, leaving two tabs that slid into the little bracket grooves on the back of the relays.  I also needed a circuit breaker and some green and brown wire to build new headlight harnesses. Fortunately GM has used green/brown/black for headlight circuits forever. I know my 63 truck used the exact same format as this truck does. I've found my local trailer supply place is cheapest for this stuff. They have the circuit breakers for 4 dollars. I chose a 20 amp auto reset breaker. Using Ohms law, we can calculate what is appropriate for our needs. Each headlight is 65 watts. Two headlights totals 130 watts. Divide 130 watts by 12 volts and you find that the headlights will draw 10.83 amps. I chose a 20 amp breaker. To get the wire I needed, I bought a 20 foot trailer wiring harness for 4 dollars. That gets me a ton of the proper color wire for dirt cheap. Sure beats buying it by the spool at the local auto supply store. Anyway, 9.63 total out the door. 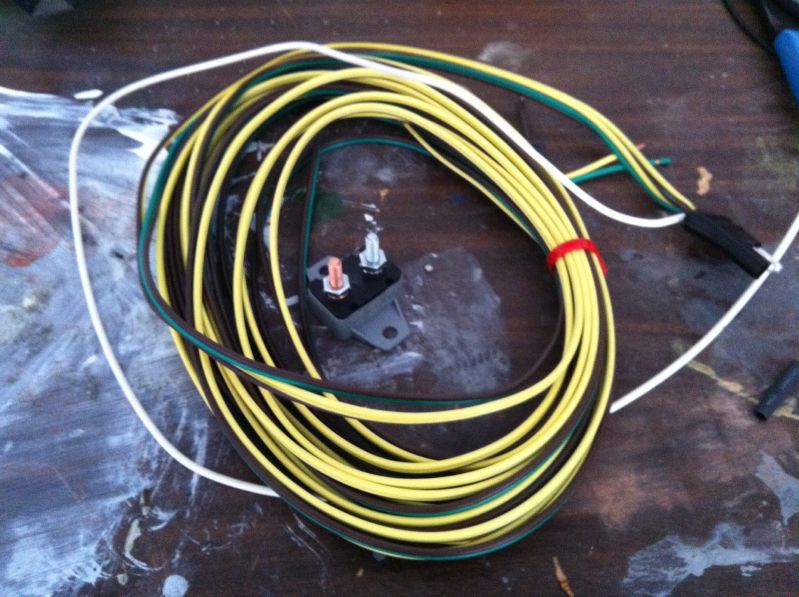 Circuit breaker mounted inside the passenger fender, near the battery. Always mount your circuit protection device as close as reasonably possible to the power source. I'll be using 12 gauge wire to power the headlights.  Power from the battery comes into the copper colored stud (its important, and the breaker is appropriately labeled as such) then leaves the breaker via the other stud and passes over to the relays where it splits off to each one. 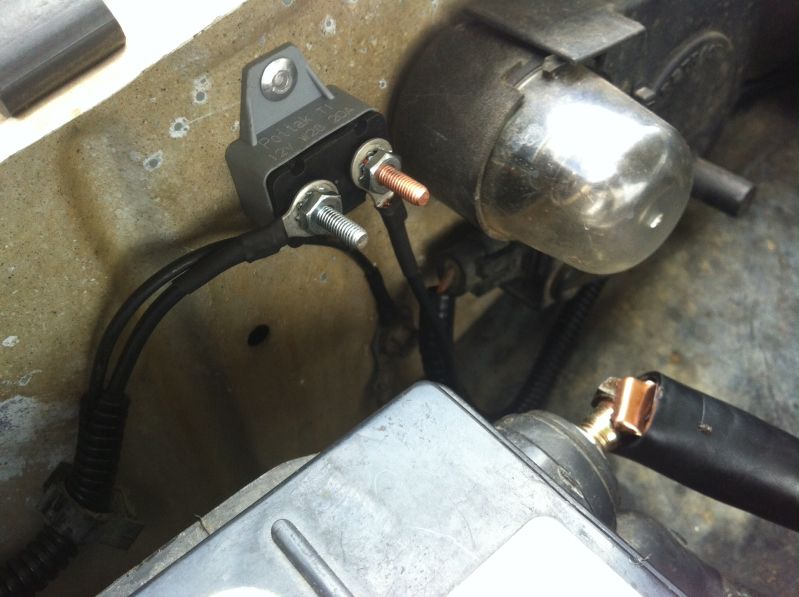 All new wiring in appropriate colors run across the front of the truck. The stock headlight power wires from the switch were terminated into each relay to act as a trigger source. The little ground wire you see there is the ground for the latch circuit. The big black wire is the 12ga power from the circuit breaker. It runs to the first relay and jumps across to the second one in parallel so each realy has a heavy gauge power feed to give to the headlight bulbs.  Here you can see the driver side headlight wiring specifically. Notice each headlight has its own dedicated black ground wire which I terminated to the core support individually. 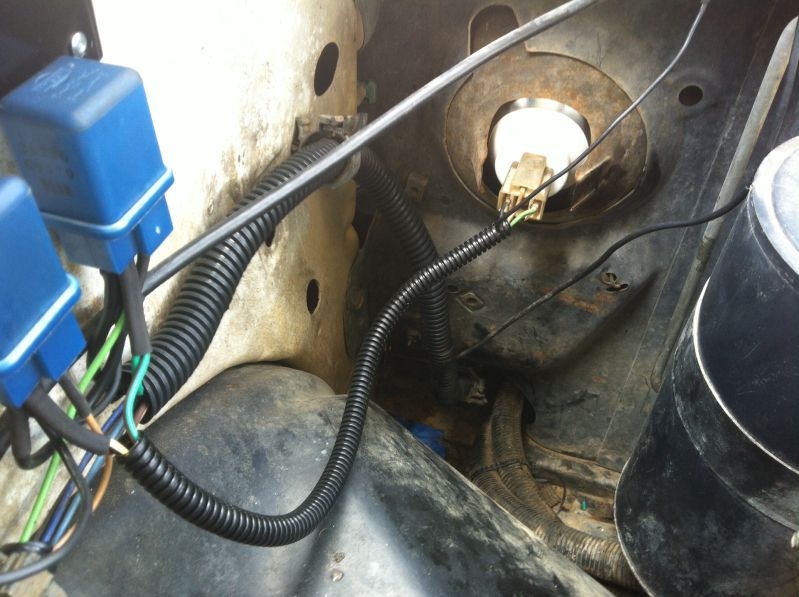 That's it. Done deal.
__________________
I'm on the Instagram- @Gearhead_Kevin Last edited by Tx Firefighter; 06-24-2014 at 02:51 PM. |
|
|
|
|
06-24-2014, 06:40 PM
|
#357 |
|
Watch out for your cornhole !
Join Date: Jun 2003
Location: Azle, Texas
Posts: 14,162
|
Re: My Luxurious late model truck (not so much)
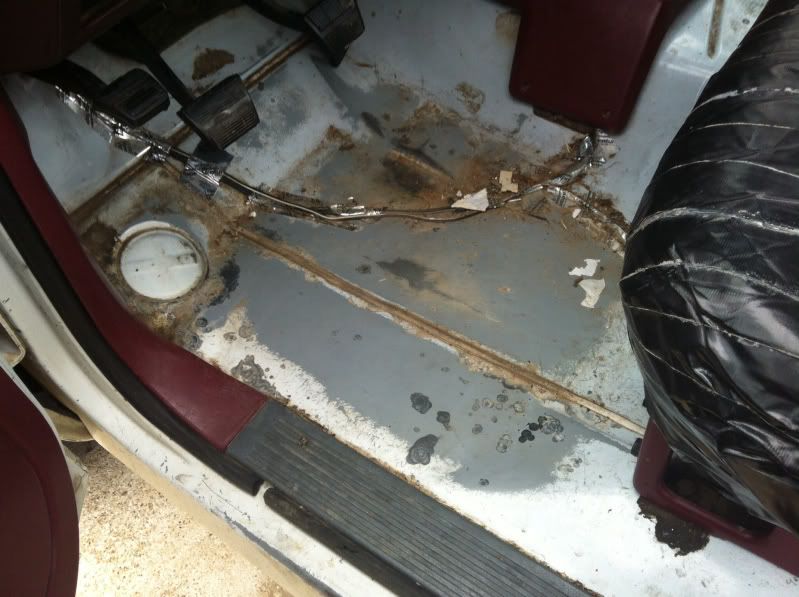
I forgot to mention, I also pulled the dash back apart and got the volt gauge working again. I had kind of pinched the revolving disc underneath the fuel gauge above it. No damage done and it only took a few minutes to repair.
__________________
I'm on the Instagram- @Gearhead_Kevin |
|
|
|
|
06-24-2014, 09:25 PM
|
#358 |
|
Farm Truck
Join Date: Aug 2006
Location: Jersey Village, Texas
Posts: 547
|
Re: My Luxurious late model truck (not so much)
Nice write up on the light mod.
__________________
1969 CST/10 1984 K5 Blazer 4x4 2016 Dodge Ram 2500 4x4 Mike Jersey Village, Tx |
|
|
|
|
06-24-2014, 09:37 PM
|
#359 |
|
Registered User
Join Date: Jun 2004
Location: El Lago, TX
Posts: 1,668
|
Re: My Luxurious late model truck (not so much)
Nice job on the relays. They sell a kit to do that in LMC. I can't remember exactly how much it cost, but it's expensive.
|
|
|
|
|
06-24-2014, 09:41 PM
|
#360 |
|
Watch out for your cornhole !
Join Date: Jun 2003
Location: Azle, Texas
Posts: 14,162
|
Re: My Luxurious late model truck (not so much)
I appreciate it fellas. I buy heat shrink and connectors in large bulk so they're basically negligible in cost. Including the wire, circuit breaker and wire loom, I'm about 15 bucks out of pocket into the mod. But also about 4 hours of diligent work too.
__________________
I'm on the Instagram- @Gearhead_Kevin |
|
|
|
|
06-24-2014, 09:55 PM
|
#361 | |
|
Registered User
Join Date: Jun 2004
Location: Spartanburg, SC
Posts: 1,963
|
Re: My Luxurious late model truck (not so much)
Quote:
__________________
Paul '78 GMC Serria 15 Heavy Half. 361/NV3500/3.73. Former LWB NV3500 swap Trailing arm swap '98 ECSB Z71 daily driver -traded  '03 burb. Family cruiser http://upstategmtrucks.com/ |
|
|
|
|
|
06-24-2014, 10:23 PM
|
#362 |
|
Registered User
Join Date: May 2008
Location: 505
Posts: 447
|
Re: My Luxurious late model truck (not so much)
Amazing work as usual.
__________________
'68 SWB Fleetside '98 K1500 Silverado |
|
|
|
|
06-24-2014, 10:25 PM
|
#363 |
|
Registered User
Join Date: Mar 2013
Location: Fayetteville Arkansas
Posts: 830
|
Re: My Luxurious late model truck (not so much)
Can you explain why it helps to do this? me=lost
__________________
Scott 87 Chevy 2WD SWB, 88 4x4 LWB http://67-72chevytrucks.com/vboard/s...d.php?t=610652 |
|
|
|
|
06-24-2014, 10:39 PM
|
#364 |
|
Watch out for your cornhole !
Join Date: Jun 2003
Location: Azle, Texas
Posts: 14,162
|
Re: My Luxurious late model truck (not so much)
Basically, the end result is much brighter headlights. Doing the relay mod typically gets you about 1.5-2 more volts at the headlights than the stock arrangement. The result is a marked increase in light output.
In the original setup, the power runs all the way up to the light switch on the dash then all the way back to the headlights. Now my lights are powered by a large 12ga wire that's significantly shorter than the original long path. All the headlight switch does now is to activate the relays. This also gives an added benefit of drastically reducing the amperage flow through the switch. That's a good thing since the stock light switch plug often melts in the stock configuration.
__________________
I'm on the Instagram- @Gearhead_Kevin |
|
|
|
|
06-25-2014, 08:43 AM
|
#365 |
|
Registered User
Join Date: Apr 2003
Location: Indep, MO
Posts: 5,893
|
Re: My Luxurious late model truck (not so much)
I can also confirm that the LMC kit eats headlight bulbs, for whatever reason. Wound up taking it off, no problems since.
Nice work!
__________________
Boppa's Old Yeller Truck Build, Old Yeller's New Heart! Project Buzz Bomb Flyin' Low! |
|
|
|
|
06-26-2014, 01:10 PM
|
#366 |
|
Watch out for your cornhole !
Join Date: Jun 2003
Location: Azle, Texas
Posts: 14,162
|
Re: My Luxurious late model truck (not so much)
Today is good day in my world. I had a fruitful visit at the junkyard on my way home from work.
Upper and lower moldings for the rear window and a carpet piece for the cab back wall. Then I grabbed another can of SEM dye to make it all match. I'd have liked to gotten red moldings, but out of the hundreds of these trucks in that junkyard, the number of 88-94 regular cabs was not that many and the ones with this molding piece with unbroken mounting ears was even less. I wound up having to climb up on a top truck in a stack to get this one.  I'm still on the look out for better door panels and armrests, but the interior will now be almost complete.
__________________
I'm on the Instagram- @Gearhead_Kevin |
|
|
|
|
06-26-2014, 01:44 PM
|
#367 |
|
Registered User
Join Date: Jan 2013
Location: Nacogdoches, Texas
Posts: 895
|
Re: My Luxurious late model truck (not so much)
Looks like you've got the interior coming together nicely!
__________________
Current Build 89 s10 ecsb 2wd 4.3/700r4 50k OG Miles Instagram- shaggin_s10 '86 Chevrolet C10 Custom Deluxe - Gen V 454 - 4l80e - welded 12 bolt (Build thread: http://67-72chevytrucks.com/vboard/s...d.php?t=611611 ) SOLD |
|
|
|
|
06-26-2014, 02:35 PM
|
#368 |
|
Registered User
Join Date: Oct 2009
Location: canton ga
Posts: 12,728
|
Re: My Luxurious late model truck (not so much)
Would you mind measuring the length and width of that carpet ,it looks like it would work behind a set of BuddyBuckets in my 72 to hide the gas tank where the middle seat folds down ? And congrats on the finds .
|
|
|
|
|
06-26-2014, 04:17 PM
|
#369 |
|
Registered User
Join Date: Feb 2013
Location: Cary, NC
Posts: 816
|
Re: My Luxurious late model truck (not so much)
Nice find. How well does the dye hold up? Going to have to re dye my door moldings in the 79
__________________
Austin 1996 Chevrolet K1500 Silverado 1979 Chevrolet K10 Scottsdale - Carolina K10 - My 4.8L Twin turbo build - Project Short Stroke - Instagram - TheBlueBomber1996 |
|
|
|
|
06-26-2014, 04:25 PM
|
#370 |
|
Watch out for your cornhole !
Join Date: Jun 2003
Location: Azle, Texas
Posts: 14,162
|
Re: My Luxurious late model truck (not so much)
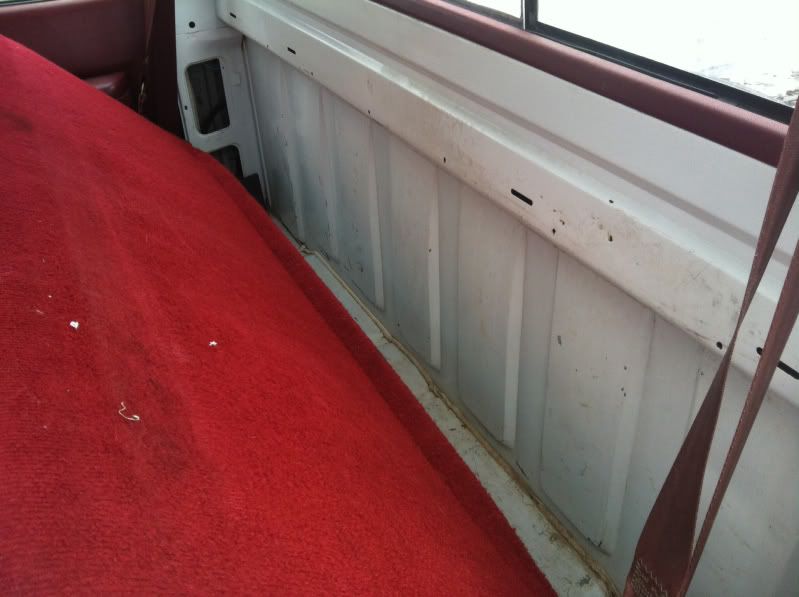
Flashed, basically the dimensions are 18 tall by 64 wide or thereabouts. I had already installed it when I saw your question so I had to kind of estimate how much was tucked under the side panels. These would be a great carpet for older trucks because they are rubber and jute backed and have five clips along the top for easy installation. Just drill five holes and snap it into place.
I started off by pressure washing the carpet to get it clean then hanging it over a fence to drip dry.  And here is where my OCD caused me a lot of trouble. The upper center molding is held by 5 clips, the dome light, and one screw on each end. It would have been plenty secure with just the clips and dome light, but the screws on each end are covered by the B post trim, so I had to completely strip both side B posts back down. Out came the lower storage tray and jack stuff, both seat belts, coat hooks,and a bunch of screws. A lot of hassle, but I just needed every single screw and clip there to sleep well at night. I figure General Motors didn't put a single unnecessary screw or clip in these trucks. If it's there, there's a reason for it. While I had that all apart I also swapped in some real nice used door seals that came off a wrecked truck. My old ones were split and torn in some areas. My phone plays tricks with colors. Sometimes it looks red, sometimes brown, and sometimes purple. Regardless of the pictures, it looks good and sanitary. 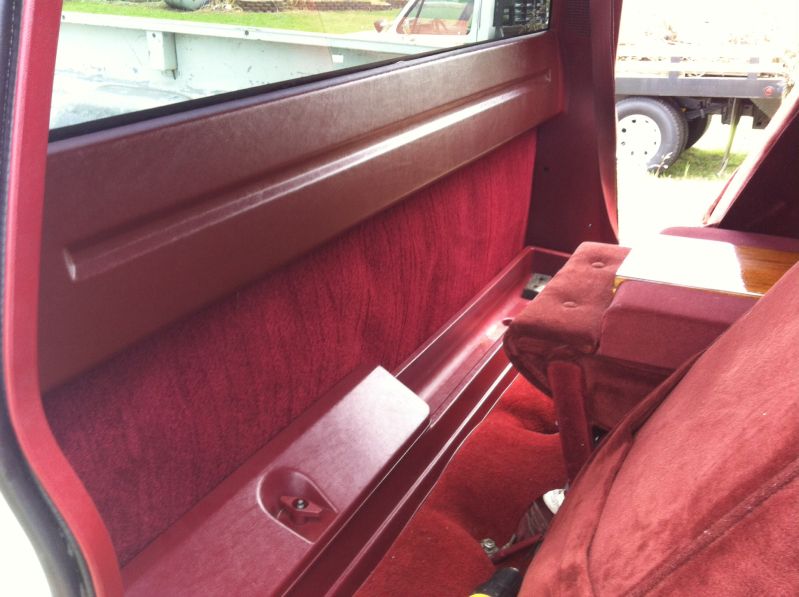 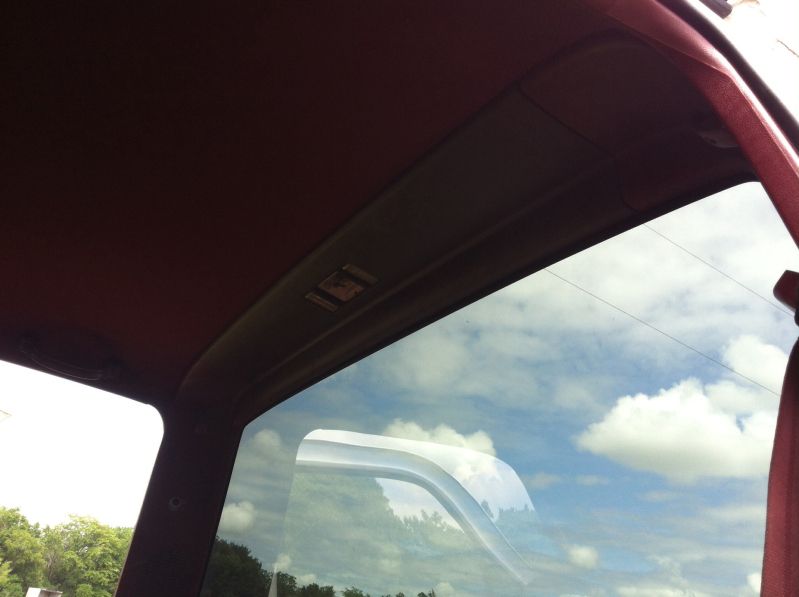 Note the rear wall carpet pieces seem puffy. It's not just a weak install job. The rubber backing and jute causes it even on original installation from GM. My brand new 94 Silverado looked like that sitting on the lot. 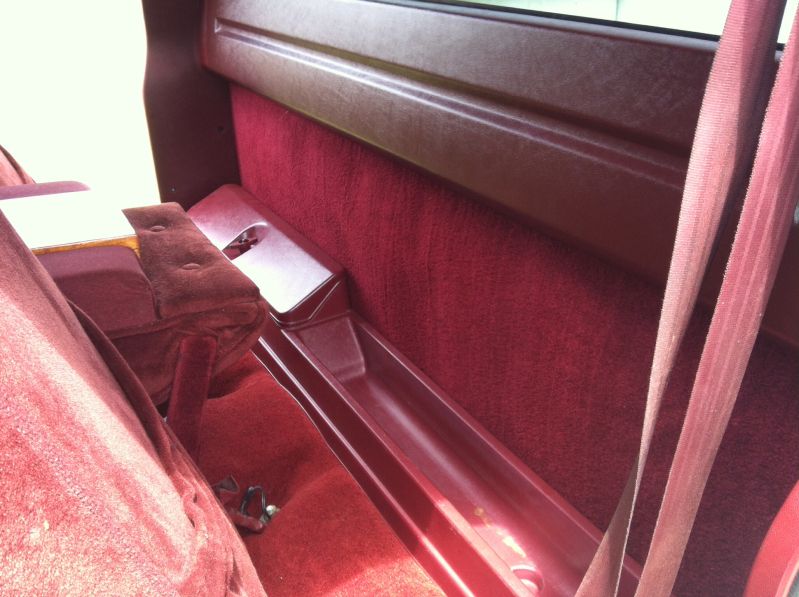 And I also clamped, cursed, and glued the passenger arm rest back into a shape that resembles what it's supposed to. No where near nice, but it's an armrest.  Other than buying floor mats and a driver armrest, the interior is now complete. I'm no where near happy with my door panel solution, so I'll always have my head on a swivel trying to turn up a better pair whenever fate chooses to bless me.
__________________
I'm on the Instagram- @Gearhead_Kevin Last edited by Tx Firefighter; 06-26-2014 at 04:46 PM. |
|
|
|
|
06-26-2014, 04:30 PM
|
#371 | |
|
Watch out for your cornhole !
Join Date: Jun 2003
Location: Azle, Texas
Posts: 14,162
|
Re: My Luxurious late model truck (not so much)
Quote:
That said, I definitely have a pair of different door panels in my future when I run across a set.
__________________
I'm on the Instagram- @Gearhead_Kevin |
|
|
|
|
|
06-26-2014, 04:43 PM
|
#372 |
|
Watch out for your cornhole !
Join Date: Jun 2003
Location: Azle, Texas
Posts: 14,162
|
Re: My Luxurious late model truck (not so much)
A reminder of where we started.
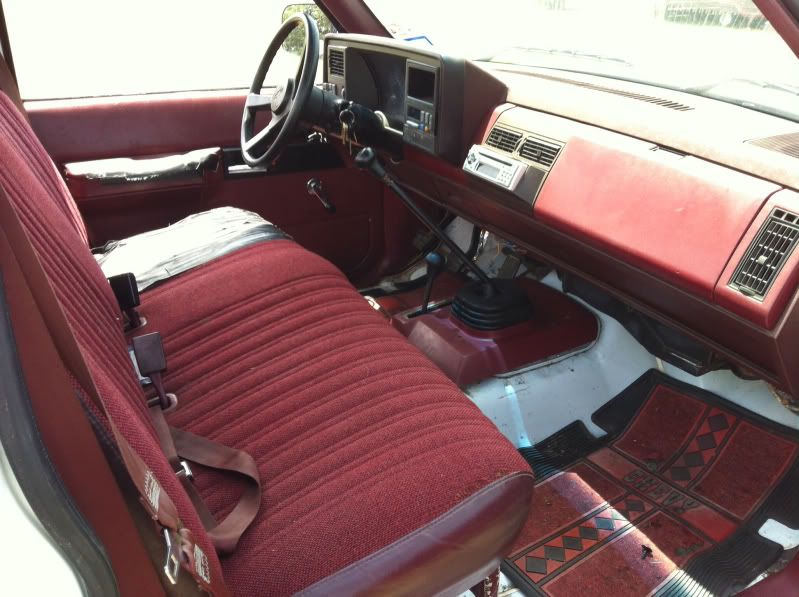    Kind of cool since his has been super low budget with only junkyard and Craigslist used parts. Other than some dye and various screws, I can't think of much I bought new.
__________________
I'm on the Instagram- @Gearhead_Kevin |
|
|
|
|
06-26-2014, 05:02 PM
|
#373 |
|
I'm just glad to be here!
Join Date: Jan 2008
Location: Longview, TX
Posts: 4,788
|
Re: My Luxurious late model truck (not so much)
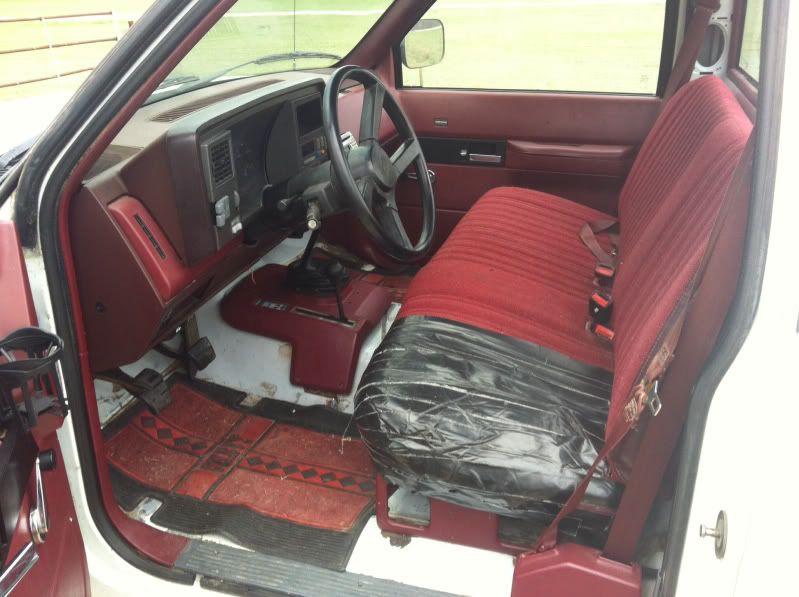
What a difference a simple few parts and some time can do to an interior.
__________________
Karl 1965 Chevy Stepside(Grandpa's Old Blue) and (July 2015 Shop Build!)(2020, the Saga Continues) http://67-72chevytrucks.com/vboard/s...d.php?t=372424 The LST Challenge: http://67-72chevytrucks.com/vboard/s...=1#post7812257 Korbin's 1st Square: "Sunburn" http://67-72chevytrucks.com/vboard/s...d.php?t=418618 1985 GMC Sierra: "White Trash", Korbin's 2nd now... http://67-72chevytrucks.com/vboard/s...d.php?t=632305 Henry - 1984 Chevrolet, Owen's 1st Square |
|
|
|
|
06-26-2014, 05:54 PM
|
#374 |
|
Farm Truck
Join Date: Aug 2006
Location: Jersey Village, Texas
Posts: 547
|
Re: My Luxurious late model truck (not so much)
10x better...You reuse the original floor mats?
__________________
1969 CST/10 1984 K5 Blazer 4x4 2016 Dodge Ram 2500 4x4 Mike Jersey Village, Tx |
|
|
|
|
06-26-2014, 06:06 PM
|
#375 | |
|
Watch out for your cornhole !
Join Date: Jun 2003
Location: Azle, Texas
Posts: 14,162
|
Re: My Luxurious late model truck (not so much)
Quote:
__________________
I'm on the Instagram- @Gearhead_Kevin |
|
|
|
|
 |
| Bookmarks |
|
|


 Linear Mode

