
|
 02-18-2013, 10:17 AM
|
#251 |
|
Registered User
Join Date: Apr 2003
Location: Indep, MO
Posts: 5,893
|
Re: Project '64 Cheapskate
Looks great!
Posted via Mobile Device
__________________
Boppa's Old Yeller Truck Build, Old Yeller's New Heart! Project Buzz Bomb Flyin' Low! |

|

|
|
02-18-2013, 11:46 AM
|
#252 |
|
Registered User
Join Date: Jan 2012
Location: Killeen, Tx
Posts: 1,351
|
Re: Project '64 Cheapskate
Frame looks good! Good job!
__________________
John Z 1962 Chevy C10 Stepside 62 Barnfind My build tread: http://67-72chevytrucks.com/vboard/s...d.php?t=507513 |
|
|
|
|
02-26-2013, 07:11 PM
|
#253 |
|
Registered User
Join Date: May 2007
Location: Mooresville NC/Gainesville GA
Posts: 499
|
Re: Project '64 Cheapskate
The paint looks great! What paint did you use?
I did your added caster mod on some A-arms for a 65 I'm building for my brother. I can't wait to see how its gonna drive. Killer idea. One of those simple, why didn't I think of that ideas. Anyhow keep at it. Its looking really good.
__________________
Eric Evans Queen City Shop Truck http://67-72chevytrucks.com/vboard/s...34#post6139834 66 GMC http://67-72chevytrucks.com/vboard/s...d.php?t=543110 |
|
|
|
|
02-26-2013, 08:02 PM
|
#254 |
|
Registered User
 Join Date: Mar 2005
Location: apple valley, ca
Posts: 2,670
|
Re: Project '64 Cheapskate
Thanks for the kind words, eldogg!
The paint I used was Rustoleum "2x" Semi-Gloss Black spray paint that I bought from OSH. Because I wasn't starting with a freshly blasted frame, I hand-sanded it, then hit it with rust converter. On all the clean, bare metal areas, I hit it with etch primer. Not too sure how the stuff is going to hold up, but if I have to touch it up, I'll just mask off the area and do a quickie. This truck is going to get the wheels driven off of it when I finally get some time off of work to finish it. It won't be a trailer queen. That's awesome that you did the caster trick. I'm really anxious to see how much extra caster it'll provide. Keep me posted if you get your brother's truck to the alignment shop before I do!
__________________
Check out my latest endeavor: https://roundsixpod.com My build threads: '55 Chevy: http://67-72chevytrucks.com/vboard/s...d.php?t=247512 '64 C-20: http://67-72chevytrucks.com/vboard/s...d.php?t=446527 |
|
|
|
|
03-09-2013, 09:46 AM
|
#255 |
|
Registered User
Join Date: Mar 2005
Location: apple valley, ca
Posts: 2,670
|
Re: Project '64 Cheapskate
I started working on a section of my project that I have been dreading: the inner fenders. If you recall, the frame on my '64 has been Z'd (2" up and moved 1" forward). Because of this mod, the stock inner fenders were now 2" too long and wouldn't fit. It wasn't as simple as chopping off 2" from the bottom and calling it a day. Nope, not that simple. The frame is now kicked up in areas of the "Z", and the bottoms of the inner fenders were going to have to be completely reshaped to follow the frame. Another area that was going to be tough to figure out was the inner fender mount bolt at the bottom of the firewall and the steering column cover piece. The location of those items didn't change, but everything else around them did.
I laid out my cut line and cut the inner fender. I started to trim the cut section to clear the core support bracket and the upper control arm. I made a series of pie-cuts to allow me to reshape the bottom of the cut piece to match the contour of the frame rail. In factory form, the stock inner fenders have a lip on the bottom, which I will keep. One of the challenges was that the bottom of the inner fender makes a transition from the outside edge of the framerail and then goes above the rail adjacent to where the radiator mounts up. I didn't want that, so my plan was to re-form the bottom of the inner fender to follow the frame contour and have the lip stay on the outside of the framerail from front to back. You can see what I'm talking about in this shot. The area on the far right will be re-flanged.  In this shot, you can see where it got tricky trying to make the inner fender still attach to the rear mount tab. I had to make a pie-cut and lay it way down in order to get it match the frame contour and still bolt up. At this time, I bolted in the column shaft cover. You can see that the bottom needs to be trimmed and the three lower bolt holes will have to be redrilled. The original 3 holes were lost when the 2" was removed from the inner fender. 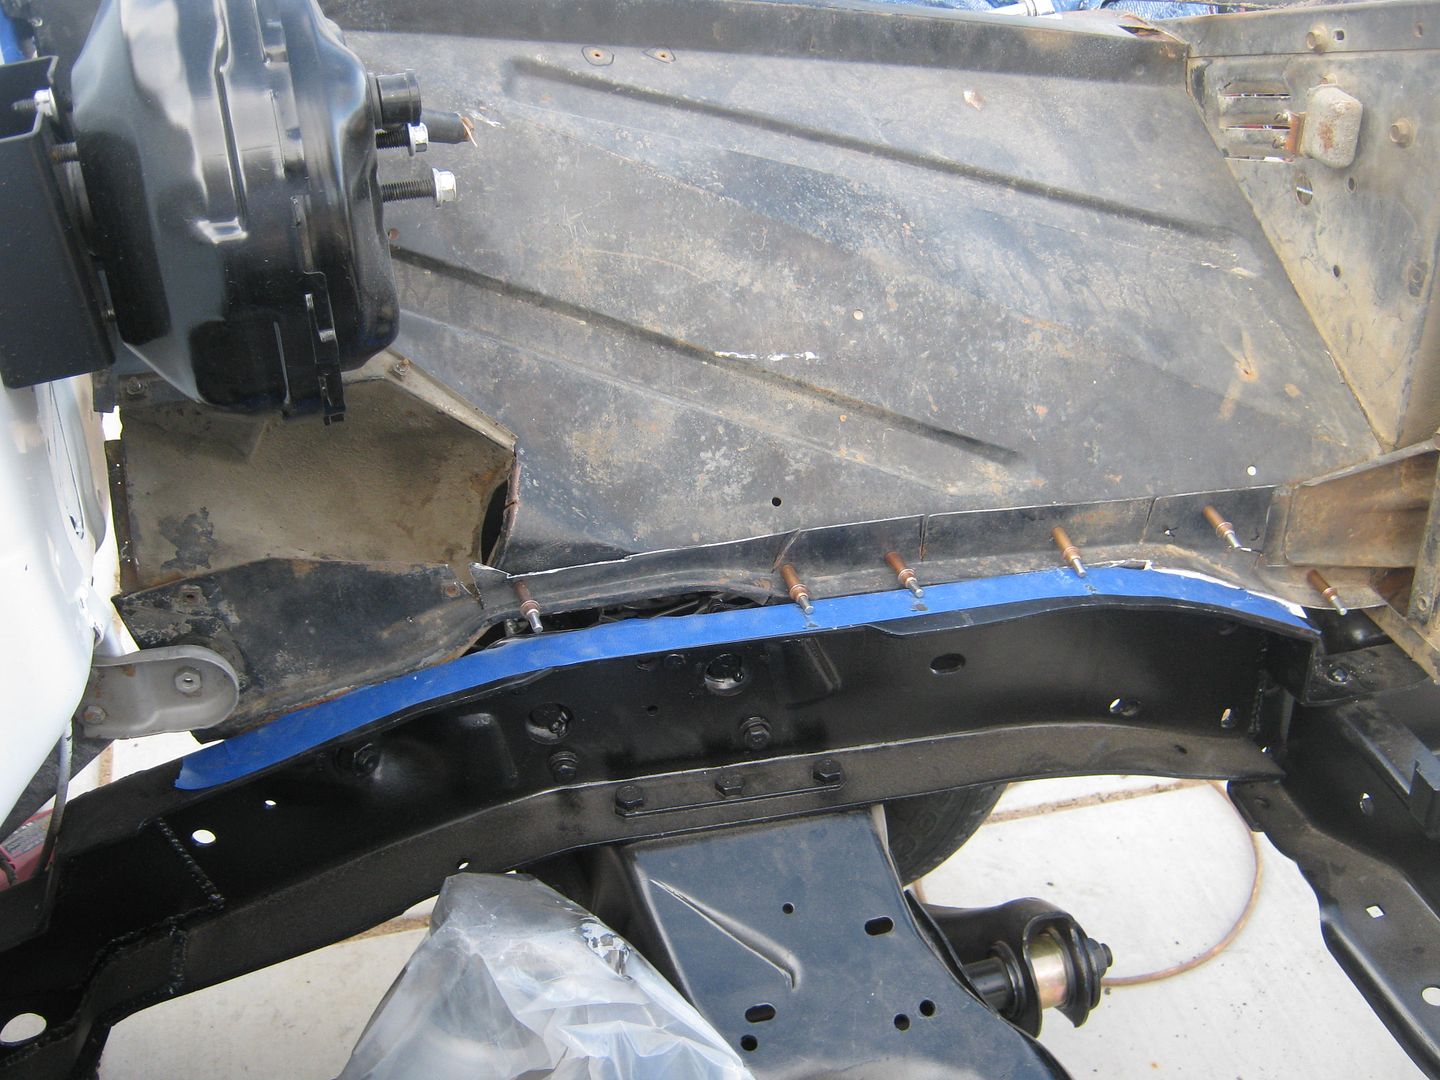 Now that the piece was located, it was now time to attach the sections. Because the pieces were overlapped, I had to make a cut line that matched my Cleco pattern. Once I made my line, I fired up the cut-off wheel and started cutting. Because I had Cleco'd the parts together, once I started making my cuts I needed to ensure that the panel stayed clamped, so after every 2" of cutting, I installed a panel clamp to keep everything lined up. After the cutting was complete, I removed all of the excess metal and was left with just the metal that was to be butt-welded together. In this picture, you can also see the area where I reflanged the forward edge of the part. Because it was on a curve, I had to make relief cuts in order to get it to bend. That will all get welded and finished. 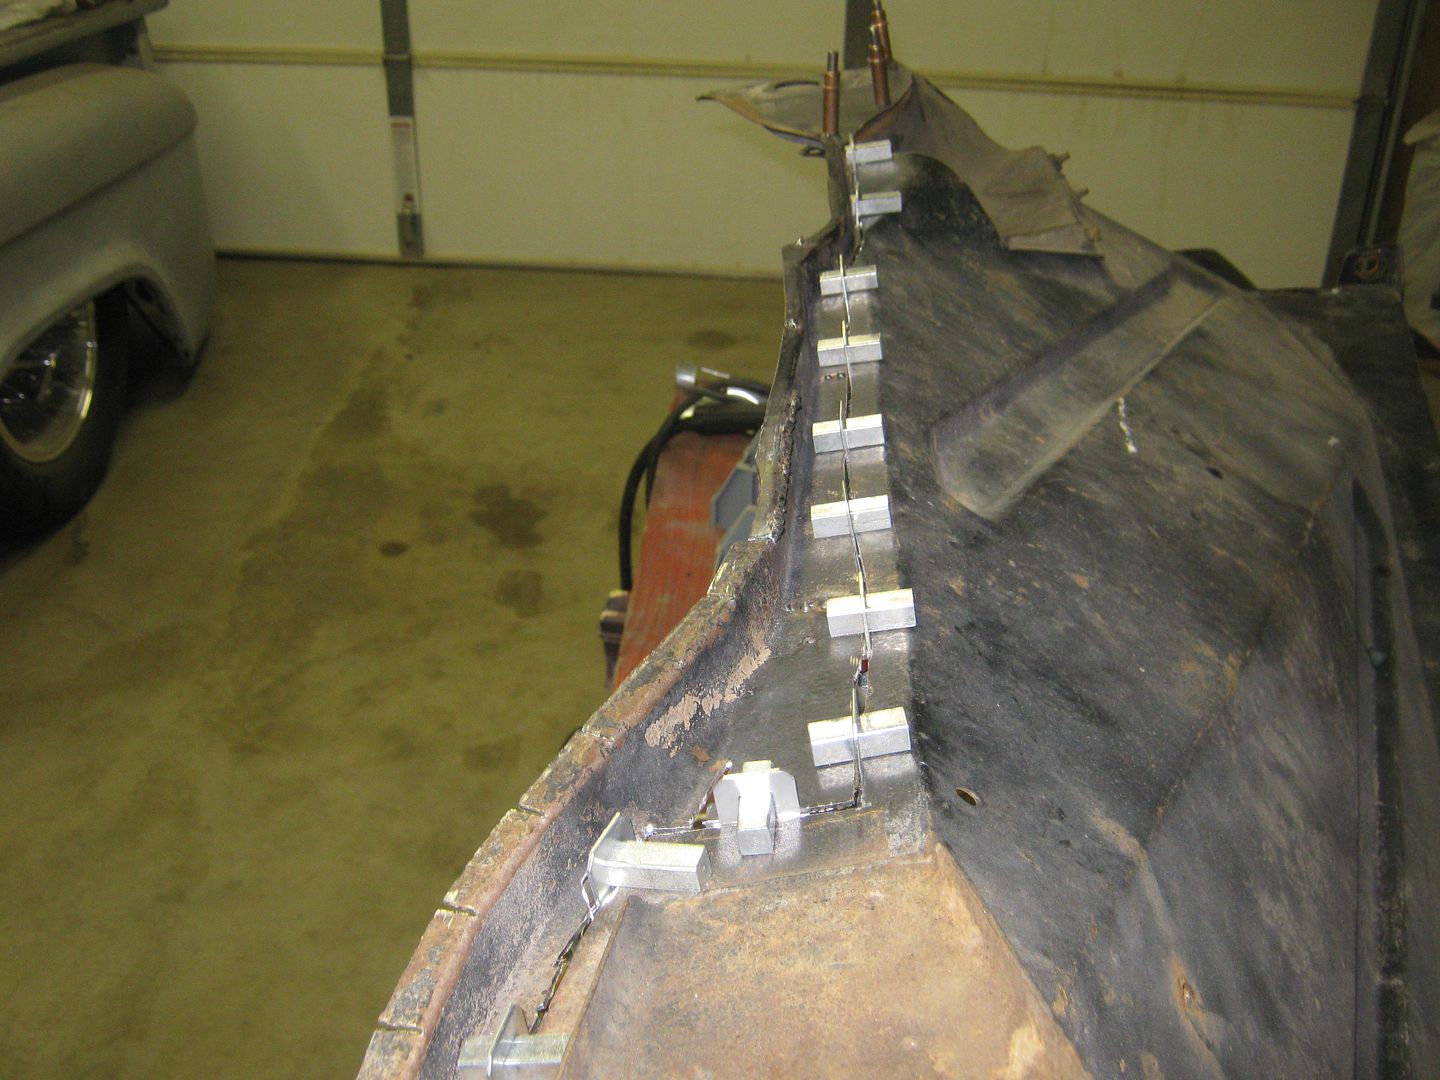 Here is the panel after a bunch of welding and sanding. It's got a factory appearance, and that's the look I was going for.  Here's a side view that really shows just how much re-contouring had to be done on the rear of the panel. I'm not done with the part yet, I still need to redrill the bottom 3 holes of the steering shaft cover, weld up a bunch of unused holes, and send it out to the sandblaster. I'll do a little filler work on it to get it perfectly straight and then shoot it in chassis black.  It's a bunch of work for something that most folks won't catch, but that's what I'm going for. I want people to look under the hood and not know that the chassis has been Z'd. Everything will look 100% factory. If you look hard enough, you'll figure it out, but at first glance you'll never know it. Today's plan: The passenger side inner fender, which will be a piece of cake compared to the driver's side.
__________________
Check out my latest endeavor: https://roundsixpod.com My build threads: '55 Chevy: http://67-72chevytrucks.com/vboard/s...d.php?t=247512 '64 C-20: http://67-72chevytrucks.com/vboard/s...d.php?t=446527 |
|
|
|
|
03-09-2013, 10:25 AM
|
#256 |
|
Registered User
Join Date: Aug 2012
Location: Smithfield rhode island
Posts: 722
|
Re: Project '64 Cheapskate
Nailed it! Coming along nicely!
 Posted via Mobile Device
__________________
My frame Layin 63 short bed project http://67-72chevytrucks.com/vboard/s...d.php?t=551353 |
|
|
|
|
03-09-2013, 11:10 AM
|
#257 |
|
Registered User
Join Date: Apr 2010
Location: Billings, MT
Posts: 417
|
Re: Project '64 Cheapskate
Very cool.
|
|
|
|
|
03-09-2013, 11:17 AM
|
#258 |
|
Registered User
Join Date: Apr 2003
Location: Indep, MO
Posts: 5,893
|
Re: Project '64 Cheapskate
Beautiful! Foose always says, the best cars are the ones that are cut all to hell, but look just...a...hair... off stock. Nice work. Glad the man let you up so I could get my fix! How goes the motor?
You almost got me, by the way. Had a guy express an interest in my 87, and a very nice in progress '64 short step was available, and I allllllllmost ran the game. Sketchy things in the near future and the fact that the 87 is paid for, runs and drives backed me out of it. But you dang near got me! You and bomp and McMurph and your 60's shenanigans!
__________________
Boppa's Old Yeller Truck Build, Old Yeller's New Heart! Project Buzz Bomb Flyin' Low! |
|
|
|
|
03-09-2013, 01:02 PM
|
#259 |
|
Registered User
Join Date: Apr 2011
Location: .
Posts: 3,104
|
Re: Project '64 Cheapskate
That there mod is totally off the charts.
I thought I was anal about making it look like nothing was done. You Sir get the trophy on inner fender "massagin'". Love it when people look at my stuff and ask, in a disapproval voice thinking nothing has been done yet, and ask, "when and what are your plans for the truck?" And the mods are staring them right in the face. You will definitely have to suffer through that. Diggin' it! |
|
|
|
|
03-09-2013, 02:44 PM
|
#260 | ||||
|
Registered User
Join Date: Mar 2005
Location: apple valley, ca
Posts: 2,670
|
Re: Project '64 Cheapskate
Quote:
Quote:
Quote:
The motor is on the stand. The long block is done, I'm just waiting to get over to a buddy's shop to use his ceramic bead tumbler on all the aluminum parts, like the intake and accessory brackets I want all of the "as-cast" parts to have the same color and finish. Quote:
__________________
Check out my latest endeavor: https://roundsixpod.com My build threads: '55 Chevy: http://67-72chevytrucks.com/vboard/s...d.php?t=247512 '64 C-20: http://67-72chevytrucks.com/vboard/s...d.php?t=446527 |
||||
|
|
|
|
03-09-2013, 03:06 PM
|
#261 |
|
Rollin' Old Skool
Join Date: Jun 2007
Location: Hattiesburg, MS
Posts: 5,371
|
Re: Project '64 Cheapskate
great work on the inner fender! definitely a nice touch
__________________
_____________________________________________ Phillip My Build threads: 1966 Chevy C-10 "Black Betty" shortbed, fleetside, BBW, 327 V8/ Powerglide (under construction) http://67-72chevytrucks.com/vboard/s...ighlight=betty 1997 Chevy Tahoe, 2dr/2wd, mild custom (Daily driver) http://67-72chevytrucks.com/vboard/s...d.php?t=601142 Pics: '66 C-10 https://flic.kr/s/aHsjHWD4h9 '97 Tahoe https://flic.kr/s/aHsjGZ7wKP '93 C-1500 https://flic.kr/s/aHskxdpdnQ '88 S-10 Blazer https://flic.kr/s/aHsjYGx4Md Previous Rides: 1993 Chevy S-10 ext. cab, 4.3L, 4/5 drop (Sold) 1993 Chevy C-1500 short/step Retro-Rod (Sold) 1988 S-10 Blazer 2dr/2wd mild custom (Sold) |
|
|
|
|
03-09-2013, 11:41 PM
|
#262 |
|
Registered User
Join Date: Mar 2005
Location: apple valley, ca
Posts: 2,670
|
Re: Project '64 Cheapskate
Update: The passenger inner fender is done.
Now, back to our regularly scheduled program currently in progress.........
__________________
Check out my latest endeavor: https://roundsixpod.com My build threads: '55 Chevy: http://67-72chevytrucks.com/vboard/s...d.php?t=247512 '64 C-20: http://67-72chevytrucks.com/vboard/s...d.php?t=446527 |
|
|
|
|
03-12-2013, 10:28 PM
|
#263 |
|
Active Member
Join Date: Aug 2011
Location: Salem, Oregon
Posts: 112
|
Re: Project '64 Cheapskate
As always, excellent attention to detail. You do great work. I like it!
__________________
Fleet '66 ***************** '66 C-10 SWB 350 w/3 spd OD 4:11's - driver/project...future T-5 trans upgrade '64 C-10 LWB BBW near future project - "The Wife's Ride" '58 "Apache"Stepside BBW w/'75 K-10 4x4 conversion 331 w/350TH and NP 205 transfer 3:73's - occasional driver/ show |
|
|
|
|
03-13-2013, 01:53 PM
|
#264 | |
|
Registered User
Join Date: Mar 2005
Location: apple valley, ca
Posts: 2,670
|
Re: Project '64 Cheapskate
Quote:
__________________
Check out my latest endeavor: https://roundsixpod.com My build threads: '55 Chevy: http://67-72chevytrucks.com/vboard/s...d.php?t=247512 '64 C-20: http://67-72chevytrucks.com/vboard/s...d.php?t=446527 |
|
|
|
|
|
03-13-2013, 06:47 PM
|
#265 |
|
Registered User
Join Date: Sep 2011
Location: Tacoma, WA
Posts: 2,425
|
Re: Project '64 Cheapskate
When I see work like this, both those guys sitting on my shoulders start saying...."dude you could so do that too!" and it just goes from there.
No matter how hard I disagree. Your inner fender just amazes me! If one mod on a rig catches my eye, then I start looking for more, like a puzzle. After I spot enough of them I start asking the owner questions. I think I belong more in a shop than at car shows at times like that. Ok, so now you got me wondering what the heck is next?
__________________
Michael McMurphy My 66 Stepside My 64 Tow Truck My 66 Tempest Table Of Contents Added to Page1 |
|
|
|
|
03-17-2013, 09:14 PM
|
#266 |
|
Registered User
Join Date: Mar 2005
Location: apple valley, ca
Posts: 2,670
|
Re: Project '64 Cheapskate
I did a quick test-fit of the modified inner fenders to see if there's any last things I need to do before they get sent to the blaster. Everything fit perfect.
  I was nervous that I was going to have to cut up the driver's side inner so the steering shaft would clear, but I was relieved to find out that cleared OK. I also mocked up the steering box and figured out how I wanted to route the power steering hoses. I will also need to put a dimple in the driver's side upper control arm to clear the steering shaft, and we've got a game plan on how that will get done. All in all, a good day. A lot of the things I was worried about turned out to be non-issues, and that's always a good thing!
__________________
Check out my latest endeavor: https://roundsixpod.com My build threads: '55 Chevy: http://67-72chevytrucks.com/vboard/s...d.php?t=247512 '64 C-20: http://67-72chevytrucks.com/vboard/s...d.php?t=446527 |
|
|
|
|
03-17-2013, 09:56 PM
|
#267 |
|
Registered User
Join Date: Apr 2012
Location: Cambridge, Ontario, Canada
Posts: 1,771
|
Re: Project '64 Cheapskate
very nice work sir, envy you guys with the welding skills and equipment...
__________________
Craigerrr My build thread, CRGRS 66 Winter Build: http://67-72chevytrucks.com/vboard/s...09#post5638709 |
|
|
|
|
04-06-2013, 10:18 AM
|
#268 |
|
Registered User
Join Date: Mar 2005
Location: apple valley, ca
Posts: 2,670
|
Re: Project '64 Cheapskate
Now that Daylight Savings Time is here, I've been working on the '64 every night after work. I'm doing a bunch of the smaller things that need to be done. One of the things I just finished yesterday was the heater box. I totally disassembled, sandblasted, and reassembled it. I rigged up a device to pressure test the heater core, and it checked out good. The heater boxes for the A/C trucks is different than the non-A/C trucks due to the door in the back for the recirculating air. Nobody makes that gasket, so I had to make one. I'm pretty happy how it turned out:
__________________
Check out my latest endeavor: https://roundsixpod.com My build threads: '55 Chevy: http://67-72chevytrucks.com/vboard/s...d.php?t=247512 '64 C-20: http://67-72chevytrucks.com/vboard/s...d.php?t=446527 |
|
|
|
|
04-06-2013, 10:37 AM
|
#269 |
|
Registered User
Join Date: Mar 2005
Location: apple valley, ca
Posts: 2,670
|
Re: Project '64 Cheapskate
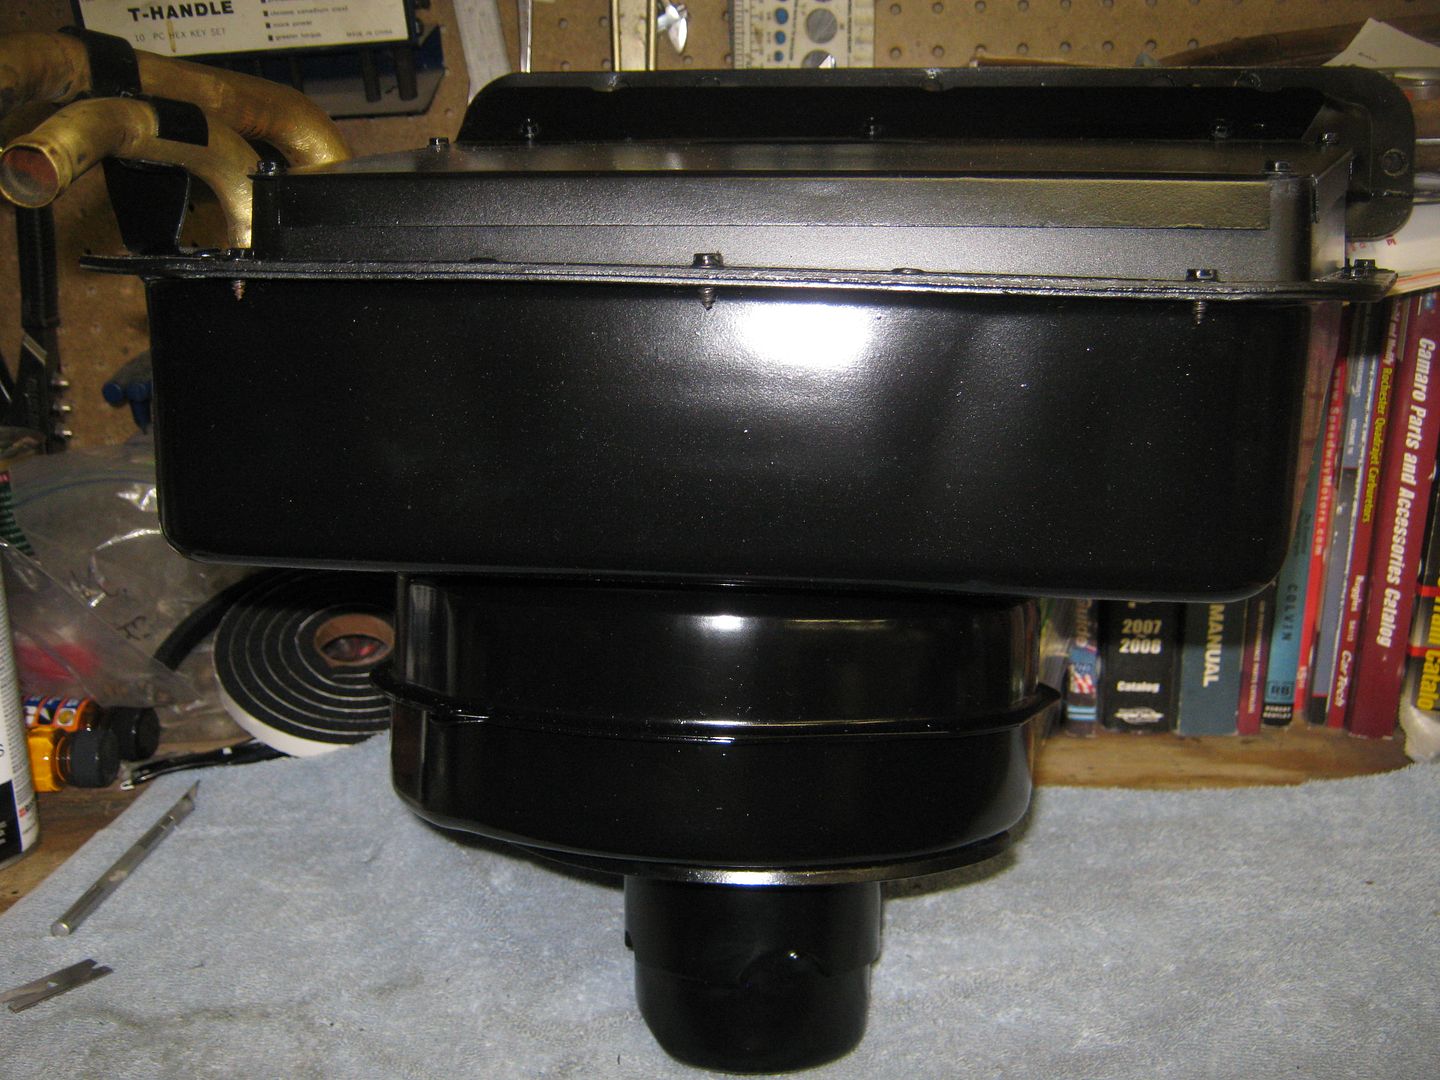
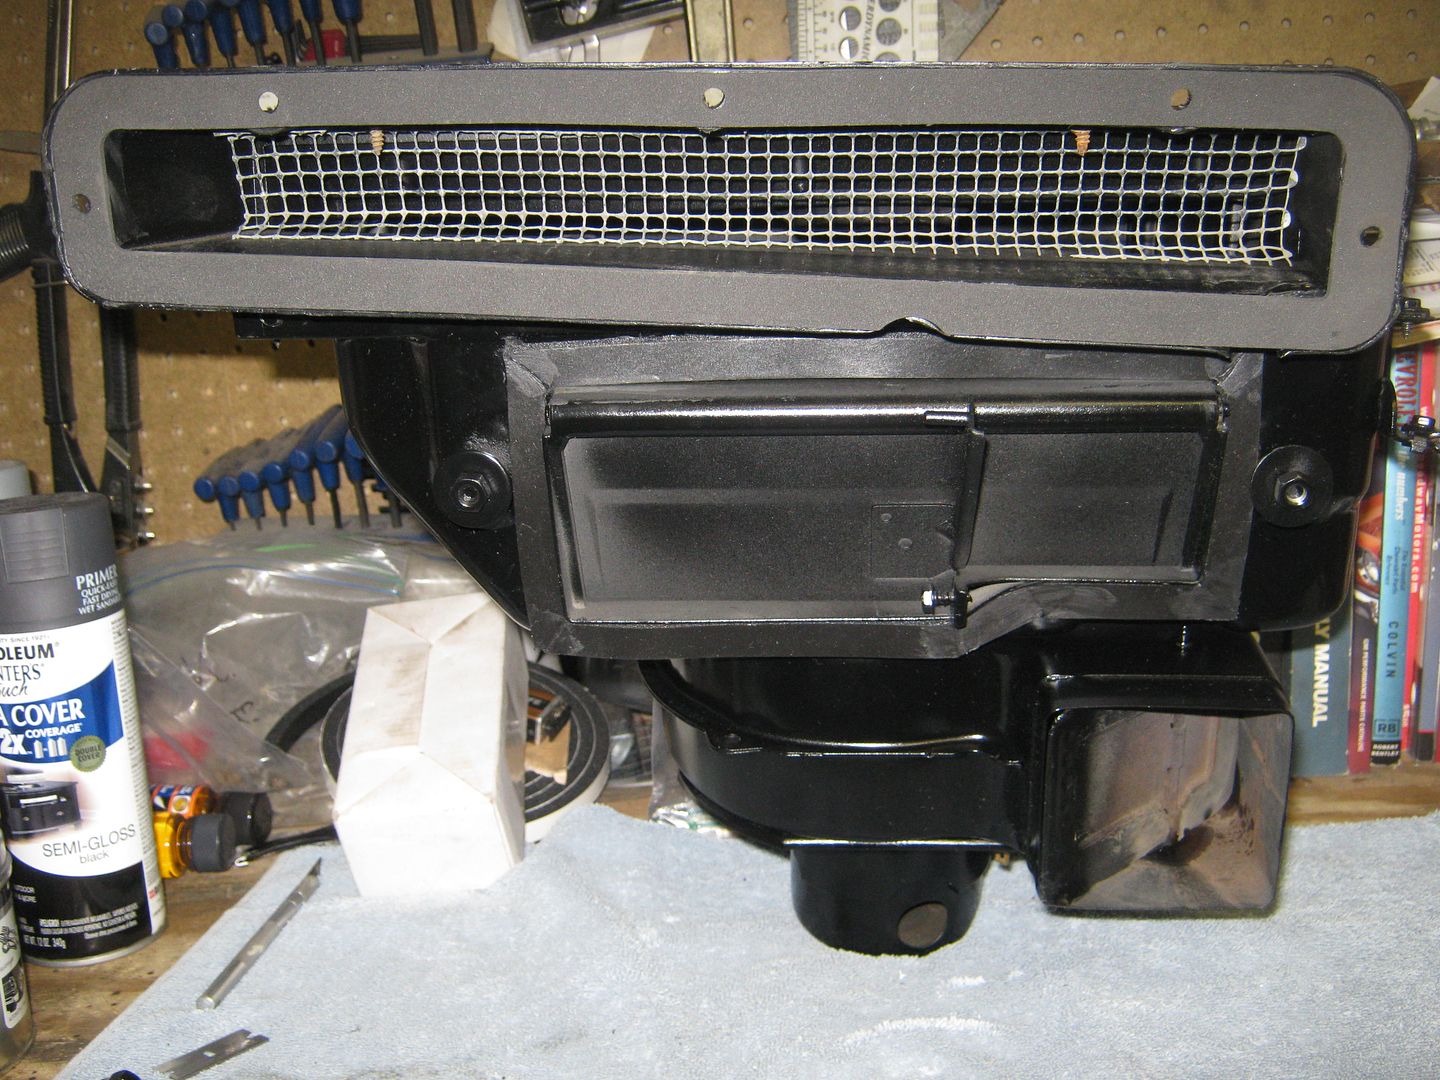
After the heater box was done, I decided to tackle the A/C box. I've got a couple of these, so I picked the nicer of the two. This box will definitely need to have some parts ordered, so the sooner I take it all apart, the sooner I'll know what I need. I have talked to the guys at Old Air Products in Ft. Worth, Texas, and they can get me the parts I need. I took lots of pictures during the disassembly to help me when I put it all back together. Actually, the box is pretty simple.
Here's a view from the top. It's pretty ratty looking:  The duct manifold is pretty beat up, but I have a spare: 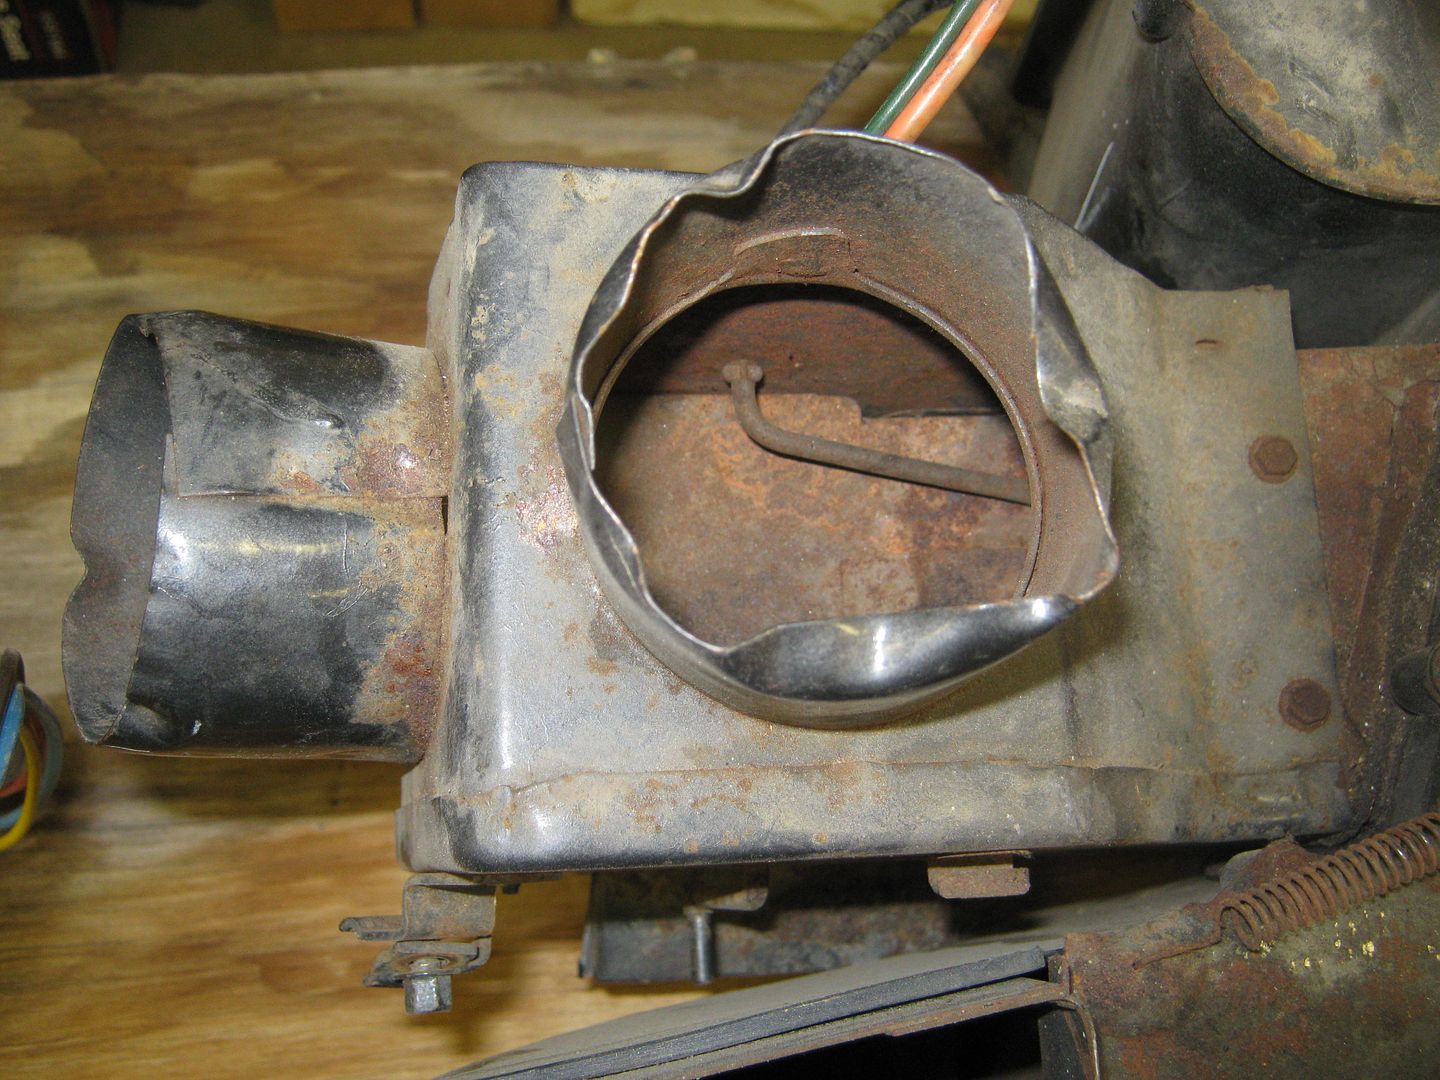 This is the rear of the box where it penetrates through the firewall: 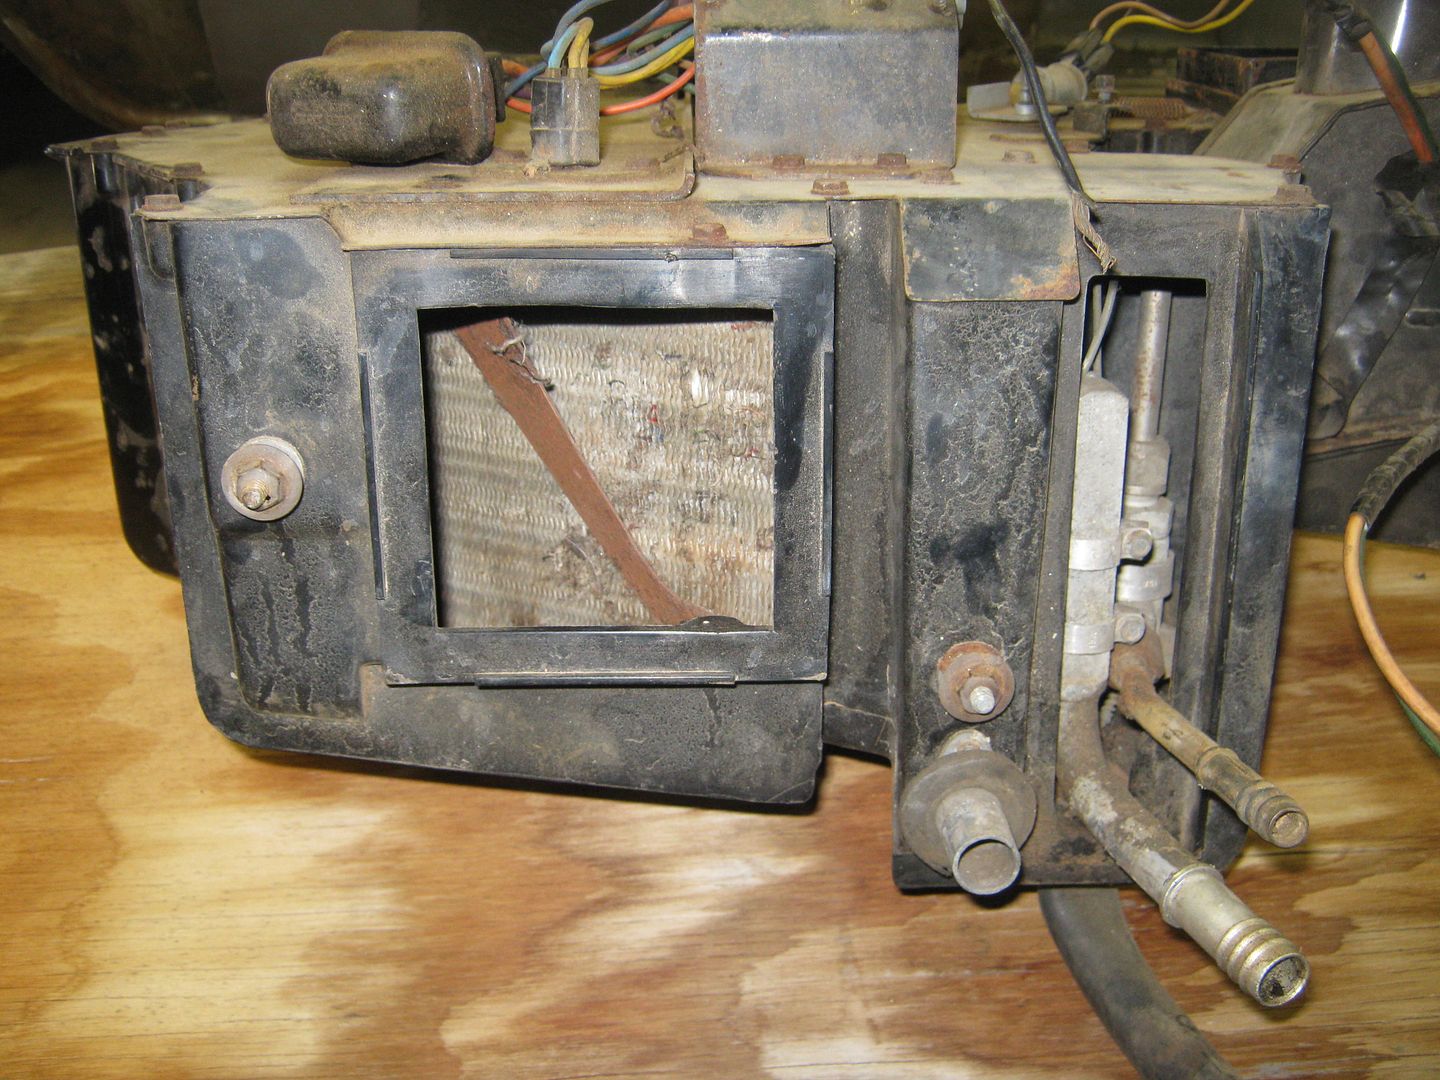 Here's what I found when I pulled the top off. Dust, dirt, sticks, acorns, stuffing. Bur NO mouse poo! That made me feel good. 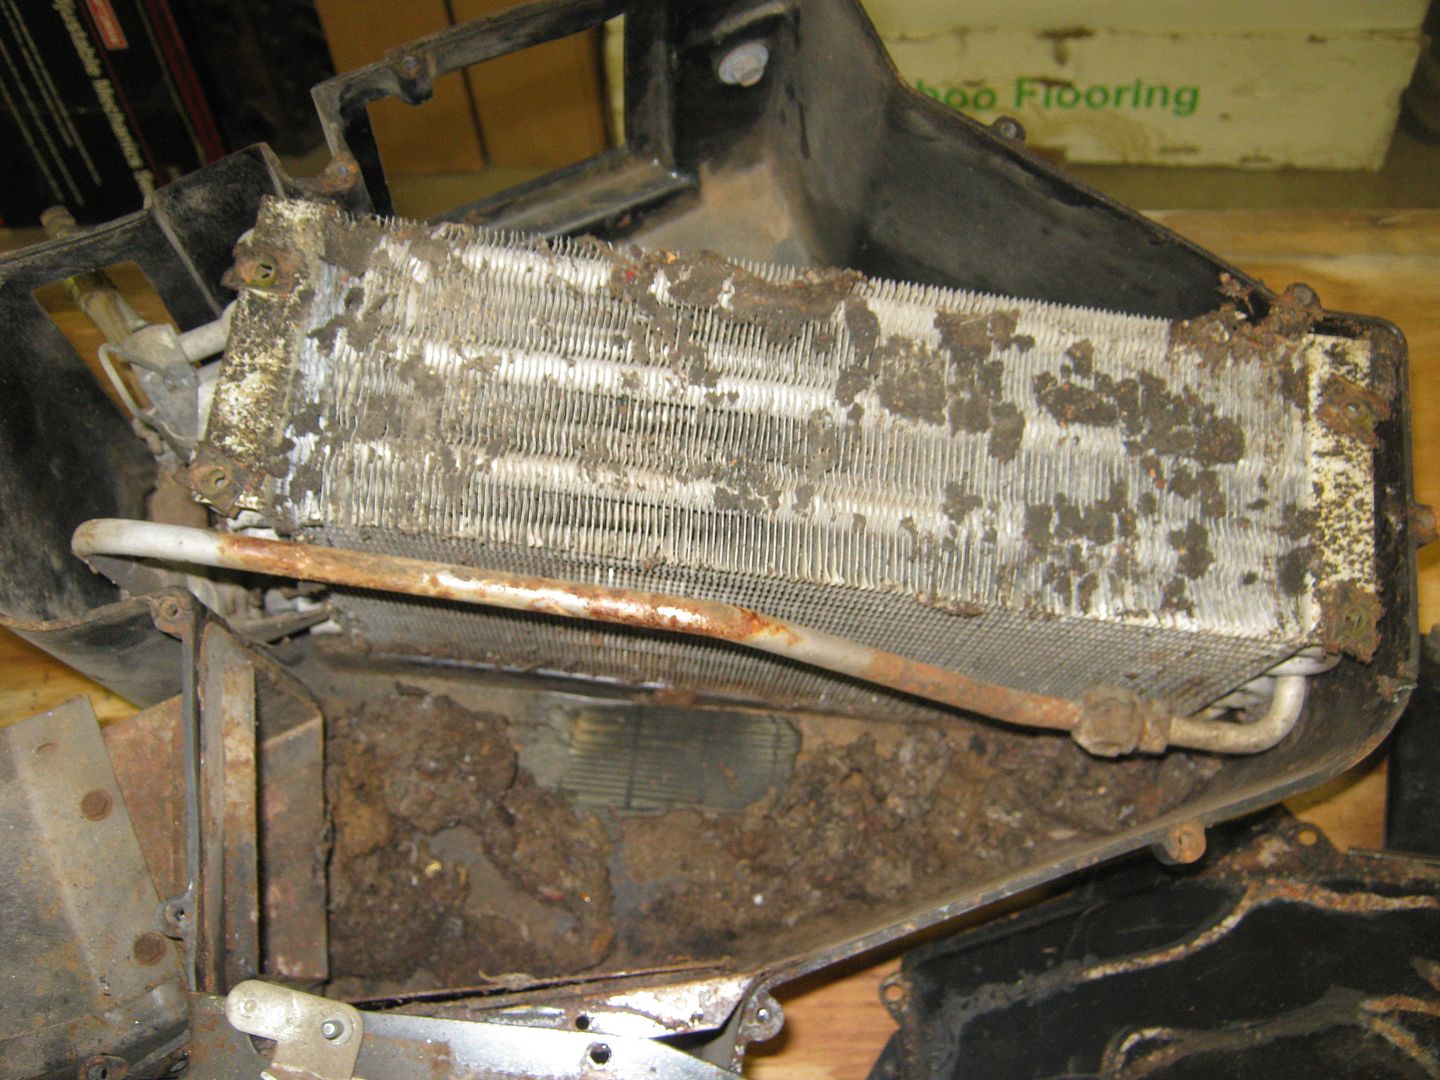 I've got some cleaning to do on the evaporator. The problem is that when the evaporator is operating, it sweats and all of that dust and dirt turns to mud and packs the fins, thereby affecting the efficiency of the evaporator. You have to make every attempt to get this as clean as possible: 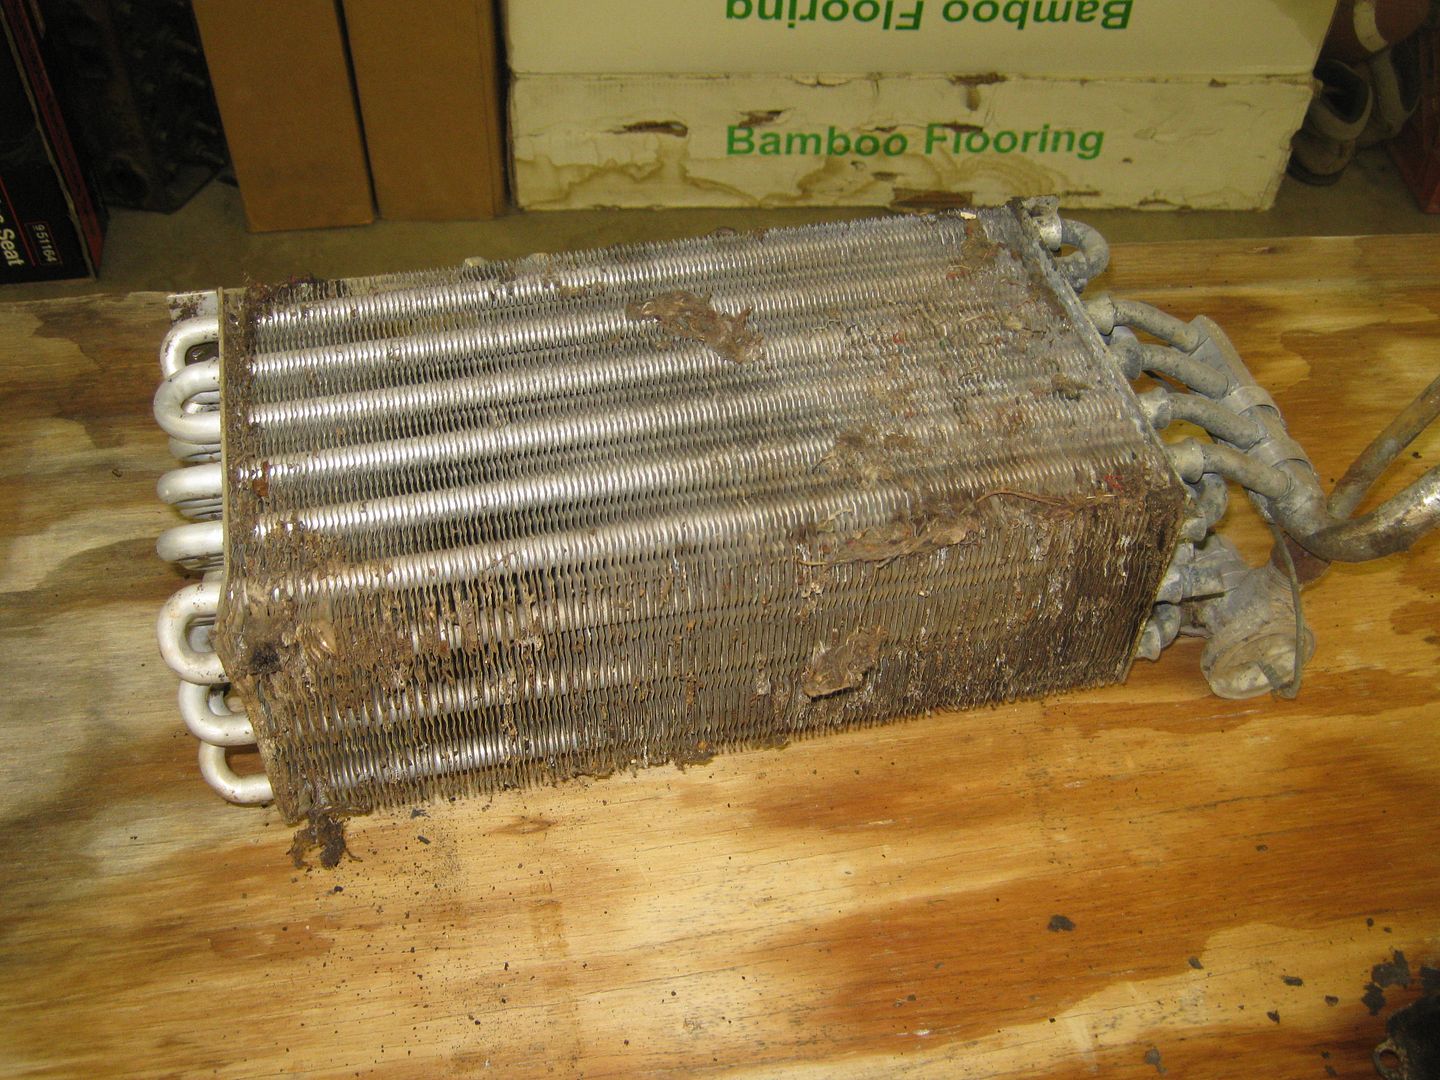 Here it is all disassembled. I did a quick clean-up of the evap with Pine Sol and water, but it still needs to be cleaned with mag wheel cleaner. The lower half of the box is plastic, so it'll get CLR'd. I trying to figure out what I'm going to do on the outside. I might wet sand it with 2000 grit paper and buff it out. The metal pieces were sandblasted yesterday, and I plan to prime them today. I am going to do a full continuity check on the harness and re-wrap it. I need to get a full list of all the components that need to be replaced and get with Old Air and order them.  I'll be back to post more on this in a few weeks when the parts get here.
__________________
Check out my latest endeavor: https://roundsixpod.com My build threads: '55 Chevy: http://67-72chevytrucks.com/vboard/s...d.php?t=247512 '64 C-20: http://67-72chevytrucks.com/vboard/s...d.php?t=446527 |
|
|
|
|
04-06-2013, 10:51 AM
|
#270 |
|
Rollin' Old Skool
Join Date: Jun 2007
Location: Hattiesburg, MS
Posts: 5,371
|
Re: Project '64 Cheapskate
heater box looks great, & nice pics of the A/C stuff...not sure yet what route I'll go when I get to that point, because I don't have factory A/C
__________________
_____________________________________________ Phillip My Build threads: 1966 Chevy C-10 "Black Betty" shortbed, fleetside, BBW, 327 V8/ Powerglide (under construction) http://67-72chevytrucks.com/vboard/s...ighlight=betty 1997 Chevy Tahoe, 2dr/2wd, mild custom (Daily driver) http://67-72chevytrucks.com/vboard/s...d.php?t=601142 Pics: '66 C-10 https://flic.kr/s/aHsjHWD4h9 '97 Tahoe https://flic.kr/s/aHsjGZ7wKP '93 C-1500 https://flic.kr/s/aHskxdpdnQ '88 S-10 Blazer https://flic.kr/s/aHsjYGx4Md Previous Rides: 1993 Chevy S-10 ext. cab, 4.3L, 4/5 drop (Sold) 1993 Chevy C-1500 short/step Retro-Rod (Sold) 1988 S-10 Blazer 2dr/2wd mild custom (Sold) |
|
|
|
|
04-06-2013, 10:57 AM
|
#271 |
|
Registered User
Join Date: Apr 2003
Location: Indep, MO
Posts: 5,893
|
Re: Project '64 Cheapskate
Good progress! Oughta have Brad stripe that box while its out! Good to see you among the living again!
Posted via Mobile Device
__________________
Boppa's Old Yeller Truck Build, Old Yeller's New Heart! Project Buzz Bomb Flyin' Low! |
|
|
|
|
04-06-2013, 11:14 AM
|
#272 |
|
Registered User
Join Date: Mar 2005
Location: apple valley, ca
Posts: 2,670
|
Re: Project '64 Cheapskate
I've been working on the motor quite a bit, too. The original engine was long gone when I got the truck, so I decided to use a 350 that I had set aside for another project. It's an '89 350 that I got for free a number of years ago. It was only a short block, and the engine had spun a rod bearing. It was a low-mile engine (80K) that was replaced by another GM factory short block. I got a new crank and freshened up the bottom end. The heads are Vortecs that I cut down the guides for added cam lift, opened the spring pockets for bigger springs, and did a bunch of port work in the bowl area. I left the runners alone to keep the velocity up. Brad re-assembled them for me, installing the new valve seals, springs, and retainers. The lifters are new, as is the roller rockers (1.5 ratio). The compression ratio wound up being right 9.65-1. The block is a factory hydraulic roller, and with the depletion of zinc in today's oil, I wanted to keep it as a roller motor. The cam is a GM Performance ZZ383 cam (part#846) that I got from a guy on Craigslist. It was brand-new, never ran, for $100. The specs are: 220/228 @ .050, .509/.528 lift on a 112 lobe center. I should have decent vacuum with a 112 lobe center, good torque with the lift numbers it has, and a slight lope with the duration it has. I think it'll work very well. The intake is an Air-Gap, the distributor is an HEI with all the MSD internals, and the carb is a 750 vacuum secondary.
I wanted simplicity because I plan to drive this truck all the time. I wanted to have it where if something breaks, I can go to the local parts place in any town and get a replacement part. One of the areas that I spent some extra time on this was the serpentine set-up. I bought a complete system from a guy on Craigslist for $80. It was off of a 1990 Chevy truck, and it needed to be freshened up. I cut off the mount for the smog pump, and had Brad run them through his buddy's ceramic tumbler. They turned out great. I changed all of the bearings for the idler wheels, got a brand new A/C compressor (Craigslist....$80!), a rebuilt alternator and a new P/S pump. I'm now good to go:  Here's a view from the top. The valve covers still need to be polished, and the areas between the fins will be painted Chevy Orange. Still haven't decided on an air cleaner yet. I am going to try the adapters that allow you to use the old style valve covers on the Vortec (they use center-bolt covers) heads. I have heard nothing but bad about them, but I am going to figure them out. I've got a an idea on how to make them work. The intake is just sitting on the engine right now. The valves still need to be adjusted. 
__________________
Check out my latest endeavor: https://roundsixpod.com My build threads: '55 Chevy: http://67-72chevytrucks.com/vboard/s...d.php?t=247512 '64 C-20: http://67-72chevytrucks.com/vboard/s...d.php?t=446527 |
|
|
|
|
04-06-2013, 11:22 AM
|
#273 | |
|
Registered User
Join Date: Mar 2005
Location: apple valley, ca
Posts: 2,670
|
Re: Project '64 Cheapskate
Quote:

__________________
Check out my latest endeavor: https://roundsixpod.com My build threads: '55 Chevy: http://67-72chevytrucks.com/vboard/s...d.php?t=247512 '64 C-20: http://67-72chevytrucks.com/vboard/s...d.php?t=446527 |
|
|
|
|
|
04-06-2013, 11:25 AM
|
#274 | |
|
Registered User
Join Date: Mar 2005
Location: apple valley, ca
Posts: 2,670
|
Re: Project '64 Cheapskate
Quote:
__________________
Check out my latest endeavor: https://roundsixpod.com My build threads: '55 Chevy: http://67-72chevytrucks.com/vboard/s...d.php?t=247512 '64 C-20: http://67-72chevytrucks.com/vboard/s...d.php?t=446527 |
|
|
|
|
|
04-06-2013, 12:42 PM
|
#275 |
|
Registered User
Join Date: Feb 2013
Location: Boulder City NV
Posts: 214
|
Re: Project '64 Cheapskate
Awesome build. I just read the whole thing!
I like your methods... mixing a little newer technology when it is cost effective and a genuine improvement while retaining the style of the 60's whenever possible. When my best friend and I go to car shows we look at everything and then tell each other which car we liked the best. It is usually something very subtle that doesn't have a crowd around it. The car that just looks put together right... brake lines, wiring, etc done with a simplistic flow that shows the builder gave it some thought before they picked up a tool. We both made our living in the race industry(until recently for me) where form follows function. Maybe that is why we appreciate the low gimmick/high functionality style? I imagine your line of work has the same effect? Even with the patina and patches I am sure I would be staring at your truck for quite a while if I saw it in person. Posted via Mobile Device Last edited by TommyDuncan; 04-06-2013 at 01:06 PM. |
|
|
|
 |
| Bookmarks |
|
|


 Linear Mode

