
|
 09-03-2012, 09:09 PM
|
#176 |
|
Registered User
Join Date: Apr 2003
Location: Indep, MO
Posts: 5,893
|
Re: Project '64 Cheapskate
Whole thing is perfect. Don't change a thing. Dead on the money.
Posted via Mobile Device
__________________
Boppa's Old Yeller Truck Build, Old Yeller's New Heart! Project Buzz Bomb Flyin' Low! |

|

|
|
09-03-2012, 09:10 PM
|
#177 |
|
Registered User
Join Date: Apr 2012
Location: Beaver, Pa.
Posts: 197
|
Re: Project '64 Cheapskate
Lookin sweeeet!
|
|
|
|
|
09-03-2012, 10:36 PM
|
#178 | |
|
Registered User
Join Date: Apr 2012
Location: Cambridge, Ontario, Canada
Posts: 1,771
|
Re: Project '64 Cheapskate
Quote:
 Seriously, love the stance though, I like the rake 
__________________
Craigerrr My build thread, CRGRS 66 Winter Build: http://67-72chevytrucks.com/vboard/s...09#post5638709 |
|
|
|
|
|
09-03-2012, 10:44 PM
|
#179 |
|
Registered User
Join Date: Nov 2008
Location: So. Cal.
Posts: 452
|
Re: Project '64 Cheapskate
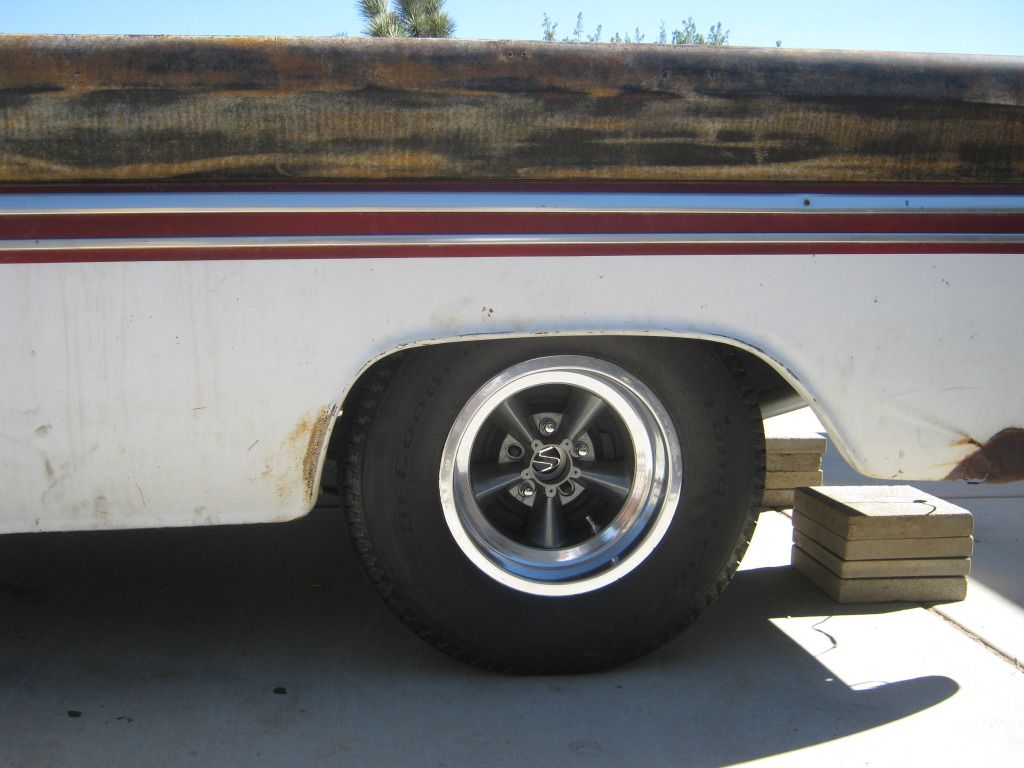
The truck is coming along nicely! Bunch of dumb little things that should take 5 minutes and 2 hrs. later its fixed, but it's getting done. The front tires are actually 215/60's and are just a hair to short, 225/60's will make it perfect! Alex and I are all about wheels, tires and stance and this thing nearly thete! This truck is slammed and I really dig the rake! You guys are gonna flip when you see how this thing will be done!
Posted via Mobile Device
__________________
It's all about the stance, baby! http://67-72chevytrucks.com/vboard/s...d.php?t=320546 |
|
|
|
|
09-07-2012, 11:28 AM
|
#180 | |||
|
Registered User
 Join Date: Mar 2005
Location: apple valley, ca
Posts: 2,670
|
Re: Project '64 Cheapskate
Quote:
Quote:
Quote:
__________________
Check out my latest endeavor: https://roundsixpod.com My build threads: '55 Chevy: http://67-72chevytrucks.com/vboard/s...d.php?t=247512 '64 C-20: http://67-72chevytrucks.com/vboard/s...d.php?t=446527 |
|||
|
|
|
|
09-18-2012, 08:58 PM
|
#181 |
|
Registered User
Join Date: Aug 2010
Location: louisville, ky
Posts: 13
|
Re: Project '64 Cheapskate
It is really looking good Alex.
Nate
__________________
In the process of looking for a 60 or newer short bed fleet side. |
|
|
|
|
09-18-2012, 09:41 PM
|
#182 | |
|
Rollin' Old Skool
Join Date: Jun 2007
Location: Hattiesburg, MS
Posts: 5,371
|
Re: Project '64 Cheapskate
Quote:
btw, i really like the wheels/stance in your pics...looking forward to more updates 
__________________
_____________________________________________ Phillip My Build threads: 1966 Chevy C-10 "Black Betty" shortbed, fleetside, BBW, 327 V8/ Powerglide (under construction) http://67-72chevytrucks.com/vboard/s...ighlight=betty 1997 Chevy Tahoe, 2dr/2wd, mild custom (Daily driver) http://67-72chevytrucks.com/vboard/s...d.php?t=601142 Pics: '66 C-10 https://flic.kr/s/aHsjHWD4h9 '97 Tahoe https://flic.kr/s/aHsjGZ7wKP '93 C-1500 https://flic.kr/s/aHskxdpdnQ '88 S-10 Blazer https://flic.kr/s/aHsjYGx4Md Previous Rides: 1993 Chevy S-10 ext. cab, 4.3L, 4/5 drop (Sold) 1993 Chevy C-1500 short/step Retro-Rod (Sold) 1988 S-10 Blazer 2dr/2wd mild custom (Sold) |
|
|
|
|
|
09-18-2012, 09:44 PM
|
#183 | ||
|
Registered User
Join Date: Mar 2005
Location: apple valley, ca
Posts: 2,670
|
Re: Project '64 Cheapskate
Quote:
Quote:
__________________
Check out my latest endeavor: https://roundsixpod.com My build threads: '55 Chevy: http://67-72chevytrucks.com/vboard/s...d.php?t=247512 '64 C-20: http://67-72chevytrucks.com/vboard/s...d.php?t=446527 |
||
|
|
|
|
09-19-2012, 12:30 AM
|
#184 |
|
chevy only
 Join Date: Sep 2006
Location: Phoenix, AZ
Posts: 6,619
|
Re: Project '64 Cheapskate
nailed the stance looks slick with the wheels
__________________
CHEVY ONLY... Nothin Else ! |
|
|
|
|
09-19-2012, 08:15 AM
|
#185 | |
|
Registered User
Join Date: Mar 2005
Location: apple valley, ca
Posts: 2,670
|
Re: Project '64 Cheapskate
Quote:
There's been a lot of work on the body in the last few weeks getting the little dents handled in preparation for the next phase, which I'm really excited about. A lot of additional chassis work was done in the last week, but I'm going to refrain on posting pictures until I get the areas painted and detailed. A special thanks to Brad and Bob for all of their help on this! The engine is about 60% done. I need to send the heads to a buddy to touch-up the valve seats, set the spring heights, and reassemble. It'll be a nice little 350, making about 380 horsepower by my estimation. With the 700r4 and the 3.73 gears, it'll be a nice freeway flyer.
__________________
Check out my latest endeavor: https://roundsixpod.com My build threads: '55 Chevy: http://67-72chevytrucks.com/vboard/s...d.php?t=247512 '64 C-20: http://67-72chevytrucks.com/vboard/s...d.php?t=446527 |
|
|
|
|
|
09-19-2012, 08:25 AM
|
#186 | |
|
Registered User
Join Date: Nov 2010
Location: Kalamazoo, MI
Posts: 1,008
|
Re: Project '64 Cheapskate
Quote:
|
|
|
|
|
|
09-19-2012, 08:32 AM
|
#187 | |
|
Registered User
Join Date: Feb 2011
Location: muskogee, ok
Posts: 1,091
|
Re: Project '64 Cheapskate
Quote:
__________________
 bagged 66 longbed build http://67-72chevytrucks.com/vboard/s...d.php?t=449548 my favorite colors.. black, rust, and shiny!!!! instagram: @coulter918 |
|
|
|
|
|
09-19-2012, 11:17 AM
|
#188 |
|
Registered User
Join Date: Apr 2003
Location: Indep, MO
Posts: 5,893
|
Re: Project '64 Cheapskate
Ok, I'll ask the pros. Yeller has a 700r4/3.08 combo, and the mileage has not been what we'd hoped. We've heard going to 3.73 puts the motor in a more efficient range, thus better mileage. We dunno. About the same hp you're talkin. Any suggestions?
Posted via Mobile Device
__________________
Boppa's Old Yeller Truck Build, Old Yeller's New Heart! Project Buzz Bomb Flyin' Low! |
|
|
|
|
09-19-2012, 01:48 PM
|
#189 |
|
Registered User
Join Date: Mar 2005
Location: apple valley, ca
Posts: 2,670
|
Re: Project '64 Cheapskate
With the 3.08 gears, you might have a condition where it's lugging the engine at highway speeds in 4th gear. Are you able to determine what your rpm is at cruising speed? The reason why I'm asking is that you may be at such a low cruising rpm that the converter is still under the stall speed (example: 1800 rpm cruise rpm with a 2500 rpm stall speed converter) and your converter is still slipping. Do you have the lock-up feature of the trans enabled? If not, having a lock-up definitely helps with fuel mileage.
What kind of fuel mileage are you getting?
__________________
Check out my latest endeavor: https://roundsixpod.com My build threads: '55 Chevy: http://67-72chevytrucks.com/vboard/s...d.php?t=247512 '64 C-20: http://67-72chevytrucks.com/vboard/s...d.php?t=446527 |
|
|
|
|
09-19-2012, 03:05 PM
|
#190 |
|
Registered User
Join Date: Apr 2003
Location: Indep, MO
Posts: 5,893
|
Re: Project '64 Cheapskate
Ten to Low teens, not much better than it was, if at all. Converter is stock. No tach. Lockup is engaging. Used the full BTO kit. Fresh tune up. We're just now to the sussing out stage. We can roll around, but it ain't perfect. Motor doesn't seem to be bogged down on the freeway, but that's me driving. 70-85mph. Boppa runs a bit slower, maybe that's the problem! We'll look into it further, I guess. Thanks for the reply!
Posted via Mobile Device
__________________
Boppa's Old Yeller Truck Build, Old Yeller's New Heart! Project Buzz Bomb Flyin' Low! |
|
|
|
|
09-20-2012, 12:02 AM
|
#191 |
|
Registered User
Join Date: Jun 2004
Location: El Lago, TX
Posts: 1,668
|
Re: Project '64 Cheapskate
Sweet build! What did you end up doing about the different diameter of the gas tank inlet and filler neck? I have the same problem. Mine is a mid 80's stepside bed. I can't seem to find the right hose. Thanks
Posted via Mobile Device |
|
|
|
|
09-20-2012, 06:35 AM
|
#192 |
|
Registered User
Join Date: Apr 2003
Location: Indep, MO
Posts: 5,893
|
Re: Project '64 Cheapskate
I went to Oreilly they have some that are like distribution hubs. Take your parts/measurements and ask to go see what they have. My diameter adapter is the top rail of a chain link fence! Hey, it works!
Posted via Mobile Device
__________________
Boppa's Old Yeller Truck Build, Old Yeller's New Heart! Project Buzz Bomb Flyin' Low! |
|
|
|
|
09-20-2012, 08:41 AM
|
#193 |
|
Registered User
Join Date: Mar 2005
Location: apple valley, ca
Posts: 2,670
|
Re: Project '64 Cheapskate
I haven't hooked my filler neck up yet because I plan to pull the tank one last time and FatMat the inside of the cab for sound deadening. I did do a little research, and you're correct when you say that finding the right hose is not as easy as it seems. The first hose they brought out was about as flimsy as radiator hose and it was expensive. I wound up hitting the wrecking yards and grabbing a few original hoses. They aren't in great shape, though, and eventually I'm going to have to find the right stuff. The original ones are a thick rubber with woven fiber. It's probably the same as what the fuel trucks have on their servicing hoses, minus the outer jacket.
Another thing I have noticed when I was grabbing the original hoses was the different fuel necks. Some were plastic and some were metal. I've got one of each, but for a durability standpoint, I'm going to use the metal. I don't know why the factory would use a plastic filler neck because wouldn't static electricity be a concern?
__________________
Check out my latest endeavor: https://roundsixpod.com My build threads: '55 Chevy: http://67-72chevytrucks.com/vboard/s...d.php?t=247512 '64 C-20: http://67-72chevytrucks.com/vboard/s...d.php?t=446527 |
|
|
|
|
09-20-2012, 02:17 PM
|
#194 |
|
Registered User
Join Date: Jun 2004
Location: El Lago, TX
Posts: 1,668
|
Re: Project '64 Cheapskate
Thanks for the replies. It seems there must have been a lot of changes with fuel filler setup from the 60's up through the 80's. I apparently have dual tank fenders from different years because the setup on mine is even a little different from side-to-side. I found a radiator hose with the right bends that looked like it was going to work, but that's when I discovered each end was a different diameter.
 I found new ones in LMC for a fleet-side bed, but not for a step-side. I found new ones in LMC for a fleet-side bed, but not for a step-side.
|
|
|
|
|
09-22-2012, 10:13 AM
|
#195 |
|
Registered User
Join Date: Mar 2008
Location: Powhatan, Va.
Posts: 376
|
Re: Project '64 Cheapskate
NAPA has the filler neck hose made from the right material.
__________________
Sean "If your gonna be dumb, you gotta be tough" 1960 Chevy Impala Sedan - my 25 year search is over!! 1969 C-10 longbed - Nice day DD  1970 Chevy Nova - Street and Strip Project 2002 Acura MDX my DD 2007 Honda Odssey - My Wife's "Mommy Van" |
|
|
|
|
09-23-2012, 11:23 PM
|
#196 |
|
Registered User
Join Date: Mar 2005
Location: apple valley, ca
Posts: 2,670
|
Re: Project '64 Cheapskate
All right...I've now that I've got a little time, I'll explain what's been happening lately on the '64. In my recent postings, I attached pictures of it at ride height, and although I was jazzed about the way it looked, the control arm clearance to the ground was about 1 3/4", and that just wasn't going to fly. I did a lot of research on Dropmembers, Z'ing frames, and sectioning crossmembers, and although each one had it pros/cons, I just needed a nudge to push me in that direction. Enter Kustombrad and Bob......
I've known Brad since I was a G.I. in the Air Force back in the late '80s, and we've always thought alike when it comes to cars. Between us, we've had quite a few cool rides. For the last 20 years, Brad has always talked about wanting to "Z" a chassis on a '73-'87 truck. Once he saw how low the control arms were on my '64, he was on a mission........he was going to do his best to convince me that Z'ing the chassis on my '64 was the way to go. It took a little bit of convincing, because I wanted to carefully plan the job, but Brad already had the cutoff wheel spinning in his brain. Once I said Yes, it was headed over to Bob's house. A little about Bob.......he's about 60yrs old with the drive and passion of an 18yr old. He is an extremely talented metal man, and has chopped more tops than I can care to count. Nothing scares him, and he was 100% ready to do the job. Anyway, as soon as the truck was in the shop, it was carefully leveled and measured. The frame was jigged at ride height in front of and behind the crossmember.  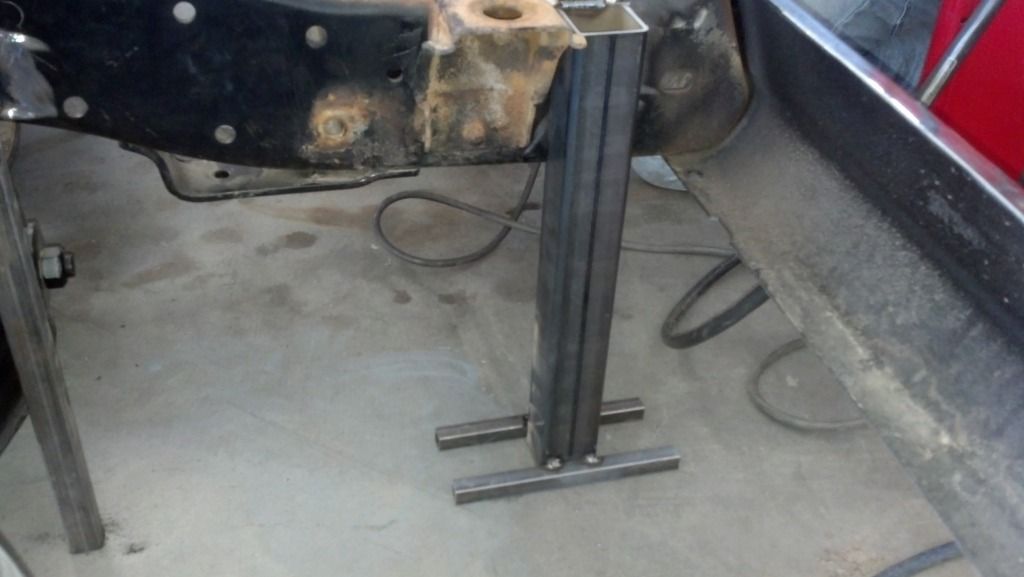 The area directly under the crossmember was also jigged. 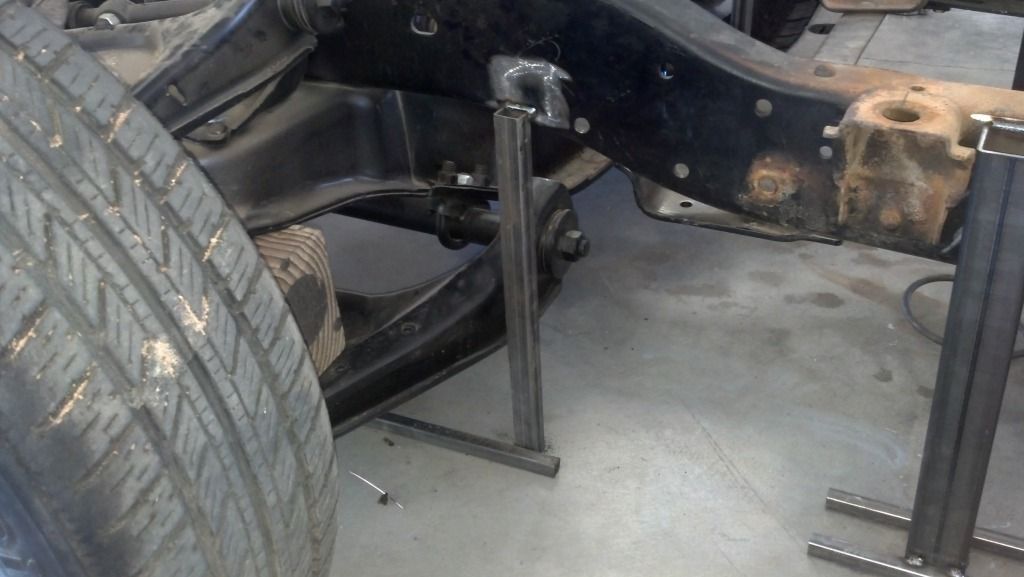 It was determined that the frame would be Z'd 2" up higher, and forward 1" to center the wheel in the wheel opening. Once the jigs were in place, they determined where the best place to cut the frame would be. In the rear, the frame makes an inward taper, so you have to take that into account. Also, you want to ensure that you cut behind the upper shock stud. You want every bit of the crossmember, including steering and shocks to move up as a complete assembly. 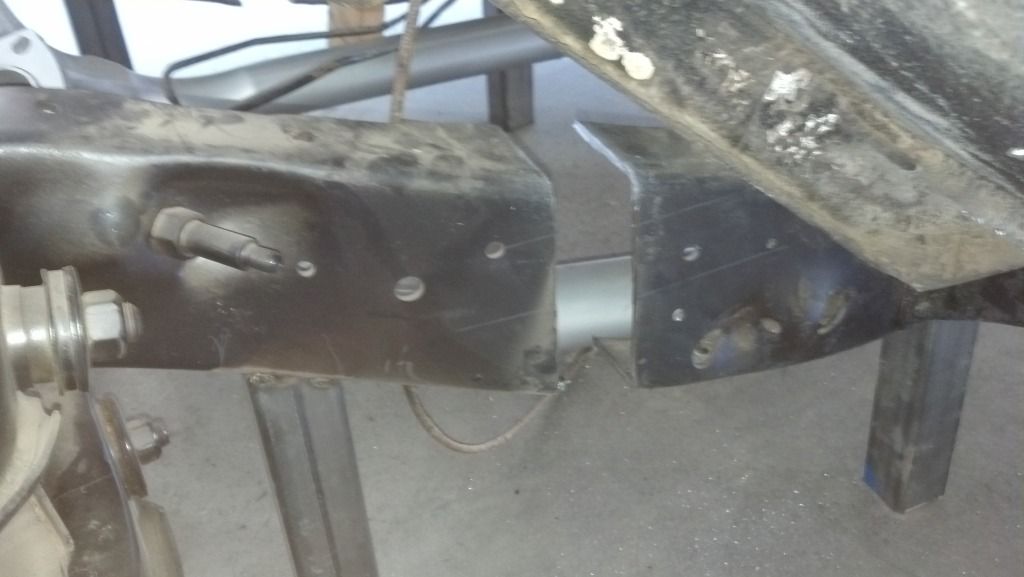 The front cuts have to be carefully planned out, because you have a few things to concern yourself with. First, the steering box. Everything in the steering box area starts to get tight, namely the radiator. You have to plan your cut where it's just forward of the steering box and just aft of the radiator saddles. 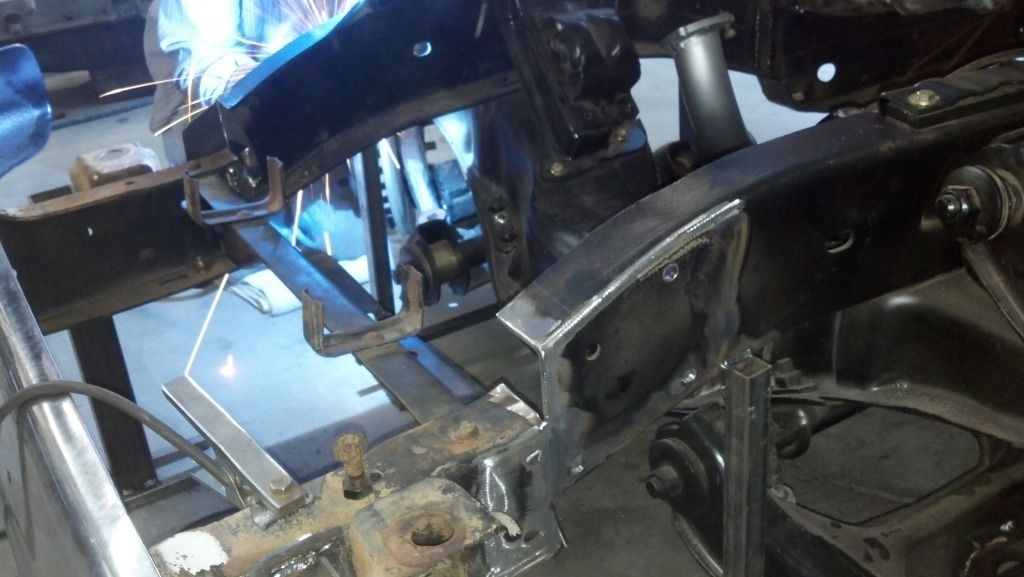 In this shot, you can see how close the radiator is. You still have good clearance because the radiator is secured on the top and bottom. 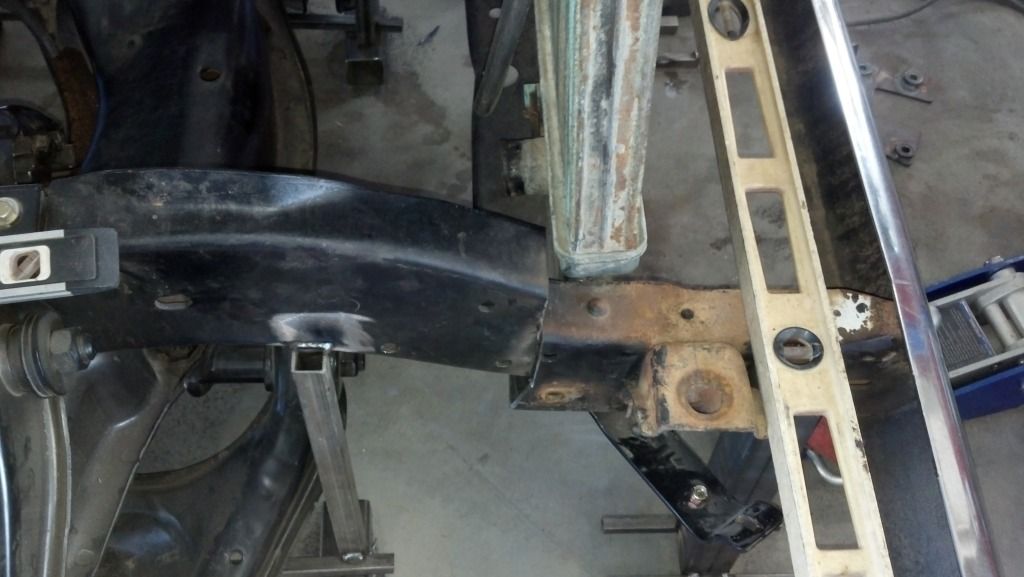
__________________
Check out my latest endeavor: https://roundsixpod.com My build threads: '55 Chevy: http://67-72chevytrucks.com/vboard/s...d.php?t=247512 '64 C-20: http://67-72chevytrucks.com/vboard/s...d.php?t=446527 Last edited by chevyrestoguy; 09-24-2012 at 12:34 AM. |
|
|
|
|
09-23-2012, 11:35 PM
|
#197 |
|
Registered User
Join Date: Mar 2012
Location: San Diego CA
Posts: 223
|
Re: Project '64 Cheapskate
wow looks good guys
|
|
|
|
|
09-24-2012, 12:06 AM
|
#198 |
|
Registered User
Join Date: Mar 2005
Location: apple valley, ca
Posts: 2,670
|
Re: Project '64 Cheapskate
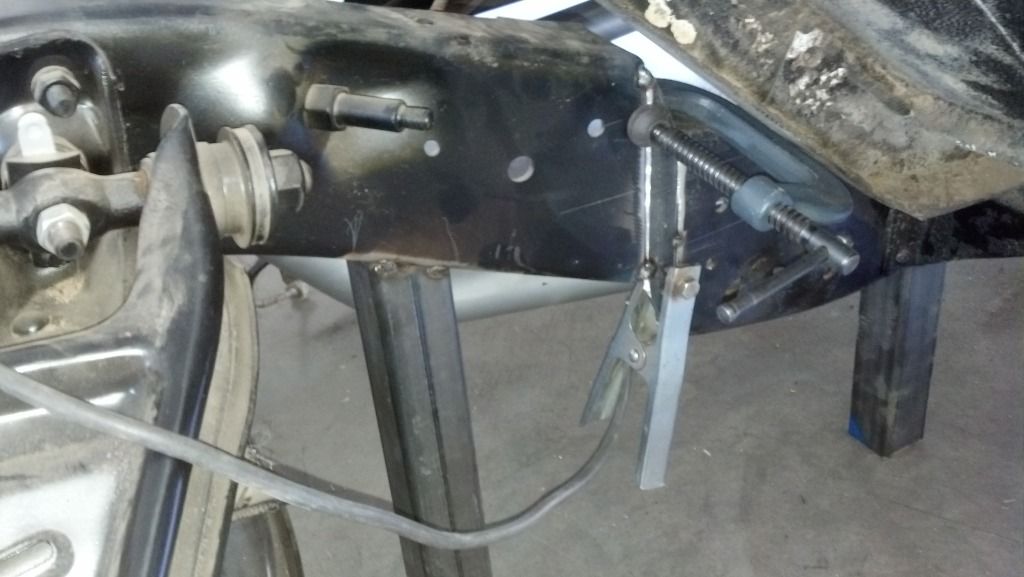
Now, once you're satisfied with the cuts, it's time to start stitching it all back together. The frame is going to be plated with 3/16ths steel plate on both sides of the frame rails, but the frame needed to be joined first. The cut gaps were measured, and small intersection plates were welded in place.
 After that, the boxing plates were cut and welded in place. Here is the passenger side outside plate. There is another place just like this welded to the inside of the frame rail as well. So, if you're keeping score, there's THREE pieces of 3/16's plate (two plates and the original frame) at every area where the frame was cut. 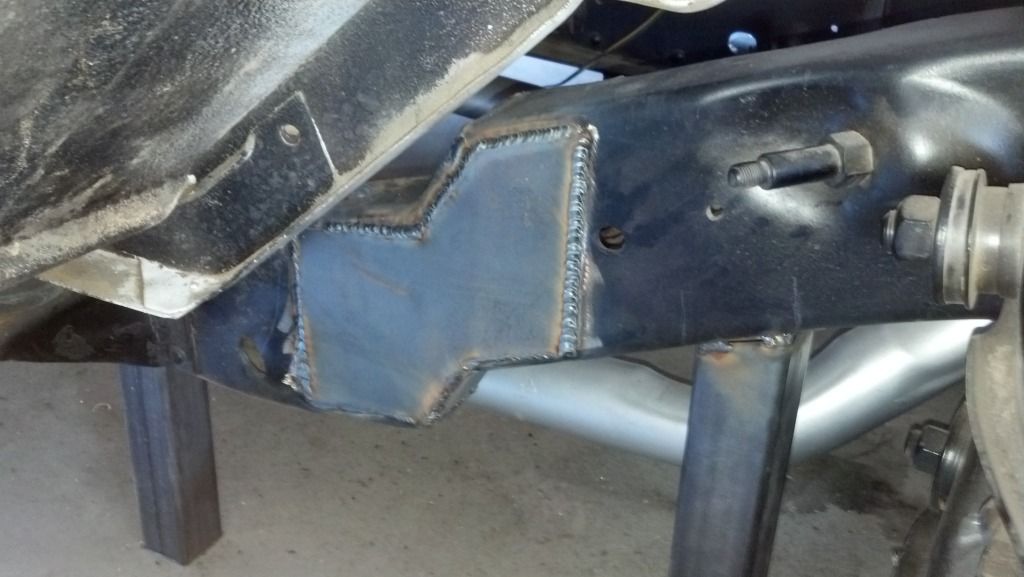 Here's a shot of the boxing plate on the passenger side front frame rail. Again, there's another plate on the side of this area as well. 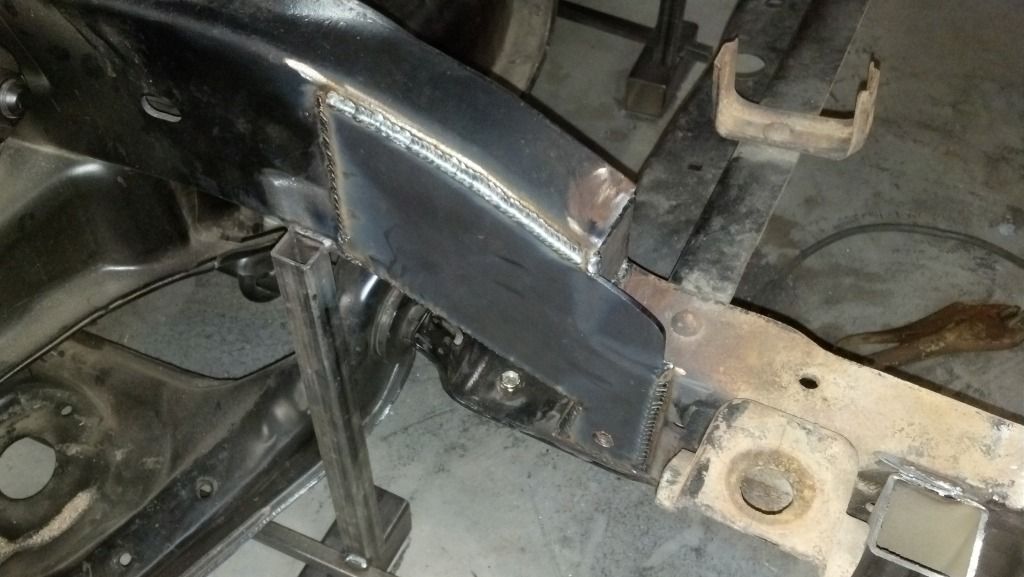 Now that the frame was in place, it was time to address the engine. From the beginning, the plan was to leave the engine in it's original location and only bring the crossmember up. The reason for this is that you don't have to mess with the trans crossmember, and plus, I had already built all my shims to get my pinion angle where I wanted it. So, this meant that the motor mounts had to be relocated down 2" on the crossmember. This was one of the more challenging parts of the job. This meant that the engine mount stands had to be shortened. If you remember, I did an earlier mod to where I could use the engine mount stands from my '79 Suburban donor, which has the superior clamshell-style mounts. In this picture, you can see the surgery that had to be done. To help get the engine lower, the original bolt hole in the clamshell for the long attach bolt was moved up about an inch. The clamshells were also trimmed up, and this picture was taken before that was done. Also, because of the fact that the wheelbase was moved forward 1" to center the wheels in the fender openings, the motor mounts had to be moved 1" to the rear to keep the engine in it's original location. Disregard the groovy green clamshells, I got them from a guy who painted his entire engine engine that color. Yeah, it was ugly...... 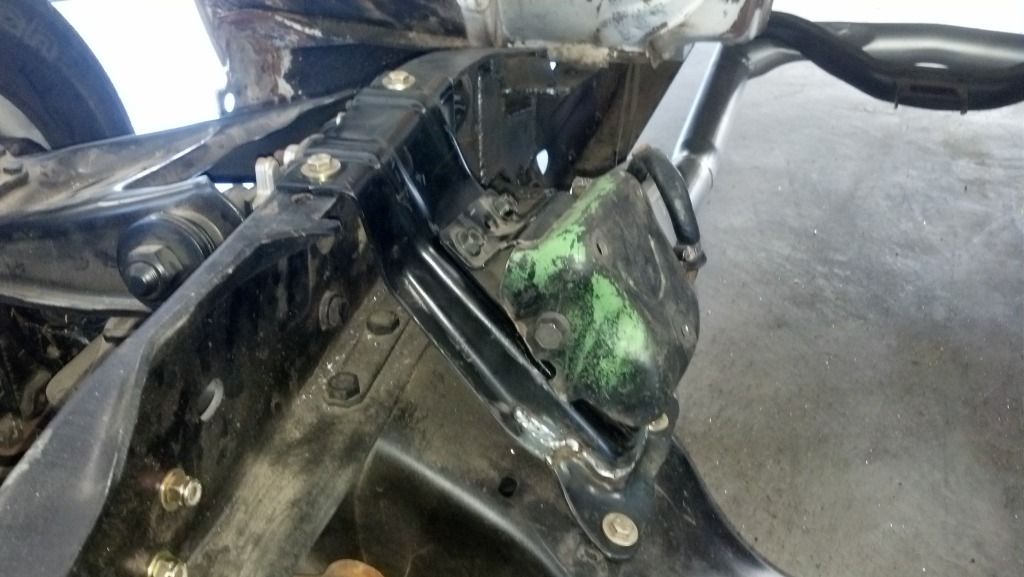 Here's a picture of the steering box bolted to check for fit and also to get the steering linkage positioned exactly where I wanted it. 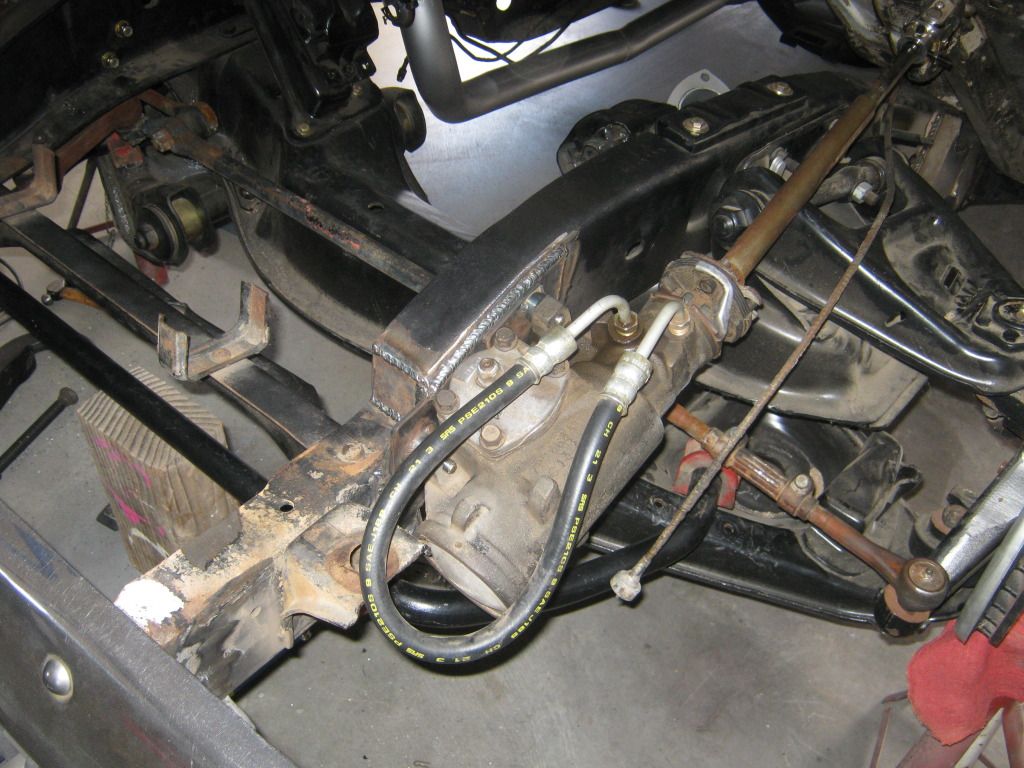 Speaking of steering linkage, I came to the conclusion that the '79 Suburban frame was taller than the '64's frame. I discovered this when I went to attach the drag link to the frame. I got the steering linkage leveled, and perfectly in-line with the tie rods, and the drag link was way too low. I remedied this by drilling another hole in the link and attaching it to the frame. 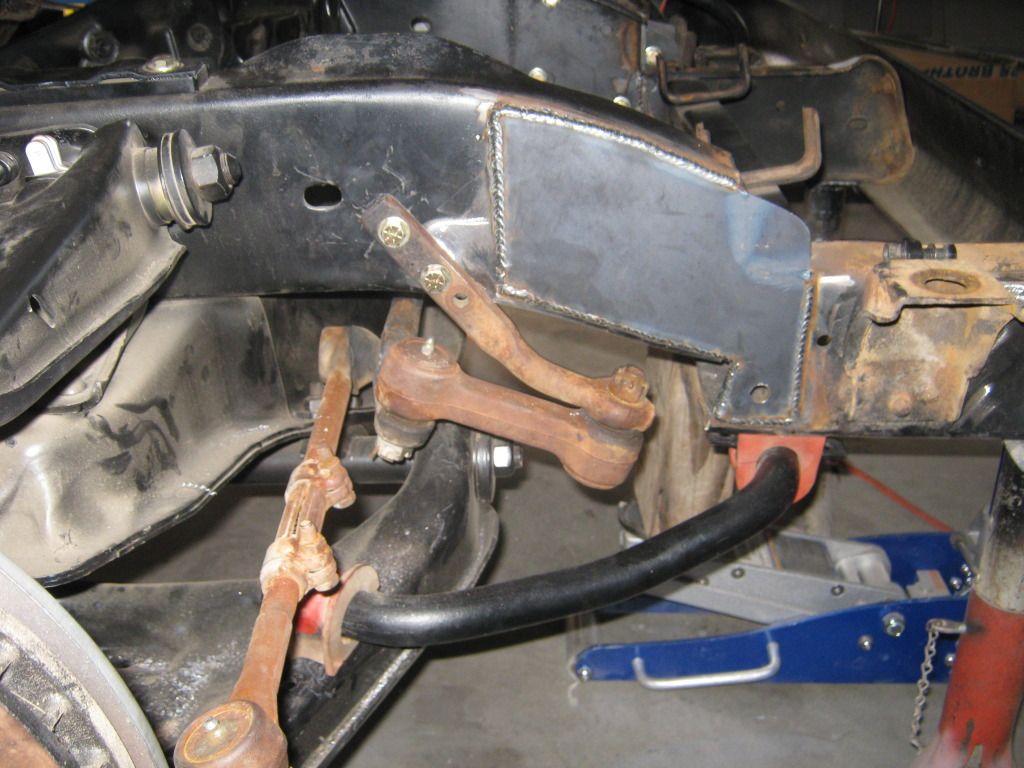 Another area that needed a little bit of attention was the swaybar. The sway bar attach brackets that I got from Early Classic would not work because the rear attach hole was now hanging in the air because the area that it originally attached to was now 2" higher. Because the crossmember was moved forward 1", that was a very good thing, because the bar was now also 1" farther forward. I redrilled the front rails for the swaybar bushing fittings, and it'll now bolt directly to the frame. You can see it in this picture. You can also see that a new steering u-joint was installed to attach my column to the box. 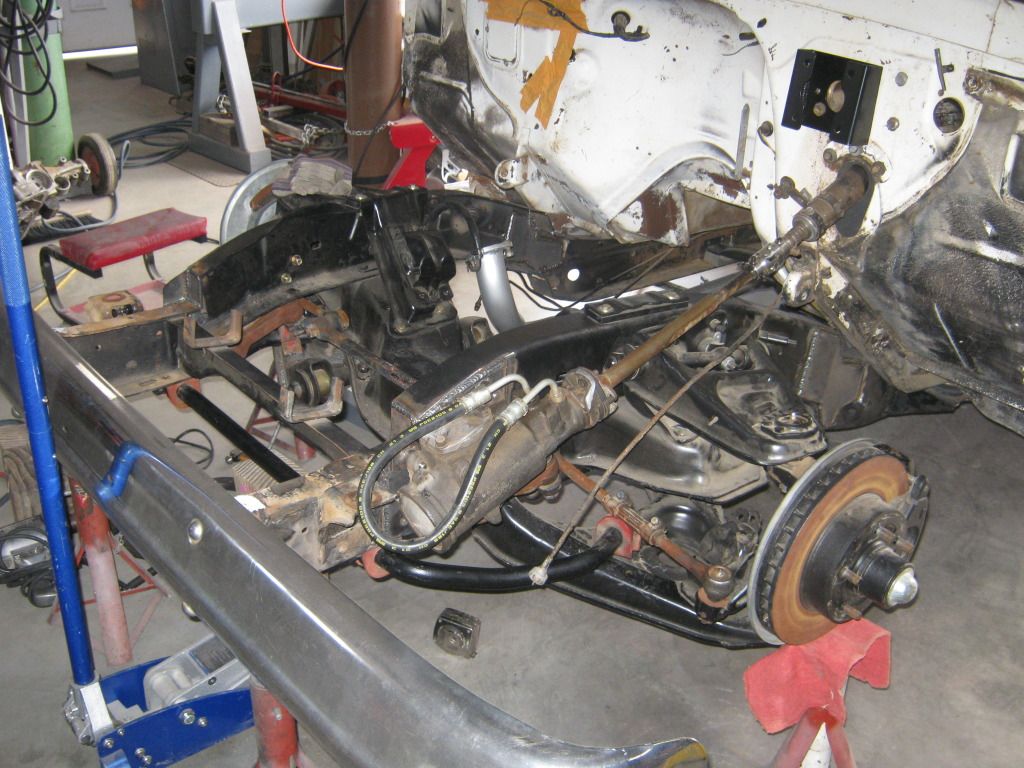 The chassis is now at the point of getting blown back apart and cleaned and painted chassis black. The inner fenders will also need to be trimmed, and I'll post up pictures when I get to that point. *****I have to give a HUGE thanks to Kustombrad and Bob for all of their hard work on this. I was away at work for 80% of the job, and those two maniacs deserve the credit for the work that was done. They did a great job. And oh yeah, it only took Brad 20 years to find out if his idea of Z'ing a chassis would turn out right!*****
__________________
Check out my latest endeavor: https://roundsixpod.com My build threads: '55 Chevy: http://67-72chevytrucks.com/vboard/s...d.php?t=247512 '64 C-20: http://67-72chevytrucks.com/vboard/s...d.php?t=446527 Last edited by chevyrestoguy; 09-24-2012 at 12:42 AM. |
|
|
|
|
09-24-2012, 12:18 AM
|
#199 |
|
Registered User
Join Date: Mar 2005
Location: apple valley, ca
Posts: 2,670
|
Re: Project '64 Cheapskate
Not done yet.....
While the truck was at Bob's, he couldn't help himself. Seeing all of those dents was driving him nuts, so he and Brad broke out the hammers and fixed a bunch of dents and then Bob installed the patch panel on the front fender. 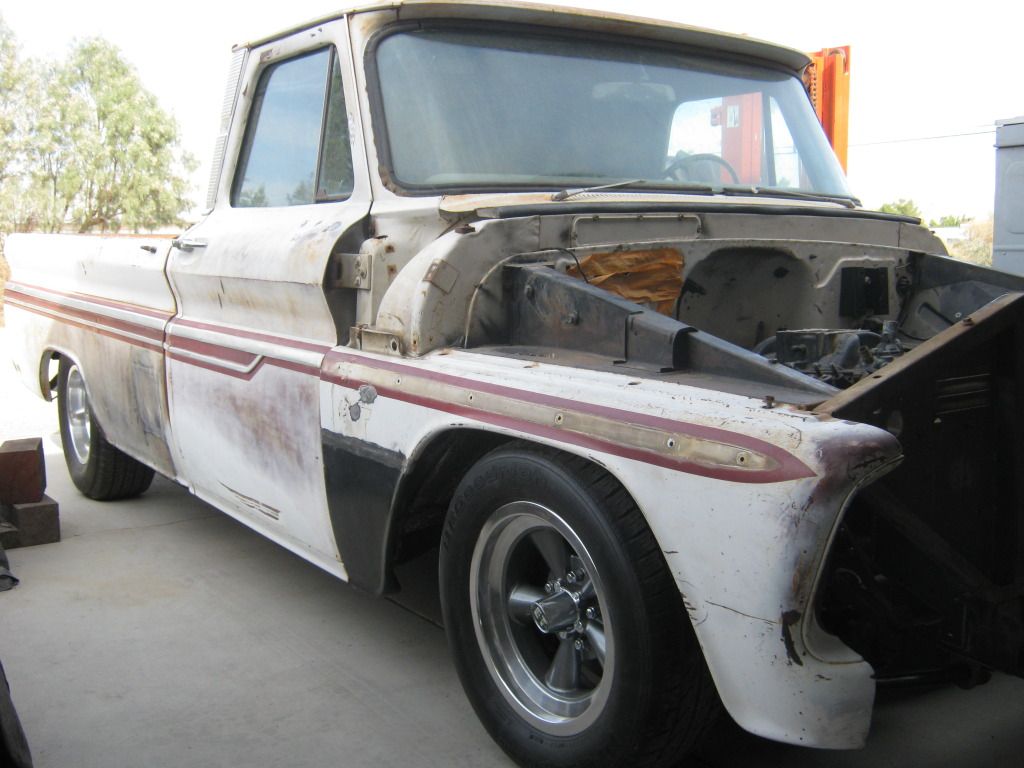 Also, I got a rear lower bedside patch panel from a member on the site (LT1 Burb), and Bob fitted it as well 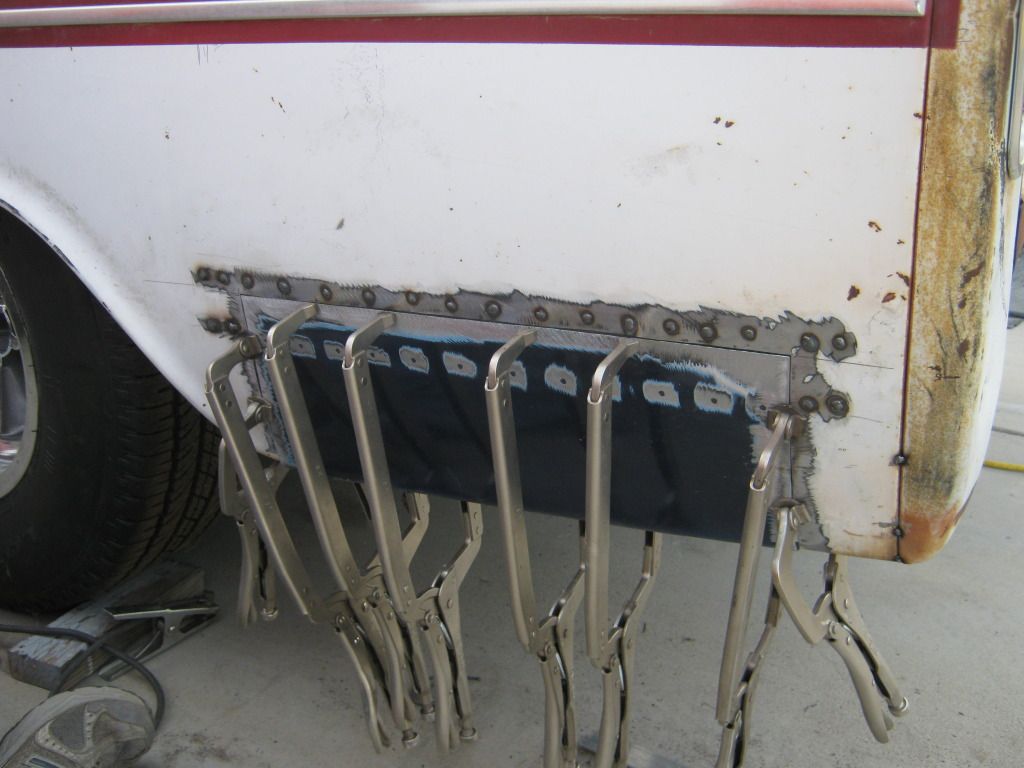  If you notice, the ugly gaping holes where the fuel access doors used to be are gone, too!! 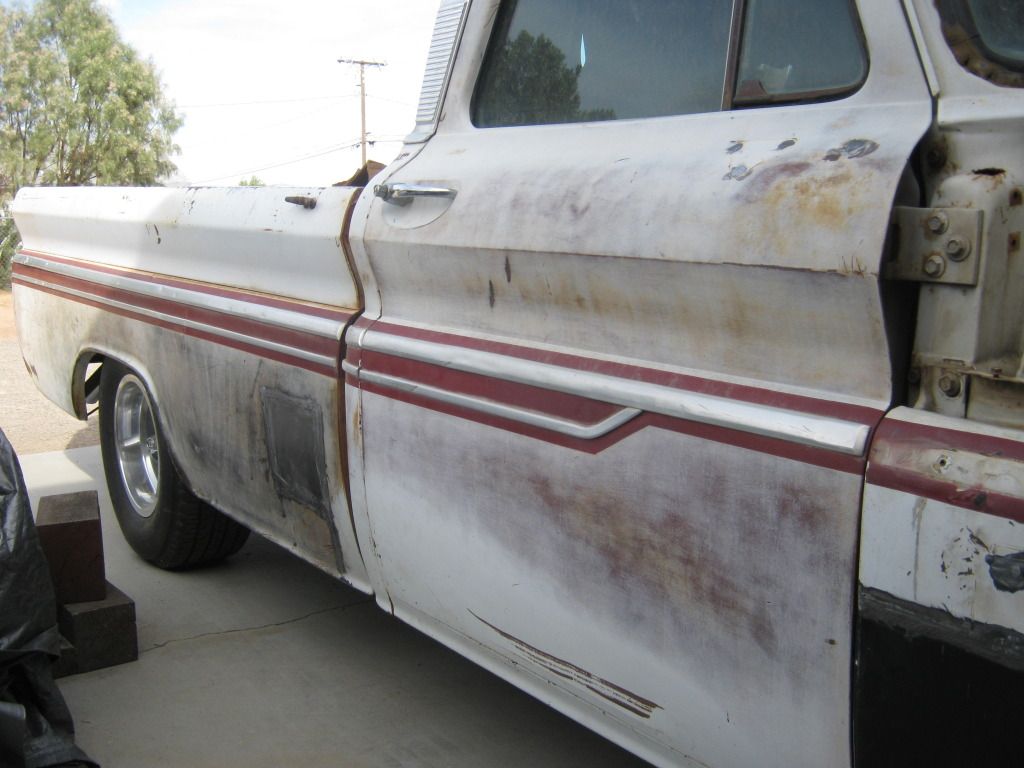 That's enough for tonight. I'll post up more pictures soon. Still a lot more to do!
__________________
Check out my latest endeavor: https://roundsixpod.com My build threads: '55 Chevy: http://67-72chevytrucks.com/vboard/s...d.php?t=247512 '64 C-20: http://67-72chevytrucks.com/vboard/s...d.php?t=446527 |
|
|
|
|
09-24-2012, 12:32 AM
|
#200 |
|
But Found Her 25yrs Later!
Join Date: Oct 2010
Location: Oregon City, Oregon
Posts: 10,468
|
Re: Project '64 Cheapskate
The patches look really nice.
__________________
I lost my 65 - Found it 25 years later: http://67-72chevytrucks.com/vboard/s...d.php?t=426650 66 C20 Service Truck: http://67-72chevytrucks.com/vboard/s...d.php?t=428035 |
|
|
|
 |
| Bookmarks |
|
|


 Linear Mode

