
|
Register or Log In To remove these advertisements. |
|
|
|
|||||||
 |
|
|
Thread Tools | Display Modes |
 05-31-2015, 09:22 PM
|
#26 |
|
Registered User
 Join Date: Nov 2007
Location: baltimore, maryland
Posts: 617
|
Re: Project: 72 Cheyenne K20 Restore
I had frame sandblasted. I painted with POR15 using a brush. I was not impressed with the look and the paint runs. If I were to do it again, I would powder coat if funds allowed. Dwilber's frame looks great in powder. If not, I would do several coats of epoxy primer black on not only the frame, but axles and chassis components. Stuff is pretty tough. I had some painted on my frame before we sand blasted it and it was a ***** to get off. Or use POR15, but absolutely spray it on, not brush on. If you go that route they have POR15 in silver. I would paint the silver first then black chassis coat to make sure I had coverage.
Ahh the memories. Chris
__________________
Project Reno Build http://67-72chevytrucks.com/vboard/s...d.php?t=392636 Easier to beg forgiveness than ask permission! 
|

|

|
|
06-02-2015, 02:06 AM
|
#27 |
|
Registered User
Join Date: Oct 2007
Location: Spanaway
Posts: 8,451
|
Re: Project: 72 Cheyenne K20 Restore
The opinion on paint is alover the board just like oil threads, I read a few threads however that they use John Deer Chassis black and said it was quite durable, another route is powder coat, some have used Por-15 then painted over that, hard to say what is the best route..
If your looking at a gas door to transplant, a late 90's and up S-10 or other chevy door is round and has been used a lot, i used an S-10 and also the filler neck, not sure if possibly a surburban filler neck would have a steeper angle?
__________________
Mike. Swamp Rat build thread : http://67-72chevytrucks.com/vboard/s...d.php?t=595019 72 3/4T 4X4 4" BDS Lift 33" BFG's |
|
|
|
|
06-14-2015, 11:08 AM
|
#28 |
|
Registered User
Join Date: May 2015
Location: San Luis Obispo, CA
Posts: 52
|
Re: Project: 72 Cheyenne K20 Restore
Hi All, I haven't had much time with the truck lately.
(I'm sure these words have never been spoken here) But I did get to spend a few hours yesterday removing everything from the frame (brake lines, fuel lines, etc.) I did notice the front most cross member is bolted in place. Evidence of an accident in its past life Im sure..  Is there any reason why this couldnt be welded in place?
__________________
- Steve "I was born with nothing, and I still have most of it" 1972 K20 Cheyenne: http://67-72chevytrucks.com/vboard/s...d.php?t=671873 |
|
|
|
|
06-14-2015, 11:53 AM
|
#29 |
|
Carpe manana
  Join Date: Dec 2010
Location: Eau Claire, WI
Posts: 12,287
|
Re: Project: 72 Cheyenne K20 Restore
Steve it seems to me a lot of front crossmembers get bent but not necessarily in an accident. It gets used as a site of attachment for a tow chain/strap and bent (forward) as a result. At least a PO replaced yours in the past - I've had to replace two to date. There may be some allowable frame flex that occurs about the rivet sites but I'm not certain of this. I'd just make sure your x-member is straight and affixed with good bolts and if so call it done.
__________________
1972 K5 CST Highlander Blazer: http://67-72chevytrucks.com/vboard/s...d.php?t=708547 1972 K20 Cheyenne Super: http://67-72chevytrucks.com/vboard/s...d.php?t=528308  Members met: ORANGBLAZ, 2003 silverado, MikeCofield, BB72CHEVKT, Duncan&Son, Sameyrasmea72, THENEWMEXICAN, HotRod C/10, brianthelion02, Sport/Truck, ryanroo, michael bustamante, Dirt's72, Already Gone, WestButteTruck, 57taskforce, Moreyel, painterljp, AASmedic, SoCoC10, Lumaestas, carbuff382, Chevyland Members met: ORANGBLAZ, 2003 silverado, MikeCofield, BB72CHEVKT, Duncan&Son, Sameyrasmea72, THENEWMEXICAN, HotRod C/10, brianthelion02, Sport/Truck, ryanroo, michael bustamante, Dirt's72, Already Gone, WestButteTruck, 57taskforce, Moreyel, painterljp, AASmedic, SoCoC10, Lumaestas, carbuff382, Chevyland
|
|
|
|
|
06-14-2015, 01:45 PM
|
#30 |
|
Registered User
Join Date: Dec 2012
Location: Los Banos CA
Posts: 2,705
|
Re: Project: 72 Cheyenne K20 Restore
When I got my frame the front crossmember was loose on the steering box side so I ground the rivots, drilled out the holes and put in grade 8 7/16 bolts. Keep it up.
__________________
1956 Chevy Bel Air 2 door 1956 Chevy 210 4 Door 1970 K20 LWB project the Hulk build w/Supercharged 4.8L-ly2/4L60E HULK BUILD 1970 C10 Yellow/White Deluxe LWB w/ 5.3L-LC9/6L80E 1968 K10 LWB Dark green my son calls it "THE HULK Jr"HULK JR *SOLD* GO  GO!!! GO!!!
|
|
|
|
|
06-14-2015, 01:53 PM
|
#31 |
|
Registered User
Join Date: Dec 2012
Location: Los Banos CA
Posts: 2,705
|
Re: Project: 72 Cheyenne K20 Restore
Hey Steve I must have not hit send on the first post. So try this again...
Looking good I will be watching. I am building a k20 myself. These guys have great info. They have been helping me a lot. Rock on! From California.
__________________
1956 Chevy Bel Air 2 door 1956 Chevy 210 4 Door 1970 K20 LWB project the Hulk build w/Supercharged 4.8L-ly2/4L60E HULK BUILD 1970 C10 Yellow/White Deluxe LWB w/ 5.3L-LC9/6L80E 1968 K10 LWB Dark green my son calls it "THE HULK Jr"HULK JR *SOLD* GO GO!!!
|
|
|
|
|
06-15-2015, 10:06 PM
|
#32 | ||
|
Registered User
Join Date: May 2015
Location: San Luis Obispo, CA
Posts: 52
|
Re: Project: 72 Cheyenne K20 Restore
Quote:
Quote:
Thanks for the input guys.. Yeah, my next step is to pressure wash the frame and drive train. Ill look up the frame specs and see if I can notice anything with a tape measure.. I was thinking of swinging by a body shop to ask what they would charge to check my frame..
__________________
- Steve "I was born with nothing, and I still have most of it" 1972 K20 Cheyenne: http://67-72chevytrucks.com/vboard/s...d.php?t=671873 |
||
|
|
|
|
06-20-2015, 10:28 PM
|
#33 |
|
Registered User
Join Date: May 2015
Location: San Luis Obispo, CA
Posts: 52
|
Re: Project: 72 Cheyenne K20 Restore
Well I loaded up the frame and "drive-train" today, hauled them in to town for a High Temp pressure wash. It was very Hot Water.
The fitting on the wand had a small leak. It dripped a few small drops on my shoe, and Dang It Hurt. It was also 105 in today.. After the wash I do see evidence of an accident. see pics.. You can see were the frame has been reworked on the passenger side, and it looks like the drivers side front horn is a bit tweaked outwards. I definitely need to get in to a Body-shop.
__________________
- Steve "I was born with nothing, and I still have most of it" 1972 K20 Cheyenne: http://67-72chevytrucks.com/vboard/s...d.php?t=671873 |
|
|
|
|
10-11-2015, 12:35 AM
|
#34 |
|
Registered User
Join Date: May 2015
Location: San Luis Obispo, CA
Posts: 52
|
Re: Project: 72 Cheyenne K20 Restore
Hi All, it's been awhile since my last post, June 20th.. Wow..
Didn't get a whole lot done in the last 4 months (on my truck anyways).. I did make it out to my buddy's shop and he had many Cars/Trucks to work on, and it didn't feel right working on my truck while he was fighting to complete some time sensitive jobs.. So I gave up 4+ Saturdays to help him catch up, The powder-coating shop had my T-Case for 3+ weeks, a few for the Wife and Kids, and you know.. But I am happy to report that I have made some progress.. My T-Case is Complete and I think it looks awesome. I found some factory over-spray on the inside if the rear output case cover, and found a darn perfect match at the powder-coating shop. But it's gloss not flat.. See pics.. I have attached a few of some random pics that I took while farting around the shop (my T-Case in disarray, my 4-bolt block, and my K20 in Shambles). I will be moving on to the Diff's in the next few weeks (rebuild and powder-coat). I also received my 4" Skyjacker lift. Thanks for the ear... 
__________________
- Steve "I was born with nothing, and I still have most of it" 1972 K20 Cheyenne: http://67-72chevytrucks.com/vboard/s...d.php?t=671873 |
|
|
|
|
10-13-2015, 04:21 PM
|
#35 |
|
Registered User
Join Date: May 2015
Location: San Luis Obispo, CA
Posts: 52
|
Re: Project: 72 Cheyenne K20 Restore
Hello, does anyone have any pictures of the Stock 72 NP205 Shift Handle/Lever and knob?
__________________
- Steve "I was born with nothing, and I still have most of it" 1972 K20 Cheyenne: http://67-72chevytrucks.com/vboard/s...d.php?t=671873 |
|
|
|
|
10-13-2015, 05:06 PM
|
#36 |
|
Registered User
Join Date: May 2015
Location: AZ
Posts: 75
|
Re: Project: 72 Cheyenne K20 Restore
Lookin good! Did you rebuild the transfer case yourself? If so, how difficult was it? I'd like to do mine, but not sure what I'd be getting into.
These pics are from my 70 k20 with the np205. Not sure if they'll help, but here ya go... 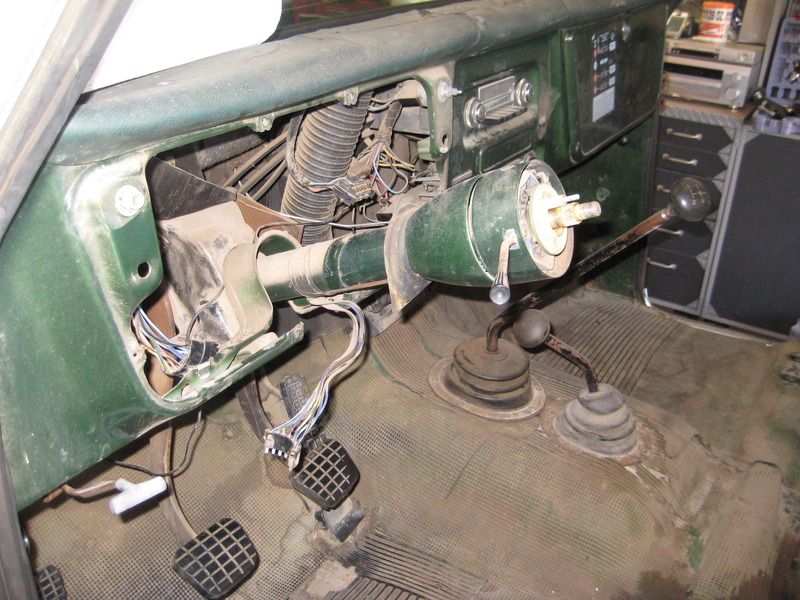 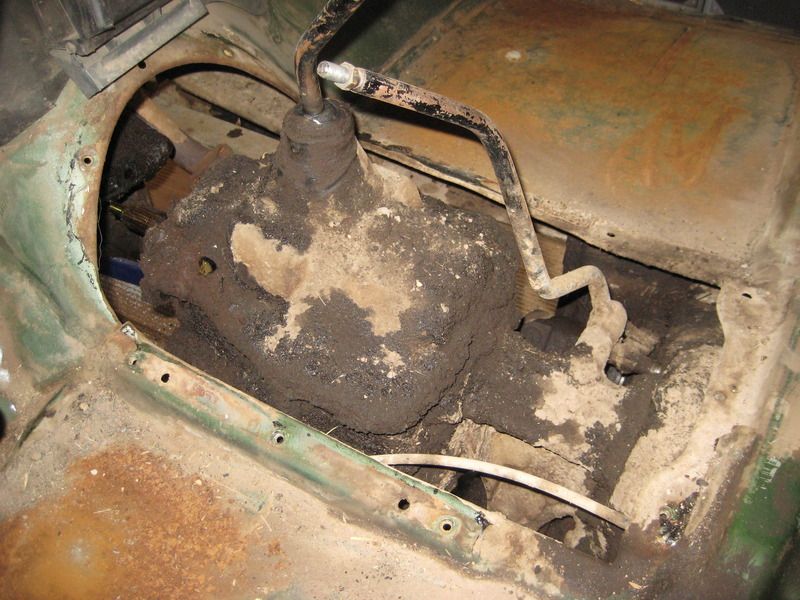
|
|
|
|
|
10-15-2015, 01:15 AM
|
#37 | |
|
Registered User
Join Date: May 2015
Location: San Luis Obispo, CA
Posts: 52
|
Re: Project: 72 Cheyenne K20 Restore
Quote:
Yes.. I did rebuilt it myself, It was pretty strait forward. But I have rebuilt gear boxes in the past. I will say that I did have to use a 3/4" drive impact gun to remove the Yoke nuts and the center idler shaft nut. I'm also glad that I did it at my friends shop, one because my tools are in storage, and two he had a 3/4" drive impact and a Large set of Snap Ring pliers which are needed as well.. I purchased this kit: http://transpartswarehouse.com/index.../bk205gdm.html (there maybe better ones out there) Be careful not to damage the small "freeze plugs" (#10 in the pic) that cover the roll pins (#23), as this kit does Not come with replacements. It also doesn't come with any info on "What's-What", this where the exploded view will come in handy. I also used an exploded view of the NP205, the 1972 Overhaul Manual along with a few "How-To's" I found on the NET.. (see attached) I tried to attach a .pdf of the 1972 Overhaul Manual and a How-To that assembled from pics I found on the net but they're to big.. PM me your email I can email them to you.
__________________
- Steve "I was born with nothing, and I still have most of it" 1972 K20 Cheyenne: http://67-72chevytrucks.com/vboard/s...d.php?t=671873 |
|
|
|
|
|
| Bookmarks |
|
|


 Linear Mode

