
|
|
|
 08-11-2013, 08:37 PM
|
#1 |
|
Registered User
Join Date: May 2005
Location: Hendersonville, TN
Posts: 134
|
Time for some floors
One of the issues I want to address before winter is fixing the big holes in the floor pan. The truck had reasonable carpet, and I wouldn't have found them except for the brown recluse sighting when I first brought her home. 7 years in a barn brings unwanted guests.
 Mostly bad toward the hump: 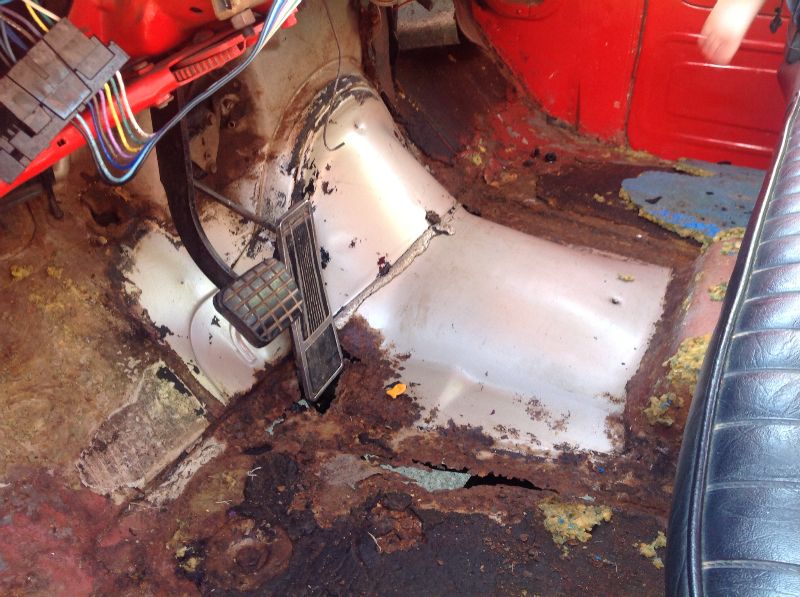 The normal rust spot by the rockers has been repaired in the past with some plates of steel and silly putty. It's good enough I can put a floor pan in, go almost to the rocker, and next summer pull the normal parts and replace them. I hope to have more than normal stability when I do this by not having to do it all at once. I know it duplicates work....but I don't have much of a shop, and driving season is fast on us... Past the point of no return: 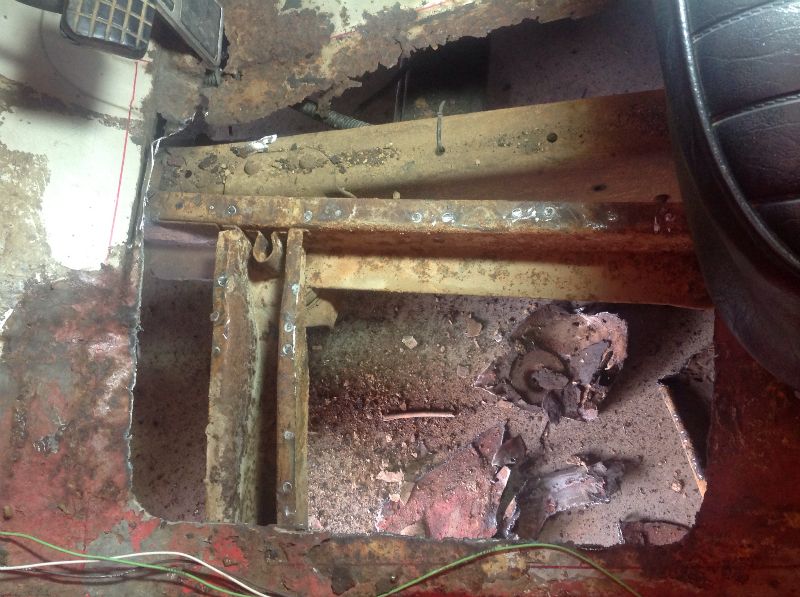 That was the initial first cut, then I'll get closer. I'm hoping all those videos I watched on youtube have me ready for this  Like some of the other floor pans out there, the bolt hole for the cab support was off by 3/4" diagonal. Odd. I think my front cross member looks original, so who knows. A little fingernail polish on the end of the pointy bolt up from the bottom, and a nice mark for how far off it is: 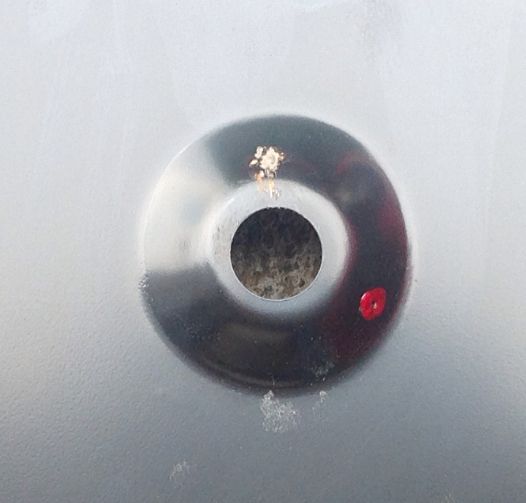 Looks better on my wife on a Friday night... A little geometry and a plasma cutter 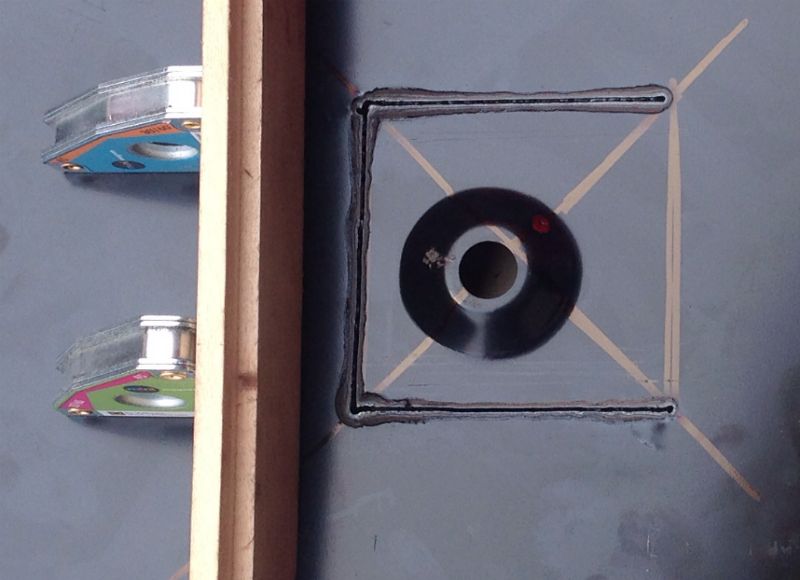 Flip it on the axis and bingo 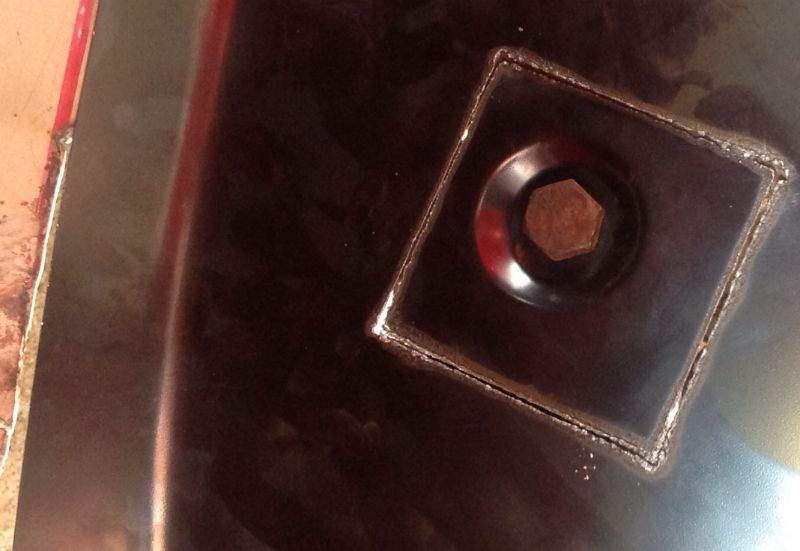 Mostly cut in and ready for a fabbed piece under the pedal 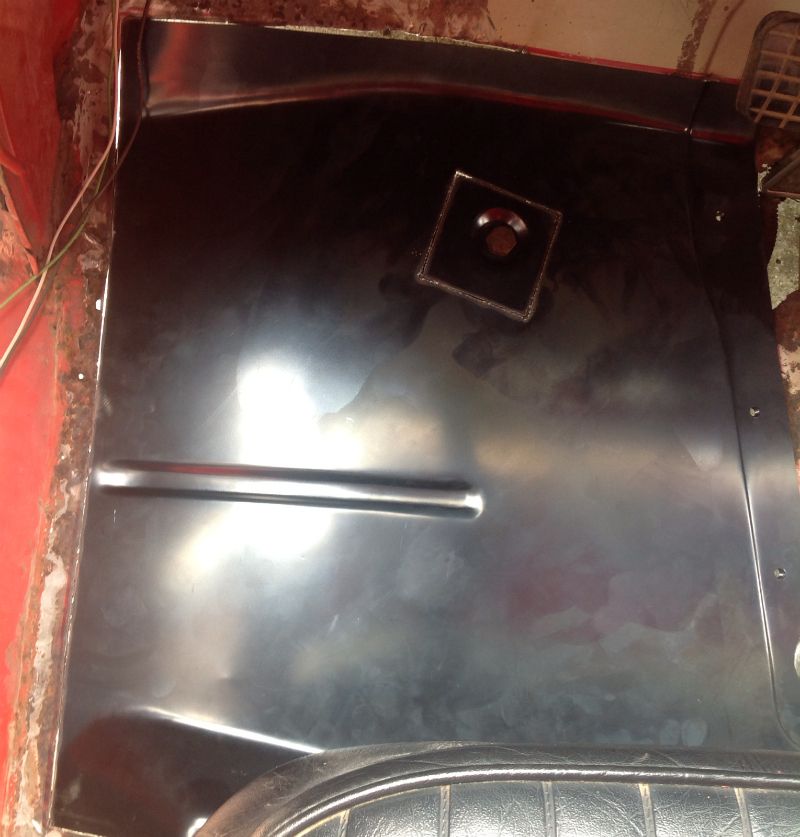 I hope I can weld. Posted via Mobile Device Posted via Mobile Device |

|

|
|
09-03-2013, 07:47 AM
|
#2 |
|
Registered User
Join Date: May 2005
Location: Hendersonville, TN
Posts: 134
|
Glad that's done...
OK so this metal repair thing is a bit addictive, even though I'm not so good at it. Disclaimer before sharing, my welding stinks. My welds are fat and ugly. But my grinder worked, so I suppose I'll get better...
From this: 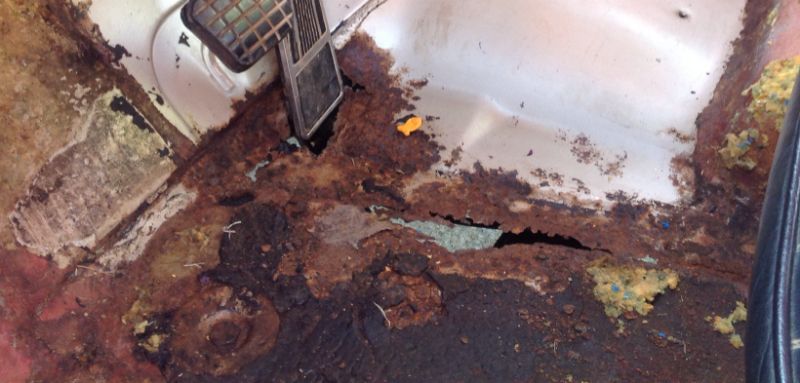 To this: 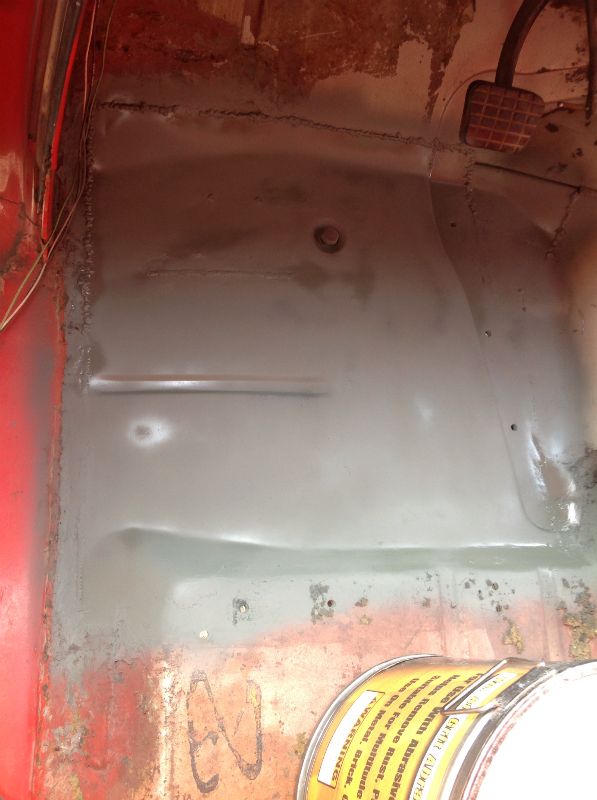 I smoothed the welds on the seat side, but not on the firewall side. That will have to come later. Had to fab up an under gas pedal piece, didn't seem so simple since it had multiple compound angles. I used some cardboard to figure the shape, then bent and welded it. It actually turned out okay. 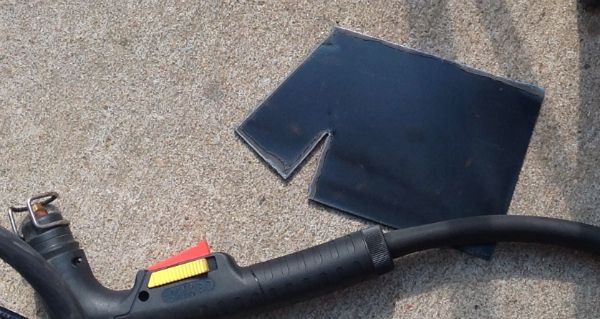 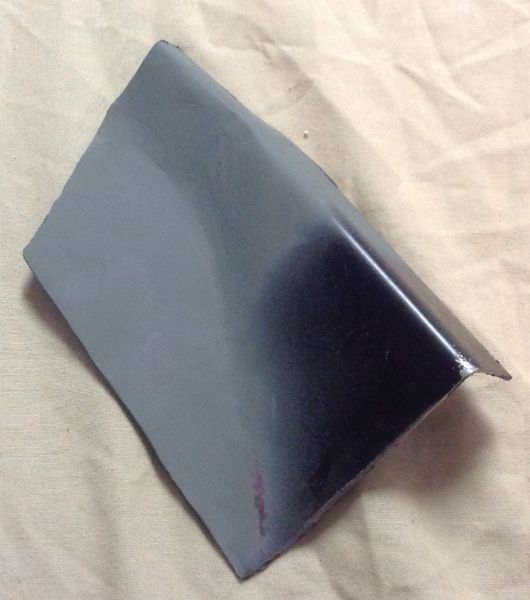 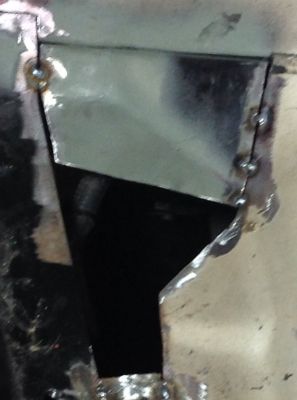 So I'm back rolling, just in time for driving season...Passenger's side isn't quite as bad, and will have to wait for next summer. DNR=0 Posted via Mobile Device Posted via Mobile Device |
|
|
|
|
07-31-2013, 11:47 PM
|
#3 |
|
Registered User
Join Date: Jun 2013
Location: Mesa AZ
Posts: 39
|
Re: Project TN 20
Nice looking truck. I had a yellow/white 65 which I should have kept. What is the 20' rule?
|
|
|
|
|
08-01-2013, 07:15 AM
|
#4 | |
|
Registered User
Join Date: May 2005
Location: Hendersonville, TN
Posts: 134
|
Re: Project TN 20
Quote:
20' rule is that it looks good from 20'. The closer you get the worse it gets. I would love to have a full frame off restore with perfect paint like a lot of the guys on the board, but my kids are just too small. Tricycles running into things, small objects getting launched about and what not. Posted via Mobile Device |
|
|
|
|
|
09-03-2013, 08:11 AM
|
#5 |
|
Registered User
Join Date: Dec 2012
Location: Rochester, KENT
Posts: 10,489
|
Re: Project TN 20
Complex pieces keep it interesting.
Well done. Posted via Mobile Device
__________________
MY BUILD LINK: http://67-72chevytrucks.com/vboard/s...585901]Redneck Express - 1966 C10 Short Fleetside MY USA ROADTRIPS http://forum.retro-rides.org/thread/...2018-humdinger IF YOU CAN'T FIX IT WITH A HAMMER, YOU'VE GOT AN ELECTRICAL PROBLEM MATE. |
|
|
|
|
09-03-2013, 09:46 AM
|
#6 | |
|
Registered User
Join Date: May 2005
Location: Hendersonville, TN
Posts: 134
|
Re: Project TN 20
Quote:
|
|
|
|
|
|
09-28-2013, 09:34 PM
|
#7 |
|
Registered User
Join Date: May 2005
Location: Hendersonville, TN
Posts: 134
|
Gotta have tunes...
I thought I could get by for a year or so listening to the sound of the engine until I could do a proper stereo. Plans are for a Kenwood touchscreen in a custom modified dash, amp, subwoofers, custom kick panels. But no, I can't wait.
 So I rummaged through the closet and pulled out a vintage 90's CD player, and some 6x9's in a box. Working in an electronics factory I'm a bit particular about my wiring. I like to put in a disconnect, solder all wires, and heat shrink. Also I tend to put strain reliefs in so the wires don't fatigue at the solder joint (ask me how I learned that). 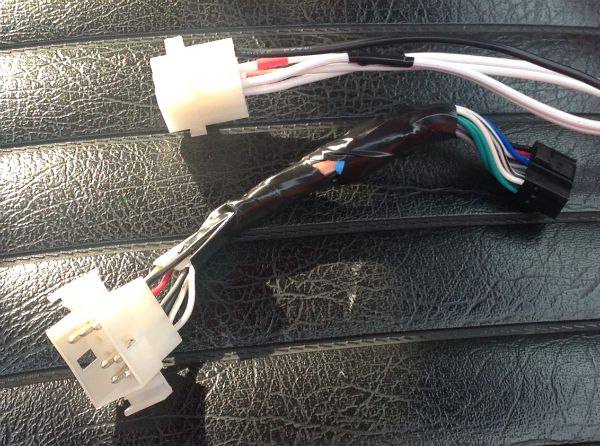 Kenwood stereo connector and vehicle side connector. This allows changing stereos without cutting and soldering inside the vehicle, quite a pain.  Connected to vehicle side connector, ground wire to right, speaker wires snaked under carpet to left, old school. 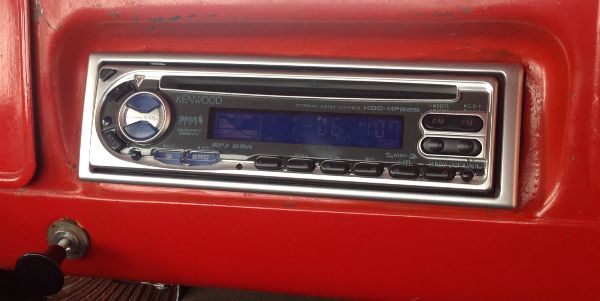 Dash was already hacked for some krappy kraco I threw away day 1, so no foul putting this guy in. 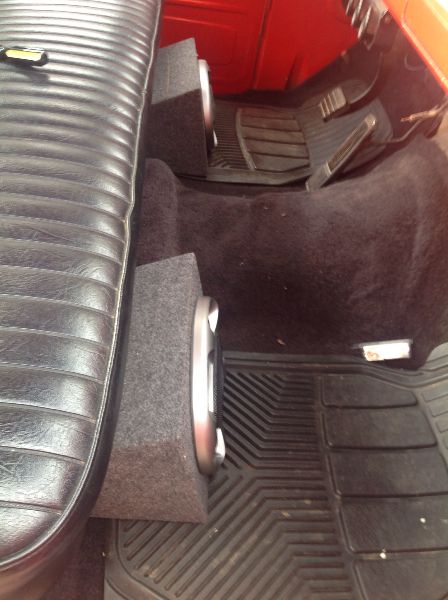 That is so redneck, but my doors are not cut, and I'm not ready to build kick panels yet. 2 hours and I have tunes. A bit redneck, but worth it.  Posted via Mobile Device Posted via Mobile Device |
|
|
|
|
10-02-2013, 04:41 PM
|
#8 |
|
Registered User
Join Date: May 2005
Location: Hendersonville, TN
Posts: 134
|
Paint Job
I take this to mean the family is not quite ready for a slick paint job...
 Posted via Mobile Device |
|
|
|
|
11-28-2013, 08:28 PM
|
#9 |
|
Registered User
Join Date: May 2005
Location: Hendersonville, TN
Posts: 134
|
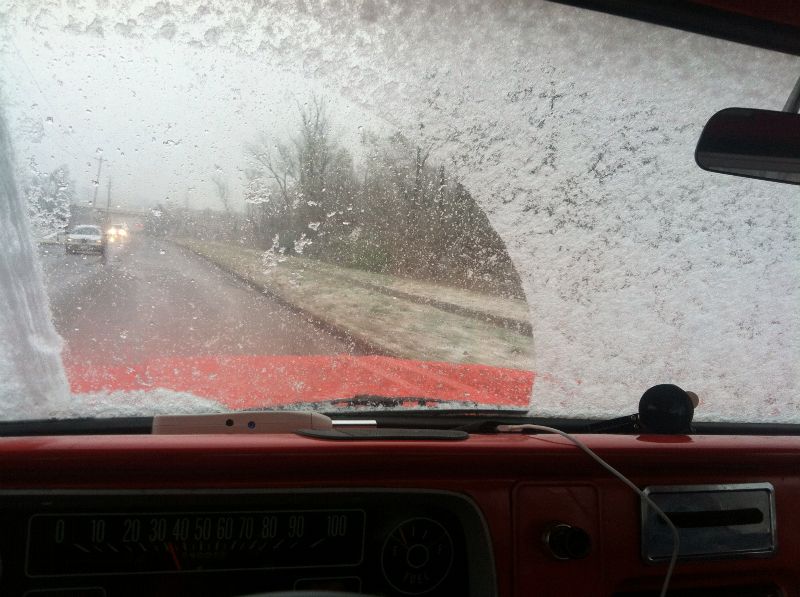
Time to fix...
Ah dang. I guess it's time to fix the other windshield wiper...
|
|
|
|
|
11-29-2013, 09:02 AM
|
#10 |
|
Registered User
Join Date: Sep 2012
Location: Midway, NC
Posts: 3,275
|
Re: Project TN 20
Cool truck. Funny about the windshield wipers. Years ago I was headed up to Wytheville VA for a dirt race. Was dark as crap and raining to beat the band. We got into the mountains and the windshield wiper on the passenger side took a dump and left. Used an old sock and some tape to keep it from scratching up the windshield. Crazy times. That was jus the beginning.
__________________
http://67-72chevytrucks.com/vboard/s...d.php?t=581873 The low buck build threads. Check'em out! http://67-72chevytrucks.com/vboard/s...d.php?t=666022 My build thread Crossmembers CC |
|
|
|
|
11-29-2013, 07:16 PM
|
#11 | ||
|
Registered User
Join Date: May 2005
Location: Hendersonville, TN
Posts: 134
|
Re: Project TN 20
Quote:
Quote:
|
||
|
|
|
|
12-13-2013, 10:33 PM
|
#12 |
|
Registered User
Join Date: May 2005
Location: Hendersonville, TN
Posts: 134
|
Tighten up the steering
Steering has been sloppy with about 30 degrees of slop since I've had her. So I set out to right that a few weeks ago. When one of the wee ones was jerking about on the steering wheel I notice the pitman arm was shot. I assumed that would fix it. Not so much. So I decided to work on tightening down on the steering box, no luck. Then I checked the rag joint. The nut wasn't tightened down and it was just slipping til it caught.
 Could have easily ended up wrapped around a tree... 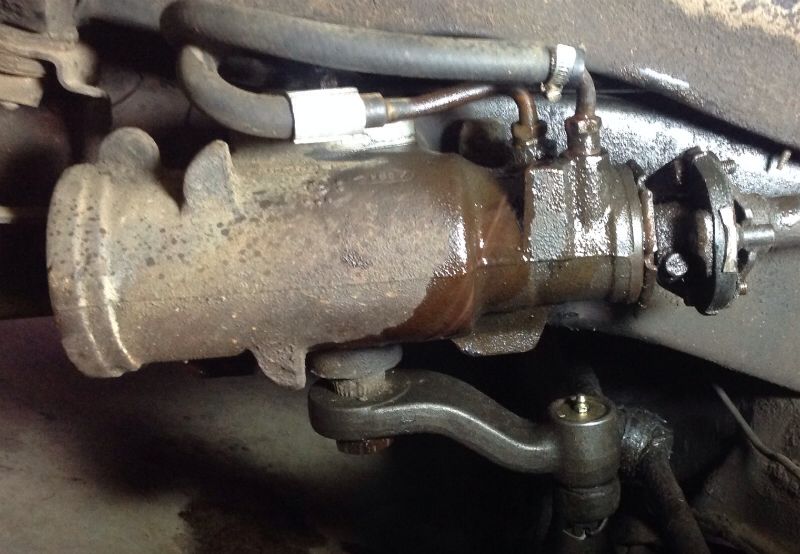 I decided to also replace the steering box, as it was leaking. It took a lot of searching, but the replacement part I found was at O'Reilly's, part # 27-7501. Now she is nice and tight. |
|
|
|
|
12-13-2013, 10:50 PM
|
#13 |
|
Registered User
Join Date: May 2005
Location: Hendersonville, TN
Posts: 134
|
And Time for Heat
A bit past chilly these days in Tennessee, and don't want DHS called with me taking the little ones to school with no heat...Heat exchanger was leaking, and motor blown. Hoses were not even attached. So time for a rebuild.
I did the vinegar soak in a big Walmart tub, took 5 days and nicely ate the rust off the heater box. Don't put the middle piece in, or not in for long...don't ask me how I know, but it's not all steel and vinegar will eat more than the rust away. So I had to contact Tony at 4-5-6 trucks and he shipped me a replacement for $45, and in a rush so I had it for Thanksgiving weekend to rebuild. Here are the parts soaked, cleaned, primed, and painted: 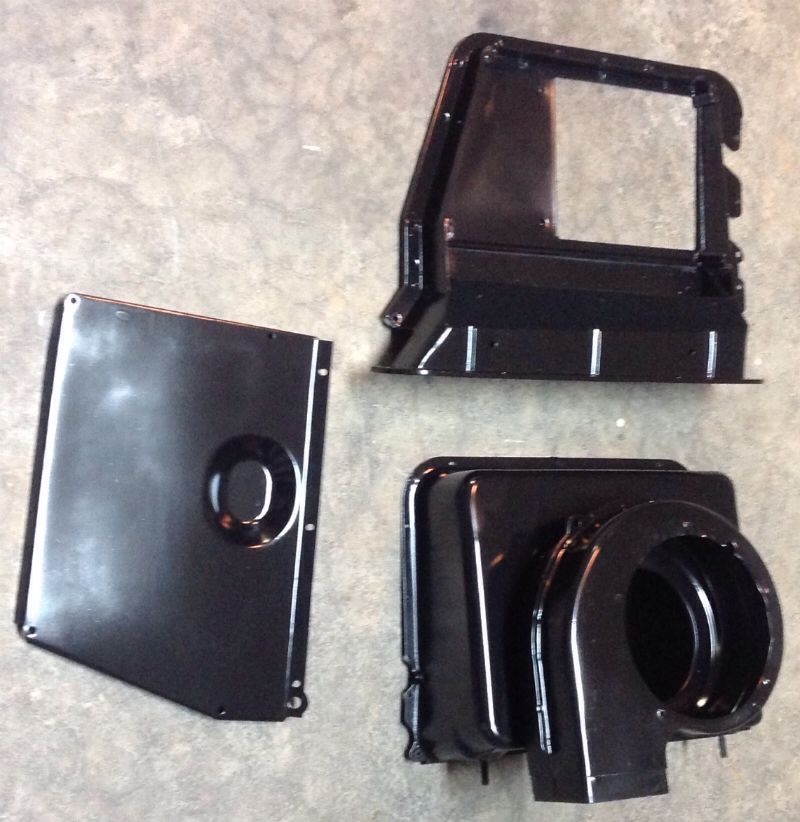 Used some gasket material I bought at Autozone for the gaskets: 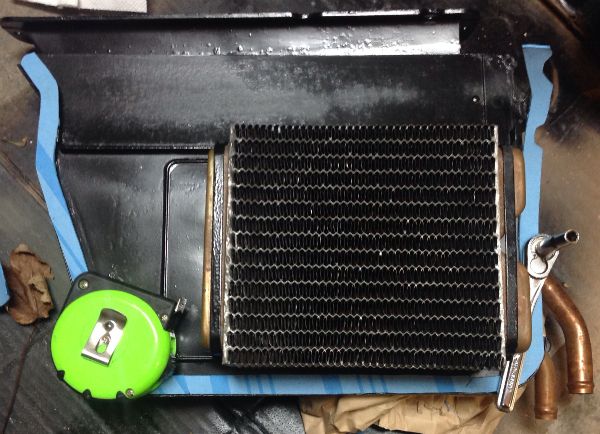 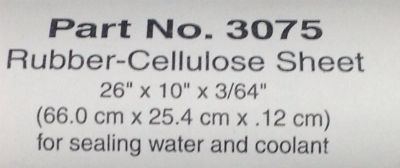 Oldest boy helped me put it together. 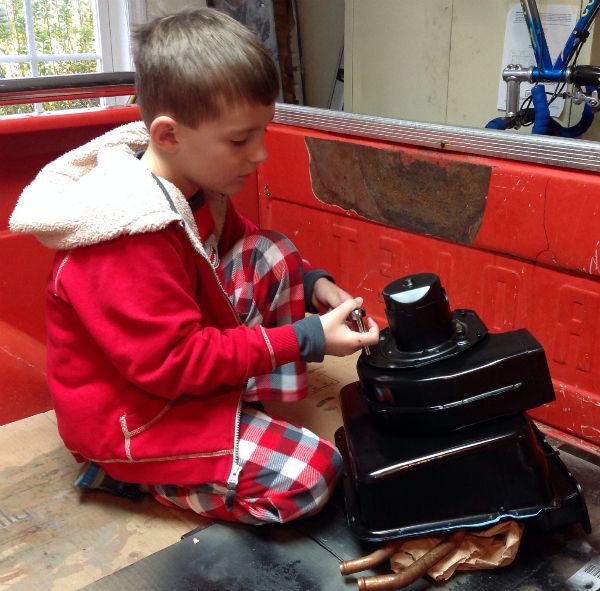 Replacement motor and fan from LMC. |
|
|
|
|
12-22-2013, 07:27 AM
|
#14 |
|
Registered User
Join Date: May 2005
Location: Hendersonville, TN
Posts: 134
|
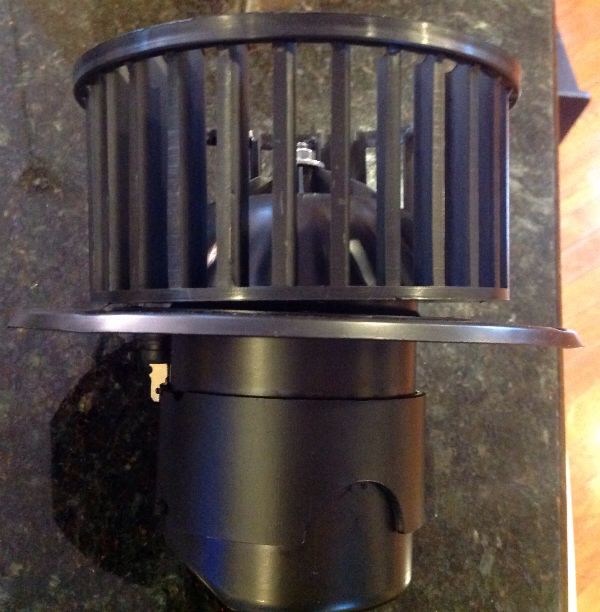
Way underwhelmed with the quality of the blower fan...
 Look at the warp. It was so bad it rubbed either on top or bottom depending on how I centered it. I had to trim the fins on the the top to get it to stop. |
|
|
|
|
12-22-2013, 09:23 AM
|
#15 | |
|
Registered User
Join Date: Sep 2012
Location: Midway, NC
Posts: 3,275
|
Re: Project TN 20
Quote:
Yeah that's a beautiful place. Great progress on the truck.!
__________________
http://67-72chevytrucks.com/vboard/s...d.php?t=581873 The low buck build threads. Check'em out! http://67-72chevytrucks.com/vboard/s...d.php?t=666022 My build thread Crossmembers CC |
|
|
|
|
|
02-08-2014, 10:16 PM
|
#16 |
|
Registered User
Join Date: May 2005
Location: Hendersonville, TN
Posts: 134
|
Time for a glove box
My ultimate idea for a glove box is to build a metal one like Rian, but I got tired of waiting for myself to do it. So I thought I would try my hand at a cardboard reproduction, seeing that the wife had bought herself something nice in a box, I thought the box could be a glove box for me so I could get my money's worth....
I started with what was left of the one that came with it 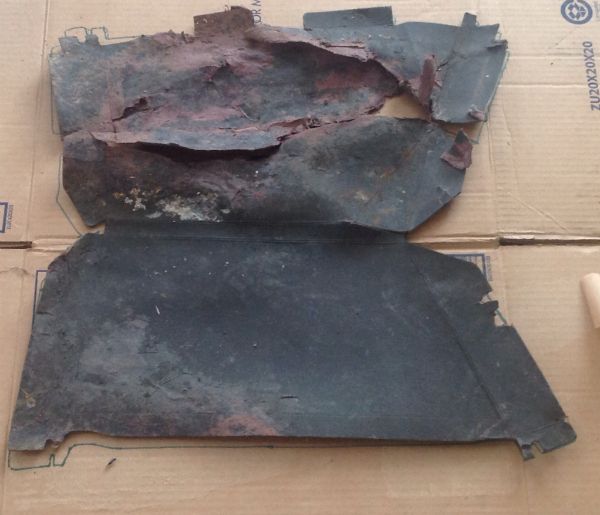 Then I traced it 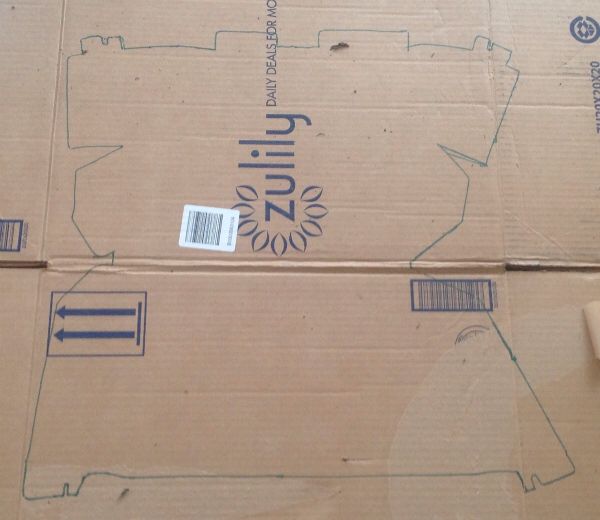 A box cutter and a hot glue gun 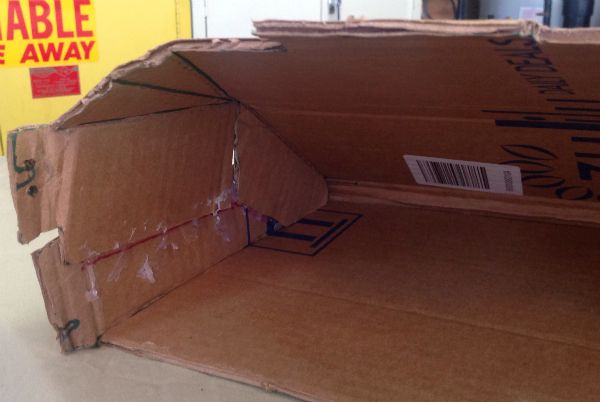 I picked up some rugged fabric at W*lm*rt and some spray tac. Good old duct tape to re-inforce around the attachment points, and I began to glue pieces in 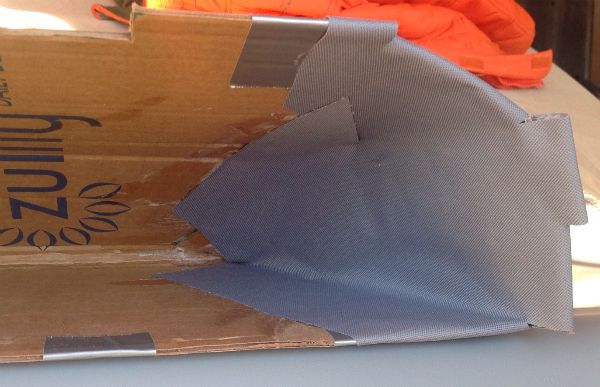 This part is a lot harder than I expected, I began to tac in a small section, then peel back the fabric and spray once it was in place. The final product is not bad at all, the pic makes it look wrinkled, though it only has a few "not perfect" bits. I think if I did a second one it would be more close to professional, but it is quite usable and up to most folks standards. The light on the left is an LED board that we make at my work, I'll have to find a circuit to tie it in to so it lights up at an appropriate time. I also poked a hole for an iP*d wire to go through 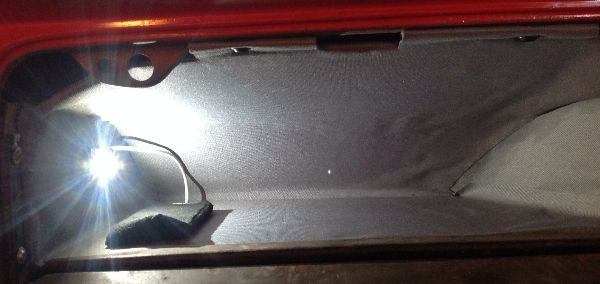
|
|
|
|
|
05-07-2016, 06:08 AM
|
#17 |
|
Registered User
Join Date: May 2005
Location: Hendersonville, TN
Posts: 134
|
Brakes...again
Been a while. Mostly for the last two years I've been driving the truck, no projects. Then a few weeks ago on the way down the (steep) driveway, I realized my front brakes were out completely, and my rear brakes couldn't hold the truck. Oh - and I hadn't hooked up that e-brake thing yet. One has to keep calm, so I managed to get her to a stop after getting down the drive and onto the flat.
Here is what I found when I got her on the lift, the proportioning valve had been mounted at the frame below the master cylinder. Unfortunately the PO mounted it where one of the front lines was laying on the frame, and with time it rubbed through: |
|
|
|
|
12-21-2013, 09:44 PM
|
#18 |
|
Registered User
Join Date: Sep 2012
Location: jackson,tn
Posts: 188
|
Re: Project TN 20
Working on same parts you are here .middle son got aggregated with heater box and fan did not come out fast enough for him bahahahah
|
|
|
|
|
12-22-2013, 07:51 AM
|
#19 | |
|
Registered User
Join Date: May 2005
Location: Hendersonville, TN
Posts: 134
|
Re: Project TN 20
Quote:
 Nothing teaches patience like an old truck! Nothing teaches patience like an old truck!
|
|
|
|
|
|
05-07-2016, 07:28 AM
|
#20 |
|
Registered User
Join Date: Mar 2005
Location: Fairfield Maine
Posts: 1,759
|
Re: Project TN 20
Good save, glad to see you back!!!
|
|
|
|
|
05-08-2016, 06:30 PM
|
#21 |
|
Registered User
Join Date: Sep 2012
Location: Midway, NC
Posts: 3,275
|
Re: Project TN 20
Glad to see you made it safe.
__________________
http://67-72chevytrucks.com/vboard/s...d.php?t=581873 The low buck build threads. Check'em out! http://67-72chevytrucks.com/vboard/s...d.php?t=666022 My build thread Crossmembers CC |
|
|
|
|
05-17-2016, 10:29 PM
|
#22 |
|
Registered User
Join Date: May 2005
Location: Hendersonville, TN
Posts: 134
|
Brake Upgrade Round 2
My plan is to replace booster/master cylinder, all lines that have not already been replaced, and replace front calipers. After some research, it looks like the current booster/master cylinder is from a '72 Impala, which is a decent choice. A rebuild unit was available from O'Reilly's for a decent price, so I grabbed one of those.
PO chose to drill out 4 large sloppy holes to mount the booster: 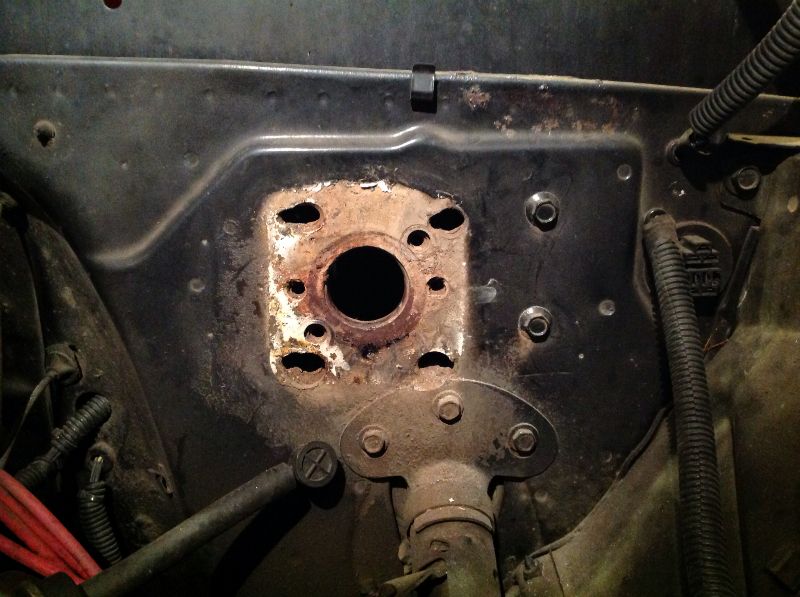 The 4 clean looking holes in the middle are the original threaded holes. I plan a hydraulic clutch setup in the future, and would like a cleaner mounting method, so I purchased a bracket and clutch master cylinder setup from CaptainFab http://www.67-72chevytrucks.com/vboa...d.php?t=651200 It's a very well engineered and fabricated kit, I highly recommend it for the time savings and professional finished product you will have. I rough mounted it: 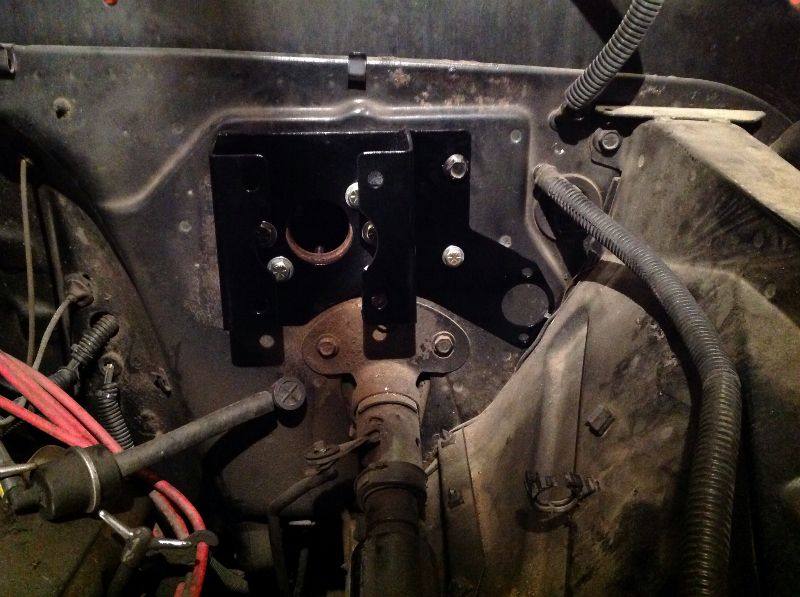 Then have 3 holes to drill. Due to the tight fit of the clutch master cylinder to the inner fender, you need an extension for your drill: 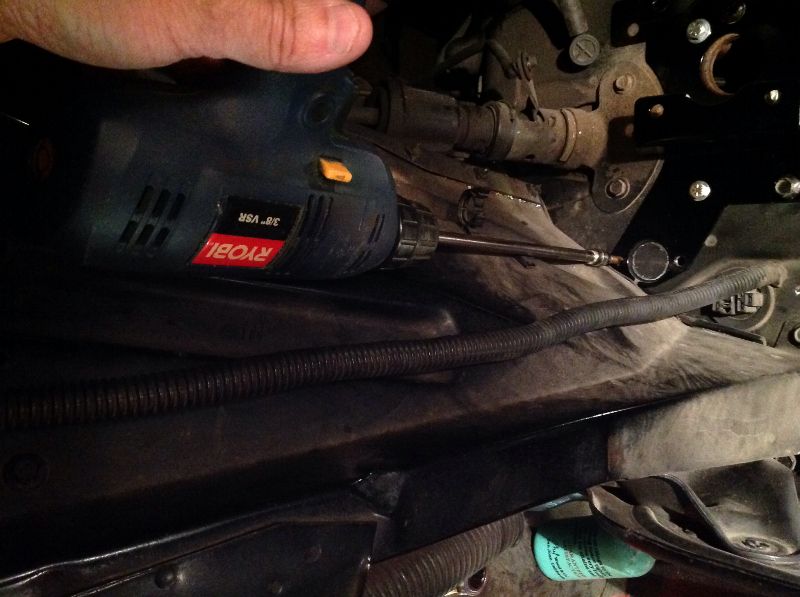
|
|
|
|
|
05-17-2016, 10:34 PM
|
#23 |
|
Registered User
Join Date: May 2005
Location: Hendersonville, TN
Posts: 134
|
Brake Upgrade Round 2
To get the larger hole centered correctly, I first traced the circle using the bracket as a template. Then I took a compass and drew a circle the same diameter as the hole, marking the center clearly. I cut out the paper and taped it to the firewall, centering it on the tracing. This gave me the center of the larger hole:
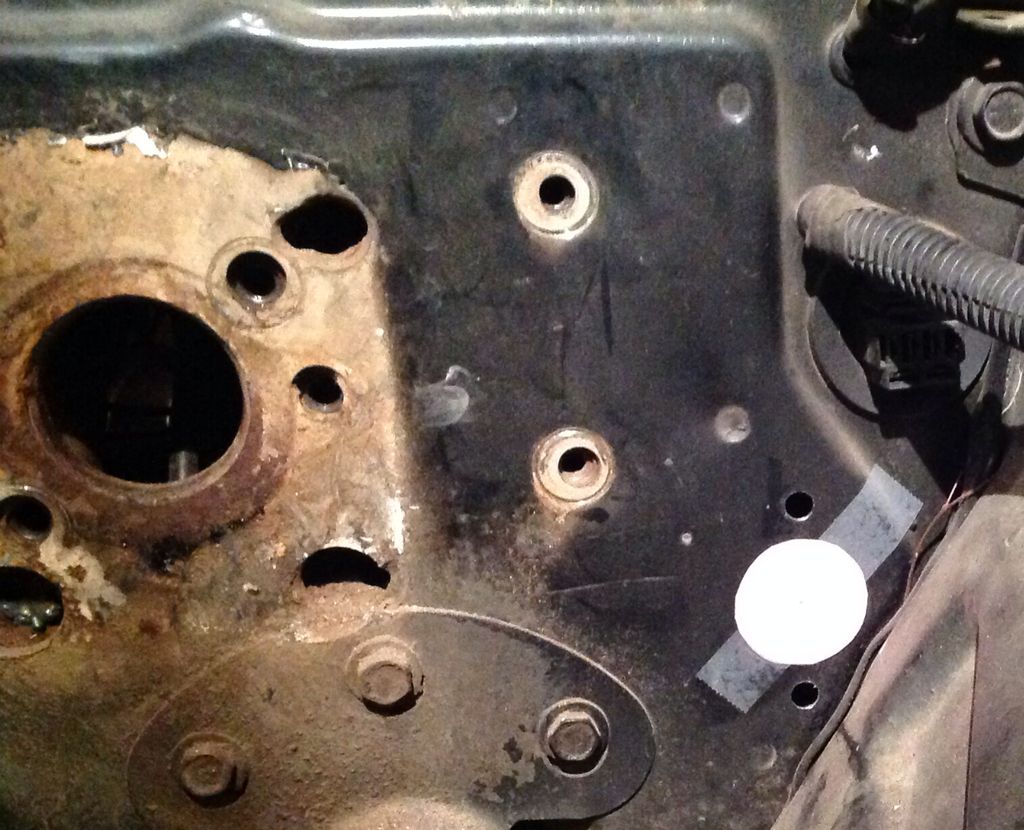 Then I drilled it with the appropriate sized hole saw. 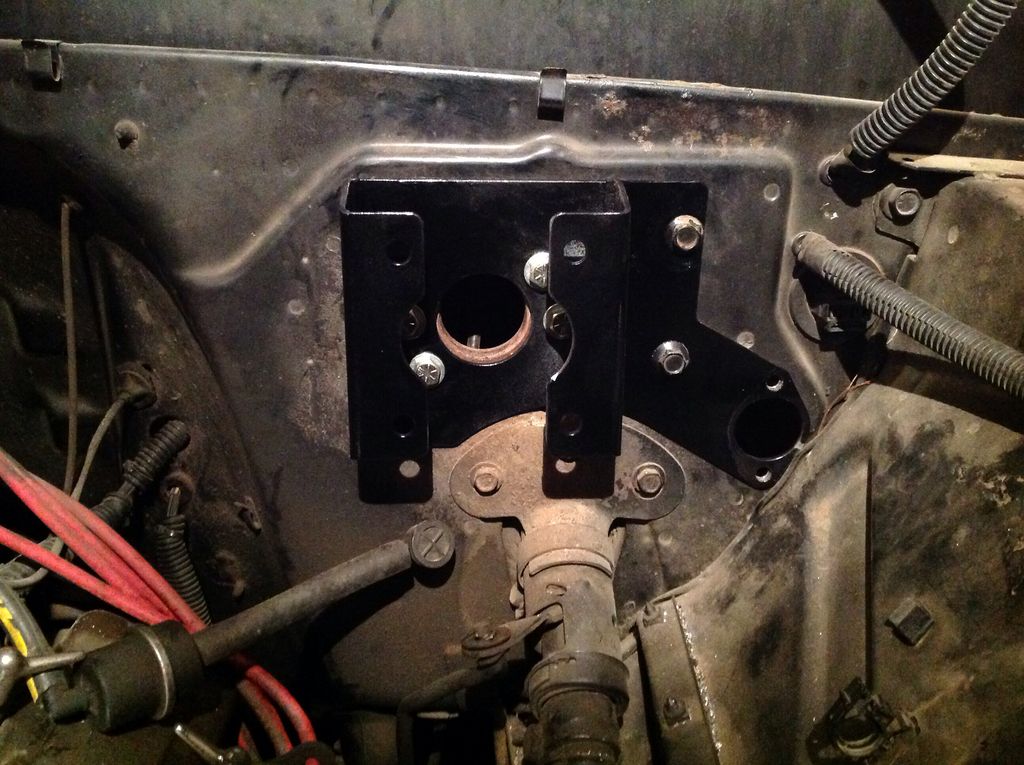
|
|
|
|
 |
| Bookmarks |
| Tags |
| driver, project, tn 20 |
|
|


 Hybrid Mode
