
|
 01-29-2013, 12:04 PM
|
#151 |
|
Registered User
Join Date: Feb 2010
Location: Hartselle, Al.
Posts: 466
|
Re: '55 International Metal/Body/Paint Work
Amazing! You repair stuff that most people don't even see and, if they did see it, would ignore.
My hat is off to you. Steven
__________________
Life is and will ever remain an equation incapable of solution, but it contains certain known factors. - Nikola Tesla Matt. 6:27 "Who of you by worrying can add a single hour to his life? http://www.67-72chevytrucks.com/vboa...=507266&page=2 |

|

|
|
01-29-2013, 12:05 PM
|
#152 |
|
Registered User
Join Date: May 2011
Location: Anderson SC
Posts: 3,870
|
Re: '55 International Metal/Body/Paint Work
The next step was to cut out the bed sides where the bed floor flange area needed replacing. The problem with that was there was a stamped section that would have to be replicated. We bought a bead roller and built a stand for it so we could remake the side panels to match the old ones. Making the replacement panels was pretty difficult since the bead is 1/4" tall and wanted to pull metal from the surrounding areas. That made for alot of distortion and it took me a few tries before I figured out how to make a useable panel. They're not perfect but they'll work.
 I started by pre-stretching the area where the offset bead would be in our english wheel so there would be less distortion after rolling the bead. 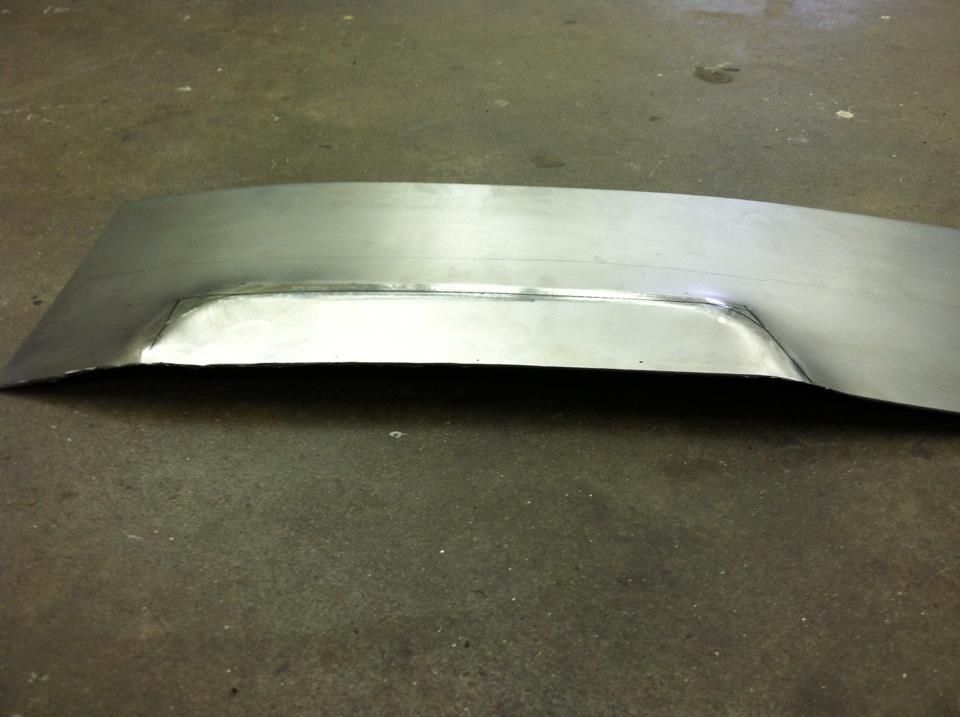 After bead rolling the panel and straightening out the warpage. 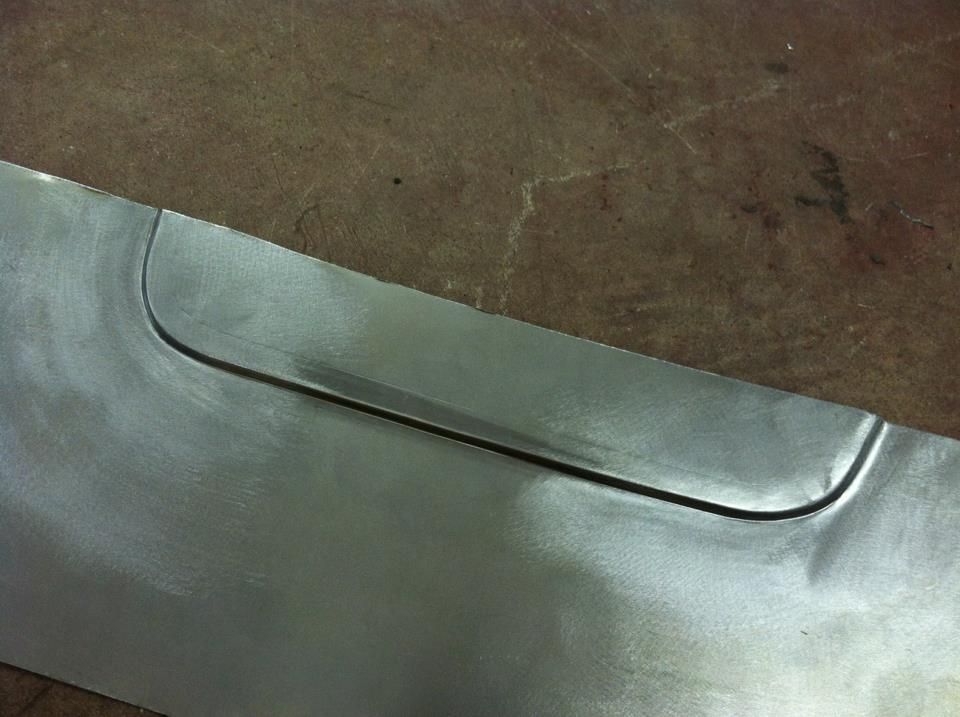 The bead roller made square edges, and the original panels had rounded edges so I used the original panel as a dolly and hammered the new panel's edges round.  Stamping details matched up, ready to cut out the old panel and weld the new one in.     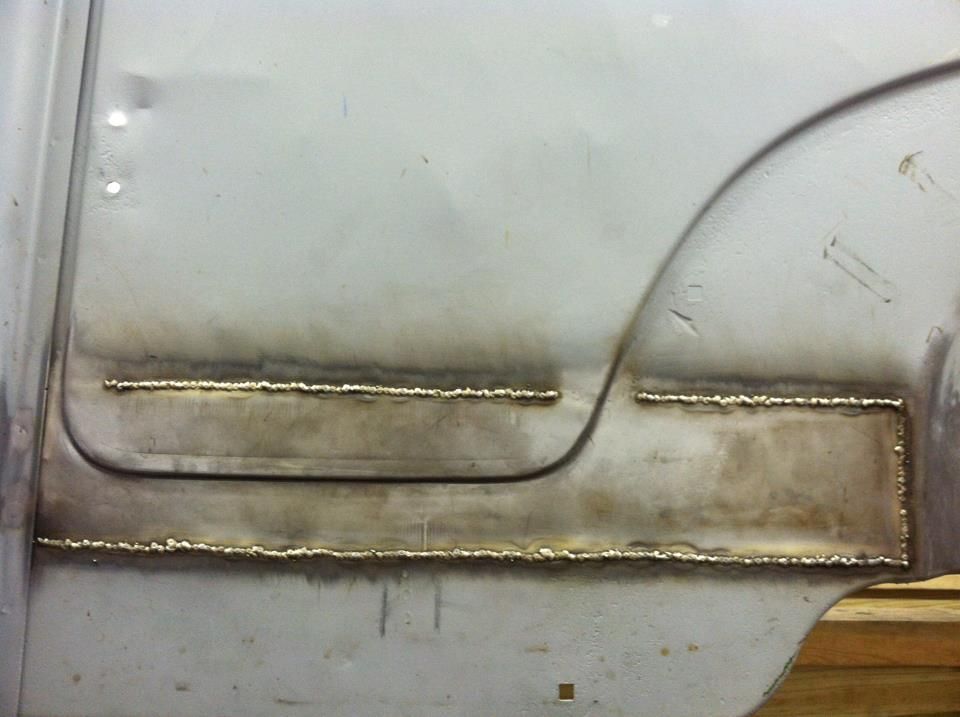
__________________
Project Goldilocks '66 C10 Short Fleet BBW Build '65 C10 Highly Detailed Stock Restoration Thread '78 Camaro Targa Roof Build '55 International Metal/Body/Paint Work '66 F100 Full Rotisserie Restoration '40 Packard 120 Convertible Coupe Restoration How To Restore and Detail an Original Gauge Cluster How To Detail Sand Body Panels, Edges, Corners, Etc |
|
|
|
|
01-29-2013, 01:27 PM
|
#153 | |
|
Registered User
Join Date: May 2011
Location: Anderson SC
Posts: 3,870
|
Re: '55 International Metal/Body/Paint Work
Quote:
__________________
Project Goldilocks '66 C10 Short Fleet BBW Build '65 C10 Highly Detailed Stock Restoration Thread '78 Camaro Targa Roof Build '55 International Metal/Body/Paint Work '66 F100 Full Rotisserie Restoration '40 Packard 120 Convertible Coupe Restoration How To Restore and Detail an Original Gauge Cluster How To Detail Sand Body Panels, Edges, Corners, Etc |
|
|
|
|
|
01-29-2013, 10:59 PM
|
#154 |
|
Registered User
 Join Date: May 2007
Location: Deale Md
Posts: 4,663
|
Re: '55 International Metal/Body/Paint Work
your a bad motor scooter ( slang )
__________________
James 63 GMC V6 4speed carryall 65 chevy swb bbw V8 auto 68 K20 327/4 speed, buddy buckets 2002 GMC CC Dually Duramax 64 GMC lwb 3/4 V6 4speed SOLD 66 GMC swb bbw buddy buckets SOLD IG duallyjams The only thing that stays the same is constant change! |
|
|
|
|
01-30-2013, 03:31 PM
|
#155 |
|
Registered User
Join Date: May 2010
Location: Shreveport, LA
Posts: 115
|
Re: '55 International Metal/Body/Paint Work
I gotta say WOW like everyone else. Great work and details and a great revival.
__________________
81 GMC C15 RC SWB 5.3L 4L80E project 
|
|
|
|
|
02-07-2013, 01:09 PM
|
#156 | ||
|
Registered User
Join Date: May 2011
Location: Anderson SC
Posts: 3,870
|
Re: '55 International Metal/Body/Paint Work
Quote:
Quote:
I had to do the same process all the way around to fix the bed sides. Right front corner, I made it in two pieces. 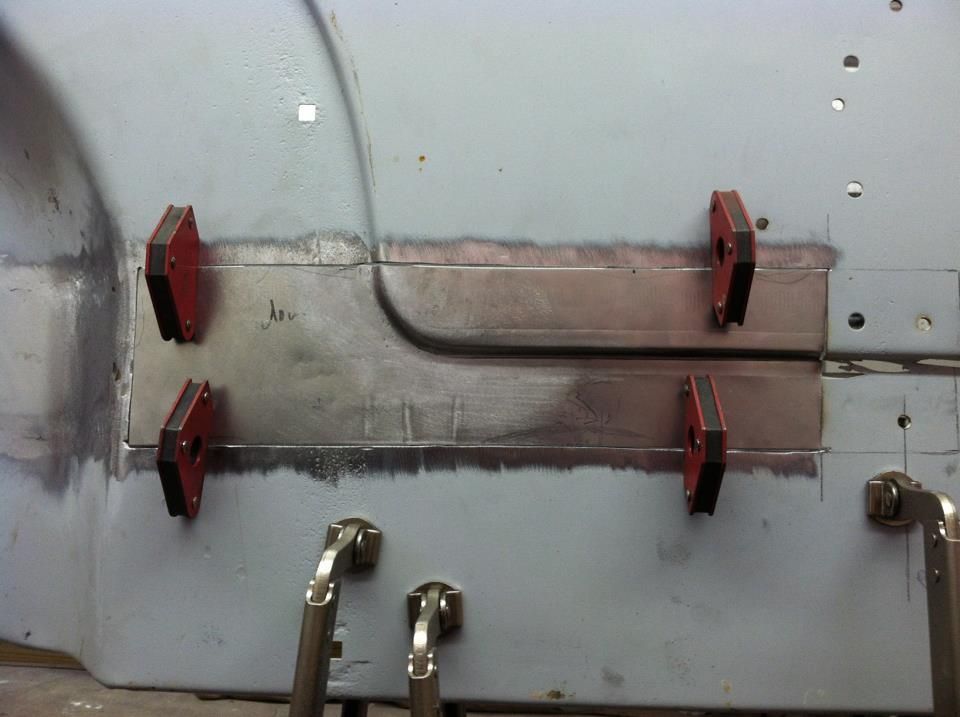  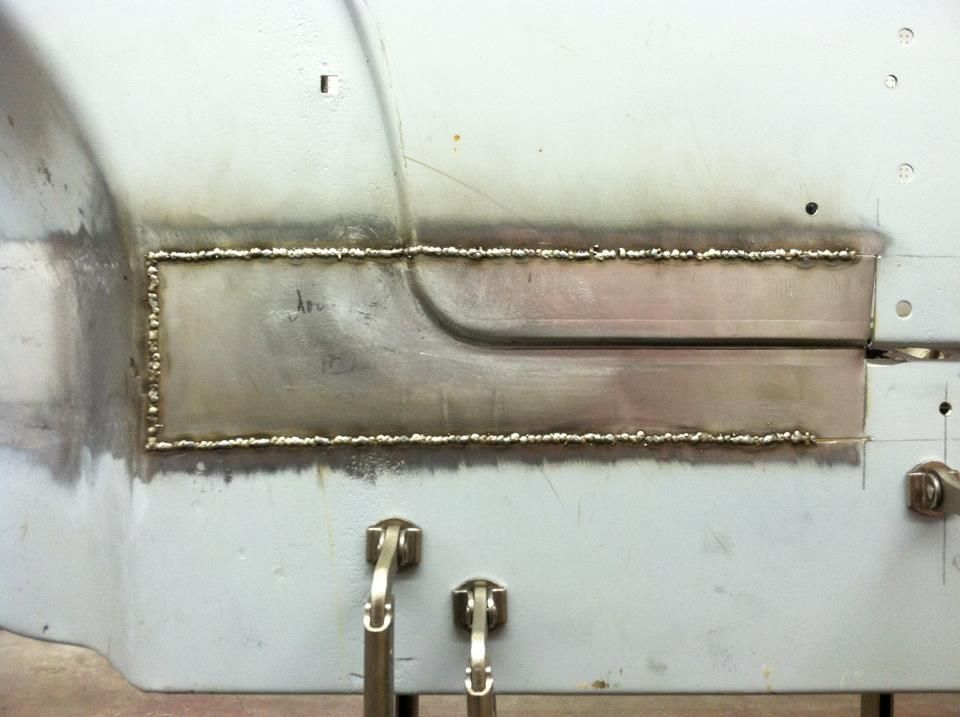 The front half was a bit more work due to the channel at the corner. I cleaned out the rust and sprayed weld thru primer on the flanges and backside of the new panel. 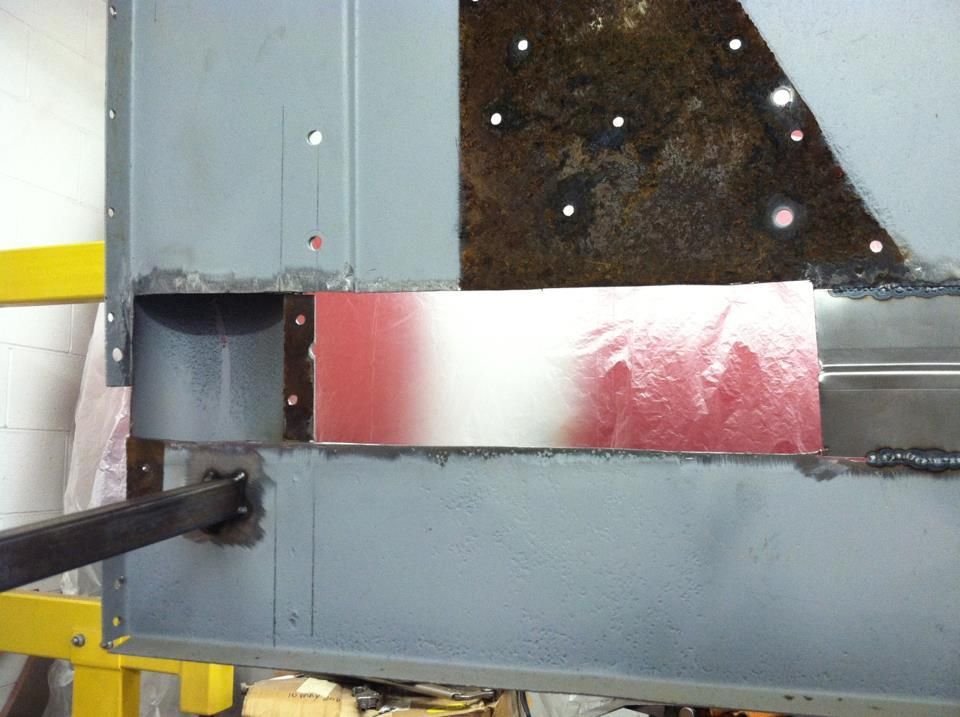  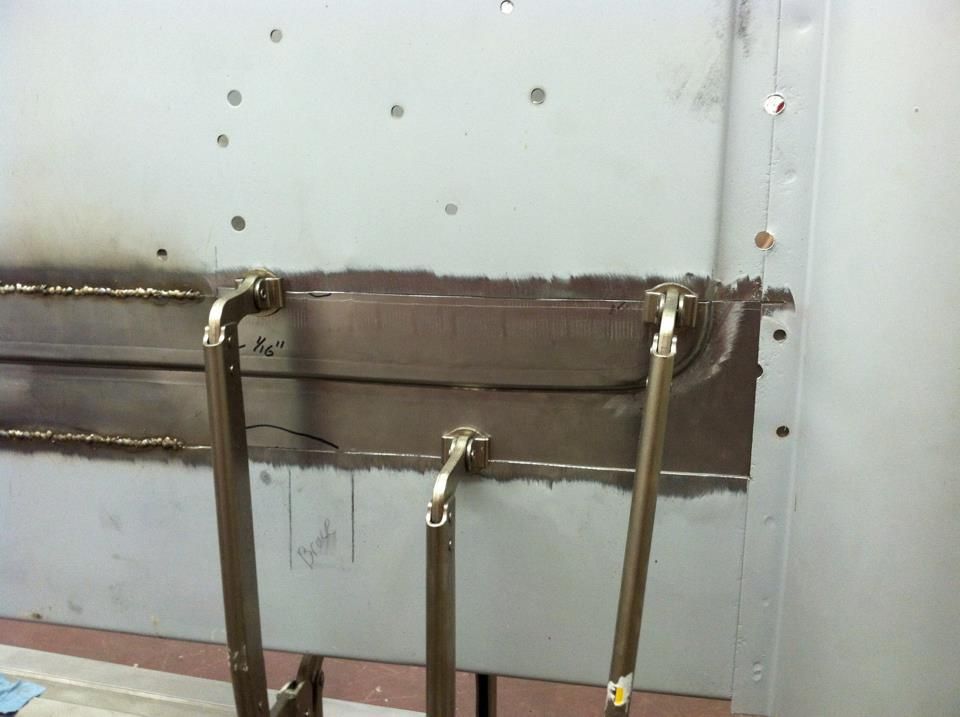 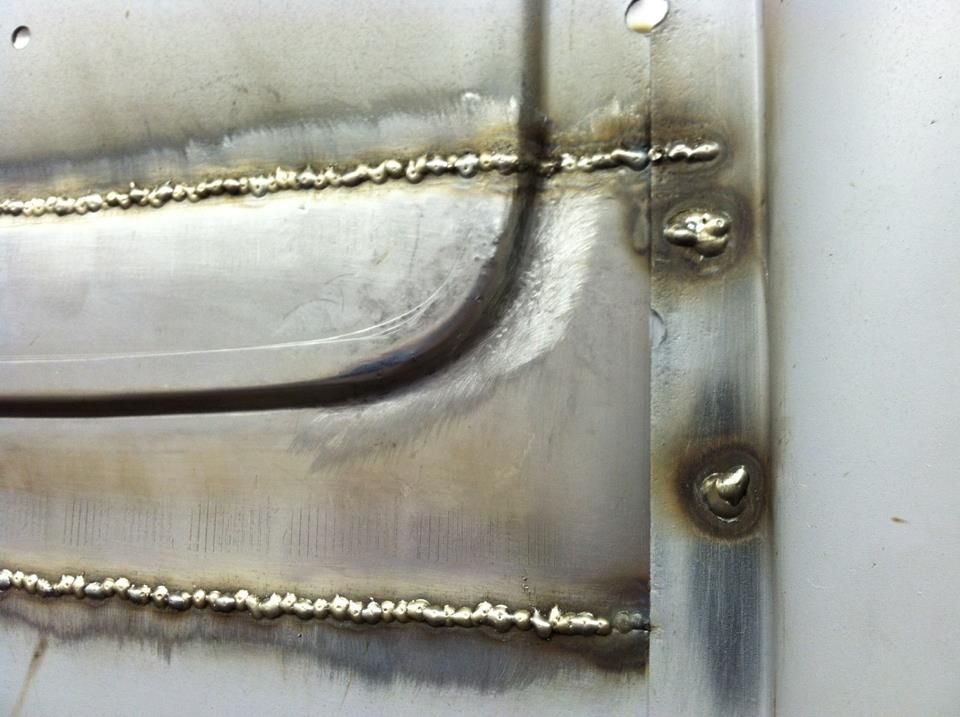 Same thing on the left front corner.  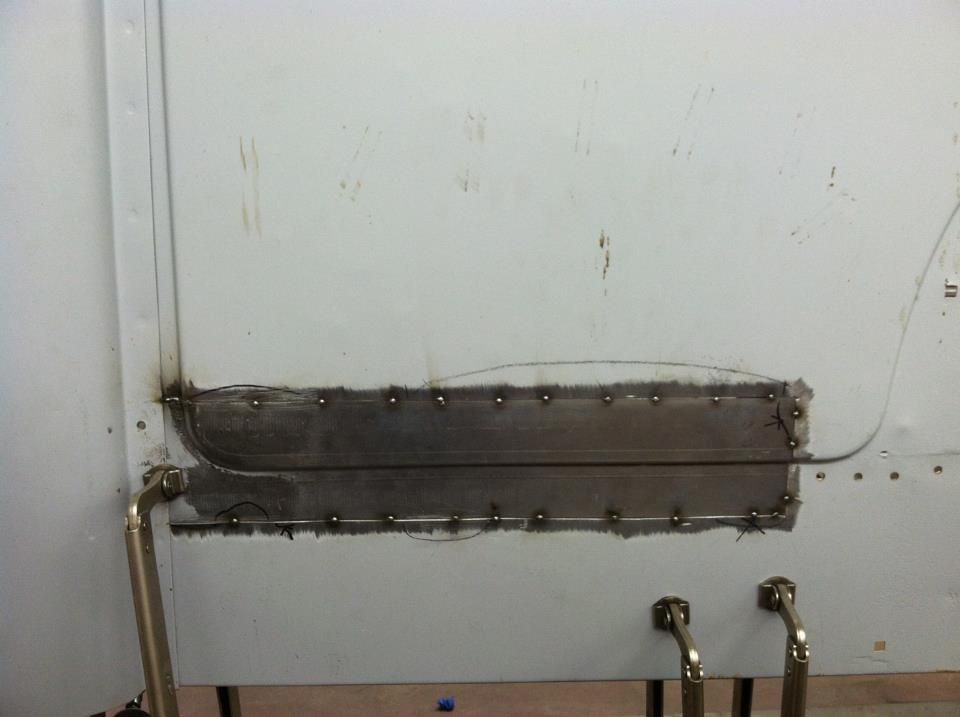 
__________________
Project Goldilocks '66 C10 Short Fleet BBW Build '65 C10 Highly Detailed Stock Restoration Thread '78 Camaro Targa Roof Build '55 International Metal/Body/Paint Work '66 F100 Full Rotisserie Restoration '40 Packard 120 Convertible Coupe Restoration How To Restore and Detail an Original Gauge Cluster How To Detail Sand Body Panels, Edges, Corners, Etc |
||
|
|
|
|
02-07-2013, 01:12 PM
|
#157 |
|
Registered User
Join Date: May 2011
Location: Anderson SC
Posts: 3,870
|
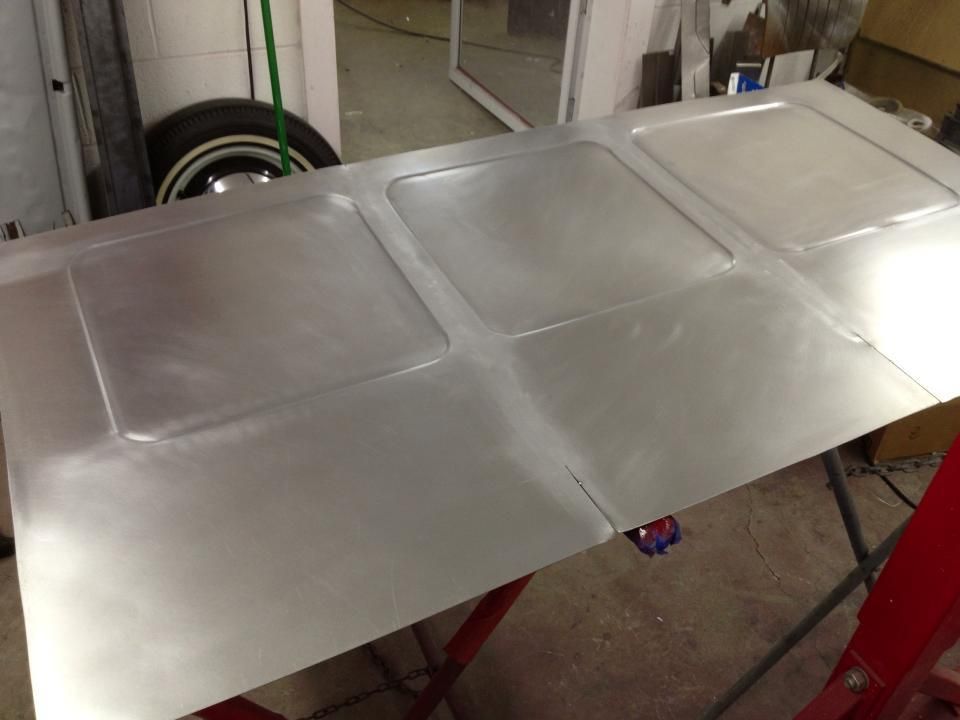
Re: '55 International Metal/Body/Paint Work
Both sides finished and welds ground down.
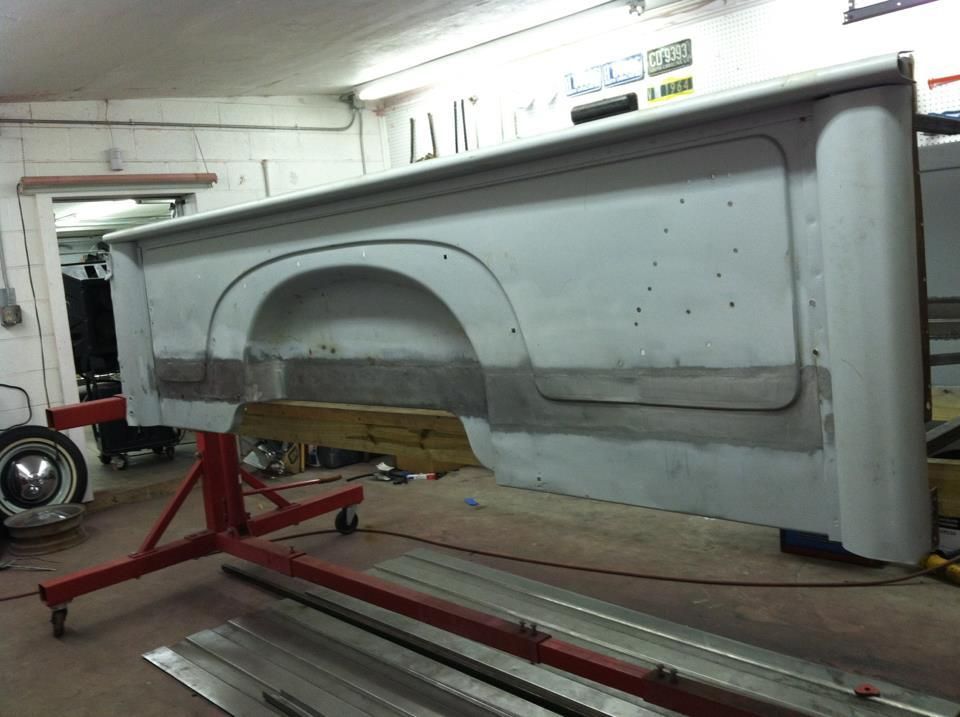 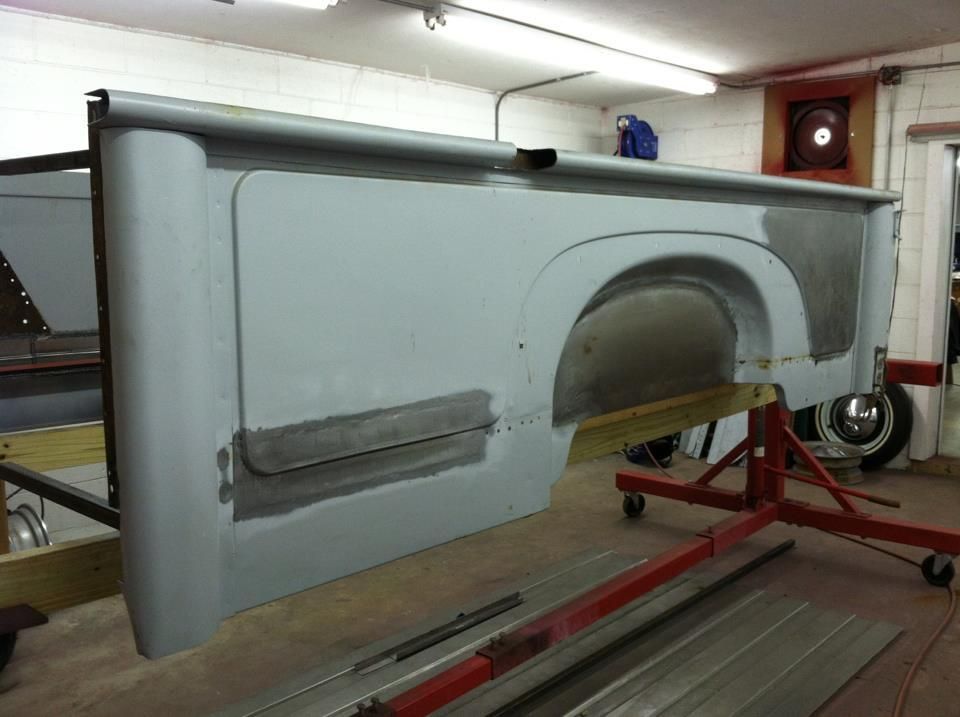 With that finished I rolled it outside and sanblasted the rusted areas.   
__________________
Project Goldilocks '66 C10 Short Fleet BBW Build '65 C10 Highly Detailed Stock Restoration Thread '78 Camaro Targa Roof Build '55 International Metal/Body/Paint Work '66 F100 Full Rotisserie Restoration '40 Packard 120 Convertible Coupe Restoration How To Restore and Detail an Original Gauge Cluster How To Detail Sand Body Panels, Edges, Corners, Etc |
|
|
|
|
02-07-2013, 01:22 PM
|
#158 |
|
Registered User
Join Date: May 2011
Location: Anderson SC
Posts: 3,870
|
Re: '55 International Metal/Body/Paint Work
The owner had a local metal shop bend up a floor that's identical to the original's stamping pattern. It wasn't wide enough the brake the edges 90* to for the spot weld flanges to attatch it to the bedsides though.
Also you can get an idea of how much grinding has been done. 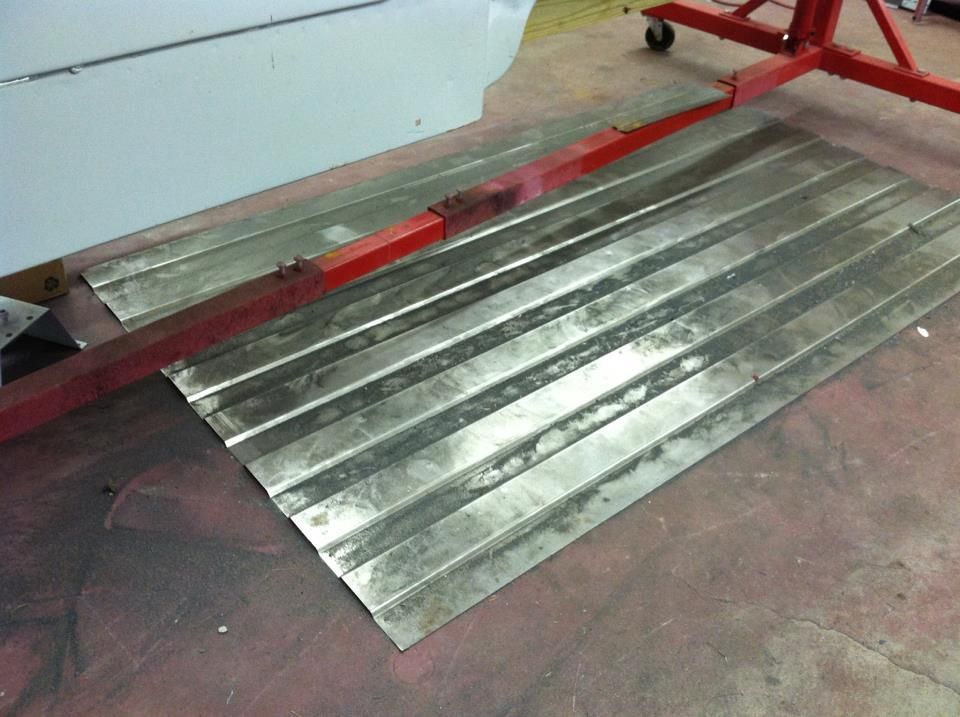 I shot some rattle can paint over the edge and scribed a cut line for the overall width. 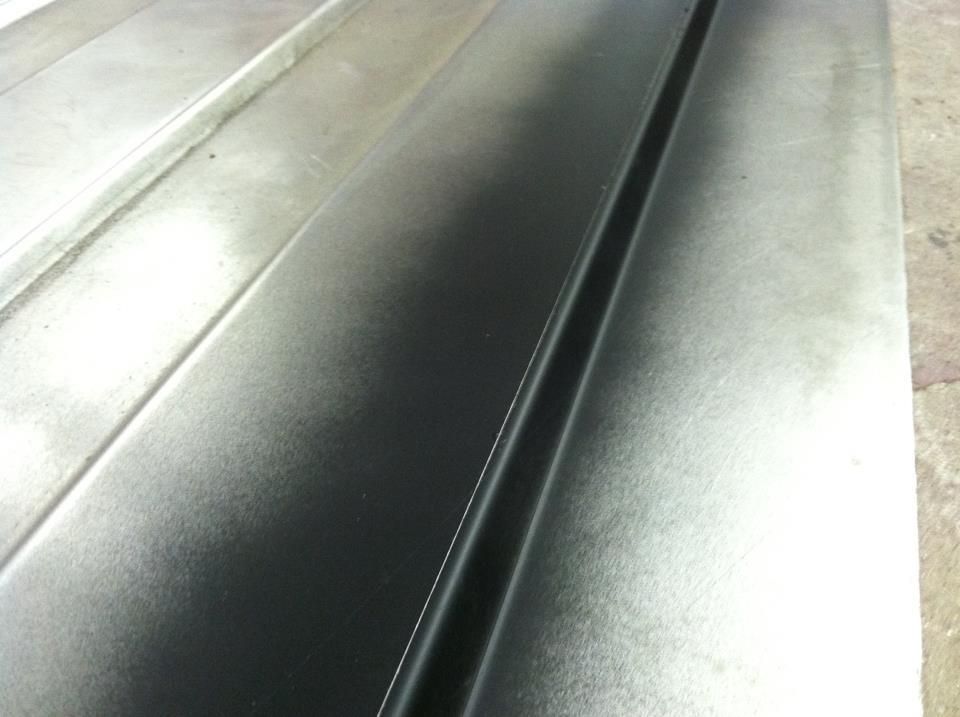 Trimmed to the right width, both sides match now. 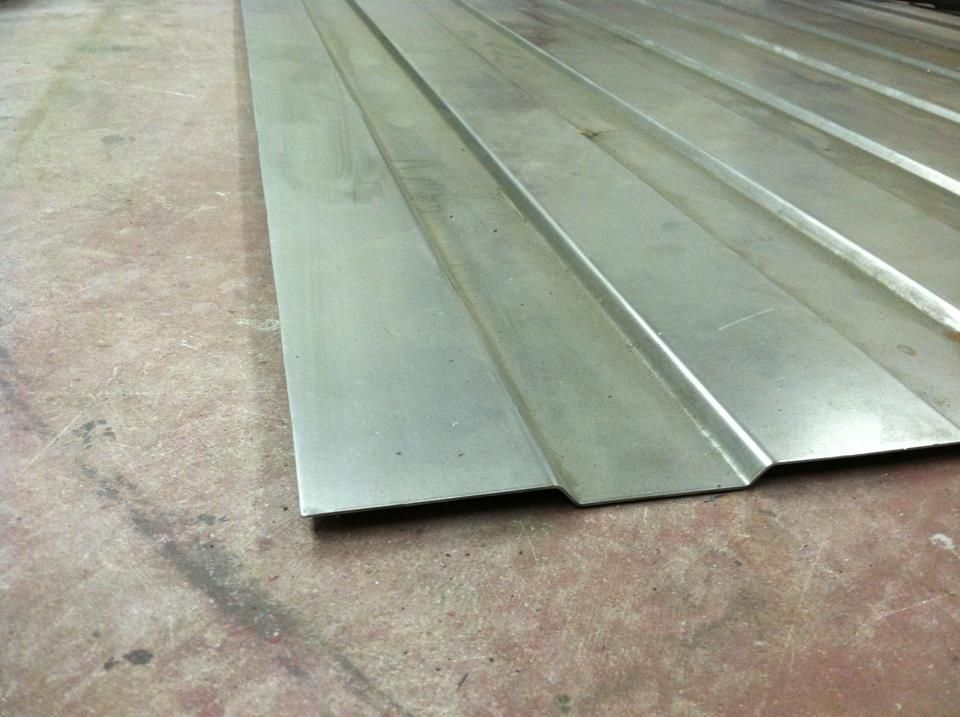 Since the floor wasn't wide enough to make 90* flanges, I had to make separate flanges for the floor mounts. I made the upper flange 2" wide for more strength, this way the bedsides will be pulled straight against the flanges when clamped and welded. 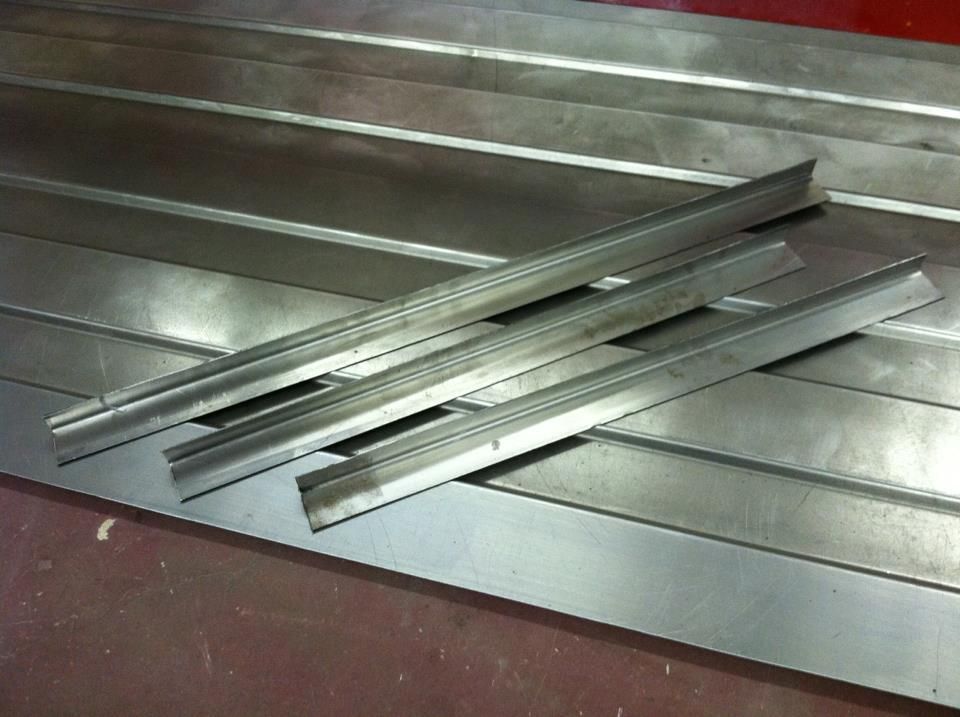 These were plug welded to the bedsides, and the floor will be welded on top of these. 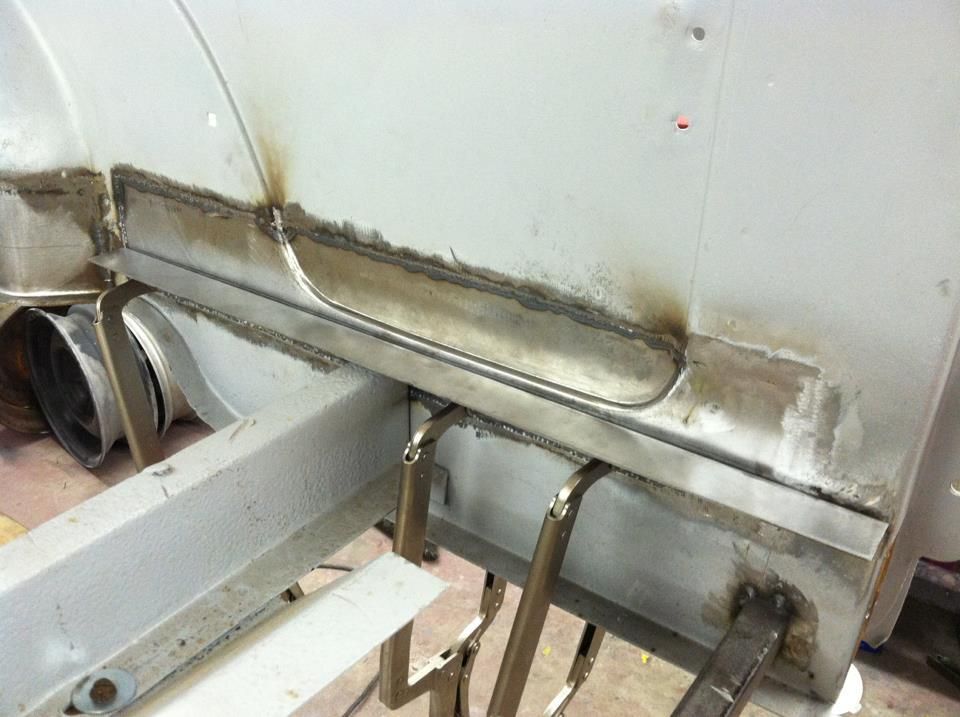 Weld thru primer on the inner surfaces, and the primer ground off right around the plug weld hole for a cleaner weld. 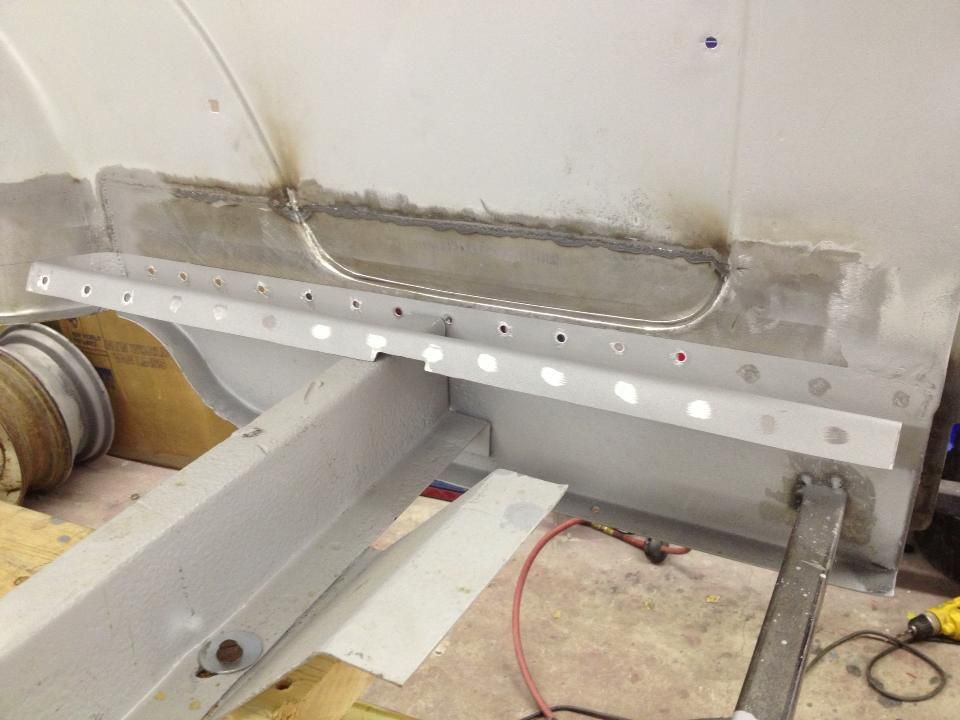 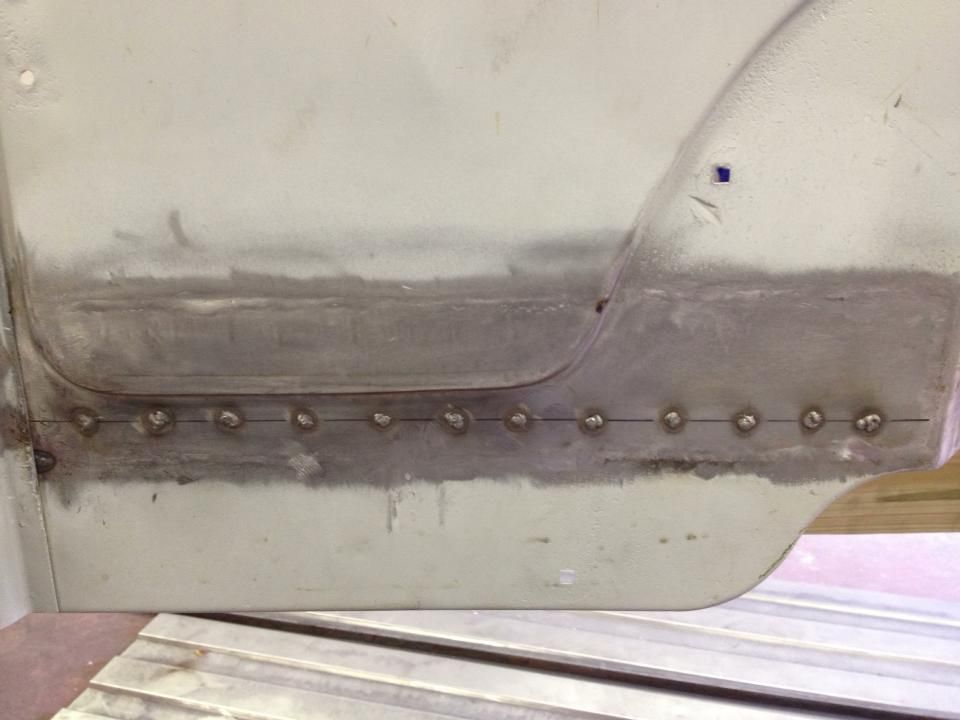 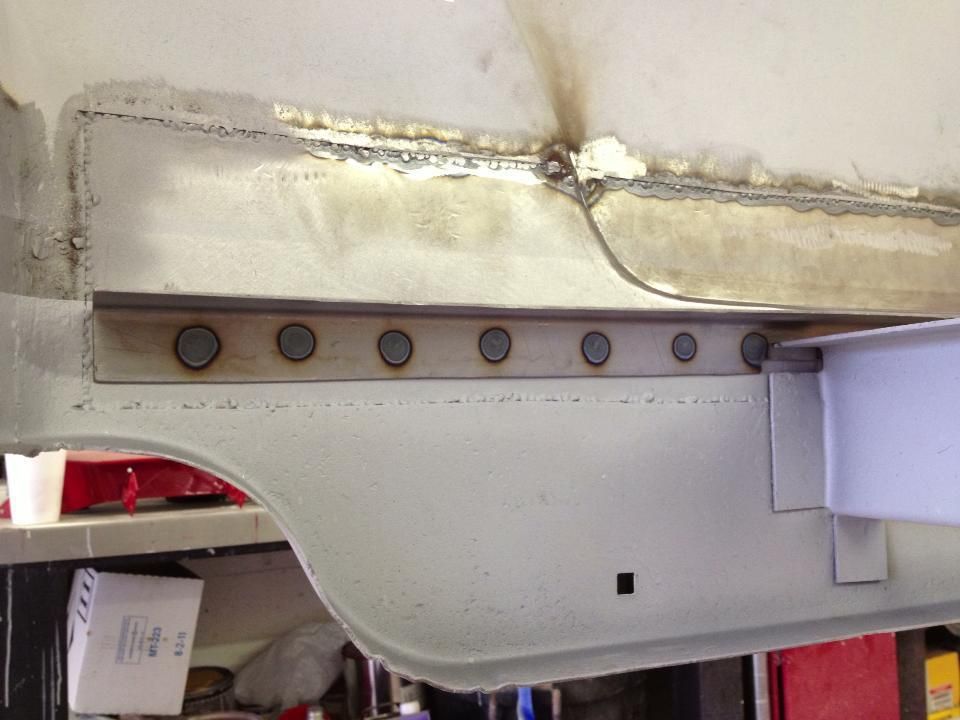 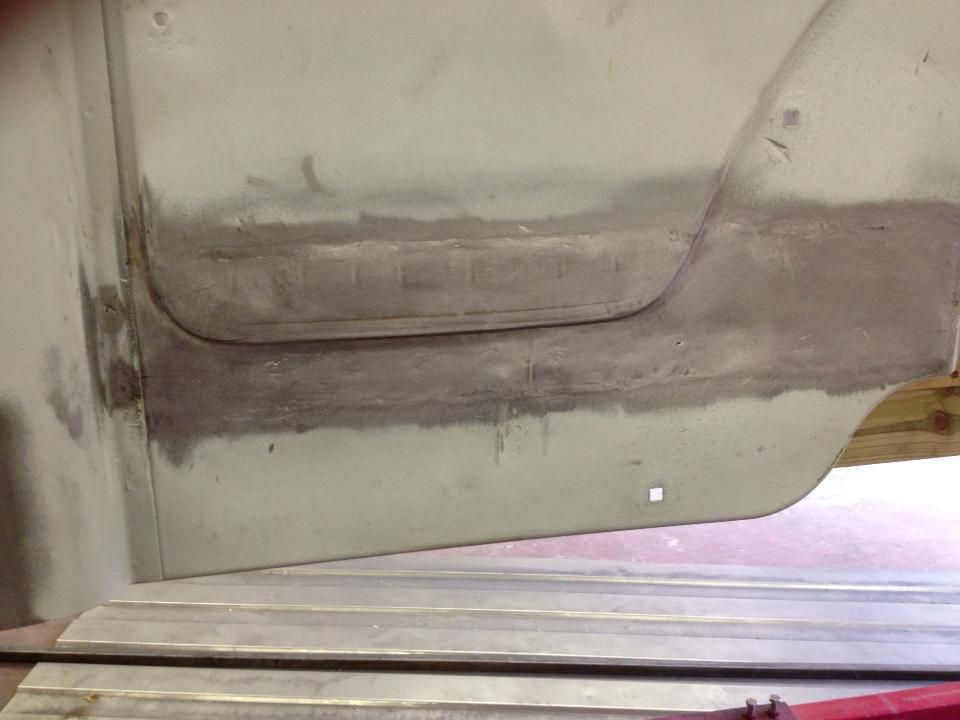 The offset stamps on the bed floor is 3/8" so I mounted the flanges 3/8" off the floor support rails. 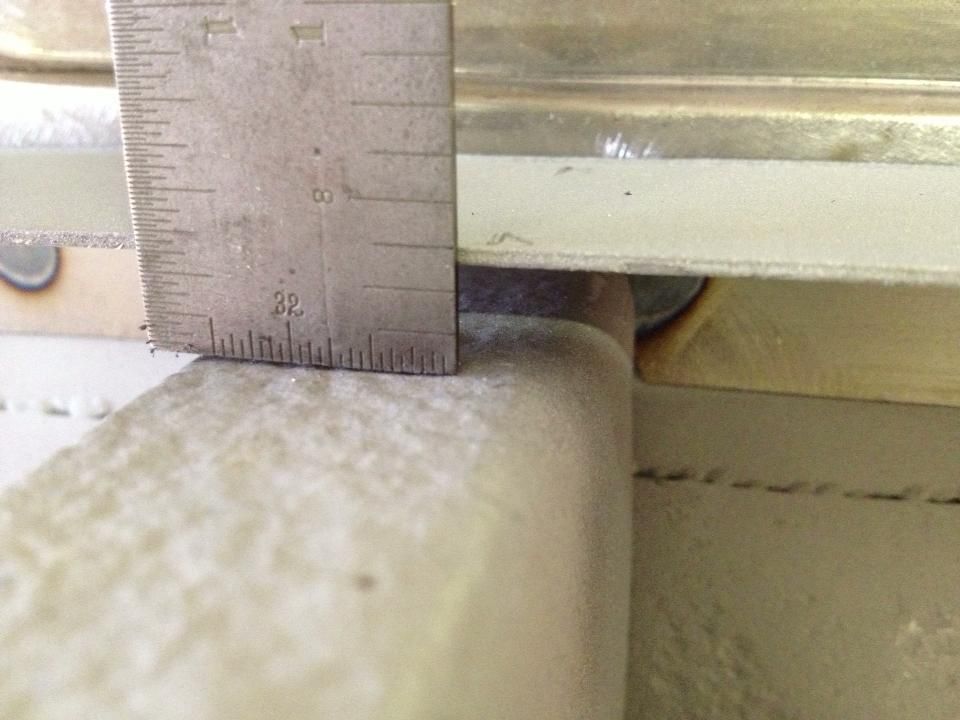  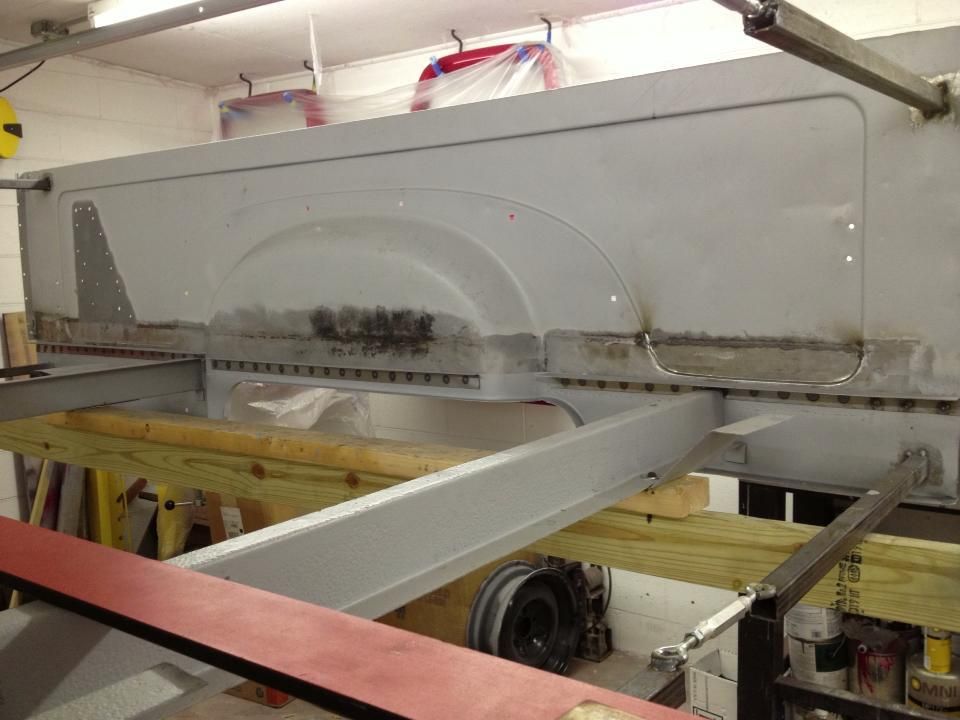
__________________
Project Goldilocks '66 C10 Short Fleet BBW Build '65 C10 Highly Detailed Stock Restoration Thread '78 Camaro Targa Roof Build '55 International Metal/Body/Paint Work '66 F100 Full Rotisserie Restoration '40 Packard 120 Convertible Coupe Restoration How To Restore and Detail an Original Gauge Cluster How To Detail Sand Body Panels, Edges, Corners, Etc |
|
|
|
|
02-07-2013, 01:31 PM
|
#159 |
|
Registered User
Join Date: Feb 2010
Location: Hartselle, Al.
Posts: 466
|
Re: '55 International Metal/Body/Paint Work
Incredible work as always!
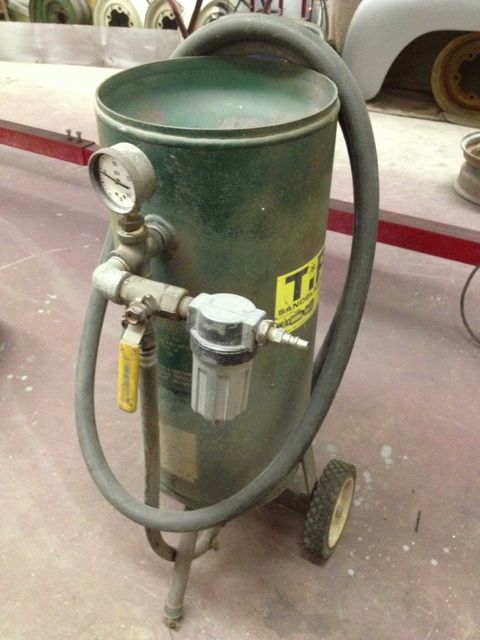
Question: When you say you sandblasted the rust, what blaster, media and grade are you using? Steven
__________________
Life is and will ever remain an equation incapable of solution, but it contains certain known factors. - Nikola Tesla Matt. 6:27 "Who of you by worrying can add a single hour to his life? http://www.67-72chevytrucks.com/vboa...=507266&page=2 |
|
|
|
|
02-07-2013, 01:35 PM
|
#160 |
|
Registered User
Join Date: Jan 2013
Location: Leonardtown, MD
Posts: 1,635
|
Re: '55 International Metal/Body/Paint Work
Awesome build!
__________________
Robert |
|
|
|
|
02-07-2013, 01:38 PM
|
#161 | |
|
Registered User
Join Date: May 2011
Location: Anderson SC
Posts: 3,870
|
Re: '55 International Metal/Body/Paint Work
Quote:
__________________
Project Goldilocks '66 C10 Short Fleet BBW Build '65 C10 Highly Detailed Stock Restoration Thread '78 Camaro Targa Roof Build '55 International Metal/Body/Paint Work '66 F100 Full Rotisserie Restoration '40 Packard 120 Convertible Coupe Restoration How To Restore and Detail an Original Gauge Cluster How To Detail Sand Body Panels, Edges, Corners, Etc |
|
|
|
|
|
02-07-2013, 01:39 PM
|
#162 | |
|
Registered User
Join Date: May 2011
Location: Anderson SC
Posts: 3,870
|
Re: '55 International Metal/Body/Paint Work
Quote:
__________________
Project Goldilocks '66 C10 Short Fleet BBW Build '65 C10 Highly Detailed Stock Restoration Thread '78 Camaro Targa Roof Build '55 International Metal/Body/Paint Work '66 F100 Full Rotisserie Restoration '40 Packard 120 Convertible Coupe Restoration How To Restore and Detail an Original Gauge Cluster How To Detail Sand Body Panels, Edges, Corners, Etc |
|
|
|
|
|
02-07-2013, 01:57 PM
|
#163 |
|
Registered User
Join Date: Feb 2010
Location: Hartselle, Al.
Posts: 466
|
Re: '55 International Metal/Body/Paint Work
Thanks for the reply.
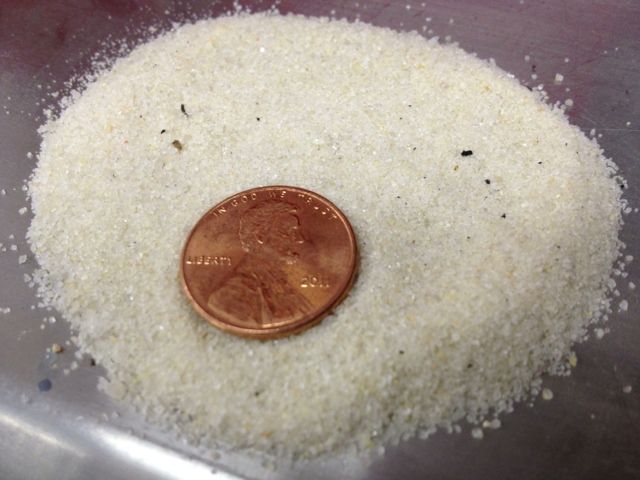
45 grit is much rougher than I had assumed. I was teetering on whether or not to go pressurized because my current siphon setup sucks! (pun intended) Steven
__________________
Life is and will ever remain an equation incapable of solution, but it contains certain known factors. - Nikola Tesla Matt. 6:27 "Who of you by worrying can add a single hour to his life? http://www.67-72chevytrucks.com/vboa...=507266&page=2 |
|
|
|
|
02-07-2013, 02:09 PM
|
#164 |
|
Registered User
Join Date: May 2011
Location: Anderson SC
Posts: 3,870
|
Re: '55 International Metal/Body/Paint Work
Here's a shot of the sand with a penny for scale.
__________________
Project Goldilocks '66 C10 Short Fleet BBW Build '65 C10 Highly Detailed Stock Restoration Thread '78 Camaro Targa Roof Build '55 International Metal/Body/Paint Work '66 F100 Full Rotisserie Restoration '40 Packard 120 Convertible Coupe Restoration How To Restore and Detail an Original Gauge Cluster How To Detail Sand Body Panels, Edges, Corners, Etc |
|
|
|
|
02-08-2013, 10:07 AM
|
#165 |
|
Registered User
Join Date: May 2011
Location: Anderson SC
Posts: 3,870
|
Re: '55 International Metal/Body/Paint Work
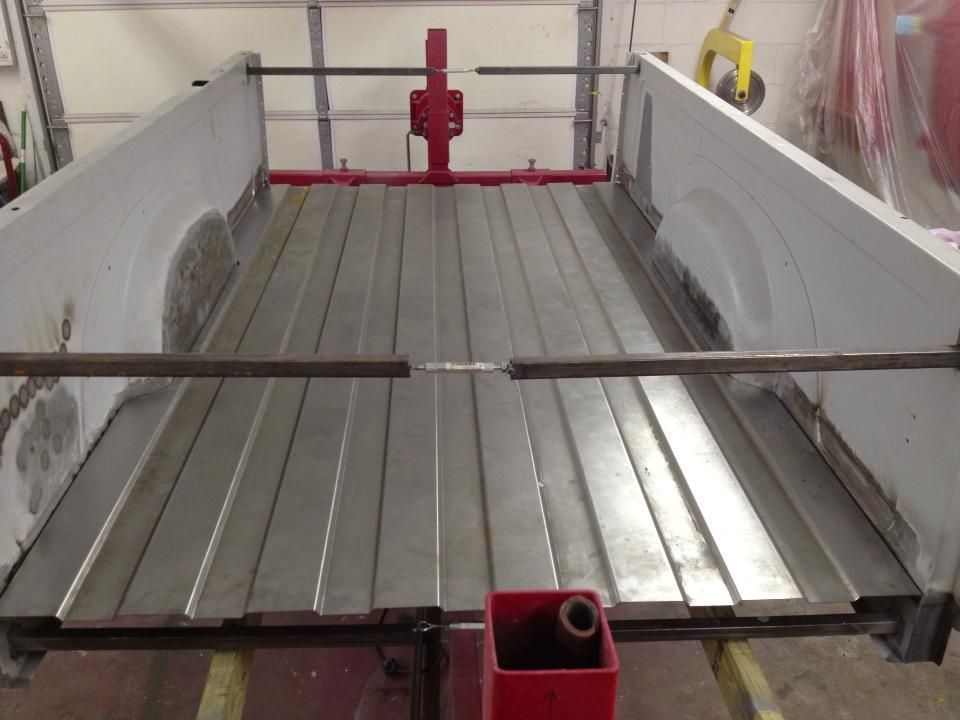
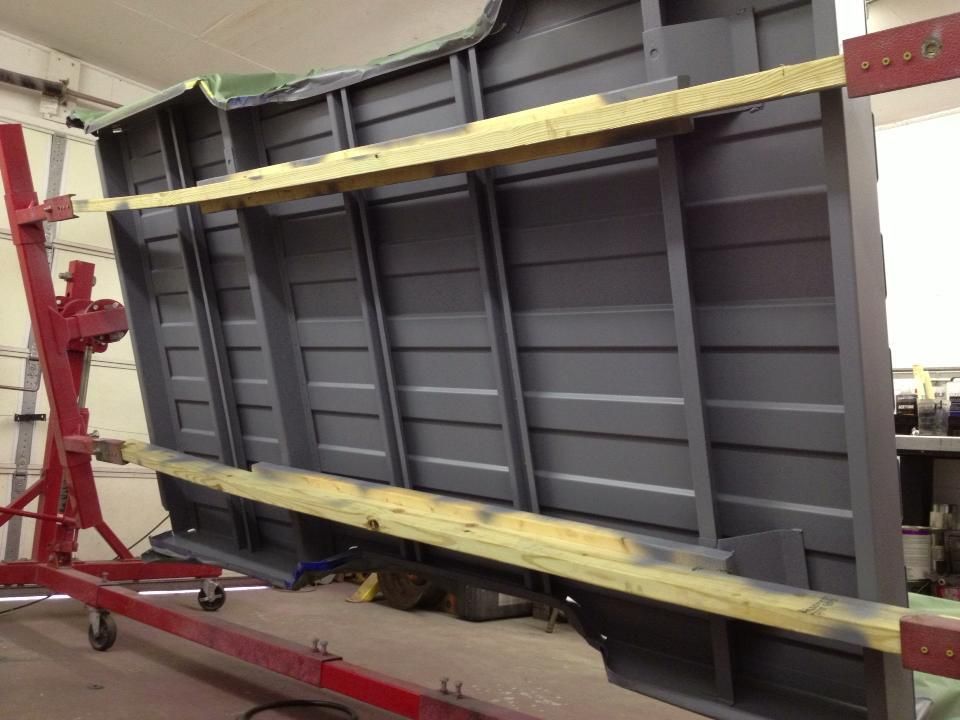
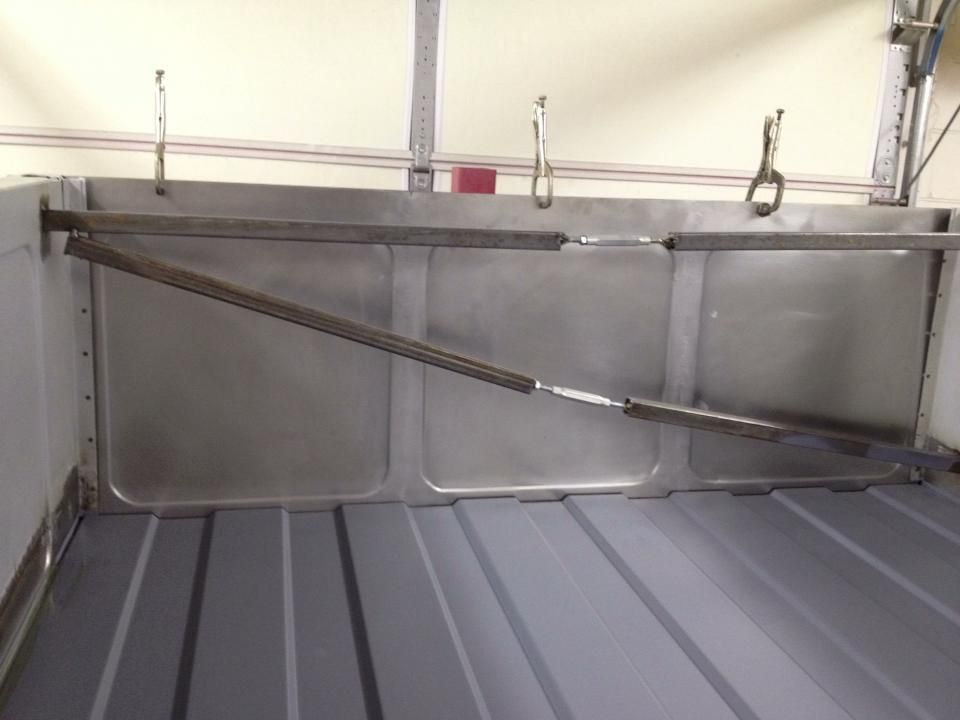
All of the floor braces except two were rotted or bent bad enought that they had to be replaced. I welded in angled 1" tubing with turnbuckles to square the bed before welding the braces in.
   Used an 8' straight edge to make sure that all of the braces were level before welding them in. 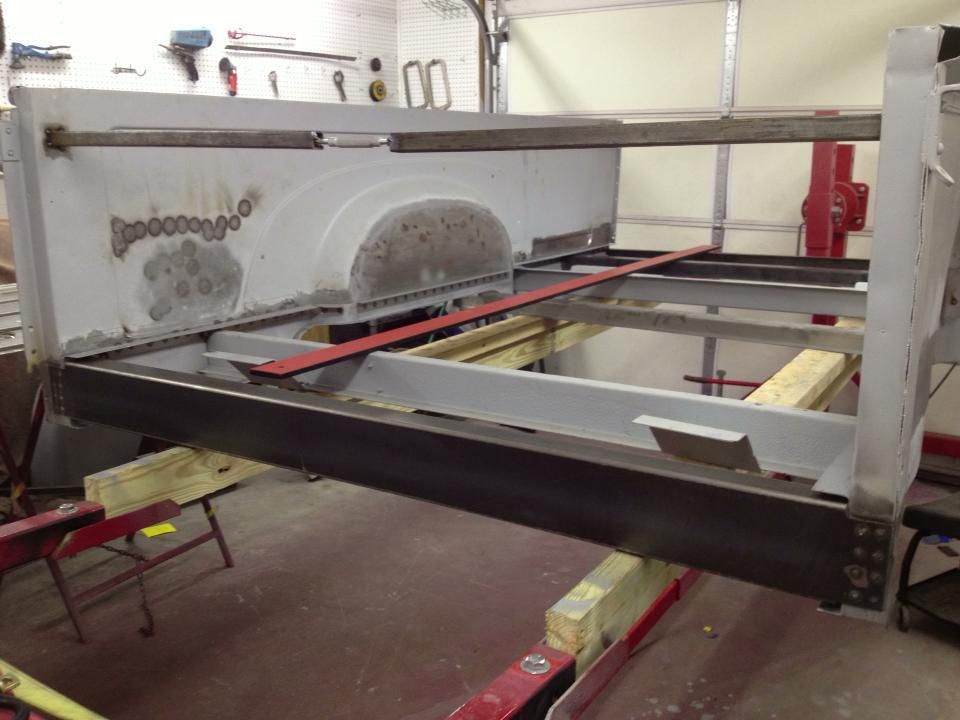 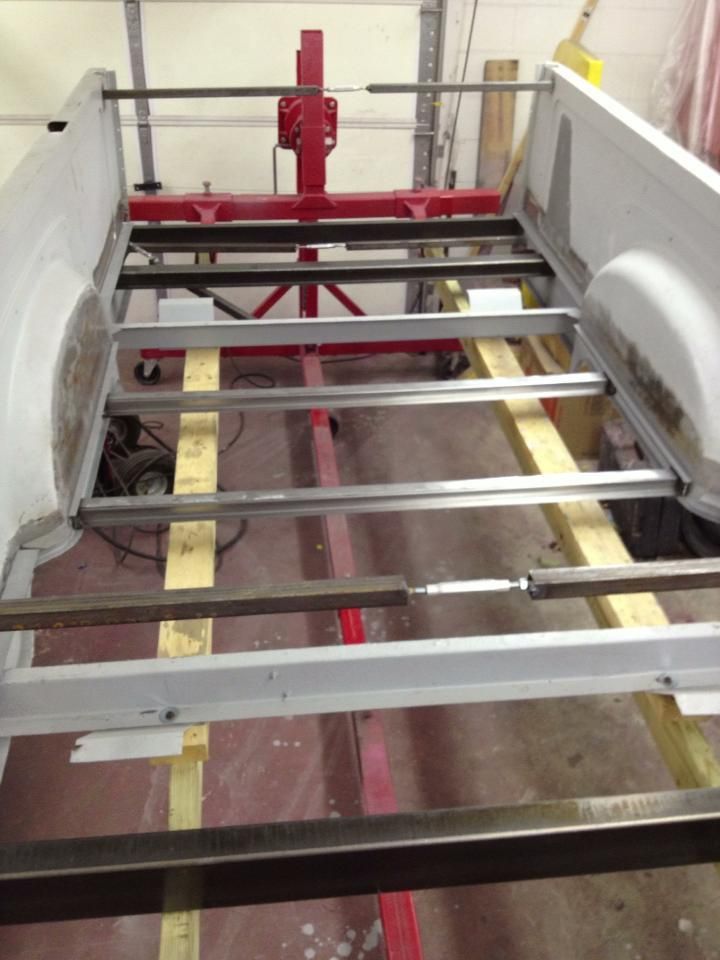 
__________________
Project Goldilocks '66 C10 Short Fleet BBW Build '65 C10 Highly Detailed Stock Restoration Thread '78 Camaro Targa Roof Build '55 International Metal/Body/Paint Work '66 F100 Full Rotisserie Restoration '40 Packard 120 Convertible Coupe Restoration How To Restore and Detail an Original Gauge Cluster How To Detail Sand Body Panels, Edges, Corners, Etc |
|
|
|
|
02-08-2013, 10:13 AM
|
#166 |
|
Registered User
Join Date: May 2011
Location: Anderson SC
Posts: 3,870
|
Re: '55 International Metal/Body/Paint Work
After the floor braces were in it was time to fit the floor. I made templates of the fenderwells and cut the floor to match.
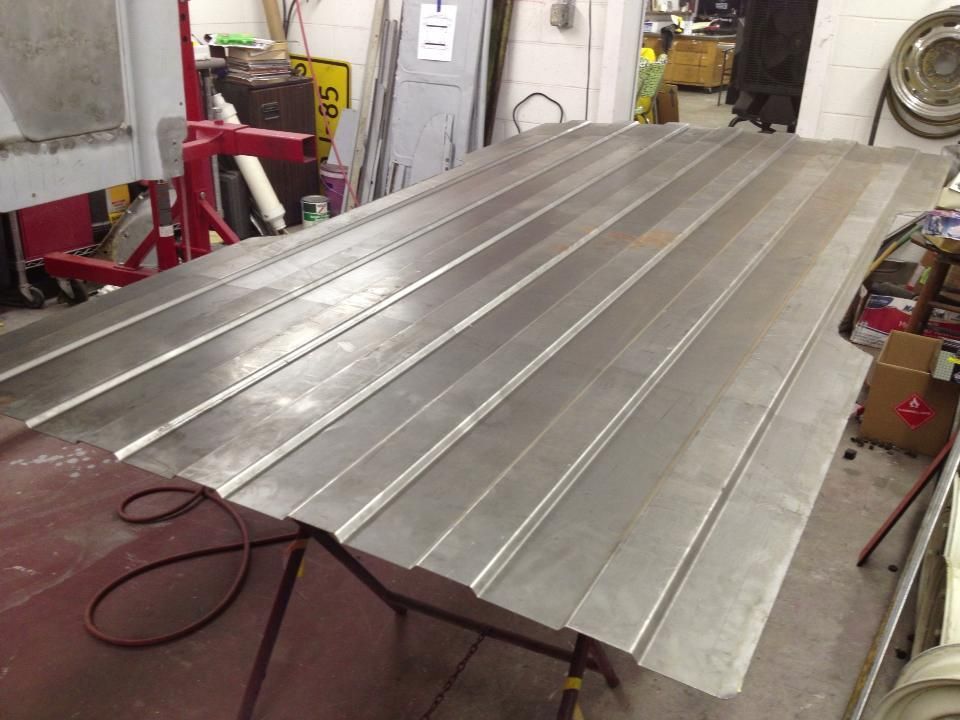   I left a gap around the edge of the floor, big enough that seam sealer could get between the bed floor and the flanges that were welded to the bedside. That way both pieces would be sealed up from the top.  Marked where all of the braces and flanges were from the bottom side so I could drill plug weld holes.   Plug weld holes drilled and washed with both PPG DX Metal Cleaner and Metal Conditioner to prep the metal for epoxy. I used PPG DPLF 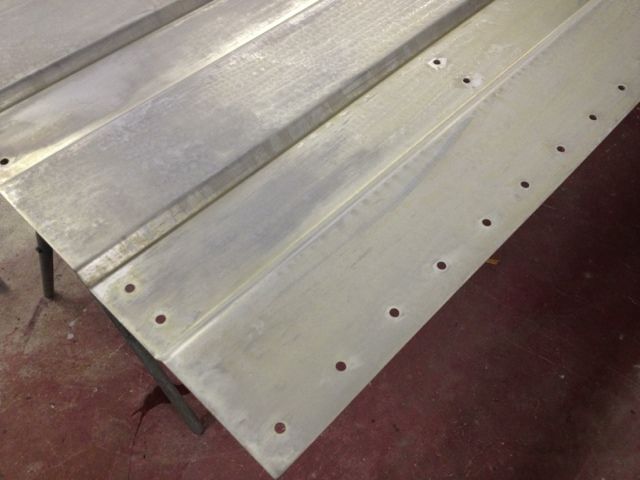 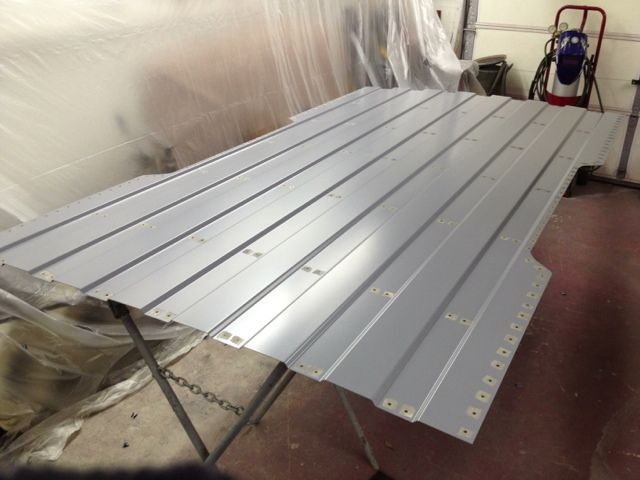
__________________
Project Goldilocks '66 C10 Short Fleet BBW Build '65 C10 Highly Detailed Stock Restoration Thread '78 Camaro Targa Roof Build '55 International Metal/Body/Paint Work '66 F100 Full Rotisserie Restoration '40 Packard 120 Convertible Coupe Restoration How To Restore and Detail an Original Gauge Cluster How To Detail Sand Body Panels, Edges, Corners, Etc |
|
|
|
|
02-08-2013, 10:19 AM
|
#167 |
|
Registered User
Join Date: May 2011
Location: Anderson SC
Posts: 3,870
|
Re: '55 International Metal/Body/Paint Work
I welded the floor in and ground the plug welds down flush, all 210-220 of them. Then I primed the top and bottom with more DPLF.
   After the epoxy dried for a day I masked the side seams, scuffed them, then applied SEM two part seam sealer. 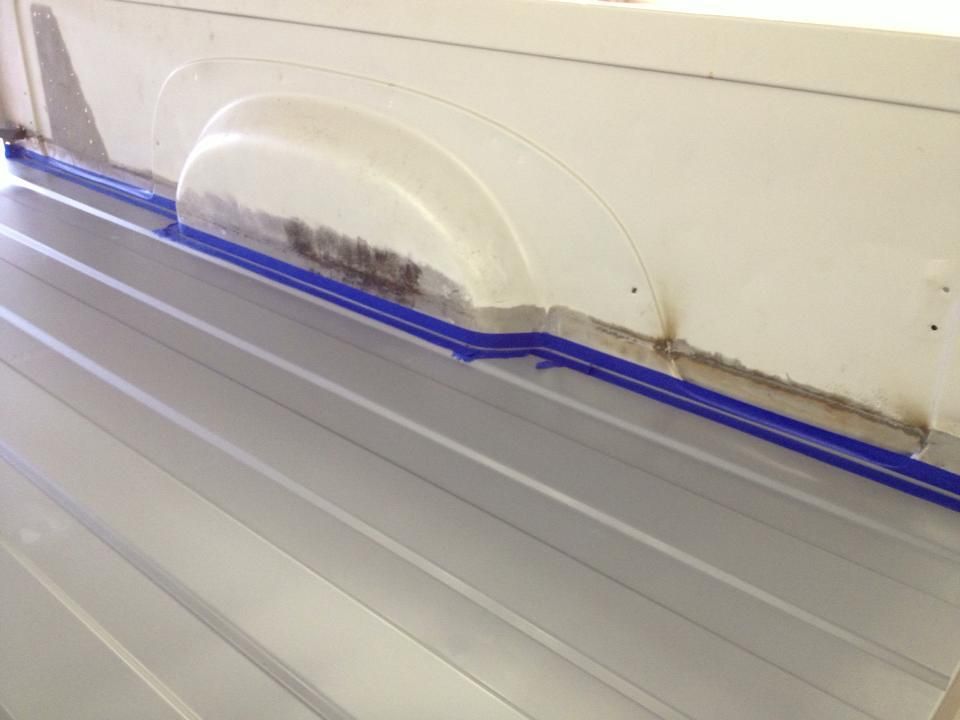 The reason I shot the second coat of epoxy after welding the floor in was to cover the welded areas, and also to get the seam and edge of the bedside coated under the seam sealer. 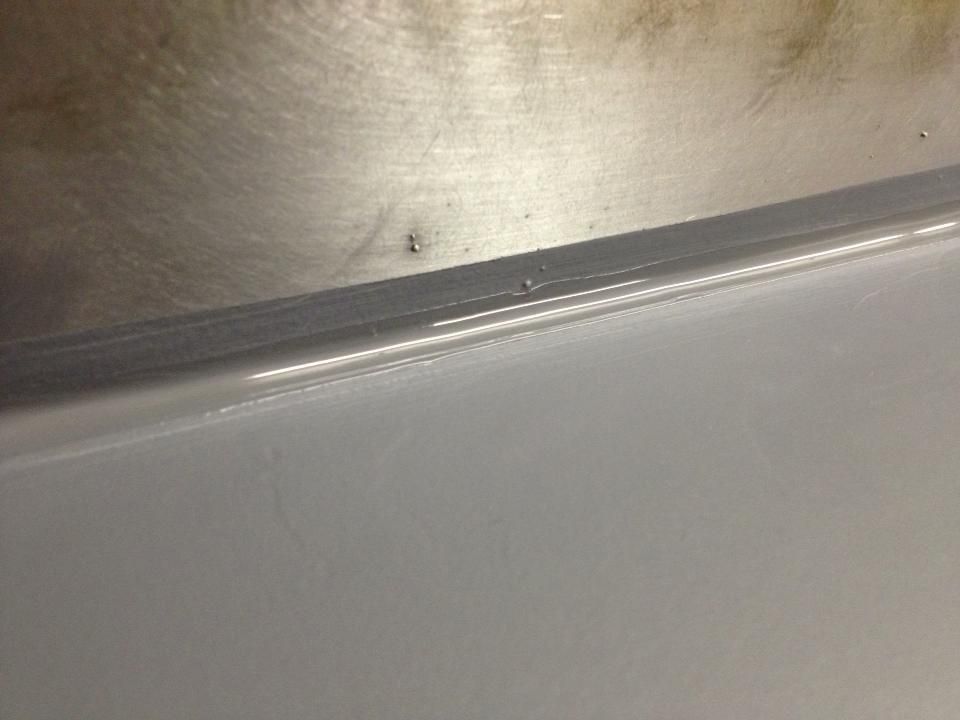 
__________________
Project Goldilocks '66 C10 Short Fleet BBW Build '65 C10 Highly Detailed Stock Restoration Thread '78 Camaro Targa Roof Build '55 International Metal/Body/Paint Work '66 F100 Full Rotisserie Restoration '40 Packard 120 Convertible Coupe Restoration How To Restore and Detail an Original Gauge Cluster How To Detail Sand Body Panels, Edges, Corners, Etc |
|
|
|
|
02-08-2013, 10:03 PM
|
#168 |
|
Registered User
Join Date: May 2007
Location: Deale Md
Posts: 4,663
|
Re: '55 International Metal/Body/Paint Work
That's going to look so good when color on it.
__________________
James 63 GMC V6 4speed carryall 65 chevy swb bbw V8 auto 68 K20 327/4 speed, buddy buckets 2002 GMC CC Dually Duramax 64 GMC lwb 3/4 V6 4speed SOLD 66 GMC swb bbw buddy buckets SOLD IG duallyjams The only thing that stays the same is constant change! |
|
|
|
|
02-10-2013, 09:40 PM
|
#169 | |
|
Registered User
Join Date: May 2011
Location: Anderson SC
Posts: 3,870
|
Re: '55 International Metal/Body/Paint Work
Quote:
When this one is finished I get to start body/paint on a '58 VW Bug Ragtop. Supposed to be rust free and straight, stored in a dry garage for years... I won't know how to act with no rust to fix!! 
__________________
Project Goldilocks '66 C10 Short Fleet BBW Build '65 C10 Highly Detailed Stock Restoration Thread '78 Camaro Targa Roof Build '55 International Metal/Body/Paint Work '66 F100 Full Rotisserie Restoration '40 Packard 120 Convertible Coupe Restoration How To Restore and Detail an Original Gauge Cluster How To Detail Sand Body Panels, Edges, Corners, Etc |
|
|
|
|
|
02-10-2013, 09:48 PM
|
#170 |
|
Registered User
Join Date: May 2011
Location: Anderson SC
Posts: 3,870
|
Re: '55 International Metal/Body/Paint Work
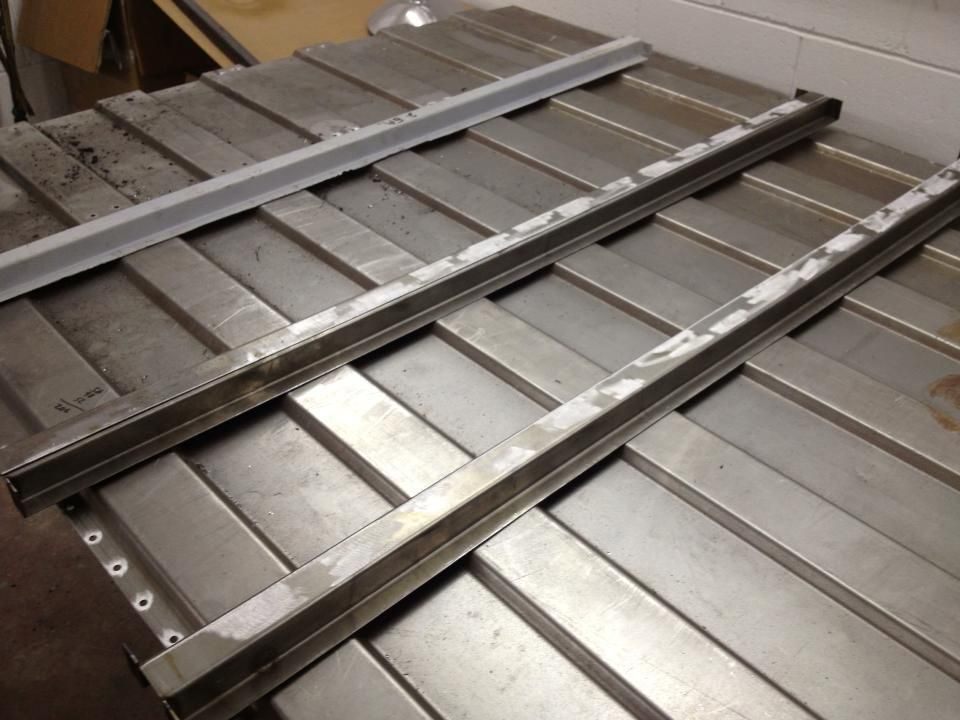
Here's the process of making the header panel. I used 18g and made it in three sections since it wouldn't fit in our bead roller in one piece. Making it in three pieces also allowed me to work out any distortion around the rolled bead in the shrinker/stretcher.
The bottom part of the original header was completely rusted off and stayed with the lower cross brace, that's why its much shorter than the new pieces.  Laid out the stamping pattern for rolling using 1/4" offset dies.  First of three panels rolled. I only rolled the depth of the bead 1/8" to minimize warping. The bead roller has a 20 gauge limit so I also didn't want to push the roller to do something it wasn't designed to do. 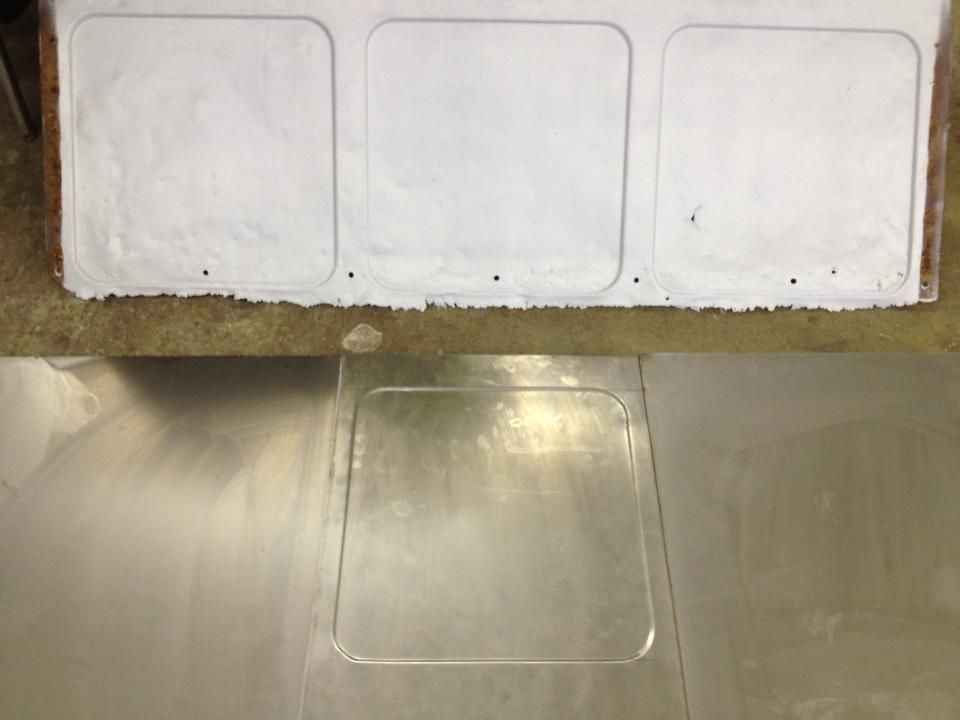 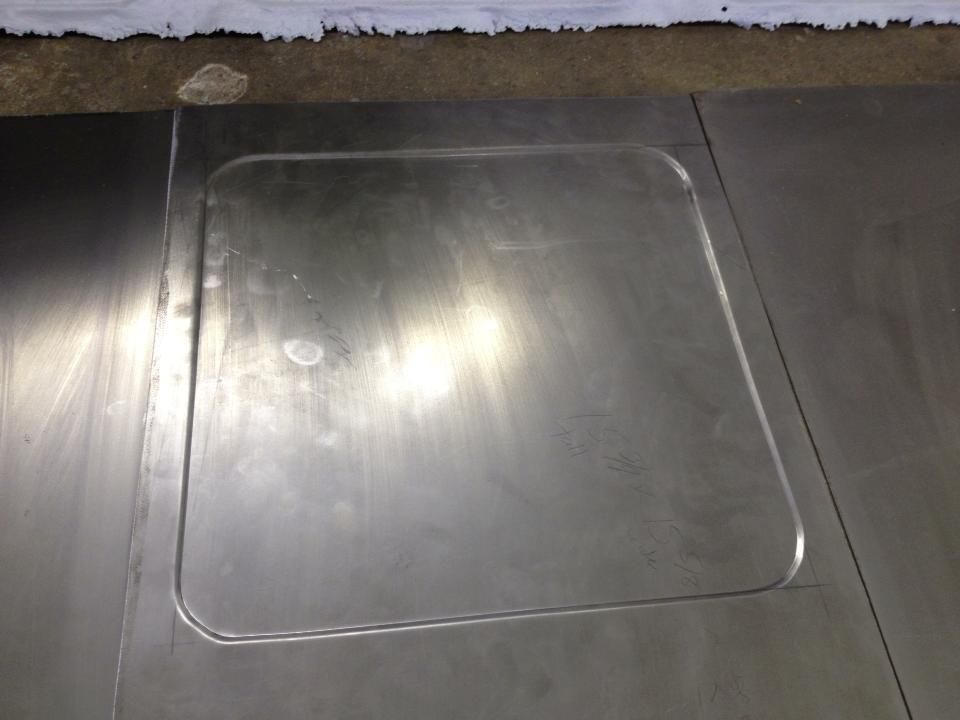 Aligned for welding. 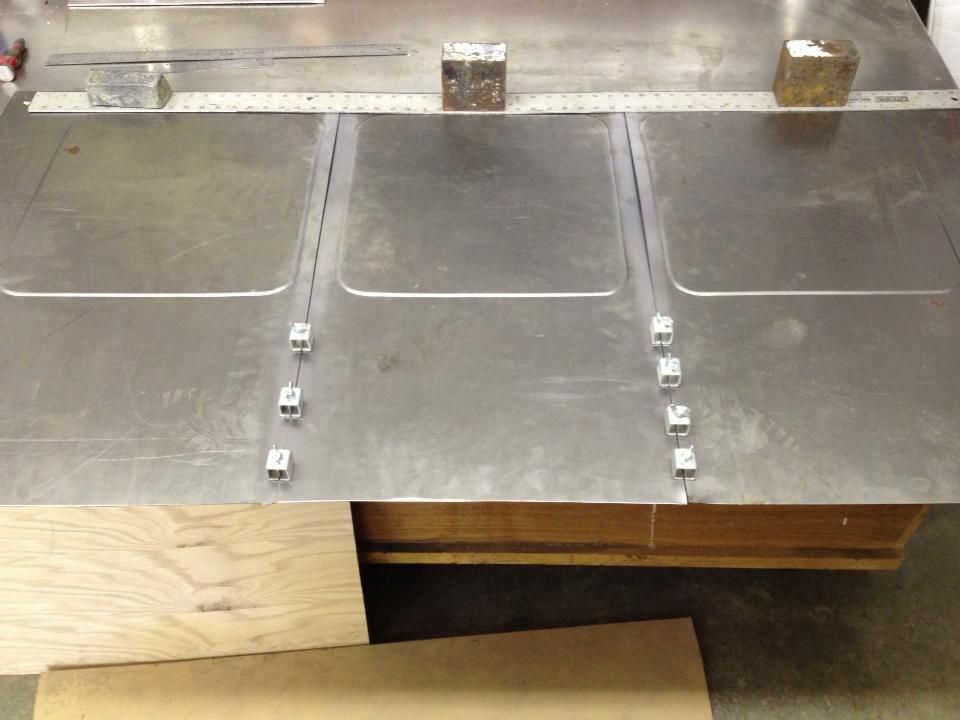 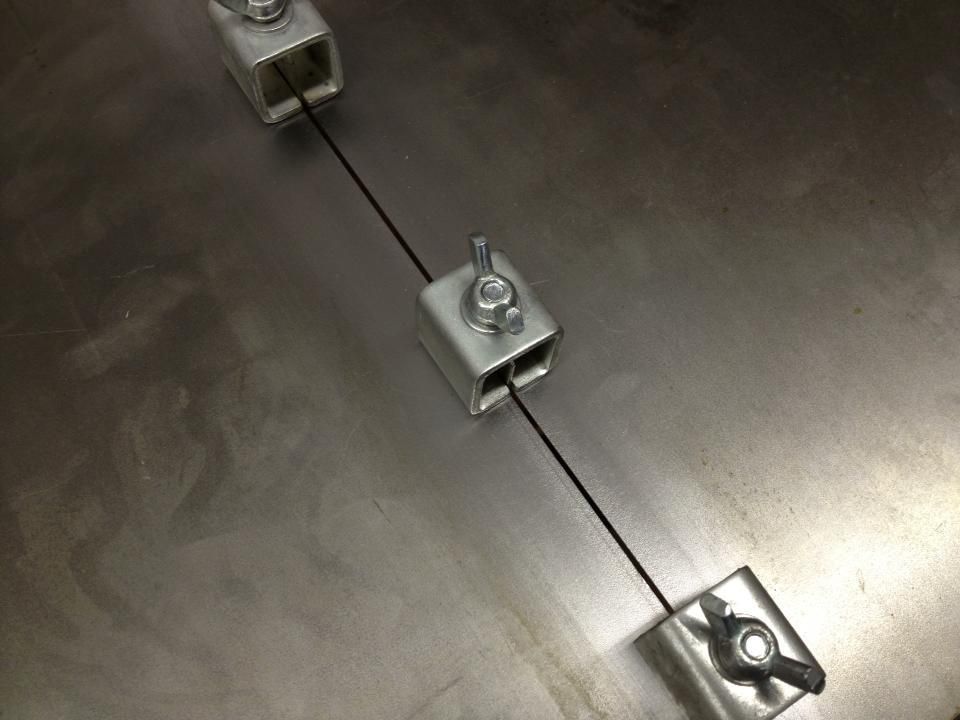 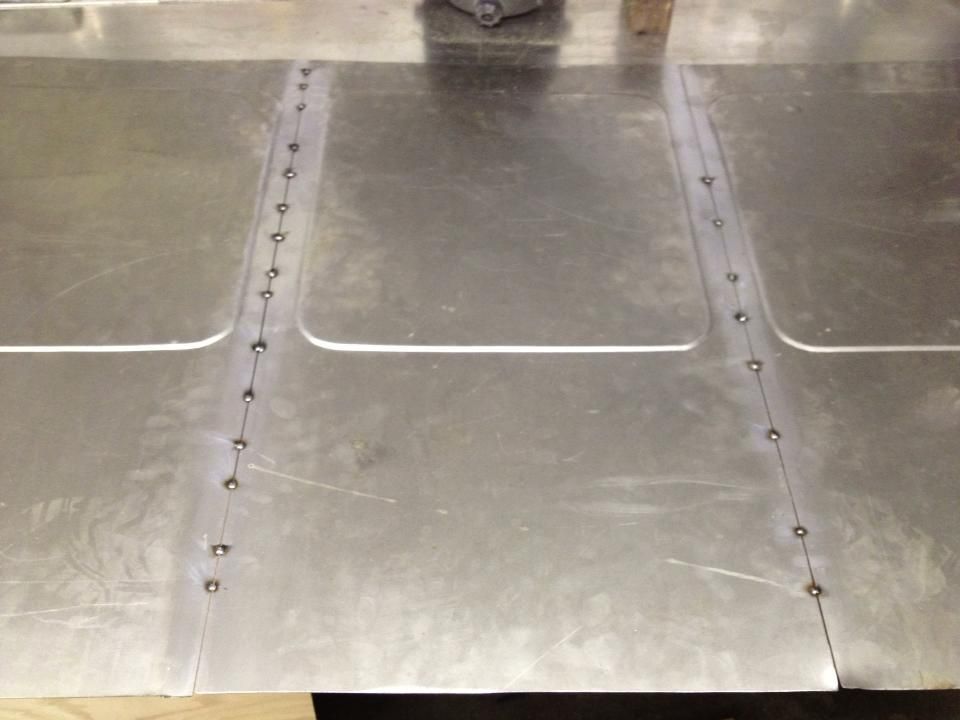
__________________
Project Goldilocks '66 C10 Short Fleet BBW Build '65 C10 Highly Detailed Stock Restoration Thread '78 Camaro Targa Roof Build '55 International Metal/Body/Paint Work '66 F100 Full Rotisserie Restoration '40 Packard 120 Convertible Coupe Restoration How To Restore and Detail an Original Gauge Cluster How To Detail Sand Body Panels, Edges, Corners, Etc |
|
|
|
|
02-10-2013, 09:50 PM
|
#171 |
|
Registered User
Join Date: May 2011
Location: Anderson SC
Posts: 3,870
|
Re: '55 International Metal/Body/Paint Work
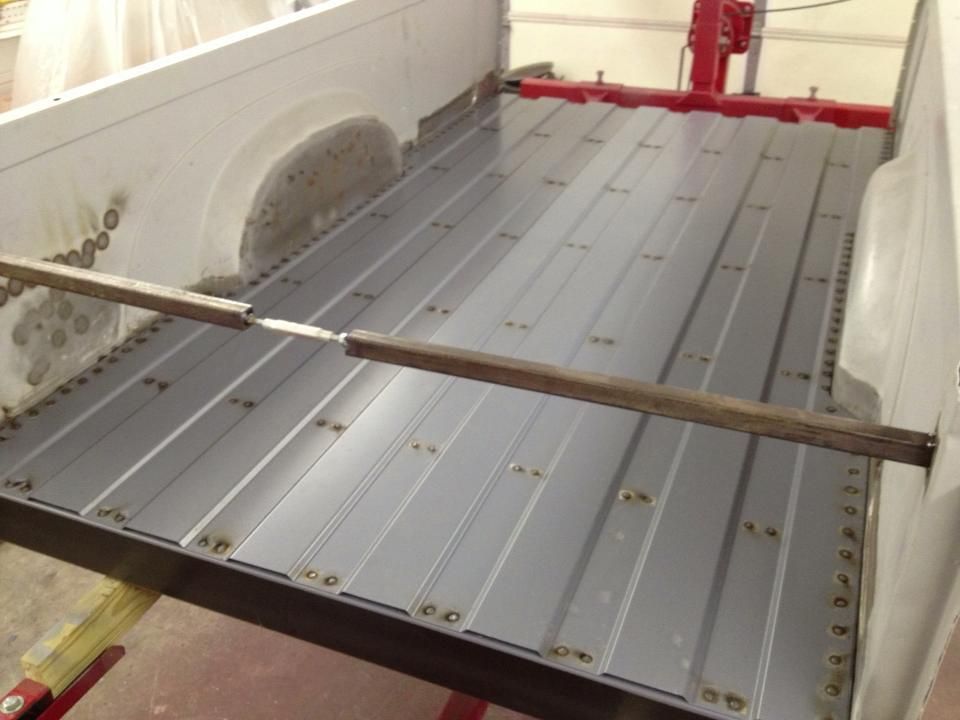
Fully welded, welds smoothed, and clamped in place for initial fitting. I added a diagonal brace to square the bedsides to the floor. More on that in a later post.
__________________
Project Goldilocks '66 C10 Short Fleet BBW Build '65 C10 Highly Detailed Stock Restoration Thread '78 Camaro Targa Roof Build '55 International Metal/Body/Paint Work '66 F100 Full Rotisserie Restoration '40 Packard 120 Convertible Coupe Restoration How To Restore and Detail an Original Gauge Cluster How To Detail Sand Body Panels, Edges, Corners, Etc |
|
|
|
|
02-10-2013, 10:19 PM
|
#172 |
|
Registered User
Join Date: Feb 2010
Location: Hartselle, Al.
Posts: 466
|
Re: '55 International Metal/Body/Paint Work
holy cow! Have you ever thought it would be easier to build the whole thing from scratch?
 Nice work! Steven
__________________
Life is and will ever remain an equation incapable of solution, but it contains certain known factors. - Nikola Tesla Matt. 6:27 "Who of you by worrying can add a single hour to his life? http://www.67-72chevytrucks.com/vboa...=507266&page=2 |
|
|
|
|
02-10-2013, 11:18 PM
|
#173 |
|
Registered User
Join Date: Jan 2013
Location: Leonardtown, MD
Posts: 1,635
|
Re: '55 International Metal/Body/Paint Work
It's all in the details....Awesome work

__________________
Robert |
|
|
|
|
02-11-2013, 09:11 AM
|
#174 |
|
Registered User
Join Date: Apr 2012
Location: Beaver, Pa.
Posts: 197
|
Re: '55 International Metal/Body/Paint Work
You never cease to amaze!
|
|
|
|
|
02-20-2013, 05:31 PM
|
#175 | |||
|
Registered User
Join Date: May 2011
Location: Anderson SC
Posts: 3,870
|
Re: '55 International Metal/Body/Paint Work
Quote:
 Quote:
With the header panel roughed in I needed to get the bed sides squared to the floor. Easier said than done!! The front 8" of the passenger bed side was twisted inward at the top, right where the stake pockets were. Everything was bent and there were cracks in the corners of the pockets.  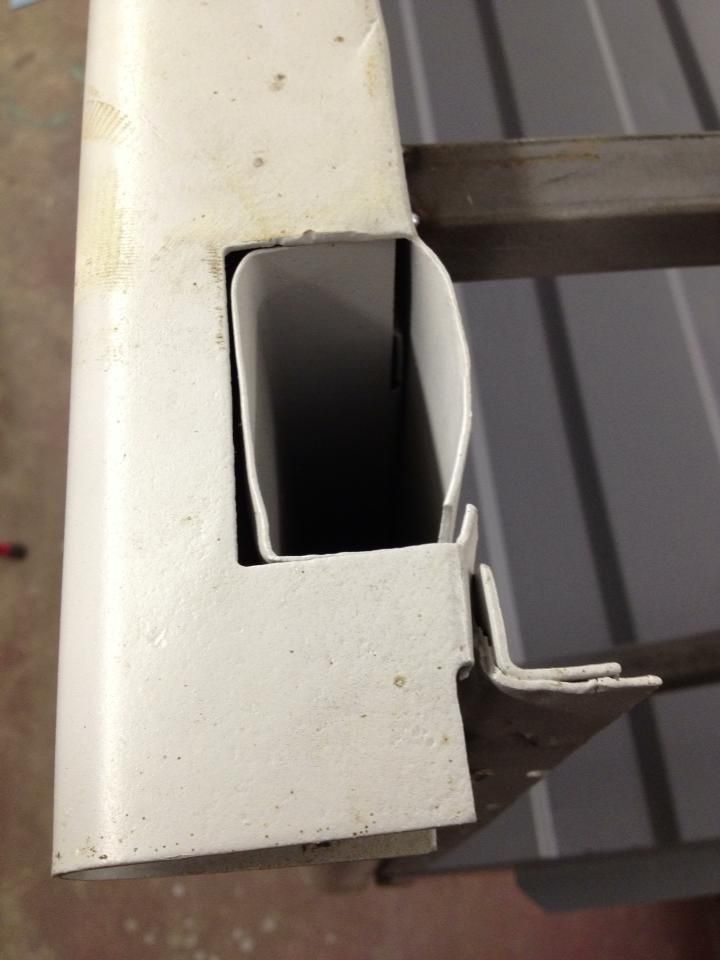  I had to cut the corner brace out, ground out the cracks to prep them for welding (gets rid of the fatigued metal), then use the porta-power and a six foot long piece of tubing to have enough leverage to pull the corner back straight. 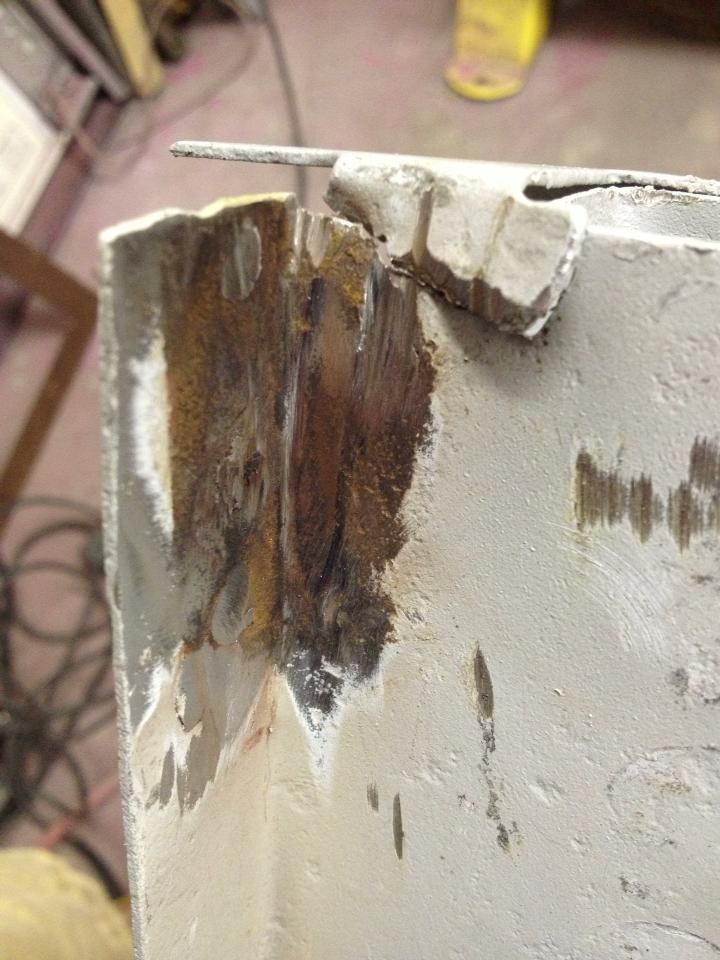 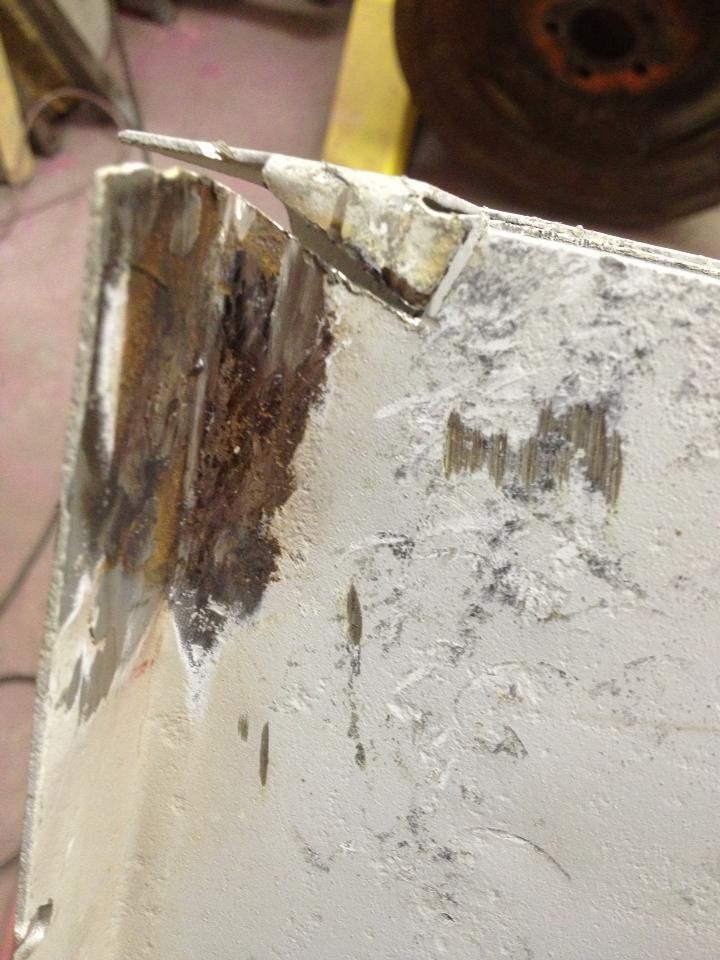 After rough shaping and welding the cracks. 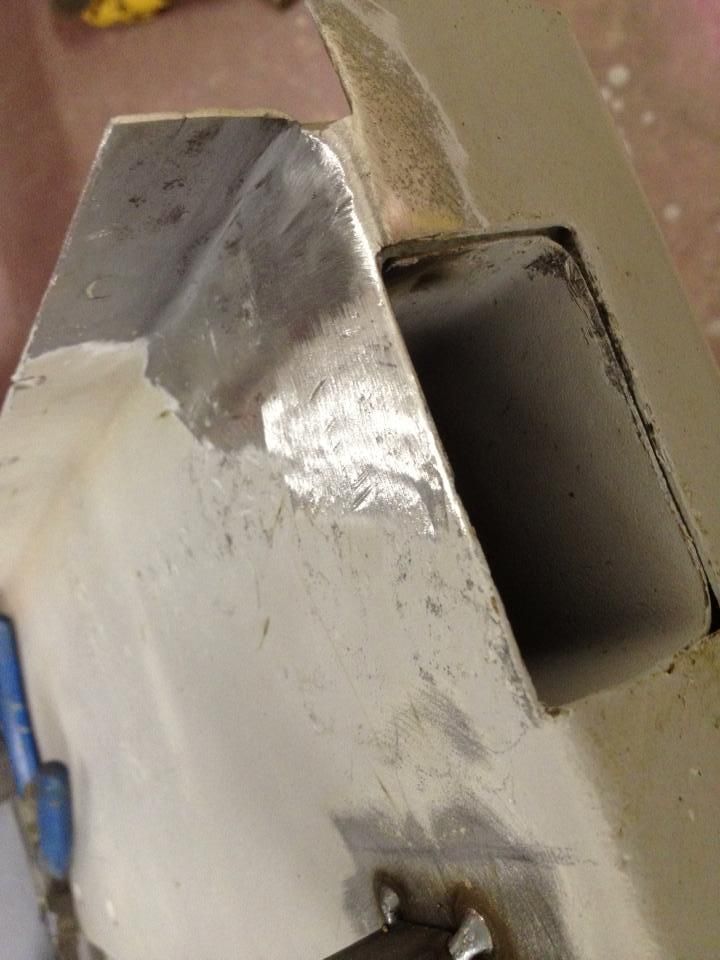 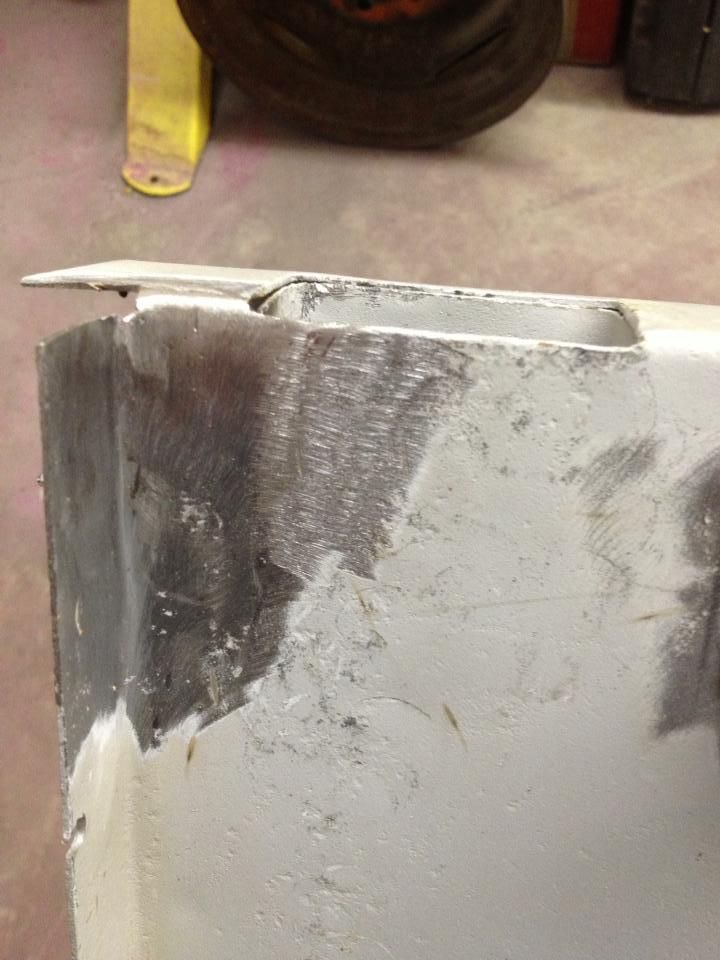 New corner brace.  
__________________
Project Goldilocks '66 C10 Short Fleet BBW Build '65 C10 Highly Detailed Stock Restoration Thread '78 Camaro Targa Roof Build '55 International Metal/Body/Paint Work '66 F100 Full Rotisserie Restoration '40 Packard 120 Convertible Coupe Restoration How To Restore and Detail an Original Gauge Cluster How To Detail Sand Body Panels, Edges, Corners, Etc |
|||
|
|
|
 |
| Bookmarks |
|
|


 Linear Mode

