
|
Register or Log In To remove these advertisements. |
|
|
|
|||||||
 |
|
|
Thread Tools | Display Modes |
|
|
 12-18-2007, 03:32 AM
|
#1 |
|
Registered User
Join Date: May 2006
Location: Philadelphia, Pa. 19454
Posts: 9,428
|
Re: "Slowly but Surely" Big J's build thread...
Nice work on the dash...the problem I see, or don't see is the step up. There is no metal behind the 'B' post. That looks more like a rip than a hole.Possibly at some time that 'B' post was shoved to the outside of the vehicle, maybe an accident? How did your doors line up?
I had to replace the metal behind it, but I have no idea what it was supposed to look like since mine was gone. Where I cut my 'B' post there are still spot welds to a 3/4" flange that is attached to the step up. What you can't see in the pic is a very small offset to the front, it makes that area alot cleaner for lining up to the 'B' post How does it look from the back side? Possibly like this 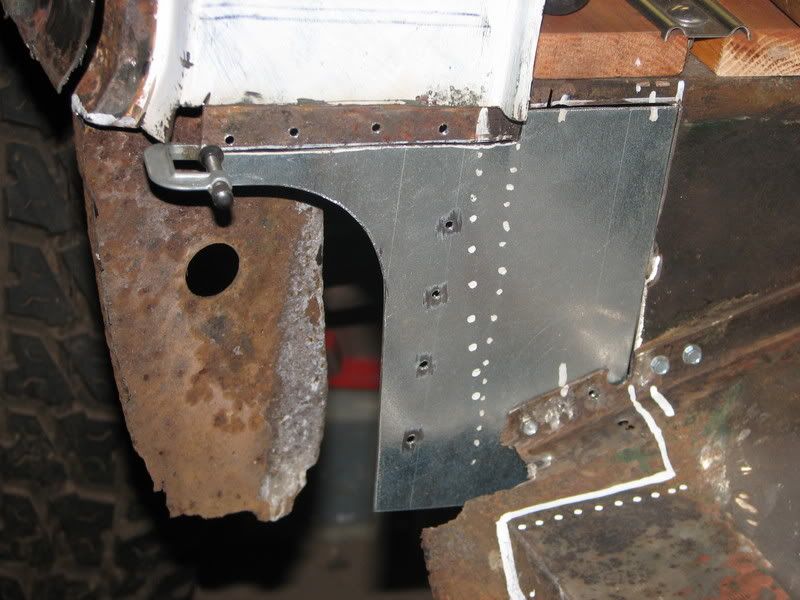
__________________
Semper Fi...Uncle Sam, you da man All parts offered to help are free, unless otherwise noted Dont try this stuff in my build thread, unless you have 55 years of mechanical OTJ training SAFETY FIRST AS usual, off topic They say your mind goes second, can't remember the first Jim Last edited by jaros44sr; 12-18-2007 at 03:54 AM. |

|

|
|
12-18-2007, 10:03 AM
|
#2 |
|
Registered User
Join Date: Mar 2004
Location: Sacramento, CA
Posts: 1,084
|
Re: "Slowly but Surely" Big J's build thread...
Forgive my jumping in with a question here. I'm also working on this area on my Jimmy. Been following all the varies posts and have gleaned great info from them. The one item I've not seen discussed is what I have circled in the pic from Jarros44sr.
I don't think anyone makes a patch panel for this area. Has anyone repaired this area? How/what have you done? Any ideas appreciated. Thanks
__________________
'71  Jimmy, 350, SM465, NP205, 2in Tuff Country lift, 33s on rallies, TBI, softtop and hardtop Jimmy, 350, SM465, NP205, 2in Tuff Country lift, 33s on rallies, TBI, softtop and hardtop"If life was fair you'd be able to afford one of each and a garage large enough to house them all." |
|
|
|
|
12-18-2007, 11:26 AM
|
#3 |
|
USMC
Join Date: May 2007
Location: SLc,UT
Posts: 300
|
Re: "Slowly but Surely" Big J's build thread...
These 2 parts go into that area http://classicheartbeat.com/catalog/...%20support.htm
and this http://classicheartbeat.com/catalog/...nt%20panel.htm I think on gmc pauls website there are pics of these parts installed
__________________
Semper Fi |
|
|
|
|
12-18-2007, 12:52 PM
|
#4 |
|
Registered User
Join Date: May 2006
Location: Philadelphia, Pa. 19454
Posts: 9,428
|
Re: "Slowly but Surely" Big J's build thread...
Don't know for sure, but I think the parts Durrty is showing might get tied into the torsion box.
The part you are referring to is not available as far as I know, it is really the back side of the 'B' post. That is why mine is still open, I haven't tackled it yet. It isn't a very hard pc. to make, just haven't got roundtoit. I'll take a pic of what is left of mine in a minute...
__________________
Semper Fi...Uncle Sam, you da man All parts offered to help are free, unless otherwise noted Dont try this stuff in my build thread, unless you have 55 years of mechanical OTJ training SAFETY FIRST AS usual, off topic They say your mind goes second, can't remember the first Jim Last edited by jaros44sr; 12-18-2007 at 02:59 PM. |
|
|
|
|
12-18-2007, 01:55 PM
|
#5 |
|
Can't wait to retire!!
Join Date: Feb 2003
Location: Corunna, MI
Posts: 1,575
|
Re: "Slowly but Surely" Big J's build thread...
Could this be it?
http://www.tri-proautomotive.com/ser...t-dooor/Detail Update: I just looked at it and I was wrong...that piece is behind the one that I put the link to.
__________________
 2009 4x4 Chevy Crew Cab 6.0 1989 4x4 Siverado (270,000 miles) 1972 4x4 Blazer 2007 Chevy Cutaway 1 ton 1970 Corvette (sons project) RIP - CLR 10/11/09 Last edited by Chevyman63; 12-18-2007 at 01:57 PM. |
|
|
|
|
12-18-2007, 03:05 PM
|
#6 |
|
Registered User
Join Date: May 2006
Location: Philadelphia, Pa. 19454
Posts: 9,428
|
Re: "Slowly but Surely" Big J's build thread...
Sorry, I had to run and do Christmas shopping
Here's some pics of the area in question I think, they are a little blurry since its white paint 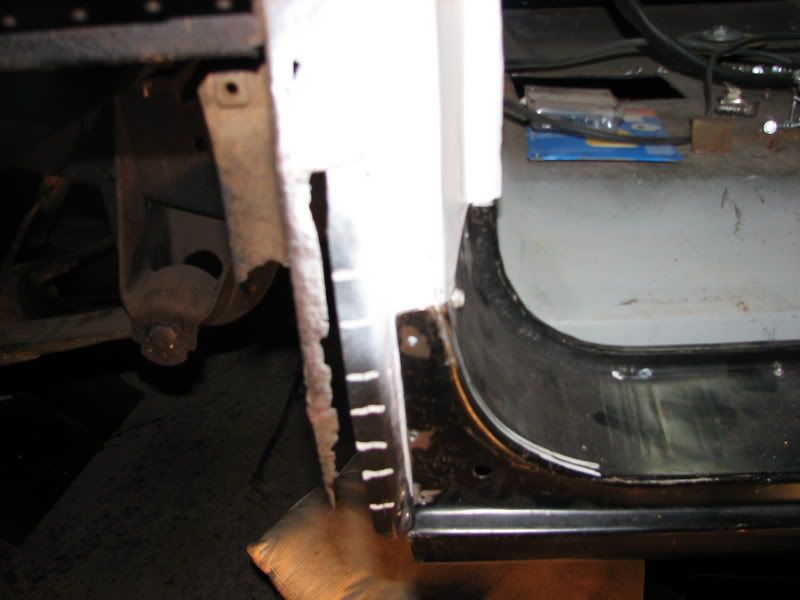 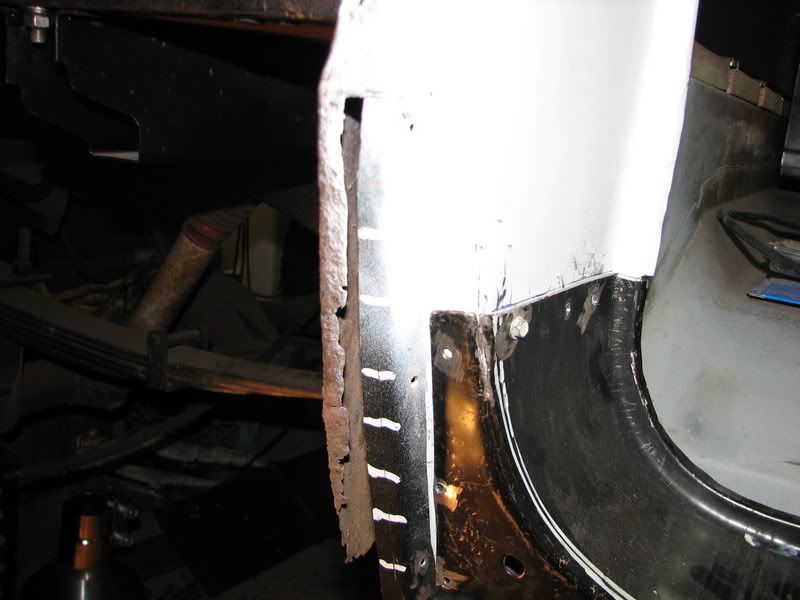 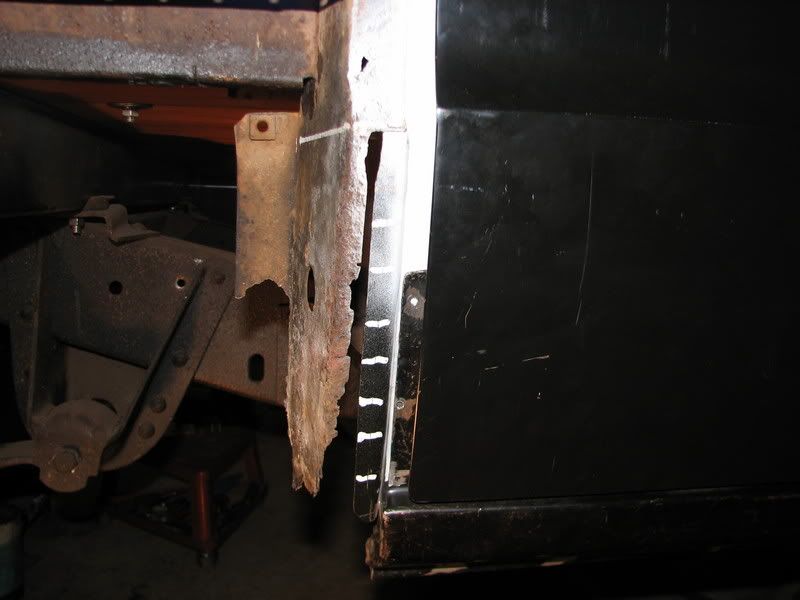  The second and third pic shows it best, the rusty pc. should continue forward about a 1/2" to 1", then bend at a 90 degree towards the interior. After this area is done then the lower forward 1/4 panel patch goes on top of this. It should extend all the way down to the rocker panel, but I don't know what it looks like, so just wing it Hope this helps
__________________
Semper Fi...Uncle Sam, you da man All parts offered to help are free, unless otherwise noted Dont try this stuff in my build thread, unless you have 55 years of mechanical OTJ training SAFETY FIRST AS usual, off topic They say your mind goes second, can't remember the first Jim Last edited by jaros44sr; 12-18-2007 at 03:18 PM. |
|
|
|
|
01-15-2008, 05:27 AM
|
#7 | |
|
Registered User
 Join Date: May 2006
Location: Wyman, Kentucky
Posts: 403
|
Re: "Slowly but Surely" Big J's build thread...
Quote:
The first piece I replaced was the piece with the hole in it. I used the hole as a reference and scribed a line across and cut it off the bedside. I then cut off the flanges from this piece so I could use what was left as a pattern. Then I tacked a square piece of metal roughly the size I would need to replace the rotted piece onto the bedside where the hole is and using the old piece I cleaned up, I placed it against the new metal and traced out an outline of what needed to be removed. I checked the contour before I cut any metal by laying a yardstick down the side of the front quarter panel and moving it down checking the line traced onto the new metal. The next piece was easier, I cut a piece of plate using the measurement off the flange still left on the bedside, appox. one inch and long enough to go the length of the first piece and bending it as I tack welded it. The last piece has an additional lip on it so it was a little more trouble. Again I cut another flat piece long enough to go the length of the first piece and I allowed enough width for the lip along the outside. I tack welded this piece the top next to the bedside and using a straight edge against the "B" pillar I drew a line down the metal so it would line up with the "B" pillar. After I scribed the line I allowed another 3/8" past the drawn line for the bent lip. Bend and tack the piece in place. Using my cutoff tool I cut a series of notches about an inch apart down to the last line drawn for the lip this would allow me to bend the metal for the lip. Bend the lip using a pair of vice grips and weld the lip up and grind down. Recheck the alignment and weld up the cracks. It's really hard to put in handwriting, but if you study the pics you can understand what I'm talking about. Hope this helps out and apologies for the highjack. Rusty
__________________
1972 GMC Jimmy, 4WD, 454 CI, 350 Turbo, 4" lift, 35" tires The math teacher said my son "Bubba" could be a mathmatical genius. cause he's got 13 fingers! |
|
|
|
|
|
01-15-2008, 03:04 PM
|
#8 |
|
Registered User
Join Date: May 2006
Location: Philadelphia, Pa. 19454
Posts: 9,428
|
Re: "Slowly but Surely" Big J's build thread...
Thanks Rusty, I thought that you did alot work in this area of your Jimmy. Good description and pics....thanks for the help. J.
__________________
Semper Fi...Uncle Sam, you da man All parts offered to help are free, unless otherwise noted Dont try this stuff in my build thread, unless you have 55 years of mechanical OTJ training SAFETY FIRST AS usual, off topic They say your mind goes second, can't remember the first Jim |
|
|
|
|
01-15-2008, 04:17 PM
|
#9 |
|
Its lookin' like a Blazer!
Join Date: Aug 2003
Location: Gods Country, KY
Posts: 1,773
|
Re: "Slowly but Surely" Big J's build thread...
No problem Rusty, we're all here to help. Everytime I see something like what you had to replace, I thank God and my uncle for being able to purchase the green tub, lol.....
I got some more work done today. Rebuilt the drivers door hinge and welded up a small crack in the door below the top hinge. I also finished up the blazer door conversion.... Got the patch cut out for the drivers floor but gave up on welding it in, lol.... I figured it was about time to hit the couch, lol... Don't think I'm lazy, I also rotated the tires on my car and cleaned it out in between workin' on the blazer lol.... I know the plate around the door latch isn't pretty. Keep in mind I'll be sandblasting everything and epoxy primering it all..... Last edited by Big J; 01-15-2008 at 04:19 PM. |
|
|
|
|
01-16-2008, 09:03 AM
|
#10 |
|
Registered User
Join Date: May 2006
Location: Philadelphia, Pa. 19454
Posts: 9,428
|
Re: "Slowly but Surely" Big J's build thread...
Hey J, any idea how much bed patch matrl. you need yet? Since your knocking the he!! out of the floorboards, I figgered you'll be working on the bed soon, LMK...J
__________________
Semper Fi...Uncle Sam, you da man All parts offered to help are free, unless otherwise noted Dont try this stuff in my build thread, unless you have 55 years of mechanical OTJ training SAFETY FIRST AS usual, off topic They say your mind goes second, can't remember the first Jim |
|
|
|
|
01-16-2008, 12:38 PM
|
#11 | |
|
Its lookin' like a Blazer!
Join Date: Aug 2003
Location: Gods Country, KY
Posts: 1,773
|
Re: "Slowly but Surely" Big J's build thread...
Quote:
I'm guessing I could use a couple 12x12 pieces, hopefully less, lol.... How much can ya part with? Another question.... I seen in your thread you just used some seam sealer. What kind should I get and how much does it cost? |
|
|
|
|
|
01-19-2008, 12:44 PM
|
#12 |
|
Registered User
Join Date: Mar 2004
Location: Sacramento, CA
Posts: 1,084
|
Re: "Slowly but Surely" Big J's build thread...
RustyParts, nice post on the B pillar repair. You do nice work. Do you remember off hand what gauges or thickness metal you use?
Thanks
__________________
'71 Jimmy, 350, SM465, NP205, 2in Tuff Country lift, 33s on rallies, TBI, softtop and hardtop"If life was fair you'd be able to afford one of each and a garage large enough to house them all." |
|
|
|
|
01-19-2008, 01:17 PM
|
#13 | |
|
Its lookin' like a Blazer!
Join Date: Aug 2003
Location: Gods Country, KY
Posts: 1,773
|
Re: "Slowly but Surely" Big J's build thread...
Quote:
|
|
|
|
|
|
01-19-2008, 06:56 PM
|
#14 | |
|
Registered User
Join Date: May 2006
Location: Wyman, Kentucky
Posts: 403
|
Re: "Slowly but Surely" Big J's build thread...
Quote:
__________________
1972 GMC Jimmy, 4WD, 454 CI, 350 Turbo, 4" lift, 35" tires The math teacher said my son "Bubba" could be a mathmatical genius. cause he's got 13 fingers! |
|
|
|
|
|
12-18-2007, 04:06 PM
|
#15 | |
|
Its lookin' like a Blazer!
Join Date: Aug 2003
Location: Gods Country, KY
Posts: 1,773
|
Re: "Slowly but Surely" Big J's build thread...
Quote:
 . .
|
|
|
|
|
|
12-18-2007, 04:16 PM
|
#16 | |
|
Registered User
Join Date: May 2006
Location: Philadelphia, Pa. 19454
Posts: 9,428
|
Re: "Slowly but Surely" Big J's build thread...
Quote:
If your rocker boxes are in tact, you my not see that area. The rear mounting plate of the torsion box comes all the way up into the second brace of the bed... J
__________________
Semper Fi...Uncle Sam, you da man All parts offered to help are free, unless otherwise noted Dont try this stuff in my build thread, unless you have 55 years of mechanical OTJ training SAFETY FIRST AS usual, off topic They say your mind goes second, can't remember the first Jim |
|
|
|
|
|
12-18-2007, 06:16 PM
|
#17 | |
|
Its lookin' like a Blazer!
Join Date: Aug 2003
Location: Gods Country, KY
Posts: 1,773
|
Re: "Slowly but Surely" Big J's build thread...
Quote:
No problem, theres a difference between hijacking and helping someone. You had me worried about what might be hiding so I walked over to the garage, crawled under and snapped some pics. Its all good! Not rusted out at all, surprisingly . The drivers and passenger side are both solid. I took a couple pics of what one of the previous owners did to install some steps, cut a big square out of the rocker box.
|
|
|
|
|
|
12-19-2007, 01:32 AM
|
#18 | |
|
Can't wait to retire!!
Join Date: Feb 2003
Location: Corunna, MI
Posts: 1,575
|
Re: "Slowly but Surely" Big J's build thread...
Quote:
__________________
2009 4x4 Chevy Crew Cab 6.0 1989 4x4 Siverado (270,000 miles) 1972 4x4 Blazer 2007 Chevy Cutaway 1 ton 1970 Corvette (sons project) RIP - CLR 10/11/09 |
|
|
|
|
|
12-19-2007, 01:33 AM
|
#19 |
|
Registered User
Join Date: May 2006
Location: Philadelphia, Pa. 19454
Posts: 9,428
|
Re: "Slowly but Surely" Big J's build thread...
Wow. that is prestine, except what the PO did. I'm glad for ya. That area did and is giving me fits J.
__________________
Semper Fi...Uncle Sam, you da man All parts offered to help are free, unless otherwise noted Dont try this stuff in my build thread, unless you have 55 years of mechanical OTJ training SAFETY FIRST AS usual, off topic They say your mind goes second, can't remember the first Jim Last edited by jaros44sr; 12-19-2007 at 04:31 PM. |
|
|
|
|
12-19-2007, 03:57 PM
|
#20 |
|
Registered User
Join Date: Mar 2004
Location: Sacramento, CA
Posts: 1,084
|
Re: "Slowly but Surely" Big J's build thread...
Your are lucky, those look great The inside fender pieces are pretty rusty on mine. I will need to make something, not sure how yet though. I don't think anyone makes a patch for this piece. It has some nasty bends/folds in it. If someone sees this and has tackled this, maybe they could open a new thread. I think the torsion box will be easy to fix. Good luck.
__________________
'71 Jimmy, 350, SM465, NP205, 2in Tuff Country lift, 33s on rallies, TBI, softtop and hardtop"If life was fair you'd be able to afford one of each and a garage large enough to house them all." |
|
|
|
|
12-19-2007, 07:06 PM
|
#21 |
|
Its lookin' like a Blazer!
Join Date: Aug 2003
Location: Gods Country, KY
Posts: 1,773
|
Re: "Slowly but Surely" Big J's build thread...
I'm going to clean up what they cut out of the boxes and weld some plate back in. Shouldn't be a big deal. I'll pour the Por-15 to it before closing it in. I need to finish the dash first. I tend to have a.d.d when it comes to this stuff. I'll start on this part then look at that part then find something else and before I know it I have 10 little projects going on........
 Anyone heard the A.D.D song on the Bob and Tom show? Funny stuff.... Anyone heard the A.D.D song on the Bob and Tom show? Funny stuff....
|
|
|
|
|
| Bookmarks |
|
|


 Hybrid Mode
