
|
Register or Log In To remove these advertisements. |
|
|
|
|||||||
 |
|
|
Thread Tools | Display Modes |
|
|
 04-03-2021, 03:17 PM
|
#1 | |
|
Registered User
Join Date: Dec 2015
Location: Beaver Falls, Pa
Posts: 165
|
Re: Roof patch causing warp / oil canning
Quote:
I look at it this way, years ago someone made a mess by drilling the hole & then tightening down the antenna, raising up the area around it with the little bar/foot (Im guessing was the reason for you to cut the bigger hole?)...you didnt help matters by welding in the square cornered patch. Without cutting some inner cab away to properly work the weld area, the whole thing is going to be a compromise at best. The middle of a Roof (or Hood) is NOT the place to learn/practice...get something stuck in there to keep the water out & move on. You may see a "ghost line" around you patch under certain light being the sun heat will be beating on it some, but the outcome for the situation (no access, somewhat limited tools & knowledge) I feel its the best answer. Like I said earlier, Ive done several antenna holes (Roof & Trunks) just like what you had starting out without a problem. A couple I just tapped down a bit & glued a piece on top. NOT Robert-like, but for a 6 or 8 year old ex-police car...it works real well If its something you have interest in, I can go into detail of how to prep the parts, ect for the best results. My intentions are not to be-little your efforts or ability, just being a realist with the situation. Lorne |
|

|

|
|
04-04-2021, 08:50 AM
|
#2 | |
|
Registered User
Join Date: Jan 2013
Location: Leonardtown, MD
Posts: 1,636
|
Re: Roof patch causing warp / oil canning
Quote:
 Sometimes we do what we have to do. In this case as long as the truck is stock height nobody should see any ghost lines..
__________________
Robert |
|
|
|
|
|
04-04-2021, 09:21 AM
|
#3 |
|
Registered User
Join Date: Dec 2015
Location: Beaver Falls, Pa
Posts: 165
|
Re: Roof patch causing warp / oil canning
THAT is my point! I love to follow along to your posts & have some pretty good skills...I think that is why I appreciate what guys like you can do. Sometimes the vehicle design, time, tools & skills should just lead in another direction for some folks.
Get it done & enjoy the truck is my thoughts. If the worst/most noticeable spot on the whole truck is that ghost line on the roof...the man did a mighty fine job for his first rodeo! Just my Thoughts, Lorne |
|
|
|
|
04-04-2021, 11:08 AM
|
#4 |
|
Registered User
Join Date: Jul 2018
Location: Catskill Mountains,NY
Posts: 8,176
|
Re: Roof patch causing warp / oil canning
This guy has some great videos and explains everything in great detail without getting to technical
https://youtu.be/_u31t13QO6A
__________________
Mark 72 c20 custom camper Husky edition, 66 SS396 Chevelle 1964 Hawk, 63 Avanti,62 lark 1969 AMX , 1968 c20 stepside ,85 K20 1977 Suburban sold 68 anniversary. |

|
|
|
04-04-2021, 09:54 PM
|
#5 | |
|
Registered User
Join Date: May 2013
Location: You're the only 10 I see
Posts: 367
|
Re: Roof patch causing warp / oil canning
Quote:
__________________
1972 C20 |
|
|
|
|
|
04-05-2021, 02:03 AM
|
#6 |
|
Registered User
Join Date: Jan 2013
Location: Leonardtown, MD
Posts: 1,636
|
Re: Roof patch causing warp / oil canning
Some casual observations... I would not recommend any novice use a 24 or 36 grit sanding disc on a 7" disc grinder for removing welds, as was shown in the video. Too much heat generated, can't see where you're sanding, a recipe for disaster when someone sands half the panel thickness away, or worse yet, sands through. For the most part his welder is not set up hot enough, or there would not be so much rework after grinding. If you need to reweld after grinding, turn up the heat, you are not getting a full penetration weld. And now you need to grind again.
Part of the reason we use butt welds is to duplicate the original metal "flavor and feel" so that when someone looks in the trunk or under the floor pans, they don't see a flange repair, or have to contend with ghost lines on exterior painted panels. If we can effectively cut out damaged (rusty) metal, butt weld in a new section, planish/metal finish/filler as needed, we can have an invisible repair that for all practical purposes should be a permanent repair. The patch is normally already shaped to match (in the case of repops) so that the crown of the patch matches the existing panel. (NORMALLY) Part of the reason you see recommendation to use TIGHT butt welds, is that it eliminates open area that allows any panel movement, ie: as the weld shrinks, the panel pulls together. If the crown of our patch used to match prior to welding, weld shrinking along with the panel's pulling closer together (due to the gap) is going to pull in some of the crown. If it is a flatter crown, such as the middle of a quarter panel or top of a roof/hood, it is more noticeable as the crown in these areas is normally minimal/just enough to maintain the shape, and may result in oil canning. If it is a concave crown, such as a reverse where the wheel opening flare comes outward, then the weld seam has a tendency to pull outward as it shrinks. The following pictorial shows an exaggerated crown and gap primarily so you can see it in such a small area. But it shows what happens as weld shrinkage and panel movement pull at the surrounding area. In the bottom view, the red line depicts where the crown was originally. 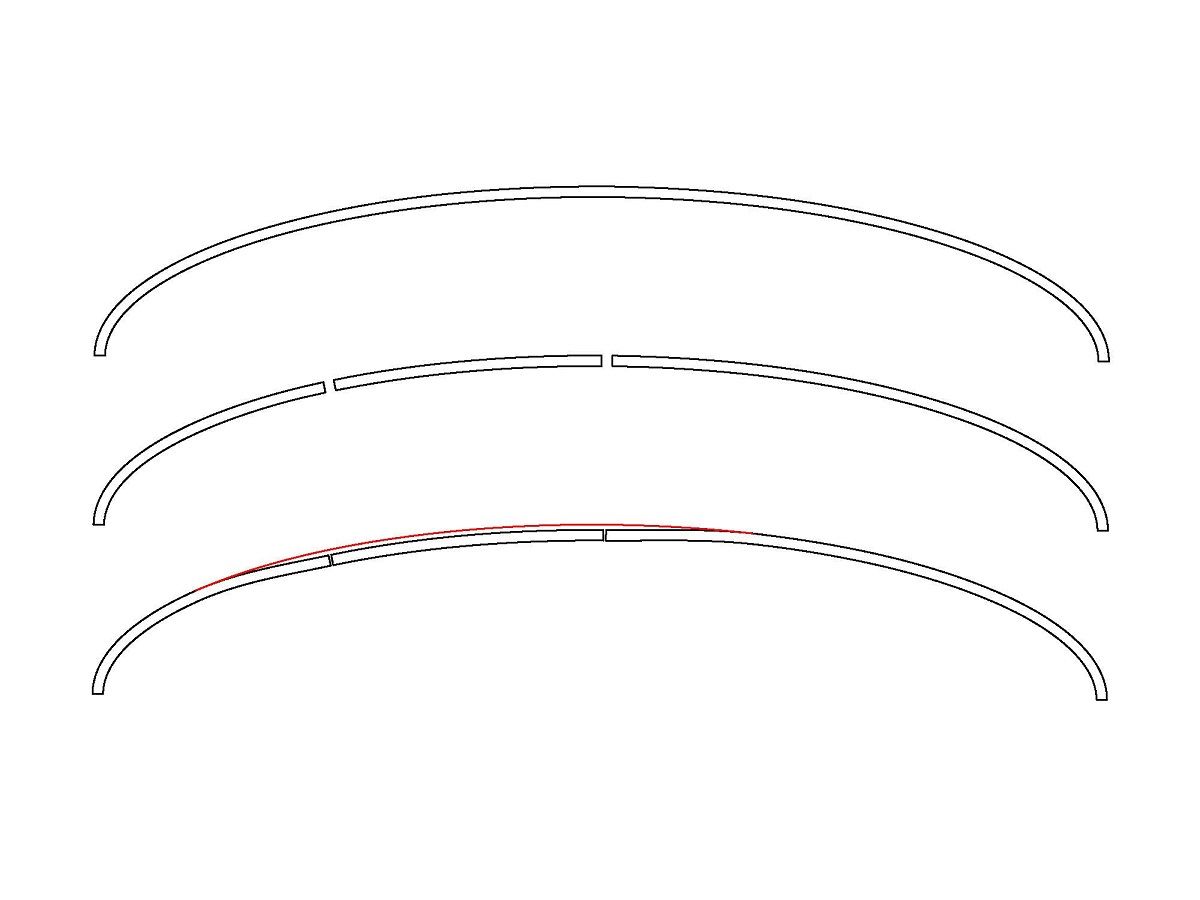 With tight butt welds we do need to planish in order to remove any deformation caused by shrinking, and add some stretch back into the area. This should be the extent of our planishing effort, as the tightly fitting panels prevent the panel pull from adjacent areas (that a gap allows, resulting in loss of crown). In the case of any gappage around a patch, we would need to planish even more to add enough stretch to overcome this loss of crown, or add filler as needed. Looking at the quarter panel in the video, and welding that took place, one would expect in the case of a normal butt weld that the edges of the panels against each other will be a positive stop against any pull from adjacent areas. The only planishing we should need to do is to overcome any shrinking issues due to weld heat. While the theory looks good on paper, the angle cut did indeed close up the gap when compared to a straight cut. But it did not totally eliminate it. My concern with this type cut is that two angled surfaces do not provide the positive "stop" that a truly butted panel does in preventing panel pull from adjacent area. After the grinding process is done, checking the weld seam with a 6" ruler may show how flat that single weld is, but our main concern should be the crown across the entire patch to see if it has pulled inward causing a loss of crown. A defect such as that will be a pain to correct, filler or otherwise. I'm not intimately familiar enough with the method to say this will indeed be a concern. But these thoughts are more cautionary, to give you things to be aware of, to look for.. if you do give this method a try.. For the quarter panel and the upper and lower weld line he used, I would expect any shrinking/panel pull to cause the following issues to the crown: 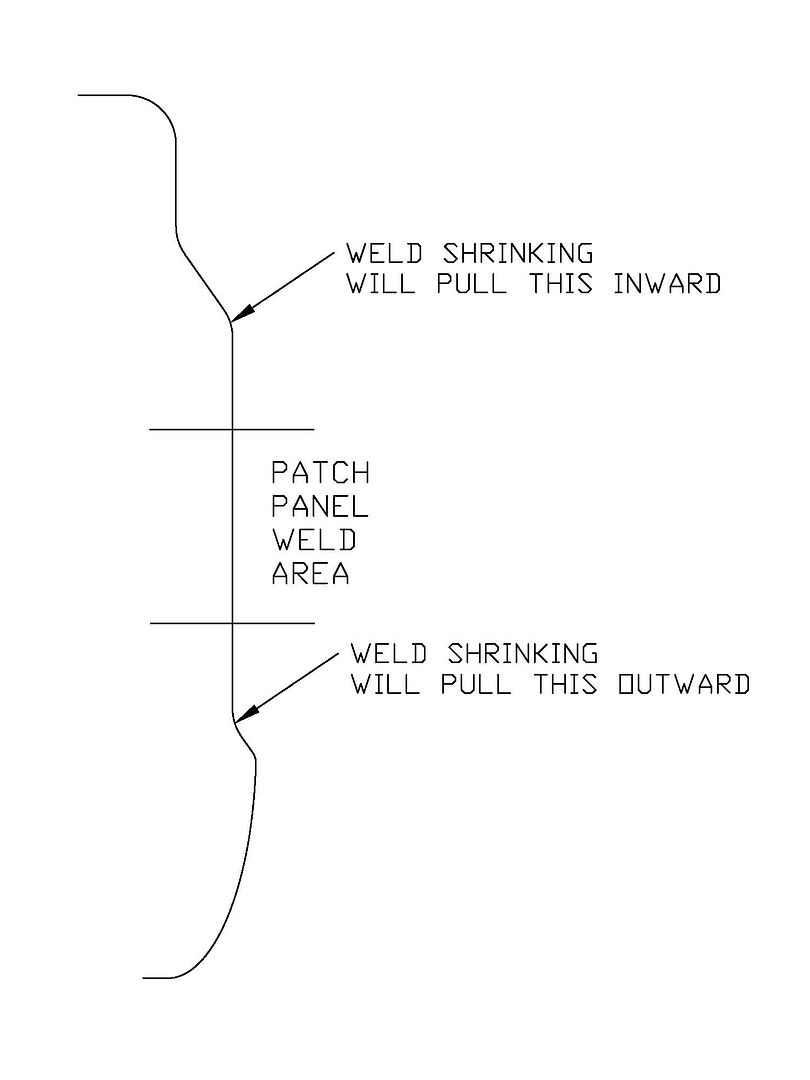 ..and to a lesser extent, the slight crown from front to back, as the weld shrinks, will pull slightly inward. Armed with this theory on shrinking and panel pull, these are merely things to look out for. More planishing perhaps may be needed to remove any defects that might show up. If you plan on using this method for your roof skin, I would find something to practice on first for some real world experience..
__________________
Robert |
|
|
|
|
04-04-2021, 09:28 PM
|
#7 | |
|
Registered User
Join Date: May 2013
Location: You're the only 10 I see
Posts: 367
|
Re: Roof patch causing warp / oil canning
Quote:
I have not looked into the metal adhesive up to this point, and havent heard of it to be honest (did I say I was ignorant yet?). I must say I am a bit skeptical of a product like this but do like the idea of avoiding this issue altogether. Is there a drawback to the metal adhesive? is there a risk this bond will break in 10 years and I will have a major issue? I do need to look into this in more detail. One additional option I thought about was to take hybrid approach to the recommendations so far: I could cut this circular patch as precise as possible and weld in as clean and slow as possible and cross fingers/hope/pray there is no warping. If there is warping, I could cut a square out of the inside roof liner to get a dolly behind it if needed and properly correct the warping. I could then metal adhesive the roof patch back in place, and put a headliner in the truck to cover the patch since there are some grooves in this metal here I could never clean up to look 100%. I'm still mulling this over and thinking through the advice so far before taking any action - please keep comments and advice coming, thanks everyone for the help.
__________________
1972 C20 |
|
|
|
|
|
| Bookmarks |
|
|


 Hybrid Mode
