
|
Register or Log In To remove these advertisements. |
|
|
|
|||||||
 |
|
|
Thread Tools | Display Modes |
 12-23-2021, 02:02 AM
|
#1476 |
|
Registered User
Join Date: Dec 2012
Location: Rochester, KENT
Posts: 10,478
|
Re: GRIZZs 79 - 2WD BLAZER Challenge over in London, England. ~Its not a Project
Being Awake since 03.20 sucks.
Stripping the MX5 donor - Part 2 When we started stripping the donor, @nickwheeler told me that getting out the wiring loom and the dash etc out would take longer than the engine and gearbox. Keep in mind that neither of us had ever stripped one before, so a lot of mini-dead ends, fighting parts, and trying to remove parts that maybe did not need to be removed. Like the exhaust down-pipe to where the catalytic converters been cut out. So Nick landed by 9.45 and a coffee and chat later, we were going at it. I had opened the shop by 08.00 anyway and moved some stuff about already. It was a long day really, and pics all look the same, but we were busy all day and again, some jobs were a nightmare. 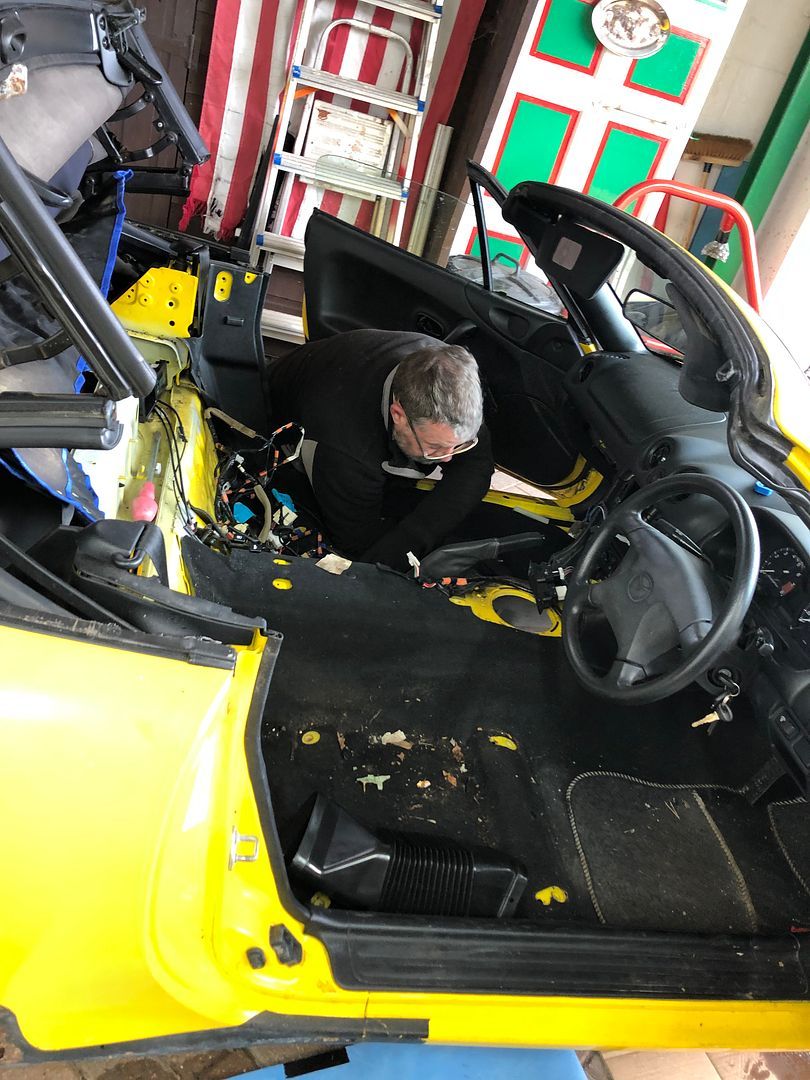 Including setting fire to the car, what a stinker that was too. ECU hidden in the footwell behind a rusted down footplate, and all the fasteners rusted to hell. Captain Grinder to the rescue. 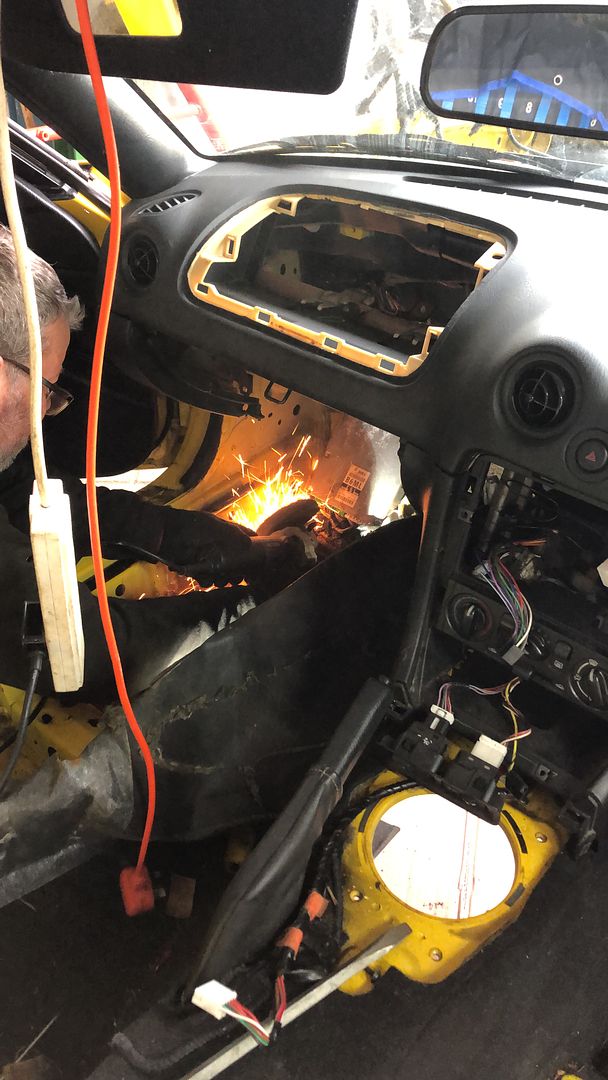 Speaking of useful tools. The strip light did duty all day for us, lighting up the interior as we went along. 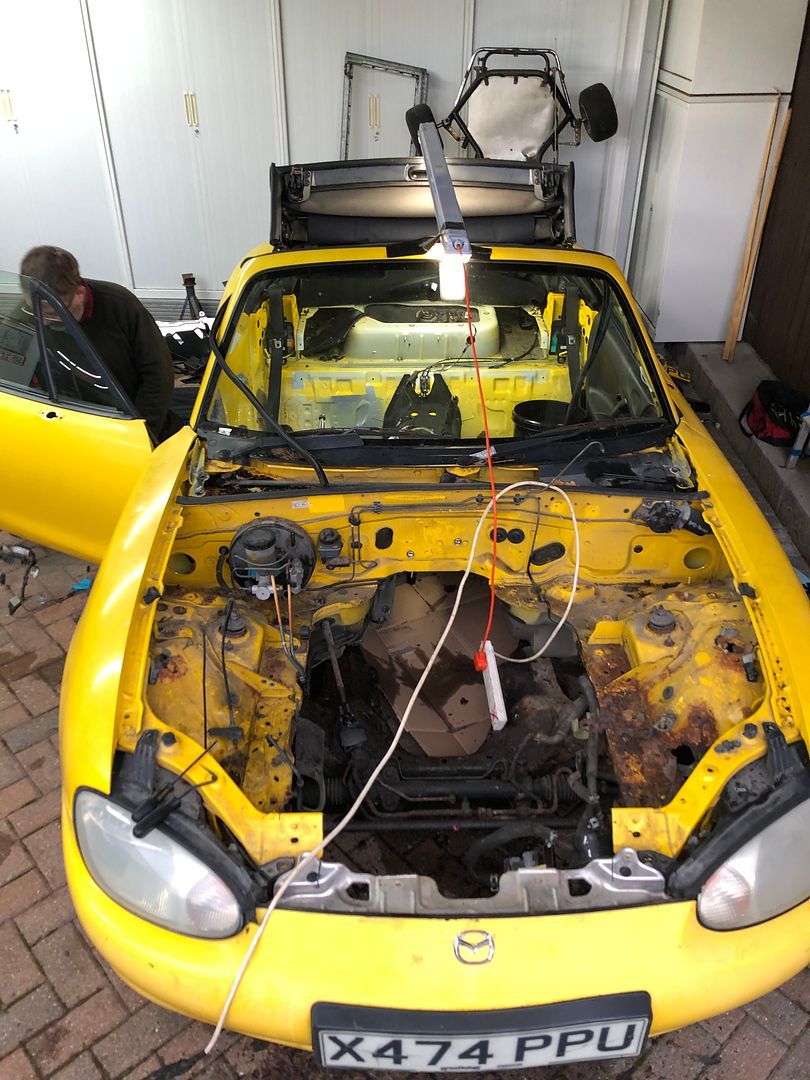 I managed to get the steering wheel, airbag etc off without hurting myself. Thats a lot of clever stuff right there.  Nick kept reminding me, we were fortunate that it did not have to go back together there. And we took a brief respite to go offer up the clocks to the Rezin Rockit dash. Looks like it should work. 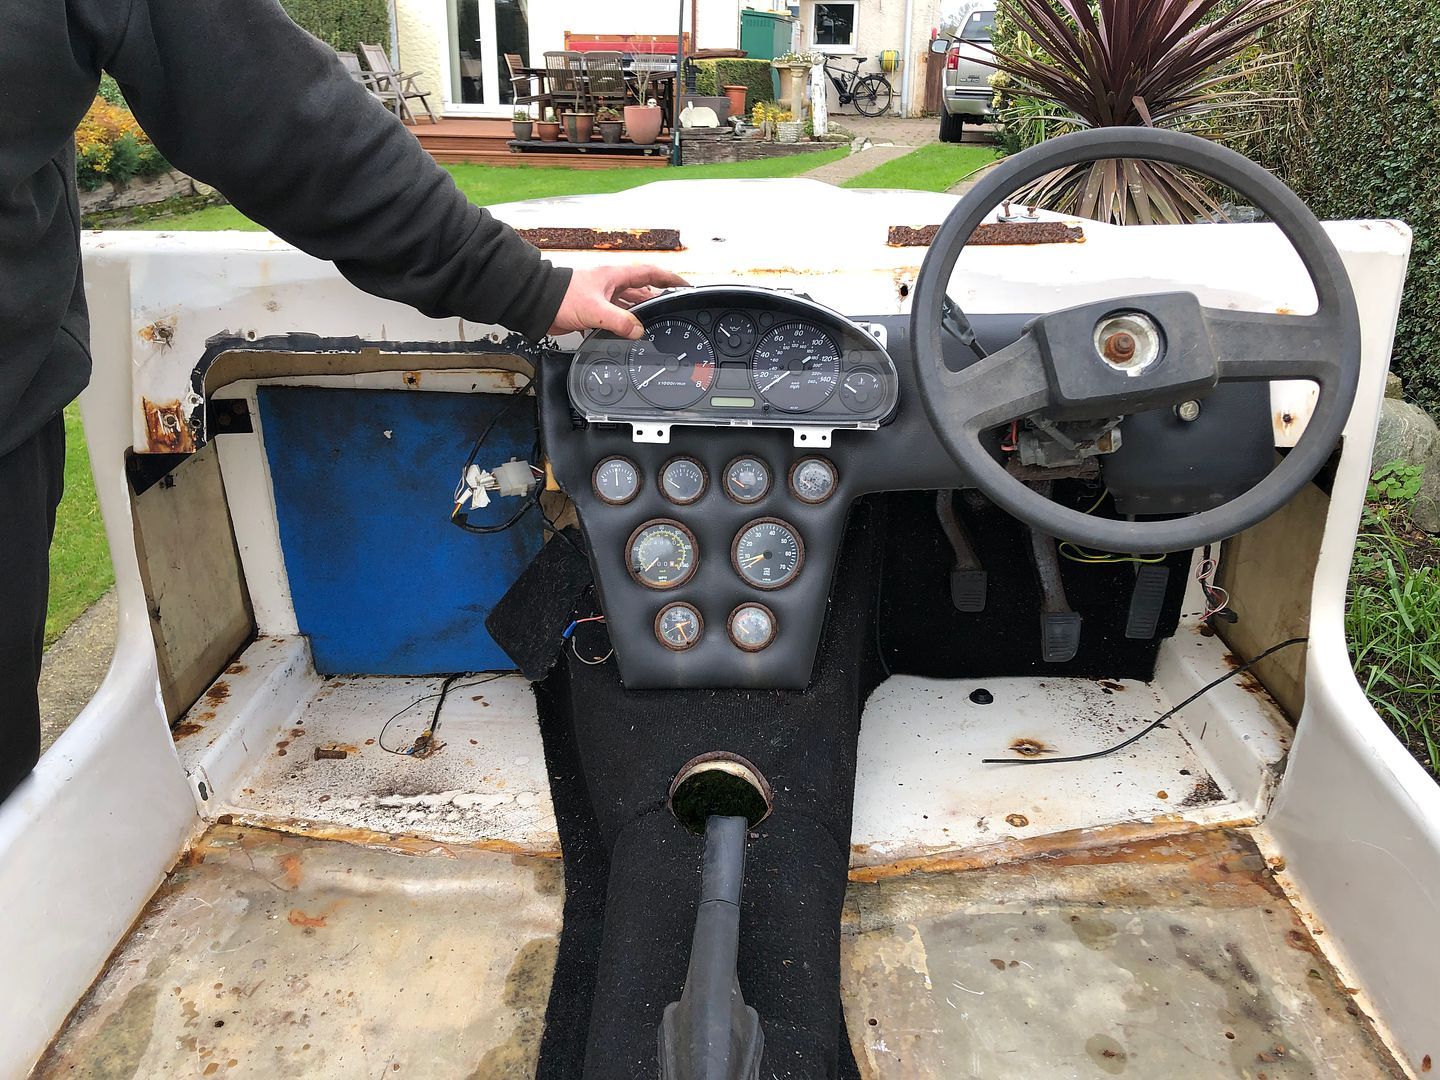 Then back to the struggle, which was real.  Marking the loom clearly as we went along since starting to remove it all the day before yesterday made a ton of sense. As does plugging as much of it back together again before stashing it away.  Eventually leaving us with this lot, plus the engine loom reattached to the engine etc. This pic taken by 4.30  By 5.30 this was the scenario .. Time flies when there is a lot to do.  6.15pm And having gone back like a drunk wanting to get one more kick in into the guy on the ground, Nick and I had pretty much run out off stuff to do and it was getting cold again. But we went back to remove the wipers, arms and motor as, if you recall, I had removed the screen and 3 original wipers months ago. I still need to figure out if I can run the final car through MOT without wipers if the screen can be folded down onto the bonnet, in effect leaving it without a screen. So by 6.30 this happened .. 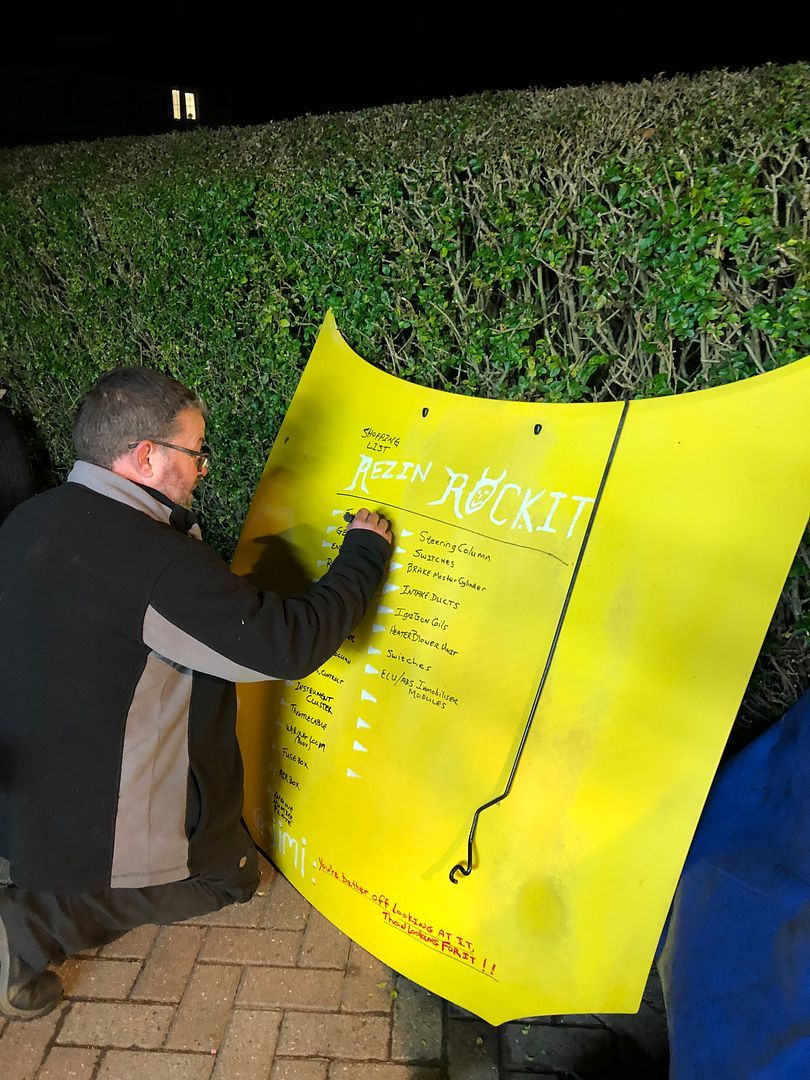 Leaving us with this. 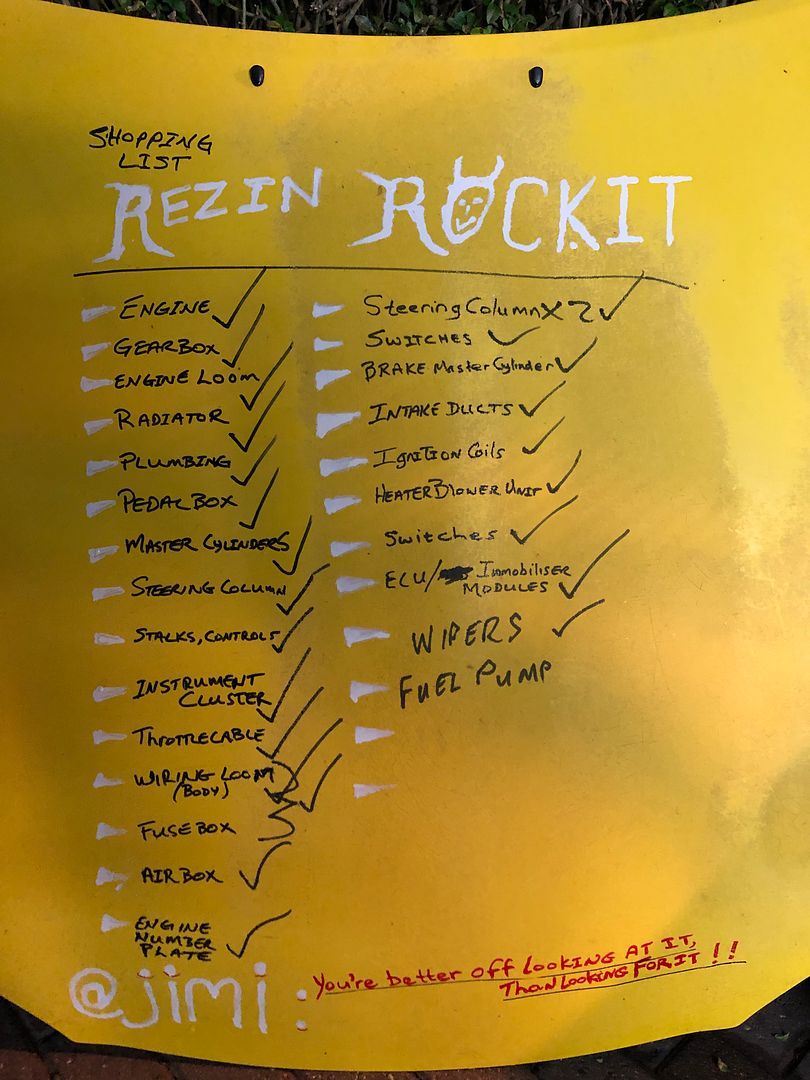 It was a long, rewarding day. Tools packed away, coffee, warm up and more chat, planning and scouring Kitcar Solutions website for bits I will need next, like a pair of rubber gearbox mounts. For today I have to remove the fuel pump, sender unit and raise the rear to get the propshaft out. Then swap around all the piles of car, parts, scrap before Christmas. The MX5 fuel tank seems inaccessible so another plan will be made. Not removing that rusted rear subframe. 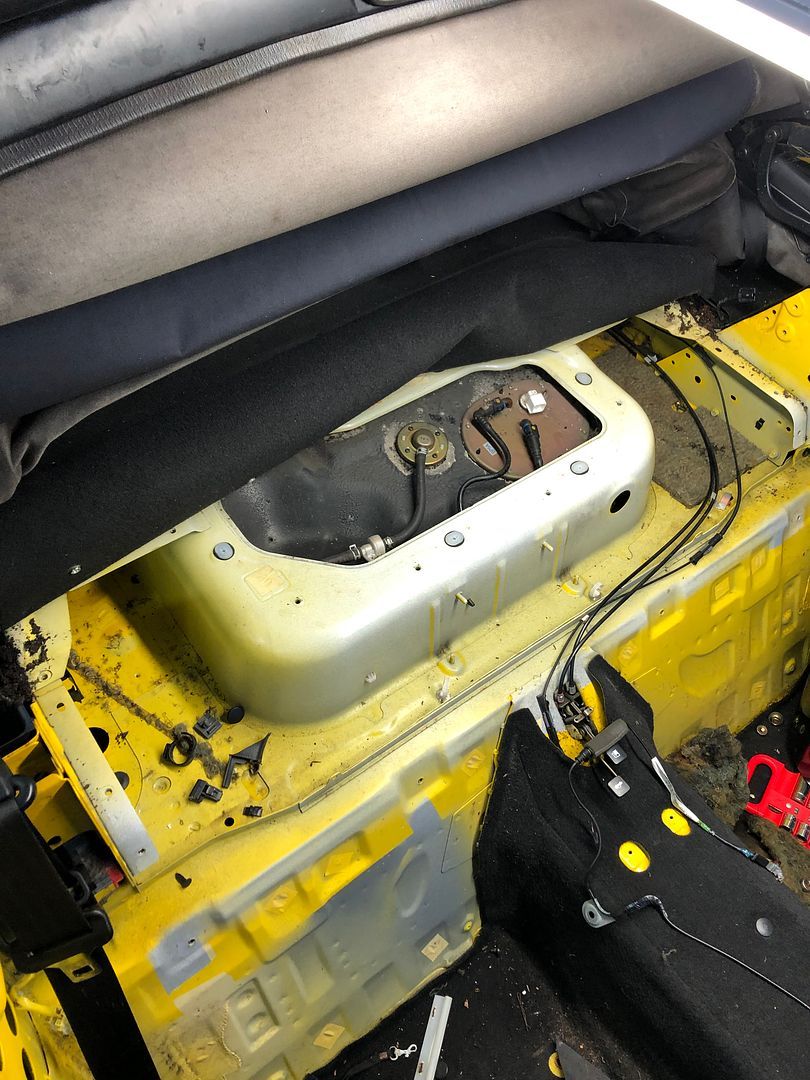 Later gang. .
__________________
MY BUILD LINK: http://67-72chevytrucks.com/vboard/s...585901]Redneck Express - 1966 C10 Short Fleetside MY USA ROADTRIPS http://forum.retro-rides.org/thread/...2018-humdinger IF YOU CAN'T FIX IT WITH A HAMMER, YOU'VE GOT AN ELECTRICAL PROBLEM MATE. |

|

|
|
12-23-2021, 04:33 PM
|
#1477 |
|
Registered User
Join Date: Dec 2012
Location: Rochester, KENT
Posts: 10,478
|
Re: GRIZZs 79 - 2WD BLAZER Challenge over in London, England. ~Its not a Project
First a video summary of yesterday and a countdown by @nickwheeler.
Really was an amazing feeling getting to this point. I am so pleased at the pace we were able to lay out for the two days. Resulting in this video: Click Link. . https://youtu.be/KrMioNy9z80 This morning I needed to get some food early, before the world and their cat was out in the shops. So I popped into Aghabridge and bought a roll of brake pipe and also a pair of M8 rubber mounts, to create the gearbox chassis mount. The rubber mounts were £18.00 for the pair, kinda eye watering, but I did not have many options as I may be getting onto this sooner than later and postage and shipping is a bit silly this time of the year. 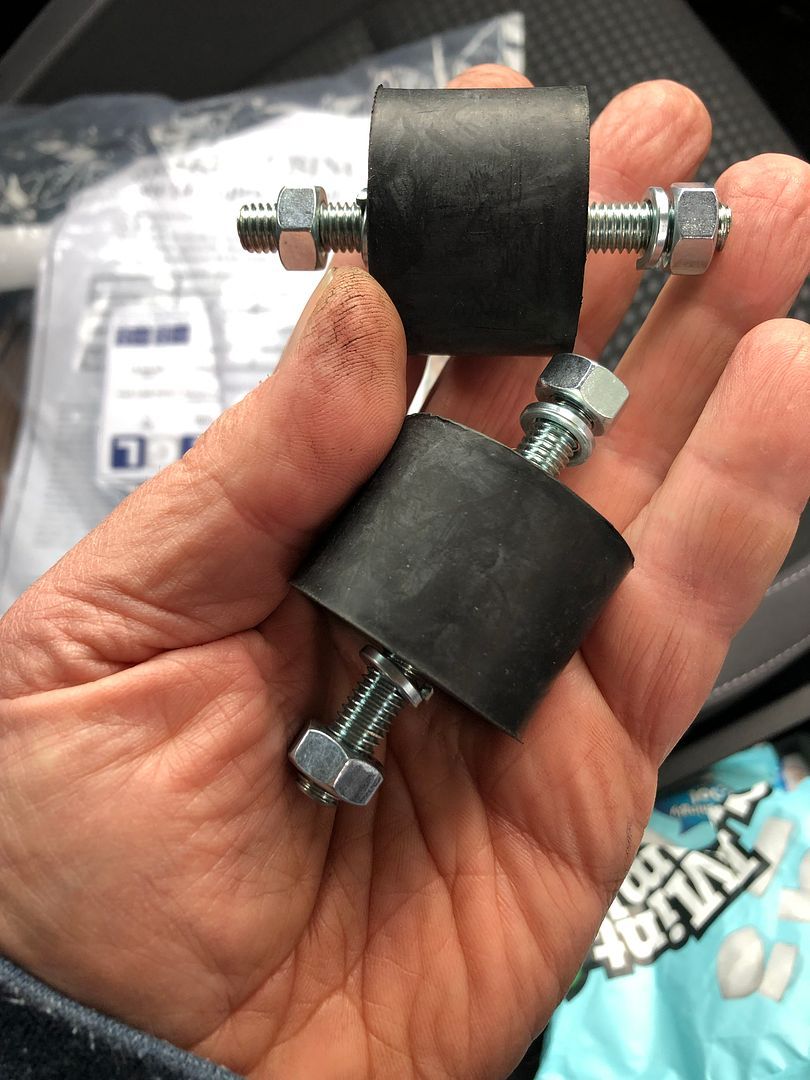 Back home I dealt with a load of work related stuff, after all, work does come first. Then later I popped down and lifted the rear end, fought the exhaust system, broke two 1mm grinder blades as the exhaust was not cooperating. Then cut the hangers out back, and managed to cut the pipe over the rear axle, rescuing the small resonator which looks to be stainless. I also got the impact wrench and removed the driveshaft bolts, ticking off another item on the list. Then I got inside the car and got to the final item . Fuel tank parts. 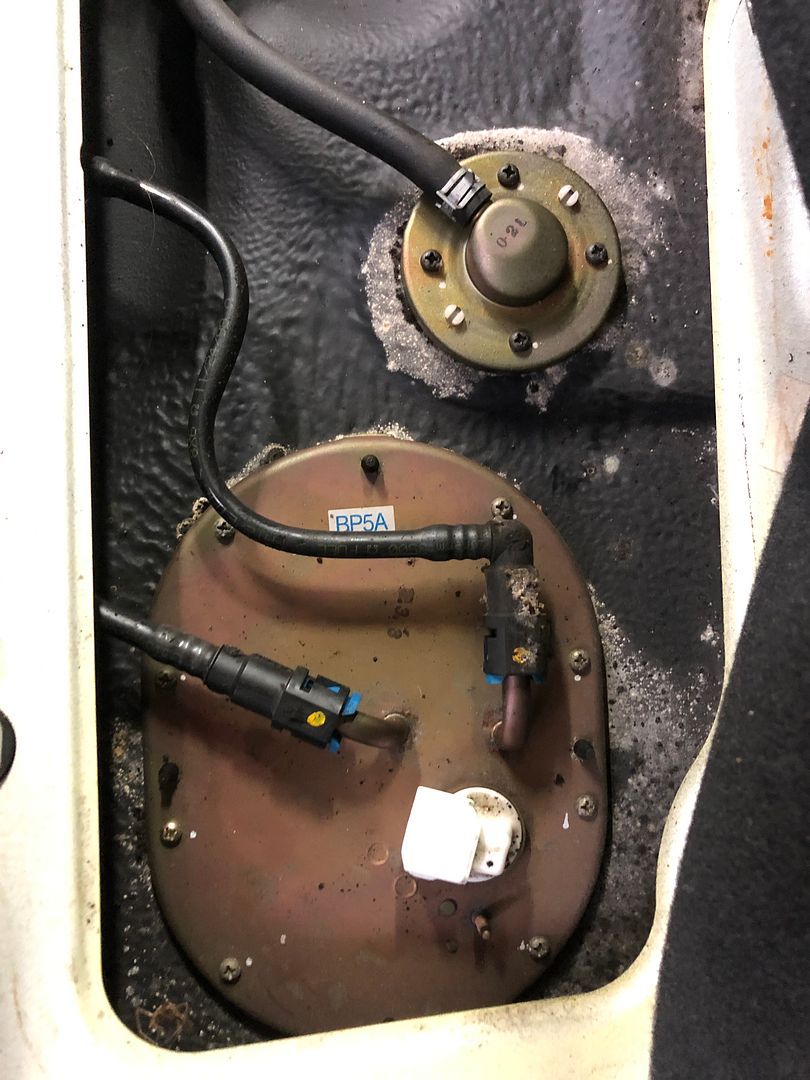 Final tally .. 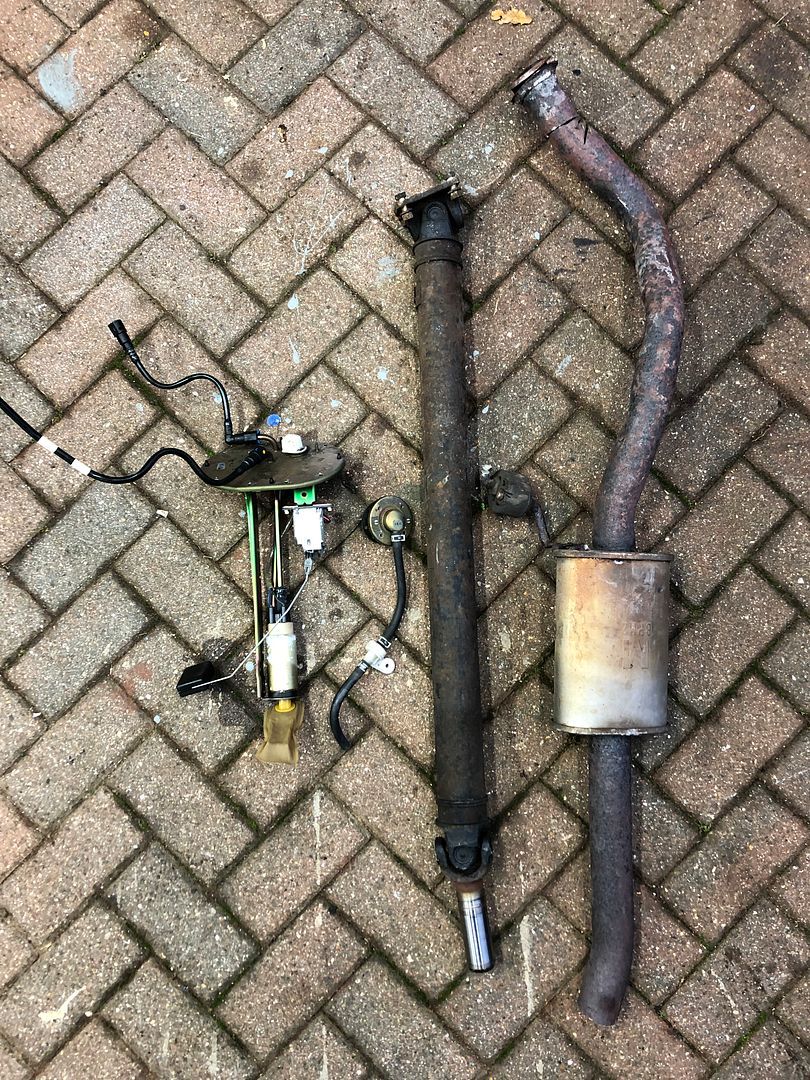 The next job was to pack all the parts that had been removed, back into the car, tidy up the carport. 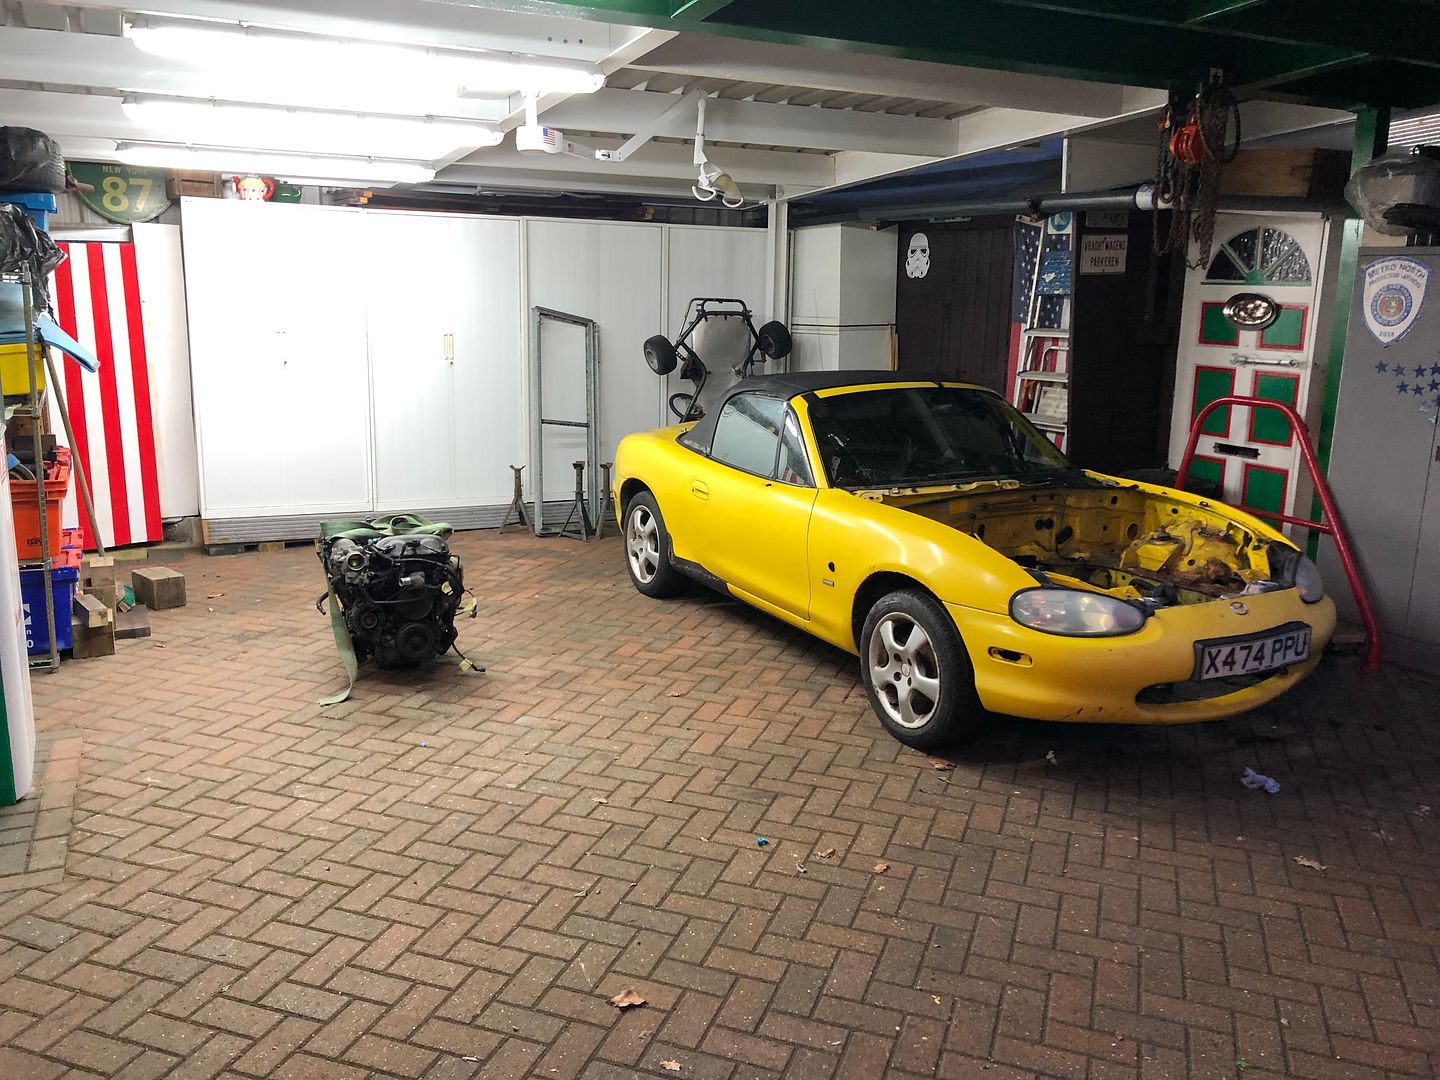 Then came the shuffle .. 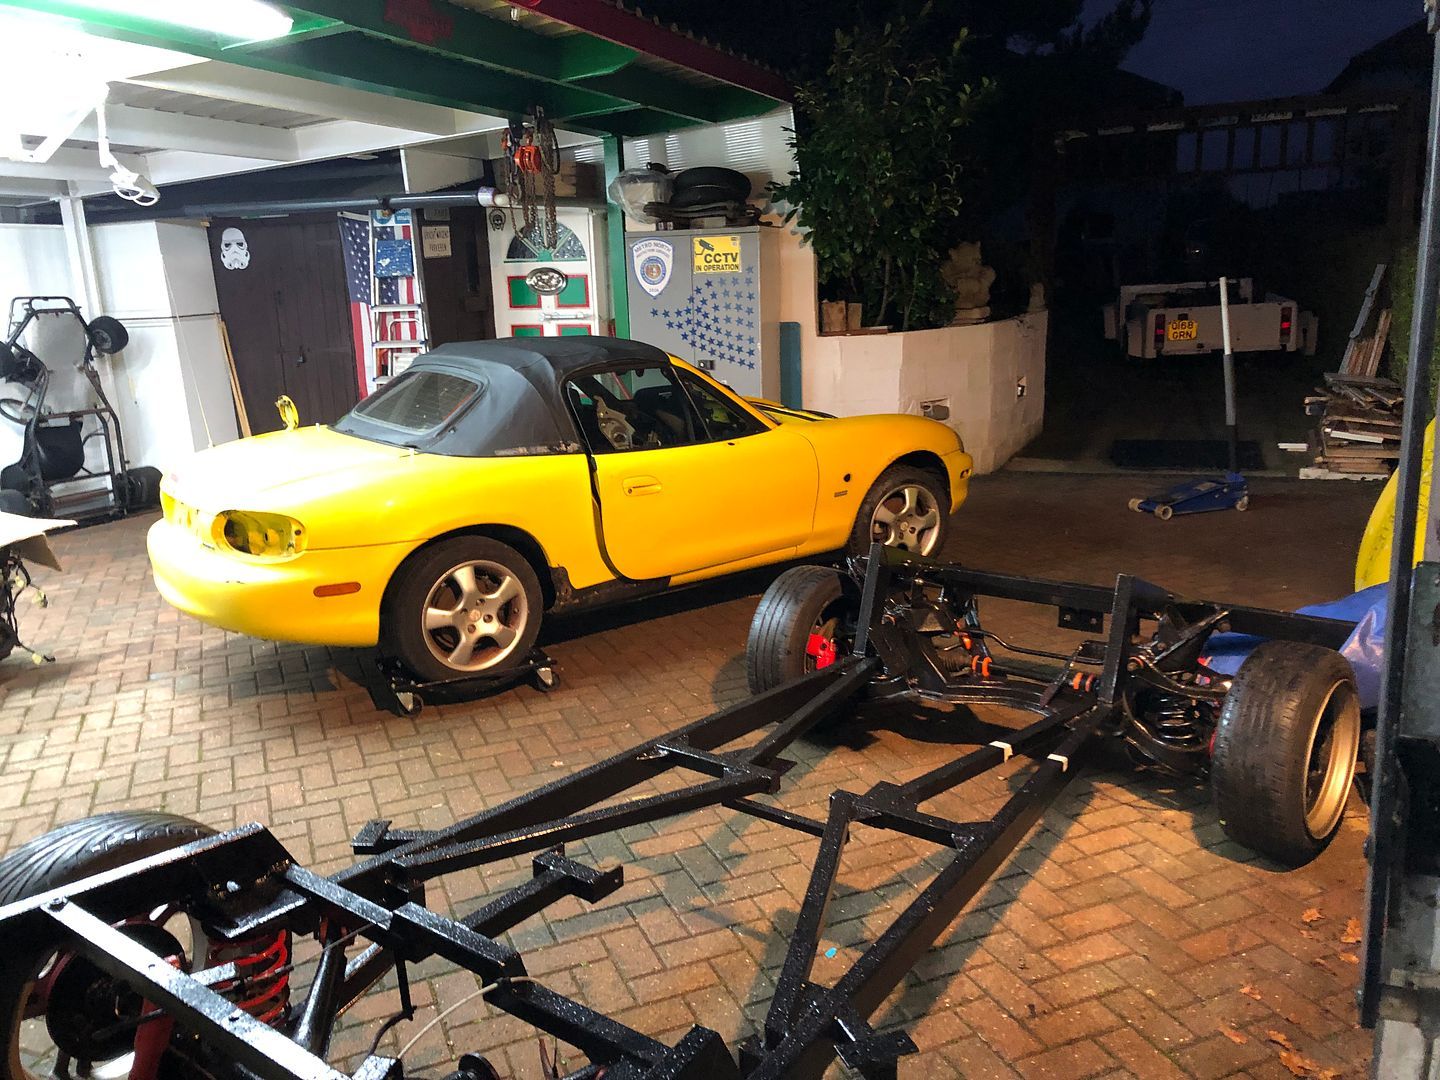 Also got the hoist in on the motor as it was not in the right place, middle of the carport.  And a mobile engine and gearbox. 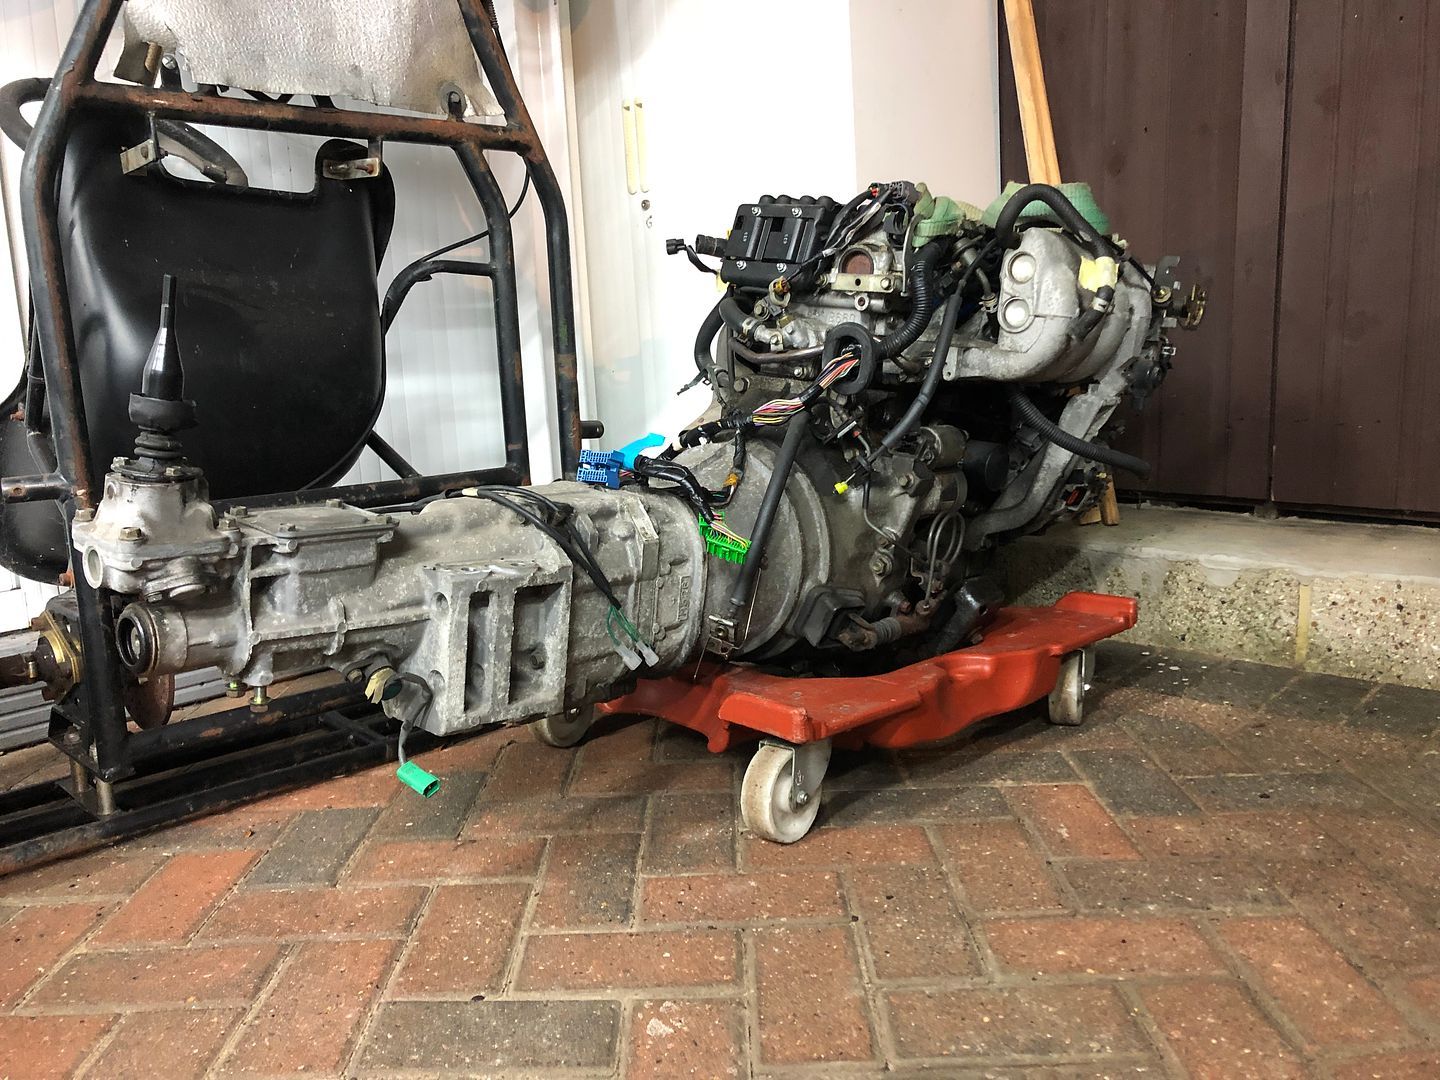 After a lot more pushing and shoving I had the carport sorted. The MX5 is ready for @KevFromWales to collect it again At this point Mickey came around to check up on me, he had had quite a few pints at lunchtime and managed to sleep all afternoon . Typically he asked why I had not called him to come and help . Drunks .. bloody useless on a job, just get in the way. Anyway, I was happy. 5.30 and today jobs were wrapped up. 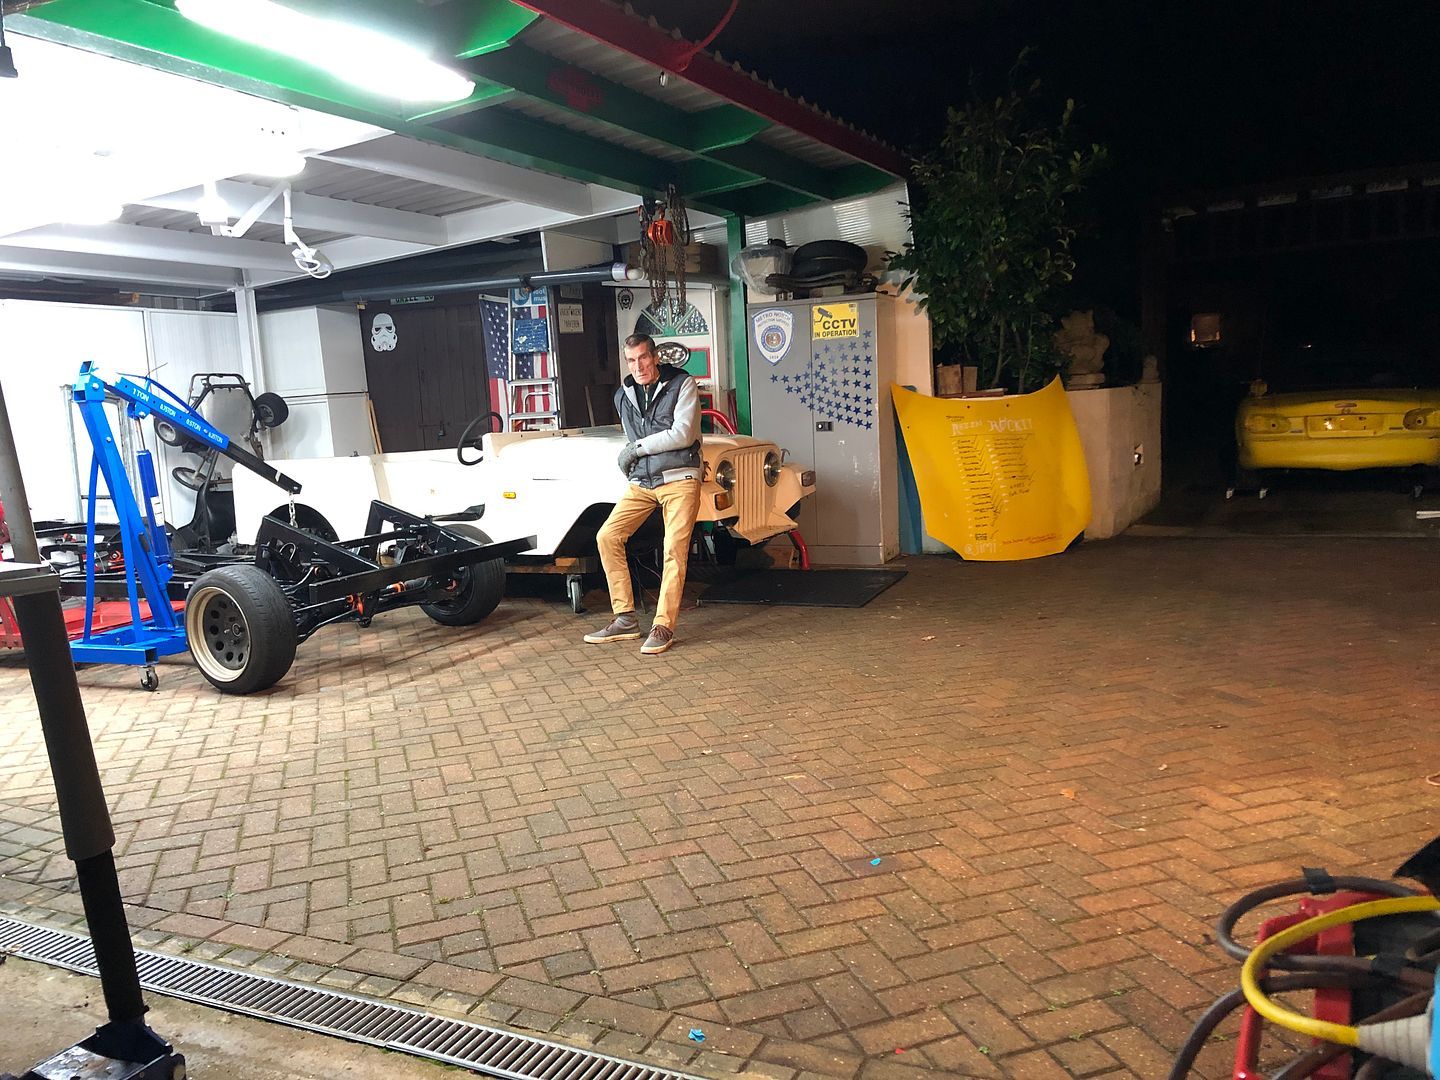 I am on vacation from tomorrow, so a few things may happen. But I am also spending some time with Sally as she is incredibly tolerant of me and my garage time. Merry Christmas everyone.
__________________
MY BUILD LINK: http://67-72chevytrucks.com/vboard/s...585901]Redneck Express - 1966 C10 Short Fleetside MY USA ROADTRIPS http://forum.retro-rides.org/thread/...2018-humdinger IF YOU CAN'T FIX IT WITH A HAMMER, YOU'VE GOT AN ELECTRICAL PROBLEM MATE. |
|
|
|
|
12-24-2021, 05:38 AM
|
#1478 |
|
Registered User
Join Date: Dec 2012
Location: Rochester, KENT
Posts: 10,478
|
Re: GRIZZs 79 - 2WD BLAZER Challenge over in London, England. ~Its not a Project
This morning when it got light, I went to look, gloat, plan, but it did not last long as it is chilly and damp outside.
Ready to be dragged up and out the front for collection. 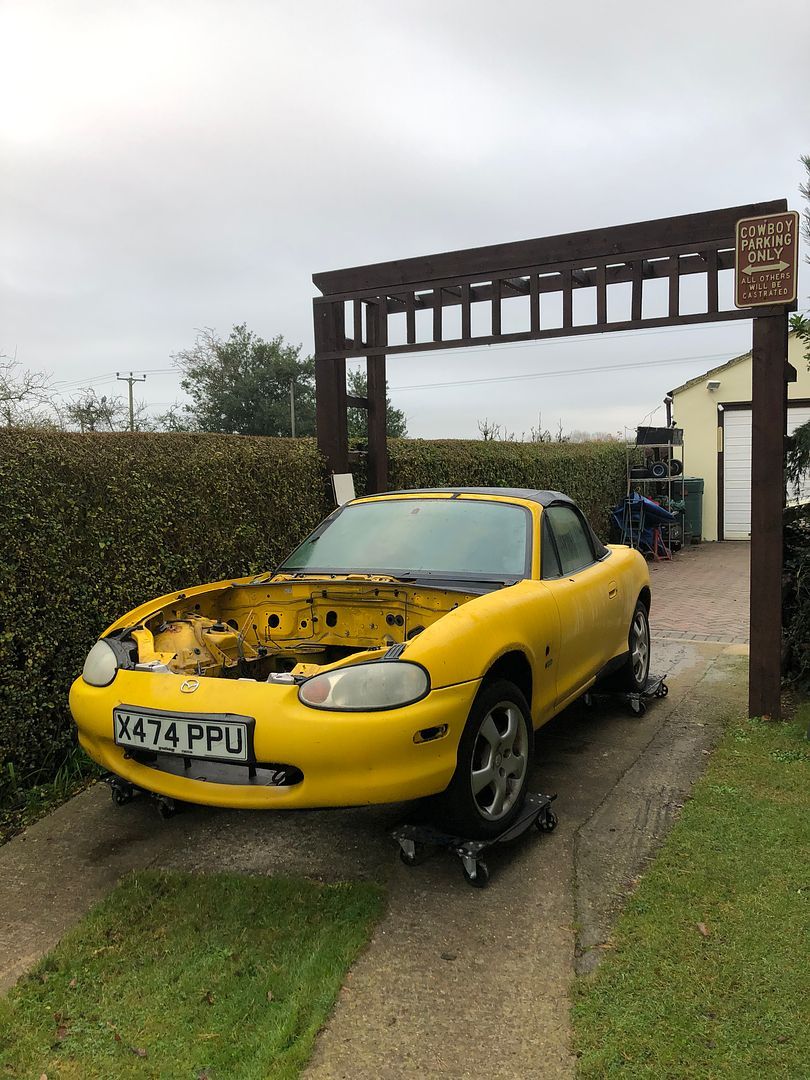 Engine bay certainly is empty now. 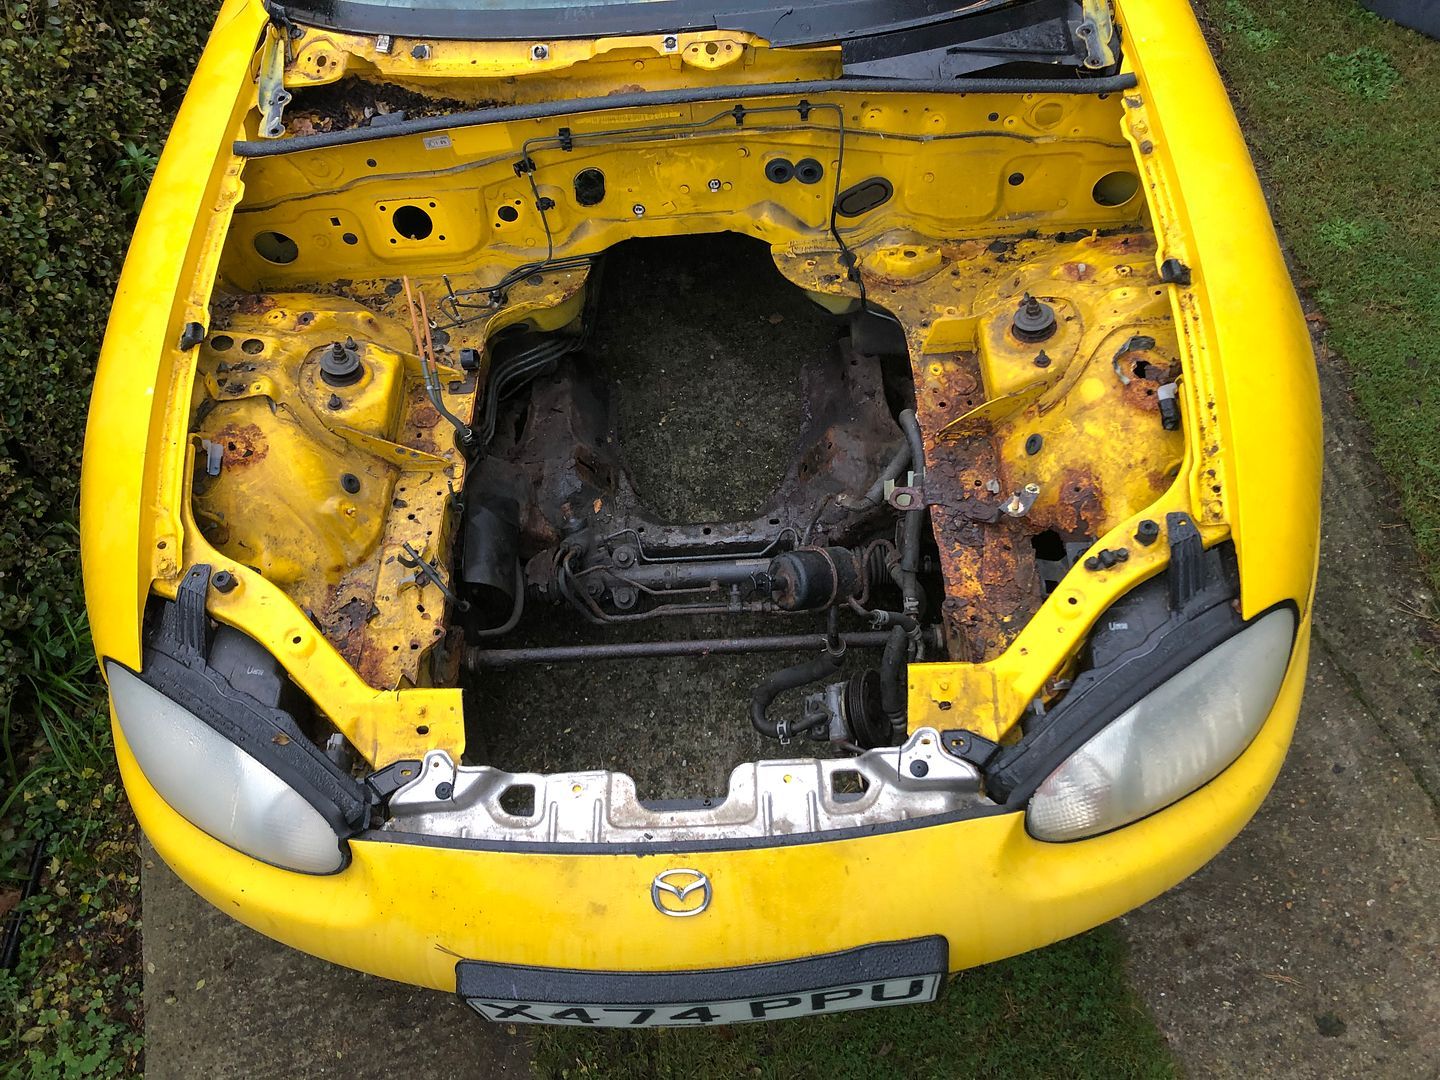 Also tried my Paul Walker gearknob. Bit early, but we can dream. 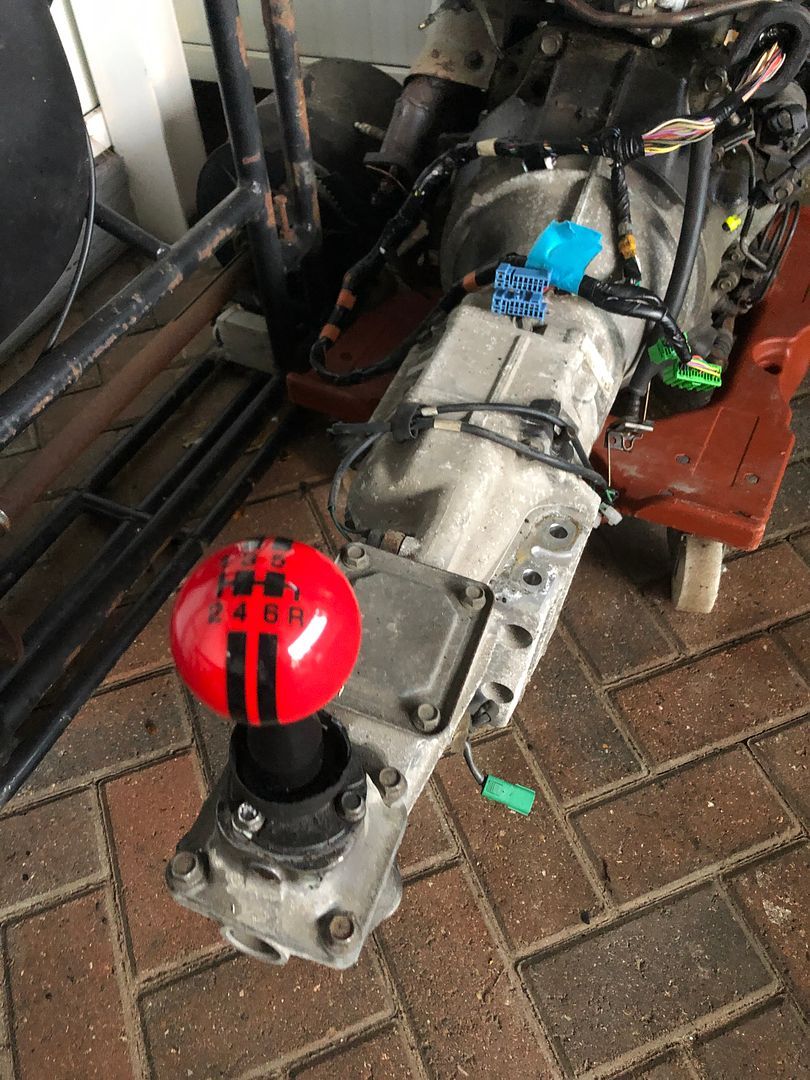 First day of my holiday, loads to get done, aside from the build.
__________________
MY BUILD LINK: http://67-72chevytrucks.com/vboard/s...585901]Redneck Express - 1966 C10 Short Fleetside MY USA ROADTRIPS http://forum.retro-rides.org/thread/...2018-humdinger IF YOU CAN'T FIX IT WITH A HAMMER, YOU'VE GOT AN ELECTRICAL PROBLEM MATE. |
|
|
|
|
12-24-2021, 02:03 PM
|
#1479 |
|
Registered User
Join Date: Dec 2012
Location: Rochester, KENT
Posts: 10,478
|
Re: GRIZZs 79 - 2WD BLAZER Challenge over in London, England. ~Its not a Project
[quote author="@nickwheeler" source="/post/2711958/thread" timestamp="1640340530"]An engine dangle is a good use of a few minutes, even if it's just to illustrate what the engine and gearbox mounts need to be.
Now that it's movable, just lining it alongside the chassis would be a good start.[/quote] Hope this is what you were thinking of @nickwheeler. As the hydraulic ram needs to be serviced. So I did very little but accomplished a load. Took a load of firewood and dogfood to some homeless kids living in a rotten caravan. Then back home, cleaned up and moved stuff around in the carport area. Moved the fiberglass body out into the open and got some masking tape, and a few lengths of tile battening. Then rolled the motor next to the chassis and marked out with the blue masking tape where the engine mounts are on the MX5 engine. Next was a stick to show where the bulkhead is, and thus the rear of the engine. Third line is where the mounting bolts for the gearbox sit.  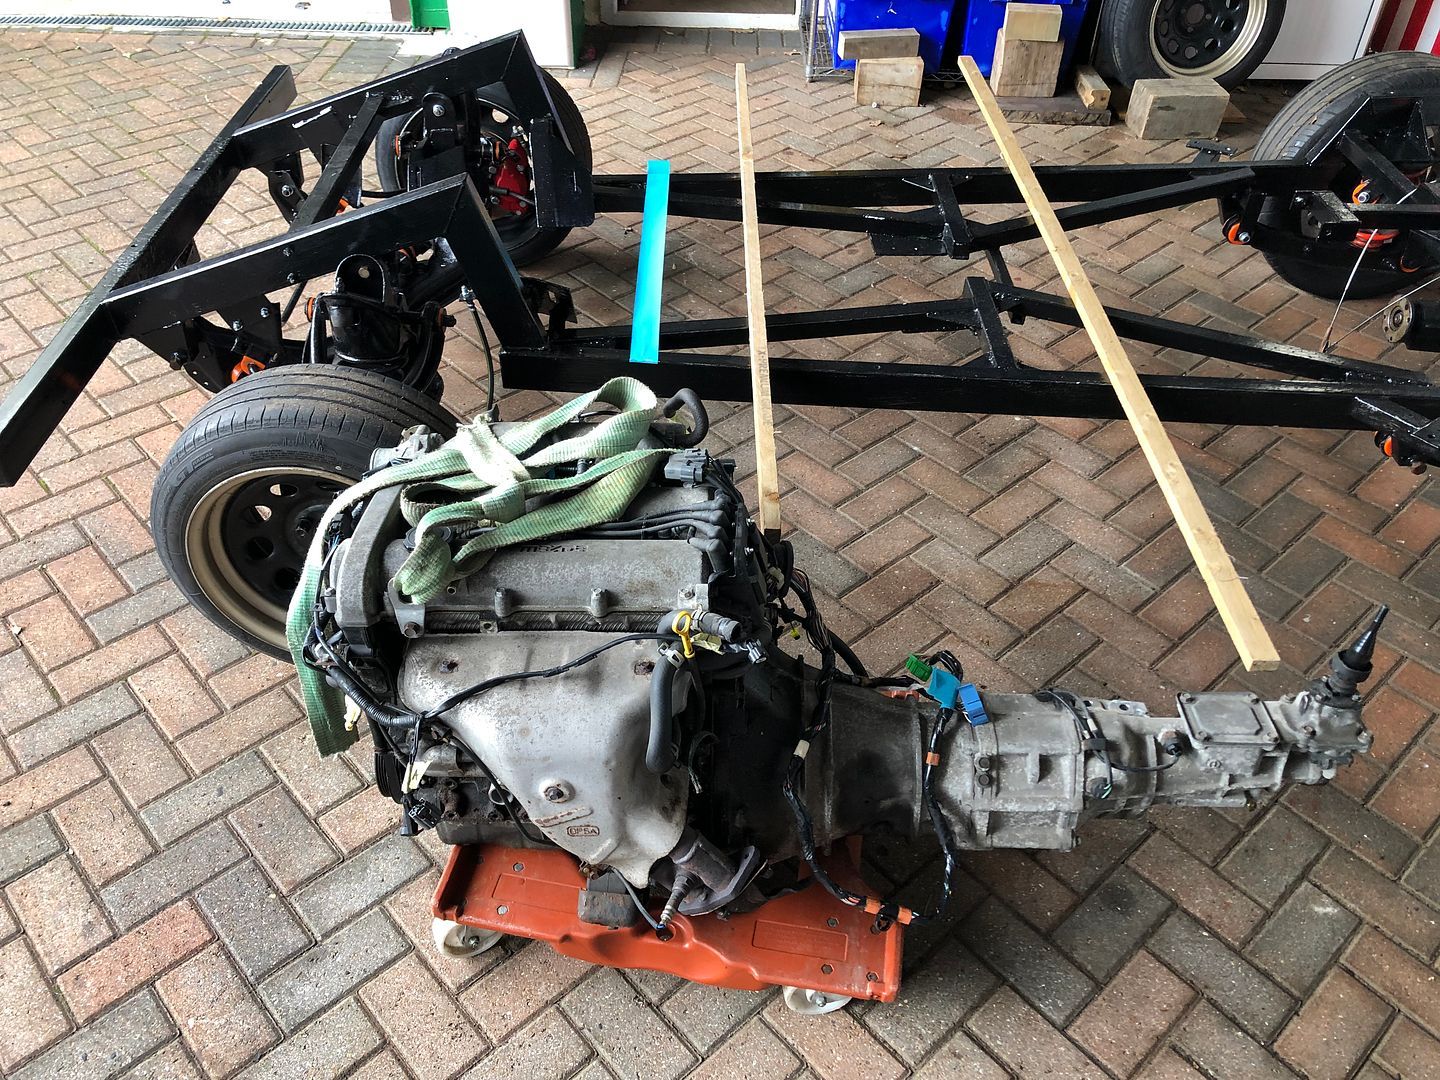 Lastly, I took the car off the rollers and pushed it up against the hedge, hopefully if @kevfromwales gets it all together, he will be collecting the shell on the 6th or 7th of January when he is delivering a car nearby (50 mile radius ) I also completed the shopping list and rebolted it onto the car. 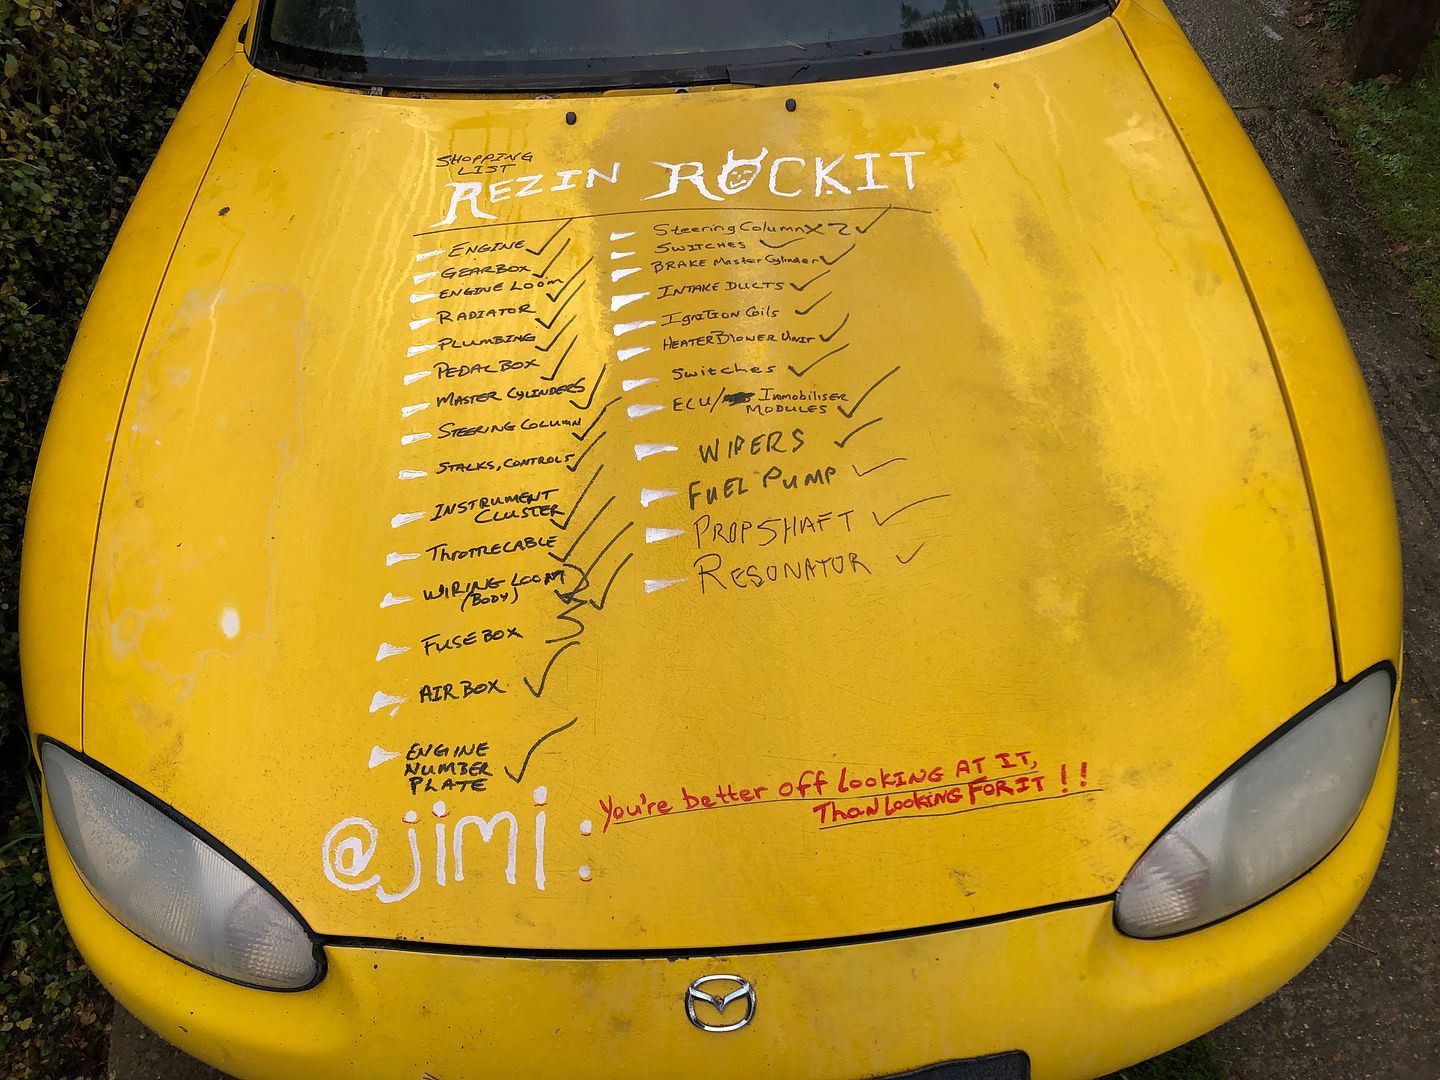 I have no car plans for Christmas day except to be nice to Sally and her family. But in the mean time .. it is spinning around in my head. Peace out.
__________________
MY BUILD LINK: http://67-72chevytrucks.com/vboard/s...585901]Redneck Express - 1966 C10 Short Fleetside MY USA ROADTRIPS http://forum.retro-rides.org/thread/...2018-humdinger IF YOU CAN'T FIX IT WITH A HAMMER, YOU'VE GOT AN ELECTRICAL PROBLEM MATE. |
|
|
|
|
12-26-2021, 07:02 AM
|
#1480 |
|
Registered User
Join Date: Dec 2012
Location: Rochester, KENT
Posts: 10,478
|
Re: GRIZZs 79 - 2WD BLAZER Challenge over in London, England. ~Its not a Project
Post Christmas plans??
Really wet and miserable out there, so . More relaxing. Maybe a trip over to Essex to meet up with @pauly to return his blasting pot, pick up a fuel tank strap from him, and have a quick natter. Also at the same time, collect a hardly used Stainless Steel rear silencer that was fitted to a 1.6 Ford Ka belonging to @kevins daughter, but she found it too loud and raucous. Thanks Kevin. . Sounded perfect to me . Antisocial Thuggery planned for 2022 14 inches of box. 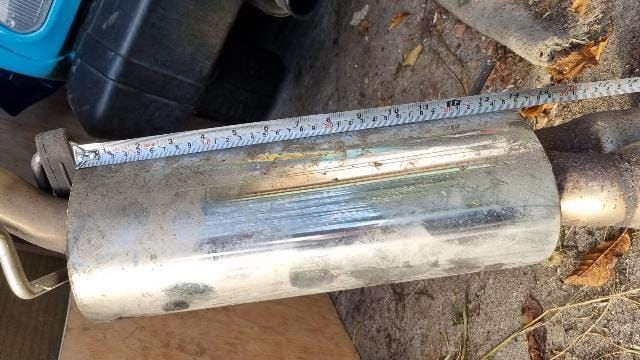 And imagine the twin peashooters poking out the side in front of the rear wheel. 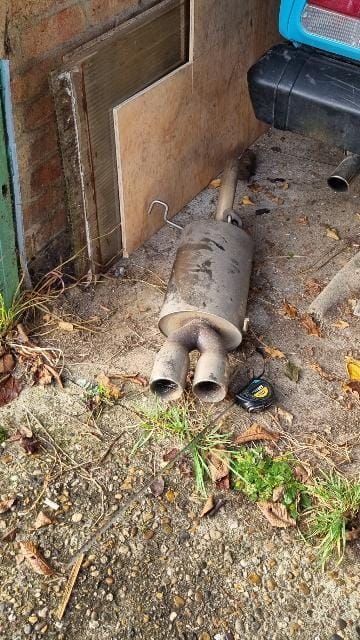 In the mean time ; Hand me those Lindor Salted Caramel chocolates. Boxing day fun continues.
__________________
MY BUILD LINK: http://67-72chevytrucks.com/vboard/s...585901]Redneck Express - 1966 C10 Short Fleetside MY USA ROADTRIPS http://forum.retro-rides.org/thread/...2018-humdinger IF YOU CAN'T FIX IT WITH A HAMMER, YOU'VE GOT AN ELECTRICAL PROBLEM MATE. |
|
|
|
|
12-26-2021, 08:12 AM
|
#1481 |
|
Registered User
Join Date: Dec 2012
Location: Rochester, KENT
Posts: 10,478
|
Re: GRIZZs 79 - 2WD BLAZER Challenge over in London, England. ~Its not a Project
A bit of fun?
My only inedible Christmas prezzie. Sally does not forget a thing, typical woman. 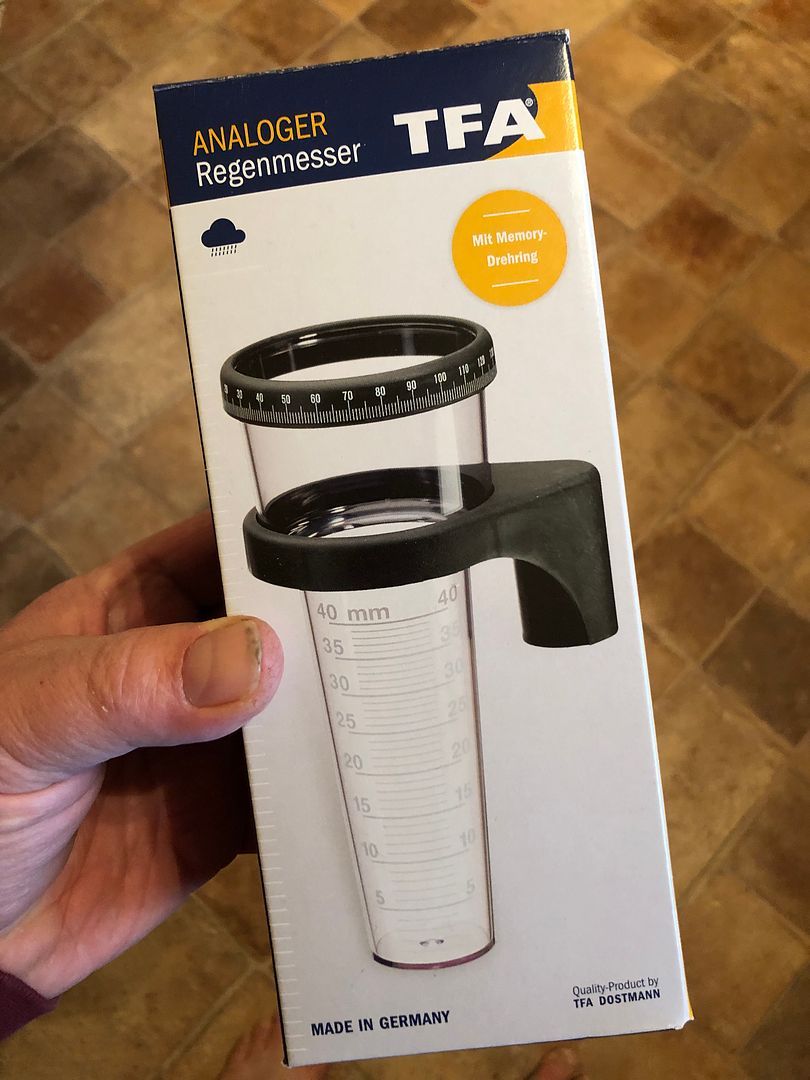 I mentioned in spring that I needed to replace mine. Love it.
__________________
MY BUILD LINK: http://67-72chevytrucks.com/vboard/s...585901]Redneck Express - 1966 C10 Short Fleetside MY USA ROADTRIPS http://forum.retro-rides.org/thread/...2018-humdinger IF YOU CAN'T FIX IT WITH A HAMMER, YOU'VE GOT AN ELECTRICAL PROBLEM MATE. |
|
|
|
|
12-26-2021, 01:27 PM
|
#1482 |
|
Registered User
Join Date: Dec 2012
Location: Rochester, KENT
Posts: 10,478
|
Re: GRIZZs 79 - 2WD BLAZER Challenge over in London, England. ~Its not a Project
OK
So I lied. Boxing day break lasted till 12.00 then Sally went home to cook UncleBobs lunch for the next two days, leaving me bored after having a coffee and biccies. So, I went down to the garage to see what the measurements were approximately for the gearbox, engine and chassis. Unusually, Sally came back because she had forgotten her phone, and came down to the carport to tell me .. Sneaky pic taken while I was doing the mock up of whwre the gear lever comes through the floor. 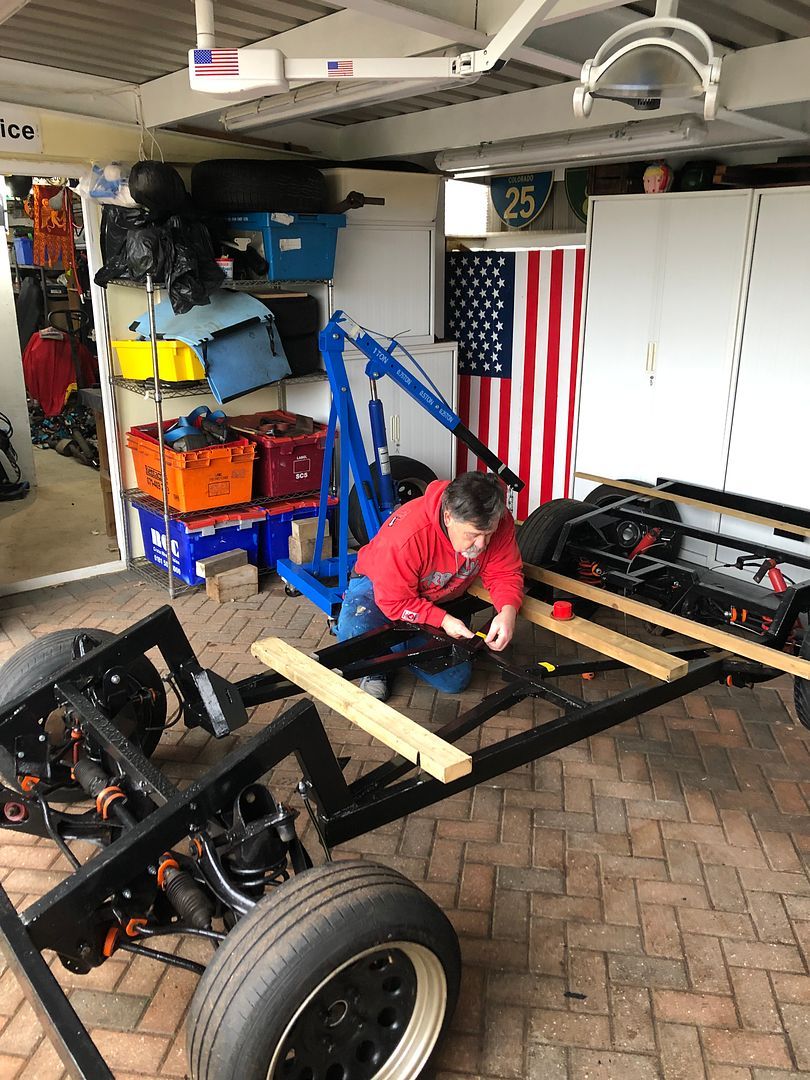 So, based on my simple measurements, the red can cap shows where the gear lever comes through the floor. The front wooden bar shows where the firewall is. 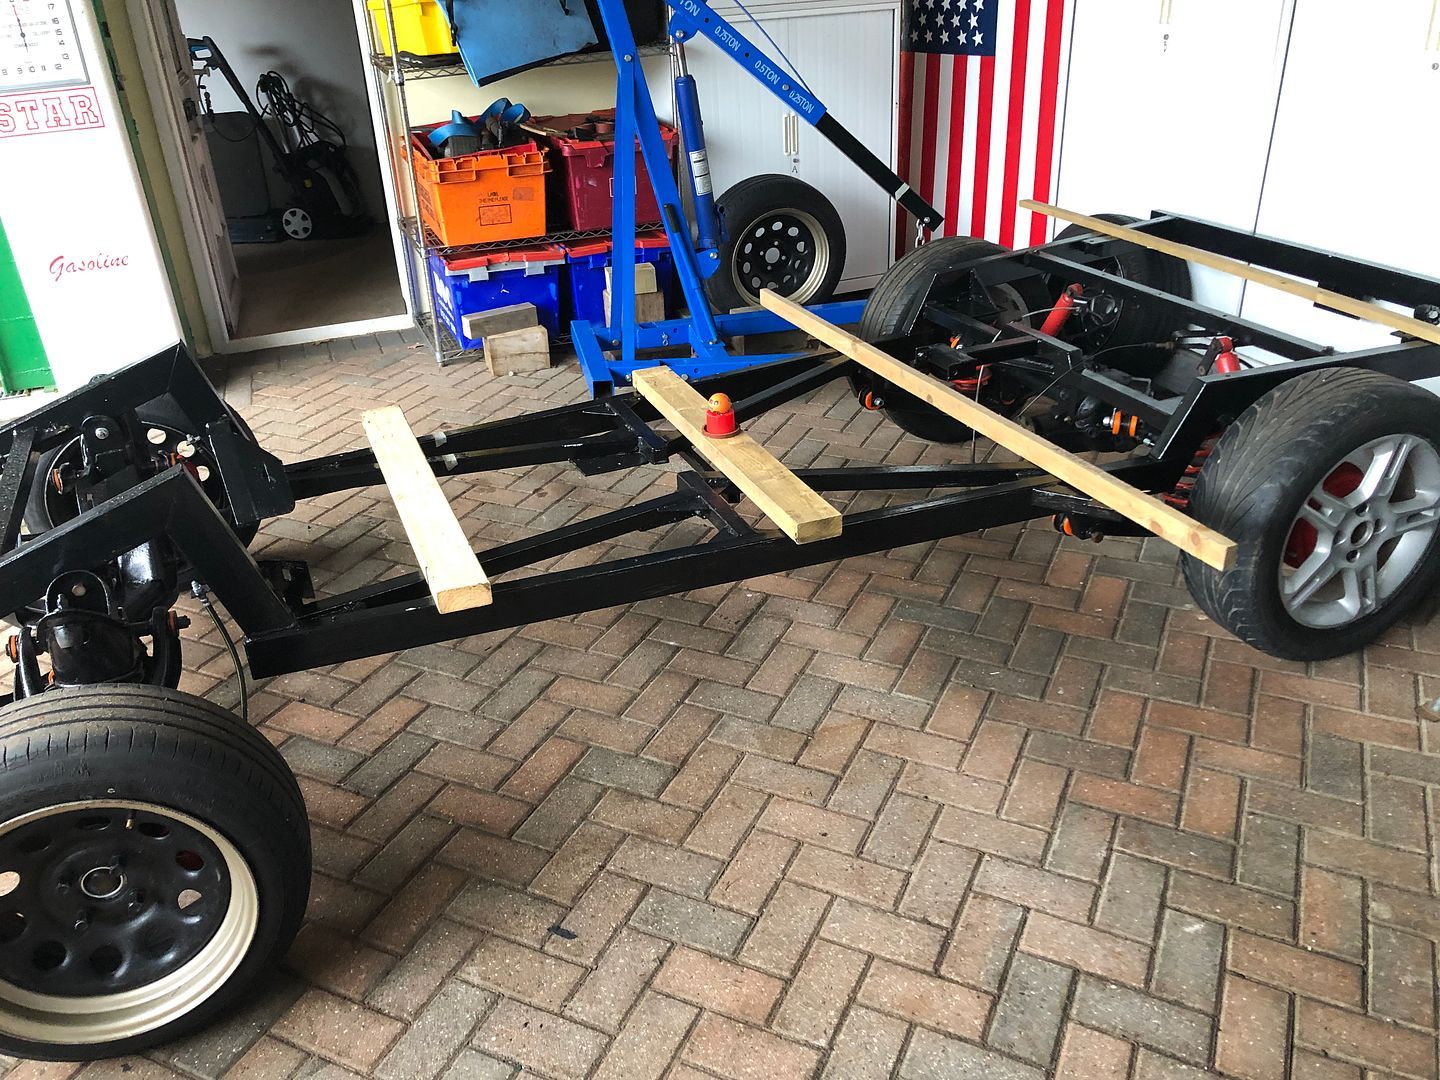 Checking the engine mounts, they seem to be 400mm apart. Also in the MX5 engine bay. 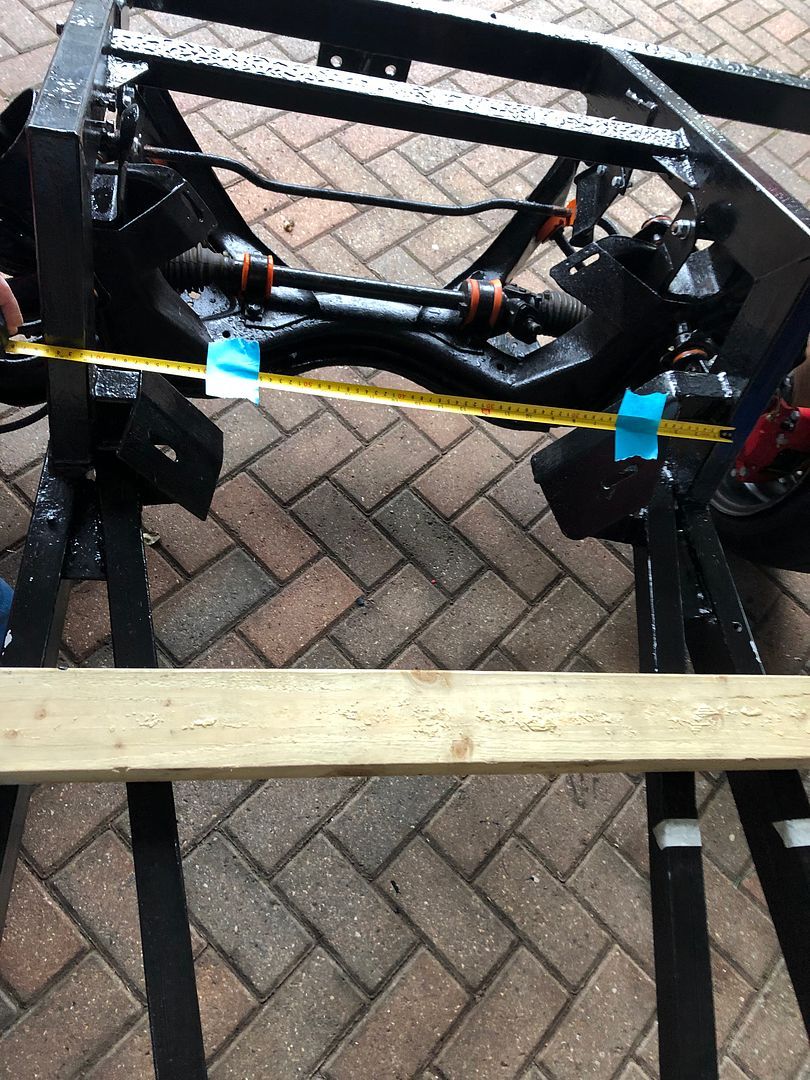 And working back from the waterpump hose mount, you have another 400mm measurement. 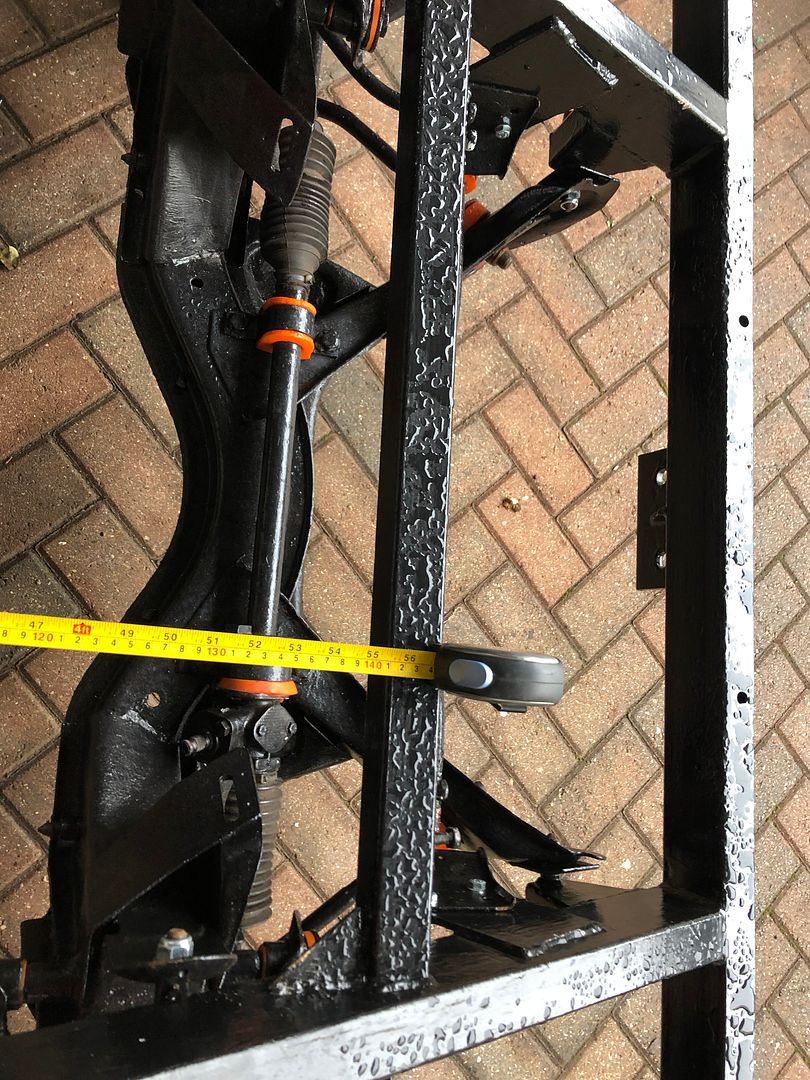 Looking from the diff coupling fact to the gear shift is about 34.5 inches. 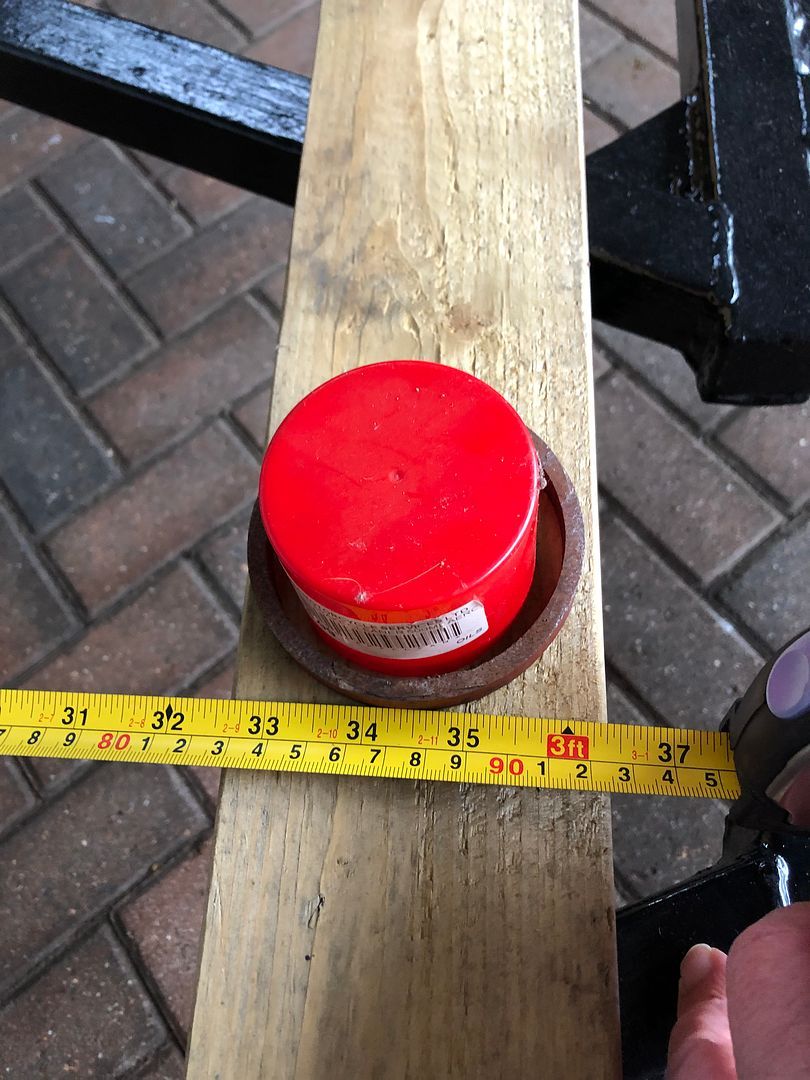 Gear shift to waterpump 55 inches Prop shaft - mounting face to slip in 36 inches Gear shift to engine mount 960mm Anyway, in order to fit the engine and keep the gear shift where it was originally, will be a tight fit. Prop shaft mount seems to be different between the ford and Mazda items, but a small issue. Next job will be to lift and lay the engine and transmission in the chassis to see where it all sits, and then to test fit the body over it all. Boxing day Also did another small job that has been long overdue. More about that later.
__________________
MY BUILD LINK: http://67-72chevytrucks.com/vboard/s...585901]Redneck Express - 1966 C10 Short Fleetside MY USA ROADTRIPS http://forum.retro-rides.org/thread/...2018-humdinger IF YOU CAN'T FIX IT WITH A HAMMER, YOU'VE GOT AN ELECTRICAL PROBLEM MATE. |
|
|
|
|
12-26-2021, 04:31 PM
|
#1483 |
|
Registered User
Join Date: Dec 2012
Location: Rochester, KENT
Posts: 10,478
|
Re: GRIZZs 79 - 2WD BLAZER Challenge over in London, England. ~Its not a Project
Remember where we started last year.
What a mess. Not much to start with. 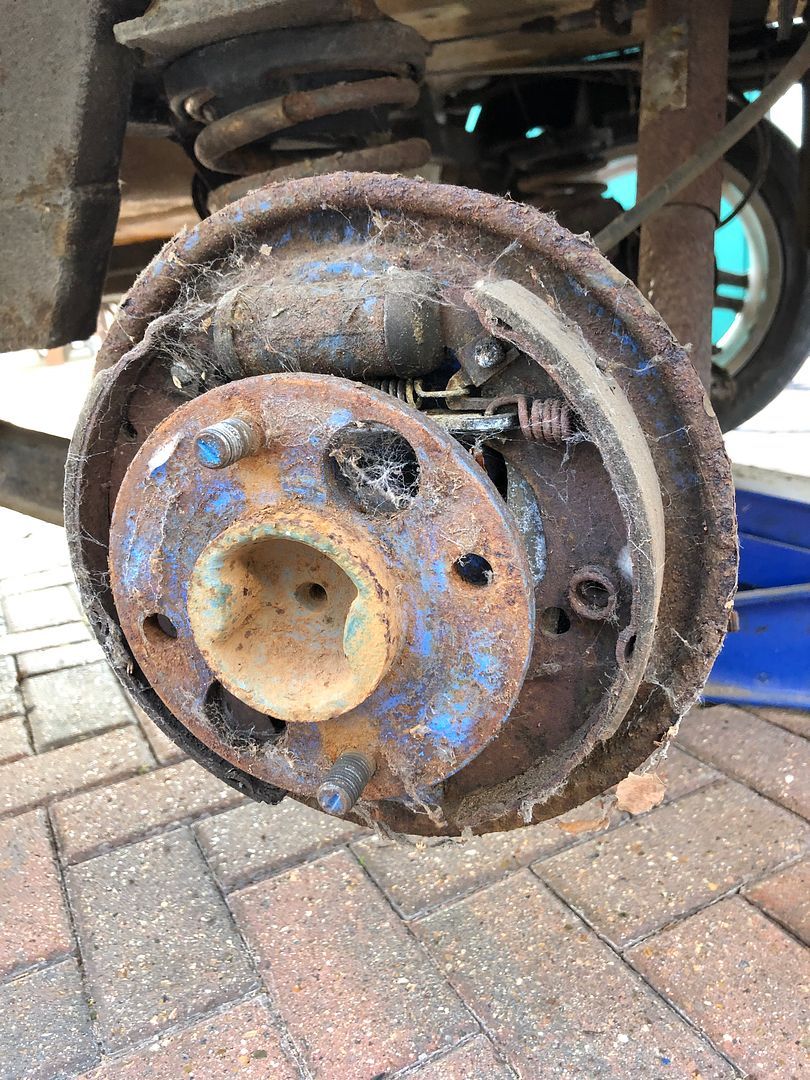 Two nuts again, as it seems to be the case all around the Rockit 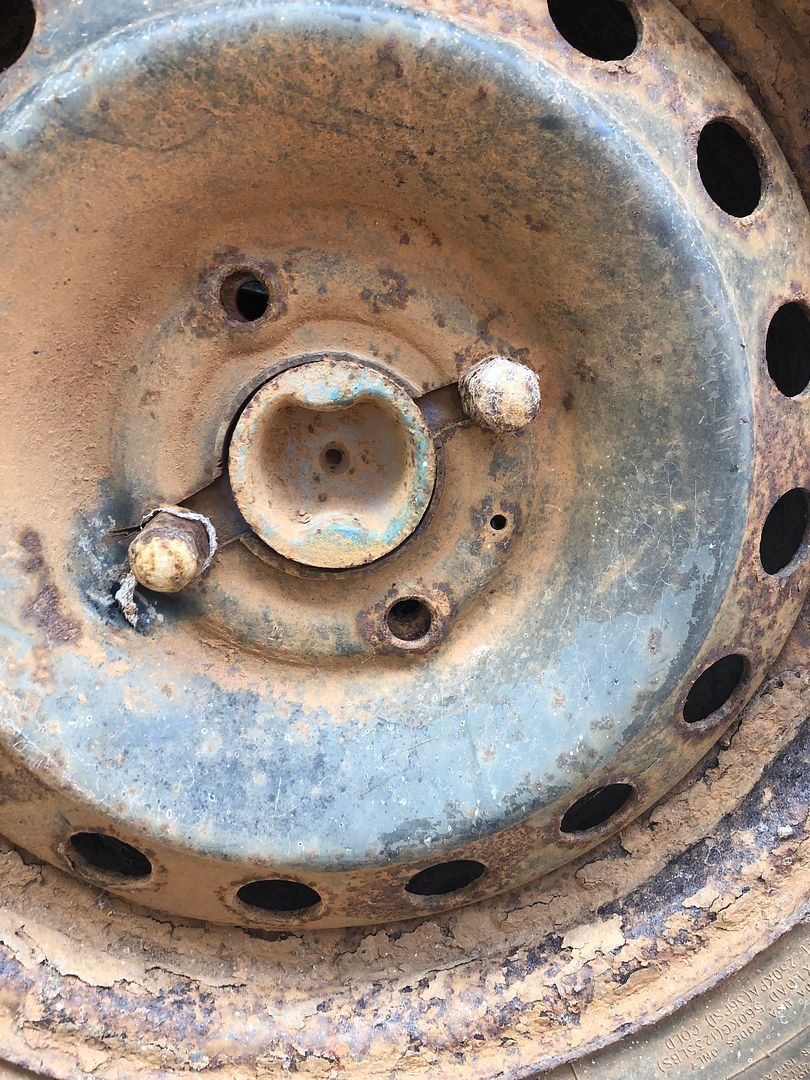 More of the same. 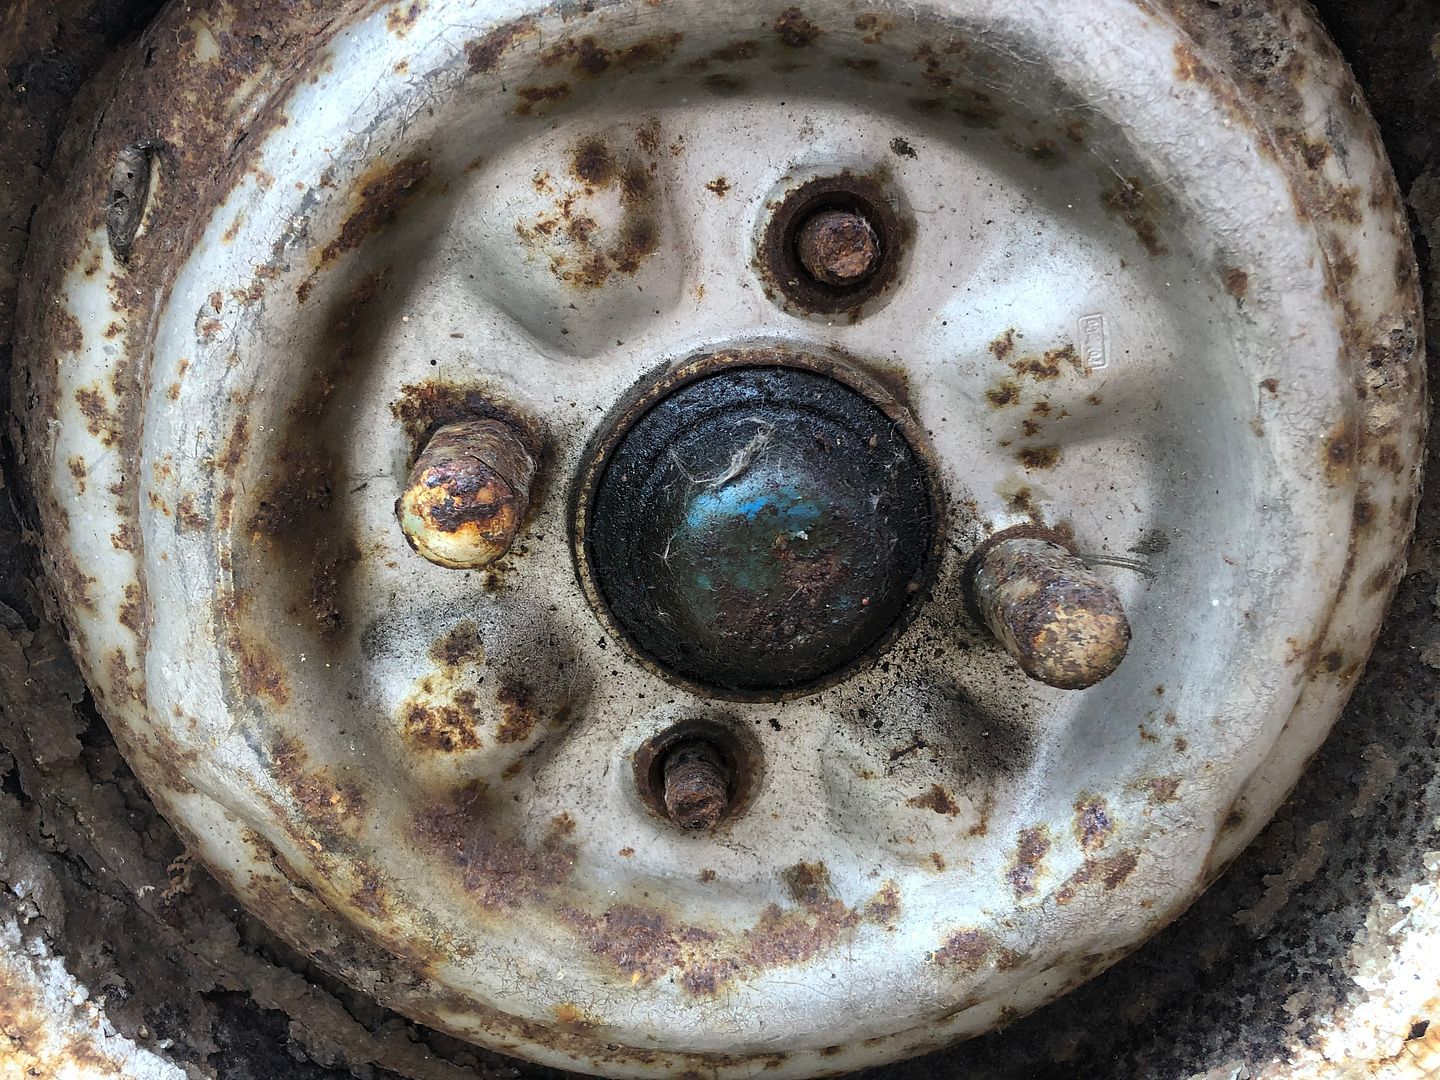 Anyway, with various helpers, including @nickwheeler and some of my own sweat and swearing of course, we got to this point where we are today .. Adapters taking it from 4x10⁸ to 4x100 and wheels I liked. But still missing some hub studs and wheel nuts. Steels with the 175 tyres stretsched on, not the look I am going for. 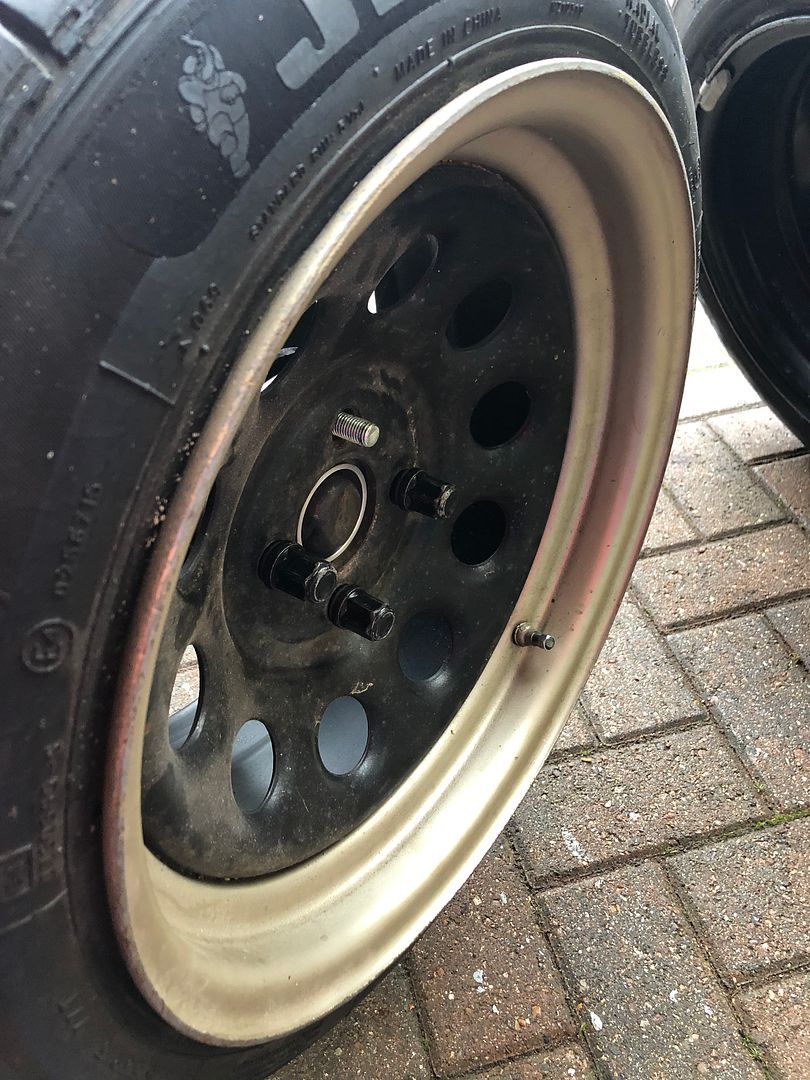 So removing the wheels and adapters I was able to fit the fromt wheel stud that had been missing all along. 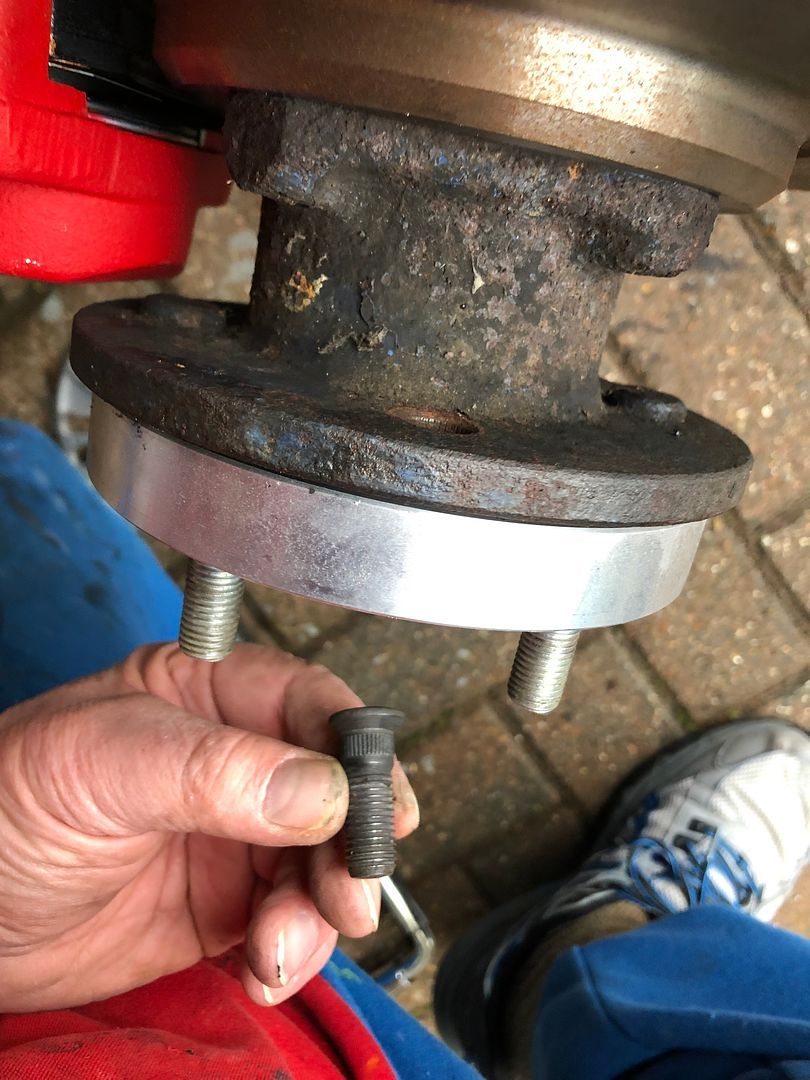 Used the impact wrench and wheel nut to pull the studs into place.  The rear hubs were missing even more.  Pulled into position.  And done. Much better now.  And another small job done that takes time. 195/60-15 shod wheels in place.  Very pleased with that. Progress.
__________________
MY BUILD LINK: http://67-72chevytrucks.com/vboard/s...585901]Redneck Express - 1966 C10 Short Fleetside MY USA ROADTRIPS http://forum.retro-rides.org/thread/...2018-humdinger IF YOU CAN'T FIX IT WITH A HAMMER, YOU'VE GOT AN ELECTRICAL PROBLEM MATE. |
|
|
|
|
12-27-2021, 04:08 PM
|
#1484 |
|
Registered User
Join Date: Dec 2012
Location: Rochester, KENT
Posts: 10,478
|
Re: GRIZZs 79 - 2WD BLAZER Challenge over in London, England. ~Its not a Project
So today Sally and I did about 110 miles, or 175km on a quick return trip that delivered on a few levels.
Including a trip to @kevins to collect a stainless steel exhaust that had been fitted to his daughters 1.6 Ford Ka. Firstly, what an awesome family to visit and then he gave me the 50 cent guided tour of his shop and some of the tools. I was only envious, despite what I have here. My favourites were a wood burner, not photographed, and his lift built into his single garage. Absolutely functional and just so simple and well thought out. Also seated on it his Lotus. A daily driver, still wet from being out when we got there.  From there we went to IKEA for some stuff I needed to get for tje house and then back to Kent for more shopping. Back home I gave the silencer a quick wash and then grabbed a cardboard box and did a quick side exit mock up. I think the pipe will be needing some editing to allow the box fit and exit correctly.  Hope it works once all the bits, including the body are back in place.  Weather forecast for this week shows it peaking at 16C later this week. Great weather to be outside in and on tje drive measuring and making stuff.
__________________
MY BUILD LINK: http://67-72chevytrucks.com/vboard/s...585901]Redneck Express - 1966 C10 Short Fleetside MY USA ROADTRIPS http://forum.retro-rides.org/thread/...2018-humdinger IF YOU CAN'T FIX IT WITH A HAMMER, YOU'VE GOT AN ELECTRICAL PROBLEM MATE. |
|
|
|
|
12-28-2021, 05:34 PM
|
#1485 |
|
Registered User
Join Date: Dec 2012
Location: Rochester, KENT
Posts: 10,478
|
Re: GRIZZs 79 - 2WD BLAZER Challenge over in London, England. ~Its not a Project
Not a lot done today.
But it kept me busy for a while. First job was to try remove the wiring harness anchors that had been drilled and screwed through the inner fenders, the small 6mm nuts and threaded screws had long since become one with each other. So a new, 10mm drill-bit and straight onto the heads while clamping the nut with a vice grip. Drill till you have no head left, wiggle or wriggle it out through the inner fender. Following this, start to undo the wiring from the front end.  While working, I was joined by George. I do not even have a cat. 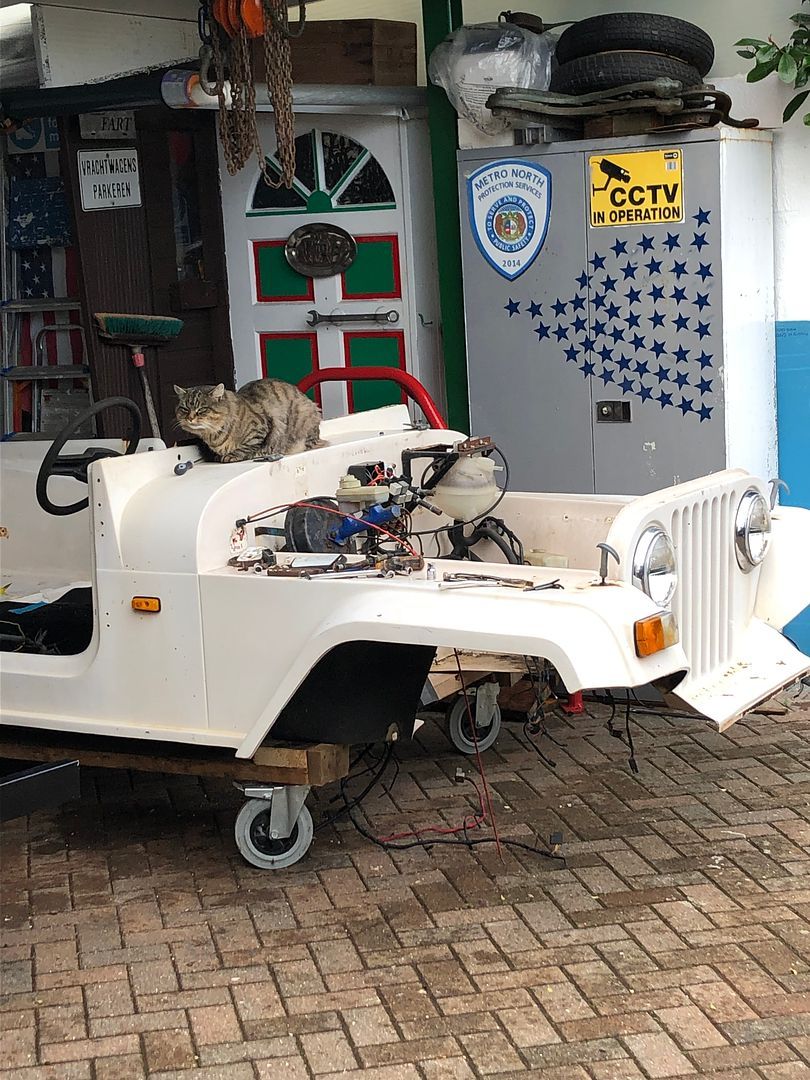 Eventually I had made it to this point. Not yet finished the engine bay clear out, but I needed to refocus on the inside of the body where a load of pipes and wired went to. Also contemplating new head lights with integrated turn signals etc, and to cut and smooth the existing indicator and side light pods so the fenders are just smooth and clear. I think that will work. 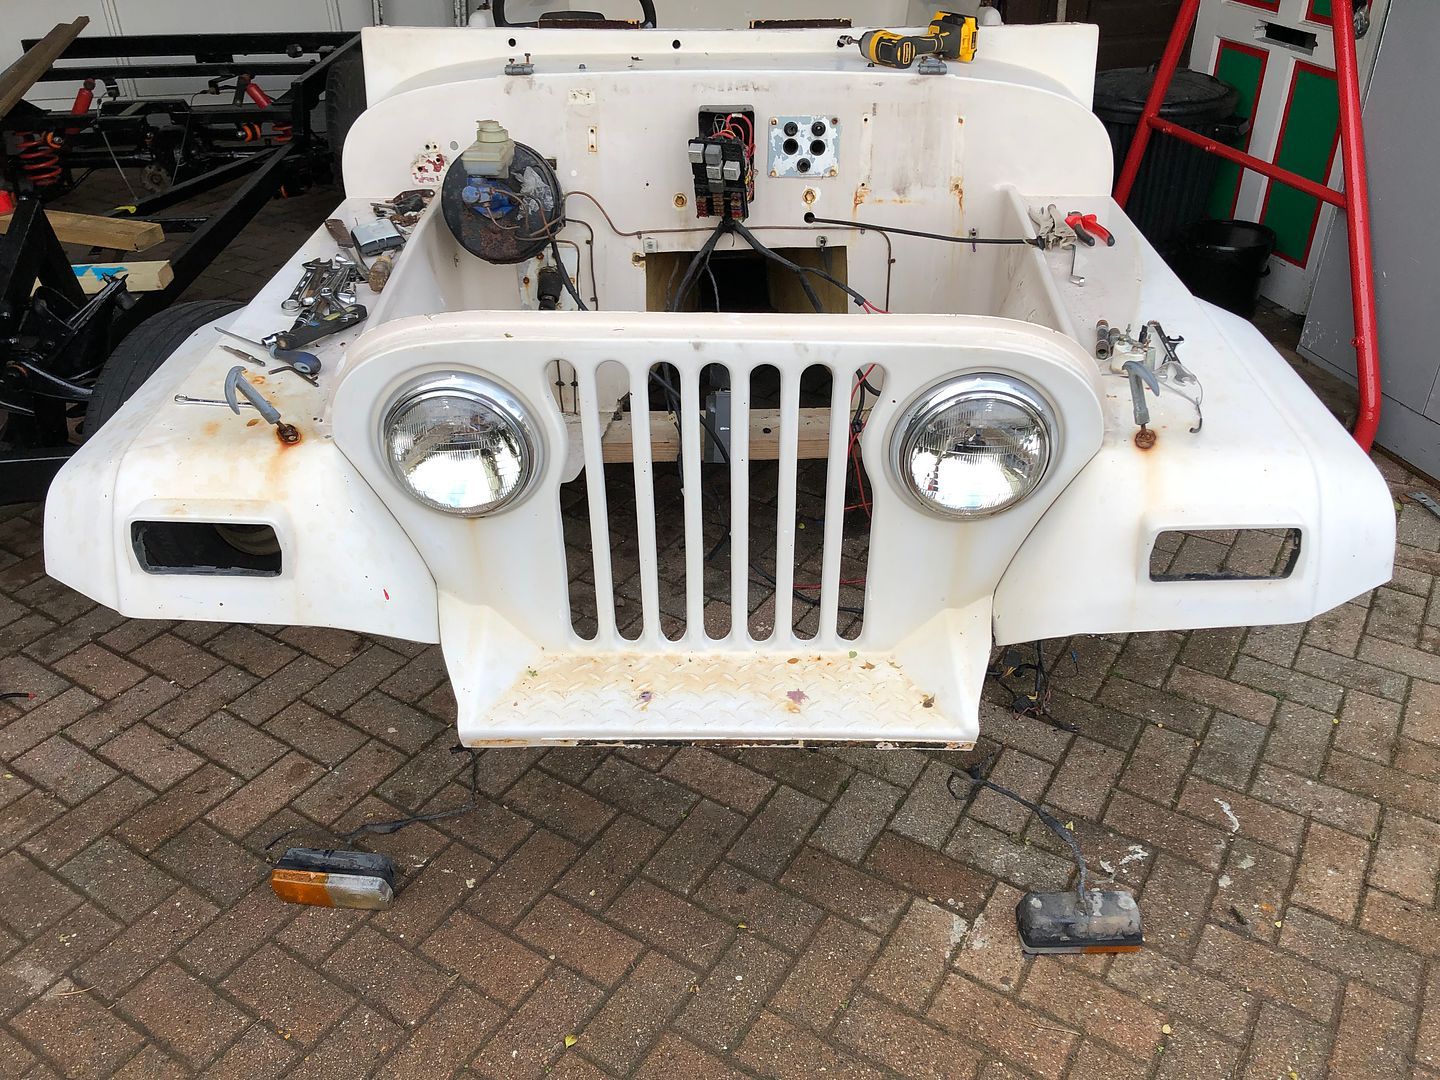 So once a bunch of the wires from the engine bay had been chased inside the cab, I needed to start undoing them. Unfortunately 30 years of open air driving and parking resulted in rotted out wood and vinyl everywhere. 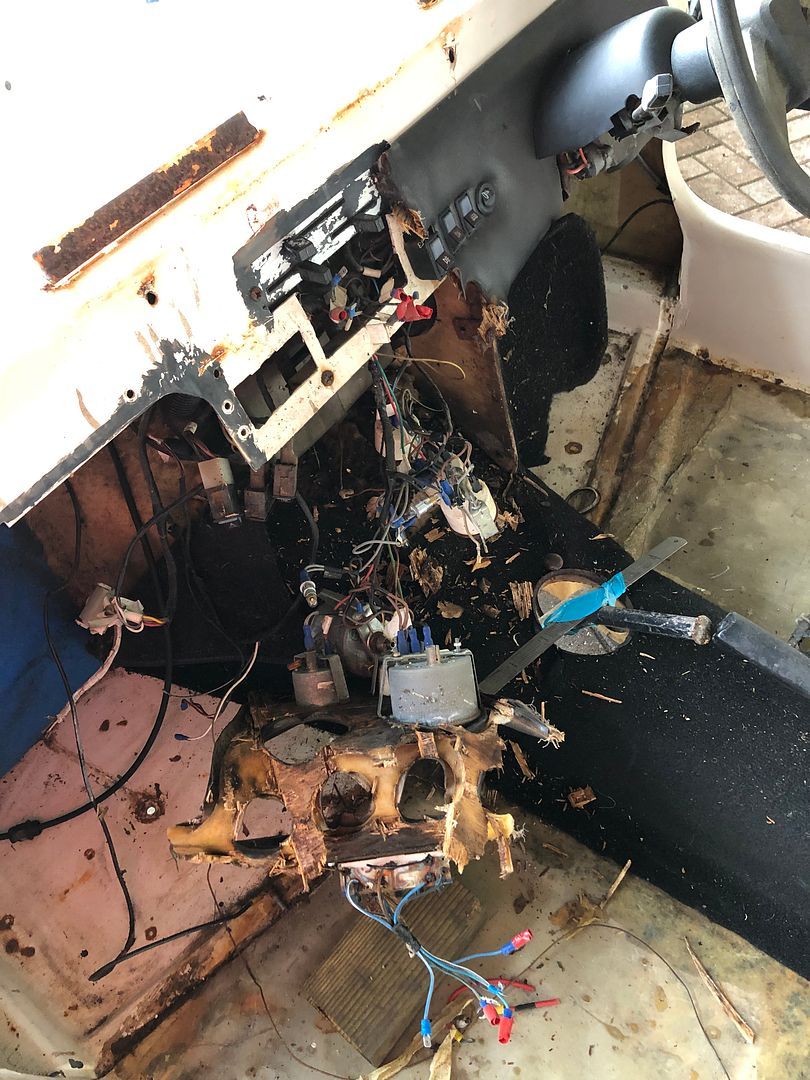 Felt like a demolition derby, though it was done gently. 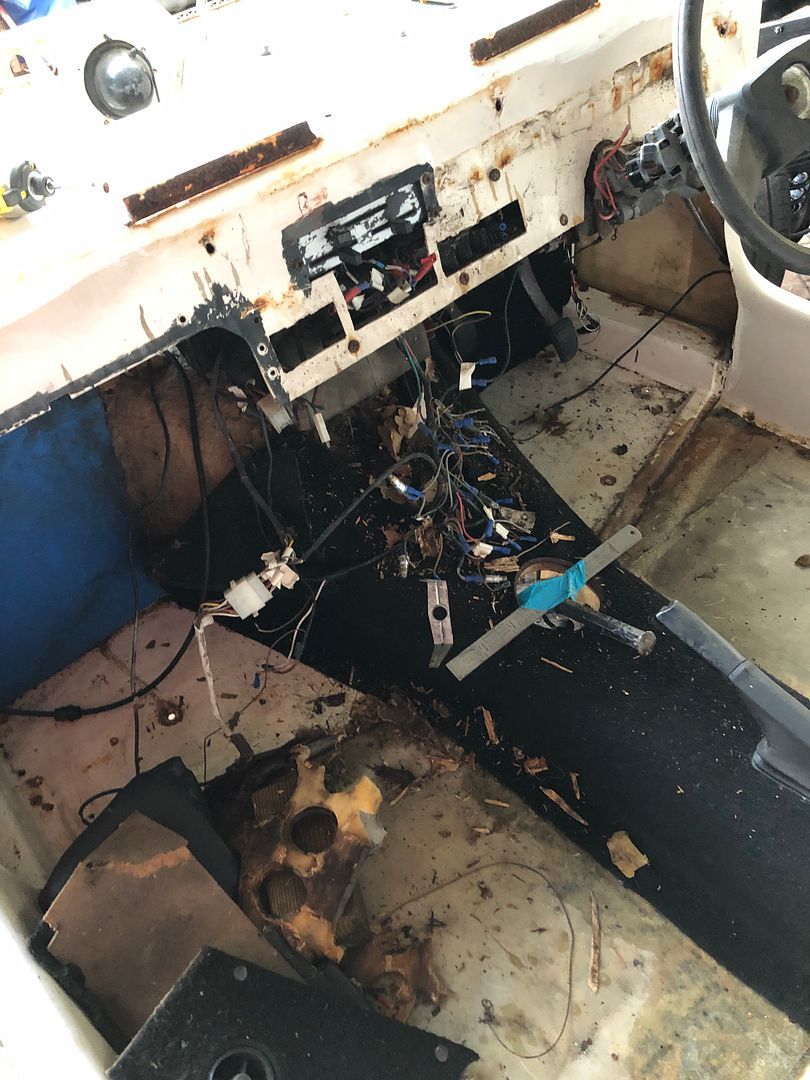 Removing all the switches, clocks and warning lights left me with a pile of VDO gauges. 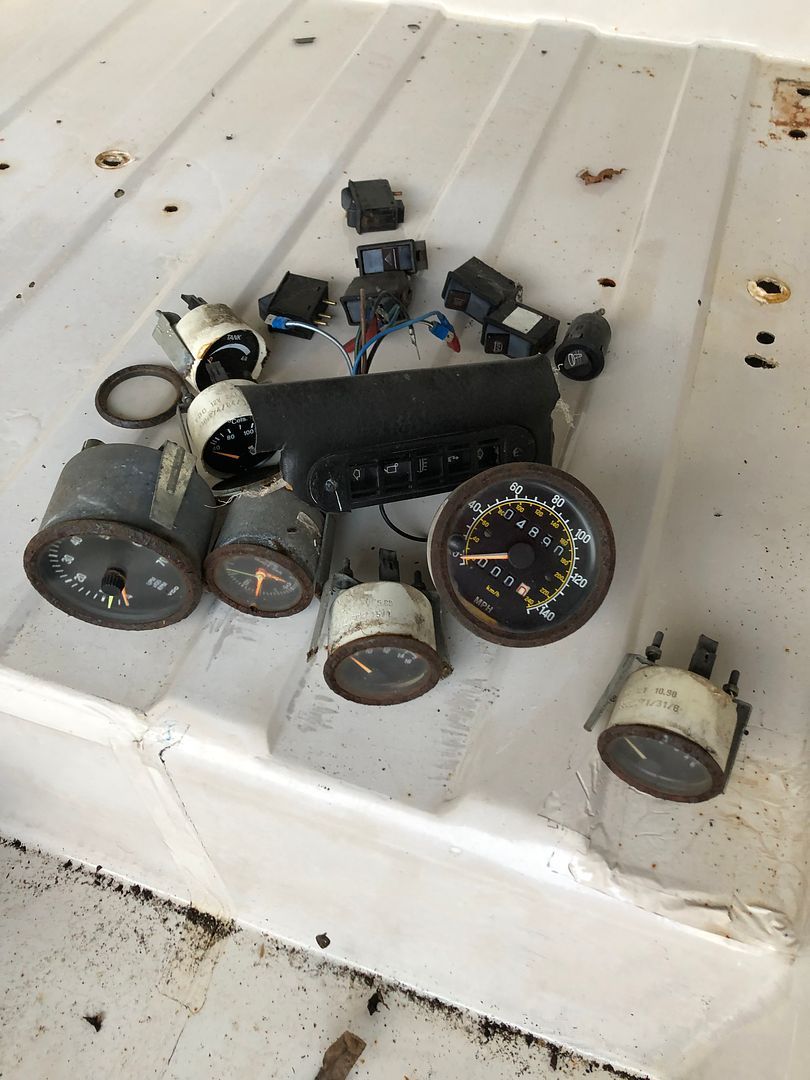 Looking at the speedo, I suspect that like many kit cars, this only did the indicated mileage after being built. Some of the parts removed to date, like the rear brake shoes clearly had hardly worked. 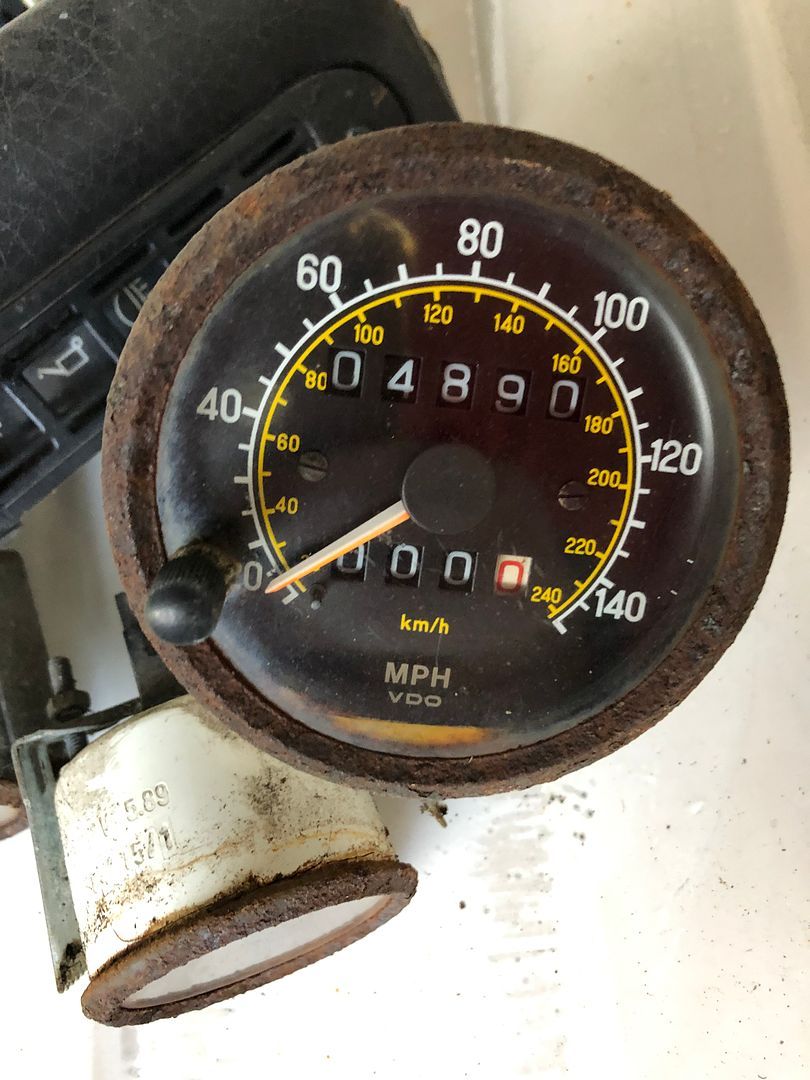 Tomorrow I will get back to doing the rest of the stripping. Today the biggest time waster was actually getting the choke knob captive nut unscrewed blind, awkwardly behind the dash, but eventually got it done. Adding the rest of the pedals and all the wiring I can get removed. .jpg) With George continuing his supervision. 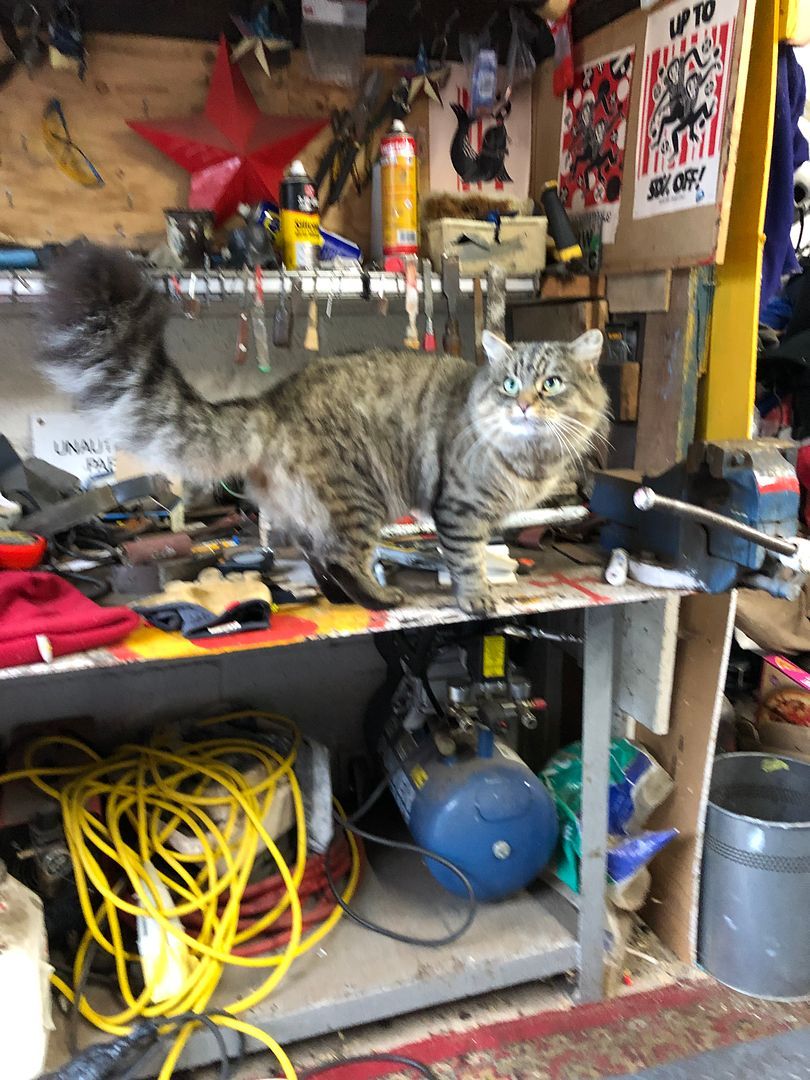 Heres to better weather tomorrow.
__________________
MY BUILD LINK: http://67-72chevytrucks.com/vboard/s...585901]Redneck Express - 1966 C10 Short Fleetside MY USA ROADTRIPS http://forum.retro-rides.org/thread/...2018-humdinger IF YOU CAN'T FIX IT WITH A HAMMER, YOU'VE GOT AN ELECTRICAL PROBLEM MATE. |
|
|
|
|
12-29-2021, 03:40 PM
|
#1486 |
|
Registered User
Join Date: Dec 2012
Location: Rochester, KENT
Posts: 10,478
|
Re: GRIZZs 79 - 2WD BLAZER Challenge over in London, England. ~Its not a Project
Todays plan was to remove the rest of the wiring loom.
Part of it had been threaded through the body and fibreglassed into and under the channel of the entrance/door. Unfortunately I just could not get the leverage to remove the loom while it was on the trolley. So I fetched a mattress I have had on reserve for years. Since doing the C10 cab that I rolled onto its back, while working on it. So I flipped the body onto its side, supported by a 2x4 and some,gravity. 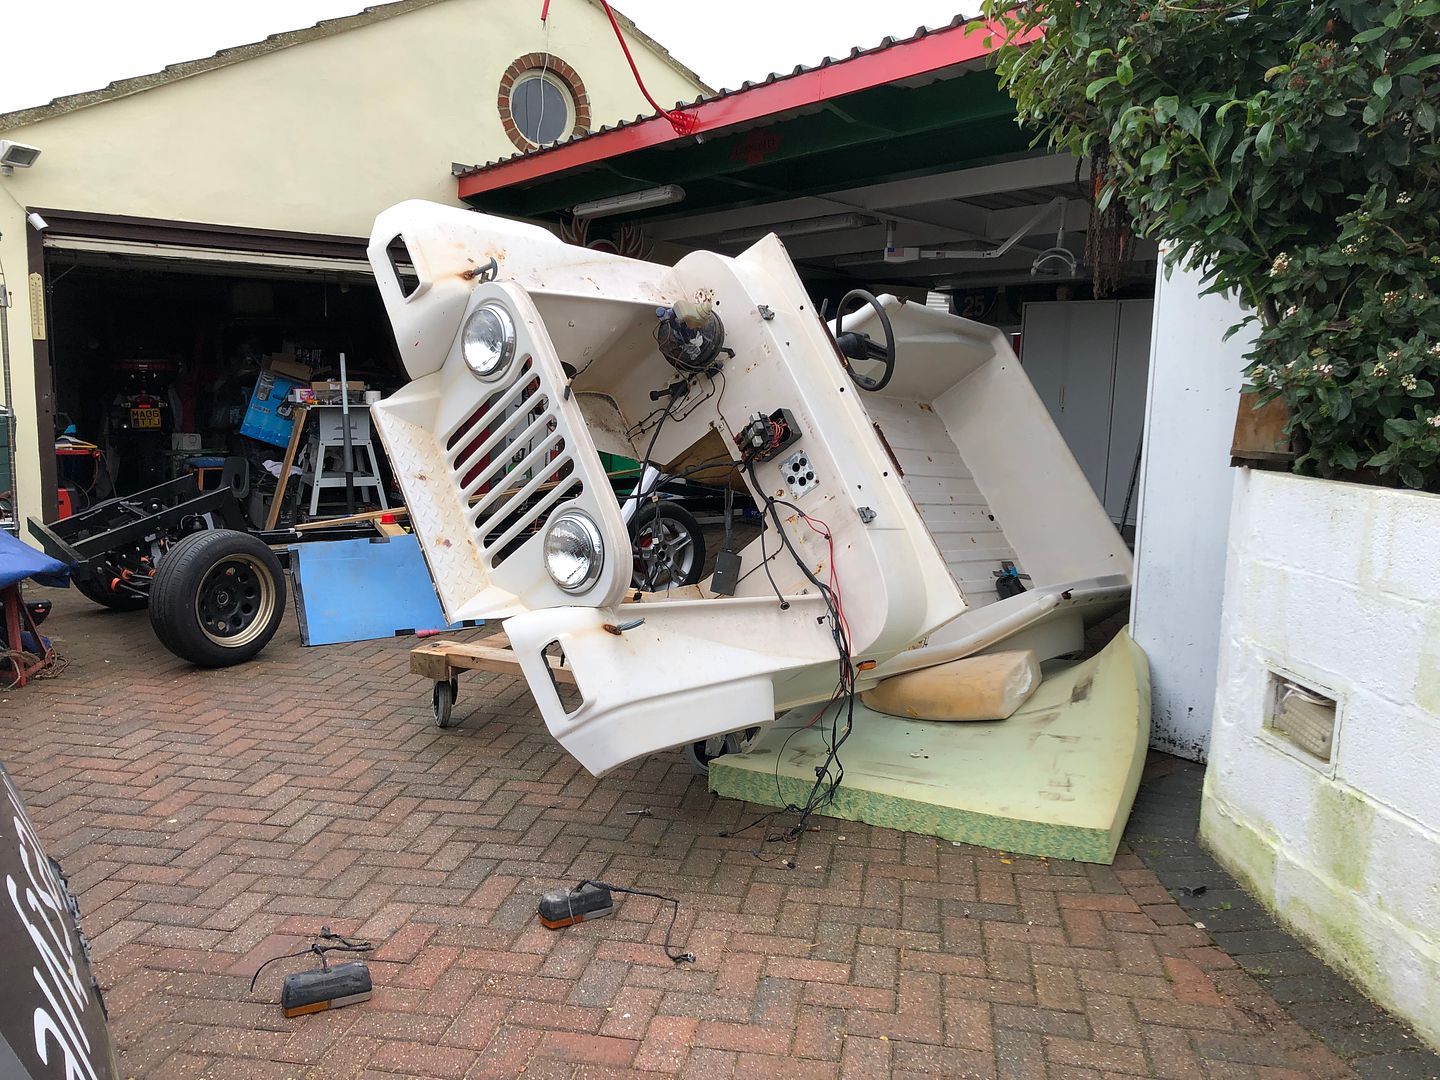 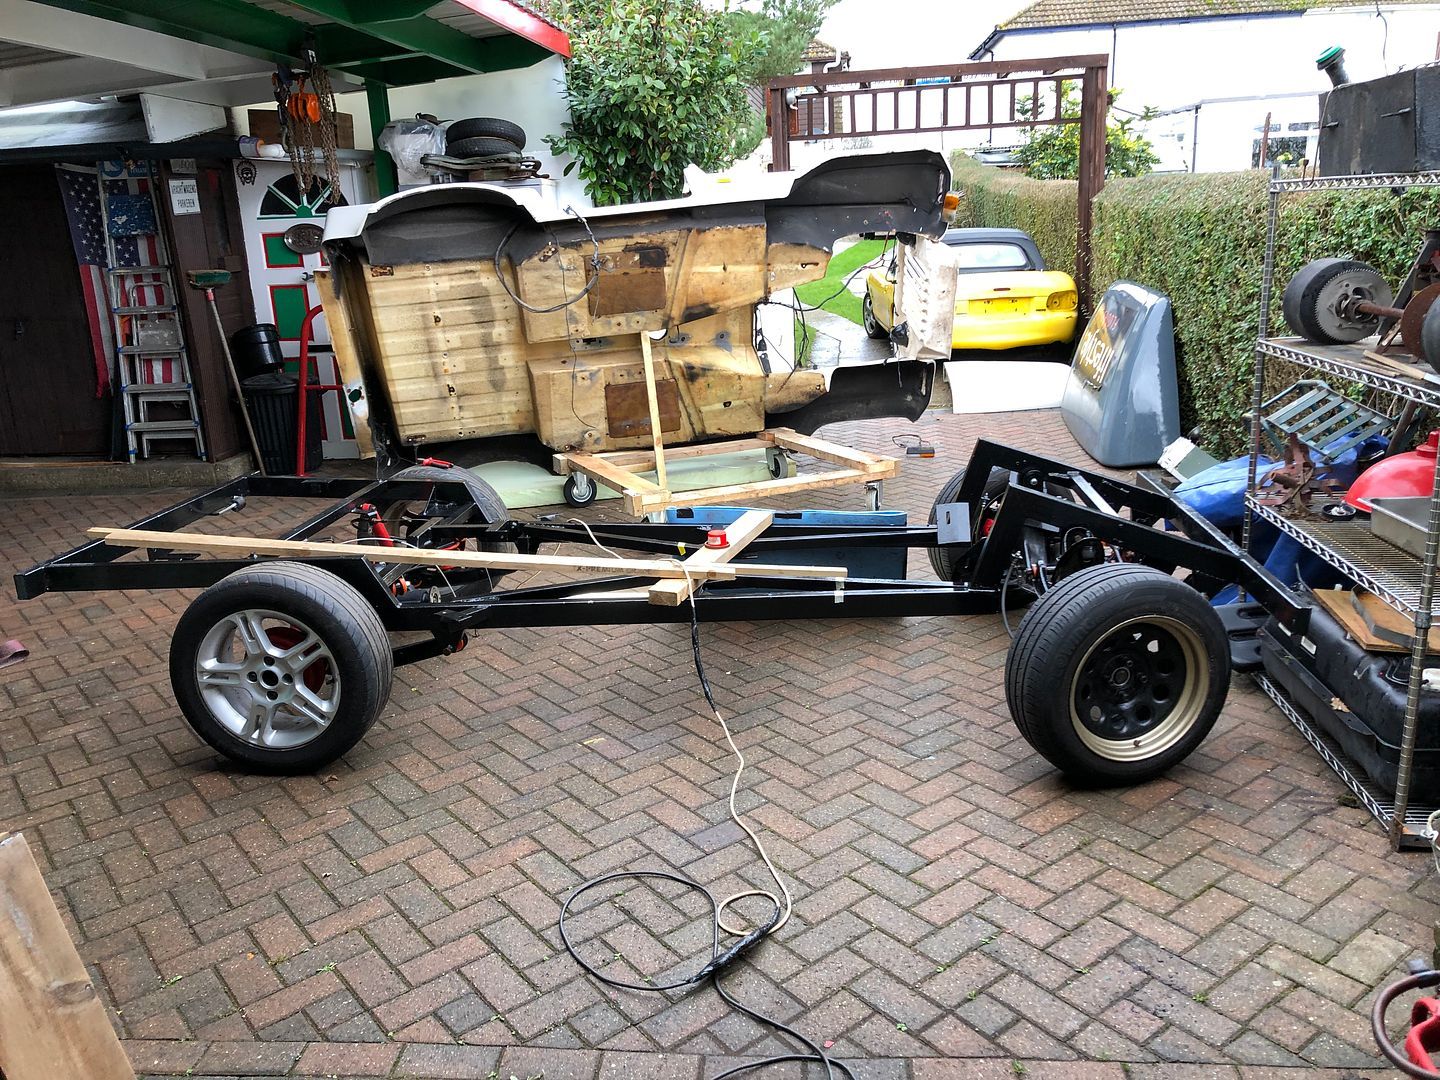 Halfway there. I also used my side cutters a few times, which would make @nickwheeler very proud. After all, planning is to fit the MX5 loom completely, editing the bits not needed from it.  Cutters next, both sides.  Once down flat on the trolley, the next job was to undo and remove the blower and heater unit. It may be of use to a restorer. 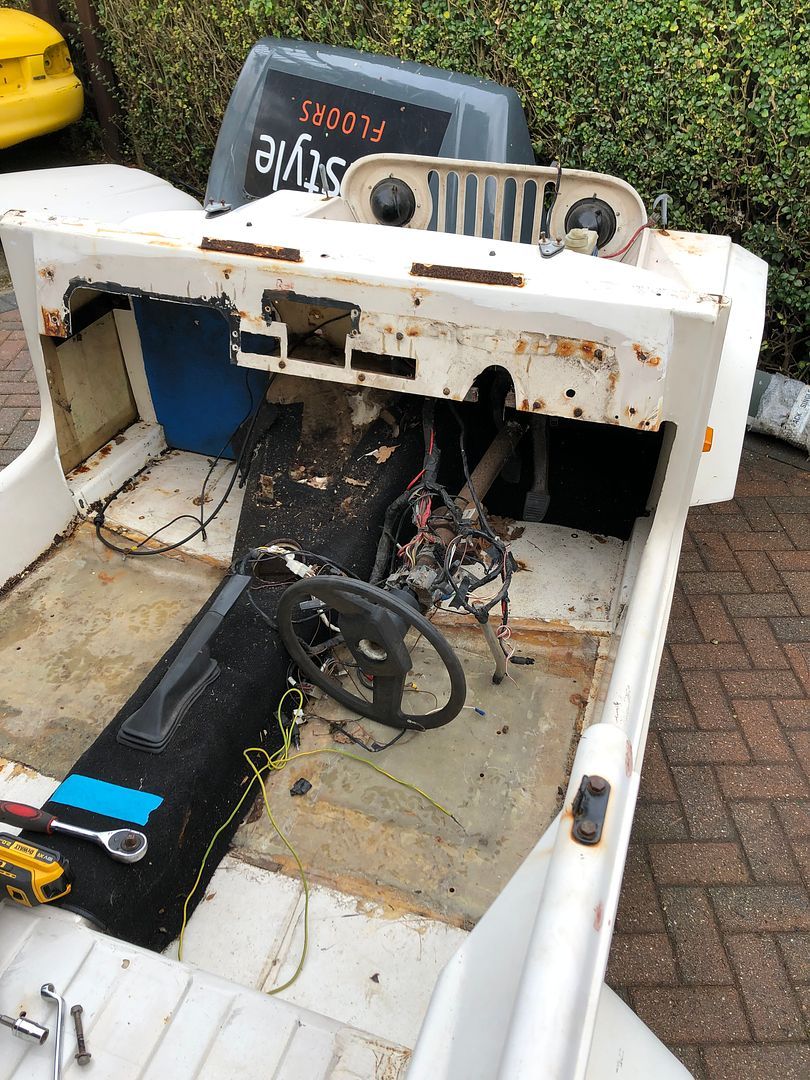 Undoing and removing the steering and more wiring next.  Out with that lot. 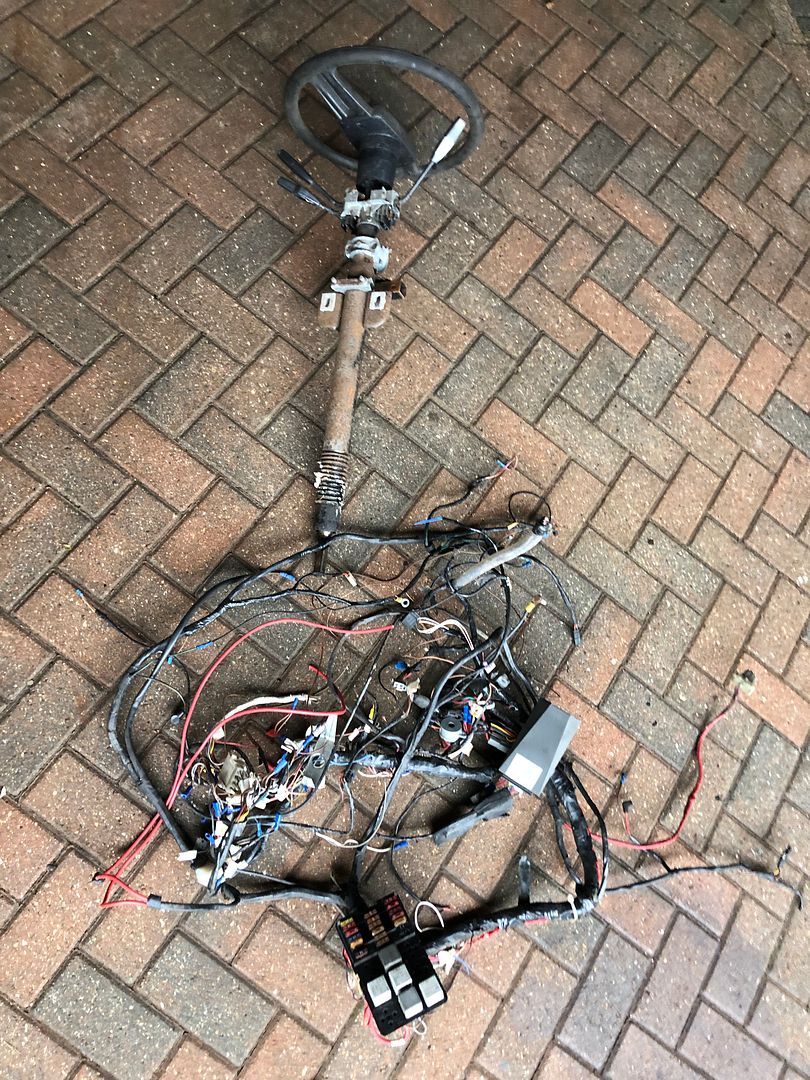 And then it was a lot clearer. Decided to leave the pedal box in place as well as the brake m/c till I compare them with the MX5 units. 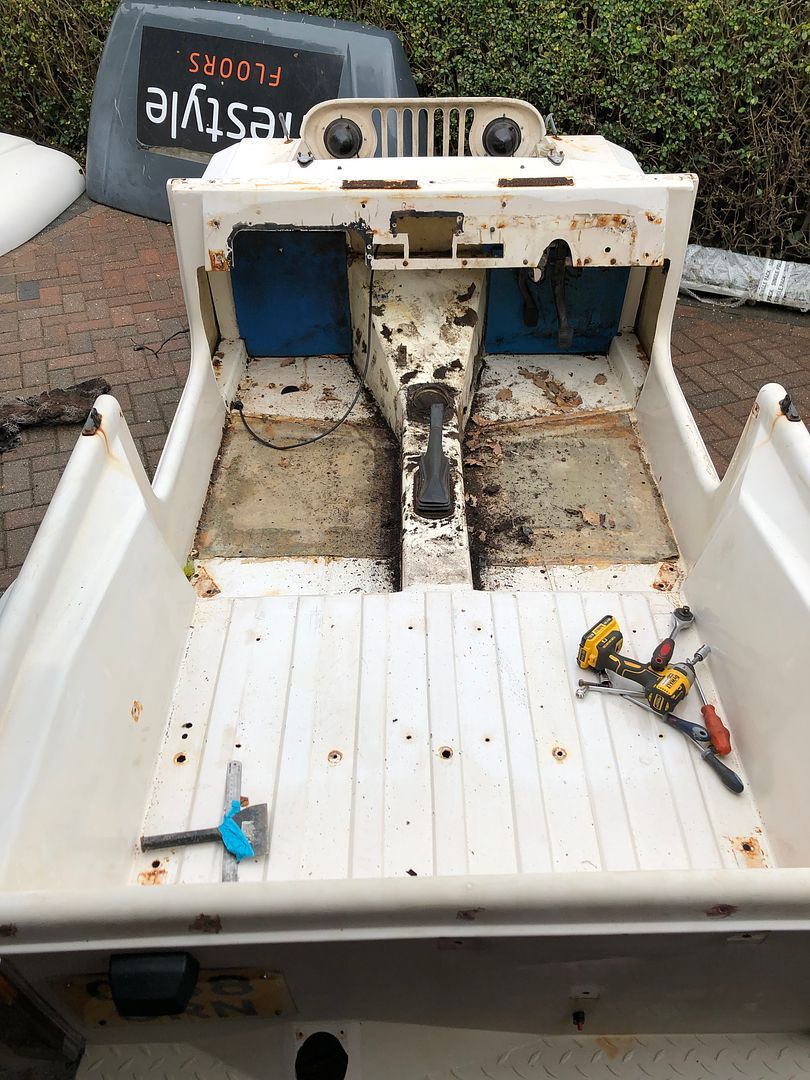 And from the front.  Happy with that lot. More work to do for the day would get me to my objective for the day. But I was chatting to @pauly this morning and mentioned to him as well, that this needs to continue being a pleasure and not a chore. Sometimes a fine line to keep to.
__________________
MY BUILD LINK: http://67-72chevytrucks.com/vboard/s...585901]Redneck Express - 1966 C10 Short Fleetside MY USA ROADTRIPS http://forum.retro-rides.org/thread/...2018-humdinger IF YOU CAN'T FIX IT WITH A HAMMER, YOU'VE GOT AN ELECTRICAL PROBLEM MATE. |
|
|
|
|
12-29-2021, 04:46 PM
|
#1487 |
|
Registered User
Join Date: Dec 2012
Location: Rochester, KENT
Posts: 10,478
|
Re: GRIZZs 79 - 2WD BLAZER Challenge over in London, England. ~Its not a Project
.
TIMED TARGETS .. WHY do we do it to ourselves .. ?? I had really hoped to make it to a specific point in this build before the end of 2021. A massive thank you once again to everyone who has added, contributed and built this car, yes it sounds like a broken record, but I prefer not to take things for granted. So part two of today was to make up a lifting mechanism that would allow me to lift the Rezin Rockit body and set it down on the chassis once the engine had been put in place and the engine and gearbox mounts are made up. You may recall that Nigel @alpina99 had dropped off a rolling gantry to add my old restored bock and tackle to to use on the front rail of the carport, which was part of the planning and build during our first COVID-19 Lockdown. Well, my mind was blown by just how featherlight it feels in action, with a load added to it. Just amazing. So the first thing to make was a cross brace (not sure what to call this piece)  Then trying it out. Raising it, I needed to find some balance, so added a tyre to the rear to balance it all.  Calling Doc and Marty. And you said Pigs wont fly.  Gently does it, Perfectly. That will make checking the fit once the engine and gearbox are in place, a lot easier. Really chuffed at this point. 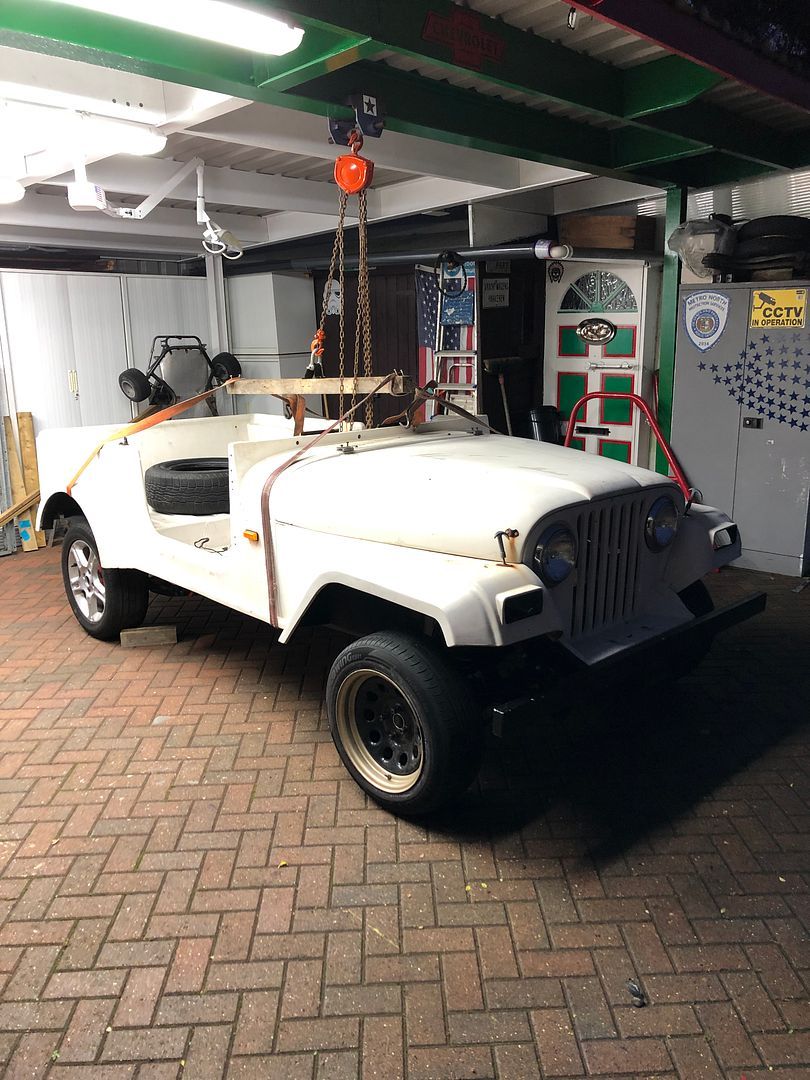 And then . One of the best pics all day. Just how cool is this fit of the steel wheels? Spacers in place, new, wider tyres fitted. 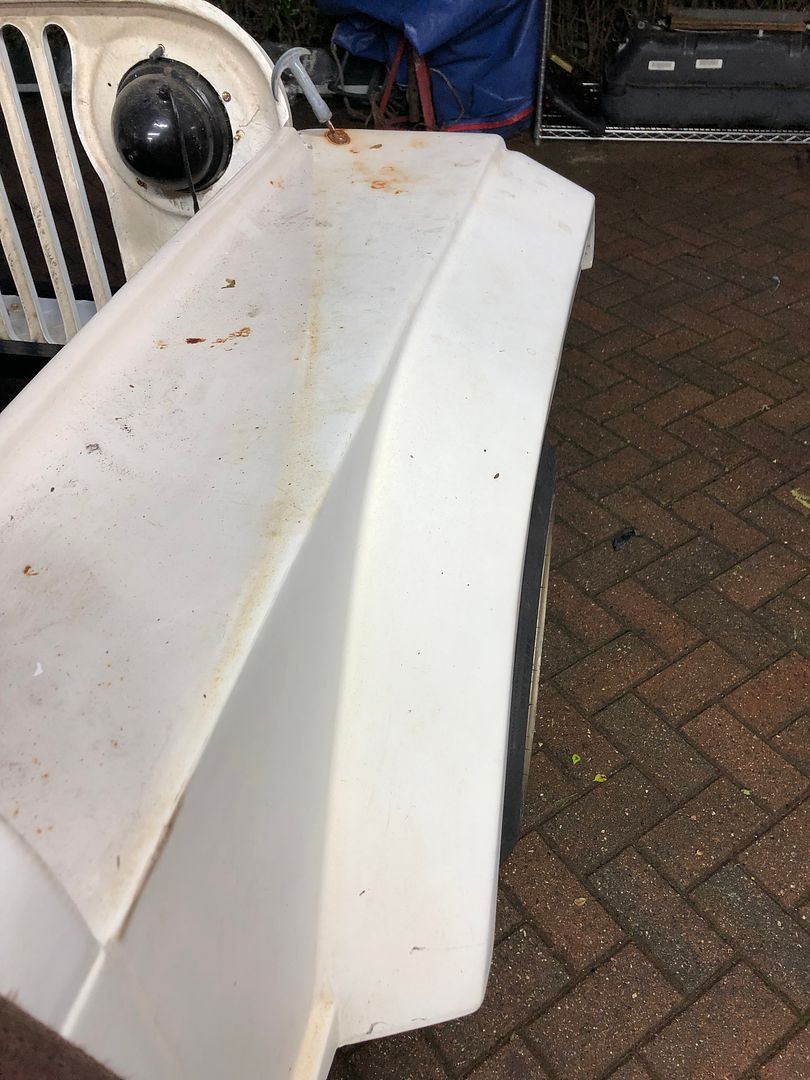 I am so chuffed right now. Onwards (In the words of @pauly )
__________________
MY BUILD LINK: http://67-72chevytrucks.com/vboard/s...585901]Redneck Express - 1966 C10 Short Fleetside MY USA ROADTRIPS http://forum.retro-rides.org/thread/...2018-humdinger IF YOU CAN'T FIX IT WITH A HAMMER, YOU'VE GOT AN ELECTRICAL PROBLEM MATE. |
|
|
|
|
12-30-2021, 07:56 AM
|
#1488 |
|
Registered User
Join Date: Dec 2012
Location: Rochester, KENT
Posts: 10,478
|
Re: GRIZZs 79 - 2WD BLAZER Challenge over in London, England. ~Its not a Project
Ordered a set of new front shocks.
Still need to do a set for the rear as well. .jpg) Running around getting new tyres fitted to the second pair of wheels and a few other jobs.
__________________
MY BUILD LINK: http://67-72chevytrucks.com/vboard/s...585901]Redneck Express - 1966 C10 Short Fleetside MY USA ROADTRIPS http://forum.retro-rides.org/thread/...2018-humdinger IF YOU CAN'T FIX IT WITH A HAMMER, YOU'VE GOT AN ELECTRICAL PROBLEM MATE. |
|
|
|
|
12-30-2021, 03:36 PM
|
#1489 |
|
Registered User
Join Date: Dec 2012
Location: Rochester, KENT
Posts: 10,478
|
Re: GRIZZs 79 - 2WD BLAZER Challenge over in London, England. ~Its not a Project
Few yard jobs to do and some stuff at Sallys place,today.
Then headed out to see if I could get another pair of part worn tyres fitted to the steels. No luck. So I had a pair of 195/50-15s fitted. 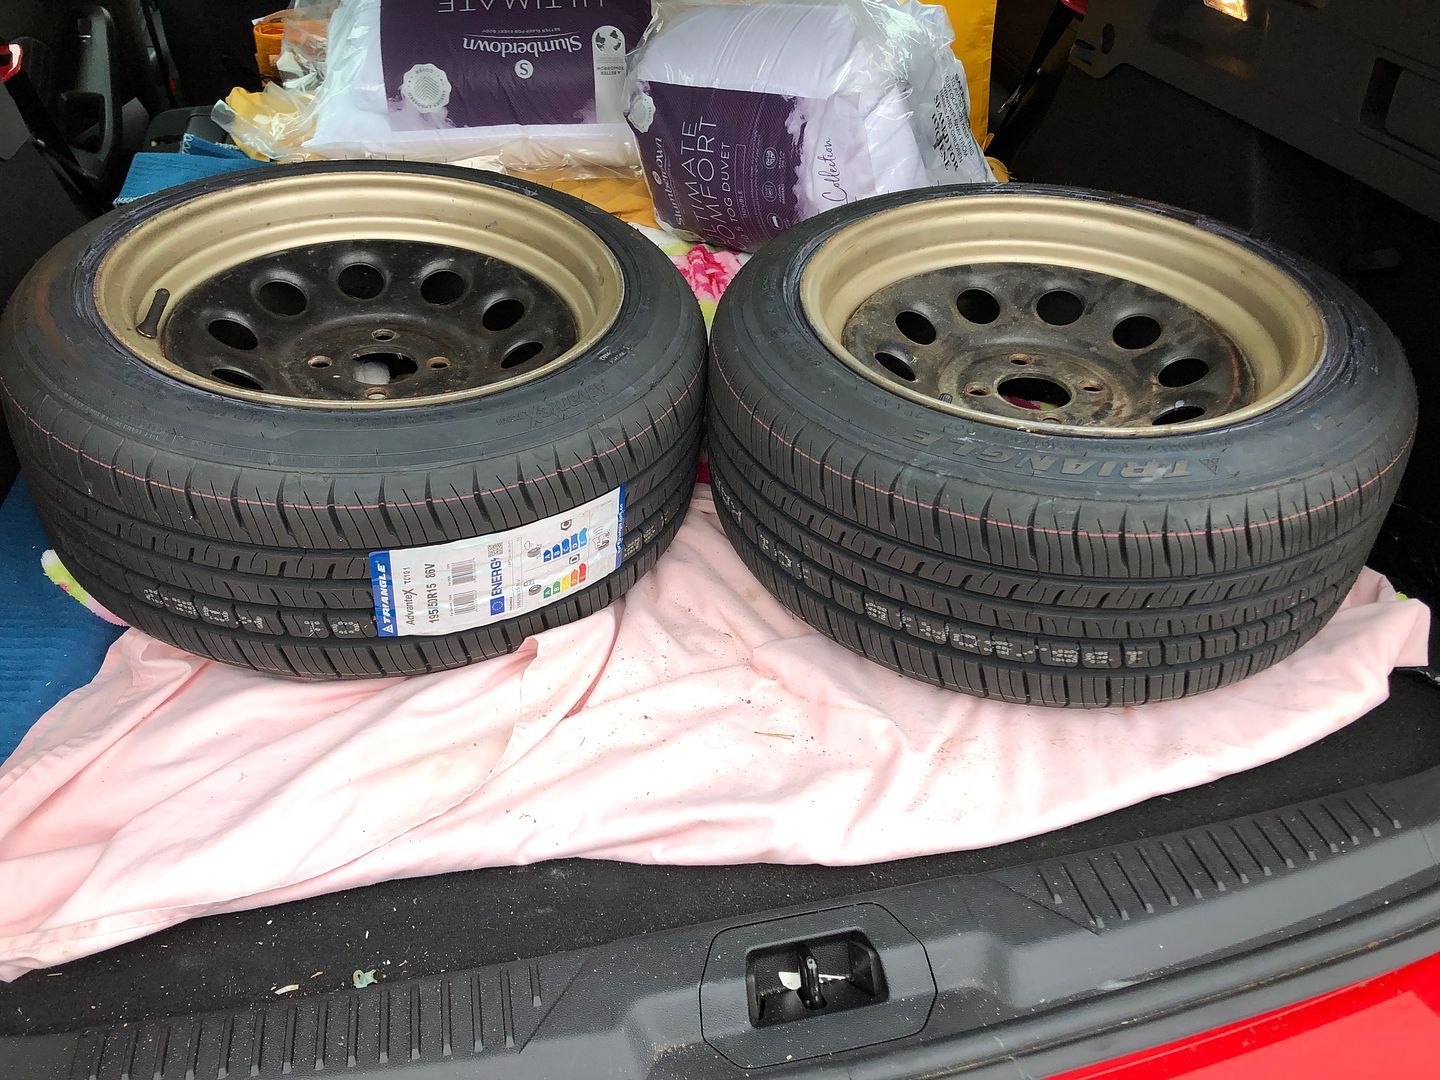 Chunky. For the front end. I like that. 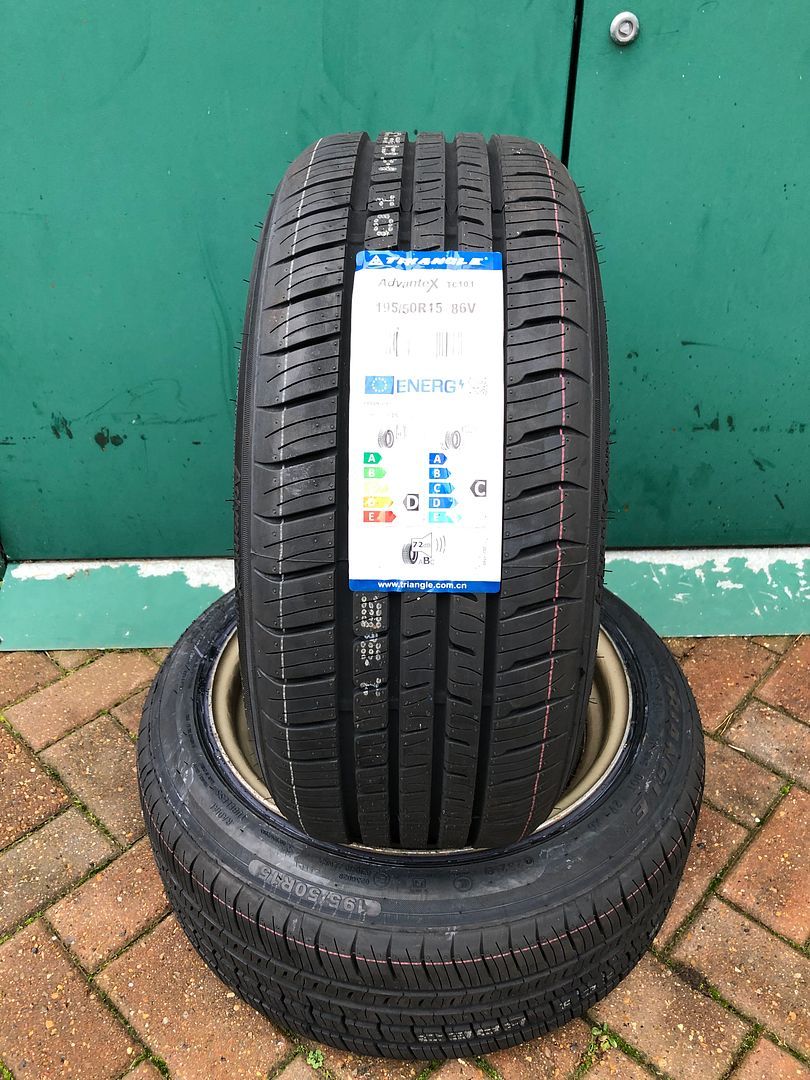 Got home and removed the 195/60-15s from the front and fitted the new ones up front. Then removed the 16 inch alloys from the rear and fitted the adapters and spacers on the rear. 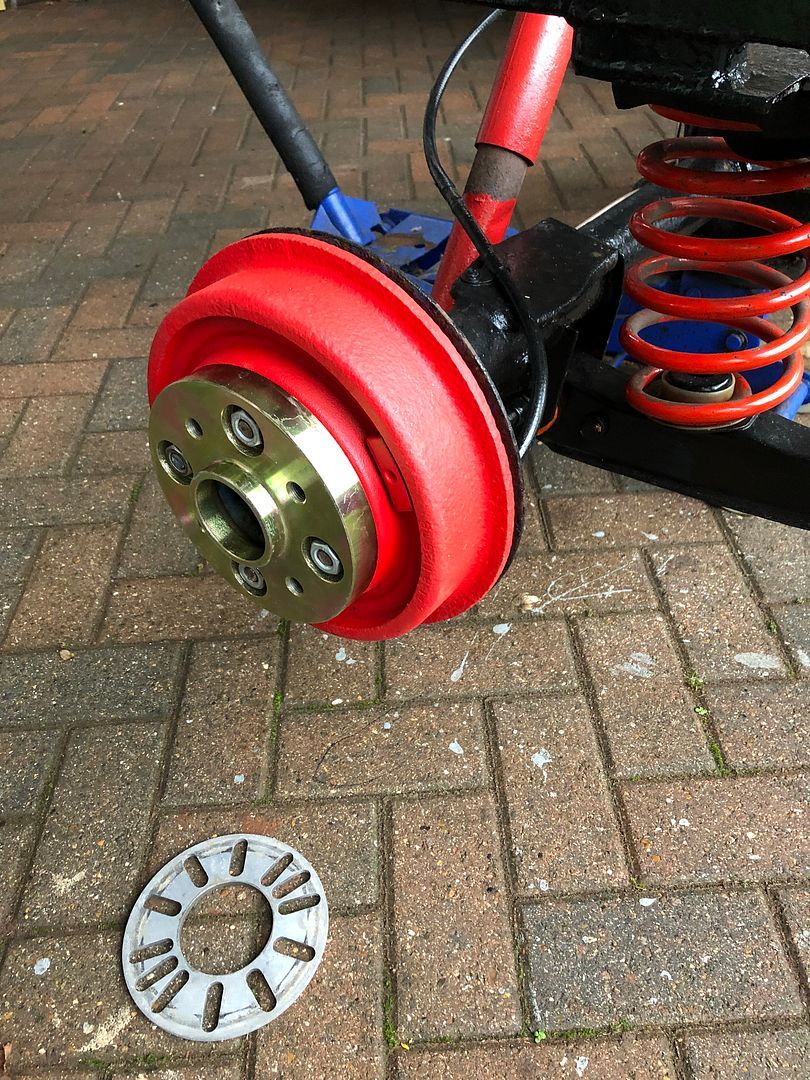 Previously @nickwheeler gave me a simple tool to help centre and fit a wheel, also helps to keep a spacer in place. 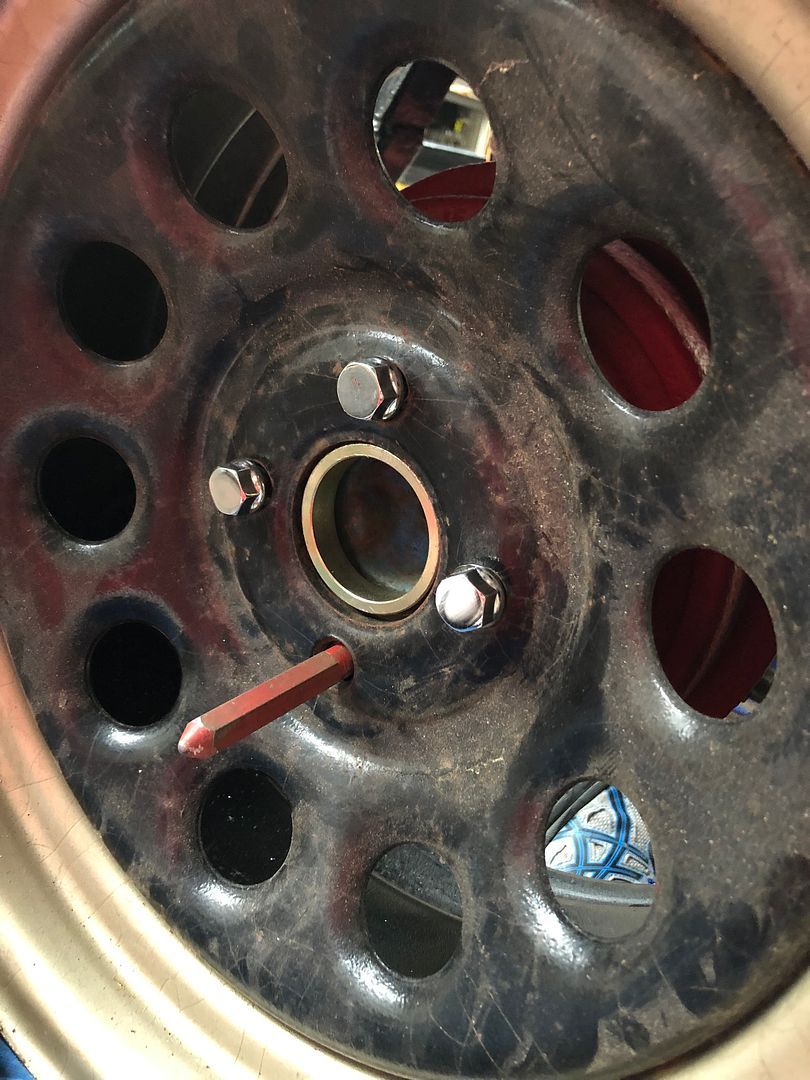 Then the rear wheels. Front wheel drive alloys fitted were just rollers. Bit tight. 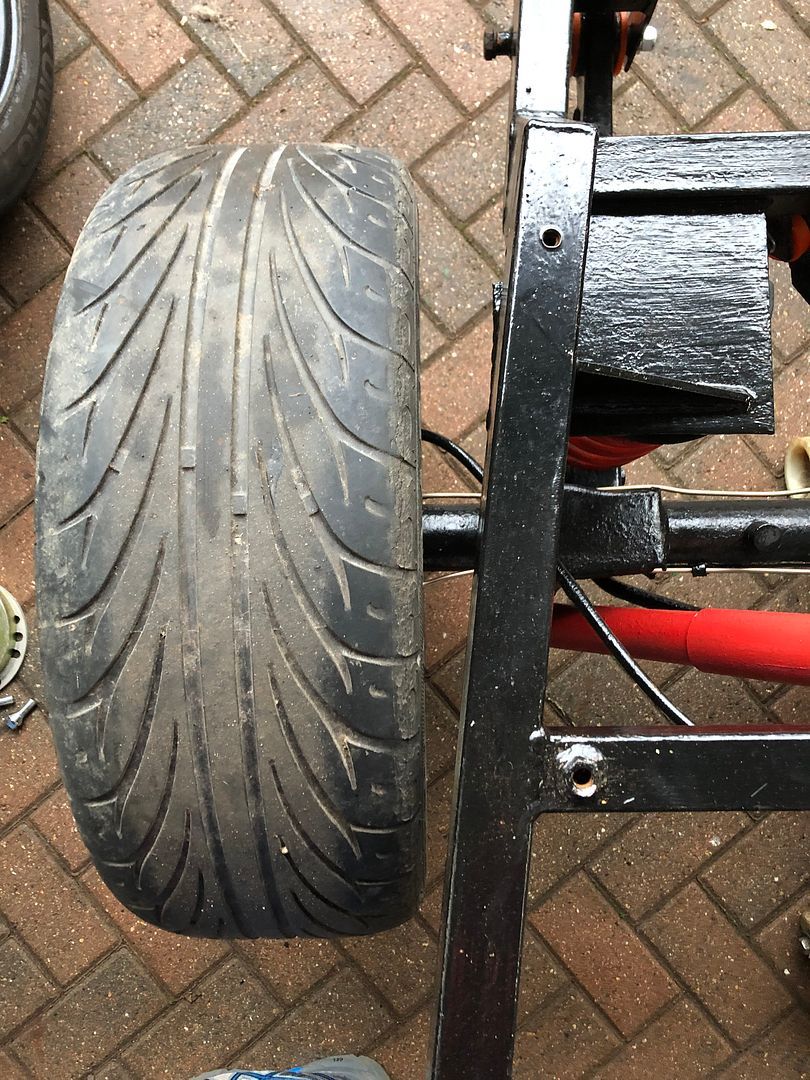 Steels fitted Hmmmmmm, those should fill the arches. 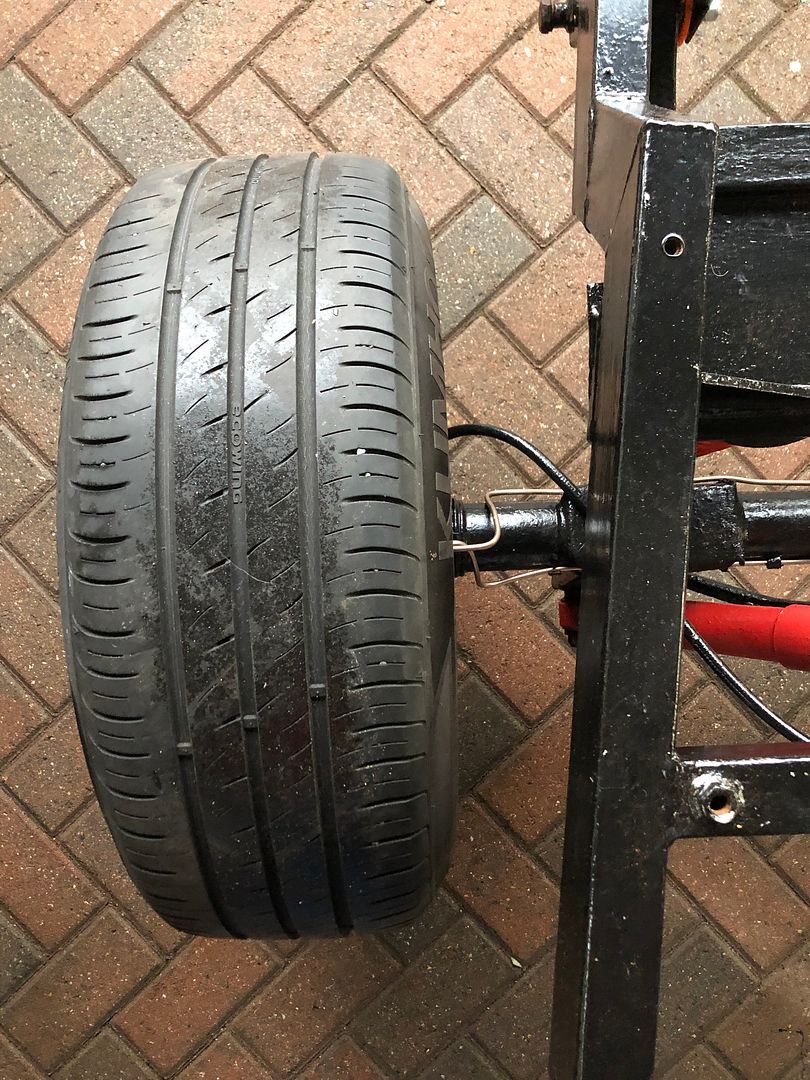 And then we have it right. Bit of rake should go a long way toward creating the look I want. 50 profiles up front and 60s out back. 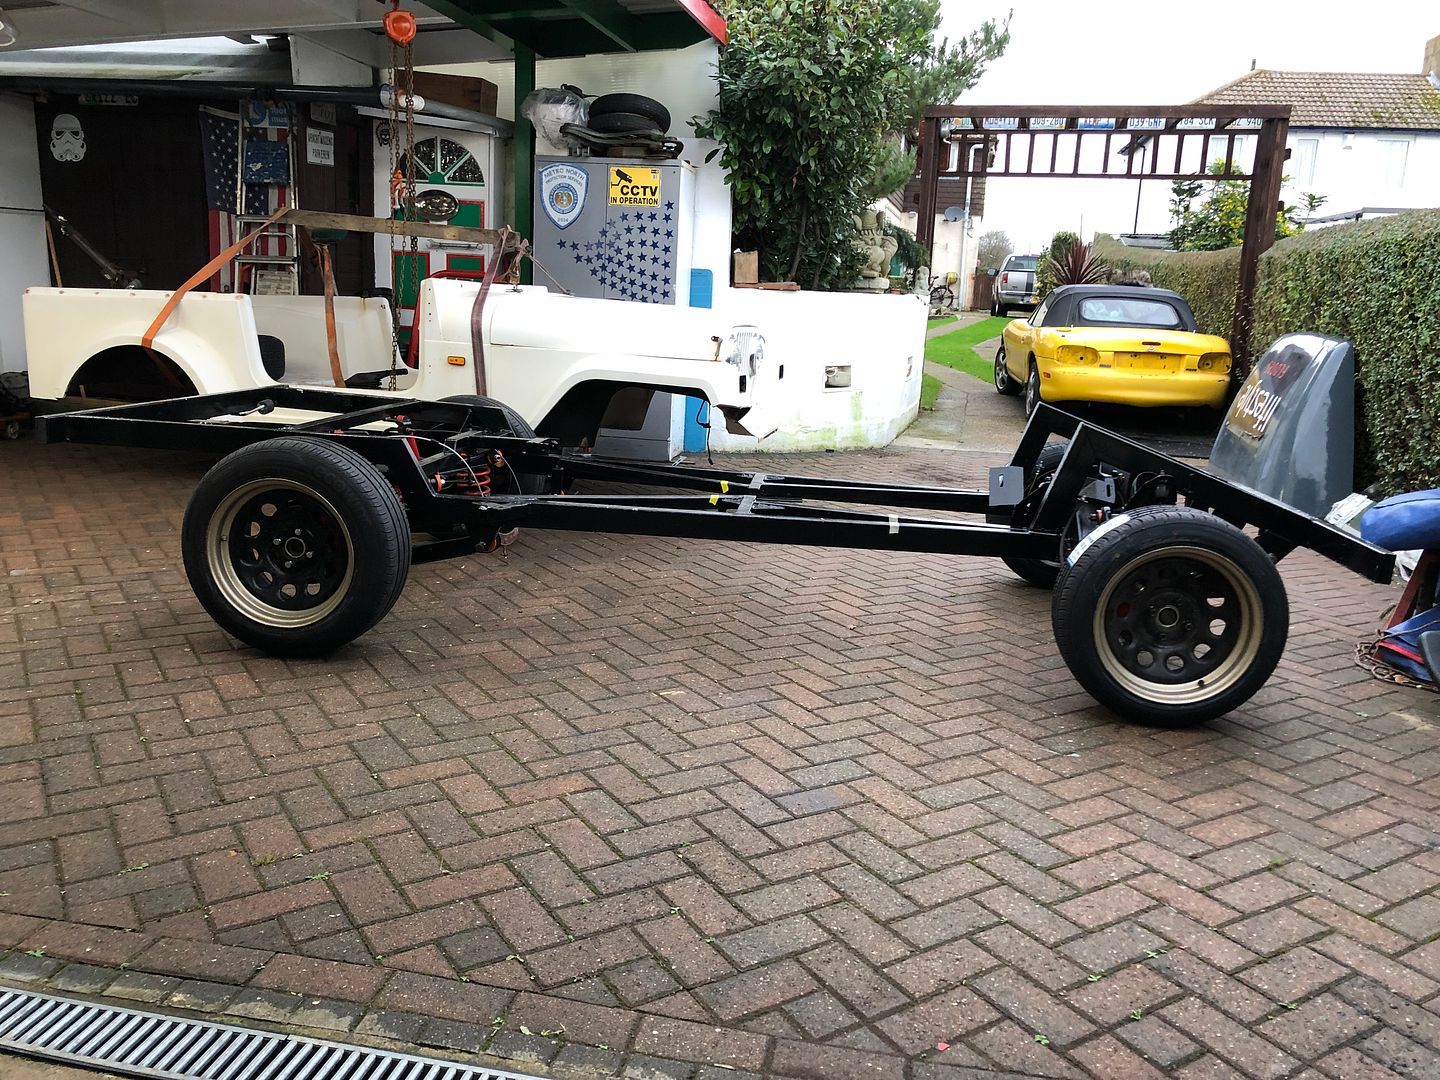 Liking this a lot. 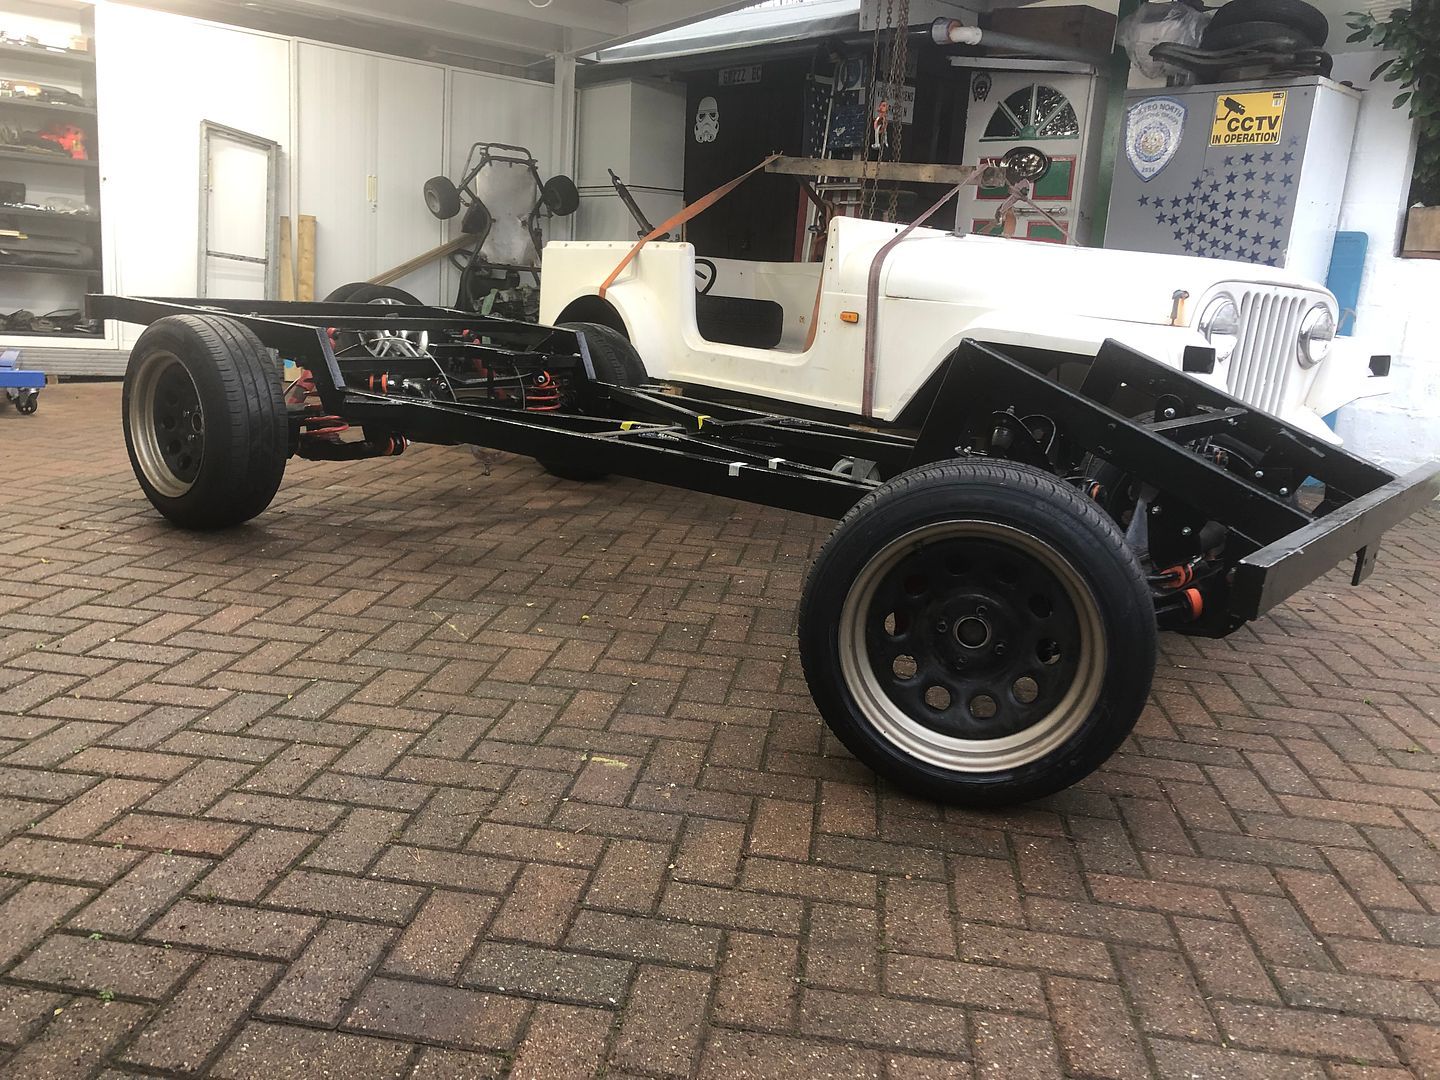 WHATCHA THINK ? .
__________________
MY BUILD LINK: http://67-72chevytrucks.com/vboard/s...585901]Redneck Express - 1966 C10 Short Fleetside MY USA ROADTRIPS http://forum.retro-rides.org/thread/...2018-humdinger IF YOU CAN'T FIX IT WITH A HAMMER, YOU'VE GOT AN ELECTRICAL PROBLEM MATE. |
|
|
|
|
12-31-2021, 04:57 AM
|
#1490 |
|
Registered User
Join Date: Dec 2012
Location: Rochester, KENT
Posts: 10,478
|
Re: GRIZZs 79 - 2WD BLAZER Challenge over in London, England. ~Its not a Project
You heard of Jack-Chitt before?
Meet Jack-Oil. 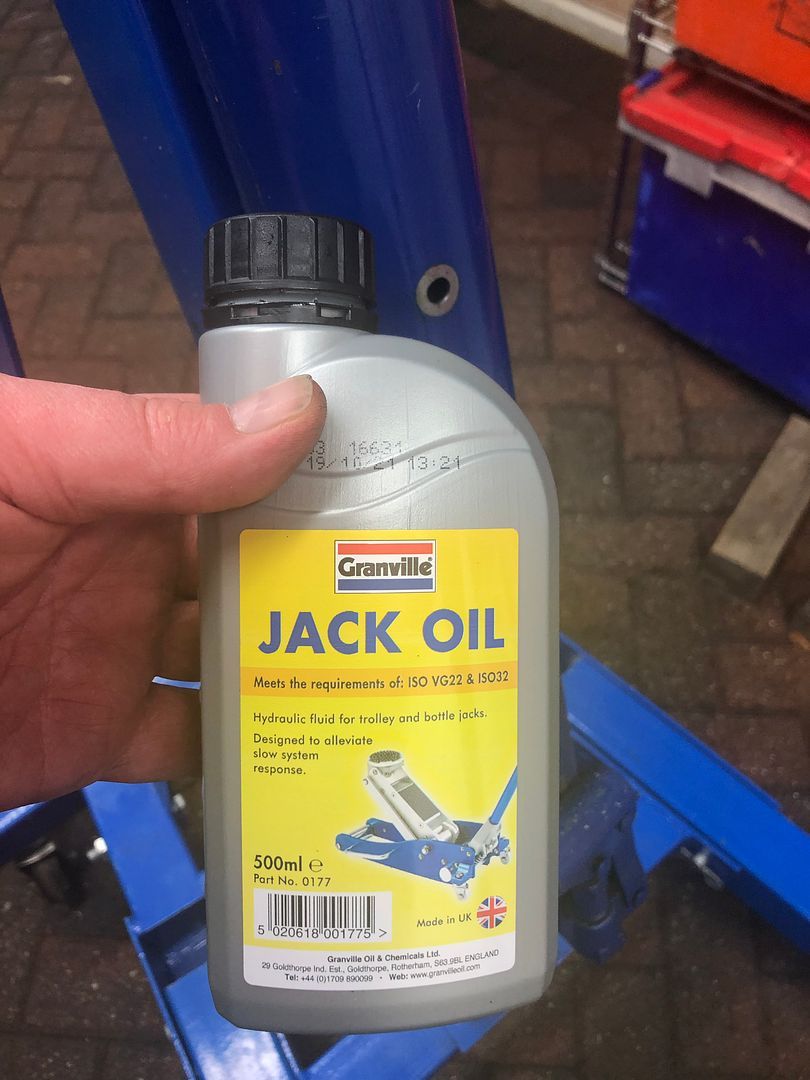 When lifting the engine out the MX5 I had to cut the front as the hoist did not lift high enough. So Nick suggested it may need a service. Tiny sideways hole So I screwed a silicone tube nozzle to the small funnel tip l.. 250ml later, filled. 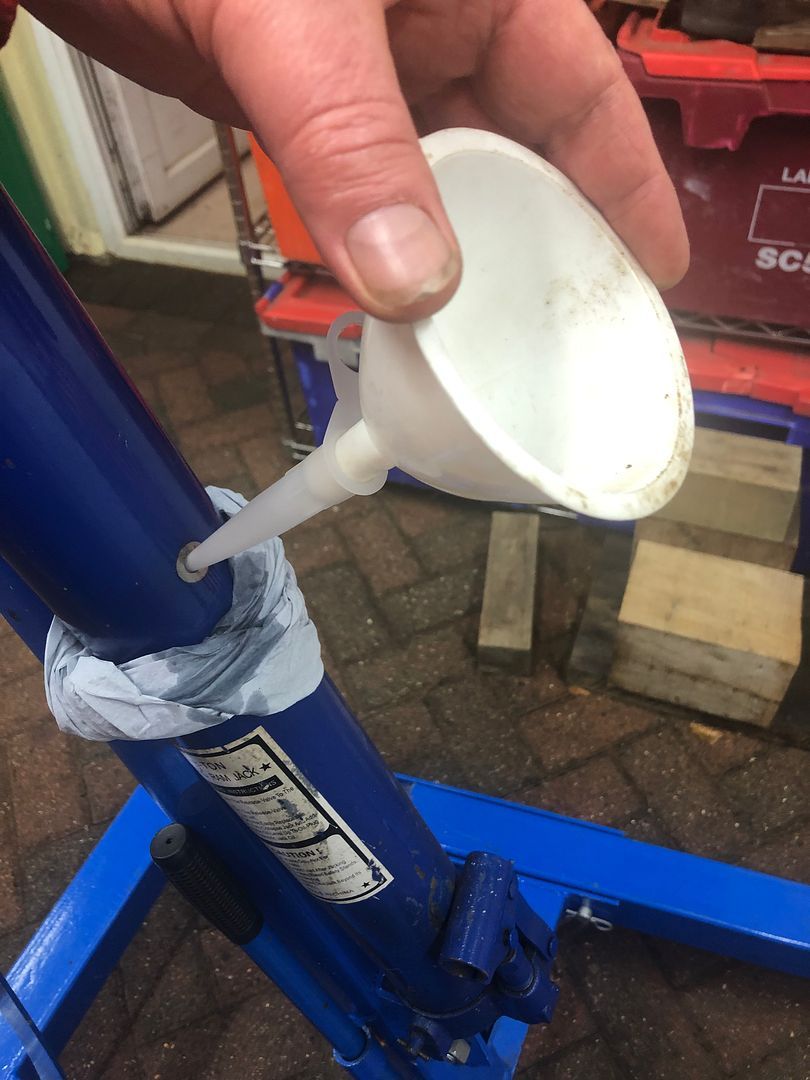 Lets hope it can raise to full height today.
__________________
MY BUILD LINK: http://67-72chevytrucks.com/vboard/s...585901]Redneck Express - 1966 C10 Short Fleetside MY USA ROADTRIPS http://forum.retro-rides.org/thread/...2018-humdinger IF YOU CAN'T FIX IT WITH A HAMMER, YOU'VE GOT AN ELECTRICAL PROBLEM MATE. |
|
|
|
|
12-31-2021, 05:05 PM
|
#1491 |
|
Registered User
Join Date: Dec 2012
Location: Rochester, KENT
Posts: 10,478
|
Re: GRIZZs 79 - 2WD BLAZER Challenge over in London, England. ~Its not a Project
Last day of the year.
This is mid winter. 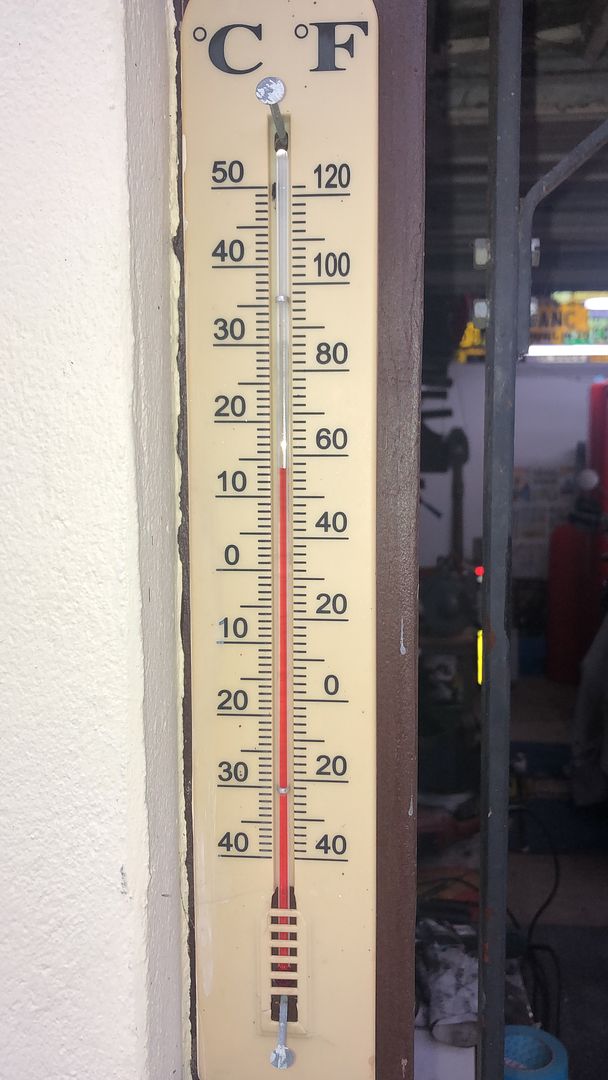 @nickwheeler and I were both thinking that if we could get the engine and gearbox mounts made, tacked and in position, followed by placing the body on the chassis, it would be a great place to end 2021, regardless of what time that happened. However, the engine hoist messed us around, and finding the right metal, getting the positioning etc sorted took time, starting just after 10.00 we only had a coffee at 12,30 or sometime later. Nick had a family meeting to attend, which meant closing off by 2.00pm so he could get across town. The pic most of us have been waiting for 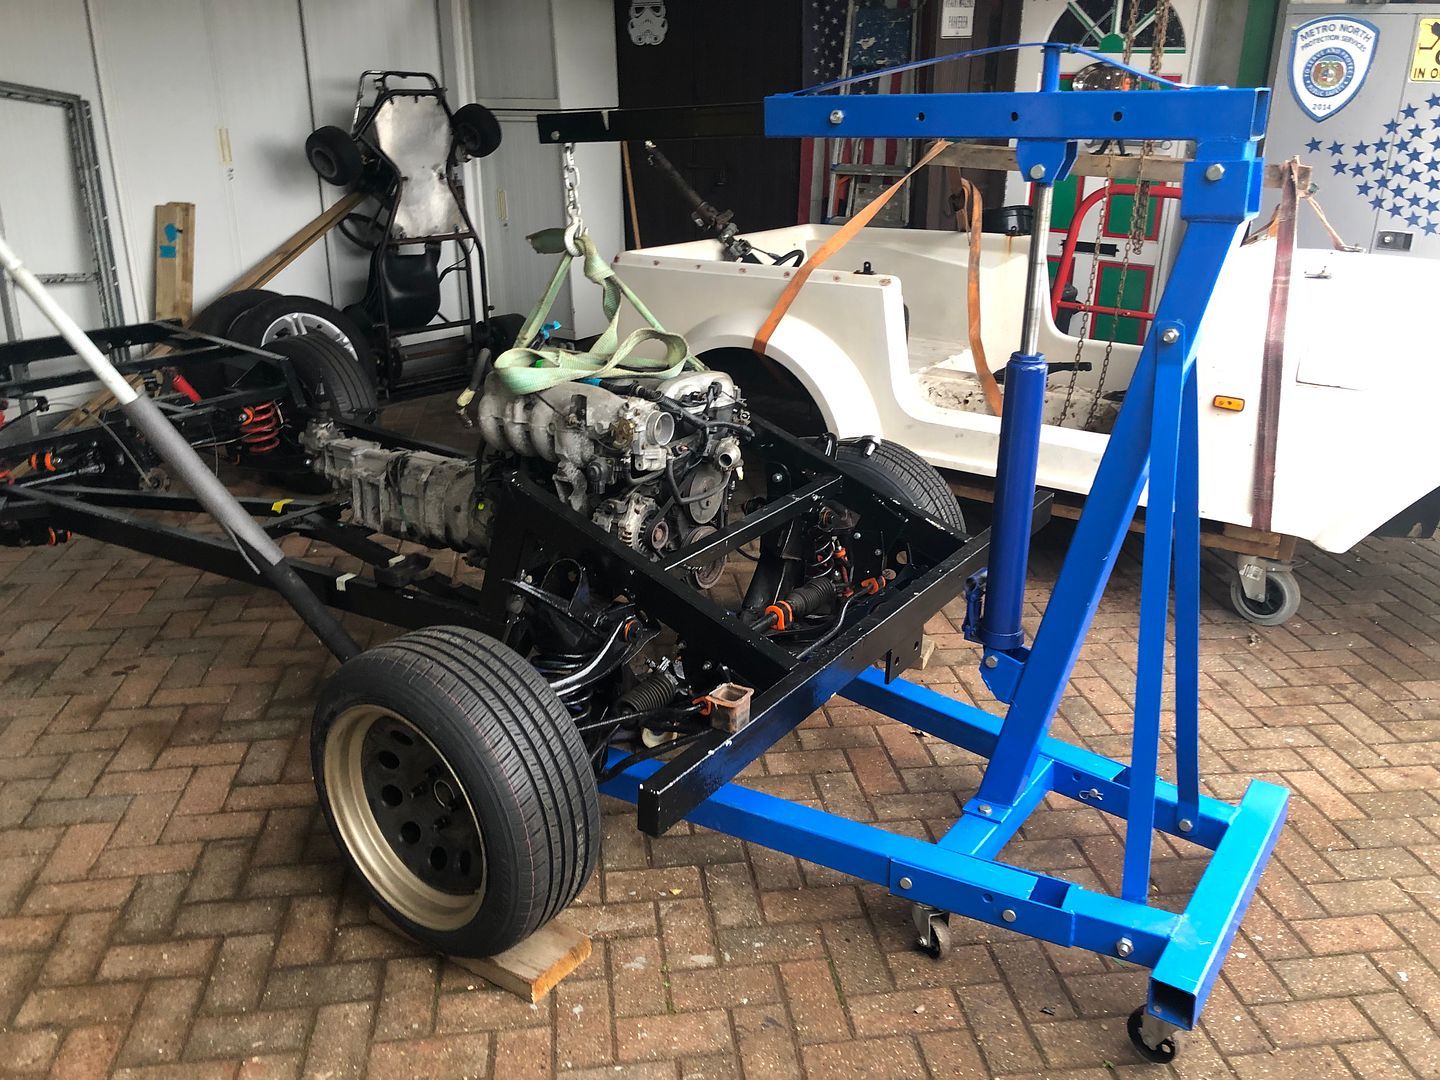 And then, once the engine was mocked in position, I added the radiator, fan and original pipework to see if it all fitted. Gear stick was in approximately the right place. 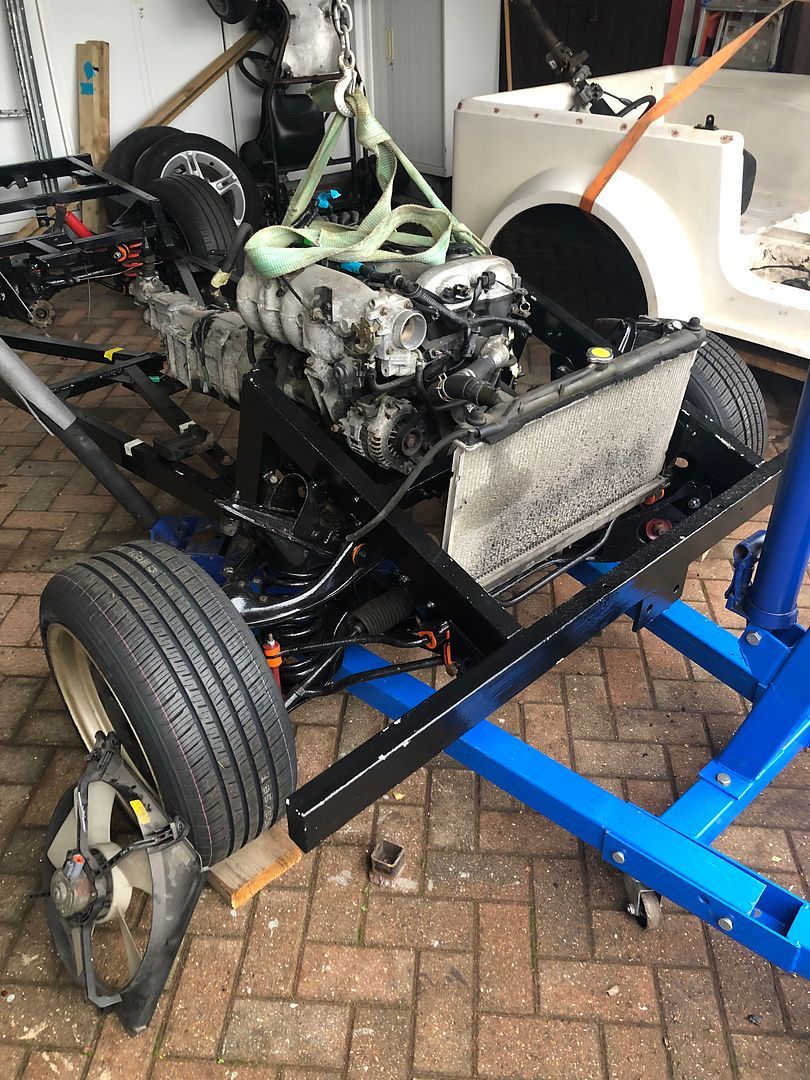 So then Nick marked out where the original Ford engine mounts on the chassis (not the crossmember) needed to be cut away as the MX5 engine mounts hang a bit lower. So Mr 9 grinder came out . It scares me. 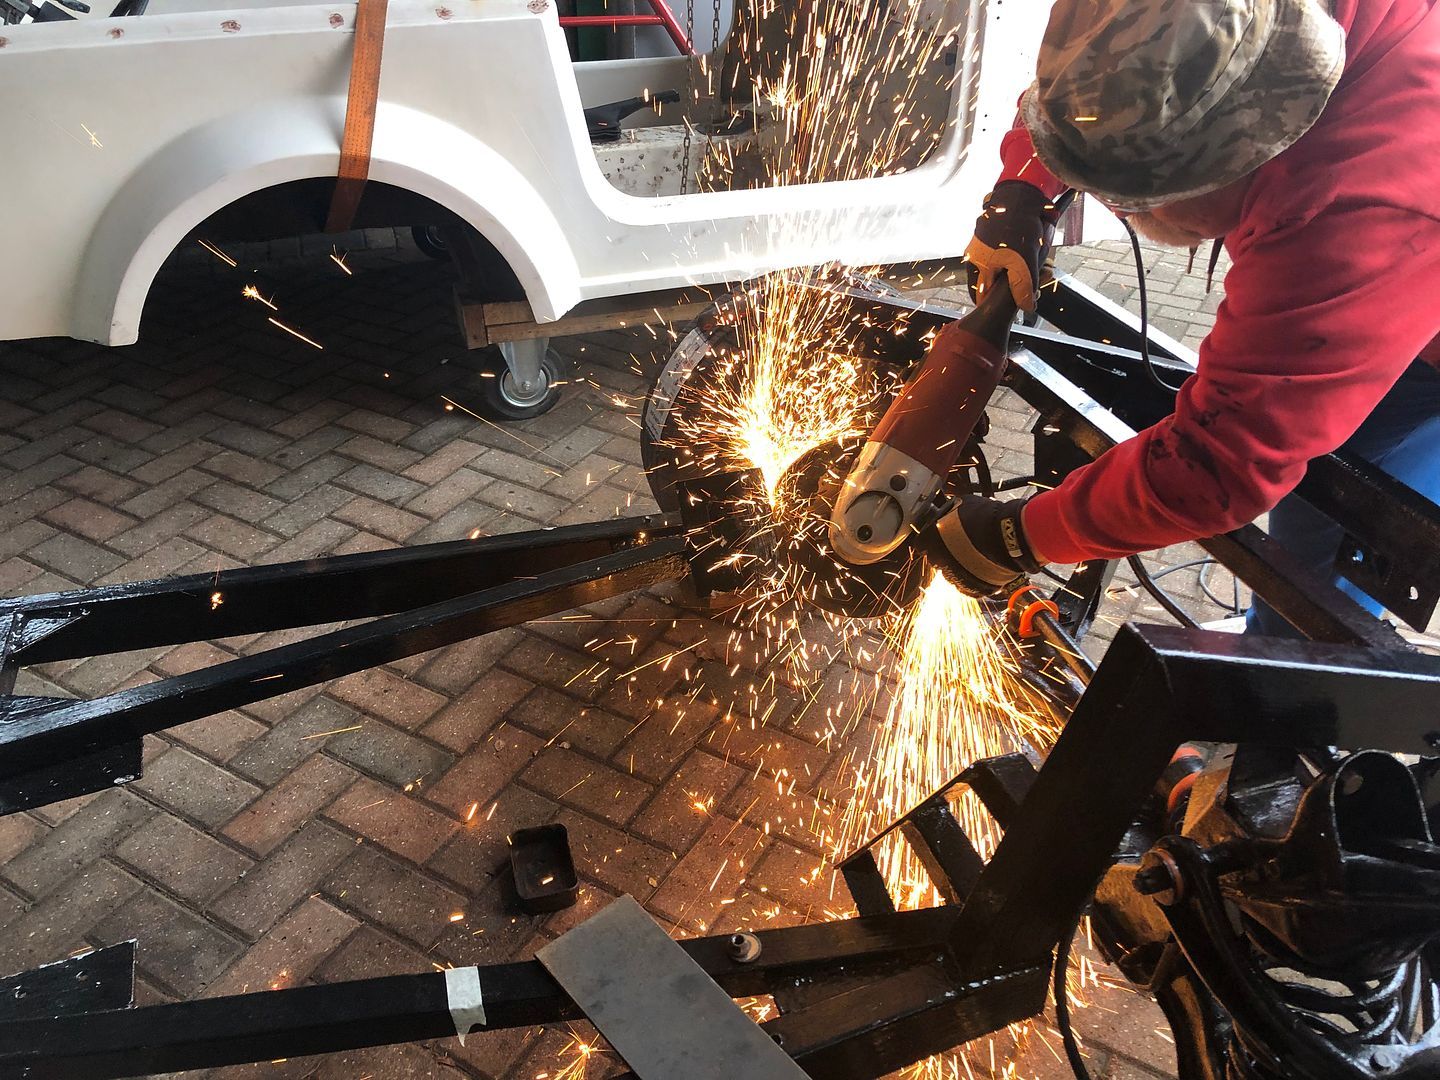 Cut away, cleaned up, and then fine tuned. 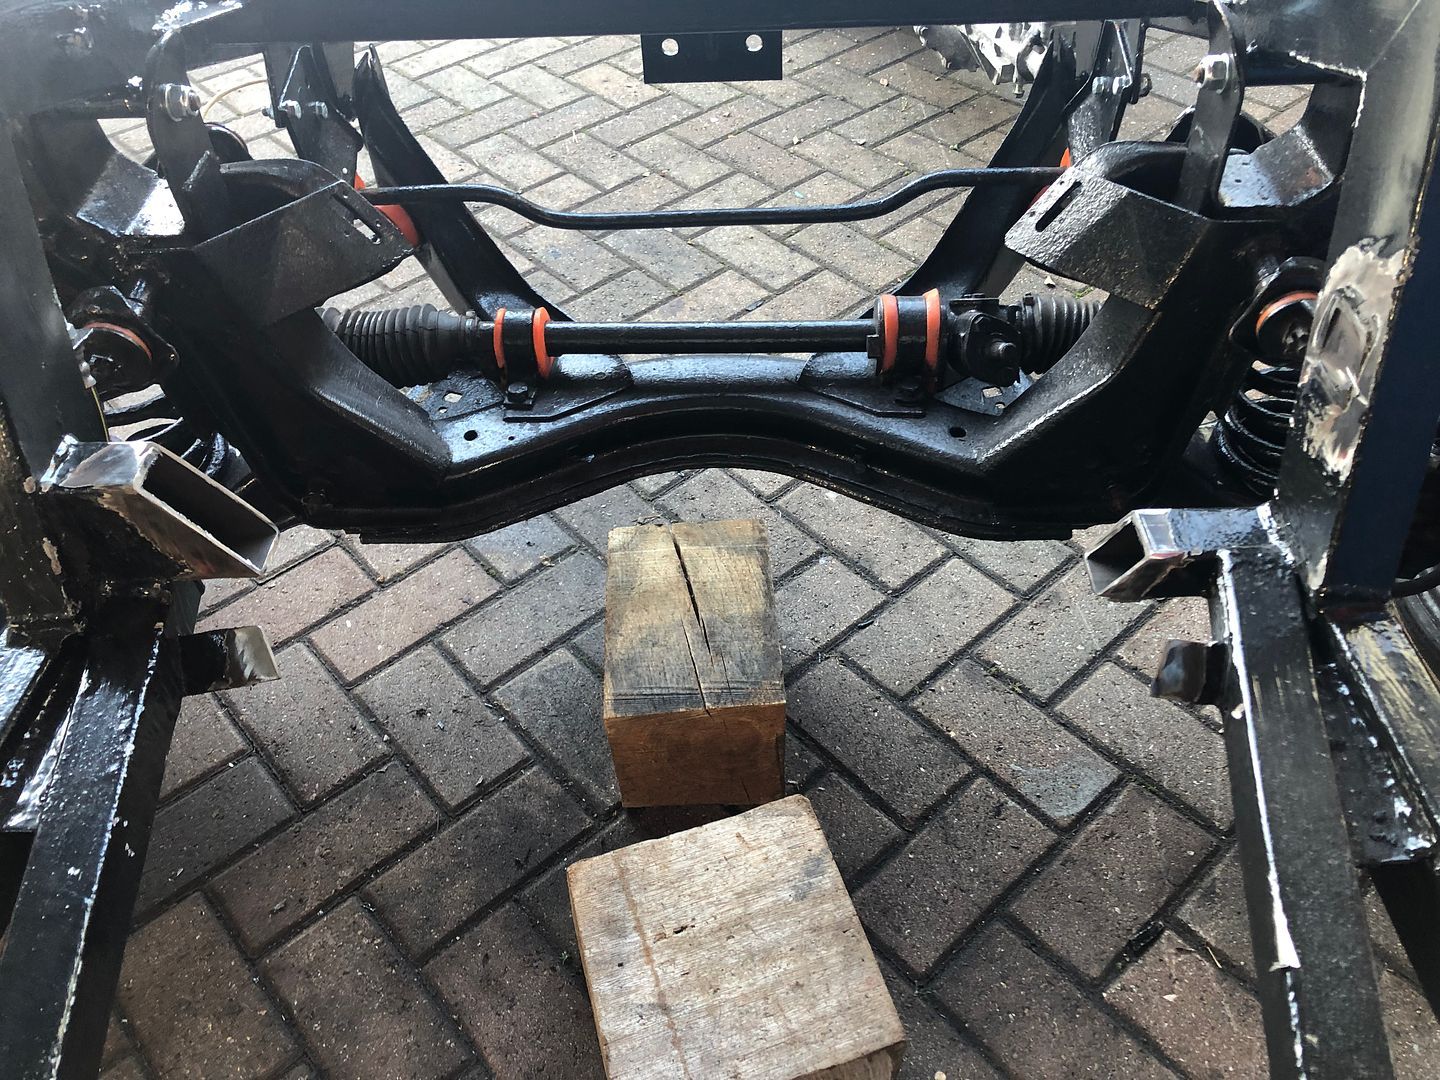 Engine back in. Mazda prop-shaft in ( No it does not match the diff .. so I will have to have a custom build done. Length is right but the bolt pattern differs out back.  Next job after Nick measured it out was for me to get on the drill press and make a few holes, followed by a slot on the face of the engine mounting plate, then Nick, who had brought his welder along, tacked it in place so me could carry on with the next one, which proved to be a bit more awkward. 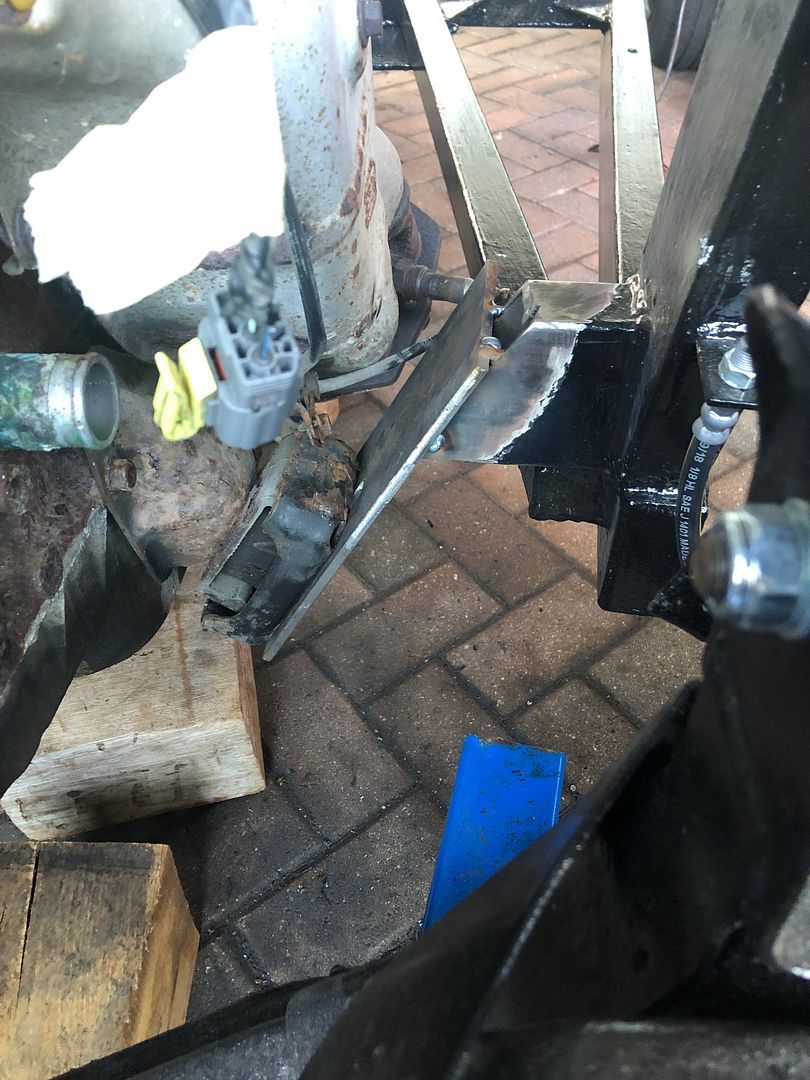 Amazing how time flies when you are having fun. Too soon it was 2.00pm and time for Nick to head out. Leaving me with some homework to get done in the meantime. So I pulled in the CAD pizza box and started to make up the templates for the gussets that will be making the mounts completely stable and ready for the next evolution, whenever, or if ever it happens. The trick of course is starting with a large section, and then adding to get an exact fit. 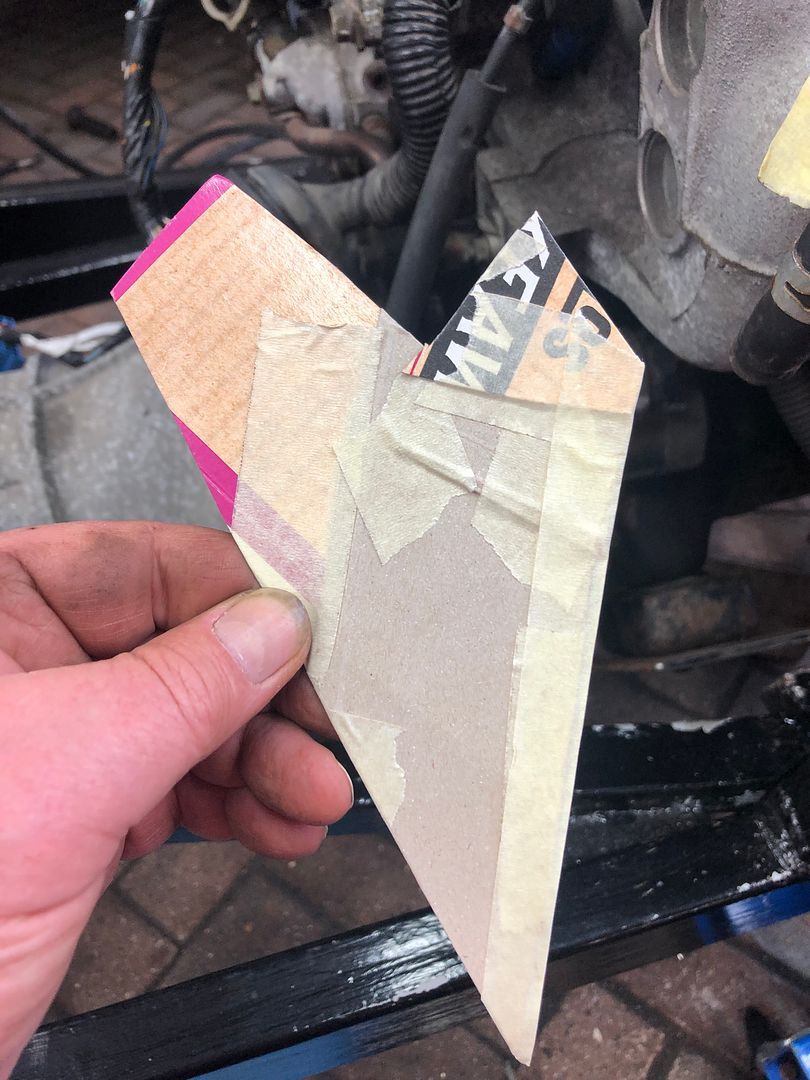 And the result. To be welded in tomorrow once the steel plate cutout is done. 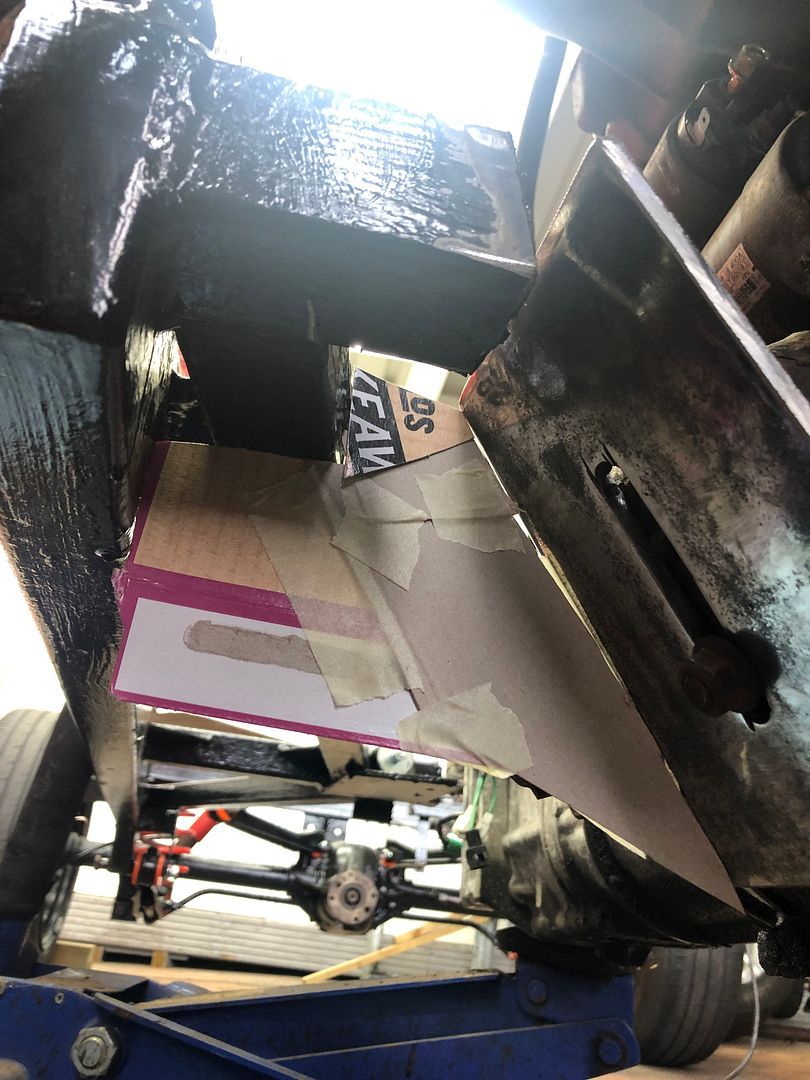 Laid out on the plate, of course playing Tetris helps. 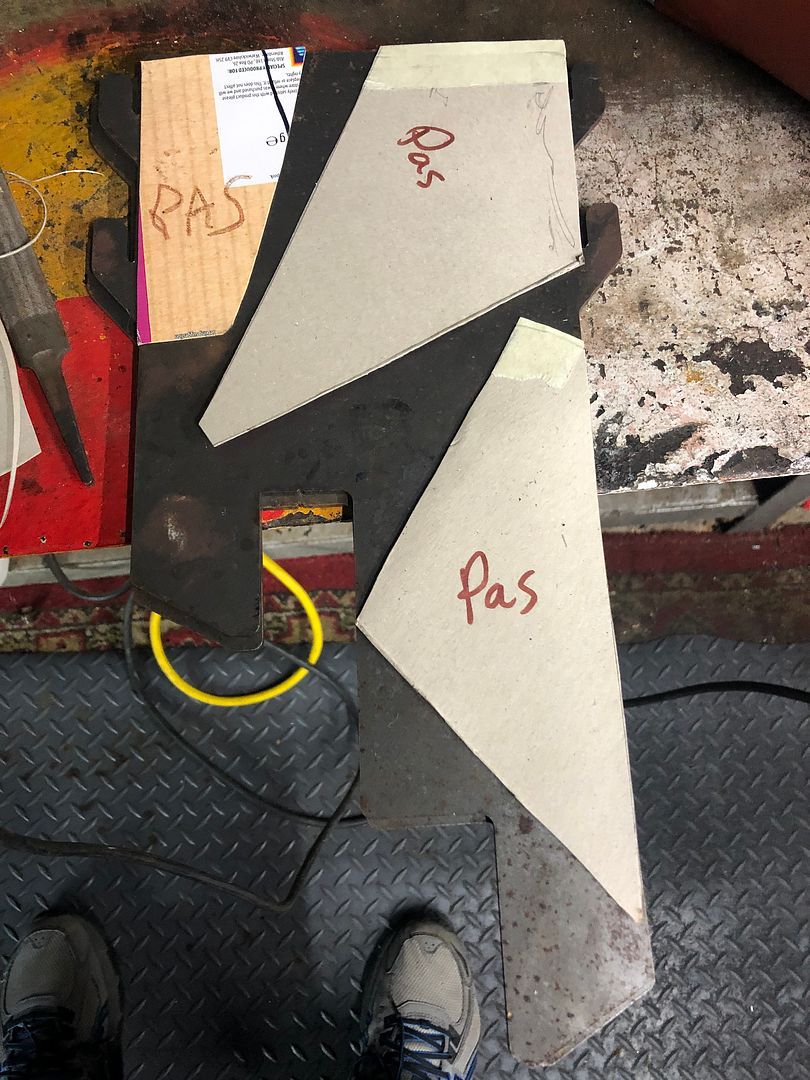 Transferred onto the steel. 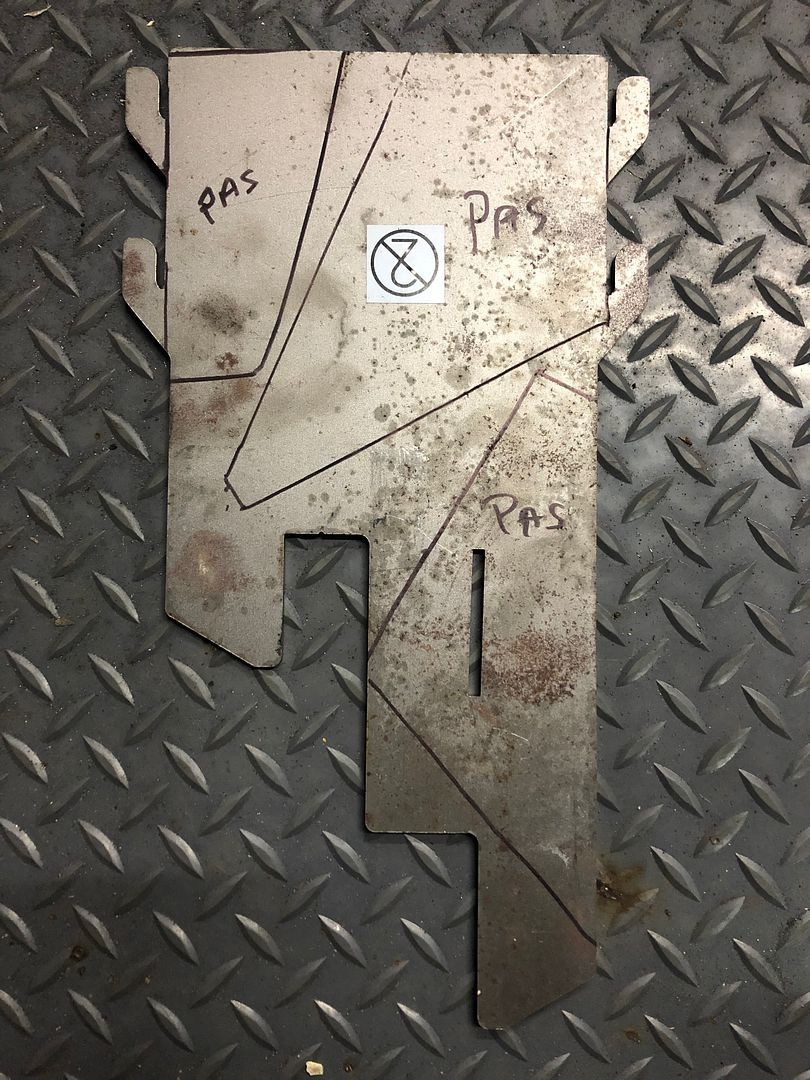 Once all were created and transferred on the steel, cutout time. Sparkly. Destroyed a very good pair of trainers, unfortunately. 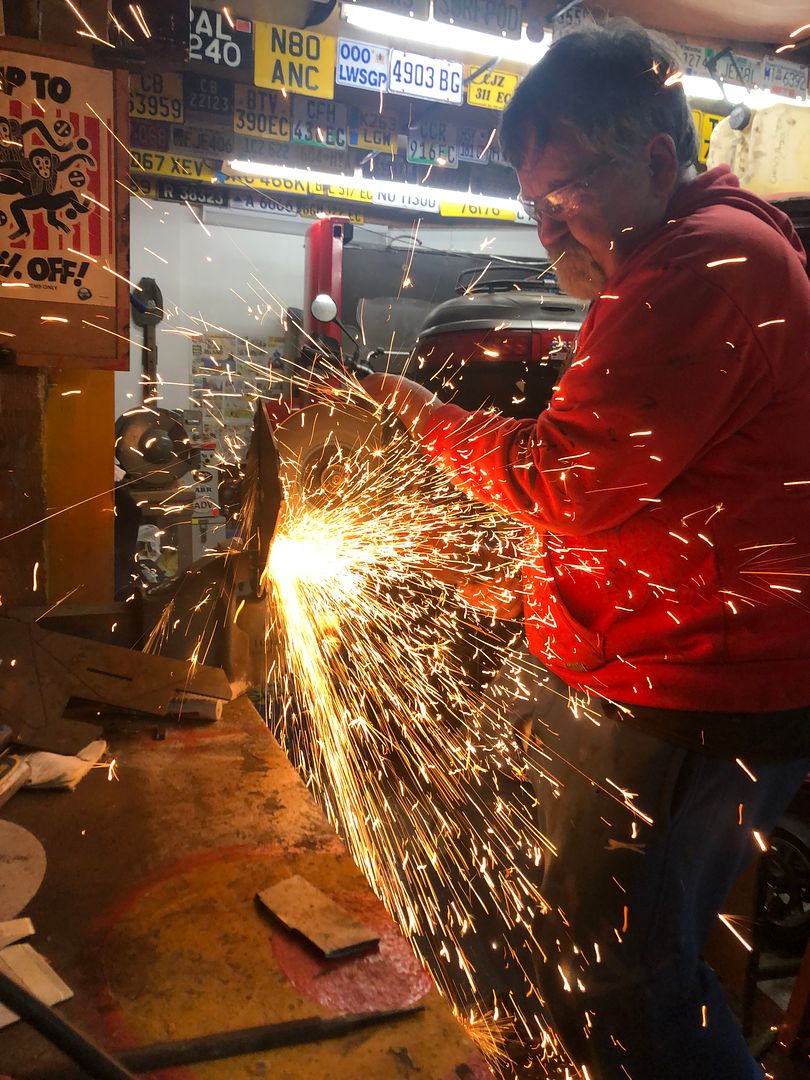 At the rear end, the gearbox needed a mount of some sort as well, using the rubber mounts. So using existing fasteners and a plate on the chassis, I cut some steel to fit, and will drill the M8 holes, mount the rubber mounts and attach to the tail. I am not 100% sure how this will look when done, but a nights sleeping on the idea should work it out in my head. 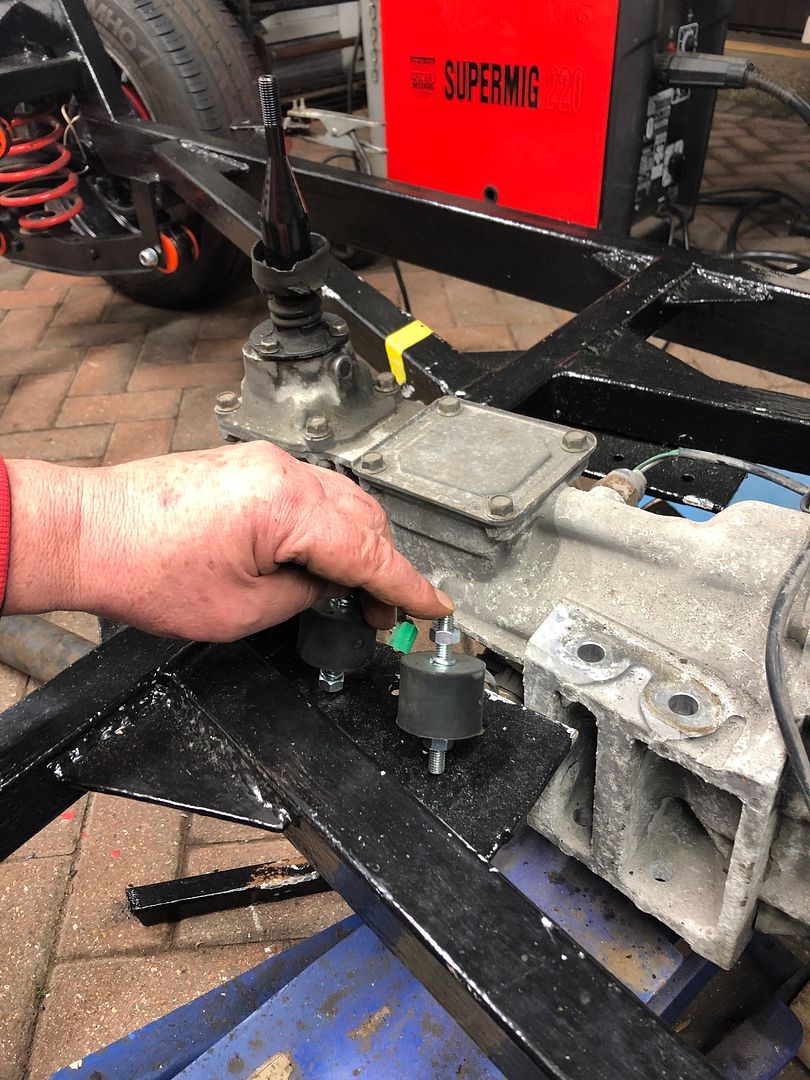  That took me to 5.30 and time to shut shop and come in to see Sally and cook us something to eat. Here you can see the gussets as they will be welded into place around the mounting plate and onto the chassis to create a solid, safe mount on each side.  Pretty chuffed with todays progress again. Tomorrow is a new year. Happy New Year to all of you out there, the writers and lurkers and the ones who rarely say a thing. Thank you for 2021.
__________________
MY BUILD LINK: http://67-72chevytrucks.com/vboard/s...585901]Redneck Express - 1966 C10 Short Fleetside MY USA ROADTRIPS http://forum.retro-rides.org/thread/...2018-humdinger IF YOU CAN'T FIX IT WITH A HAMMER, YOU'VE GOT AN ELECTRICAL PROBLEM MATE. |
|
|
|
|
01-01-2022, 05:05 AM
|
#1492 |
|
Registered User
Join Date: Dec 2012
Location: Rochester, KENT
Posts: 10,478
|
Re: GRIZZs 79 - 2WD BLAZER Challenge over in London, England. ~Its not a Project
HAPPY NEW YEAR
.
HOW LAST YEAR ENDED.  HOPEFULLY, Today will see the bracketry made up and welded in place. With the body test fitted
__________________
MY BUILD LINK: http://67-72chevytrucks.com/vboard/s...585901]Redneck Express - 1966 C10 Short Fleetside MY USA ROADTRIPS http://forum.retro-rides.org/thread/...2018-humdinger IF YOU CAN'T FIX IT WITH A HAMMER, YOU'VE GOT AN ELECTRICAL PROBLEM MATE. |
|
|
|
|
01-01-2022, 05:39 PM
|
#1493 |
|
Registered User
Join Date: Dec 2012
Location: Rochester, KENT
Posts: 10,478
|
Re: GRIZZs 79 - 2WD BLAZER Challenge over in London, England. ~Its not a Project
So the 1st of January 2022 dawned like this
..
 With another good days weather promised. Loads on the agenda. Hopefully a few jobs would be done by 6.30pm. Write up as soon as I catch my breath. Insomnia unfortunately results in being knackered by the end of a day like this. @nickwheeler and I struck a great pace and just kept moving forward. .
__________________
MY BUILD LINK: http://67-72chevytrucks.com/vboard/s...585901]Redneck Express - 1966 C10 Short Fleetside MY USA ROADTRIPS http://forum.retro-rides.org/thread/...2018-humdinger IF YOU CAN'T FIX IT WITH A HAMMER, YOU'VE GOT AN ELECTRICAL PROBLEM MATE. |
|
|
|
|
01-02-2022, 06:01 AM
|
#1494 |
|
Registered User
Join Date: Dec 2012
Location: Rochester, KENT
Posts: 10,478
|
Re: GRIZZs 79 - 2WD BLAZER Challenge over in London, England. ~Its not a Project
.
Fncking Photobucket. No links available to copy and post. Google ads tab at the bottom of the page. Seriously am not happy now. Cant update thread. Sorry. .
__________________
MY BUILD LINK: http://67-72chevytrucks.com/vboard/s...585901]Redneck Express - 1966 C10 Short Fleetside MY USA ROADTRIPS http://forum.retro-rides.org/thread/...2018-humdinger IF YOU CAN'T FIX IT WITH A HAMMER, YOU'VE GOT AN ELECTRICAL PROBLEM MATE. |
|
|
|
|
01-02-2022, 09:11 AM
|
#1495 |
|
Registered User
Join Date: Dec 2012
Location: Rochester, KENT
Posts: 10,478
|
Re: GRIZZs 79 - 2WD BLAZER Challenge over in London, England. ~Its not a Project
Weather yesterday on New Years day was,great.
We could feel our fingers and get on with a load of small jobs that came together to deliver on the unwritten schedule. For me, a massive achievement for my holidays would have been to get the engine out of the MX5 and getting that stripped on my own. But, with the help of @nickwheeler the pace was quadrupled and we completed it in two days. BOOOOM ! As @pauly always says. That job done, meant that I still had a few days of leave over to make more progress, in-between Sallys working days and all the happy festive family days that I had agreed to being festive on this year. And I actually enjoyed the very low key Christmas season. Though stuff was not getting done nonstop, it was actually the right pace, because this build must never become a chore or a bore. With the engine and gearbox on the floor, the obvious next point to aim for was to lift up and get the mock up and then fixing them to the chassis. On the in-between days I carried on and got the body ready by stripping it further etc. On New Years Eve, Nick and I spent a few hours getting some stuff done. I made up the gusseting/boxing plates for the engine mounts in the mean time. Then 01 January 2022 Nick was at my door by 9.30 followed by a coffee, planning and looking at some Kit Car options like lights etc. Then we headed down and hit the build hard. Really hard. Slotted mount plate and engine in position. 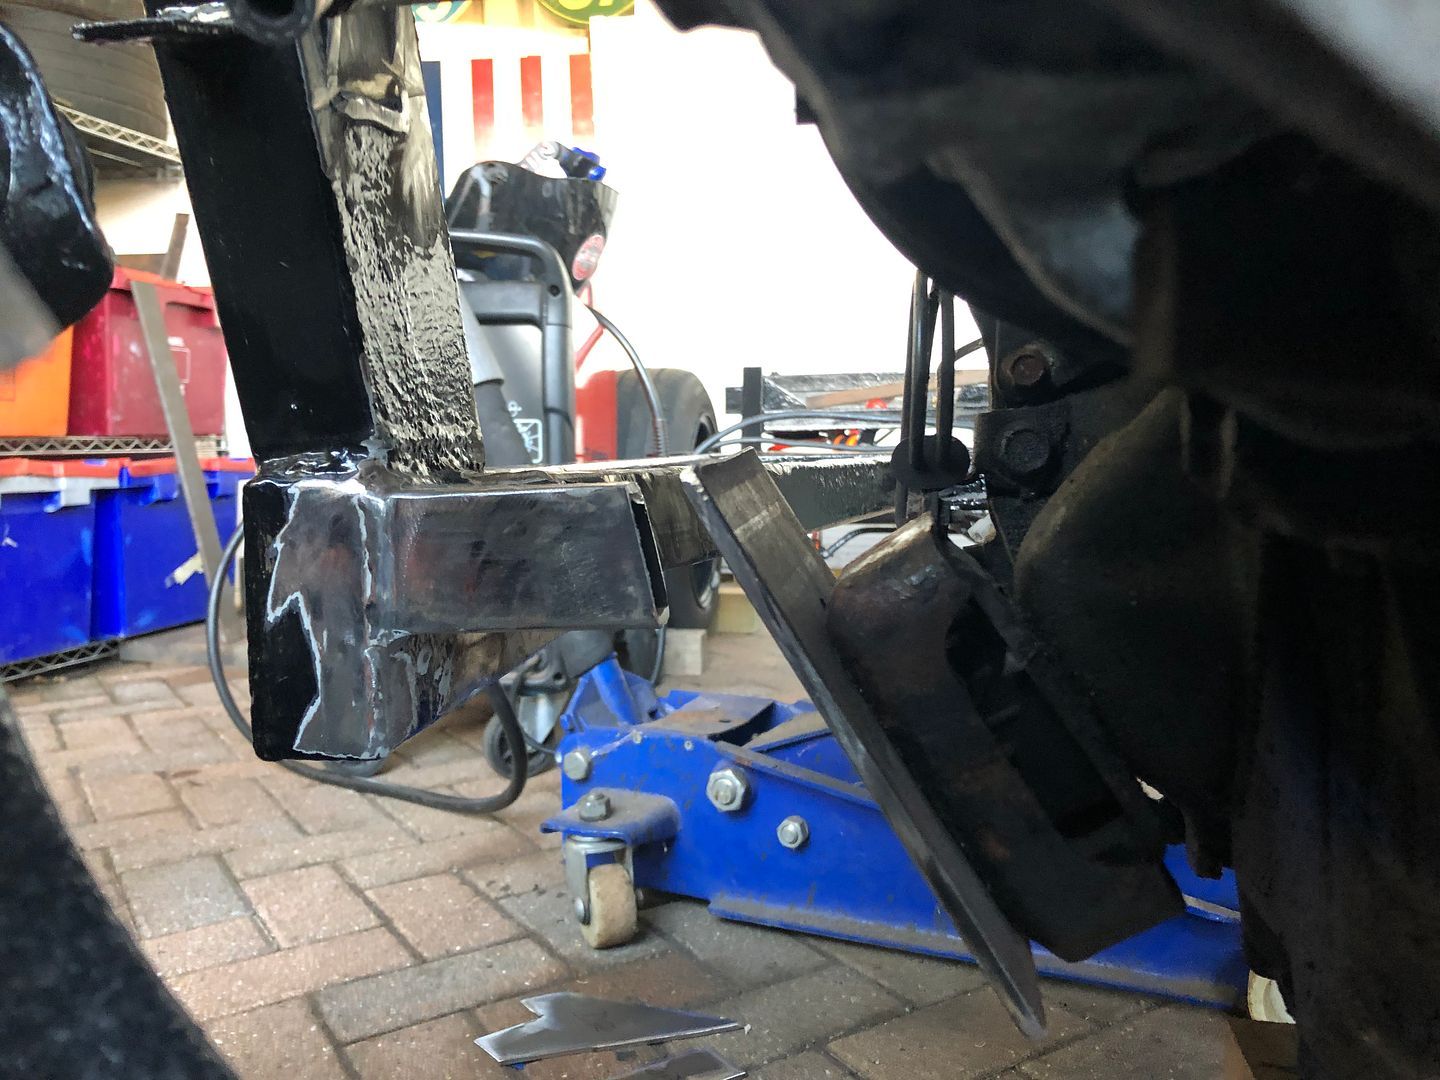 Then one gusset tacked in place with the MIG welder Nick had brought. 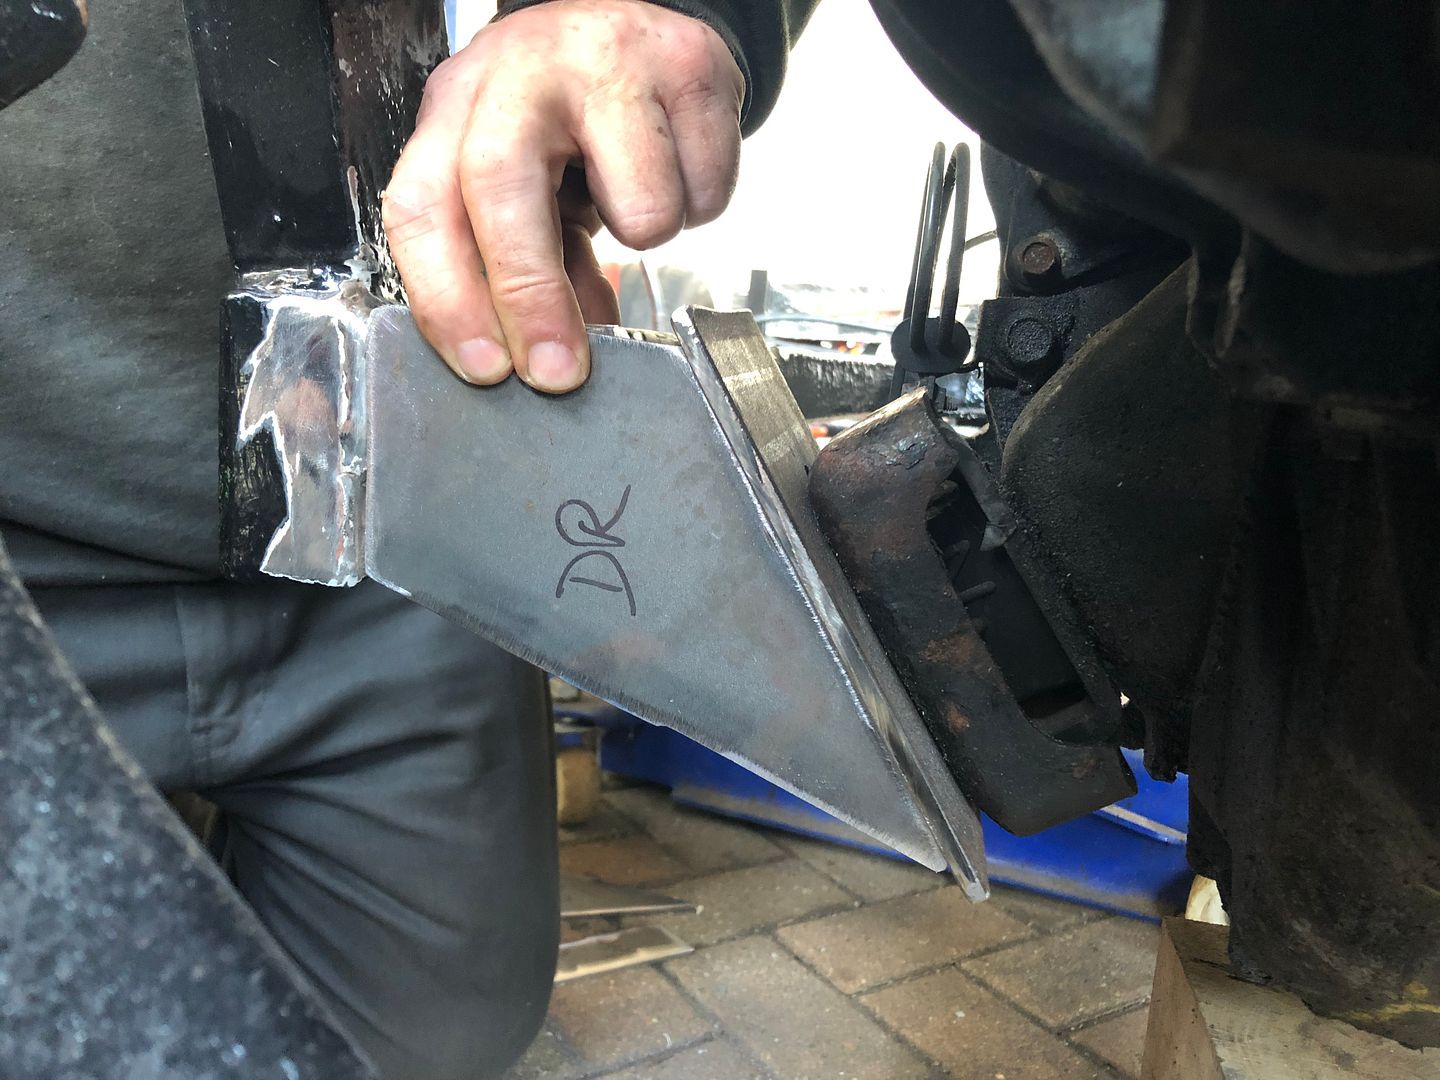 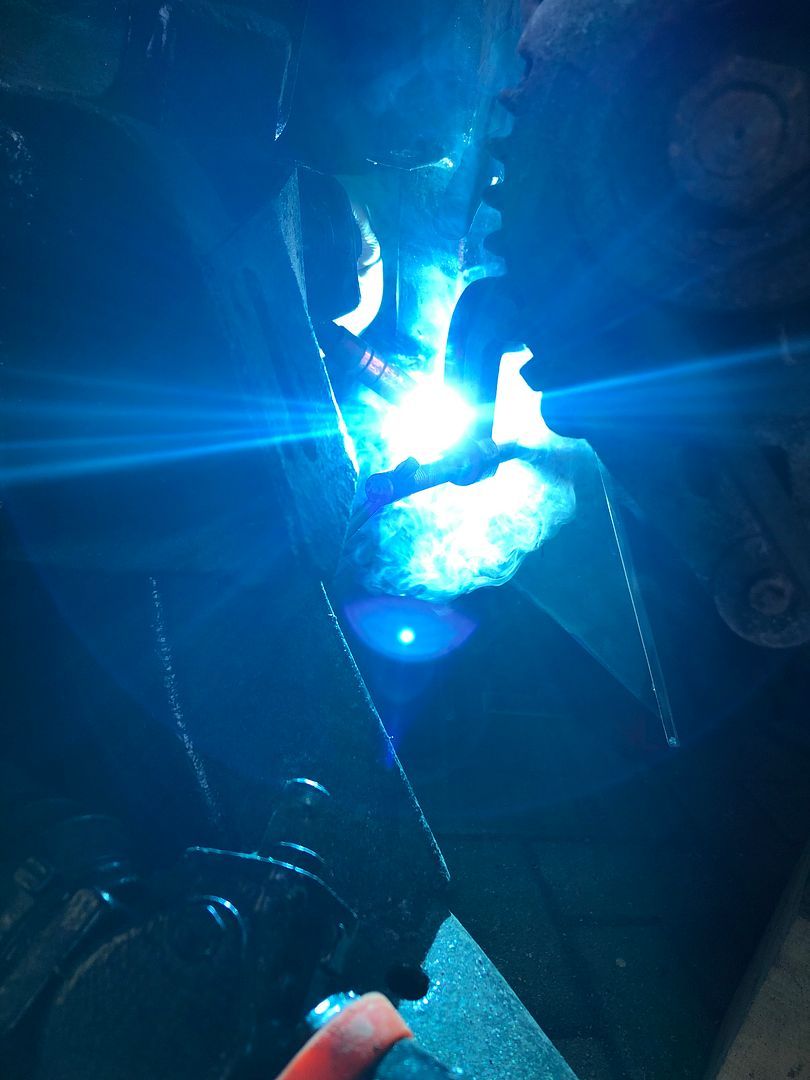 Followed by the other side. 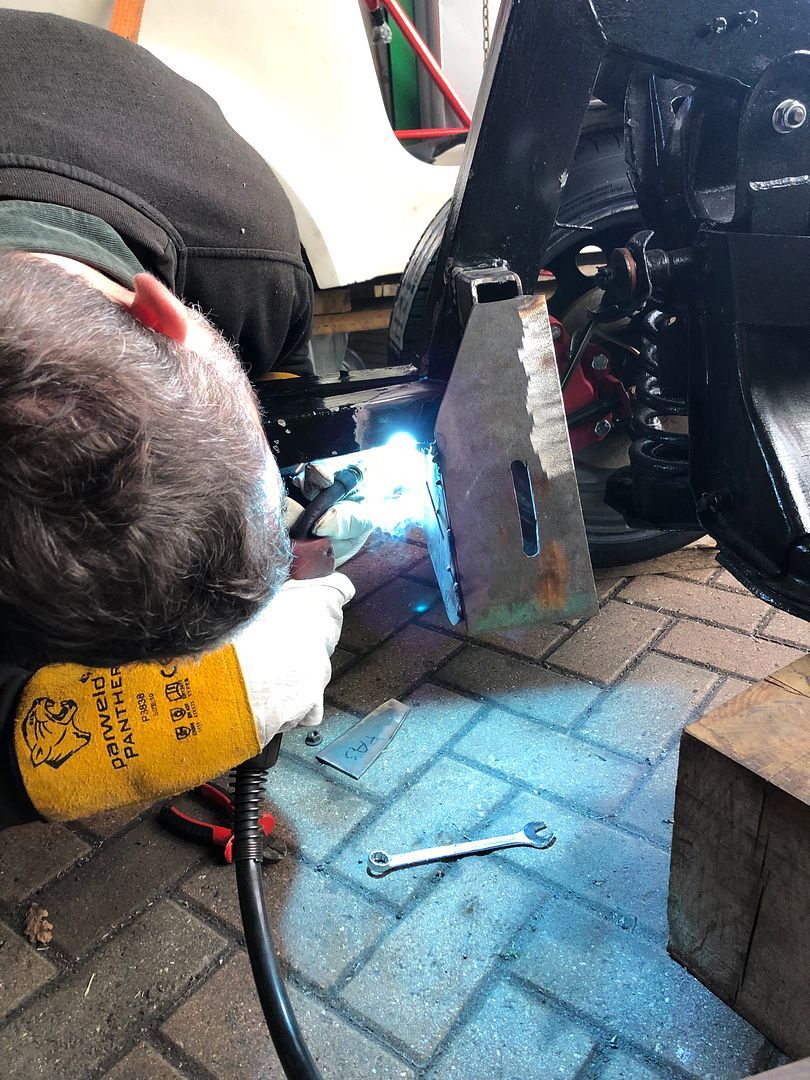 Some crawling around on the floor .. 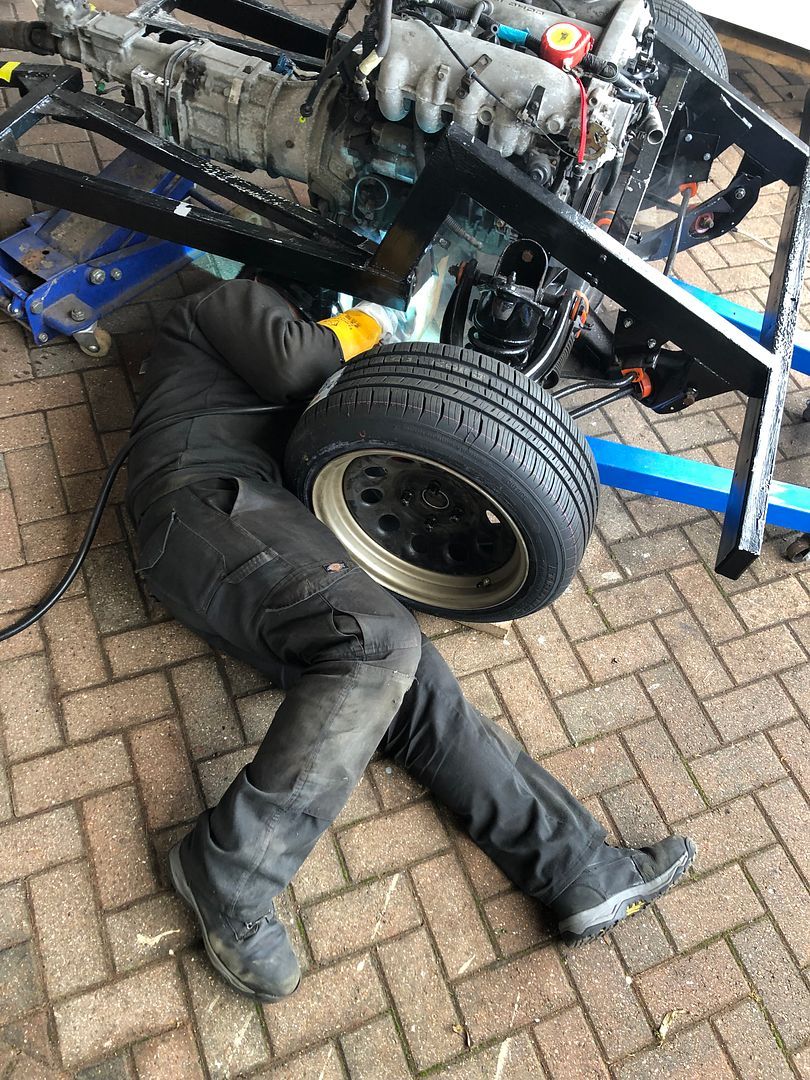 Giving this result. 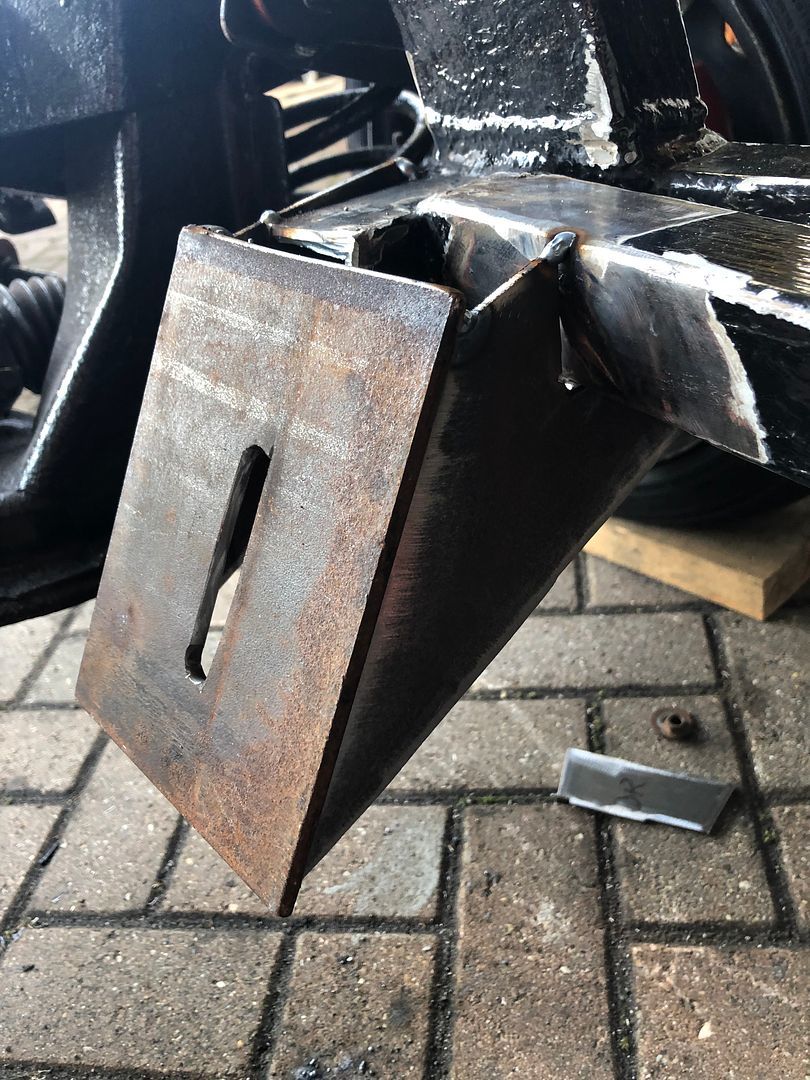 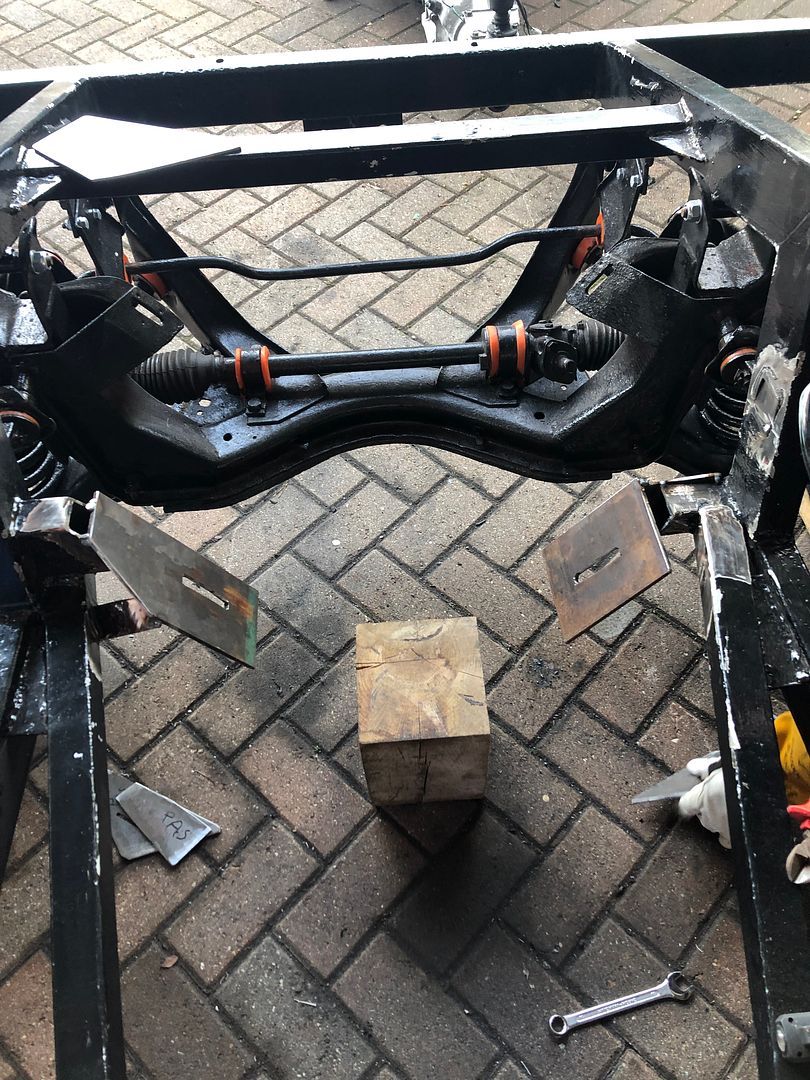 With all the gussets tacked in place, Welder no 2 came out . Stick welders love thick steel. I turned the amps up to result in a cherry glow right through the 6mm steel plate. So full on, deep penetration. I ran up all the seams and between us, the mounts ended up a formidable pieces of engineering, covering over most of the original Ford mounts that I had cut away the day before.  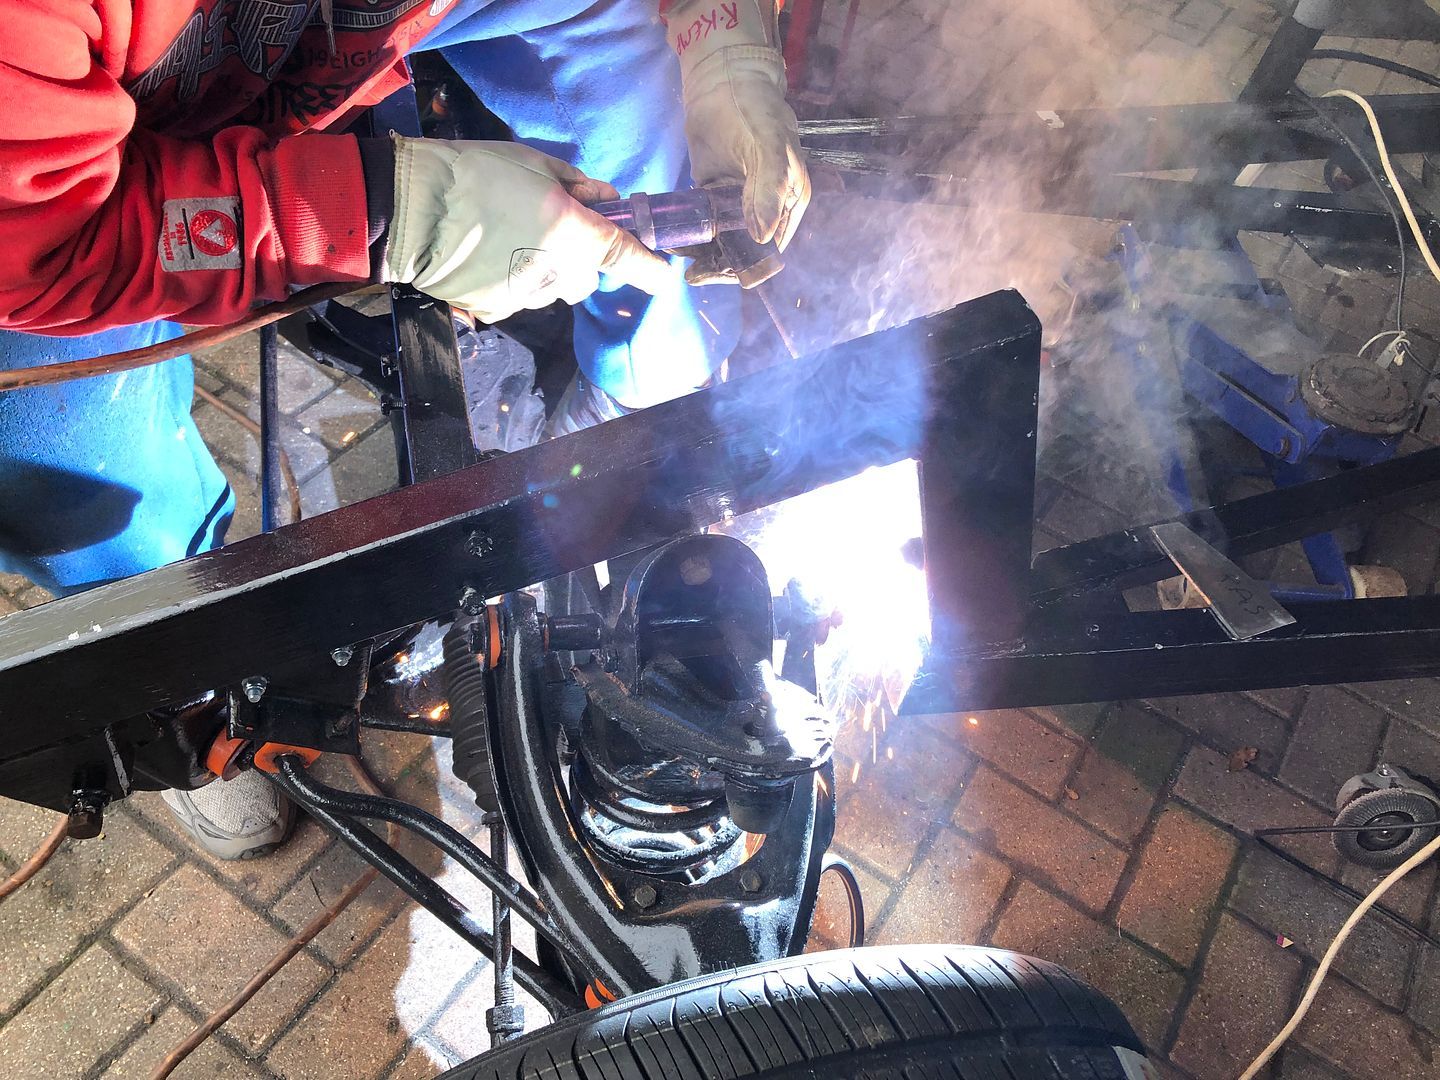 From there a quick coffee (Nick runs on caffeine) and without missing a beat, the 80 grit flapwheel came out and tidied the splatter and flat surfaces. The results speak for themselves. One side . 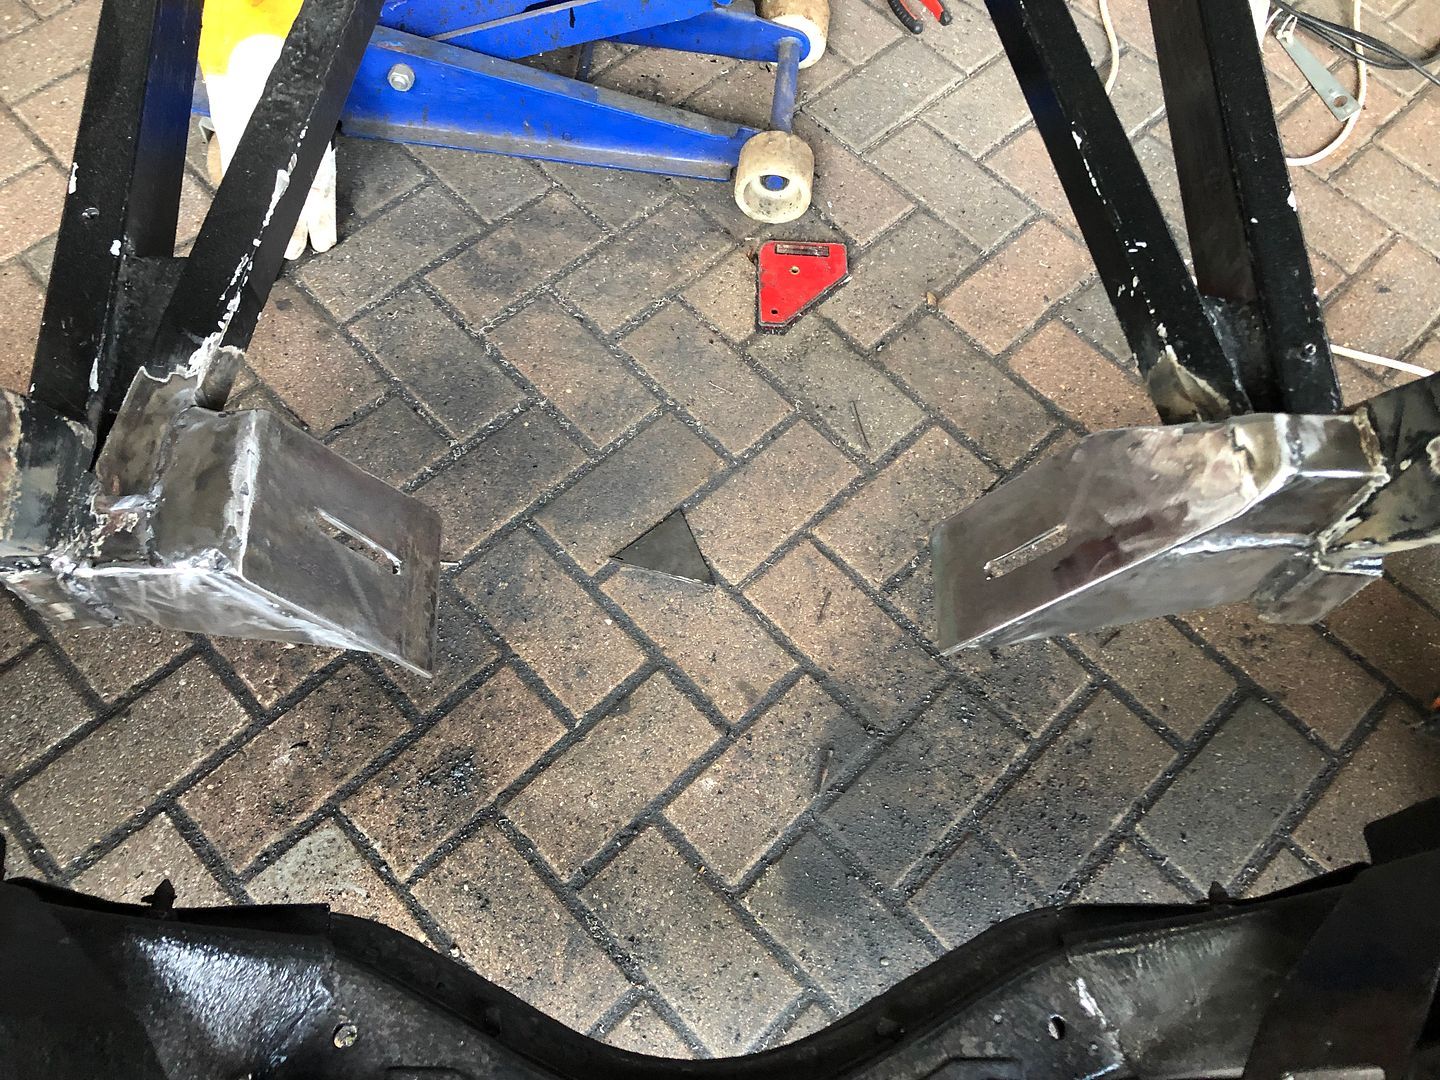 Opposite view. 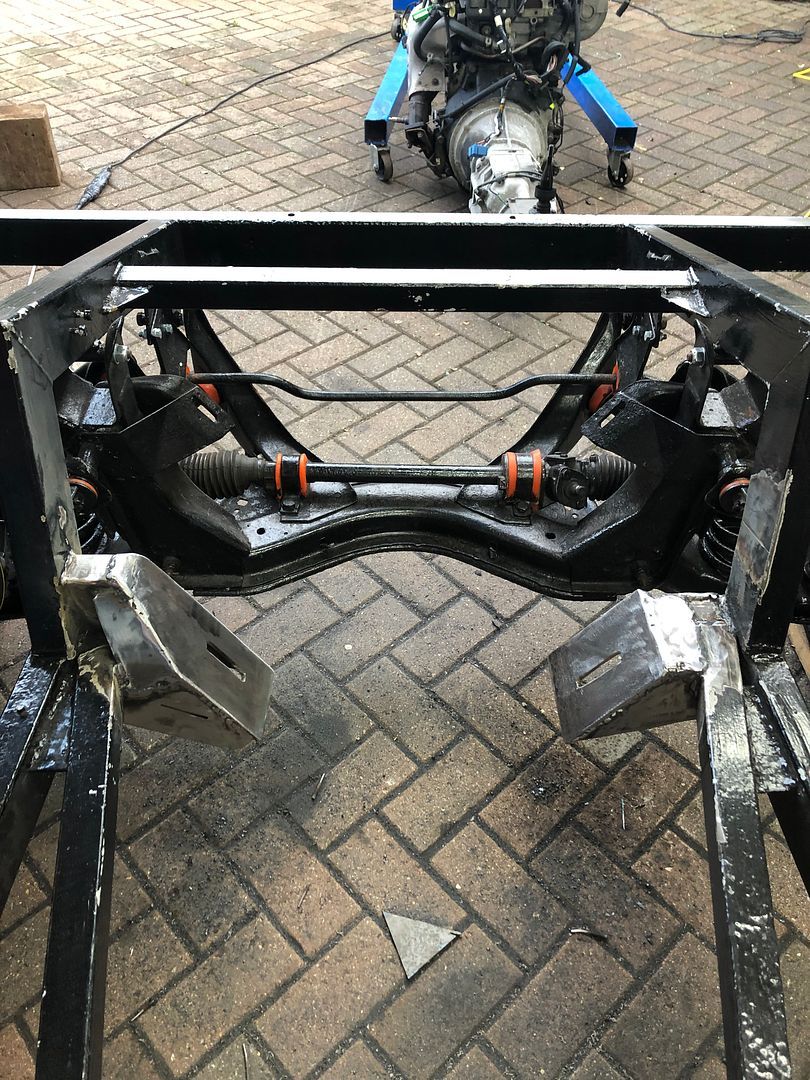 CHUFFED AS FECK WE WERE. Time for a sandwich and coffee. Anyone want to see the rest of the afternoons activities? .
__________________
MY BUILD LINK: http://67-72chevytrucks.com/vboard/s...585901]Redneck Express - 1966 C10 Short Fleetside MY USA ROADTRIPS http://forum.retro-rides.org/thread/...2018-humdinger IF YOU CAN'T FIX IT WITH A HAMMER, YOU'VE GOT AN ELECTRICAL PROBLEM MATE. |
|
|
|
|
01-02-2022, 12:31 PM
|
#1496 |
|
Registered User
Join Date: Dec 2012
Location: Rochester, KENT
Posts: 10,478
|
Re: GRIZZs 79 - 2WD BLAZER Challenge over in London, England. ~Its not a Project
Thought I would change pace quickly.
Sally has not stopped making these pictures. Crazy money they make.  These are actually different. 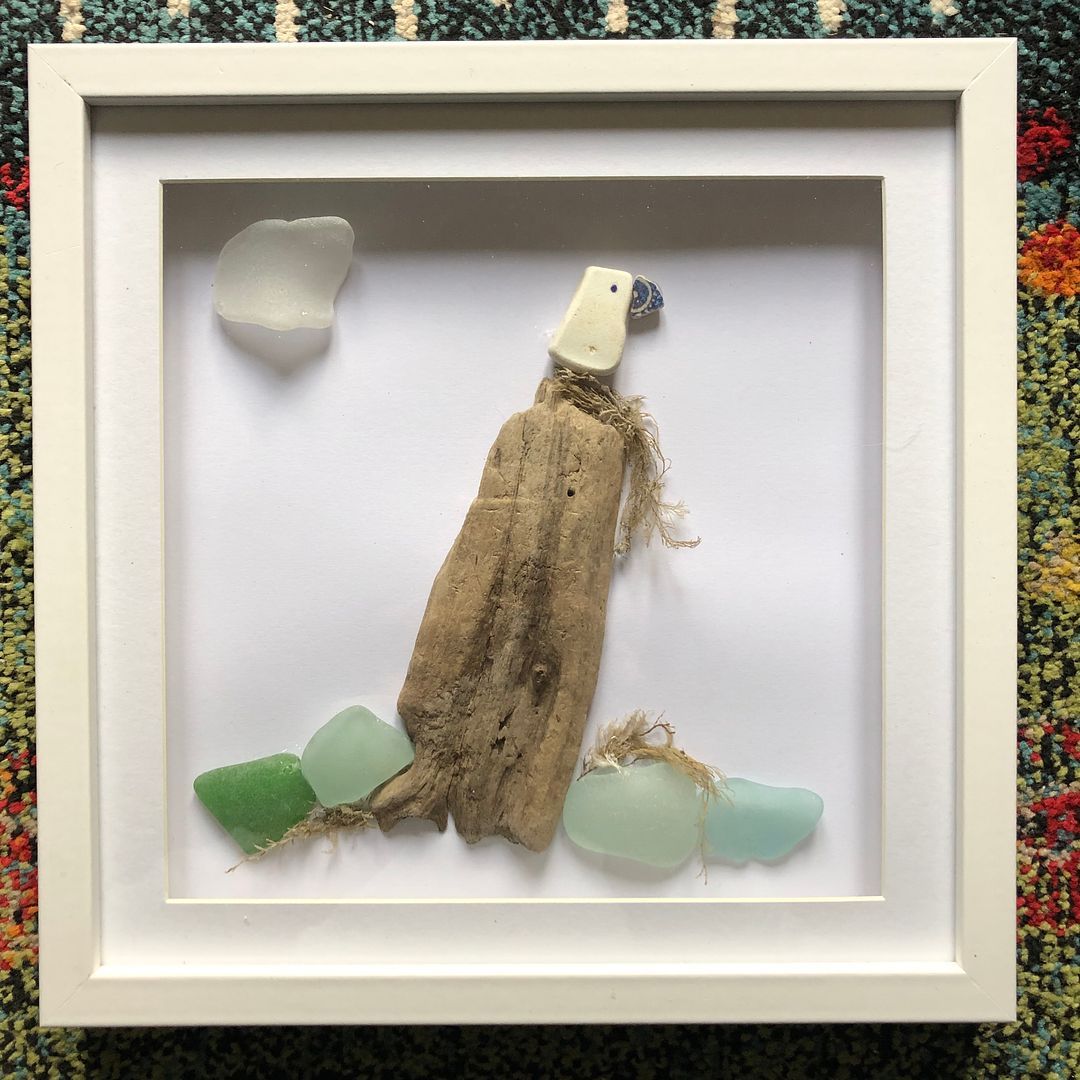 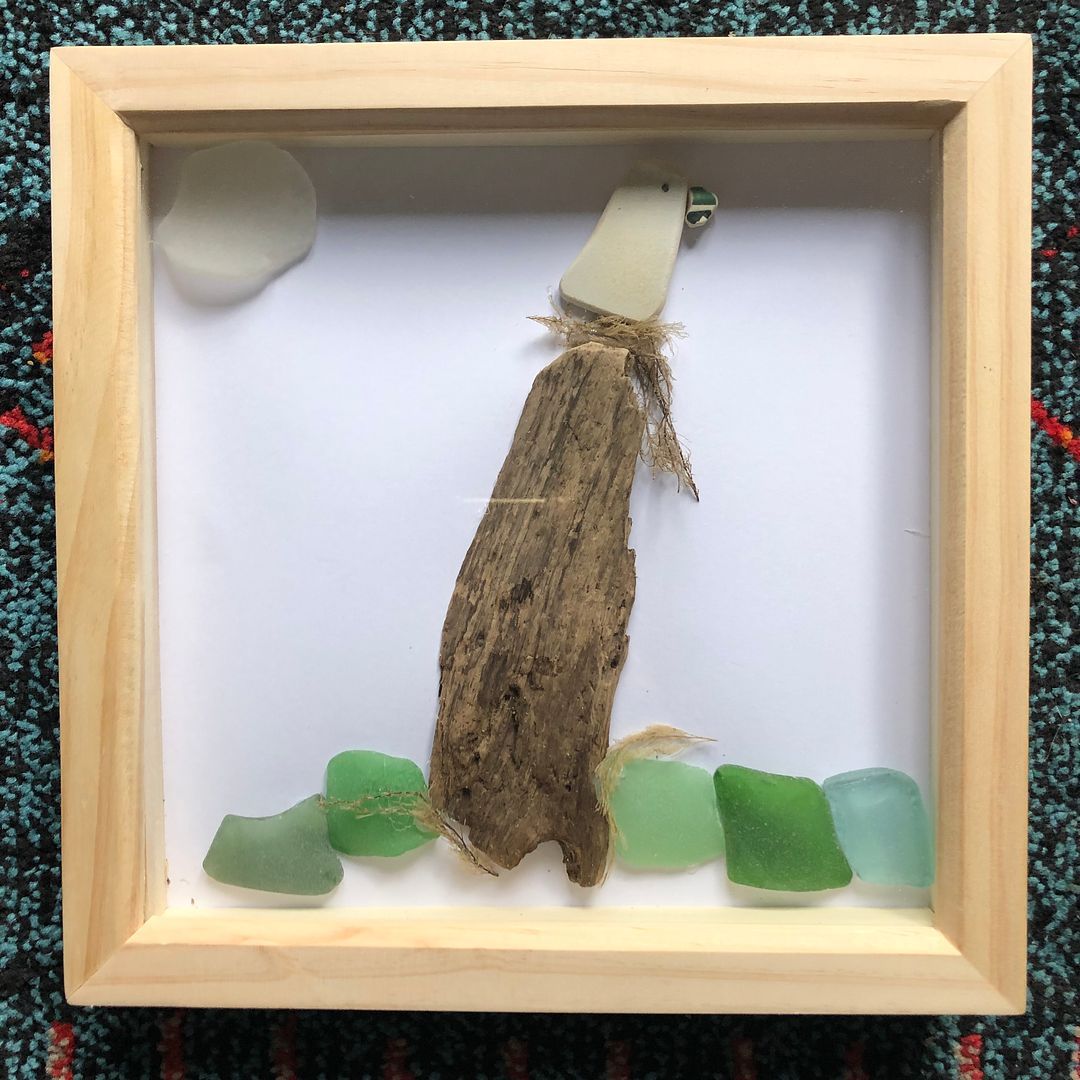 Flowers sir?  Glad she is keeping busy.
__________________
MY BUILD LINK: http://67-72chevytrucks.com/vboard/s...585901]Redneck Express - 1966 C10 Short Fleetside MY USA ROADTRIPS http://forum.retro-rides.org/thread/...2018-humdinger IF YOU CAN'T FIX IT WITH A HAMMER, YOU'VE GOT AN ELECTRICAL PROBLEM MATE. |
|
|
|
|
01-02-2022, 01:22 PM
|
#1497 |
|
Registered User
Join Date: Dec 2012
Location: Rochester, KENT
Posts: 10,478
|
Re: GRIZZs 79 - 2WD BLAZER Challenge over in London, England. ~Its not a Project
After a quick sandwich and coffee we headed back to the shop.
Next job was to create a rubber mounted gearbox mount out back. Firstly, cut a previous mounting plate smaller and add a curve. Then add some 3mm strapping, beaten and folded to shape. 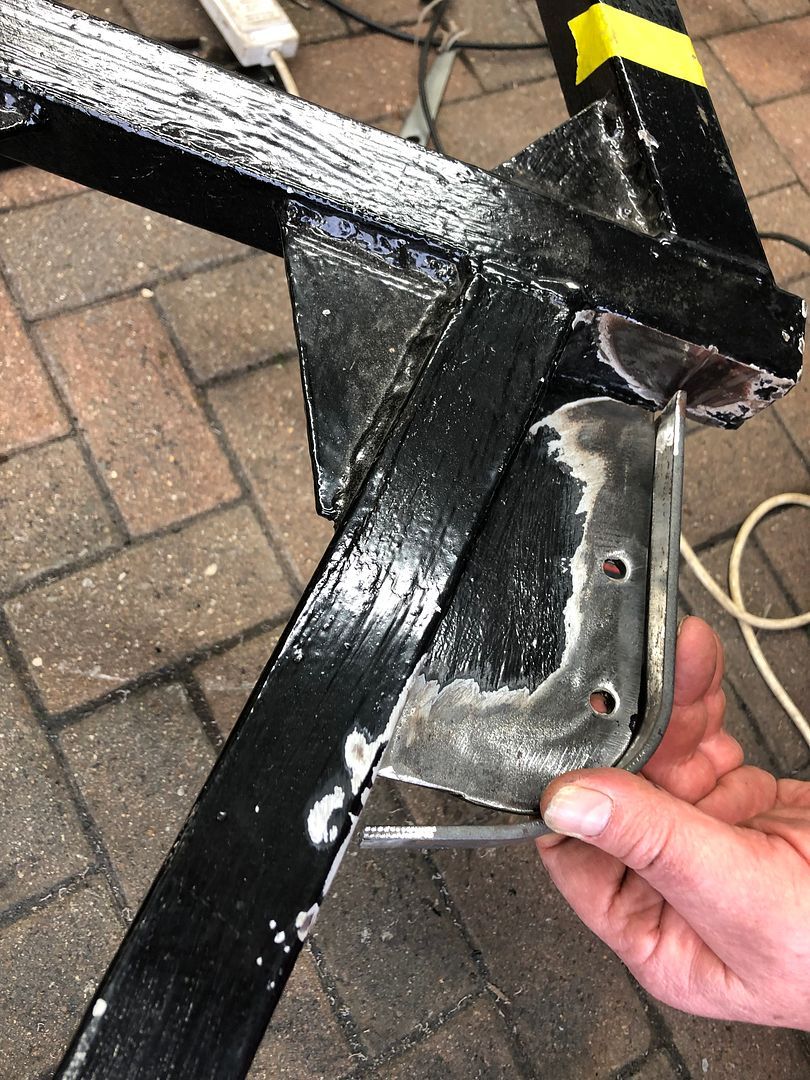 Tack into place. Then weld up the whole seam. 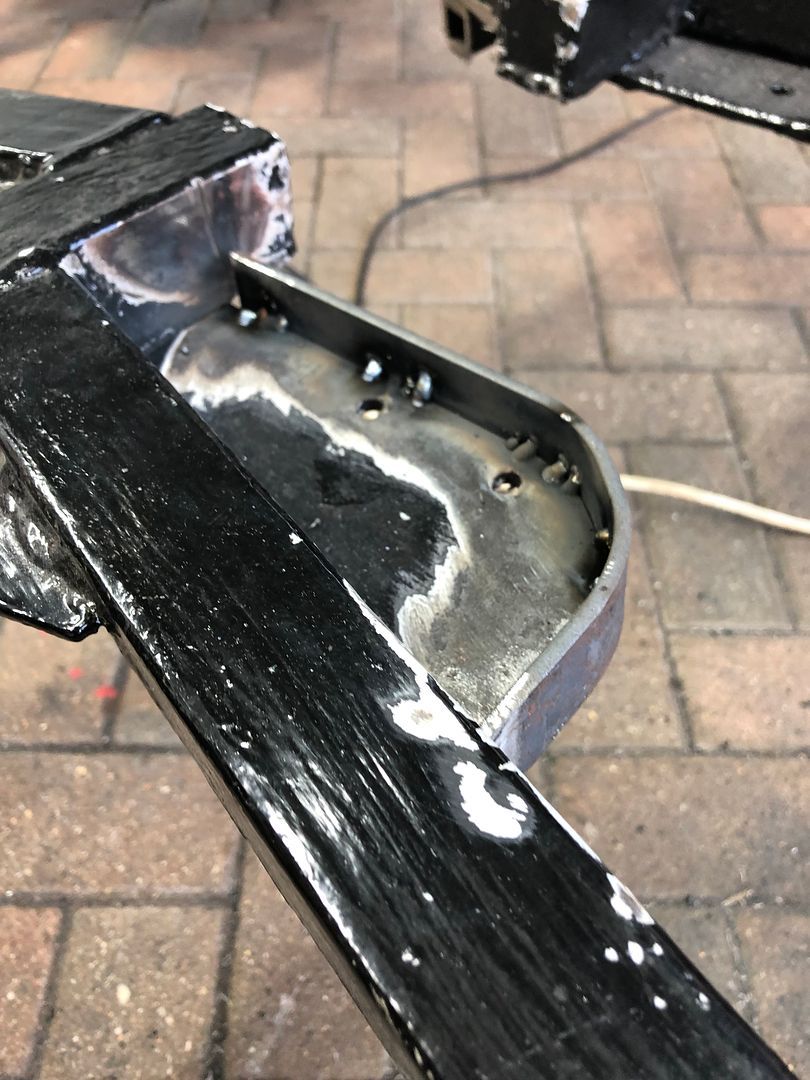 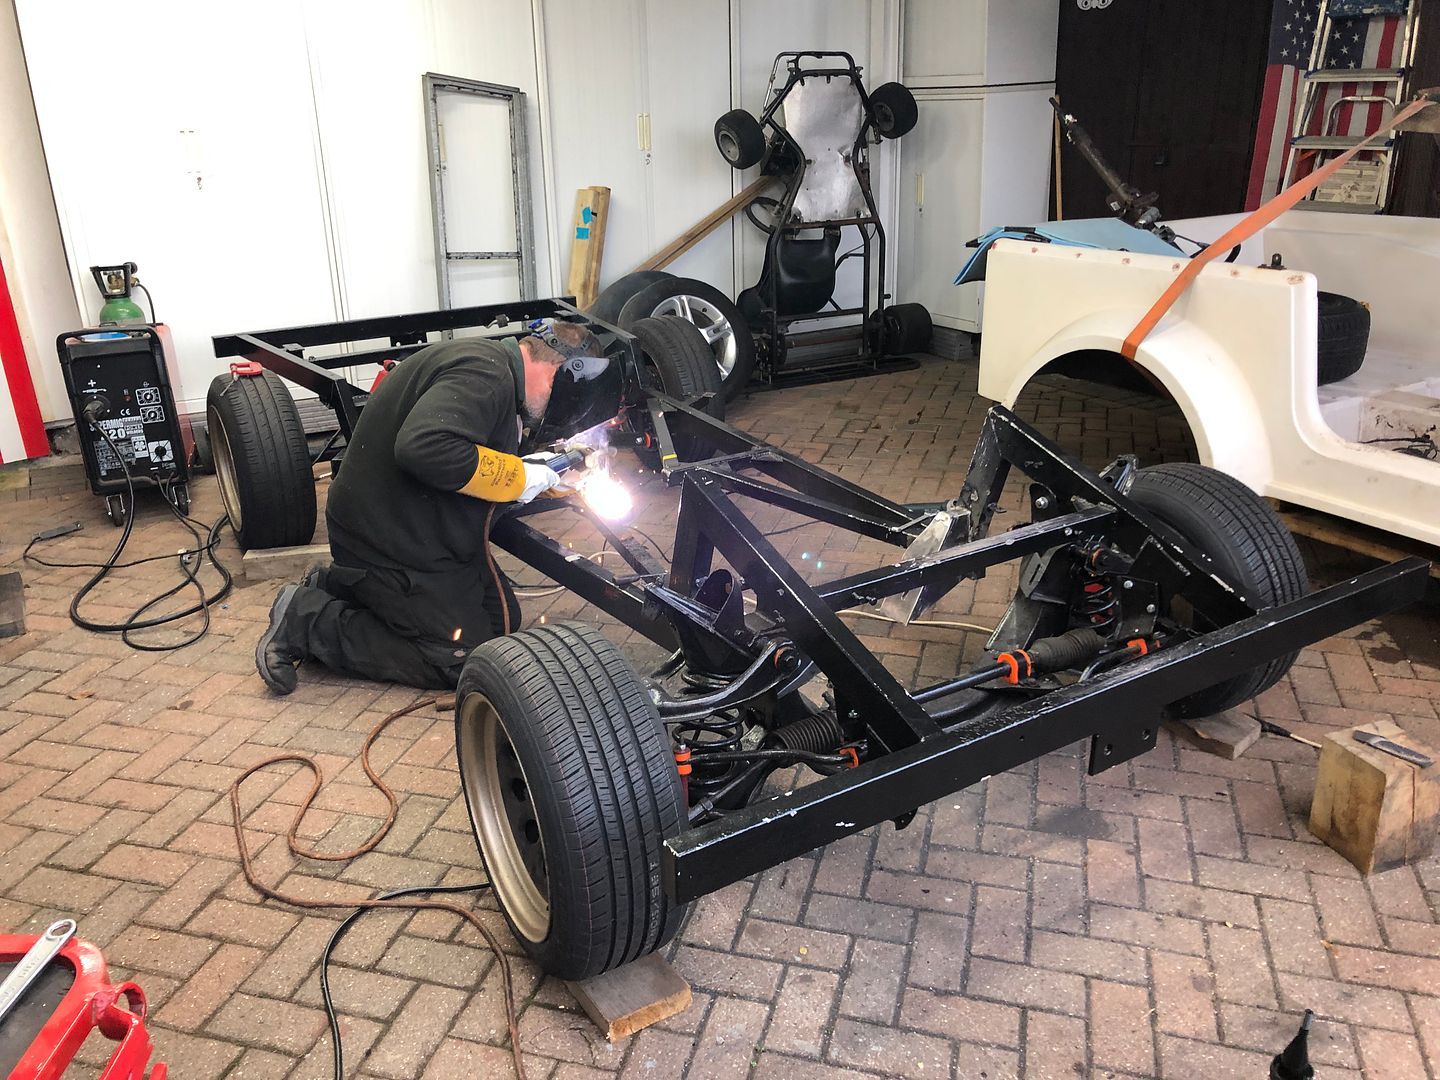 Take the 6mm plate cut before, mark out and drill the 12mm holes for the gearbox, and then add the M8 holes for the mounts. 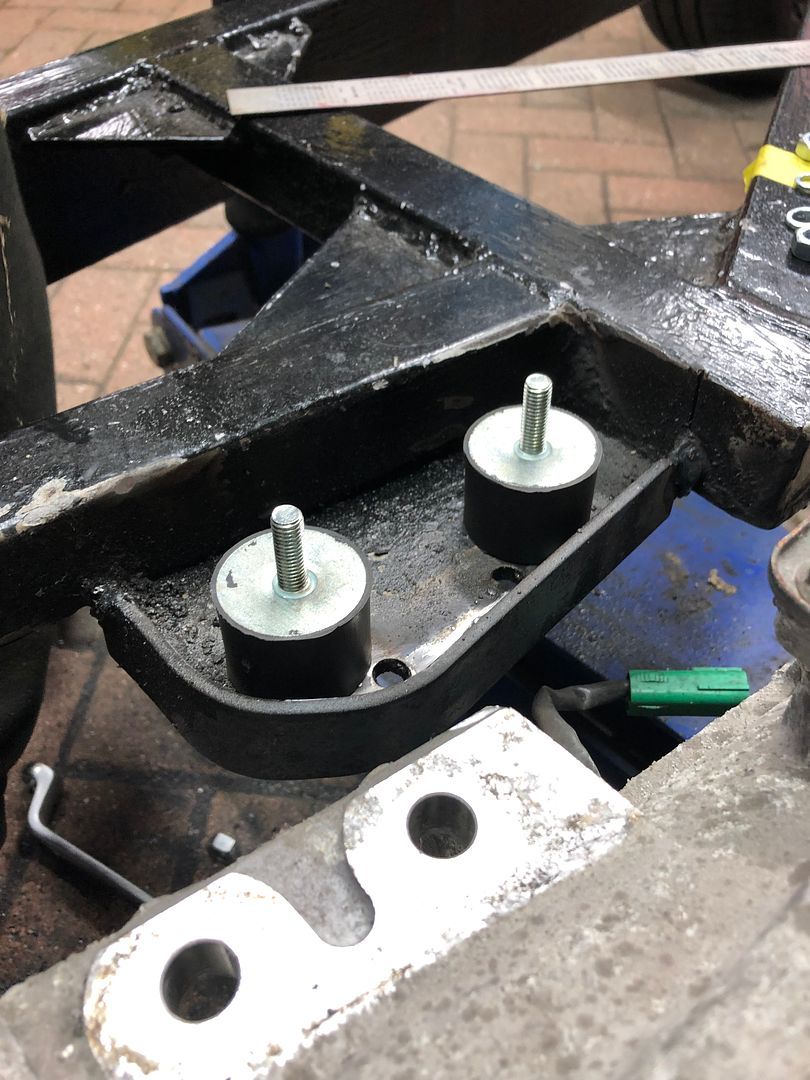 Added together. 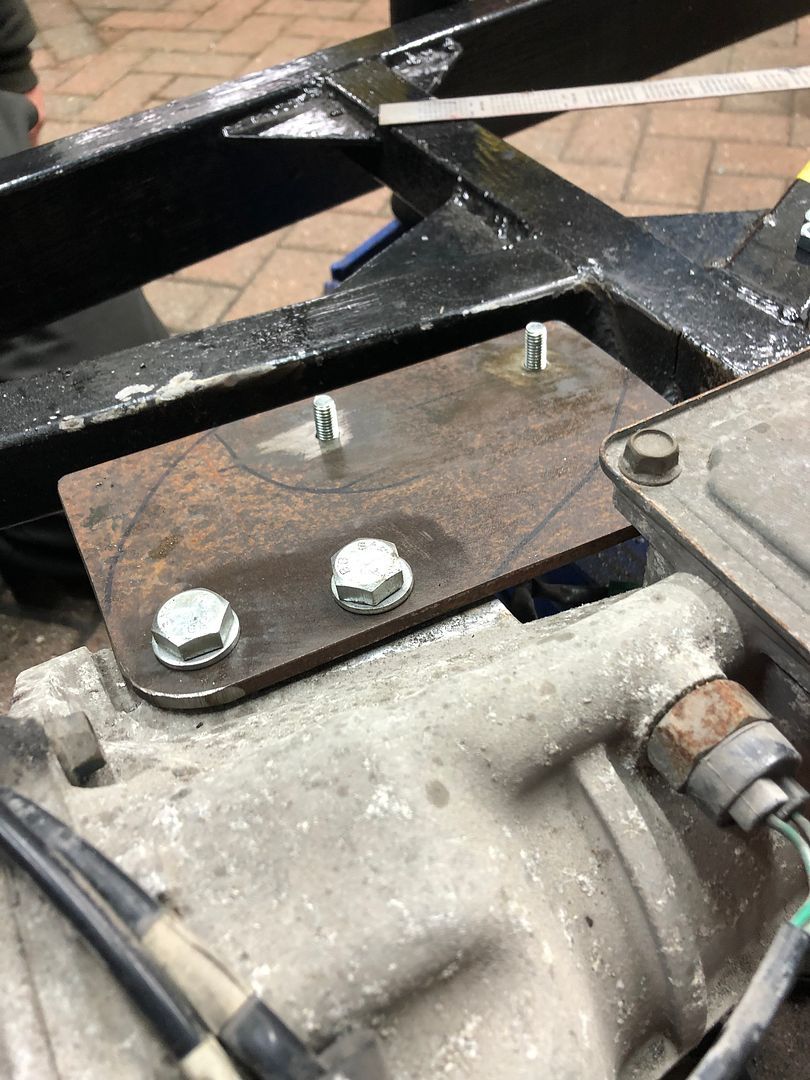 After this bit of working and making fit .. It started to come together. Plate and mounts all together. Can you see the result below? Front view. Liking this. 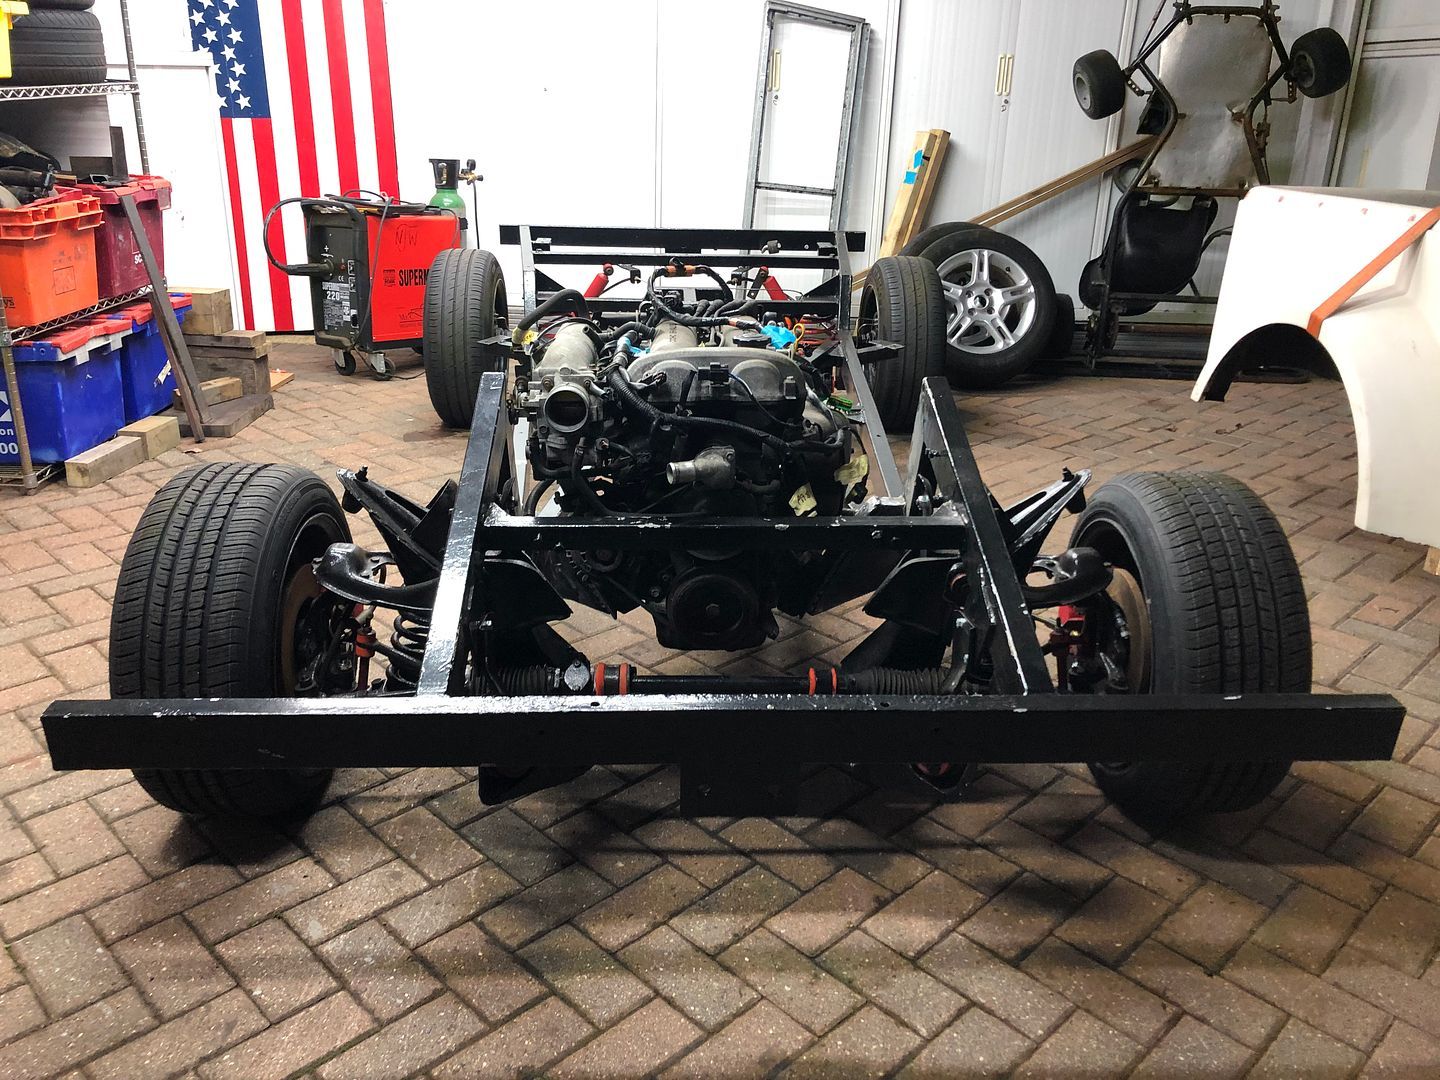 And from the rear. Layout seems pretty decent. 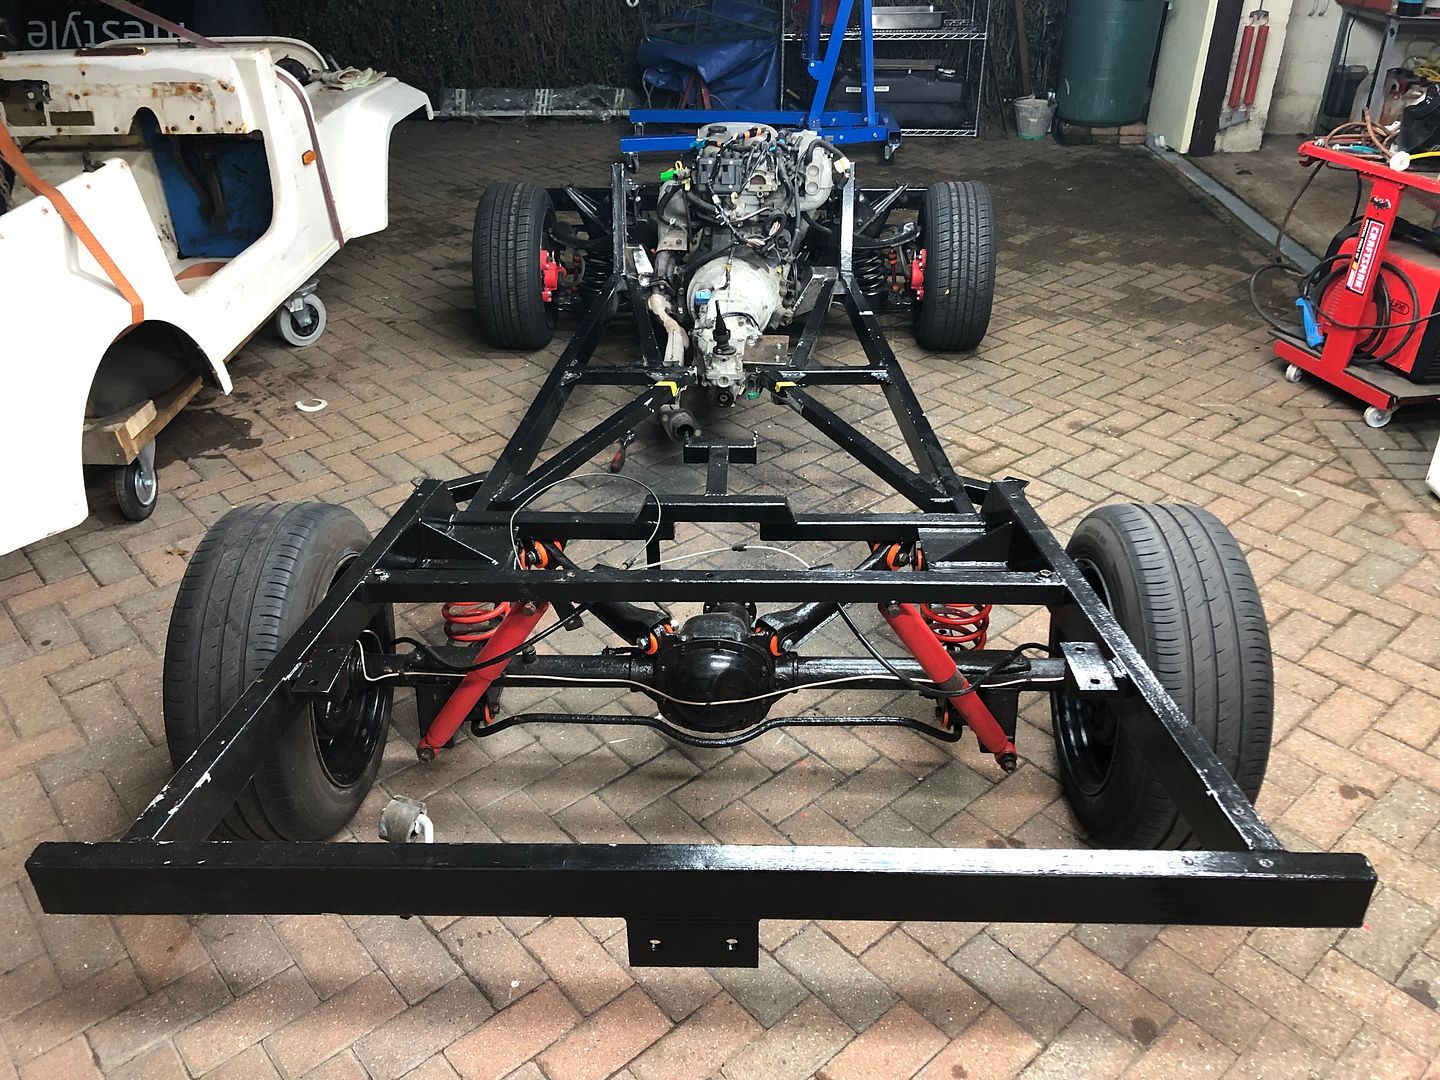 And finally with the propshaft fitted . High view. 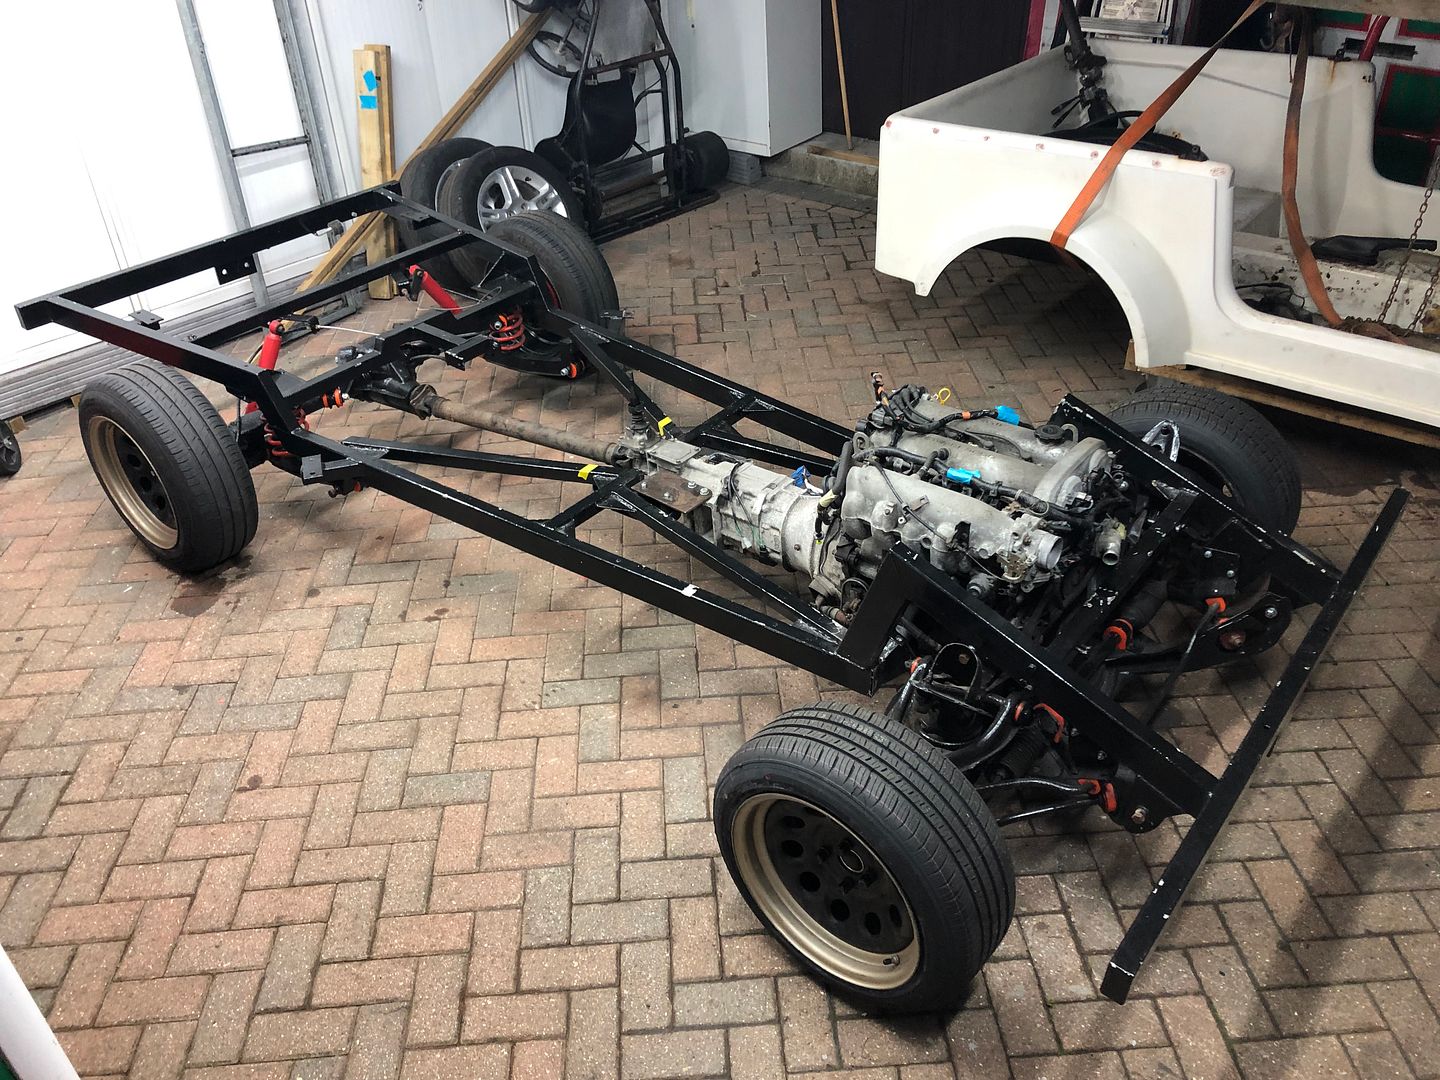 It did not take much to convince Nick to try it for size. 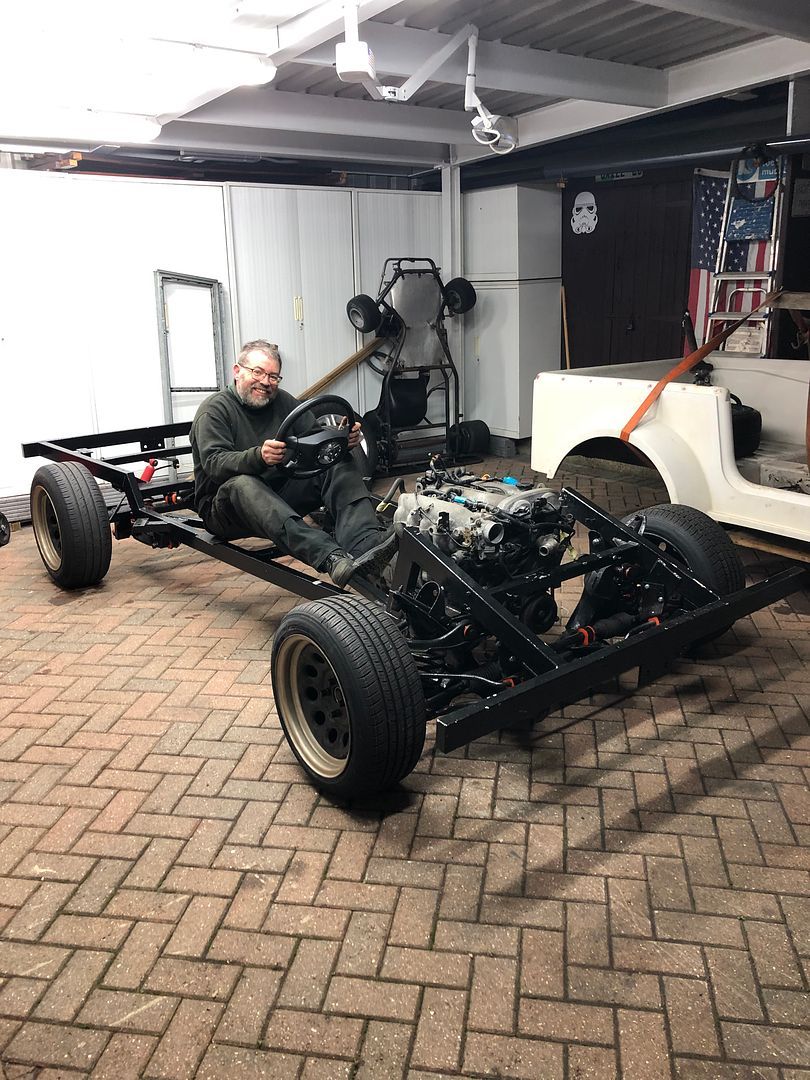 Unfortunately neither the original Mazda MX5 or Ford propshafts fit. As mentioned by @nickwheeler : [quote author="@nickwheeler" source="/post/2713201/thread" timestamp="1641140942"][quote author="@mk2cossie" timestamp="1641131623" source="/post/2713185/thread"]Also, is it worth trying the original kitcar propshaft in the Mazda box? If that fits the gap, one more thing less to worry about [img alt="  " src="//storage.proboards.com/forum/images/smiley/wink.png" class="smile"] " src="//storage.proboards.com/forum/images/smiley/wink.png" class="smile"]First thing I tried while Rian was opening the garage. It would have been about right for length(we would have used it for the gearbox position), but the splined end won't fit into the gearbox - it is splined all the way around, but the gearbox has a double spline so the prop only fits in one place. And we can't swap either of the ends because the UJs are different sizes. So that was the next part of the build, and more importantly, a major milestone. Still grinning today. Anyone else happy so far?
__________________
MY BUILD LINK: http://67-72chevytrucks.com/vboard/s...585901]Redneck Express - 1966 C10 Short Fleetside MY USA ROADTRIPS http://forum.retro-rides.org/thread/...2018-humdinger IF YOU CAN'T FIX IT WITH A HAMMER, YOU'VE GOT AN ELECTRICAL PROBLEM MATE. |
|
|
|
|
01-02-2022, 04:47 PM
|
#1498 |
|
Registered User
Join Date: Dec 2012
Location: Rochester, KENT
Posts: 10,478
|
Re: GRIZZs 79 - 2WD BLAZER Challenge over in London, England. ~Its not a Project
.
. . . . . .. So eventually we got to this point. Body hoisted up. 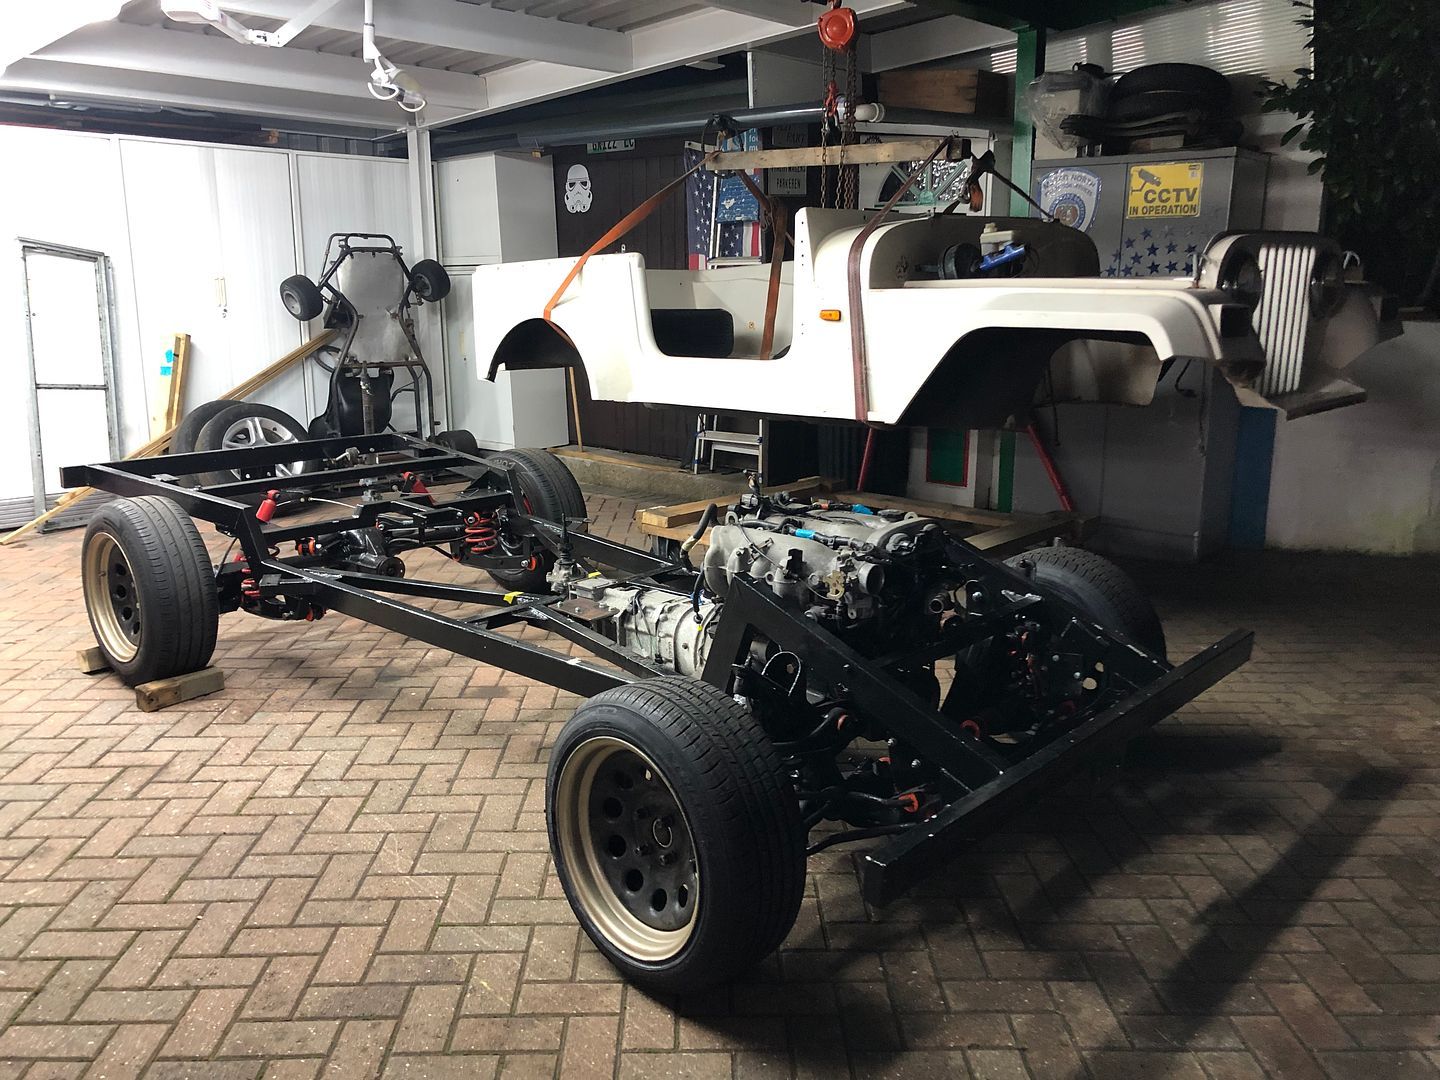 Pulled over. @nickwheeler grinning like an expectant father.  And about 30 minutes after touchdown, which was absolutely without a fault, we added the set of RX8 seats and the rollbar and the @glenanderson screen frame. Also realised this rollbar needs to be remade as the seats need to move back about 150mm from where they are. Still, it did not stop Nick and I from trying it out for size. 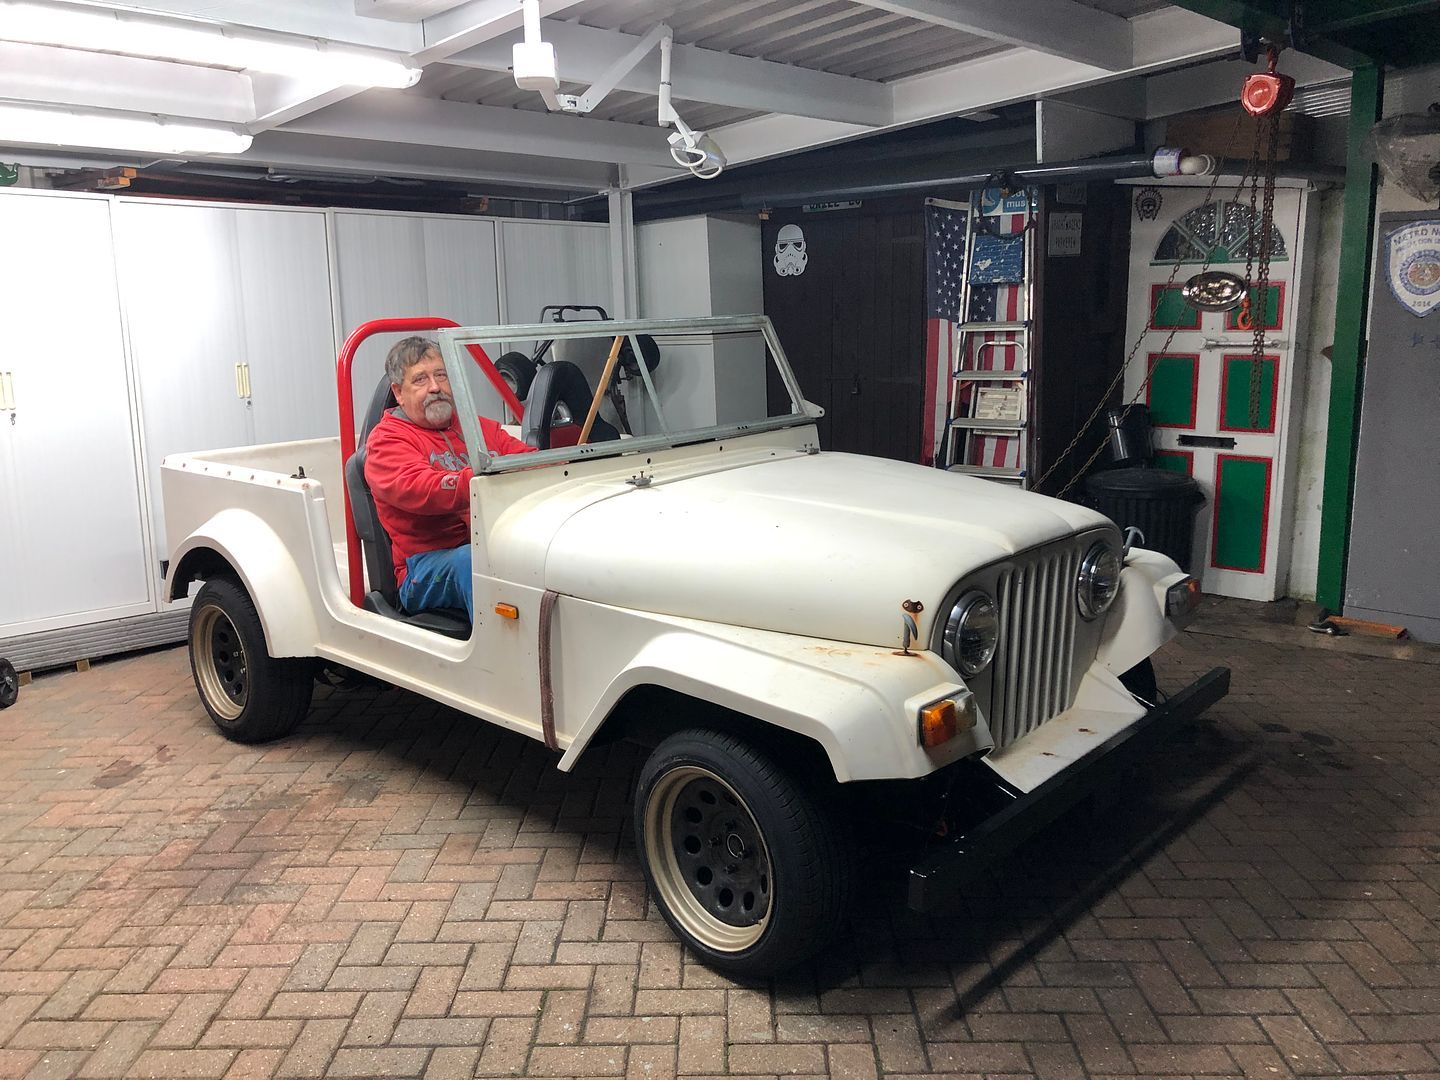 Also tried out the speedo clocks. Running as much as possible of the original Mazda MX5 loom and instruments However . I will possibly be looking for a loom donor for the Instrument binnacle section have it all reach as the loom is tightly made to size. Plan is to fit the clocks like in the pic, central, facing the driver, and that may call for 18 of extra loom. Know anyone with a scrap MX5 with that part of the loom available to remove or donate to the build? 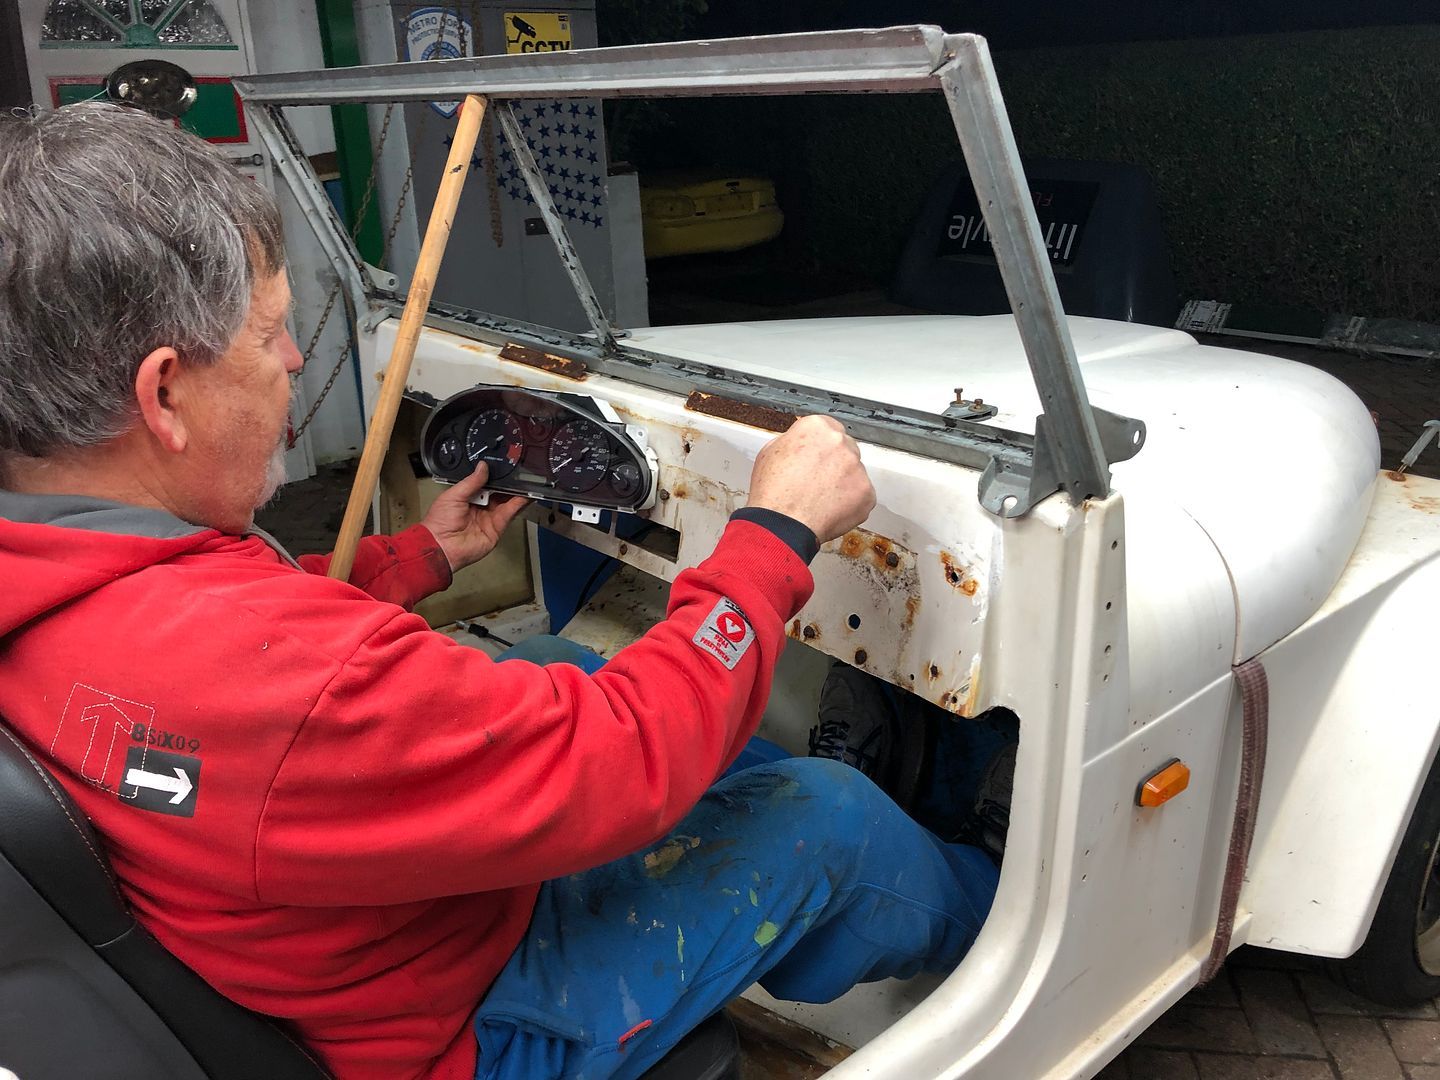 Next up, a look at the engine fit in the engine compartment. This is it, without ancillaries. .jpg) Adding in the original Mazda radiator and air intake gives you this. PROBLEM The slimline cooling fan from the donor, does not fit into the space available. So another plan and solution to be made.  And then next up. MAF AND AIR FILTER PLACEMENT. Safe place to fit it, back here. So it needs a section of pipe to connect it. Clever guys . QUESTION: Will a lengthened section here, affect performance at all?  And finally . Took a positively underwhelmed Sally to see what had kept me busy today. And walking down there, the current stance, lowering and look ROCKS. I love it. As it stands, no fluids, screen, extra bits, loom etc. The front crossmember is 5 above the ground and actually the sump may be 4.5 above the hotizon. Current look.  And then you add my bulk to it. Sure, it is a cheated pic, using leverage I managed to get the front down real low. Not far from the original vision. Whatcha think team ???  Loads if work left to get it to the next phase. Brackets, links, supports, wiring, Rivnuts, holes, fittings, lights, steering, pedals . The list goes on and on. Chuffed as a Chuffed thing tonight. Tomorrow its me and Mr Grinder and the donor again. Yup, realised we need more parts removed. .
__________________
MY BUILD LINK: http://67-72chevytrucks.com/vboard/s...585901]Redneck Express - 1966 C10 Short Fleetside MY USA ROADTRIPS http://forum.retro-rides.org/thread/...2018-humdinger IF YOU CAN'T FIX IT WITH A HAMMER, YOU'VE GOT AN ELECTRICAL PROBLEM MATE. |
|
|
|
|
01-03-2022, 05:27 PM
|
#1499 |
|
Registered User
Join Date: Dec 2012
Location: Rochester, KENT
Posts: 10,478
|
Re: GRIZZs 79 - 2WD BLAZER Challenge over in London, England. ~Its not a Project
So, public holiday here in England.
Spent two hours on the phone with friends. And a stop start day out at the garage. When we mounted the engine and gearbox using the MX5 propshaft as a guide, it placed the gearbox and gear stick forward from the original Ford position. The steel that was under the carpeting had rusted away over the years too, so needs to be removed. 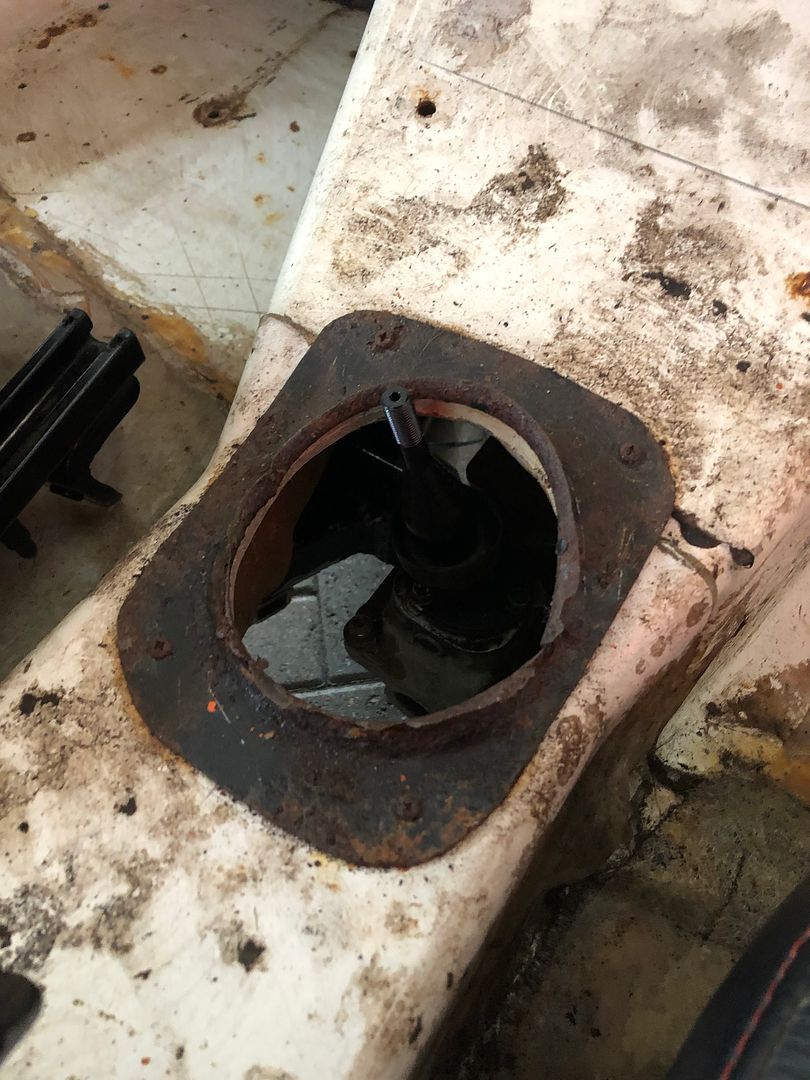 The donor car had a tunnel with the right holes and spacing for an original MX5 part. So calling on Mr Grinder, we went from this .. 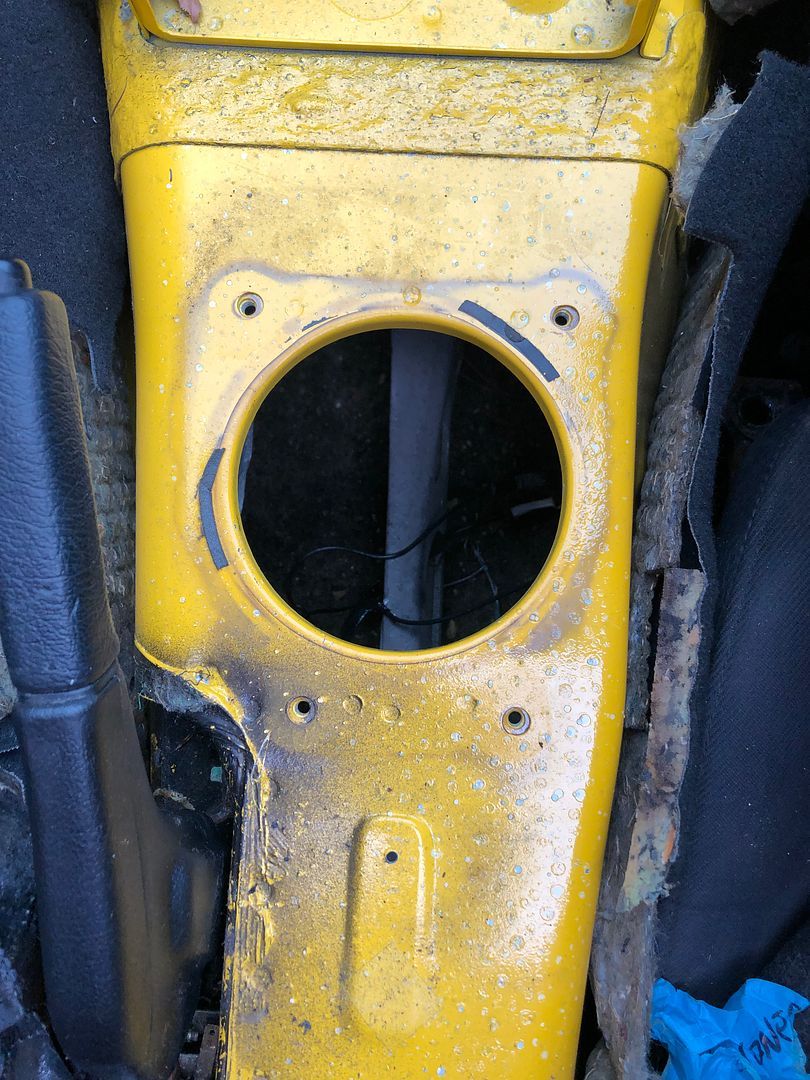 To this. And for the OCD brigade, I know it is partly upside down. 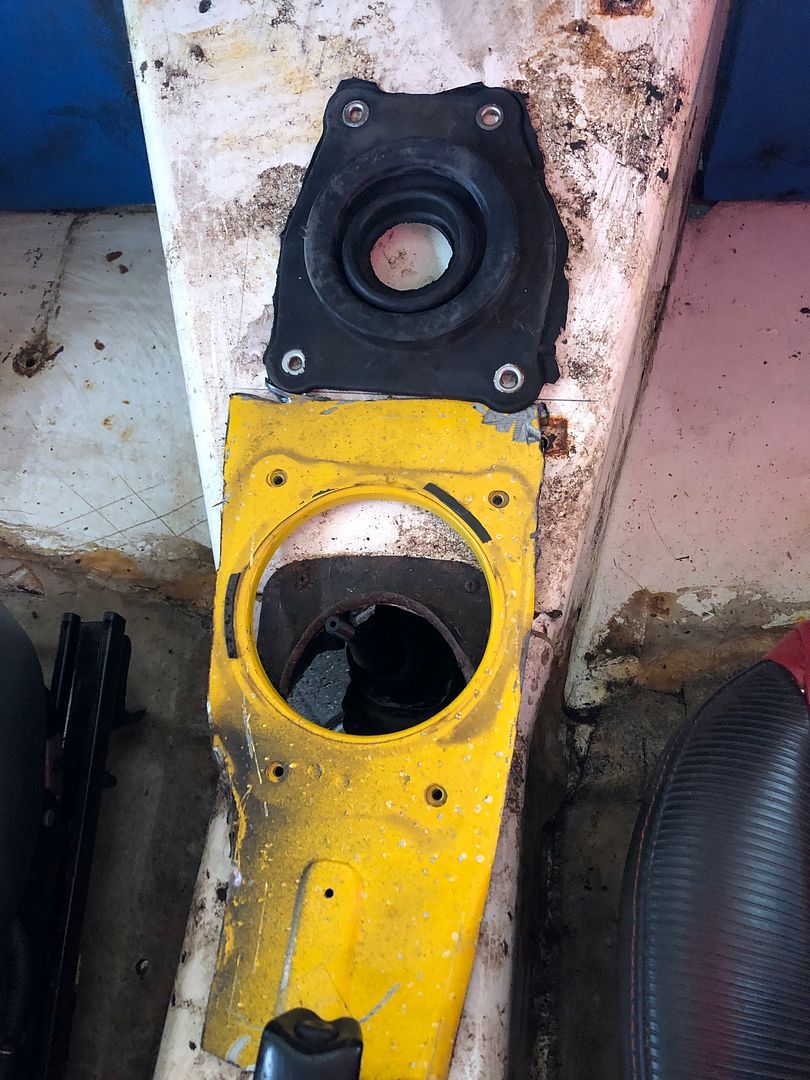 While I was at it, the old dash came out again from the scrap pile . 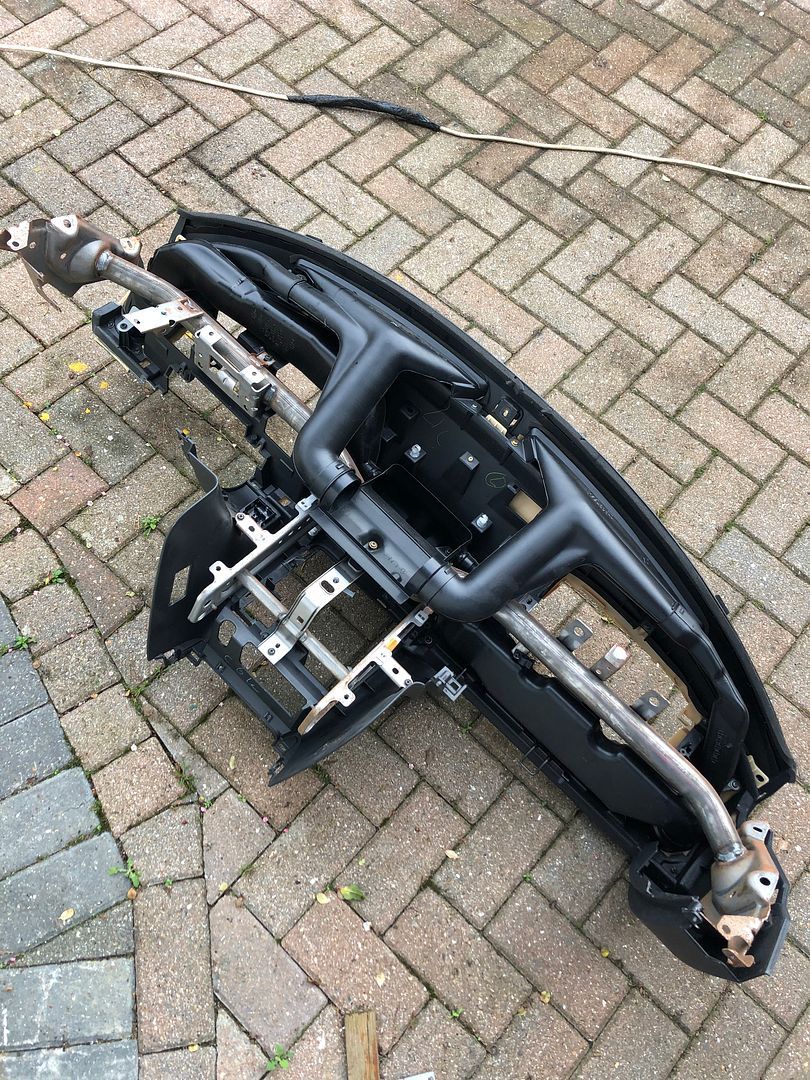 Producing this brace. 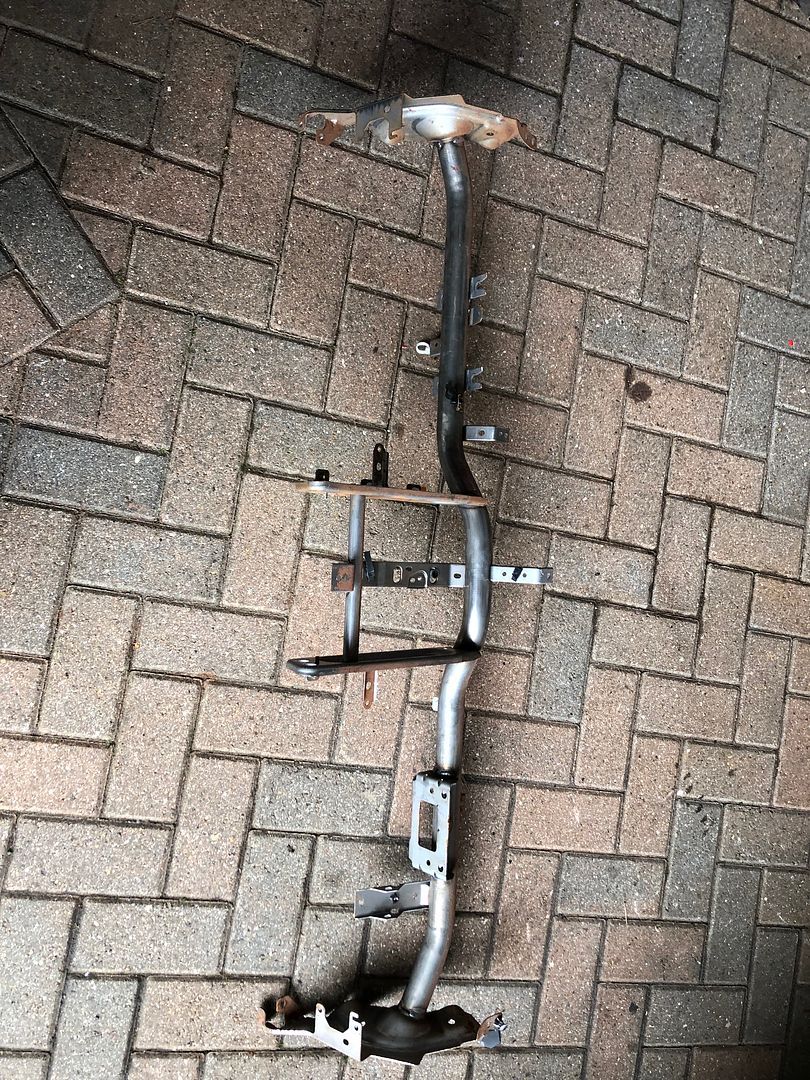 Which is a touch narrow, but has the mounting points and tabs already welded in place. 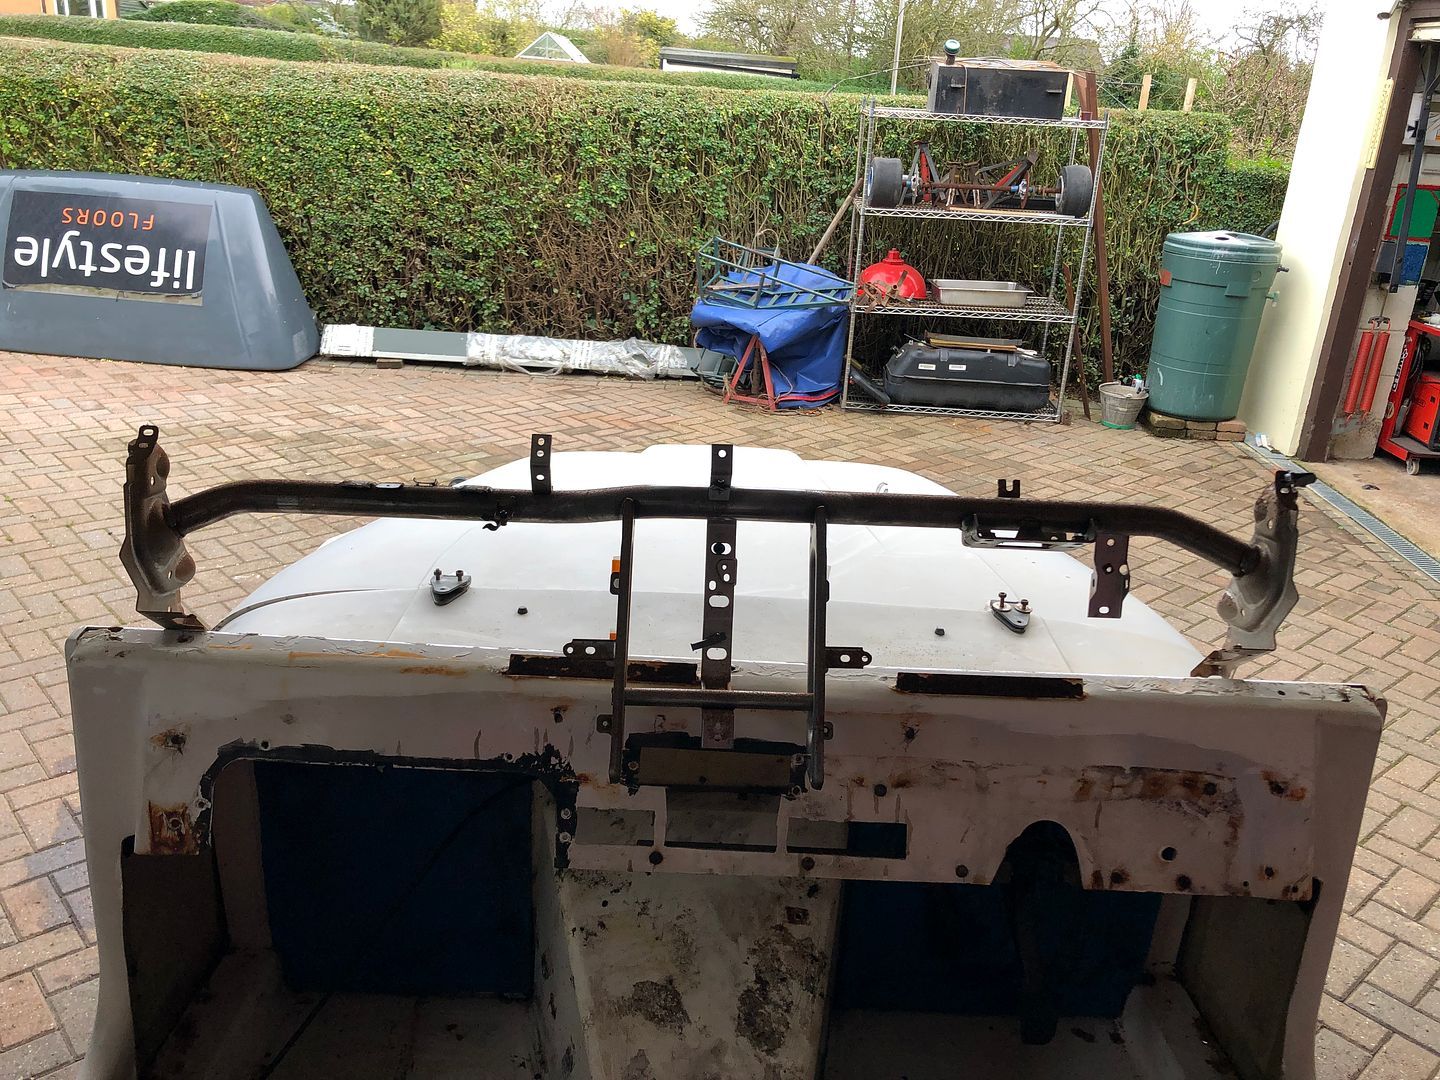 Every time I walk past this monstrosity, I shiver and look the other way. Job for another day. 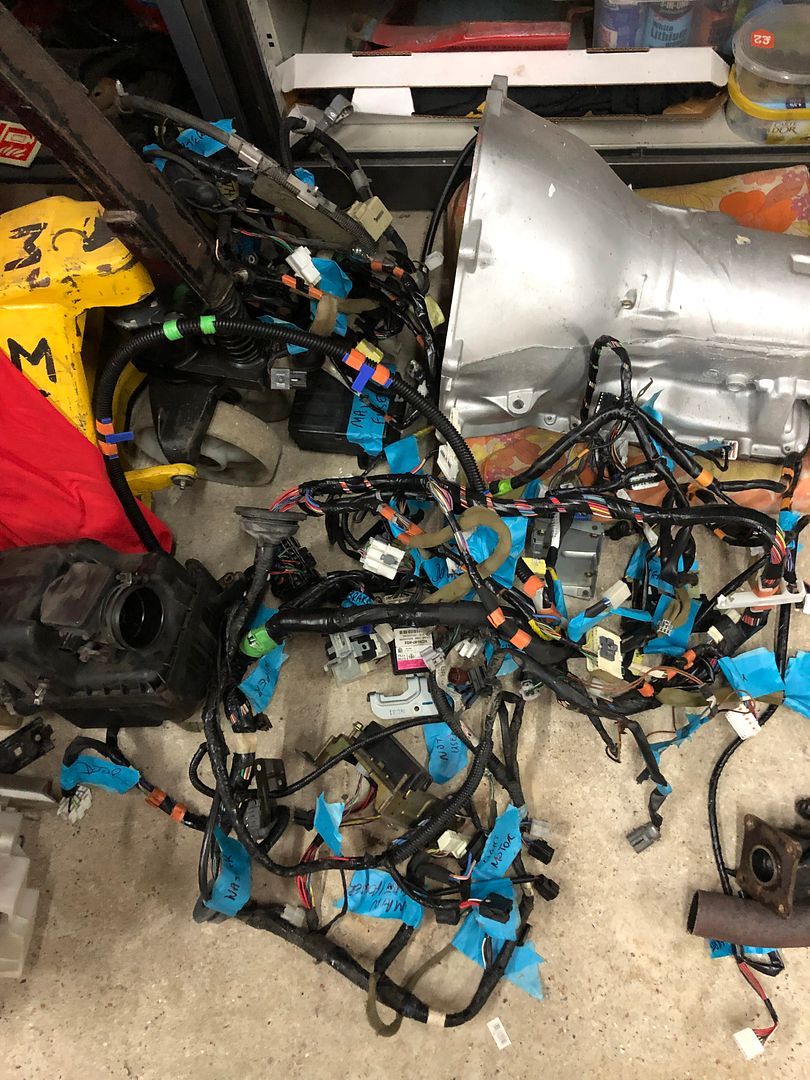 I was asked be a friend in Siberia just how much lower it had really gone now, what it looked like compared to something relatable. No cars down there to compare with, so this will have to do.  And that is what 5 inches or 130mm looks like.  The other job today was to remove the seats, get the motors and actuators removed and swap the drivers and passenger seats around, as the drivers seat will be manually adjustable, and passenger seat that was the drivers will be in a fixed position. Then also to create raised plinths for both seats.  Job incomplete.  One other job that I started on was removing the roll bar. It needs to be modified to move back 150mm or 6 inches in the tub, and the legs need to be bent closer together to fit in the narrowed space. So it will need to be a modified version of this, or maybe make a completely new design and made up piece. .jpg) So it was a slow day, but little jobs come together ultimately to deliver a bigger picture.
__________________
MY BUILD LINK: http://67-72chevytrucks.com/vboard/s...585901]Redneck Express - 1966 C10 Short Fleetside MY USA ROADTRIPS http://forum.retro-rides.org/thread/...2018-humdinger IF YOU CAN'T FIX IT WITH A HAMMER, YOU'VE GOT AN ELECTRICAL PROBLEM MATE. |
|
|
|
|
01-04-2022, 06:11 AM
|
#1500 |
|
Registered User
Join Date: Dec 2012
Location: Rochester, KENT
Posts: 10,478
|
Re: GRIZZs 79 - 2WD BLAZER Challenge over in London, England. ~Its not a Project
Looking for a pair of 3 point seatbelts/safety harnesses for the Rezin Rockit build.
USED will do just fine. Colour preference is Red or Black, followed by Blue. But not too choosy. They just need to work. And be affordable. Keep in mind, the RX8 seats have a single, high level hole. I am sure I could use a regular 4-point harness too, but prefer the 3-point look. Show us whatcha got. .jpg) PM please. Thanks.
__________________
MY BUILD LINK: http://67-72chevytrucks.com/vboard/s...585901]Redneck Express - 1966 C10 Short Fleetside MY USA ROADTRIPS http://forum.retro-rides.org/thread/...2018-humdinger IF YOU CAN'T FIX IT WITH A HAMMER, YOU'VE GOT AN ELECTRICAL PROBLEM MATE. |
|
|
|
|
| Bookmarks |
|
|


 Linear Mode

