
|
 12-22-2015, 03:29 PM
|
#1 |
|
Senior Member
 Join Date: Jul 2009
Location: Tomball, Texas
Posts: 1,592
|
Cut and buff question
So spraying my clear didn't come out anywhere near as smooth as I'd hoped even for a driver, so I'm doing the cut & buff job on the parts that will show. I'm wet sanding on a small block with 1000, 1500 and 2000 grit before pulling out the variable speed polisher.
The part itself tells me when I'm done with 1000 grit when I no longer see orange peel after cleaning and drying. I can still see little shiny dimples where it needs more work, like in the first picture. The second picture shows the lower part of the panel done (as far as I can tell) with the 1000 grit and ready to move onto 1500 grit. My question is, how do you know when you've sanded enough with the 1500 and 2000 grit. Are there signs to look for? Thanks!
__________________
Rick 78 GMC K15 SWB, 350/NV4500/NP205/4.10s Project Hazel 71 GMC C25 350/TH400 - Project Angie 59 Chevy SWB Stepside (next in line? Not sure now  ) )2001 GMC Sierra K2500 |

|

|
|
12-22-2015, 09:28 PM
|
#2 |
|
Registered User
Join Date: Oct 2008
Location: Marianna Arkansas
Posts: 7,257
|
Re: Cut and buff question
The reason for moving to the next grit is to remove t he scratches left behind from the 1000 grit. So once done with 1000, move to the 1500 and you will see that the 1000 grit scratches will disappear. Once the 1000 grit marks are gone it is time to move on to the 2000 grit to remove the scratches left behind from the 1500 grit paper. See how that works? By the time you get to 2000 grit it should really take a good buffing and then come to you in real good order.
|
|
|
|
|
12-22-2015, 11:19 PM
|
#3 |
|
Registered User
Join Date: Dec 2000
Location: Boise, Idaho
Posts: 6,003
|
Re: Cut and buff question
I really need to do a "basics of basics" on this subject. One thing I do is to stop before you get everything thing with the first grits. In other words I don't sand it perfectly getting every speck of texture with the 1000 or 1200, I stop just shy of it disappearing. I then go to the next finest to take it down further, then I know I got all the scratches out but also I haven't sanded it too thin.
When you go to the next grit, you just be sure to sand it nice and flat and thorough and you will get out all the previous scratches. Brian
__________________
1948 Chevy pickup Chopped, Sectioned, 1953 Corvette 235 powered. Once was even 401 Buick mid engined with the carburetor right between the seats! Bought with paper route money in 1973 when I was 15. "Fan of most anything that moves human beings" |
|
|
|
|
12-23-2015, 12:27 AM
|
#4 |
|
Registered User
 Join Date: Jun 2006
Location: Maple Valley, WA
Posts: 1,913
|
Re: Cut and buff question
Brian, that's a good idea. But put in bold letters a "before you do this list" and make sure to mention having enough clear on it to proceed and if you decide to do an advanced version add in about blocking with a balsa block then re-clearing, that's for the very few who will do it but for the rest to know about what it takes to go that far.
__________________
Custom Painter/Restoration Specialist 1965 GMC 3/4 Ton LB SOLD? 1964 Chevy El Camino in full restoration 1991 Chevy S10 288K+ miles 2nd Owner SOLD 2020 RAM 1500 Warlock |
|
|
|
|
12-23-2015, 02:04 AM
|
#5 |
|
Registered User
Join Date: Dec 2000
Location: Boise, Idaho
Posts: 6,003
|
Re: Cut and buff question
Very true Dan, very true.
Brian
__________________
1948 Chevy pickup Chopped, Sectioned, 1953 Corvette 235 powered. Once was even 401 Buick mid engined with the carburetor right between the seats! Bought with paper route money in 1973 when I was 15. "Fan of most anything that moves human beings" |
|
|
|
|
12-23-2015, 08:27 AM
|
#6 |
|
Senior Member
Join Date: Jul 2009
Location: Tomball, Texas
Posts: 1,592
|
Re: Cut and buff question
Thanks for the advice gentlemen. I understand in practice the reason for progressing through the grits, I'm just having a little difficulty actually seeing 1000 and 1500 grit scratches. I sprayed 3 layers of clear so I believe there is enough. Basically I ended up sanding the panel once with 1500 and then again for good measure. Same with the 2000 grit. It buffed out pretty nice but I can still see some texture in the edge of reflections.
__________________
Rick 78 GMC K15 SWB, 350/NV4500/NP205/4.10s Project Hazel 71 GMC C25 350/TH400 - Project Angie 59 Chevy SWB Stepside (next in line? Not sure now )2001 GMC Sierra K2500 |
|
|
|
|
12-23-2015, 10:30 AM
|
#7 |
|
Account Suspended
Join Date: Jun 2011
Location: Des Moines, IA.
Posts: 4,143
|
Re: Cut and buff question
Its kind of hard to explain but I go less on visual and more on "feel" of the surface I'm sanding once I get into 1500g and finer-the paper will sand will less resistance as you work the panel. I try to also work in a wet lit area showing overhead long shop lighting. Once I feel the panel is nice and smooth, I then look at the reflection of my overhead lights as I run smooth water across the panel-if the lines of the fluorescent lighting is crisp, I know I'm done with that step. I make sure to dry off the panel afterwards and look for any areas where I may have burned thru the clear by hand too.
As you work towards a finer and finer grit, the shop lighting edges gradually become sharper and sharper. Once I've gotten to 2000g they are pretty damn straight....and after 3000g they appear laser straight. Its easier to show these steps than to explain them IMO. |
|
|
|
|
12-23-2015, 11:21 AM
|
#8 |
|
Registered User
Join Date: Dec 2000
Location: Boise, Idaho
Posts: 6,003
|
Re: Cut and buff question
It's funny, for me it is all about that first cut being nice and even and getting it all to look the same. Then the grits after I don't even look at it anymore, I simply remove the same amount everywhere, sanding the same amount everywhere so it ends up the same. Kinda like when the clear was applied, putting it the same everywhere, no so much how it looks because if it's applied the same it will look good anyway.
I have to say, there was some serious texture in that clear Rick, getting it all out is asking a lot. Not so much as it simply takes the time to sand it, but when there is that much texture it's easy to go through. Brian
__________________
1948 Chevy pickup Chopped, Sectioned, 1953 Corvette 235 powered. Once was even 401 Buick mid engined with the carburetor right between the seats! Bought with paper route money in 1973 when I was 15. "Fan of most anything that moves human beings" |
|
|
|
|
12-23-2015, 11:37 AM
|
#9 |
|
Senior Member
Join Date: Jul 2009
Location: Tomball, Texas
Posts: 1,592
|
Re: Cut and buff question
I appreciate all this information. This was my first paint job and it didn't turn out that great, but I've always considered this my practice build and the truck will be a driver. I do have a lot of it left to sand and buff, so I'm asking for this advice to improve as I progress across the truck, but given how rough the clear was, I'm not really expecting perfection martinsr. It does look 100% better than it started so I'm happy if I can improve and actually know what I'm doing on the next project.
One thing I've learned is that this cutting and buffing brings out any scratches left from block sanding the primer. That's one area that is too late to fix on this truck (I really don't want to start over ) and I'll need to figure out how to do a better job on the next.
__________________
Rick 78 GMC K15 SWB, 350/NV4500/NP205/4.10s Project Hazel 71 GMC C25 350/TH400 - Project Angie 59 Chevy SWB Stepside (next in line? Not sure now )2001 GMC Sierra K2500 |
|
|
|
|
12-23-2015, 12:28 PM
|
#10 |
|
Registered User
Join Date: Dec 2000
Location: Boise, Idaho
Posts: 6,003
|
Re: Cut and buff question
You're doing an awesome job for the first time, don't sweat it.
 Yeah, that is my point with the first sanding of the clear, it's the same with primer, you have to make sure that is perfect before you proceed. This is a very important little tip, "Never ask the product to do too much." It's a thought that should always be in your head as you do this stuff. All the way from the bondo, don't ask it to fill too much, right? The primer, don't ask it to fill too much, don't leave coarse scratches in the bondo, don't leave pin holes, don't leave an poor feather edge expecting the primer to fill it! That is a huge no-no. One of the first things we would do to correct those scratches in the primer or pin holes or what ever is to apply the primer heavy right? Well not you have primer full of solvent, the KILLER in any paintwork is products full of solvent sprayed too wet. It shrinks, it wrinkles, it dies back, it is without a doubt the number one reason for failure in paint jobs, excessive solvents from applying products too heavy or too short of flash time, or too many coats etc. Applying a "skim coat" of polyester putty over your filler work and never sanding that with anything coarser than 180 will all but eliminate sand scratch problems with primers. Any primer can fill those 180 scratches easy, end of problem, you aren't asking it to do too much.  But really, your truck, for a driver, are you kidding, that thing is going to be awesome! Brian
__________________
1948 Chevy pickup Chopped, Sectioned, 1953 Corvette 235 powered. Once was even 401 Buick mid engined with the carburetor right between the seats! Bought with paper route money in 1973 when I was 15. "Fan of most anything that moves human beings" |
|
|
|
|
12-23-2015, 12:29 PM
|
#11 |
|
Registered User
Join Date: Dec 2000
Location: Boise, Idaho
Posts: 6,003
|
Re: Cut and buff question
As mentioned, a quick cut of that clear and applying another couple of coats would have gotten you a lot better finish before sanding and buffing, maybe good enough to leave.
Brian
__________________
1948 Chevy pickup Chopped, Sectioned, 1953 Corvette 235 powered. Once was even 401 Buick mid engined with the carburetor right between the seats! Bought with paper route money in 1973 when I was 15. "Fan of most anything that moves human beings" |
|
|
|
|
12-23-2015, 03:12 PM
|
#12 |
|
Registered User
Join Date: Oct 2015
Location: Calgary, Alberta
Posts: 1,252
|
Re: Cut and buff question
Looking great!
Stay clear of the edges and body lines as you can burn through those areas faster than could imagine. One trick to consider using is Masking those areas off until your done, then remove the tap and finish.
__________________
So when is this "Old enough to know better" supposed to kick in? My 1959 GMC build thread http://67-72chevytrucks.com/vboard/s...d.php?t=686989 |
|
|
|
|
12-23-2015, 03:40 PM
|
#13 | |
|
Cruzzzn' Vet
Join Date: Jan 2005
Location: Porterville,Ca.
Posts: 1,918
|
Re: Cut and buff question
Quote:
|
|
|
|
|
|
12-23-2015, 04:18 PM
|
#14 |
|
Registered User
Join Date: May 2011
Location: Anderson SC
Posts: 3,870
|
Re: Cut and buff question
For knowing how much to sand, use a sharpie marker as a "guide coat" so you can see how much texture you're sanding out. Once the sharpie marker is gone you know it's flat with no texture. This is really helpful on body lines or edges so you know you're not sanding too much.
       Creases on a door that I buffed. Marked them with a sharpie and watched my sanding patter to avoid cutting through the clear in the crease. 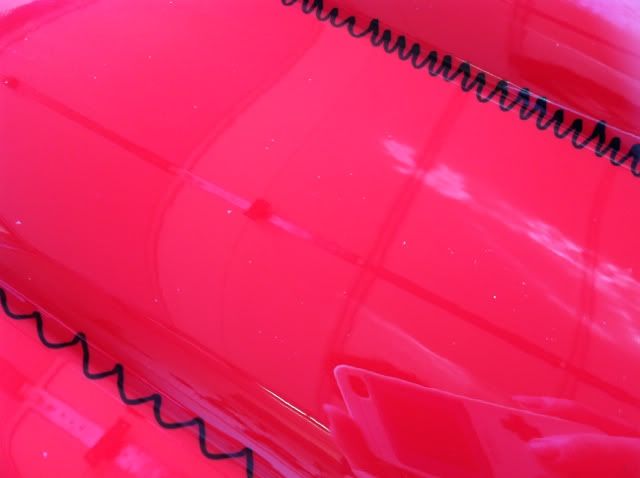 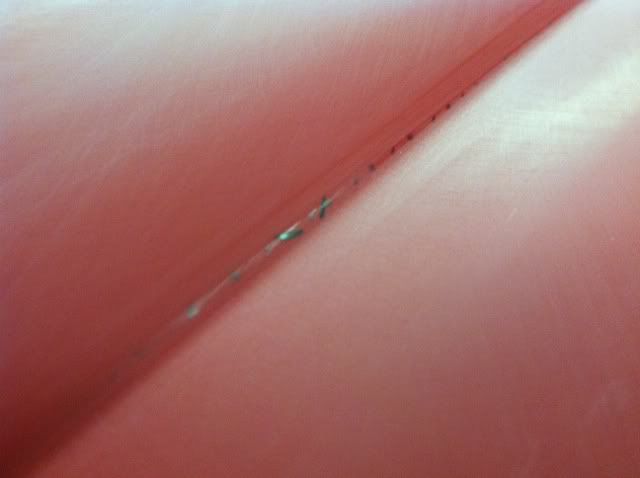 After buffing. 
__________________
Project Goldilocks '66 C10 Short Fleet BBW Build '65 C10 Highly Detailed Stock Restoration Thread '78 Camaro Targa Roof Build '55 International Metal/Body/Paint Work '66 F100 Full Rotisserie Restoration '40 Packard 120 Convertible Coupe Restoration How To Restore and Detail an Original Gauge Cluster How To Detail Sand Body Panels, Edges, Corners, Etc |

|
|
|
12-23-2015, 05:28 PM
|
#15 |
|
Registered User
Join Date: Dec 2000
Location: Boise, Idaho
Posts: 6,003
|
Re: Cut and buff question
That is so wild, seen this over at the autobodystore.com site. I have to say, I don't see a need for that at all, you can see what is sanded and what isn't when sanding it. I still like wet sanding it and using a squeegee to quickly wipe it dry and see exactly what you have, works like a charm.
You are doing a mind blowing beautiful job on those so obviously it works, I have just never saw a need.  It's not like sanding bondo where you can't see a high or low spot easily. When sanding clear (or paint for that matter) you can see the texture so easily. Once it's squeegeed off the shiny unsanded spots are as clear as a bell. Oh, and be sure the bucket is clean enough to drink out of, NEVER drop a piece of paper on the floor and clean it out in the bucket, that paper gets thrown away usually. Brian
__________________
1948 Chevy pickup Chopped, Sectioned, 1953 Corvette 235 powered. Once was even 401 Buick mid engined with the carburetor right between the seats! Bought with paper route money in 1973 when I was 15. "Fan of most anything that moves human beings" |
|
|
|
|
12-23-2015, 10:59 PM
|
#16 |
|
Registered User
Join Date: Jan 2012
Location: Petal,Ms.
Posts: 428
|
Re: Cut and buff question
Great info, love this site.
|
|
|
|
|
12-25-2015, 05:50 AM
|
#17 |
|
Registered User
Join Date: Jun 2006
Location: Maple Valley, WA
Posts: 1,913
|
Re: Cut and buff question
Now that the sanding info is there don't be in a rush to switch compounds, look at in every direction and with different types of light. You could be buffing indoors and thinking it looks fine and switch to the next compound and when done in natural sunlight your scratches start showing again.
__________________
Custom Painter/Restoration Specialist 1965 GMC 3/4 Ton LB SOLD? 1964 Chevy El Camino in full restoration 1991 Chevy S10 288K+ miles 2nd Owner SOLD 2020 RAM 1500 Warlock |
|
|
|
|
12-27-2015, 02:28 PM
|
#18 |
|
Senior Member
Join Date: Aug 2005
Location: OKC, OK
Posts: 2,365
|
Re: Cut and buff question
The easiest way to tell when you have sanded out the previous sanding scratches is to sand a different pattern when stepping up on paper. I start by straight line sanding then go to circular pattern. Once all the straight lines are gone from the circular path, you can move to the next grit. It takes some practice but after a while you can tell when to move to the next grit. The is my old 69 Camaro. BTW, I start at 600 grit when cutting a buffing. I also have applied 5-6 coats of high solids clear as well.

__________________
Mike Redpath |
|
|
|
|
12-27-2015, 11:24 PM
|
#19 |
|
Senior Member
Join Date: Jul 2009
Location: Tomball, Texas
Posts: 1,592
|
Re: Cut and buff question
Wow, leave for a few days and come back to lots of awesome information. I'm glad I started a thread that looks like it should be useful to many of us. Thanks again for lending your expertise!
__________________
Rick 78 GMC K15 SWB, 350/NV4500/NP205/4.10s Project Hazel 71 GMC C25 350/TH400 - Project Angie 59 Chevy SWB Stepside (next in line? Not sure now )2001 GMC Sierra K2500 |
|
|
|
 |
| Bookmarks |
|
|


 Linear Mode

