
|
|
|
 01-26-2010, 11:29 AM
|
#1 | |
|
GEARHEAD
Join Date: Aug 2003
Location: MN
Posts: 6,115
|
Re: Over 25 Years Later, Finally My 71 C-10 Truck Build
Quote:
__________________
If no one knows what you're doing, they can't tell you you're doing it wrong HG's Dream Car Build - Shelby Cobra Kit Build your own adjustable track bar 71  Long Fleet C/10 Long Fleet C/10 72  Jimmy 4x4 (Junkyard Jimmy) Jimmy 4x4 (Junkyard Jimmy)HG's Plow Truck '78  K35 Dually K35 DuallyBigass Farm Truck HG's thread of miscellaneous stuff |
|

|

|
|
01-26-2010, 06:06 PM
|
#2 |
|
6>8 Plugless........
 Join Date: Sep 2007
Location: Prairie City, Ia
Posts: 17,141
|
Re: Over 25 Years Later, Finally My 71 C-10 Truck Build
I know a lot of body shops here are primering the repaired bare metal areas first before applying filler to help eliminate rust. They say that these new fillers will adhere to the primer and will not come off without sanding. I think they are using urethane primers when doing this. Anyone else hear of this being done?
It is really looking good, keep up the good work!
__________________
Ryan 1972 Chevy Longhorn K30 Cheyenne Super, 359 Inline 6 cylinder, Auto Trans, Tilt, Diesel Tach/Vach, Buckets, Rare Rear 4-link and air ride option Build Thread 1972 GMC Sierra Grande Longhorn 4x4 1972 Chevy Cheyenne Super K20 Long Step side tilt, tach, tow hooks, AC, 350 4 speed 1972 C10 Suburban Custom Deluxe 1969 Chevy milk truck 1971 Camaro RS 5.3 BTR STG3 Cam Super T10 1940 Ford 354 Hemi 46RH Ford 9" on air ride huge project Tired of spark plugs? Check this out. |
|
|
|
|
01-26-2010, 08:01 PM
|
#3 | ||
|
Registered User
Join Date: Jun 2007
Location: Saskatoon, Saskatchewan,:
Posts: 2,901
|
Re: Over 25 Years Later, Finally My 71 C-10 Truck Build
Quote:
Hey bud, filler is really coming along, looking much better. What i would do know is sand it down to a 120 grit and see where you are from there. That one spot on the back right that is showing should be fine. All dependds on how much is left around it. But normally when i get to that point, just about this point i mean i start with finer grits. I would go from there. Then off to the races you are. But great start Quote:
__________________
James 1968 GMC "HAVOC" 1986 GMC "Frank" J.J.R.H. Design & Consulting My 68`Rebuild "HAVOC": http://67-72chevytrucks.com/vboard/s...d.php?t=316300 A 58' chev build thread: http://www.67-72chevytrucks.com/vboa...d.php?t=311238 1969 Camaro Pro Touring http://67-72chevytrucks.com/vboard/s...61#post3513361 Swiss Cheese: http://67-72chevytrucks.com/vboard/s...d.php?t=384390 Adjustable Trailing Arm How-To: http://67-72chevytrucks.com/vboard/s...d.php?t=321100 1968 Ford Farm Truck: http://67-72chevytrucks.com/vboard/s...=1#post6555587 |
||
|
|
|
|
01-26-2010, 08:28 PM
|
#4 |
|
6>8 Plugless........
Join Date: Sep 2007
Location: Prairie City, Ia
Posts: 17,141
|
Re: Over 25 Years Later, Finally My 71 C-10 Truck Build
Ok, thanks Nuke. I might try that on my next project as there will be a lot of welding and body work required.

__________________
Ryan 1972 Chevy Longhorn K30 Cheyenne Super, 359 Inline 6 cylinder, Auto Trans, Tilt, Diesel Tach/Vach, Buckets, Rare Rear 4-link and air ride option Build Thread 1972 GMC Sierra Grande Longhorn 4x4 1972 Chevy Cheyenne Super K20 Long Step side tilt, tach, tow hooks, AC, 350 4 speed 1972 C10 Suburban Custom Deluxe 1969 Chevy milk truck 1971 Camaro RS 5.3 BTR STG3 Cam Super T10 1940 Ford 354 Hemi 46RH Ford 9" on air ride huge project Tired of spark plugs? Check this out. |
|
|
|
|
01-26-2010, 11:03 PM
|
#5 |
|
GEARHEAD
Join Date: Aug 2003
Location: MN
Posts: 6,115
|
Re: Over 25 Years Later, Finally My 71 C-10 Truck Build
Thanks for the input guys. After all the sanding yesterday, then digging out from our blizzard today, my back, shoulders and legs are shot. I'll get the finer grit sanding done this weekend. So once that is done, I should be ready to spray the epoxy primer right? I started scuffing the inside of the cab using a red scuff pad and planned on spraying the inside of the cab and the back at the same time.
__________________
If no one knows what you're doing, they can't tell you you're doing it wrong HG's Dream Car Build - Shelby Cobra Kit Build your own adjustable track bar 71 Long Fleet C/10 72 Jimmy 4x4 (Junkyard Jimmy)HG's Plow Truck '78 K35 DuallyBigass Farm Truck HG's thread of miscellaneous stuff |
|
|
|
|
02-01-2010, 12:45 AM
|
#6 |
|
Registered User
Join Date: Mar 2008
Location: Salt Lake City UT
Posts: 441
|
Re: Over 25 Years Later, Finally My 71 C-10 Truck Build
Great thread.
|
|
|
|
|
02-01-2010, 01:57 AM
|
#7 | |
|
GEARHEAD
Join Date: Aug 2003
Location: MN
Posts: 6,115
|
Re: Over 25 Years Later, Finally My 71 C-10 Truck Build
Quote:
I had to work today also. I'll do more sanding this week though.
__________________
If no one knows what you're doing, they can't tell you you're doing it wrong HG's Dream Car Build - Shelby Cobra Kit Build your own adjustable track bar 71 Long Fleet C/10 72 Jimmy 4x4 (Junkyard Jimmy)HG's Plow Truck '78 K35 DuallyBigass Farm Truck HG's thread of miscellaneous stuff |
|
|
|
|
|
02-01-2010, 11:08 PM
|
#8 |
|
GEARHEAD
Join Date: Aug 2003
Location: MN
Posts: 6,115
|
Re: Over 25 Years Later, Finally My 71 C-10 Truck Build
Did more sanding, 80 grit this time and it smoothed out pretty well. Problem is I still have a few high spots, which means more banging, putty and sanding, just to get back to where I'm at now. Frustrating.
I'm glad this is the back of the cab and won't be seen with the bed on, but I'm trying to learn to do it as well as I can here so when I'm doing the bed sides later it looks as good as I can get it.
__________________
If no one knows what you're doing, they can't tell you you're doing it wrong HG's Dream Car Build - Shelby Cobra Kit Build your own adjustable track bar 71 Long Fleet C/10 72 Jimmy 4x4 (Junkyard Jimmy)HG's Plow Truck '78 K35 DuallyBigass Farm Truck HG's thread of miscellaneous stuff |
|
|
|
|
02-01-2010, 11:53 PM
|
#9 |
|
Still Learning
Join Date: Jul 2009
Location: Central Oklahoma
Posts: 10,108
|
Re: Over 25 Years Later, Finally My 71 C-10 Truck Build
Great looking project! I have to commend on doing the same thing I did back in 1989 after my first "paid" paint job didn't turn out the way I expected for $600 (family deal..go figure). I know that's not much by todays standards but when you only make $6 an hour that's a bunch of cash. BTW, I did all the finish sanding and taping for that one. I figured, no way I'm paying someone to do this if I can figure it out. And you were right when you said your not worried about the actual painting...thats the easiest part of any paint job....almost like a reward for all the hard work building up to it. Nuke has directed you with some really good tips that I had to learn by trial and error. Especially the one about the primer is only for filling sanding scratches. I would recommend using a long sanding block (I think 8") with some high quality 3m 80 grit HERE, then 120 and so on, it will allow you to feather the edges easy. There is a reason that the paint stores charge high $$ for supplies. Most of them are worth the extra cash. I have also heard really good things about the newer body fillers. They are supposed to sand better and not bleed through the paint. Anyway, listen to Nuke he (used) to do it everyday. Good luck! I will be following.
__________________
Mike "69 Short Wide" My Project 86 Silverado Landen's Project Instagram: @mcbassin My Website C/10 Club Oklahoma Facebook Group Last edited by mcbassin; 02-02-2010 at 12:08 AM. |
|
|
|
|
02-07-2010, 01:06 AM
|
#10 |
|
GEARHEAD
Join Date: Aug 2003
Location: MN
Posts: 6,115
|
Re: Over 25 Years Later, Finally My 71 C-10 Truck Build
Spent the day outside or in the garage. First I had to move my parts blazer. It's been sitting in my neighbors driveway for over a month. I couldn't park it where I wanted to because the snow was too deep. But it's moved to a friends place under his A frame hoist set up. So when the time comes I can lift the tub off and get it parted out, swap the tub to my Jimmy, etc. etc. That took a few hours.
Then I warmed up the garage and put on even more putty and did even more sanding. As far as I'm concerned, the back side of this cab is about as straight as I can make it. It's really surprising how unflat the flat areas of these cabs are. Like below the window, it looks flat, but it actually has a slight depression in it that runs all the way across. So just fixing the ends where the dents were wasn't enough. I had to mud it all the way across so it would be flat all the way across. The corners of the cab, behind the door, it looks like a nice even turn in that metal, but it's not. There are flatter spots, etc. Now I know why these things cost so much for body work and repaints. If it was an easy scuff and shoot job, no problem. But if you have to fix anything, it just spreads to everything. Then it just depends on how straight and smooth you really want to make it. Anyway, couple pics of the days work. Did a bunch of cleaning up after the sanding. I was thinking about putting some primer over it finally, but I need to pick up some fittings for the new gun and get it set up the way I want it. Maybe tomorrow, if not, then maybe next saturday. 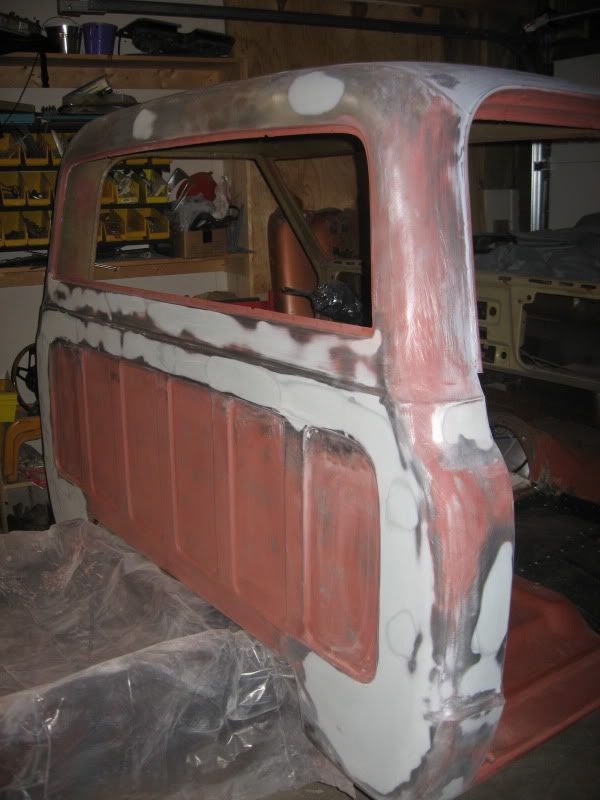 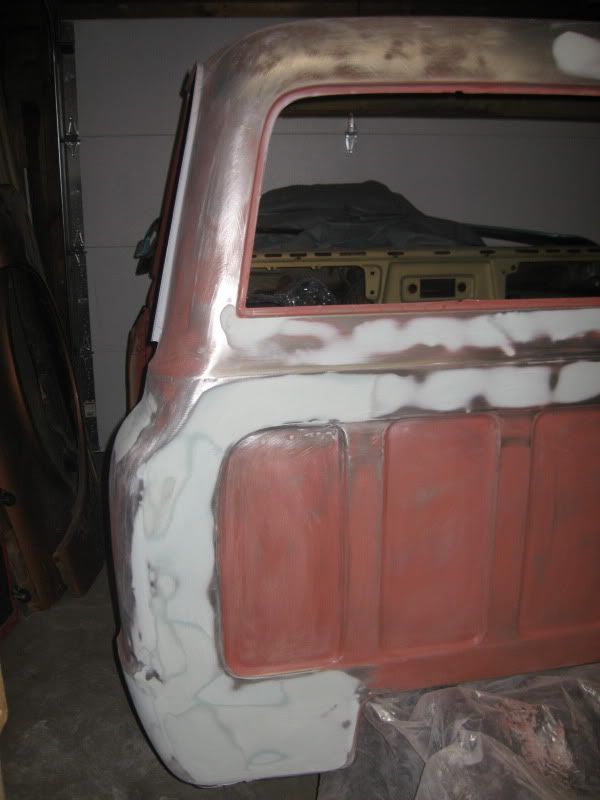
__________________
If no one knows what you're doing, they can't tell you you're doing it wrong HG's Dream Car Build - Shelby Cobra Kit Build your own adjustable track bar 71 Long Fleet C/10 72 Jimmy 4x4 (Junkyard Jimmy)HG's Plow Truck '78 K35 DuallyBigass Farm Truck HG's thread of miscellaneous stuff Last edited by hgs_notes; 02-07-2010 at 01:07 AM. |
|
|
|
|
02-07-2010, 07:54 AM
|
#11 |
|
Registered User
Join Date: Jun 2007
Location: Saskatoon, Saskatchewan,:
Posts: 2,901
|
Re: Over 25 Years Later, Finally My 71 C-10 Truck Build
Good morning, It's funny you know, when ppl ask how much bodywork and paint cost they get appaled when i tell them, but they do not realize how much time it really takes to do a perfect job, it is more work than ppl know to get something strait. I am to the point in my life now , that i use hardly any filler, i pick and file most everything, if i can.
Well, I am glad that you are working at it, remember patience makes perfect. Do not get frustrated, if you do, walk away for an hour, Return and start again, it will be fine. Anyhow, the back of the cab is starting to take shape, The right cab corner above the bodyline has a few high spots, that will need to be worked some more yet, it will show with primer. The rest looks close, left cab corner looks good, below the windows is close, it will be a little wavy but not bad at all. What kind of primer do you plan on using? If you use a 2k high build you will be ok. might have to prime, sand and prime one more time. Just remember, before prime to have the mud finished off in 180, other wise it will shrink and show through, you live in a climate like me. On a side note, if you have the time, let your truck sit in primer for a month before sanding, this allows the primer to shrink and the job will turn out even better! Harder than most ppl think, and frustrating, I know. It takes a certain kind of person to have the patience to do this. You are doing a great job so far. Do not think otherwise, remember that you are new at this. Also, it gets mush more rewarding in just a bit. Trust me. Congrats on the ambition on getting this done. GREAT JOB!! Talk to you in a bit. Also, remember constructive criticism. Any questions ask. James
__________________
James 1968 GMC "HAVOC" 1986 GMC "Frank" J.J.R.H. Design & Consulting My 68`Rebuild "HAVOC": http://67-72chevytrucks.com/vboard/s...d.php?t=316300 A 58' chev build thread: http://www.67-72chevytrucks.com/vboa...d.php?t=311238 1969 Camaro Pro Touring http://67-72chevytrucks.com/vboard/s...61#post3513361 Swiss Cheese: http://67-72chevytrucks.com/vboard/s...d.php?t=384390 Adjustable Trailing Arm How-To: http://67-72chevytrucks.com/vboard/s...d.php?t=321100 1968 Ford Farm Truck: http://67-72chevytrucks.com/vboard/s...=1#post6555587 |
|
|
|
|
02-07-2010, 10:58 AM
|
#12 |
|
GEARHEAD
Join Date: Aug 2003
Location: MN
Posts: 6,115
|
Re: Over 25 Years Later, Finally My 71 C-10 Truck Build
Thanks for the input James. Yesterday I was at my limit and ready to take the shortcut to primer right then and there, even though in my mind I knew it wasn't quite ready. It's not that I lack patience, it's more that I am anxious to see the end result. Also, with the epoxy primer I can still use filler on it if needed.
The primer I have now is the epoxy primer so I can seal it up. It's in gray, and I plan on using another color for high build primer. But I've been wondering if I should use high build primer first then after sanding/primer/sanding and getting it smooth, then use the epoxy primer. Your thoughts?
__________________
If no one knows what you're doing, they can't tell you you're doing it wrong HG's Dream Car Build - Shelby Cobra Kit Build your own adjustable track bar 71 Long Fleet C/10 72 Jimmy 4x4 (Junkyard Jimmy)HG's Plow Truck '78 K35 DuallyBigass Farm Truck HG's thread of miscellaneous stuff |
|
|
|
|
02-07-2010, 11:59 AM
|
#13 |
|
Registered User
Join Date: Jun 2007
Location: Saskatoon, Saskatchewan,:
Posts: 2,901
|
Re: Over 25 Years Later, Finally My 71 C-10 Truck Build
use the epoxy first, expoxy can not go over high build, and epoxy bonds to bare steel, not high build, you need an etch. so epoxy, finish body fill, high build then.
__________________
James 1968 GMC "HAVOC" 1986 GMC "Frank" J.J.R.H. Design & Consulting My 68`Rebuild "HAVOC": http://67-72chevytrucks.com/vboard/s...d.php?t=316300 A 58' chev build thread: http://www.67-72chevytrucks.com/vboa...d.php?t=311238 1969 Camaro Pro Touring http://67-72chevytrucks.com/vboard/s...61#post3513361 Swiss Cheese: http://67-72chevytrucks.com/vboard/s...d.php?t=384390 Adjustable Trailing Arm How-To: http://67-72chevytrucks.com/vboard/s...d.php?t=321100 1968 Ford Farm Truck: http://67-72chevytrucks.com/vboard/s...=1#post6555587 |
|
|
|
|
02-07-2010, 04:58 PM
|
#14 | |
|
GEARHEAD
Join Date: Aug 2003
Location: MN
Posts: 6,115
|
Re: Over 25 Years Later, Finally My 71 C-10 Truck Build
Quote:
__________________
If no one knows what you're doing, they can't tell you you're doing it wrong HG's Dream Car Build - Shelby Cobra Kit Build your own adjustable track bar 71 Long Fleet C/10 72 Jimmy 4x4 (Junkyard Jimmy)HG's Plow Truck '78 K35 DuallyBigass Farm Truck HG's thread of miscellaneous stuff |
|
|
|
|
|
02-07-2010, 01:46 PM
|
#15 |
|
Still Learning
Join Date: Jul 2009
Location: Central Oklahoma
Posts: 10,108
|
Re: Over 25 Years Later, Finally My 71 C-10 Truck Build
Looking good!
|
|
|
|
|
02-07-2010, 07:06 PM
|
#16 |
|
Registered User
Join Date: Jun 2007
Location: Saskatoon, Saskatchewan,:
Posts: 2,901
|
Re: Over 25 Years Later, Finally My 71 C-10 Truck Build
polyester putty, make sure it is a two part
__________________
James 1968 GMC "HAVOC" 1986 GMC "Frank" J.J.R.H. Design & Consulting My 68`Rebuild "HAVOC": http://67-72chevytrucks.com/vboard/s...d.php?t=316300 A 58' chev build thread: http://www.67-72chevytrucks.com/vboa...d.php?t=311238 1969 Camaro Pro Touring http://67-72chevytrucks.com/vboard/s...61#post3513361 Swiss Cheese: http://67-72chevytrucks.com/vboard/s...d.php?t=384390 Adjustable Trailing Arm How-To: http://67-72chevytrucks.com/vboard/s...d.php?t=321100 1968 Ford Farm Truck: http://67-72chevytrucks.com/vboard/s...=1#post6555587 |
|
|
|
|
02-14-2010, 12:44 AM
|
#17 |
|
GEARHEAD
Join Date: Aug 2003
Location: MN
Posts: 6,115
|
Re: Over 25 Years Later, Finally My 71 C-10 Truck Build
Picked up polyester putty the other day, along with some finer grit paper. It's been a busy week for work, so wasn't able to get out there until today. The glazing putty is ok, but it sets up real fast and you have to be quick getting it on the body. Went over most of the back side of the cab, sanded with 180 grit and overall, I think I did pretty good for a beginner. I'm getting the hang of it. Hopefully I'll be able to progress faster on other parts once I get past this part.
No pics, it doesn't look much different than the previous ones. Fixed a few more high spots, filled a few more little low spots, sanded. I found a couple very small dimples I need to fill yet, but other than that, it's ready for primer. Don't think I'll do that tomorrow, but probably this next week, if I'm lucky. I'm a little nervous about that. New spray gun, a style I've never had before. Never mixed primer/paint like this before either. I'm not really worried about how it looks, because it is just primer. It will be covered and sanded again anyway. I've got some cardboard to practice on and set the spray pattern up, etc. I'll post pics after primer, good or bad.
__________________
If no one knows what you're doing, they can't tell you you're doing it wrong HG's Dream Car Build - Shelby Cobra Kit Build your own adjustable track bar 71 Long Fleet C/10 72 Jimmy 4x4 (Junkyard Jimmy)HG's Plow Truck '78 K35 DuallyBigass Farm Truck HG's thread of miscellaneous stuff |
|
|
|
|
02-15-2010, 05:20 PM
|
#18 |
|
6>8 Plugless........
Join Date: Sep 2007
Location: Prairie City, Ia
Posts: 17,141
|
Re: Over 25 Years Later, Finally My 71 C-10 Truck Build
Good luck spraying the primer. It's always a PITA getting ready to spray because you're so nervous to try and not ruin/spill your material.
__________________
Ryan 1972 Chevy Longhorn K30 Cheyenne Super, 359 Inline 6 cylinder, Auto Trans, Tilt, Diesel Tach/Vach, Buckets, Rare Rear 4-link and air ride option Build Thread 1972 GMC Sierra Grande Longhorn 4x4 1972 Chevy Cheyenne Super K20 Long Step side tilt, tach, tow hooks, AC, 350 4 speed 1972 C10 Suburban Custom Deluxe 1969 Chevy milk truck 1971 Camaro RS 5.3 BTR STG3 Cam Super T10 1940 Ford 354 Hemi 46RH Ford 9" on air ride huge project Tired of spark plugs? Check this out. Last edited by Dieselwrencher; 02-15-2010 at 05:21 PM. |
|
|
|
|
02-15-2010, 07:34 PM
|
#19 | |
|
GEARHEAD
Join Date: Aug 2003
Location: MN
Posts: 6,115
|
Re: Over 25 Years Later, Finally My 71 C-10 Truck Build
Quote:
Anyway, good or bad, here are the pics. Criticism I can take. Try to be helpful if you can. I just want to know what I did wrong, what I did right, what I need to do next. 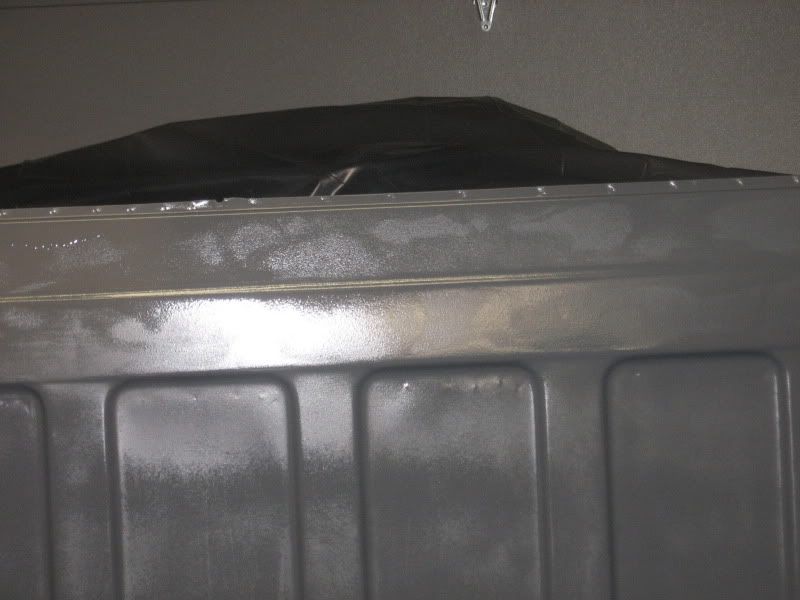 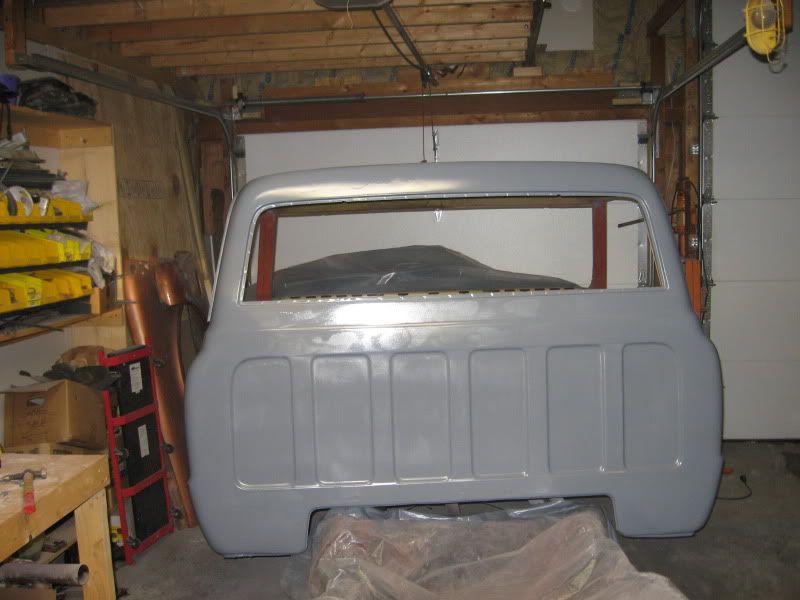 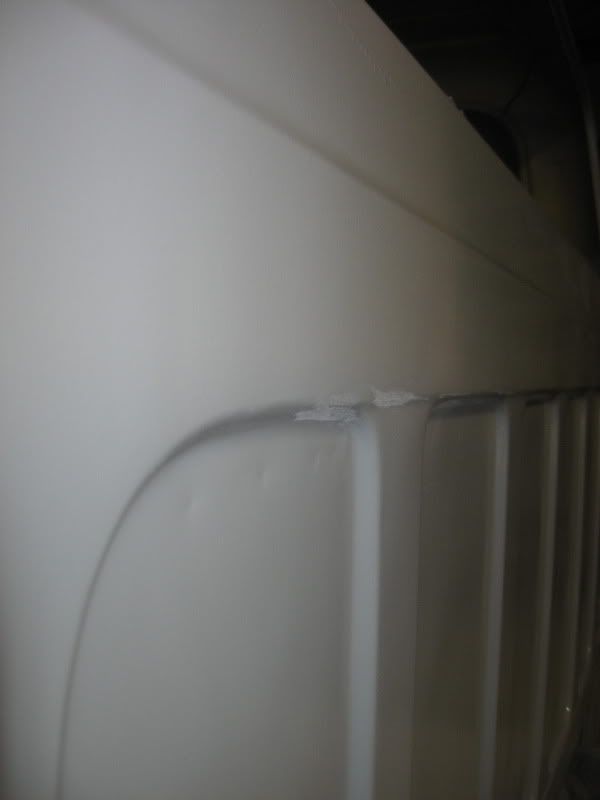 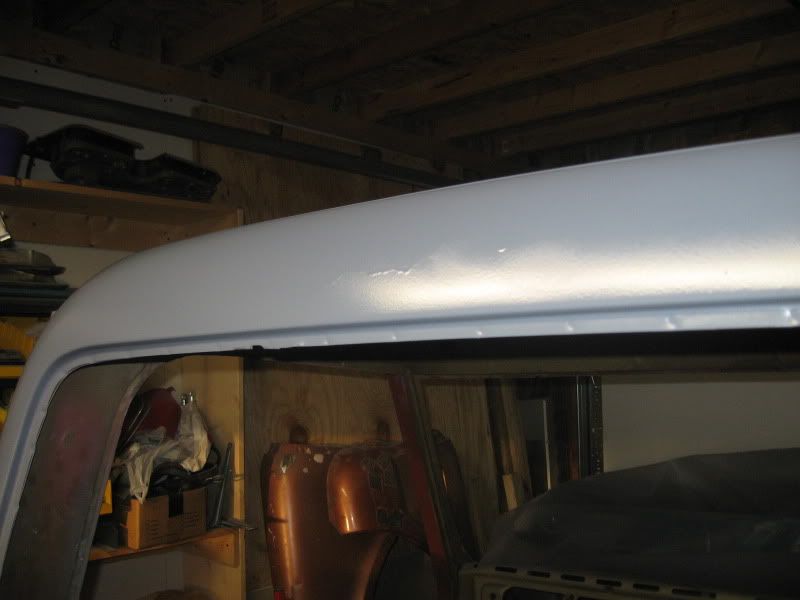 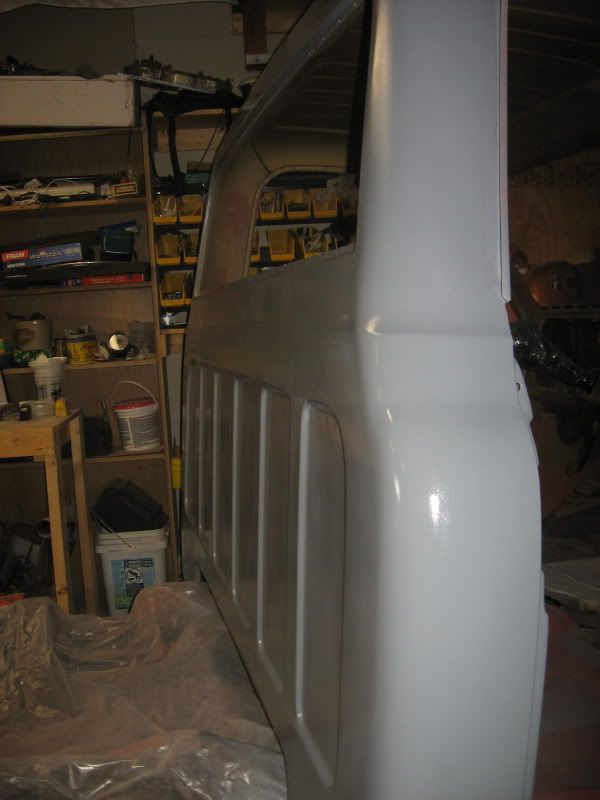 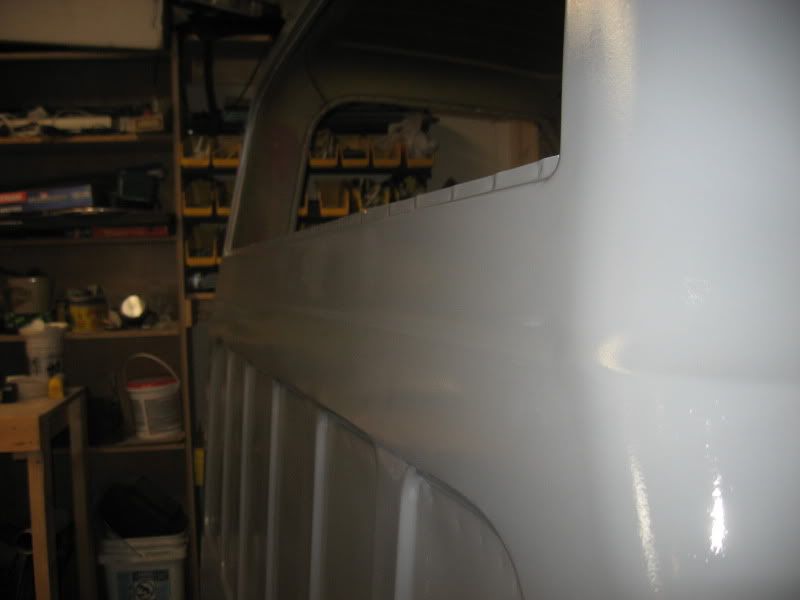 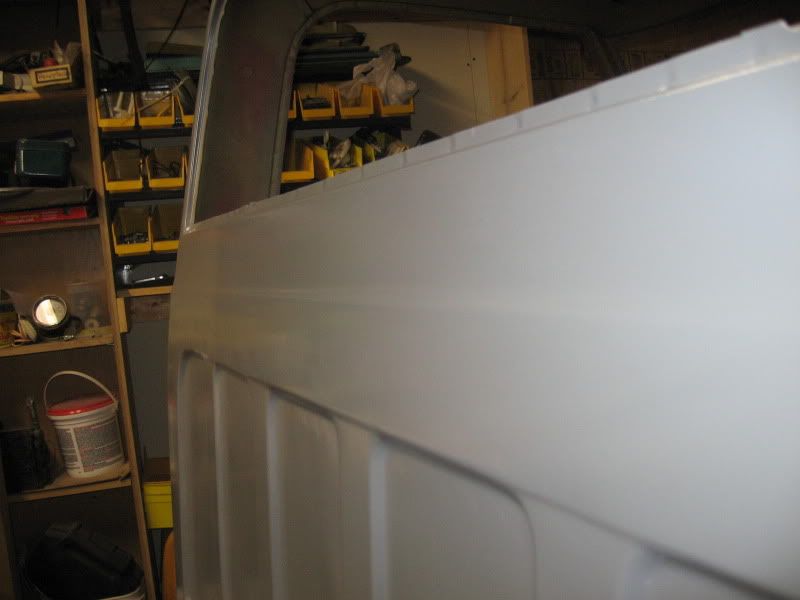 
__________________
If no one knows what you're doing, they can't tell you you're doing it wrong HG's Dream Car Build - Shelby Cobra Kit Build your own adjustable track bar 71 Long Fleet C/10 72 Jimmy 4x4 (Junkyard Jimmy)HG's Plow Truck '78 K35 DuallyBigass Farm Truck HG's thread of miscellaneous stuff |
|
|
|
|
|
02-22-2010, 12:01 AM
|
#20 |
|
GEARHEAD
Join Date: Aug 2003
Location: MN
Posts: 6,115
|
Re: Over 25 Years Later, Finally My 71 C-10 Truck Build
I spent almost the entire day in the garage and barely touched the truck. The mess was just getting too hard to work around and something needed to be done about it. I added another light, which is really helping with the body work. I cleaned up the work benches, got a pile of stuff off my parts washer, rearranged things and made it cleaner than it's been in years.
I even ran my little MIG welder on some exhaust pipe I had around. It's set up with flux core right now and the spatter is really bad. I'd never consider it for body work. I have a gas set up, but no bottle. I really don't have much welding work that needs to be done on this vehicle, but if I do the blazers I might get the bottle and try it out again. Work should be fairly light tomorrow, giving me some time to get back on the truck. There are a few small holes in the firewall I want to clean up. I need to get the gas peddle from the original cab and get it in. I might work more on the fenders since they are sitting there waiting, but might bring a door over from the storage garage and get started on that. Probably no more spraying until next weekend. The pic of todays progress...You should have seen it before... 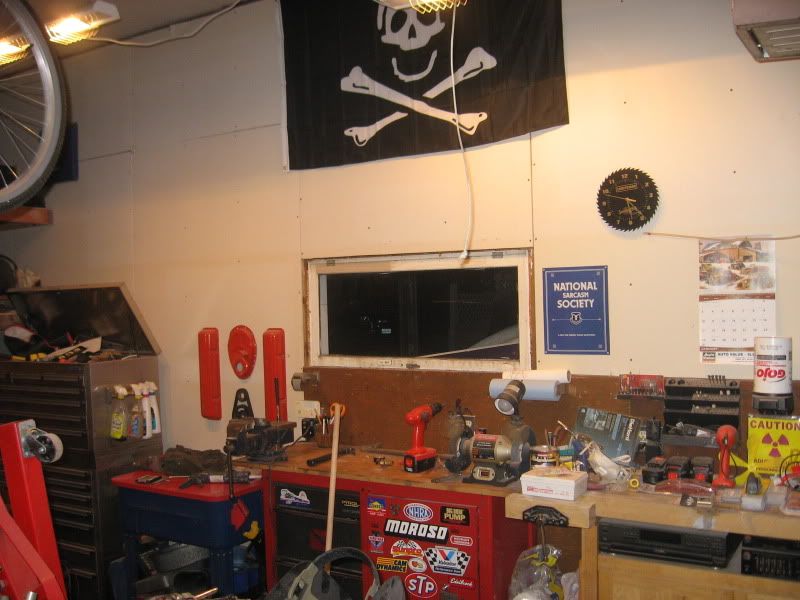
__________________
If no one knows what you're doing, they can't tell you you're doing it wrong HG's Dream Car Build - Shelby Cobra Kit Build your own adjustable track bar 71 Long Fleet C/10 72 Jimmy 4x4 (Junkyard Jimmy)HG's Plow Truck '78 K35 DuallyBigass Farm Truck HG's thread of miscellaneous stuff |
|
|
|
|
02-27-2010, 12:42 AM
|
#21 |
|
GEARHEAD
Join Date: Aug 2003
Location: MN
Posts: 6,115
|
Re: Over 25 Years Later, Finally My 71 C-10 Truck Build
Got a couple hours to spend in the garage, so I did a little grinding, a little cutting, a little sanding...
Started working on the driver side door. I had thought it was in pretty good shape. And on the outside it really wasn't bad. The bottom had very small rust spots, but the lower corners were not so good. I probably could have let it go, just cleaned it up real good, seal it up with some kind of rust preventer, but decided I should try and do better than that. I took off the handles, mirror, inside trim, etc. cut off the bottom outside and have to decide how I want to repair the inner part of the door. I have time to think on it, and I'll take a closer look at the other door before I do anything. It started like this: 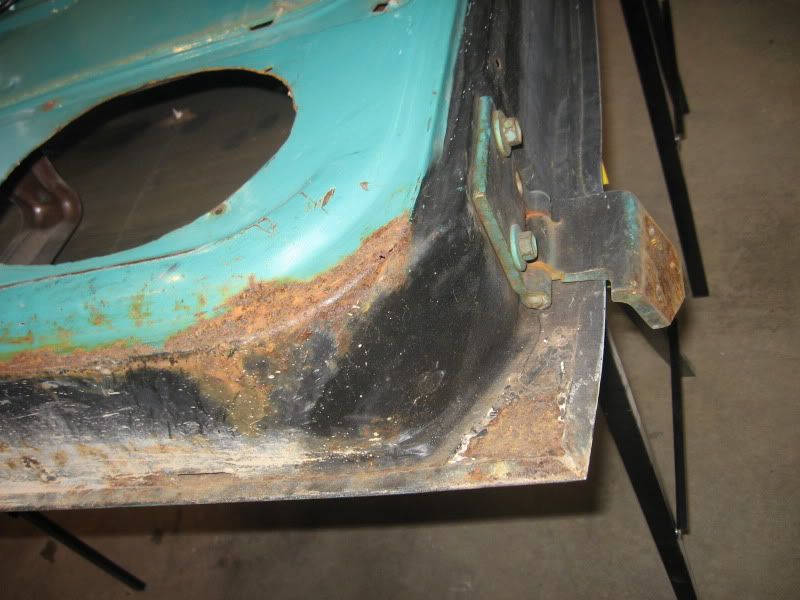 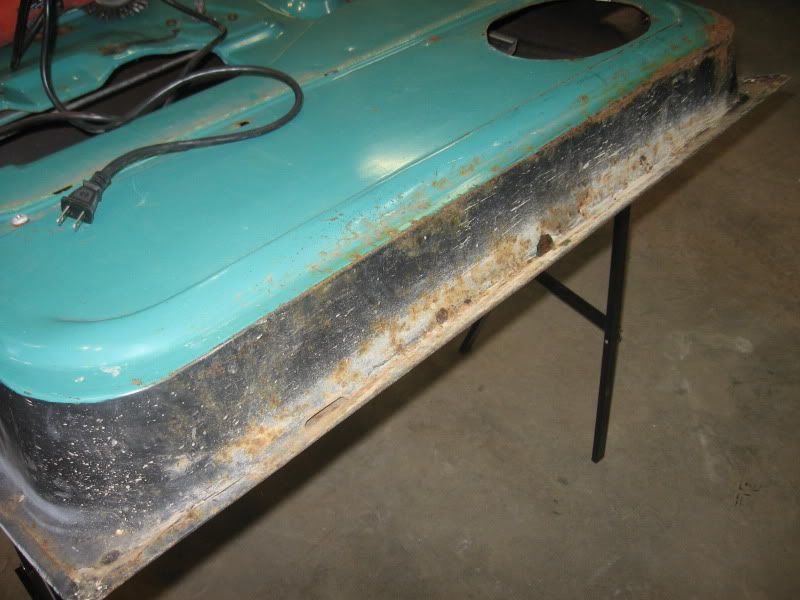 Then I cleaned it up with a wire wheel on the makita: 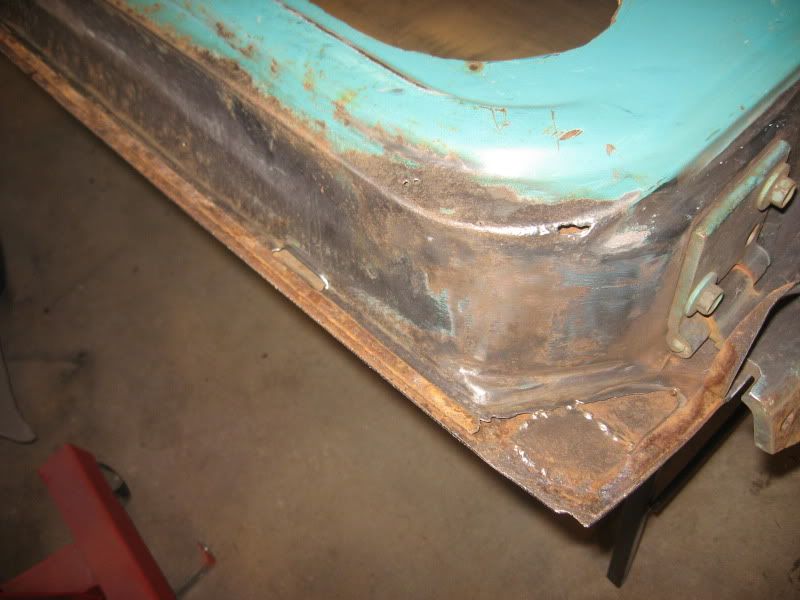 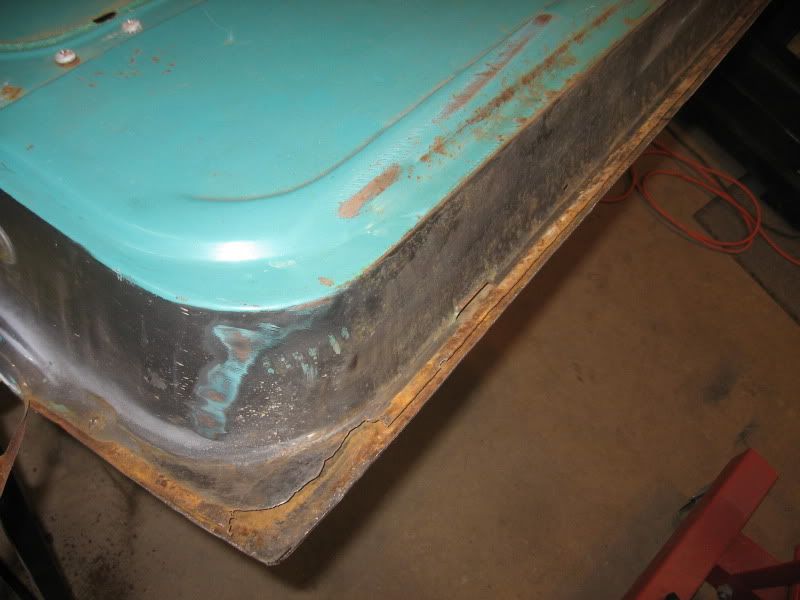 Then cut off the lower outside part: 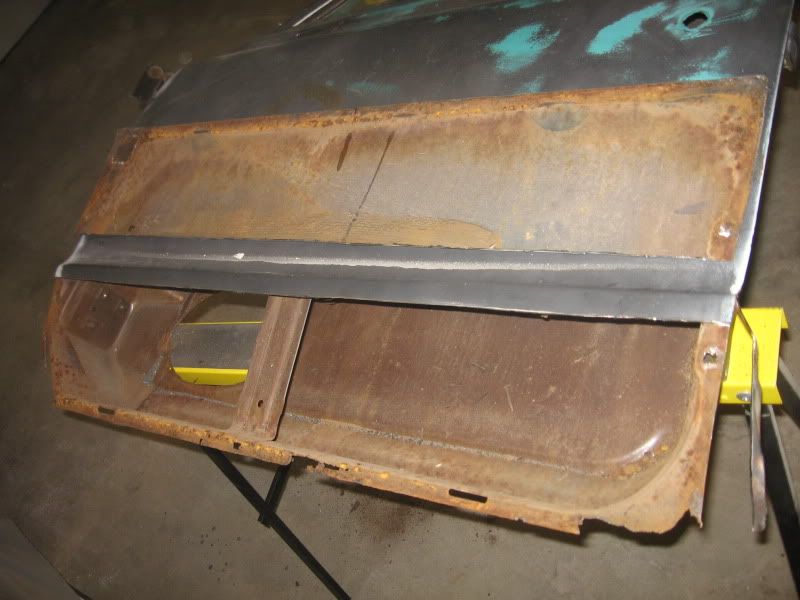 Then sanded the rest of the outside to see if anything else was hidden, it was ok. Just a few spots from where the old farm truck mirror was mounted and a small dent. Oh yeah, the lower door hinge is kinda worn too. 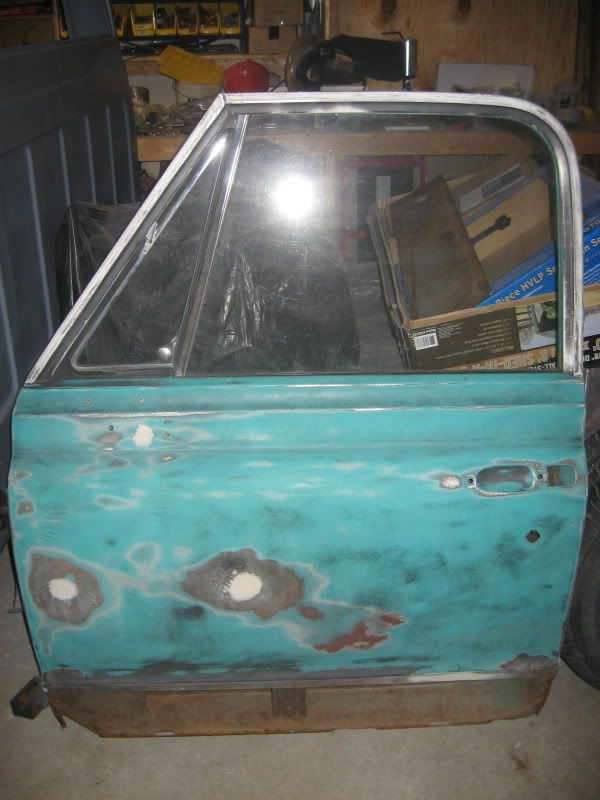 I did more sanding on the fender I started on also. Basically scuffing off the second coat of paint and found a couple small repair areas. This will be an easy panel to prep for paint I think.  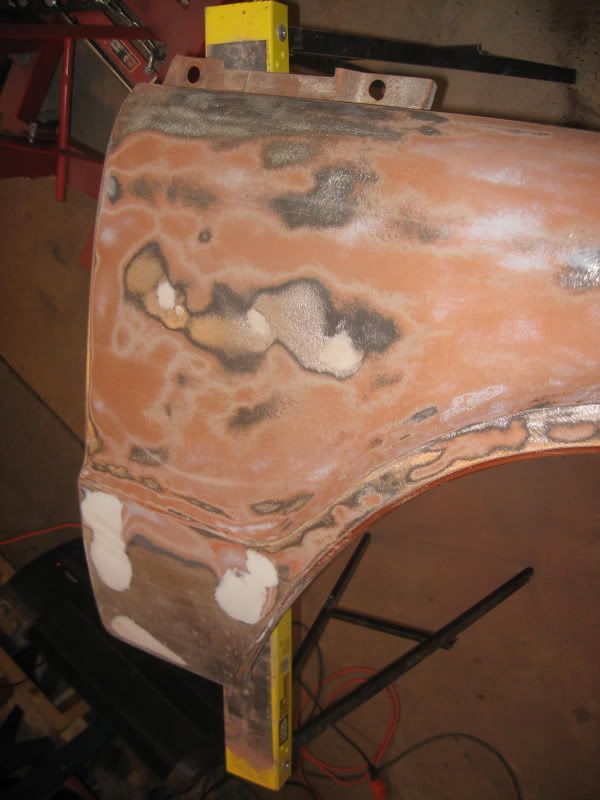 The cab isn't done yet, but I didn't really have time to mess with that tonight. I'm going to World of Wheels in St Paul tomorrow with the family.
__________________
If no one knows what you're doing, they can't tell you you're doing it wrong HG's Dream Car Build - Shelby Cobra Kit Build your own adjustable track bar 71 Long Fleet C/10 72 Jimmy 4x4 (Junkyard Jimmy)HG's Plow Truck '78 K35 DuallyBigass Farm Truck HG's thread of miscellaneous stuff Last edited by hgs_notes; 02-27-2010 at 12:47 AM. |
|
|
|
|
02-15-2010, 08:56 PM
|
#22 |
|
Registered User
Join Date: Jun 2007
Location: Saskatoon, Saskatchewan,:
Posts: 2,901
|
Re: Over 25 Years Later, Finally My 71 C-10 Truck Build
Hello, well i just got back from Edmonton and checked in with you, Looks good, but i got a couple questions first. well, my first question is, how big is the tip of your spraygun? It looks a little dry, heavier coats and open up your fluid volume some. How many coats did you put on? How thivk were your coats? either way, it has COLOR! Now let it dry, sand it down and reprime it. Good job!!!
__________________
James 1968 GMC "HAVOC" 1986 GMC "Frank" J.J.R.H. Design & Consulting My 68`Rebuild "HAVOC": http://67-72chevytrucks.com/vboard/s...d.php?t=316300 A 58' chev build thread: http://www.67-72chevytrucks.com/vboa...d.php?t=311238 1969 Camaro Pro Touring http://67-72chevytrucks.com/vboard/s...61#post3513361 Swiss Cheese: http://67-72chevytrucks.com/vboard/s...d.php?t=384390 Adjustable Trailing Arm How-To: http://67-72chevytrucks.com/vboard/s...d.php?t=321100 1968 Ford Farm Truck: http://67-72chevytrucks.com/vboard/s...=1#post6555587 |
|
|
|
|
02-15-2010, 10:27 PM
|
#23 |
|
GEARHEAD
Join Date: Aug 2003
Location: MN
Posts: 6,115
|
Re: Over 25 Years Later, Finally My 71 C-10 Truck Build
So it looks ok then for a single coat?
I have a 1.8 tip I think. I wasn't sure how much reducer to use so ended up doing a 8:4:1 mix with the reducer and hardener. It seemed real thin. I should probably use less reducer next time. I was changing my distance a bit and need to stay more consistent with that. To do the top and back of the cab I had 1 cup of primer, plus the reducer and hardener. I don't know how to tell how thick it is.
__________________
If no one knows what you're doing, they can't tell you you're doing it wrong HG's Dream Car Build - Shelby Cobra Kit Build your own adjustable track bar 71 Long Fleet C/10 72 Jimmy 4x4 (Junkyard Jimmy)HG's Plow Truck '78 K35 DuallyBigass Farm Truck HG's thread of miscellaneous stuff |
|
|
|
|
02-15-2010, 11:23 PM
|
#24 |
|
Still Learning
Join Date: Jul 2009
Location: Central Oklahoma
Posts: 10,108
|
Re: Over 25 Years Later, Finally My 71 C-10 Truck Build
Looks real good to me. You should be able to tell how your body work turned out now for sure. You might want to let it dry a little then start sanding. Don't sweat the runs, thats the only way to learn how to use the gun. Keep it up!
|
|
|
|
|
02-15-2010, 11:51 PM
|
#25 | |
|
GEARHEAD
Join Date: Aug 2003
Location: MN
Posts: 6,115
|
Re: Over 25 Years Later, Finally My 71 C-10 Truck Build
Quote:
__________________
If no one knows what you're doing, they can't tell you you're doing it wrong HG's Dream Car Build - Shelby Cobra Kit Build your own adjustable track bar 71 Long Fleet C/10 72 Jimmy 4x4 (Junkyard Jimmy)HG's Plow Truck '78 K35 DuallyBigass Farm Truck HG's thread of miscellaneous stuff |
|
|
|
|
 |
| Bookmarks |
|
|


 Hybrid Mode
