
|
 07-01-2010, 10:20 AM
|
#551 |
|
Senior Member
Join Date: Aug 2002
Location: Valley Center KS
Posts: 3,525
|
Re: Ackattack's Pro touring restoration thread
yesterday was my trucks 3 year anniversary. Almost done

|

|

|
|
07-01-2010, 12:42 PM
|
#552 |
|
Registered User
Join Date: Jul 2009
Location: Russellville, Arkansas
Posts: 1,699
|
Re: Ackattack's Pro touring restoration thread
What brake/torque converter lockup switch did you use. I'm at this point now. What kind of mods did you have to do to mount it. Thanks.
|
|
|
|
|
07-01-2010, 02:48 PM
|
#553 | |
|
Senior Member
Join Date: Aug 2002
Location: Valley Center KS
Posts: 3,525
|
Re: Ackattack's Pro touring restoration thread
Quote:
|
|
|
|
|
|
08-01-2010, 12:17 AM
|
#554 | |
|
Registered User
Join Date: Feb 2008
Location: Arizona
Posts: 638
|
Re: Ackattack's Pro touring restoration thread
Quote:
__________________
72 Cheyenne shorty "CheyLow" 72 3/4 long 4X4 69 SWB "Prospector" 68 C/10 shorty - "Picacho" http://67-72chevytrucks.com/vboard/s...d.php?t=428379 sold to "93redsled"  Have you heard about C10 Talk? C10 Talk is a podcast all about C10 Trucks, the builders, the vendors, and most importantly the C10 Community. Check us out online at www.c10talk.com Have you heard about C10 Talk? C10 Talk is a podcast all about C10 Trucks, the builders, the vendors, and most importantly the C10 Community. Check us out online at www.c10talk.com
|
|
|
|
|
|
08-02-2010, 03:01 AM
|
#555 |
|
Registered User
Join Date: Oct 2008
Location: cross hill, south carolina
Posts: 21
|
Re: Ackattack's Pro touring restoration thread
great job on the build. i read through all of it and it gave me a lot of tips and inspiration
__________________
71 c10 350 sm465 - sold 71 c10 305/th350 - dd |
|
|
|
|
08-12-2010, 12:48 AM
|
#556 |
|
Senior Member
Join Date: Aug 2002
Location: Valley Center KS
Posts: 3,525
|
Re: Ackattack's Pro touring restoration thread
Well progress has been pretty slow lately, cause frankly I'm almost done with it, its driveable, so haven't worked much on it. I took it to 2 car shows, had a bunch of people stare at it, ask a lot of questions, but no awards (of course I'm not completly done with it either, so maybe that's what....plus one of the show's was the GoodGuys show and there were TONS of nice rides there)
Anyway, I was having a high RPM miss. After asking some questions and doing some data logging, I determined that it was the number 3 spark plug wire that the header had partially melted. So I removed the coil packs from the valve covers, relocated them, made custom spark plug wires (you have to use LT1 spark plug boots BTW) and that took care of that problem. I then installed my cool cast aluminum "CHEVROLET" valve covers that my wife got for me last christmas. Then I got my butt in gear and finally installed my LS6 intake manifold that I've had sitting on the shelf ever since I sold my corvette a year and a half ago. I got a used set of fuel rails and 28lb injectors (stock truck injectors are 24). I already had the corvette front drive accessories, so that wasn't too much of an issue. But, my temperature sensor for my gauge was in the top of the water pump and the throttle body was hitting it, so I removed the temp sensor and plugged the hole. I got an adapter to put the temp sending unit in the pass. side head, but haven't done it yet. I also had to cut the coolant passage off the bottom of the truck throttle body as well as notch it for a bolt that protrudes up from the corvette water pump. No biggies there. I then broke out my laptop, reprogrammed for the larger injectors, and it's running great. Here's what the engine is looking like now: 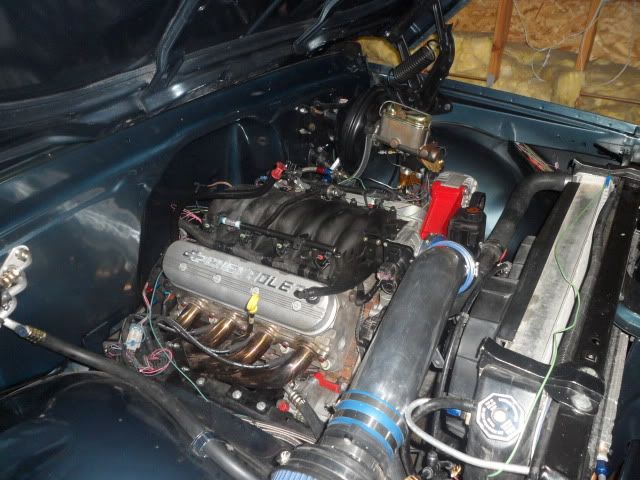 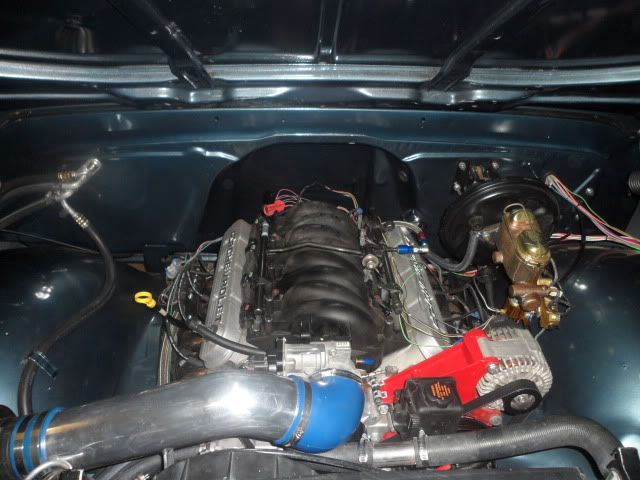 Tonight I got the A/C system charged and working. A buddy was helping me. The first thing we had to do was draw a vacuum on the system and checked for leaks. None found, so then we hooked up the heater hoses to the water pump. For a long time I wasn't getting any heat until I checked on stuff. Basically some where along the line the cable that controls the water valve slipped off the controller in the cab, so not hot water was circulating through the heater core (this is an Old Air setup BTW). After we got that figured out, we charged the system. The Old air instructions called for 28-32 ounces of refrigerant. Well I used refrigerant that also included the compressor oil with 11 oz of refrigerant per can. We used 3 cans, but my buddy disconnected the first one before it was completely empty, so I probably have ~30 oz of refrigerant in the system and it seems to be working great. Then we took the truck for a test drive since my buddy hadn't ridden in it, and we wanted to see how the A/C was working out on the road. The truck ran good, A/C was cool. While on the test drive I also tried out my line lock that I had wired up a few days ago. Basically it confirmed that my brakes aren't really working all that great. I could push down on the brakes, turn the line lock solenoid on and could still roll forward pretty easily. I could tell the actual solenoid was working, the brakes basically just suck. The truck stops pretty decently, but not like it really should (I can't even lock up the rear brakes with rear disks). So.....I"m going to go back over the entire system and check for leaks and re-bleed it. I don't really think that is the problem though. The whole braking system is brand new except the brake booster, so I'm probably going to get a new brake booster and see if that fixed my "under powered" brakes. The truck is still safe to drive, but it should be able to stop quicker than it does now. I'd say it's probably on par with a stock drum/drum truck as far as stopping distance. |
|
|
|
|
08-12-2010, 06:04 AM
|
#557 |
|
Registered User
Join Date: Jan 2009
Location: orangevale, ca
Posts: 3,626
|
Re: Ackattack's Pro touring restoration thread
looking good man! it takes time working all the bugs out after a total rebuild. once everything is done im sure you'll be bringing home trophies hand over fist
 awesome to hear you got the a/c working too! awesome to hear you got the a/c working too!
__________________
"Dennis the Menace" 1978 Silverado (2wd, 1/2 ton, short bed)complete nut & bolt frame off restomod LQ9/4L80E MY LS SWAP/FRAME OFF BUILD BOOK 2006 TBSS way too much to list 
|
|
|
|
|
08-12-2010, 09:43 AM
|
#558 |
|
Registered User
Join Date: Jun 2007
Location: Saskatoon, Saskatchewan,:
Posts: 2,901
|
Re: Ackattack's Pro touring restoration thread
This is such a sweet truck!!!!
__________________
James 1968 GMC "HAVOC" 1986 GMC "Frank" J.J.R.H. Design & Consulting My 68`Rebuild "HAVOC": http://67-72chevytrucks.com/vboard/s...d.php?t=316300 A 58' chev build thread: http://www.67-72chevytrucks.com/vboa...d.php?t=311238 1969 Camaro Pro Touring http://67-72chevytrucks.com/vboard/s...61#post3513361 Swiss Cheese: http://67-72chevytrucks.com/vboard/s...d.php?t=384390 Adjustable Trailing Arm How-To: http://67-72chevytrucks.com/vboard/s...d.php?t=321100 1968 Ford Farm Truck: http://67-72chevytrucks.com/vboard/s...=1#post6555587 |
|
|
|
|
08-12-2010, 06:23 PM
|
#559 |
|
Registered User
Join Date: May 2006
Location: So.Cal
Posts: 542
|
Re: Ackattack's Pro touring restoration thread
Nice work.
What kind of fuse panel and relay system did you use with your build? |
|
|
|
|
08-12-2010, 06:29 PM
|
#560 | |
|
Senior Member
Join Date: Aug 2002
Location: Valley Center KS
Posts: 3,525
|
Re: Ackattack's Pro touring restoration thread
Quote:
http://www.currentperformance.com/Ac...iring_acc.html it made it very easy to hook up all the necessary circuits. Another thing, when I turn on my A/C, it is wired to kick on one of the electric fans. I thought this was a much cleaner solution (due to size) than trying to use the factory fuse block. |
|
|
|
|
|
08-12-2010, 10:48 PM
|
#561 |
|
Still Learning
Join Date: Jul 2009
Location: Central Oklahoma
Posts: 10,108
|
Re: Ackattack's Pro touring restoration thread
Totally diggin the new clean look of the engine! Glad to hear you got cold! Must be awesome to get to enjoy the fruit of all that 3 years of hard work.
|
|
|
|
|
08-13-2010, 01:03 AM
|
#562 |
|
Senior Member
Join Date: Aug 2002
Location: Valley Center KS
Posts: 3,525
|
Re: Ackattack's Pro touring restoration thread
so after doing some research about braking systems, I'm pretty sure I need a different master cylinder. The "stock" 72 MC is a 1-1/8" bore, so I think a 1" bore MC will work much better.
|
|
|
|
|
08-13-2010, 02:56 PM
|
#563 | |
|
Still plays with trucks
Join Date: Jul 2009
Location: Spokane, WA
Posts: 3,556
|
Re: Ackattack's Pro touring restoration thread
Quote:
It sounds like you are not pushing enough fluid volume for the brakes you are running. You need a master cylinder with enough fluid volume for the 4-wheel disc brakes. A good one to use with the older boosters is the 67 to 76 C3 Vette piece. 1-1/8" bore for power brakes and 1" bore for manual brakes. I didn't notice if you had an adjustable proportioning valve. If you don't have one you should definitely get one to get the brakes dialed in once you get proper braking pressure established.
__________________
miSSed opportunity - ground up creation of an AWD 1994 454 SS that never was http://67-72chevytrucks.com/vboard/s...d.php?t=795577 69 C10 shortbed stepside 400 small block - built like what a super sport truck could have been 69 K20 lwb TBI 350 4L60E NP208 14-bolt Dana-44 w/disc 68 Camaro SS / RS 500hp 439 inch roller cam big block 4L80E 79 Malibu TPI 350 4L60 w/ Z28 steering & sway bars |
|
|
|
|
|
08-13-2010, 04:18 PM
|
#564 | |
|
Senior Member
Join Date: Aug 2002
Location: Valley Center KS
Posts: 3,525
|
Re: Ackattack's Pro touring restoration thread
Quote:
BTW the 96 camaros (vehicle I got the rear calipers off of) also had a 1" bore MC. The area of the front pistons is very close to what my area is. (LT1 camaros used a single piston caliper in the front) I may need an adjustable proportioning valve. Right now I have a CPP disc/disc non adjustable proportioning valve. |
|
|
|
|
|
08-13-2010, 04:55 PM
|
#565 | |
|
Still plays with trucks
Join Date: Jul 2009
Location: Spokane, WA
Posts: 3,556
|
Re: Ackattack's Pro touring restoration thread
Quote:
I think you might be on the right track with the booster replacement. The one in my Blazer was going out and took a bunch of effort to get it to stop. You couldn't push hard enough on it to lock the brakes up. With the new booster installed it only took a couple toes on the pedal to lock the brakes up. I am thinking of replacing the 72 Suburban booster on my 67 K10 with one from a mid 90's S-10 Blazer. It has four threaded mount studs on the back of the booster so it should be pretty simple to make it fit the bell crank setup mount of the 72 Suburban booster setup. Just have to modify the pedal rod on the Blazer booster so it can connect to the bell crank parts. Looks pretty straight forward though. I could always make a new mount setup for the Blazer booster where it just lines up straight with the pedal connection point. I will have to mock that up this weekend and see if there is enough clearance to do that.
__________________
miSSed opportunity - ground up creation of an AWD 1994 454 SS that never was http://67-72chevytrucks.com/vboard/s...d.php?t=795577 69 C10 shortbed stepside 400 small block - built like what a super sport truck could have been 69 K20 lwb TBI 350 4L60E NP208 14-bolt Dana-44 w/disc 68 Camaro SS / RS 500hp 439 inch roller cam big block 4L80E 79 Malibu TPI 350 4L60 w/ Z28 steering & sway bars |
|
|
|
|
|
08-13-2010, 05:50 PM
|
#566 |
|
Senior Member
Join Date: Aug 2002
Location: Valley Center KS
Posts: 3,525
|
Re: Ackattack's Pro touring restoration thread
96 camaro z28 uses a single 2.5" bore front caliper = 4.9 sq in
My front calipers are dual 47mm bore = 5.4 sq in Comparing the camaro and my truck also assume an approx. equal pedal ration too (that comes into the equation too)
__________________
Project Bruiser: 68 Pro-Touring C-10 5.3L / 4L60E Project Ironhide: 97 GMC Crew Cab 4x4 Cummins SOLD: '69 GMC 1/2T SWB TBI'd: Project No Buck Assembly Manual Index Sign up Thread!!! Factory Service Manual Index Last edited by Ackattack; 08-13-2010 at 07:30 PM. |
|
|
|
|
08-13-2010, 06:48 PM
|
#567 | |
|
Still plays with trucks
Join Date: Jul 2009
Location: Spokane, WA
Posts: 3,556
|
Re: Ackattack's Pro touring restoration thread
Quote:
Most likely the truck has more pedal leverage than the F-body so that should be in your favor.
__________________
miSSed opportunity - ground up creation of an AWD 1994 454 SS that never was http://67-72chevytrucks.com/vboard/s...d.php?t=795577 69 C10 shortbed stepside 400 small block - built like what a super sport truck could have been 69 K20 lwb TBI 350 4L60E NP208 14-bolt Dana-44 w/disc 68 Camaro SS / RS 500hp 439 inch roller cam big block 4L80E 79 Malibu TPI 350 4L60 w/ Z28 steering & sway bars |
|
|
|
|
|
08-13-2010, 07:57 PM
|
#568 |
|
Senior Member
Join Date: Aug 2002
Location: Valley Center KS
Posts: 3,525
|
Re: Ackattack's Pro touring restoration thread
LS1 F-body also use 1" bore
|
|
|
|
|
08-13-2010, 10:09 PM
|
#569 | |
|
Registered User
Join Date: May 2006
Location: So.Cal
Posts: 542
|
Re: Ackattack's Pro touring restoration thread
Quote:
I heard that the current performance relay and fuse panel is labeled with everything that needs to be hooked up. Did you find it easy to use? |
|
|
|
|
|
08-16-2010, 12:34 AM
|
#570 | |
|
Senior Member
Join Date: Aug 2002
Location: Valley Center KS
Posts: 3,525
|
Re: Ackattack's Pro touring restoration thread
Quote:
|
|
|
|
|
|
08-19-2010, 12:58 AM
|
#571 |
|
Senior Member
Join Date: Aug 2002
Location: Valley Center KS
Posts: 3,525
|
Re: Ackattack's Pro touring restoration thread
Well I got a master cylinder for a 72 corvette with manual brakes (1" bore). I took a few initial measurements, painted it, bench bled it, then installed it.
It was a bolt in deal, the two lines from it line up with the proportioning valve, the push rod depth was the same. I did not get to test it out. I have a flat tire. I took off the wheel/tire and put some air in it, and the valve stem is leaking. So I'll take care of that, then bleed the whole brake system again. Not much air got in it, but better to be safe than sorry. I did start up the truck to see how it feels. The pedal has more of a natural feel to it, rather than being stiff and little movement. Guess we'll see later for sure. |
|
|
|
|
09-30-2010, 08:06 PM
|
#572 |
|
Registered User
Join Date: Apr 2008
Location: Imperial Beach, CA
Posts: 1,040
|
Re: Ackattack's Pro touring restoration thread
Nasty build man, i love it.
__________________
69 c-10 BBC 462ci, forged crank, H-beam rods, 10.5-1 KB forged pistons, Dart Iron Eagle 308cc, Straub Cam, Comp Cams chrome moly full rollers, Weiand Team G, Prosystems 950, TH400/3500 Dalenzie stall, Currie 9+ Detroit Locker w/31spline axles.  3.5/6in drop. My Build. 3.5/6in drop. My Build.
|
|
|
|
|
11-19-2010, 07:43 AM
|
#573 | |
|
Registered User
 Join Date: Aug 2010
Location: Alta Loma, CA
Posts: 610
|
Re: Ackattack's Pro touring restoration thread
Quote:
__________________
67 5.3L Build |
|
|
|
|
|
11-19-2010, 08:11 PM
|
#574 | |
|
Senior Member
Join Date: Aug 2002
Location: Valley Center KS
Posts: 3,525
|
Re: Ackattack's Pro touring restoration thread
Quote:
I'll get some pictures later...but here's the answer of how I did it. First, I'm using corvette accessory brackets and an LS1 F-body A/C compressor. So it is a little different than the 5.3 truck A/C setup. Basically I connected the doc's block to the back of the compressor, put on the fittings, cut the A/C hoses to length and routed them. I marked the fittings and hoses, and then removed them and had the fittings crimped onto the hoses. Then re-installed. I'm pretty sure this is the a/c adapter I used http://www.docsblocks.com/proddetail.asp?prod=AA0443 |
|
|
|
|
|
11-19-2010, 08:56 PM
|
#575 |
|
Registered User
Join Date: Apr 2001
Location: DALLAS,TX
Posts: 21,914
|
Re: Ackattack's Pro touring restoration thread
What's the update on your ongoing brake dilemma? Did the new master cylinder sort it out?
__________________
67SWB-B.B.RetroRod 64SWB-Recycle 89CCDually-Driver/Tow Truck 99CCSWB Driver All Fleetsides @rattlecankustoms in IG Building a small, high rpm engine with the perfect bore, stroke and rod ratio is very impressive. It's like a highly skilled Morrocan sword fighter with a Damascus Steel Scimitar..... Cubic inches is like Indiana Jones with a cheap pistol. |
|
|
|
 |
| Bookmarks |
|
|


 Linear Mode

